1
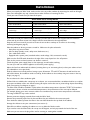
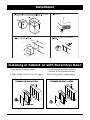
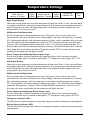
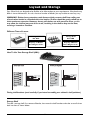
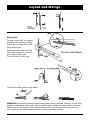
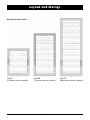
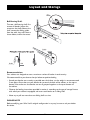
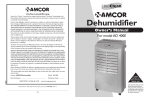
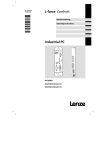
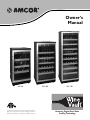
Owner’s
Manual
WV 50
It is important that you read these instructions before
using your new purchase and we strongly recommend
that you keep them in a safe place for future reference.
WV 100
WV 150
Featuring Digital Dual Zone
Cooling Technology
You can also register your Amcor purchase online,
and view our broad selection of innovative products.
www.amcorgroupusa.com
Table of Contents
Thank You ……………………………………………………… 2
Safety Instructions ……………………………………………… 3
Your Wine Vault ………………………………………………… 4
Installation …………………………………………………… 5-6
Installing in Cabinet or with Decorative Door ………………… 6
Temperature Settings ………………………………………… 7-8
Layout & Storage ……………………………………………… 9-12
Care & Maintenance ……………………………………………13
Troubleshooting …………………………………………………14
Limited Warranty ………………………………………………16
1
Thank You!
Thank you for choosing the Amcor Wine Vault™
This Owners Manual is applicable for Amcor models WV-50, WV-100, WV-150
Wine Vault Models.
Before using your Wine Vault, please carefully read this instruction manual to fully
understand how to maximize this product's performance. The manual describes
in detail options for storing your wine, and how to adjust the units dual zone
temperauture, shelf positioning, and odor filter devices.
For over 50 years, Amcor has specialized in indoor environmental control devices, and
a broad array of innovative products such as portable air conditioners, air purifiers,
shower products, and aroma therapy scent diffusers. These world class products have
incorporated patented technologies, and beautiful industrial design styling for the home
or office interiors.
SPECIAL CAUTION:
1. The Wine Vault should not be plugged in for 48 hours, to insure refrigerant
has settled properly
2. Do not store flammable or explosive chemicals in this unit
3. Storage of food and other consumable items should comply with
local laws relating to food safety
4. Door should be kept locked, and keys kept safely away from children
5. These Wine Vaults are not designed for the storage of medicine or
any medical products
6. Improper use of the grounded plug can result in the risk of electrical shock.
If the power cord is defective, return the unit to Amcor. If your electrical outlet
does not accept a grounded plug, consult with a licensed electrician
7. It is strongly recommended that you do not use an extension cord with
any Amcor Wine Vault product
2
Safety Instructions
1. The parameter is subject to change without prior notice, the final data and circuit
diagram is on rating label. Please pay attention to latest data.
2. Its common that there are drips on the glass door when humidity in the air is high or
the temperature different largely between inside of the cabinet and the environment
temperature. Rub it clear with dry soft cloth will be OK.
3. The protective film attached to the unit has been applied to prevent scuff damage
and may be removed.
4. It is normal to frost on the inside back panel of your Wine Vault.
5. If the appliance is broken and not be used for ever, don’t throw it freely,
send it to the recycle bin.
IMPORTANT SAFETY INSTRUCTIONS
• You must always observe some basic precautions when using your wine cabinet, including:
Only use your wine cabinet for the use intended, as described in this guide.
• Never unplug the wine cabinet by pulling on the power cord.
Grip the plug firmly and pull straight out to remove from wall socket.
• Immediately repair or replace any worn or damaged cord.
Never use a cord that is split or which shows signs of wear along its length or on its ends.
• Do not allow children to climb on, sit on or stand on the Wine Vault, nor hang from its
shelves. They could damage the wine cabinet and injure themselves seriously.
• Do not use an extension cord.
DANGER - Risk of child entrapment
If you throw away your Wine Vault:
1. Take off the doors
2. Leave the shelves in place so that children may not easily climb inside.
If the supply cord is damaged, it must be replaced by the manufacturer, its service agent or
similarly qualified persons in order to avoid a hazard.
Connecting To Power Supply
The Wine Vault’s power cord is equipped with a plug which fits into any standard socket with
grounded connection, to prevent any risk of shock.
Have the power outlet checked by a qualified electrician to make sure it is actually grounded.
If this is not the case, you must have it replaced with a socket which is suitably grounded.
If the power cord is damaged, have it replaced by a qualified electrician to prevent any risk.
If the wall socket is not equipped with an grounded connection, it is your responsibility and
your duty to have it replaced with a suitably grounded wall socket, if the plug does not match
your socket, you may have another fitted.
Note
1. For your safety, Wine Vault must be correctly grounded
2. New electrical cables and plugs should be fitted by a qualified electrician.
3
Your Wine Vault
1. Removable Top Plate for installations under cabinets
2. Digital Control Panel for Dual Zone Temperature Settings
3. Durable Wine Vault Cabinet Construction
4. Sliding Shelf
5. Storage Shelf
6. Front Ventilation Base
7.
Four Adjustable Feet
8. Hinge
9. Activated Charcoal Filter
10. Door
11. Free Ventilation Hole
4
Installation
When you unpack your Wine Vault, make sure the unit is in perfect conditon by inspecting the unit from all angles.
If the unit is damaged in any way, contact Amcor within 24 hours of receiving the unit.
Check your unit to make sure you have all the parts:
Wine Vault Parts List By Model
WV-50
WV-100
WV-150
1- Wine Vault Cabinet
1- Wine Vault Cabinet
1- Wine Vault Cabinet
3- Wooden Shelves
5- Wooden Shelves
8- Wooden Shelves
1- Metal Handle Assembly Bag
with 2 Keys
1- Metal Handle Assembly Bag
with 2 Keys
1- Metal Handle Assembly Bag
with 2 Keys
1- Carbon Filter Assembly Bag
1- Carbon Filter Assembly Bag
1- Carbon Filter Assembly Bag
1- Owners Manual
1- Owners Manual
1- Owners Manual
If you wish to install your cabinet under a worktop, you will need to remove the top plate which is fixed from
underneath by two front screws in the hinges and two screws behind in the angle brackets.
Keep the two front screws if you wish to encase the unit under a worktop so as to fix it to the existing
worktop (see diagrams page 4).
Move the cabinet to where you want to install it. Make sure the place selected is:
• Away from any source of heat
• Not too damp (laundry room, utility room, bathroom, etc.)
• On a stable level surface
• Equipped with a power point (standard socket, rated voltage, 16A, connected to earth)
Make sure the On/Off switch located on the right of the control panel is in the off position.
Take out the power cord and connect it as shown in section 3.
Check the power point supply (fuses in, fuse amperage, circuit breaker working.
You can if you wish use another appliance to check the power supply.)
Adjust the four feet underneath the cabinet (screwing them up or unscrewing them) so that your cabinet is level
(it is advisable to use a spirit level).
Slide the cabinet into its final position, leaving a space of between .75" and 2.25" between the wall and the rear
wall of the cabinet, for installation under a worktop, fix the cabinet to the worktop using two screws in the top
hinges (see page 6).
Do not obstruct the front ventilation grille.
If Wine Vault is installed under countertop or in cabinet, it is recommended that a ventilation hole be cut to allow
for proper ventillation of the unit. A flush mount grill may be used in this case to prevent large objects from falling
down vent opening. See diagram on page 6.
The Wine Vault should be installed in a place where the ambient temperature is between 72-78°F. If the ambient
temperature is above or below recommended temperatures, the performance of the unit may be affected.
For example, placing your unit in extreme cold or hot conditions may cause interior temperatures to fluctuate.
The range of 40-65°F may not be reached.
Remove protective shipping materials from inside the Wine Vault.
Remove the protective paper from the charcoal filter that you will find in the accessories pack.
From inside the cabinet, position the filter in the round box located in the top back of the cabinet.
Arrange the shelves to suit your convenience (see section 6.)
Wait 48 hours before switching the cabinet on so as to allow the fluids to settle.
If you need to move the Wine Vault, do not tip over 45 degrees, and only tip towards the back of the unit.
Make sure you can access the plug of the unit for servicing or moving when needed.
5
Installation
minimum 22.6"
22.5"
.5"
22
23
.5"
23
.4"
32"- 32.5"
4.25"
Installing in Cabinet or with Decorative Door
1. Level the Unit inside the cabinet
3. Fix the facing of the kitchen cabinet on
the door of unit (8 screws included)
2. Open the door or the unit at a 90° angle
4. Be sure the gasket is sealed properly
.5"
27
.5"
27
.6"
23
23
.6"
23
23
.4
"w
ith
.4
"w
ith
31
.3
31
.3
"
"
Air entry
grid 79"2 minimum
33 lbs.
33 lbs.
6
Temperature Settings
Set temperature for
Lower Layer by
adjusting +/- buttons
Left
Digital
Display
Set temperature for
Upper Layer by
adjusting +/- buttons
Right
Digital
Display
Compressor
Indication LED
ON/OFF
Key
Right Digital Display:
Indicate the current temperature or preset temperature of upper layer. When +/- Key is pressed, display
on the digital tube flashes, indicating the preset temperature. If no temperature setting operation occurs
within five seconds, the system will automatically return to the display of ambient temperature in the
storage cabinet, with the accuracy of 1°F.
Malfunction Code Explanation:
E2 Faults of upper layer’s cabinet temperature sensor. The sensor is short circuit or open circuit
(10 seconds later the system will close and this code will display. The buzzer will tweet every 2 seconds).
E9 is Superheating protection. After compressor operating 4 hours under any condition, When the upper
layer sensor detects the cabinet temperature no less than 77°F, The buzzer will alarm and tweet every
2 seconds. When the detected cabinet temperature is >86°F, “E9” malfunction code will display. The
Electrical Heating will close and compressor will go on working. (The buzzer will tweet every 2 seconds).
When Upper layer sensor detects the cabinet Temperature reaches 70°F, the system will restart automatically and the temperature will display normally.
Preset Temperature Adjusting Key for Upper Layer:
Press this key to adjust the preset temperature of upper layer. Every time it is pressed, the preset
temperature of upper layer is increased or decreased by 1°F. Temperature setting range is 54°F - 72°F.
Left Digital Display:
Indicate the current temperature or preset temperature of lower layer. When +/- Key is pressed, display
on the digital tube flashes, indicating the preset temperature. If no temperature setting operation occurs
within five seconds, the system will automatically return to the display of ambient temperature in the
storage cabinet, with the accuracy of 1°F.
Malfunction Code Explanation:
E3 Faults of lower layer’s cabinet temperature sensor. The sensor is short circuit or open circuit
(10 seconds later the system will close and this code will display. The buzzer will tweet every 2 seconds).
E8 is Supercooling protection. When the lower layer sensor detects the cabinet temperature reaches
37°F , the compressor will stop, but electrical heating keeps going on. “E8” malfunction code will display
(the buzzer will tweet every 1 second). When the detected cabinet temperature is no less than 43°F,
the system will restart automatically and the temperature will display normally.
Preset Temperature Adjusting Key for Lower Layer:
Press this key to adjust the preset temperature of lower layer. Every time it is pressed, the preset
temperature of lower layer is increased or decreased by 1°F. Temperature setting range is 41°F-54°F.
Compressor Indicator LED:
This LED comes on while the compressor is operating, and goes out when the compressor stops operation.
Electric Heating Indicator LED:
This LED comes on during operation of electric heating device and goes out when electric heating device
stops operation.
7
Temperature Settings
TEST Key:
If this Key is pressed in Standby state, the compressor and electric heating device will operate at the
same time, and Compressor Indicator LED and Electric Heating Indicator LED will come on at the same
time. When this key is released, the system returns to previous standby state.
This key is invalid in operational state.
Notes:
1. There should be at least 5-minute interval between compressor stopping and starting again.
The compressor should operate for at least five minutes after it is started up and then its operation
can be stopped depending on actual conditions.
2. The temperature indicating range of Digital Display 1 and Digital Display 2 is 32°F - 99°F.
When the temperature is below 32ºF in the storage cabinet, indicated temperature is 000, and when
the ambient temperature is above 99°F in the storage cabinet, the indicated temperature is 99°F.
3. The difference of temperature displayed on Digital Display 1 and Digital Display 2 should
be above 41°F.
4. The temperature setting range of upper layer (54°F - 72°F) and lower layer (41°F - 54°F) are
effective when the ambient temperature is 90°F, otherwise it would be difficult to reach the lowest
setting temperature of upper layer and lower layer.
5. The difference between display temperature and setting temperature is ±3°F,
when the cabinet temperature is balanced.
8
Layout and Storage
Your Wine Vault was designed to be flexible, to be able to adapt to your requirements. Many bottle may
differ in size and dimensions. As such, the actual number of bottles you may be able to store may vary.
WARNING: Shelves have protective notch feature which prevents shelf from rolling out
of track when loaded or unloaded with wine bottles. Shelves should be gently rolled out to
their maximum extension. However, do not pull shelves out with excessive force, as this
may allow the shelf to jump out of the track, resulting in the shelf to drop to the floor,
creating a hazardous situation.
Different Types of Layout:
Storage Shelf
Ref: AXL
Storage Shelf
Ref: AXM
Capacity: 61 Bottles
Max. Weight: 187 ibs.
Capacity: 8 Bottles
Max. Weight: 33 lbs.
How To Use Your Storage Shelf (AXL):
Fitting shelf brackets (read carefully if you intend to modify your cabinet's shelf positions)
Storage Shelf
To move a storage shelf, first remove all bottles, then move the shelf brackets and make sure to fit them
back into slots as shown below:
9
Layout and Storage
Sliding Shelf
To move a sliding shelf, first remove
all bottles, then remove the sliding
shelf by sliding it towards you while
lifting the front part.
Remove the sliding guides from the
walls, while making sure not to mix
up the right and left guides.
Then refit them as shown here:
Then refit the sliding shelf as shown below:
WARNING: Shelves have protective notch feature which prevents shelf from rolling out of track when
loaded or unloaded with wine bottles. Shelves should be gently rolled out to their maximum extension.
However, do not pull shelves out with excessive force, as this may allow the shelf to jump out of the
track, resulting in the shelf to drop to the floor, creating a hazardous situation.
10
Layout and Storage
All slide wooden shelves
VW-50
(35 bottle maximum capacity)
VW-100
(72 bottle maximum capacity)
11
VW-150
(100 bottle maaximum capacity)
Layout and Storage
Ball Bearing Shelf:
To move a ball bearing shelf, first
remove all bottles, loosen the
screws on the shelf, slide out the
shelf, remove the sliding guides
from the walls, then refit them as
shown below, and fix the screws.
Guide
Wall
Guide
Wall
Recommendations
Your cabinet was designed to store a maximum number of bottles in total security.
We recommend that you observe the tips below to optimize loading.
• Spread your bottles out as evenly as possible over the shelves, so that weight is not concentrated
in one point. Also make sure your bottles do not touch the back of the cabinet, or the step at
bottom. Also make sure that bottles are not all grouped together at the top or bottom of
the cabinet.
• Observe the loading instructions provided in section 6, according to the type of storage fixtures
with which your cabinet is equipped, and never stack bottles on a sliding shelf.
• Never try to pull out more than one sliding shelf at a time.
PLEASE NOTE
Before modifying your Wine Vault's original configuration in any way, be sure to ask your dealer
for advice.
12
Care & Maintenance
Cleaning Your Wine Vault
• Turn off the power, unplug the appliance, and remove all items including shelves
• Wash the inside surfaces with warm water and baking soda solution.
Solution should be 2 tablespoons of baking soda to a quart of water.
• Wash the shelves with a mild detergent solution
• Wash the outside cabinet with warm water and mild liquid detergent.
Rinse well and wipe dry with a clean soft cloth
Power Failure
• Most power failures are corrected within a few hours, and should not affect the temperature of
your appliance if you minimize the numberof times you open the door.
• If unit is unplugged, power lost, or turned off, you must wait 3-5 minutes before restarting the unit.
If you attempt to restart your Wine Vault before this time delay, the Wine Vault may not start.
• If the power is going to be off for a longer period of time, you need to take the proper steps
to protect your contents.
Moving Your Wine Vault
• Remove all items
• Securely tape down all loose items, shelves etc. inside your appliance
• Turn the adjustable leg up to the base to avoid damage
• Tape the door shut
• Be sure the appliance stays secure in an upright position during transportation.
Also protect the appliance with a blanket, or similar item.
Energy Saving Tip
The Wine Vault should be located in the coolest area of the room, away from heat producing appliances,
and out of direct sunlight.
13
Troubleshooting
START-UP
Compressor does not start, even though the desired temperature is lower
than the temperature in the room.
1. Check the wall socket by plugging in any type of electrical device, and make sure that the
on/off button is pressed.
2. Press the TEST button and check that the two red and green indicator lights light up.
(In the standby status).
3. If the compressor still does not start after steps 2 and 3, contact your dealer.
Compressor Does Not Stop.
1. Place your hand on the condenser (metal screen at the back of your cabinet) to check its temperature
Contact your dealer if cold.
2. If the condenser is hot, set the cold temperature as high as possible (as far as it will go clockwise) and
make sure that the cold circuit operation indicator goes off. lf the compressor does not stop, unplug
the cabinet and contact your dealer.
DURING OPERATION
Digital Tube display indicates a temperature below the temperature you set.
1. Check the temperature set-points.
2. Check that the red hot circuit operation indicator light is on.
3. Press the TEST button, and check that the two red and green indicator lights on the right side of the
panel are on. lf either step 2 or 3 is incorrect contact your dealer.
Digital Tube display indicates a temperature above the temperature you set.
1. Check the temperature set-points.
2. Check that the green cold circuit operation indicator light is on.
3. Press the TEST button, and check that the two red and green indicator lights on the right side of the
panel are on. lf either step 2 or 3 is incorrect contact your dealer.
Contact your dealer, if after adjusting set-points and testing hot and cold circuit indicator lights either of
the two problems above are not corrected.
NOTE: The refrigeration unit must only be serviced by a refrigeration technician, who
must check the circuit for leaks before putting back into service.
Any servicing of the electrical circuit must only be performed by an electrician.
Whatever the case, if your cabinet does not seem to be operating normally, unplug it and
call your dealer.
14
Wine Vault Warranty
WHAT IS COVERED
One Year Limited Warranty Amcor, Inc. (“Amcor”) warrants the original retail purchaser (“Purchaser”) purchasing in the United States
that the Amcor product with which this warranty is enclosed is free from defects in materials and workmanship.
Amcor’s sole obligation under this warranty is to replace, or at Amcor’s discretion, to repair, free of charge, all defective parts, for a period
of one (1) year from date of original purchase. ANY IMPLIED WARRANTY OF MERCHANTABILITY IS SIMILARLY LIMITED TO ONE
(1) YEAR FROM DATE OF ORIGINAL PURCHASE AND NO ACTION BASED UPON ANY IMPLIED WARRANTY OF MERCHANTABILITY OR OTHERWISE MAY BE COMMENCED AFTER EXPIRATION OF ONE (1) YEAR FROM DATE OF ORIGINAL RETAIL
PURCHASE. Some states do not allow limitations on how long an implied warranty lasts, so the above limitation may not apply to you.
For one year from the date of purchase by the original owner, AMCOR, will at its option, repair or replace any part of the unit, which
proves to be defective in material or workmanship under normal use. During this period AMCOR will provide all parts necessary to
correct such defects free of charge, so long as the unit has been installed and operated in accordance with the written instructions in
the owner’s manual. In rental or commercial use, the warranty period is 90 days.
The provisions of this warranty shall not apply to any product which in Amcor’s judgment has been: (1) subject to misuse or neglect.
(2) damaged in an accident. (3) used for a purpose for which it was not designed, or (4) repaired or altered in any way that adversely
affected its performance or reliability.
WHAT IS NOT COVERED
• Content losses of food or other, due to spoilage
• Incidental or consequential damages.
• Parts and Labor costs for the following will not be considered as warranty:
Door Springs, and/or frames.
Inner door panels, door rails and/or door supports.
Light bulbs and/or plastic housing.
Plastic cabinet liners.
Punctured evaporator that voids the warranty on the complete sealed system.
Repairs peformed by third party, other than Amcor.
Service calls that do not involve defects in material or workmanship such as customer education, door reversal, or
proper installation.
Service calls that are related to external problems, such as abuse, misuse, inadequate electrical power, accidents, fire, floods, or
acts of God.
Replacement of house fuses or resetting circuit breakers.
Failure of product if used for other than its intended purpose.
Failure of product due to improper installation
• This warranty does not apply outside the Continental USA.
To obtain warranty service, the defective product or part must be shipped or delivered to Amcor.
All postage, insurance and shipping charges are the responsibility of the Purchaser and are not included in this warranty.
LIMITED SECOND THROUGH FIFTH YEAR WARRANTY
For the Second through fifth year from the date of original purchase, AMCOR will provide a replacement compressor free of charge due
to a failure. You are responsible for the service labor and freight charges. In rental or commercial use, the limited compressor warranty
is one year and nine months. Cost to move the appliance to the servicers’ shop and back to the user’s home, as may be required, are
the users responsibility.
AMCOR NEITHER ASSUMES NOR AUTHORIZES ANY PERSON TO ASSUME FOR IT ANY OTHER (LIABILITY IN CONNECTION
WITH ITS PRODUCTS, THERE ARE NO WARRANTIES WHICH EXTEND BEYOND THE DESCRIPTION ON THE FACE HEREOF.
NO RESPONSIBILITY IS ASSUMED FOR INCIDENTAL OR CONSEQUENTIAL DAMAGES THAT MAY RESULT FROM THE USE OF
AN AMCOR PRODUCT, NOR FOR THE DAMAGES DUE TO ACCIDENT, ABUSE, LACK OF RESPONSIBLE CARE, THE AFFIXING
OF ANY UNAUTHORIZED ATTACHMENT, LOSS OF PARTS, OR USE AT A VOLTAGE OTHER THAN SPECIFIED. Some states do
not allow the exclusion of limitation of incidental or consequential damages, so these limitations may not apply to you.
Product: Amcor Wine Vault™
Models: WV 50, WV 100, WV 150
Date Purchased:_______________________________
Production Code:________
QUESTIONS? Call 866-361-2233 • www.amcorgroupusa.com
14
913126830
7/2008
Amcor disclaims all liabilities for defects or damages caused by use of replacement parts obtained from or by service at any service
center other than Amcor’s authorized service center. This warranty gives you specific legal rights, and you may also have other rights
which vary from state to state.
Manuel
De Dueños
WV 50
Es importante que usted lee estas instrucciones
antes utilizar su nueva compra y nosotros
recomendamos totalmente que usted los mantenga
en un lugar seguro para la referencia futura.
WV 100
WV 150
Representar la Zona Doble Digital
La refrigeración de Tecnología
Usted puede registrar también su compra de Amcor en línea,
y ver nuestra amplia selección de productos innovadores.
www.amcorgroupusa.com
Tabla de contenido
Gracias ………………………………………………………… 2
Instrucciones de Seguridad ……………………………………… 3
Su Gabinete de Vino …………………………………………… 4
Instalación …………………………………………………… 5-6
Instalar en el Gabinete o con Puerta Decorativa ……………… 6
Escenarios de Temperatura …………………………………… 7-8
Disposición & Almacenamiento ……………………………… 9-12
Cuidado y Mantenimient …………………………………………13
Solución de Problemas …………………………………………14
Garantía Limitada ………………………………………………16
1
Gracias
Gracias para escoger la Boveda de Vino de Amcor
Este Manual de Dueños es aplicable para modelos de Amcor WV-50, WV-100, WV-150
modelos de Boveda de Vino.
Antes de utilizar su Boveda de Vino porfavor lea cuidadosamente este manual
de instrucciones para comprender la forma de maximizar el rendimiento de este.
El manual describe en detalle las opciones para almacenar sus vinos, y cómo ajustar
las unidades de doble zona de la temperatura, la plataforma de posicionamiento, y los
dispositivos de filtro de olor.
Durante más de 50 años, Amcor se ha especializado en dispositivos de control
ambiental en interiores, y una amplia gama de productos innovadores
Los acondicionadores de aire tal como portátiles, los purificadores de aire, regan los
productos y difusores de olor de terapia de aroma. Estos productos de talla mundial
han incorporado las tecnologías patentadas, y estilizar hermoso de diseño industrial
para los interiores de hogar y oficina
Cuidado especial
1. La Boveda del Vino no debe ser conectada por 48 horas, para asegurar
refrigerante se ha asentado apropiadamente.
2. No almacene sustancias químicas inflamables ni explosivas en esta unidad
3. El almacenamiento de alimento y otros artículos consumibles debe conformarse con
las leyes locales que relacionan a la seguridad del alimento.
4. La puerta debe ser mantenida cerrada, y las llaves mantenerlas fuera de peligro lejos
de niños
5. Estas Boveda del Vino no son diseñadas para el almacenamiento de la medicina ni
ningún producto médico
6. El uso inadecuado del enchufe a tierra puede resultar en el riesgo de
descarga eléctrica
7. Es recomendado totalmente que usted no utilizara un alargador con cualquier
Amcor producto de Bovedo de Vino
2
Instrucciones de seguridad
1. El Parámetro está sujeta a cambios sin previo aviso, los datos finales y el circuito se encuentra en el
diagrama de etiqueta. Por favor preste atención a los datos más recientes.
2. Es común que hay gotas en la puerta de crystal cuando humedad en el aire es alta o de la
temperatura en gran parte entre las diferentes dentro del gabinete y la temperatura ambiente.
Limpie claro con paño suave seco.
3. La hoja protectora conectada a la unidad ha sido aplicada para prevenir el daño de arrastre de pies y
puede ser quitado.
4. Es normal cubrir de escarcha por dentro atrás entrepaño de su Gabinete de Vino
5. Si el aparato no funciona y no se utilizará para siempre, no tire libremente.
Enviarlo a la papelera de reciclaje
Instrucciones importantes de seguridad
• Usted siempre debe observar algunas precauciones básicas cuando se usa su gabinete devino.
incluyendo: Sólo utilice su gabinete de vino para el uso destinado, como descrito en esta guía.
• Nunca desconecte el vino gabinete tirando del cable de alimentación.
Agarre firmemente el enchufe y tire hacia fuera al eliminar de zócalo de la pared
• Inmediatamente reparar o reemplazar cualquier cable dañado o desgastado. Nunca utilice un cable
que se divide o que muestra signos de desgaste a lo largo de su longitud o de sus fines.
• No permita que los niños trepen sobre, o se sientan en pie en el gabinete de vino
Ellos podrían dañar el gabinete de vino y herir a sí mismo gravemente
• No use un cable de extensión
Peligro- el Riesgo de niño atrapamiento
Si usted tira su Gabinete de Vino
1. Quite las puertas
2. Deje los estantes en el lugar a fin de que los niños no pueden escalar fácilmente dentro
Si el cordón está dañado, debe ser reemplazado por el fabricante, su agente de servicio o de manera
similar a personas cualificadas con el fin de evitar un peligro.
Conexión a fuente de alimentación
El cable de alimentación del gabinete de vino está equipado con un enchufe que encaja en cualquier
enchufe estándar con conexión a tierra, para evitar cualquier riesgo de choque.
Tenga la salida del poder verificada por un electricista calificado para para asegurarse de que es realmente a electricas a tierra.
Si este no es el caso, debe tener lo sustituye con un conector que está debidamente fundamentada
Si el cordón está dañado, debe ser reemplazado por un Electricista para evitar cualquier riesgo.
Si el zócalo de la pared no está equipada con una conexión a tierra, es su responsabilidad y su deber de
tener que sustituirse con un zócalo de pared a tierra adecuadamente
Si el enchufe no coincide con su zócalo, es posible que otro equipado.
Nota
1. Para su seguridad, debe ser el Gabinete de Vino correctamente a tierra.
2. Nuevos cables eléctricos y los tapones deben ser quedados por un electricista calificado
3
Su Gabinete de Vino
1. El plato primero movible para instalaciones bajo gabinetes
2. Digital panel de control para la configuración de doble zona
de la temperatura.
3. Construcción duradera de Gabinete de Vino
4. Estante Deslizante
5. Almacenamiento estante
6. Base anterior de Ventilación
7. Cuatro pies ajustables
8. Bisagra
9. Filtro de carbón activado
10. Puerta
11. Hoyo de ventilación
4
Instalación
Cuando desempaquetar su Gabinete de vino, asegúrese de que la unidad esté en perfectas condiciones
través de lainspección de la unidad desde todos los ángulos
Lista de piezas por modelo de Gabinete de Vino
WV-50
WV-100
WV-150
1- Gabinete de Vino
1- Gabinete de Vino
1- Gabinete de Vino
3- Estanterías de madera
5- Estanterías de madera
8- Estanterías de madera
1- Asidero de metal bolsa de asamblea
con 2 llaves
1- Asidero de metal bolsa de asamblea
con 2 llaves
1- Asidero de metal bolsa de asamblea
con 2 llaves
1- Filtro de carbón con bolsa de a
samblea
1- Filtro de carbón con bolsa de
asamblea
1- Filtro de carbón con bolsa de
asambleag
1- Manual de duenos
1- Manual de duenos
1- Manual de duenos
Si usted desea instalar su gabinete bajo una encimera Usted deberá eliminar la placa superior de la que se fija
Por debajo de dos tornillos delanteros en las bisagras y tornillos de atrás en el ángulo entre paréntesis
Mantener los dos tornillos delanteros si desea encierra la unidad en virtud de una encimera para fijar a la encimera existentes (véase el diagrama de la página 4)
Trasladar a la caja en la que desea instalarlo. Asegúrese de que el lugar elegido es:
• Lejos de cualquier fuente de calor
• No muy húmedo (lavadero, lavadero, cuarto de baño,
• Sobre una superficie estable
• Equipado con un punto de energía (nivel de socket, tensión nominal, 16A, conectado con la tierra)
Asegúrese de que el interruptor Encender/ Apaga situado a la derecha del panel de control está en la
posición de apagado.
Retire el cable de alimentación y conectar como se muestra en la sección 3
Compruebe el punto de suministro de energía (en los fusibles, fusible de amperaje, disyuntor de trabajo
Usted puede si lo desea utilizar otro dispositivo para comprobar la fuente de alimentación)
Ajuste los cuatro pies debajo de la caja (atornillar hacia arriba o destornillar para abajo) para que su gabinete esté
nivelado es recomendable utilizar un nivel de burbuja)
Deslice el gabinete en su posición final dejando un espacio de entre .75" y 2.25" entre el muro y la pared trasera
de la caja, para la instalación en virtud de una encimera, fijar el gabinete a la encimera utilizando dos tornillos de
las bisagras en la parte superior (véase Pg. 6).
No obstruya la rejilla de ventilación frontal
Si está instalado El Gabinete de Vino en virtud de contrarrestar o en la parte superior del gabinete, se recomienda que un agujero de ventilación ser cortado para permitir la adecuada ventilación de la unidad.
A ras de montaje parrilla puede ser utilizado en este caso para evitar la caída de objetos grandes en la apertura de
ventilación. Ver diagrama de Pg. 6
El Vino de gabinete se debe instalar en un lugar donde la temperatura ambiente de entre 72-78°F. Si la temperatura ambiente está por encima o por debajo de la temperatura recomendada, el rendimiento de la unidad pueden
verse afectados. Por ejemplo la colocación de su unidad en la extrema fría o caliente puede causar condiciones de
temperatura interior a fluctuar La gama de 40 - 65°F no puede ser alcanzado
Quitar protector de transporte de materiales en el interior Del Gabinete de Vino.
Retire el papel protector de los filtros de carbón que usted encontrará en el paquete de accesorios. Desde dentro
del gabinete la posición del filtro en el cuadro de ronda situado en la parte superior trasera de la caja
Se encargará de las estanterías para adaptarse a su conveniencia (ver sección 6)
Espere 48 horas antes cambiar el gabinete en para permitir los líquidos para asentarse
Si usted necesita mover El Gabinete de Vino, no vuelca 45 grados, y sólo punta hacia la espalda de la unidad.
Cercióresele puede conseguir acceso al tapón de la unidad para atender a o mover cuando sea necesario
5
Instalación
1. Retirar la placa por des - atornillar los 2 tornillos localizar en el marco
del 2 bisagras (puerta abierta) y los 2 tornillos de atrás en el ángulo
entre paréntesis
2. Ajuste las cuatro patas
Placa
Bisagras
3. Deslizar el gabinete en posición final
4. Atornille los 2 tornillos a través de las bisagras y
en la encimera
mínimo 22.6"
22.5"
Hoyo de ventilación
.5"
22
23
.5"
23
.4"
32"- 32.5"
4.25"
Instalación en el gabinete o con la puerta decorativa
1. Nivel de la unidad dentro del gabinete
3. Fije el frente a del armario de cocina
2. Abra la puerta o la unidad en un 90 grado ángulo
en la puerta de la unidad (8 tornillos incluyeron
4. Asegúrese de que el empaque esté
sellado correctamente
2. Dibujo de la unidad en un gabinete
1. Dibujo de la unidad colocada en el suelo
.5
27
"
.6
23
Max peso
de los que
enfrentan
33 libras
aire
"
aire
"
.5
27
"
.6
23
23
Bi .4"
sa co
gr n
as
31
.3
"
Max peso
de los que
enfrentan
33 libras
6
23
Bi .4"
sa co
gr n
as
31
.
3"
Air entry
grid 79"2 minimum
Escenarios de Temperatura
Fije la temperatura de Despliegue
nivel inferior ajustanDigital
do botones + / Izquierdo
Fije la Temperatura de nivel la capa
superior adjustando
botones + / -
Despliegue
Digital
Derecho
La indicación\
del compresor
DIRIGIO
Llave de
Encender
o Apagar
Despliegue Digital Derecho
Indique la temperatura actual pre-establecidos o capa superior de la temperatura. Cuando + / - llave es
presionado. En la pantalla digital de tubo parpadeaindicando la temperatura pre-establecido.
Si no hay ninguna operación de ajuste de temperatura se produce en el plazo de cinco segundos, el sistema
automáticamente volver a la pantalla de la temperatura ambiente en el gabinete de almacenamiento,
con precisión de 1 grado.
Falle la Explicación de Código Los Defectos
E2 de sensor superior de temperatura de gabinete de capa. El sensor es cortocircuito o abre circuito
(10 momentos después el sistema cerrará y este código demostrará. El zumbador piará cada 2 segundos.
E9 Faltas es Super calefacción protección. Después de compresor de funcionamiento 4 horas bajo cualquier
condición, Cuando la capa superior del sensor detecta la temperatura del gabinete no menos de 77 grados,
el zumbador de alarma y tweet cada 2 segundos. Cuando se detecta la temperatura del gabinete es> 86
grados F, “E9” el mal funcionamiento del código se mostrará. La calefacción eléctrica se cerrará y pondrán al
compresor a trabajar. (El zumbador tweet cada 2 segundos). Cuando la capa superior de la caja de sensores
detecta la temperatura llega a 70 grados el sistema se reiniciará automáticamente y se mostrará la temperatura normalmente.
Ajuste de la temperatura Preset clave para la capa superior
Apriete esta llave para ajustar el fijó la temperatura de capa superior. Cada vez es apretado, el fijó la
temperatura de capa superior es aumentada o es disminuida por 1 gama de la colocación de la Temperatura
del grado es 54 grado F - 72 grado F.
Despliegue Digital Izquierdo
Indique la temperatura actual pre-establecidos o capa Baja de la temperatura. Cuando + / - llave es
presionado. En la pantalla digital de tubo parpadea indicando la temperatura pre-establecido Si no hay ninguna
operación de ajuste de temperatura se produce en el plazo de cinco segundos, el sistema automáticamente
volver a la pantalla de la temperatura ambiente en el gabinete de almacenamiento, con precisión de 1 grado.
Falle la Explicación de Código
Los Defectos E3 de sensor Bajo de temperatura de gabinete de capa. El sensor es cortocircuito o abre circuito (10 momentos después el sistema cerrará y este código demostrará. El zumbador piará cada 2 segundos.
E8 es super refrigeración protección. Cuando la capa inferior de la caja del sensor detecta la temperatura
alcanza 37 grados, el compresor se detiene, pero mantiene la calefacción eléctrica pasando. "E8" Malfunction
código serán visualizados (el zumbador tweet cada 1 segundo). Cuando la temperatura es detectado gabinete
no menos de 43 grados el sistema se reiniciará automáticamente y se mostrará la temperatura normalmente.
Ajuste de la temperatura Preset clave para la capa Baja:
Apriete esta llave para ajustar el fijó la temperatura de capa baja. Cada vez es apretado, el fijó la temperatura
de capa baja es aumentada o es disminuida por 1 gama de la colocación de la Temperatura del grado es
41 grado F-54 dregree F.
El Indicador del compresor DIRIGIO
Este LED se enciende mientras que el compresor está en funcionamiento y se apaga cuando el compresor se
detiene la operación.
El Indicador eléctrico de la Calefacción DIRIGIO
Este DIRIGIDO se enciende durante el funcionamiento de la calefacción eléctrica y el dispositivo se apaga
cuando se deja de calefacción eléctrica dispositivo de operación.
7
Escenarios de Temperatura
Pruebe Llave
Si la llave es apretada en el estado de reserva, El compresor y la calefacción eléctrica dispositivo
operará al mismo tiempo, e indicador de Compresor DIRIGIO y la Calefacción Eléctrica Indicador
DIRIGIDO vendrá en al mismo tiempo Cuándo esta llave es liberada el sistema vuelve al estado previo
de la reserva. Esta llave es inválida en el estado operacional.
Notas
1. Debe haber por lo menos 5 minutos entre compresor intervalo de detener y comenzar de nuevo.
El compresor debe operar para por lo menos cinco minutos después de que sea empezado
y entonces su operación puede ser parada dependiendo de las condiciones verdaderas
2. La temperatura que indica la gama de Pantalla Digital 1 y Pantalla Digital 2 son 32 grado - 99 grado.
Cuándo la temperatura está debajo de 32 grado en el gabinete de almacenamiento, la temperatura
indicada es 000, y cuando la temperatura del ambiente está encima de 99 grado en el gabinete de
almacenamiento, la temperatura indicada es 99 grado.
3. La diferencia de la temperatura demostró en el Pantalla Digital 1 y Pantalla Digital 2 deben estar
encima de 41 grado.
4. La temperatura que pone la gama de capa superior (54 grado-72 grado y capa más baja (41 grado 54 grado) son efectivas cuando el termperature del ambiente es 90 grado, de otro modo sería difícil
de alcanzar la temperatura bajo poniente de capa superior y capa más baja.
5. La diferencia entre mostrar la temperatura y el establecimiento de la temperatura es mas o menos
3 grado de temperatura cuando el gabinete está equilibrada
8
Disposición y Almacenamiento
Su Gabinete de Vino fue diseñado para ser flexible, para poder r adaptarla a sus necesidades.
Muchas botellas pueden variar en tamaño y dimensiones.
Como tal, el número real de las botellas para almacenar puede varia.
Advertencia
Estantes han muesca característica de protección que impide que la plataforma de rodadura de la pista
cuando se cargan o descargan con las botellas de vino. Estantes debe para pasar suavemente a su
máxima extensión. Sin embargo no extraer las estancas con fuerza excesiva
Ya que esto puede permitir que la plataforma salte de la pista, resultando que la plataforma caer al suelo
creando una situación peligrosa
Los Tipos diferentes de la Disposición
Plataforma de Almacenamient o Ref: AXL
Plataforma de Almacenamiento Ref: AXM
Capacidad: 61 Botellas
Max. Peso: 187 libras
Capacidad: 8 Botellas
Max. Peso: 33 libras
Instrucciones de uso de la plataforma
de almacenamiento (AXL)
Para almacenar su clarete
Para almacenar su Borgoña
Vista lateral
Vista superior
Dorso de gabinete
Vista superior
Dorso de gabinete
El estante apropiado pone entre paréntesis (Leer cuidadosamente si tiene la intención
de modificar su gabinete posiciones de la plataforma)
Plataforma de Almacenamiento
Para mover una plataforma de almacenamiento, en primer lugar eliminar todas las botellas, a
continuación, mover la plataforma corchetes y asegúrese de volver a encajar en las ranuras
como se muestra a continuación.
9
Disposición y Almacenamiento
Pared
Disposición y
almacenamiento
Pared
Plataforma de deslizamiento
Para Mover un estante que desliza,
quita primero todas las botellas,
entonces quitan el estante que
desliza deslizandolo hacia usted al
levantar la parte anterior:
Guía
Montar la parte
delantera de la guía
Pared
Guía
Montar la parte
trasera de la guía
Guía
Guía
Pared
Pared
Luego montar los corredero como se muestra a continuación:
Advertencia
Estantes han muesca característica de protección que impide que la plataforma de rodadura de la pista
cuando se cargan o descargan con las botellas de vino. Estantes debe para pasar suavemente a su máxima
extensión. Sin embargo no extraer las estancas con fuerza excesiva a que esto puede permitir que la
plataforma salte de la pista, resultando que la plataforma caer al suelo creando una situación peligrosa.
10
Disposición y Almacenamiento
Todo resbaladero de madera arrincona
VW-50
(35 botella la capacidad máxima)
VW-100
(72 botella la capacidad máxima)
11
VW-150
(100 botella la capacidad máxima)
Disposición y Almacenamiento
Pared
Estante de Cojinete
Para mover un cojinete de bolas
de la plataforma, en primer lugar
eliminar todas las botellas,
aflojar los tornillos de la
plataforma, diapositiva de la
plataforma, eliminar los guías de
deslizamiento de las paredes, a
continuación, volver a como se
muestra a continuación, y fijar
los tornillos.
Guía
Montar la parte
trasera de la guía
Pared
Guía
Guía
Montar la parte delantera de la guía
Guía
Pared
Pared
Recomendaciones
Su gabinete fue diseñado para almacenar un número máximo de botellas en total seguridad.
Le recomendamos que observen estas sugerencias para optimizar la carga.
Esparzasus botellas a cabo lo más uniformemente posible en los estantes, de modo que el peso
no está concentrado en un solo punto. Asimismo, asegúrese de que no todas las botellas están
agrupados en la parte superior o inferior de la caja.
Observe las instrucciones de carga previstas en la sección 6, en función del tipo de instalaciones de
almacenamiento con la que su gabinete está equipado, y nunca sobre una pila de botellas corredero.
Nunca trate de extraer más de una plataforma de deslizamiento a la vez.
Porfavor Note:
Antes de modificar su Gabinete de Vino original de la configuración de cualquier manera,
asegúrese de preguntar a su distribuidor para que le aconseje.
12
Cuidado y Mantenimient
Limpieza de su Gabinete de Vino
• Apague la cámara, desconecte el aparato, y se eliminarán todos los artículos incluidos los estantes
• Lave el interior de las superficies con agua caliente y bicarbonato de soda solución.
Solución debe ser 2 cucharadita de bicarbonato de soda a un cuarto de galón de agua.
• Lave los estantes con un detergente suave solución
• Lave el exterior de gabinete con agua caliente y detergente líquido suave.
Enjuague bien y seque con una toallita limpia paño suave
Falla de energía
• La mayor parte del Fallo de energia se corrigen dentro de un par de horas, y no debe afectar
a la temperatura de su dispositivo si minimizar el número de veces que se abre la puerta.
• Si la unidad está desconectada, el poder perdido o desactivada, debe esperar 3-5 minutos antes de
volver a arrancar la unidad. Si intenta reiniciar su gabinete de Vino antes de la demora el Gabinete de
Vino no podrá comenzar
• Si el poder va a estar fuera por un período más largo de tiempo, el usuario debe tomar las medidas
adecuadas para proteger su contenido.
Moviendo su Gabinete de vino
• Eliminar todos los elementos
• Ponga seguridad con cintas a todo los elementos sueltos, estanterías, etc, dentro de su dispositivo.
• Gire a la pata ajustable hasta la base para evitar daños
• Cinta de la puerta cerrada
• Asegúrese de que el dispositivo de seguridad se mantiene en posición vertical durante
el transporte. También proteger el aparato con una manta, o artículos similares
Punto de Ahorro de energía
El Gabinete de Vino debería estar situado en la mejor zona de la habitación, lejos del calor
que producen los aparatos, y de la luz directa del sol
13
Solución de Problemas
EMPIECE
Compresor no arranca, a pesar de que la temperatura deseada es inferior a la temperatura
en la habitación
1. Verifique el enchufe de pared conectando cualquier tipo de dispositivo eléctrico, y se cerciora que el
botón de en/lejos es apretado
2. Pulse el botón TEST y comprobar que las dos rojo y verde indicador de las luces se encienden
(Con la pantalla en estado)
3. Si el compresor aún no se inicia después de los pasos 2 y 3. Póngase en contacto con su distribuidor.
Compresor no se detiene
1. Ponga su mano en el condensador (pantalla de metal en la parte posterior de su gabinete)
para comprobar su temperatura, contacte su distribuidor si esta frío
2. Si el condensador es caliente, ajustar la temperatura fría, lo más alto posible (en la medida de lo que
irá en sentido horario) y asegúrese de que el circuito de frío operación indicador se apaga. Si el compresor no se detiene, desconecte or el gabinete y en contacto con su distribuid
Durante Operación
El despliegue digital del Tubo indica una temperatura debajo de la temperatura
que usted pone.
1. Verifique los fijo-puntos de la temperatura
2. Verifique que la luz roja de indicador de operación de circuito está encendida.
3. Apriete el botón de la Prueba y comprebe que las dos luces rojas y verdes de indicador
en el lado correcto del entrepaño están encendida.
Si paso 2 o 3 son inexactos póngase en contacto con su distribuidor.
El despliegue digital del Tubo indica una temperatura superior de la temperatura
que usted ajusta.
1. Verifique los fijo-puntos de la temperatura
2. Verifique que la luz verde de indicador de operación de circuito está encendida.
3. Apriete el botón de la Prueba y comprebe que las dos luces rojas y verdes de indicador en el lado correcto del entrepaño están encendida. Si paso 2 o 3 son inexactos póngase en contacto con su distribuidor.
Póngase en contacto con su distribuidor, si después de fijar los puntos de ajuste y pruebas caliente y fría
circuito luces indicadoras ninguno de los dos problemas anteriormente no son corregidos.
NOTA:
La unidad de la refrigeración sólo debe ser atendida por un técnico de la refrigeración,
que debe verificar el circuito para escapes antes de volver a poner en el servicio.
14
Garantía de Gabinete de Vino
QUÉ ESTÁ CUBIERTO
Un año de garantía limitada de Amcor Inc (AMCOR) garantiza el comprador minorista original ( "Comprador") comprar en los Estados Unidos que la
Amcor productos con la que se adjunta esta garantía está libre de defectos en materiales y mano de obra.
La única obligación de Amcor en virtud de esta garantía es de sustituir, o al la discreción de Amcor, de reparar, de forma gratuita, todas las partes
defectuosas, por un período de un (1) año a partir de la fecha de la compra original.
Cualquier garantía implícita de comerciabilidad está limitada de manera similar a un (1) año a partir de la fecha de la compra original y no se adopten
medidas sobre la base de cualquier garantía implícita de comerciabilidad o de otra manera se podrá iniciar después de la expiración de un (1) año a
partir de la fecha de compra minorista original.
Algunos estados no permiten limitaciones en el tiempo pasado de una garantía implícita, por lo que la limitación anterior puede no aplicarse a usted.
Por un año a partir de la fecha de compra por el propietario original, Amcor, se tiene la opción de reparar o reemplazar cualquier parte de la unidad,
lo que demuestra que presenta defectos de materiales o mano de obra en condiciones de uso normales. Durante este período Amcor proporcionará
todos los elementos necesarios para corregir tales defectos de forma gratuita, siempre y cuando la unidad se ha instalado y funciona de acuerdo con
las instrucciones escritas en el manual del propietario. En alquiler o utilización comercial, el período de garantía es de 90 días.
Las disposiciones de esta garantía no será aplicable a cualquier producto que en la sentencia Amcor ha sido: (1) sujetos a abuso o descuido.
(2) dañado en un accidente (3) Se utiliza para un fin para el que no fue diseñado, o (4) reparado o alterado de alguna manera que afectan negativamente a su rendimiento o fi abilidad.
LO QUE NO ESTÁ CUBIERTO
• Contenido de las pérdidas de alimentos o de otro tipo, debido a la descomposición
• Daños incidentales o consecuentes
• Partes y mano de obra para los siguientes gastos no se tendrán en cuenta como garantía:
Puerta manantiales y o Marcos
Los entrepaños interiores de la puerta, la puerta clama y/o apoyos de puerta.
Las bombillas y o envoltura de plástico.
Transatlánticos plásticos de gabinete
Pinchazo evaporador que se anulará la garantía del completo sistema sellado.
Las reparaciones realizadas por terceros, distintos de Amcor.
Llamadas de servicio que están relacionadas con los problemas externos, tales como el abuso, la utilización, la insuficiencia de
energía eléctrica, accidentes, incendios, inundaciones o actos de Dios
Sustitución de los fusibles de la casa o reponer cortacircuitos.
El incumplimiento de los productos en caso de que no sea utilizado para los fines previstos
La falta de producto debido a la instalación inadecuada
• Esta garantía no se aplica fuera de la parte continental de EE.UU.
Para obtener el servicio de garantía, el producto defectuoso o de una parte debe ser enviada o entregada a Amcor. Todos los gastos de envío, los
seguros y los gastos de envío son responsabilidad del comprador y no están incluidos en esta garantía.
LIMITADA SEGUNDO A QUINTO ANO DE GARANTIA
Por el segundo por quinto año de la fecha de la compra original. Amcor proporcionará un compresor del reemplazo libre de la carga debido a un
fracaso. Usted es responsable del trabajo del servicio y gastos de transporte.
En la renta o el uso comercial, la garantía limitada de compresor es un año y nueve meses.
El costo para mover el aparato a la tienda del servicer y atrás al hogar del usuario, como puede ser requerido, son la responsabilidad de usuario
AMCOR NI ASUME no AUTORIZA a NINGUNA PERSONA a ASUMIR PARA ELLO CUALQUIER OTRO (la OBLIGACION CON RESPECTO A
SUS PRODUCTOS. No HAY las GARANTIAS QUE EXTIENDEN MAS ALLA DE LA DESCRIPCION EN LA CARA DE ESTO.
Ninguna RESPONSABILIDAD ES ASUMIDA PARA DAÑOS CASUALES ni CONSECUENTES ESE mayo RESULD DEL USO DE UN PRODUCTO de
AMCOR. NI PARA LOS DAÑOS DEBIDO Al ACCIDENTE, el ABUSO, la FALTA DE el CUIDADO RESPONSIBLE.
LA COLOCACION DE CUALQUIER ADJUNTO NO AUTORIZADO, PERDIDA DE LAS PARTES, EN USO DE TENSION A DISTINTOS
SPECIFIED. Algunos estados no permiten la exclusión de limitación de daños incidentales o consecuentes, por lo que estas limitaciones pueden |no
ser aplicables.
Producto: Amcor Wine Vault™
Modelos: WV 50, WV 100, WV 150
Fecha comprador:_______________________________
Producción código:________
Preguntas? 1-866-361-2233 • www.amcorgroupusa.com
Estimado Cliente: Por favor Mantenga esta garantía para su registro. NO devolverlo.
16
913126830
7/2008
Amcor declina toda responsabilidad por los defectos o daños causados por el uso de piezas de repuesto obtenidos a partir de o con el servicio en
cualquier centro de servicio distintas de Amcor del centro de servicio autorizado. Esta garantía le otorga derechos legales específicos y puede tener
también otros derechos que varían de estado a estado.