1
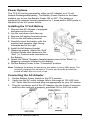
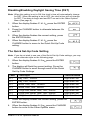
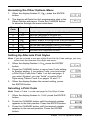
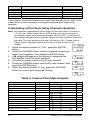
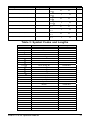
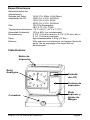
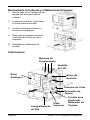
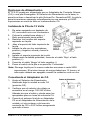
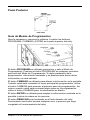
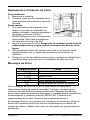
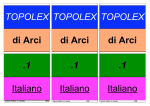
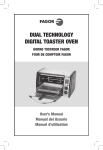
®
AMANO
TCX-22
Electronic Time Clock
Operation Manual
Thank you…
for purchasing another fine product from
Amano Cincinnati, Inc.
Important
Note that the government standard for DST is subject to change. Your
clock is factory-set for correct DST based upon when it was
manufactured, but any revision to DST begin or end dates may require
updating the system-set DST calendar.
If you live in Arizona, Hawaii, parts of Indiana, or any other area that
does not use Daylight Saving Time, refer to this document’s DST
settings instruction for details regarding disabling the DST function.
Do not return this clock to the retailer. If you have any questions or need
assistance, please call us toll free at:
1-800-253-9836
Proprietary Notice
This document contains proprietary information and such information
may not be reproduced in whole or part without the written permission
from Amano Cincinnati, Inc., 140 Harrison Ave., Roseland, New Jersey,
07068.
Amano Cincinnati, Inc. reserves the right to make equipment changes
and improvements, which may not be reflected in this document.
Portions of this document may have been updated to include the latest
hardware or firmware version, if applicable.
We recommend that this document be read in its entirety before any
attempt is made to operate the equipment.
Need Ribbons, Keys and Accessories?
Visit
www.amano.com
or
Call - (800)-253-9836
Specifications
Power Requirements:
For Clock Input:
For AC Adapter:
AC16.5V, 60Hz, 0.6A (Max.)
AC100V ± 10%, 50/60Hz
AC120V ± 10%, 60Hz
AC230V ± 10%, 50/60Hz
Battery:
12V Sealed Rechargeable Lead-Acid Battery
NP1.2-12 12V 1.2Ah
Ambient Temperature: -10°C to 45°C (14°F to 113°F)
Ambient Humidity:
10% to 90% (non-condensing)
Dimensions:
6 7/8” (175 mm) wide x 8 1/4” (210 mm) high x
6 1/4” (159 mm) deep
Weight:
Approximately 5.9 Kg (13 lbs.)
Environment:
Indoor use only; dust-free environment. Keep
out of direct sunlight.
External View
Print Button
Analog Clock
LCD Display
Print Window
Cover Lock
Amano TCX-22 Operation Manual
Printer Platen
and Margin
Adjustment
1
Removing the Cover & Packing Material
1. Turn the key clockwise to unlock the
cover.
2. Lift the cover up, then pull towards you
to remove it.
3. Lift the printer block and remove the
spacer.
4. Remove the spacer between the Ribbon
Cartridge and the Printer
Carriage Tab.
5. Reinstall the cover of your unit.
Internal View
Program Buttons
LCD Display
Analog Clock
Reset Button
Ribbon Cartridge
Card Stopper
Card Stopper
Adjustment Screw
Printer Platen
Battery Compartment
2
Amano TCX-22 Operation Manual
Power Options
The TCX-22 can be powered by either an AC Adapter or a 12 volt
Sealed Rechargeable battery. The Battery Power Switch on the base
enables you to turn the Battery Power ON or OFF. The battery is
equipped to maintain normal operations for 1 week and/or 5000 prints in
the event of an A/C power failure.
Installing the 12 Volt Battery
1. Remove the AC Adapter if equipped
and remove the cover.
2. Lay the unit down clock face up
3. Remove left battery bracket screws
4. Pull out the left battery bracket.
5. Carefully insert the battery with the
positive and negative clips facing
outwards and to the right.
6. Install the left battery bracket
7. Observing polarity, attach the “Red”
Positive female wire harness to the
“Red” (+) Positive male connector on
the Battery.
8. Attach the “Black” Negative female harness wire to the “Black” (-)
Negative connector located on the battery.
9. Set the Battery Power to the “Connected” position.
Note: Recharge the battery at least every two weeks or every 5000 prints. The
minimum charging time should be 12 hours and the switch should be
turned off when the unit is not in use.
Connecting the AC Adapter
1. Set the Battery Power Switch to the OFF position.
2. Verify that the AC outlet voltage falls in the range of 100-240 Volts
AC. Verify that the cord and plug are appropriate for your AC source.
3. Plug the connector end of the AC Adapter into the Power Connector
and the other end into a properly grounded 120 or 240 Volt outlet.
Amano TCX-22 Operation Manual
3
Make a Test Print
1. Make sure that there is power to the TCX-22 (Refer to Page 3).
2. Insert a piece of paper or time card into the TCX-22. The clock will
automatically print YEAR, MONTH, DATE and TIME with AM or PM.
3. If the imprint is satisfactory, the TCX-22 is ready for use.
4. If you wish to change the time and/or print style on the TCX-22, enter
into Program Mode for various print styles. The next page gives
instructions on programming the TCX-22 to fit your needs.
Adjusting the Margin
1. Unlock and remove the
cover. Note – suggest
unplugging the clock
before performing
margin adjustment.
2. Locate the Card Stopper
Adjustment Screw on the
right side of the clock,
below the printer platen.
3. Position a piece of paper or
time card as desired.
4. Loosen the screw to move
the Card Stopper forward or
back. Tighten the screw as
needed. (See top
illustration.) The print
margin can be adjusted to a
maximum of 7/8” (22 mm).
Illuminated Print Option
The TCX-22 is equipped with a feature that allows
the print area to illuminate. The switch is located
on the back panel. When connected to an AC
adapter the unit will stay illuminated. When used
with a battery, it illuminates for about 20 minutes
every time the LED switch is pressed.
4
Amano TCX-22 Operation Manual
Program Mode Guide
Unlock and remove the cover. Locate the PROGRAM, CHANGE and
ENTER buttons on top of the clock.
The PROGRAM button is used to enter and exit the Program Mode.
Press the PROGRAM button at any time to exit the Program Mode. If a
program step is in the process of being changed when this button is
pushed, the new information will not be saved.
The CHANGE button is used to change the information on the display.
When you are reviewing the main programming menu, use the CHANGE
button to advance to the next programming step. When you are revising
a programming step, use the CHANGE button to change the blinking
information.
The ENTER button is used to accept the information shown on the
display and save it in memory.
The RESET button is located on the right-side of the clock. Pressing this
button will clear any jams or errors.
Entering the Program Mode
1. Unlock and remove the cover.
2. Press and hold the PROGRAM button to access the Main
Programming Menu. The Main Programming Menu consists of the
Following
Menu Code
Menu
Function
P1
dA E
Sets the date
P2
Cloc
Sets the clock time
P3
dLS
Disable/Enable Daylight Saving Time
P4
Prn
Sets the print style using Quick Print Set-Up Codes
P5
O hr
Accesses Other Options Menu
Amano TCX-22 Operation Manual
5
3. When P1 dA E flashes in the display, release the
PROGRAM button. To move to the next menu item,
press the CHANGE button.
Note: If no other button is pressed after five minutes, the clock will return to the
Normal Mode and the clock hands will reset.
Setting the Year, Month and Date
1. When the display flashes P1 dA E, press the ENTER
button.
2. Press the CHANGE button until the correct year
appears, then press the ENTER button.
3. Press the CHANGE button until the correct month
appears, then press the ENTER button.
4. Press the CHANGE button until the correct date
appears, then press the ENTER button.
5. When the display flashes the correct year, month and
date, press the ENTER button.
6. When the display flashes P1 dA E, press the CHANGE
button to move to Setting the Clock Time.
Setting the Clock Time
Note: Use a 24 hour and 60 minute format when setting the time. For example,
2:00 PM = 14:00.
1. Press the PROGRAM button for two seconds.
2. Press the CHANGE button until the display flashes
P2 CLoc, then press the ENTER button.
3. Press the CHANGE button until the correct hour
appears, then press the ENTER button.
4. Press the CHANGE button until the correct minute
appears, then press the ENTER button.
5. When the display flashes the correct time, press the
ENTER button.
6. When the display flashes P2 CLoc, press the
CHANGE button to move to the Daylight Saving
Time On/Off Setting.
6
Amano TCX-22 Operation Manual
Disabling/Enabling Daylight Saving Time (DST)
Note: When this setting is set to ON, the clock’s time will automatically change
for DST. When this setting is set to OFF, the clock’s time will not change
for DST. The dates to begin and end DST are set in the Other Options
Menu (See page 8).
1. When the display flashes P3 dL S , press the ENTER
button.
2. Press the CHANGE button to alternate between On
and Off.
3. When the display flashes the correct setting, press
the ENTER button.
4. When the display flashes P3 dL S , press the
CHANGE button to move to the Quick Set-Up Code
setting.
The Quick Set-Up Code Setting
Note: If you do not wish to use one of the Quick Set-Up Code settings, you may
set an alternate style on the following page.
1. When the display flashes P4 Prn , press the ENTER
button.
2. The display will flash the current setting. Press the
CHANGE button to scroll through each of the Quick
Set-Up Code Settings.
Code
Print Style
Print Direction
Pr-1
Day, 24Hr., 100th/Hr
Right Side Print
Pr-2
Day, 12Hr., 60th/Hr.
Right Side Print
Pr-3
Month, Date, 24Hr., 100th/Hr.
Right Side Print
Pr-4
Month, Date, 12Hr., 60th/Hr.
Right Side Print
Pr-5
2 Digit Year, Month, Date, 12Hr., 60th/Hr.
Right Side Print
Pr-6
4 Digit Year, Month, Date, 12Hr., 60th/Hr.
Right Side Print
Pr-7
4 Digit Year, Month, Date, 24Hr., 60th/Hr.
Right Side Print
3. When the display flashes the correct setting, press the
ENTER button.
4. When the display flashes P4 Prn , press the CHANGE
button to move to the Other Options menu.
Amano TCX-22 Operation Manual
7
Accessing the Other Options Menu
1. When the display flashes P5 Oh r, press the ENTER
button.
2. The display will flash the first programming step in the
Other Options sub-menu. Press the CHANGE button
to advance through the menu selections.
Menu
Code
Menu
Function
I1
I2
I3
I4
I5
I6
I7
I8
Prn
LAn9
Prdr
APr
2Er0
bdL
EdL
dIA9
Set Print Style using Symbol or Print Style Codes
Sets the Language of the print out
Sets the Print Direction (left or right hand)
Disable, enable, or configure the Auto print option
Disable/enable Leading Zero in print out
Set the date that Daylight Saving Time begins
Set the date that Daylight Saving Time ends
Accesses the Diagnostic Routine
Setting Up Alternate Print Styles
Note: If you do not wish to use one of the Quick Set-Up Code settings, you may
select from the Alternate Print Style sub-menu.
1. When the display flashes11 Prn , press the ENTER
button.
2. Press the CHANGE button to move from Code setting
to Symbol setting. If you select Code, you must enter
a Print Style Code from Table 1 on the next page. If
you select Symbol, you can “build” a custom Print
Style using Tables 2 and 3 on pages 10 and 11.
3. When the display flashes the correct setting, press
the ENTER button.
Selecting a Print Code
Note: Refer to Table 1 on the next page for Print Style Codes.
1. When the display flashes Pr COdE, press the ENTER
button.
2. Press the CHANGE button until the desired number
appears in the first position. Press the ENTER button.
3. Press the CHANGE button until the desired number
appears in the second position. Press the ENTER
button.
8
Amano TCX-22 Operation Manual
4. Press the CHANGE button until the desired number
appears in the third position. Press the ENTER button.
5. Press the CHANGE button until the desired number
appears in the fourth position. Press the ENTER button.
6. When the display flashes all four correct numbers,
press the ENTER button.
7. When the display flashes 11 Prn , press the CHANGE
button to move to the Language Setting.
Table 1: Print Style Codes for the Program Mode
Code
6510
6210
6810
6520
6620
6820
6540
6640
6840
6680
6071
6072
6073
6074
6075
6076
6077
6078
6079
6070
5510
5210
5810
5520
5620
5820
5540
5640
5840
5680
5071
5072
5073
5074
5075
5076
Print Style
DAY, 12H, 60th
DAY, 24H, 10th
DAY, 24H, 100th
DATE, 12H, 60th
DATE, 24H, 60th
DATE, 24H, 100th
DATE, MONTH, 12H, 60th
DATE, MONTH, 24H, 60th
DATE, MONTH, 24H, 100th
DATE, MONTH, YEAR, 24H, 60th
YEAR, MONTH, DATE, RCV’D
YEAR, MONTH, DATE, SENT
YEAR, MONTH, DATE, FAX’D
YEAR, MONTH, DATE, VOID
YEAR, MONTH, DATE, PAID
YEAR, MONTH, DATE, CFM’D
YEAR, MONTH, DATE, APR’D
YEAR, MONTH, DATE, CMPL’D
YEAR, MONTH, DATE, ORIGN
YEAR, MONTH, DATE, FILE
DAY, 12H, 60th
DAY, 24H, 10th
DAY, 24H, 100th
DATE, 12H, 60th
DATE, 24H, 60th
DATE, 24H, 100th
DATE, MONTH, 12H, 60th
DATE, MONTH, 24H, 60th
DATE, MONTH, 24H, 100th
DATE, MONTH, YEAR, 24H, 60th
YEAR, MONTH, DATE, RCV’D
YEAR, MONTH, DATE, SENT
YEAR, MONTH, DATE, FAX’D
YEAR, MONTH, DATE, VOID
YEAR, MONTH, DATE, PAID
YEAR, MONTH, DATE, CFM’D
Amano TCX-22 Operation Manual
Print Direction
Right Side Printing
Right Side Printing
Right Side Printing
Right Side Printing
Right Side Printing
Right Side Printing
Right Side Printing
Right Side Printing
Right Side Printing
Right Side Printing
Right Side Printing
Right Side Printing
Right Side Printing
Right Side Printing
Right Side Printing
Right Side Printing
Right Side Printing
Right Side Printing
Right Side Printing
Right Side Printing
Left Side Printing
Left Side Printing
Left Side Printing
Left Side Printing
Left Side Printing
Left Side Printing
Left Side Printing
Left Side Printing
Left Side Printing
Left Side Printing
Left Side Printing
Left Side Printing
Left Side Printing
Left Side Printing
Left Side Printing
Left Side Printing
9
Code
5077
5078
5079
5070
Print Style
YEAR, MONTH, DATE, APR’D
YEAR, MONTH, DATE, CMPL’D
YEAR, MONTH, DATE, ORIGN
YEAR, MONTH, DATE, FILE
Print Direction
Left Side Printing
Left Side Printing
Left Side Printing
Left Side Printing
If you cannot locate the desired print style from the above list, refer to the
instructions on the next page for programming the print style using
symbols.
Customizing a Print Style Using Character Symbols
Note: The maximum displacement (print length) of the print head is 152 dots or
1.4" (35 mm). When viewed on the LCD display, this value becomes a
percentage, where the maximum allowable value is 99%. To determine if
your desired symbol will print, add the lengths of each character used from
the table. The total should be less than 150 dots or 99%. Please refer to
Tables 2 and 3 representing the print styles, number of dots or line
lengths.
1. When the display flashes Pr SYbL, press the ENTER
button.
2. Press the CHANGE button until the character symbol you
want to print appears, then press the ENTER button.
3. A n symbol will appear in the display to designate the
first Symbol Code has been assigned.
4. Continue to assign codes until you have finished.
5. Press the CHANGE button until the En code flashes, then
press the ENTER button.
6. When the display flashes II Prn , press the CHANGE
button to move to the Language Setting.
Table 2: Custom Print Style Samples
Print Style
Example
Code to Enter
Length
DAY,12Hr,60th/Hr
FRI PM 1:45
dAY SPCE 1260 h
82
DAY,24Hr,60th/Hr
FRI 13:45
dAY SPCE 2460 h
68
DAY,24Hr,10th/Hr
FRI 13.7
dAY SPCE 2410 h
58
DAY,24Hr,100th/Hr
FRI 13.75
dAY SPCE 24100 h
68
DATE,12Hr,60th/Hr
13 PM 1:45
dA E SPCE 1260 h
82
DATE,24Hr,60th/Hr
13 13:45
dA E SPCE 2460 h
68
DATE,24Hr,10th/Hr
13 13.7
dA E SPCE 2410 h
58
DATE,24Hr,100th/Hr
13 13.75
dA E SPCE 24100 h
68
MONTH,DATE,12Hr,60th/Hr
APR13 PM 1:45
mon h SPCE dA E SPCE 1260 h
115
MONTH,DATE,24Hr,60th/Hr
APR13 13:45
mon h SPCE dA E SPCE 2460 h
101
MONTH,DATE,24Hr,10th/Hr
APR13 13.7
mon h SPCE dA E SPCE 2410 h
91
MONTH,DATE,24Hr,100th/Hr
APR13 13.75
mon h SPCE dA E SPCE 24100 h
101
10
Amano TCX-22 Operation Manual
Print Style
Example
YEAR,MONTH,DATE,12Hr,60th/Hr
95 APR13 PM 1:45 YEAr SPCE mon h SPCE dA E SPCE 143
1260 h
Code to Enter
Length
YEAR,MONTH,DATE,24Hr,60th/Hr
95 APR13 13:45
YEAr SPCE mon h SPCE dA E SPCE 129
2460 h
YEAR,MONTH,DATE,24Hr,10th/Hr
95 APR13 13.7
YEAr SPCE mon h SPCE dA E SPCE 119
2410 h
YEAR,MONTH,DATE,24Hr,100th/Hr 95 APR13 13.75
YEAr SPCE mon h SPCE dA E SPCE 129
24100 h
YEAR,MONTH,DATE,SYMBOL1
95 APR13 RCV’D
YEAr SPCE mon h SPCE dA E SPCE 127
SY-1
YEAR,MONTH,DATE,SYMBOL2
95 APR13 SENT
YEAr SPCE mon h SPCE dA E SPCE 124
SY-2
YEAR,MONTH, DATE,SYMBOL3
95 APR13 FAX’D
YEAr SPCE mon h SPCE dA E SPCE 127
SY-3
YEAR,MONTH, DATE,SYMBOL4
95 APR13 PAID
YEAr SPCE mon h SPCE dA E SPCE 124
SY-4
Table 3: Symbol Codes and Lengths
Code
Character
Length
2dYEAr
2 Digit Year
25=16.45%
nnonh
Month
30=19.74%
dA E
Date
20=13.16%
dAY
Day
20=13.16%
JLAN
Julian Date
30=19.74%
12 10 h
12 Hr & 10th/Hr
49=32.24%
12 20 h
12 Hr & 20th/Hr
59=38.82%
12 60 h
12 Hr & 60th/Hr
59=38.82%
12 100 h
12 Hr & 100th/Hr
59=38.82%
24 10 h
24 Hr & 10th/Hr
35=23.03%
24 20 h
24 Hr & 20th/Hr
45=29.61%
24 60 h
24 Hr & 60th/Hr
45=29.61%
24 100 h
24 Hr & 100th/Hr
5=29.61%
SLSh
Slash ( / )
10=6.58%
dASh
SPCE
Dash ( - )
Space ( )
07=4.61%
03=1.97%
4dYEAr
4 Digit Year
28=14.00%
SY-1
RCV’D
43=28.29%
SY-2
SENT
40=26.32%
SY-3
SY-4
FAX’D
VOID
43=28.29%
40=26.32%
40=26.32%
SY-5
PAID
SY-6C
FM’D
43=28.29%
SY-7
APR’D
43=28.29%
SY-8
CMPL’D
53=34.87%
SY-9
SY-10
ORIGN
FILE
50=32.89%
40=26.32%
En
End of File
-
Ad
Add a Character
-
dL
Delete a Character
-
Amano TCX-22 Operation Manual
11
Setting the Language
1. When the display flashes I2 LAn9, press the ENTER
button.
2. Press the CHANGE button until the correct language
appears, then press the ENTER button.
3. When the display flashes I2 LAn9, press the CHANGE
button to move to the Print Direction. Please refer to
the table below for Language selections.
English
LI En9
Spanish
L2 SPn
French
L3 Frn
Portuguese
L4 P 9
Setting the Print Direction
1. When the display flashes I3 Prdr, press the ENTER
button.
2. Press the CHANGE button until the correct direction
appears, r 9h for Right Side Printing, or LEF for Left
Side Printing, then press the ENTER button.
3. When the display flashes I3 Prdr, press the CHANGE
button to move to the Auto Print Setting.
Setting the Auto Print
1. When the display flashes I4 APr , press the ENTER
button.
2. Press the CHANGE button until the correct printing
mode appears, then press the ENTER button.
Auto Print (on P:): Will automatically print a single
print when media is inserted.
Manual Print (OFF): Requires you to use the PRINT button when
printing.
Precision Print (on P:5): Enables you to print multiple or
consecutive prints when holding down the PRINT
button.
3. When the display flashes I4 APr , press the CHANGE
button to move to the Leading Zero Setting.
12
Amano TCX-22 Operation Manual
Setting the Leading Zero On or Off
Note: The Leading Zero appears on the print out before single digit times and
dates (For example DEC. 06, 08:00)
1. When the display flashes I5 2ErO, press the ENTER
button.
2. When the display flashes OFF or on, press the
CHANGE button to toggle between off and on. Press
the ENTER button to select.
3. When the display flashes I5 2ErO, press the CHANGE
button to move to the Begin Daylight Saving Time
setting.
Setting Begin Daylight Saving Time
Note: The government standard for DST is subject to change. Your clock is
factory-set for correct DST based upon when it was manufactured, but any
revision to DST begin or end dates may require updating the system-set
DST calendar.
The steps below change the begin date for DST. DST is enabled and
disabled in the Main Programming Menu. Updating the begin date for DST
needs to be done just one time*, since the clock's rolling calendar function
will auto-calculate the begin date for each year thereafter. To change the
end date for DST, refer to the next section.
1. When the display flashes I6 bdL , press the ENTER
button.
2. Press the CHANGE button until the correct year
appears, then press the ENTER button.
3. Press the CHANGE button until the correct month
appears, then press the ENTER button.
4. Press the CHANGE button until the correct date
appears, then press the ENTER button.
5. When the display flashes the correct year, month and
date, press the ENTER button.
6. When the display flashes I6 bdL , press the CHANGE
button to move to the End Daylight Saving Time
Setting (17 EdL will display).
Amano TCX-22 Operation Manual
13
Setting End Daylight Saving Time
Note: The government standard for DST is subject to change. Your clock is
factory-set for correct DST based upon when it was manufactured, but any
revision to DST begin or end dates may require updating the system-set
DST calendar.
The steps below change the end date for DST. DST is enabled and
disabled in the Main Programming Menu. Updating the end date for DST
needs to be done just one time*, since the clock's rolling calendar function
will auto-calculate the end date for each year thereafter.
1. When the display flashes 17 EdL , press the ENTER
button.
2. Press the CHANGE button until the correct year
appears, then press the ENTER button.
3. Press the CHANGE button until the correct month
appears, then press the ENTER button.
4. Press the CHANGE button until the correct date
appears, then press the ENTER button.
5. When the display flashes the correct year, month and
date, press the ENTER button.
6. When the display flashes 17 EdL , press the CHANGE
button to move to the Diagnostics Mode (see Exit
Program Mode to end).
The Diagnostic Routine
The Diagnostic Routine checks the LCD segments, the number of prints,
and clears the memory (Print Style, Language, Leading Zero Suppress,
Clock and Calendar, Right/Left Print and Daylight Saving Time features).
1. When the display flashes I8 dlA9, press the
ENTER button. The Diagnostic Routine consists of
the following:
14
Menu Code
Menu
Function
d1
LCd
Tests the segments of the LCD
d2
NPr
Displays total number of print outs
d3
Clr
Clears memory and restores default settings
Amano TCX-22 Operation Manual
2. When the display flashes dl LCd (LCD segments
check), press the ENTER button.
3. When all of the LCD segments are turned on, press
the ENTER button to advance to the next step.
4. When the display flashes d2 nPr (total number of
prints), press the ENTER button.
5. The number of prints counted will be displayed. Press
the ENTER, then CHANGE button to advance to the
next step.
6. When the display flashes d3 CLr (memory clear),
press the ENTER button.
7. To clear the memory and reset the defaults, press the
CHANGE button until the 3 appears, then press the
ENTER button. Press the CHANGE button until the 2
appears, then press the ENTER button.
8. When the display flashes 32, press the ENTER
button.
Exit Program Mode
Press the PROGRAM button and the display will show the current date.
The clock hands will reset to the current time.
Note: The TCX-22 uses a Lithium battery to maintain the user settings incase of
a power failure. If a power failure occurs and the Lithium battery is dead,
the time clock settings may revert to default settings (i.e., DST Begin and
End dates may change).
Amano TCX-22 Operation Manual
15
Replacing the Ribbon
To Remove:
1. Remove the cover.
2. Pull the two white release tabs
upward and remove the ribbon
cassette.
To Insert:
1. If the print mechanism is down and a piece of paper cannot be
inserted, press the RESET button to move the carriage up. This will
make the ribbon installation easier.
2. Insert the ribbon cassette. Be sure to mount the ribbon between
the printer head and ribbon guide as arrows illustrate.
3. Turn the knob on the cassette clockwise one turn to take up any
slack in the ribbon.
4. Replace the cover and check the print quality to confirm that you
have installed the ribbon correctly.
Error Messages
Error Code
E1 Pr
E2 Pr
E3 Pr
E4 Pr
Er
dL
Cause
Home sensor, motor carriage stuck
Time sensor, carriage stuck
Home sensor
Carriage stuck
General print error
Daylight Saving Time Program
For error messages E1 through E4, turn off the power before checking to
see that the carriage is not stuck or jammed. Also, check to see that the
ribbon cables are in good condition. After clearing any jams, restore the
power and press the RESET button. Contact your Amano Cincinnati
representative for assistance.
The dL error message signifies that an attempt was made to get into the
Program mode during the Daylight Saving changeover one-hour lockout.
Wait one hour and you will be able to program the clock.
16
Amano TCX-22 Operation Manual
AJR-307403 z Copyright ©2007 Amano Cincinnati, Inc. z 1/07/0
®
AMANO
TCX-22
Reloj Electrónico
Manual de Operación
Importante
Note que el estándar del gobierno para DST es sujeto de cambiarse. Su
reloj es el juego de fábrica para correcto DST basado sobre cuando es
fue fabricado, pero cualquier revisión a principio de DST y fechas de
final puede requerir que la actualización del sistema ponga el calendario
DST.
Si usted vive en Arizona, Hawai, las partes de la Indiana, o cualquier
otra área que no usa el Horario de Verano, se refiere a la instrucción de
ajustes DST de este documento para detalles en cuanto a la
incapacitación de la función de DST.
No devuelva este reloj al detallista. Si usted tiene alguna pregunta o
necesita la ayuda, por favor llámenos peaje libre en:
1-800-253-9836
La instalación, mantenimiento, etc., de este dispositivo debe ser hecha
solo por personal calificado.
Nota del Fabricante
Este documento contiene información propiedad de la Compañía y como
tal, dicha información no puede ser reproducida total ni parcialmente sin
autorización escrita de Amano Cincinnati, Inc., Harrison Avenue,
Reseland, New Jersey, 07068.
Amano Cincinnati, Inc. Se reserva los derechos de hacer cambios o
mejoras al equipo los cuales pueden no estar reflejados en este
documento.
Partes de este documento pueden haber sido actualizadas para incluir
las últimas mejoras en “hardware” y/o las últimas versiones de
“firmware”.
Recomendamos que éste documento sea leído en su totalidad antes de
que cualquier intento de operar el equipo.
¿Cintas de Necesidad, Llaves y
Accesorios?
Visita
www.amano.com
o Llamada - (800)-253-9836
Especificaciones
Requerimientos de
Alimentación:
Entrada del Reloj:
Adaptador de CA:
16.5V CA, 60Hz, 0.6A (Max.)
100V CA ± 10%, 50/60Hz
120V CA ± 10%, 60Hz
230V CA ± 10%, 50/60Hz
Pila:
12V Pila Recargable
NP1.2-12 12V 1.2Ah
Temperatura Ambiente: -10°C a 45°C (14°F a 113°F)
Humedad Ambiental: 10% a 90% (no condensado)
Dimensiones:
6 7/8” (175 mm) ancho x 8 1/4” (210 mm) alto x
6 1/4” (159 mm) profundo
Peso:
Aproximadamente 5.9 Kg (13 lbs.)
Entorno:
Sólo para uso en interiores, en lugares libres de
polvo. No se exponga a los rayos del sol
directamente.
Vista Exterior
Botón de
Impresión
Reloj
Analógico
Pantalla
de LCD
Ventana de
impresión
Cerradura
Amano TCX-22 Manual de Operación
Plato
Impresor y
Ajuste de
Margen
Página 1
Removiendo la Cubierta y el Material de Empaque
1. Gire la llave en el sentido de las
agujas del reloj para abrir la
cubierta.
2. Levante la cubierta, y jale hacia
el frente para removerla.
3. Levante el bloque impresor y
remueva el empaque.
4. Remueva el empaque entre el
Cartucho de Cinta y el Carro
Impresor.
5. Reinstale la cubierta de su
unidad.
Vista Interna
Botones de
Programación
Pantalla
de LCD
Reloj
Analógico
Botón de
Reinicio
Cartucho de Cinta
Detenedor de
Tarjeta
Compartimiento
de Pila
Página 2
Plato
Impresor
Tornillo para
Ajuste del
Detenedor de
Tarjetas
Amano TCX-22 Manual de Operación
Opciones de Alimentación
El TCX-22 puede ser alimentado por un Adaptador de Corriente Alterna
(CA) o una pila Recargable. El Selector de Alimentación en la base, le
permite activar o desactivar la pila (Activar/On Desactivar/Off). La pila le
permite mantener operando normalmente por una semana y/o 5000
impresiones en caso de falla en la alimentación CA.
Instalando la Pila de 12 Volts
1. De estar equipado con daptador de
AC, removerlo unto con la cobertura.
2. Colocar la unidad boca abajo y l
Reloj posicionado hacia arriba.
3. Remover los tornillos del soporte
izquierdo en la pila.
4. Jalar el soporte del lado izquierdo de
la pila.
5. Instalar la pila con los sujetadores
positivo y negativo afuera y hacia la
derecha.
6. Instalar el soporte izquierdo de la pila.
7. Observando la debida polaridad, conectar el cable ‘Rojo’ al lado
positivo (+)
8. Conectar el cable ‘Negro’ al lado negativo (-)
9. Poner el switch de la pila a su posición ‘Conectado’.
Nota: Recarge la pila por lo menos cada dos semanas o cada 5000
impresiones. El mínimo tiempo de carga deberá ser 12 horas y el
interruptor deberá ser apagado cuando la unidad no esté en uso.
Conectando el Adaptador de CA
1. Ajuste el Selector de Alimentación
localizado bajo la unidad a modo CA
(posición Off).
2. Verifique que el selector de voltaje se
encuentre en el rango 100-240 Voltios.
Además de que el cable y clavija sean los
apropiados para su toma de corriente CA.
3. Conecte el extremo final de su Adaptador
CA en el Adaptador de Alimentación de la
unidad y el otro extremo a la toma de
corriente de 120 o 240 Voltios asegurando
que esté a tierra.
Amano TCX-22 Manual de Operación
Página 3
Haciendo una Prueba de Impresión
1. Asegurese que esté alimentada la unidad TCX-22 (Refierase a la
Página 3).
2. Inserte un pedazo de papel o tarjeta registradora de tiempo en el
TCX-22. El reloj automáticamente imprimirá AÑO, MES, FECHA y
HORA (AM o PM).
3. Si la impresión es de su satisfacción, su TCX-22 está listo para
usarse.
4. Si desea cambiar la hora y/o estilo de impresión en su TCX-22, entre
al Modo de Programación para seleccionar entre varios estilos de
impresión. Las siguientes páginas le dan instrucciones para
programar el TCX-22 de acuerdo a sus necesidades.
Ajustando los Margenes
1. Abra la cerradura y remueva la
cubierta. Note – aconsejan
desenchufar el reloj antes de la
realización ajuste de margen.
2. Localice el Tornillo para Ajuste
del Detenedor de Tarjeta en la
parte derecha del reloj, bajo el
plato impresor.
3. Coloque un pedazo de papel o
una tarjeta registradora de
tiempo.
4. Afloje el tornillo para mover el
Detenedor de Tarjeta de
acuerdo a sus necesidades.
Apriete el tornillo si es
necesario. (Observe la figura).
EL margen de impresión
puede ser ajustado a un
máximo de 7/8” (22 mm).
Opción de Impresión Iluminada
El TCX-22 esta equipado con una característica que permite iluminar el
área de impresión. El interruptor esta localizado en la parte trasera del
panel. Cuando conecte la unidad a un adaptador de CA está
permanecerá iluminada. Cuando use la unidad con pilas, ésta se
iluminará por cerca de 20 minutos cada vez que el interruptor LED sea
presionado.
Página 4
Amano TCX-22 Manual de Operación
Panel Posterior
Guía de Modos de Programación
Abra la cerradura y remueva la cubierta. Localice los botónes
PROGRAMA, CAMBIAR y ENTER en la parte superior del reloj.
El botón PROGRAMA es utilizado para entrar y salir al Modo de
Programación. Presione el botón PROGRAMA en cualquier momento
para salir del Modo de Programación. Si algún parámetro de la
programación está siendo cambiado y se presiona este botón dicha
información no será salvada.
El botón CAMBIAR es utilizado para alterar la información en la pantalla.
Cuando usted esté revisando el menú principal de programación, utilice
el botón CAMBIAR para avanzar al próximo paso de programación. Asi
mismo cuando usted esté revisando algún paso en la programación
utilice el botón CAMBIAR para la información en blanco.
El botón ENTER es utilizado para aceptar la información mostrada en la
pantalla y salvar la misma en la memoria.
El botón REINICIAR esta localizado en el lado derecho del reloj.
Presionando éste botón borrará cualquier error o proceso que haya
congelado el funcionamiento del reloj.
Amano TCX-22 Manual de Operación
Página 5
Entrando al Modo de Programación
1. Abra y remueva la cubierta.
Códigos de
Menú
P1
Menú
Función
dA E
Ajusta la fecha del reloj
P2
P3
P4
Cloc
dLS
Prn
P5
O hr
Ajusta la hora del reloj
Activa/Desactiva el horario de verano
Ajusta el estilo de impresión usando los
Códigos Programados de Impresión
Da acceso a Otras Opciones del Menú
2. Mantenga presionado el botón PROGRAMA para
accesar al Menú Principal de Programación. El Menú
Principal de Programación consiste de lo siguiente
3. Cuando P1 dA E encienda intermitentemente en la pantalla, suelte el
botón PROGRAMA. Para avanzar a la siguiente opción, presione el
botón CAMBIAR.
Nota:
Si otro botón es presionado depués de cinco minutos, el reloj
regresará al Modo Normal y las agujas del reloj se reiniciarán.
Ajustando Año, Mes y Fecha
1. Cuando en la pantalla se encienda intermitentemente
Pl dA E, presione el botón ENTER.
2. Presione el botón CAMBIAR hasta que el año
correcto aparezca en pantalla, entonces presione el
botón ENTER.
3. Presione el botón CAMBIAR hasta que el mes
correcto aparezca en pantalla, luego presione el
botón ENTER.
4. Presione el botón CAMBIAR hasta que la fecha
correcta aparezca en pantalla, luego presione el
botón ENTER.
5. Cuando la pantalla muestre intermitentemente el año,
mes y fecha correctos, presione el botón ENTER.
6. Cuando la pantalla muestre intermitentement Pl dA E,
presione el botón CAMBIAR para cambiar a Ajuste de
Horario.
Página 6
Amano TCX-22 Manual de Operación
Ajustando el Horario
Nota: Utilice el formato de 24 horas y 60 minutos cuando ajuste la hora.
Por ejemplo, 2:00 PM = 14:00.
1. Cuando la pantalla muestre intermitentemente P2
CLoc, presione el botón ENTER.
2. Presione el botón CAMBIAR hasta que la hora
correcta aparezca en pantalla, luego presione el
botón ENTER.
3. Presione el botón CAMBIAR hasta que los minutos
correctos aparezcan en pantalla, luego presione el
botón ENTER.
4. Cuando la pantalla muestra intermitentemente la
hora correcta, presione el botón ENTER.
5. Cuando la pantalla muestre intermitentemente P2
CLoc, presione el botón CAMBIAR para activar o
desactivar el uso del Horario de Verano.
Activando/Desactivando el Horario de Verano (DST)
Nota: Cuando éste parámetro esté activado, el horario en el reloj
automáticamente se ajustará en la fecha correspondiente del
cambio de horario de verano DST. Cuando éste parámetro esté
desactivado, el reloj no ejecutará el cambio. El ajuste del inicio y
finalización de la fecha del horario de verano se encuentran en
Otras Opciones del Menú (Vea la Página 8).
1. Cuando la pantalla muestre intermitentemente P3
dLS , presione el botón ENTER.
2. Presione el botón CAMBIAR para alternar entre
Activado/Desactivado.
3. Cuando la pantalla muestre intermitentemente los
parámetros elegidos, presione el botón ENTER.
4. Cuando la pantalla muestre intermitentemente P3
dLS , presione el botón CAMBIAR para moverse a
la sección Ajuste de Códigos Programados de
Impresión.
Amano TCX-22 Manual de Operación
Página 7
Códigos Programados de Impresión
Nota: Si no desea usar uno de los Códigos Programados de Impresión,
puede utilizar una manera alterna en la siguiente página.
1. Cuando la pantalla muestre intermitentemente P4 Prn ,
presione el botón ENTER.
2. La pantalla mostrará intermitentemente los actuales
parámetros. Presione el botón CAMBIAR para
desplazarse a través de cada Código Programado de
Impresión.
Código Estilo de Impresión
Dirección de Impresión
Pr-1
Pr-2
Pr-3
Pr-4
Pr-5
Pr-6
Pr-7
Impresión Derecha
Impresión Derecha
Impresión Derecha
Impresión Derecha
Impresión Derecha
Impresión Derecha
Impresión Derecha
Dia, 24Hr., 100th/Hr
Dia, 12Hr., 60th/Hr.
Mes, Fecha, 24Hr., 100th/Hr.
Mes, Fecha, 12Hr., 60th/Hr.
th
2 Digitos Año, Mes, Fecha, 12Hr., 60 /Hr.
th
4 Digitos Año, Mes, Fecha, 12Hr., 60 /Hr.
th
4 Digitos Año, Mes, Fecha, 24Hr., 60 /Hr.
3. Cuando la pantalla muestre intermitentemente los
parámetros correctos, entonces presione el botón
ENTER.
4. Cuando la pantalla muestre intermitentemente P4 Prn ,
presione el botón CAMBIAR para cambiarse a Otras
Opciones del menú.
Accesando a Otras Opciones del Menú
1. Cuando muestre intermitentemente P5 Oh r, presione el
botón ENTER.
2. La pantalla mostrará intermitentemente el primer paso
de la programación en el sub-menú Otras Opciones.
Presione el botón CAMBIAR para avanzar a través de
las opciones del menú.
Código Menú Función
de Menú
I1
Prn
I2
I3
I4
I5
I6
I7
I8
LAn9
Prdr
APr
2Er0
bdL
EdL
dIA9
Página 8
Ajuste de Estilo de Impresión usando Símbolos o Códigos de
Estilos de Impresión
Ajusta el Idioma de impresión
Ajusta la Dirección de Impresión (Mano izquierda o derecha)
Activa/desactiva, o configura la opción de Auto impresión.
Activa/desactiva la impresión del Cero a la Izquierda.
Ajusta el inicio de la fecha de cambio de Horaio de Verano.
Ajusta la finalización de la fecha de cambio de Horario de Verano.
Accesa a la Rutina de Diagnóstico.
Amano TCX-22 Manual de Operación
Ajustando Estilos de Impresión Alternos
Nota: Si no desea usar uno de los Códigos Programados de Impresión,
usted puede selecionar del sub-menú Estilos Alternos de
Impresión.
1. Cuando la pantalla muestre intermitentemente 11 Prn ,
presione el botón ENTER.
2. Presione el botón CAMBIAR para moverse del Ajuste
de Códigos a Ajuste de Símbolos. Si usted selecciona
el Código, usted debe elegir un Estilo de Código de
Impresión de la Tabla 1 en la siguiente página. Si
usted selecciona Symbol, usted podrá “construir” un
Estilo de Impresión de acuerdo a sus necesidades
usando las Tablas 2 y 3 en las páginas 11 y 12.
3. Cuando la pantalla muestre intermitentemente los parámetros
correctos, entonces presione el botón ENTER.
Seleccionando el Código de Impresión
Nota: Refierase a la Tabla 1 en la siguiente página para los Códigos de
los Estilos de Impresión.
1. Cuando la pantalla muestre intermitentemente Pr COdE,
presione el botón ENTER.
2. Presione el botón CAMBIAR hasta que el número
deseado aparezca en la primera posición. Presione el
botón ENTER.
3. Presion el botón CAMBIAR hasta que el número
deseado aparezca en la segunda posición. Presione el
botón ENTER.
4. Presione el botón CAMBIAR hasta que el número
deseado aparezca en la tercera posición. Presione el
botón ENTER.
5. Presione el botón CAMBIAR hasta que el número
deseado aparezca en la cuarta posición. Presione el
botón ENTER.
6. Cuando la pantalla muestre intermitentemente los
cuatro números correctos, presione el botón ENTER.
7. Cuando la pantalla muestre intermitentemente 11 Prn ,
presione el botón CAMBIAR para cambiarse al Ajuste
de Idioma.
Amano TCX-22 Manual de Operación
Página 9
Tabla 1: Códigos de Estilos de Impresión
Código
Estilos de Impresión
6510 DIA, 12H, 60th
6210 DIA, 24H, 10th
6810 DíA, 24H, 100th
6520 FECHA, 12H, 60th
6620 FECHA, 24H, 60th
6820 FECHA, 24H, 100th
6540 FECHA, MES, 12H, 60th
6640 FECHA, MES, 24H, 60th
6840 FECHA, MES 24H, 100th
6680 FECHA, MES, AÑO, 24H, 60th
6910 AÑO,MES, FECHA, 12hs, 60th
6920 AÑO, MES, FECHA, 24hs, 60th
6071 AÑO, MES, FECHA, RECIBIDO
6072 AÑO, MES, FECHA, ENVIADO
6073 AÑO, MES, FECHA, FAX
6074 AÑO, MES, FECHA, SIN VALOR
6075 AÑO, MES, FECHA, PAGADO
6076 AÑO, MES, FECHA, CONFIRMADO
6077 AÑO, MES, FECHA, APROBADO
6078 AÑO, MES, FECHA, COMPLETADO
6079 AÑO, MES, FECHA, ORIGINAL
6070 AÑO, MES, FECHA, ARCHIVO
5510 DIA, 12H, 60th
5210 DIA, 24H, 10th
5810 DIA, 24H, 100th
5520 FECHA, 12H, 60th
5620 FECHA, 24H, 60th
5820 FECHA, 24H, 100th
5540 FECHA, MES, 12H, 60th
5640 FECHA, MES, 24H, 60th
5840 FECHA, MES, 24H, 100th
5680 FECHA, MES, AÑO, 24H, 60th
5910 AÑO, MES, FECHA, 12hs, 60th
5920 AÑO, MES, FECHA, 24hs, 60th
5071 AÑO, MES, FECHA, RECIBIDO
5072 AÑO, MES, FECHA, ENVIADO
5073 AÑO, MES, FECHA, FAX
5074 AÑO, MES, FECHA, SIN VALOR
5075 AÑO, MES, FECHA, PAGADO
5076 AÑO, MES, FECHA, CONFIRMADO
5077 AÑO, MES, FECHA, APROBADO
5078 AÑO, MES, FECHA, COMPLETADO
5079 AÑO, MES, FECHA, ORIGINAL
5070 AÑO, MES, FECHA, ARCHIVO
Dirección de Impresión
Lado Derecho
Lado Derecho
Lado Derecho
Lado Derecho
Lado Derecho
Lado Derecho
Lado Derecho
Lado Derecho
Lado Derecho
Lado Derecho
Lado Derecho
Lado Derecho
Lado Derecho
Lado Derecho
Lado Derecho
Lado Derecho
Lado Derecho
Lado Derecho
Lado Derecho
Lado Derecho
Lado Derecho
Lado Derecho
Lado Izquierdo
Lado Izquierdo
Lado Izquierdo
Lado Izquierdo
Lado Izquierdo
Lado Izquierdo
Lado Izquierdo
Lado Izquierdo
Lado Izquierdo
Lado Izquierdo
Lado Izquierdo
Lado Izquierdo
Lado Izquierdo
Lado Izquierdo
Lado Izquierdo
Lado Izquierdo
Lado Izquierdo
Lado Izquierdo
Lado Izquierdo
Lado Izquierdo
Lado Izquierdo
Lado Izquierdo
Si no encuentra en esta lista el estilo de impresión deseado, utilice el modo de
programación normal explicado en páginas siguientes.
Página 10
Amano TCX-22 Manual de Operación
Personalizando un Estilo de Impresión Utilizando
Símbolos de Caracteres
Nota: El máximo desplazamiento (longitud de impresión) de la cabeza
impresora es 152 puntos o 35 mm (1.4”). Cuando revise en la pantalla de
LCD, este valor aparecera como un porcentaje donde el máximo valor
permitido es 99%. Consultar la Tabla 2 y 3 que muestran los estilos de
impresión, números de puntos y longitudes de línea.
1. Cuando la pantalla muestre intermitentemente Pr SYbL,
presione el botón ENTER.
2. Presione el botón CAMBIAR hasta que el símbolo del
caracter que usted desee imprimir aparezca, luego
presione el botón ENTER.
3. Un n simbolo aparecera en la pantalla para designar el
primer Símbolo el primer Código de Símbolo que ha sido
asignado.
4. Continue asignando códigos hasta que haya finalizado.
5.
6.
Presione el botón CAMBIAR hasta que el código encienda
intermitentemente, entonces presione el botón ENTER.
Cuando la pantalla muestra intermitentemente II Prn , presione
el botón CAMBIAR para moverse a la sección de Ajuste de
Idioma.
Tabla 2: Ejemplos de Estilos de Impresión Comunes
Estilo de Impresión
DIA,12Hr,60th/Hr
DIA,24Hr,60th/Hr
DIA,24Hr,10th/Hr
DIA,24Hr,100th/Hr
FECHA,12Hr,60th/Hr
FECHA,24Hr,60th/Hr
FECHA,24Hr,10th/Hr
FECHA,24Hr,100th/Hr
MES, FECHA,12Hr,60th/Hr
MES, FECHA,24Hr,60th/Hr
MES, FECHA,24Hr,10th/Hr
MES, FECHA,24Hr,100th/Hr
AÑO, MES, FECHA,12Hr,60th/Hr
Ejemplo
FRI PM 1:45
FRI 13:45
FRI 13.7
FRI 13.75
13 PM 1:45
13 13:45
13 13.7
13 13.75
APR13 PM 1:45
APR13 13:45
APR13 13.7
APR13 13.75
95 APR13 PM 1:45
AÑO, MES, FECHA,24Hr,60th/Hr
95 APR13 13:45
AÑO, MES, FECHA,24Hr,10th/Hr
95 APR13 13.7
AÑO, MES, FECHA,24Hr,100th/Hr
95 APR13 13.75
AÑO, MES, FECHA, SIMBOLO 1
95 APR13 RCV’D
AÑO, MES, FECHA, SIMBOLO 2
95 APR13 SENT
AÑO, MES, FECHA,SIMBOLO3
95 APR13 FAX’D
AÑO, MES, FECHA, SIMBOLO 4
95 APR13 PAID
Amano TCX-22 Manual de Operación
Código de Entrada
DAY SPCE 1260 h
DAY SPCE 2460 h
dAY SPCE 2410 h
dAY SPCE 24100 h
dA E SPCE 1260 h
dA E SPCE 2460 h
dA E SPCE 2410 h
dA E SPCE 24100 h
mon h SPCE dA E SPCE 1260 h
mon h SPCE dA E SPCE 2460 h
mon h SPCE dA E SPCE 2410 h
mon h SPCE dA E SPCE 24100 h
YEAr SPCE mon h SPCE dA E
SPCE 1260 h
YEAr SPCE mon h SPCE dA E
SPCE 2460 h
YEAr SPCE mon h SPCE dA E
SPCE 2410 h
YEAr SPCE mon h SPCE dA E
SPCE 24100 h
YEAr SPCE mon h SPCE dA E
SPCE SY-1
YEAr SPCE mon h SPCE dA E
SPCE SY-2
YEAr SPCE mon h SPCE dA E
SPCE SY-3
YEAr SPCE mon h SPCE dA E
SPCE SY-4
Longitud
82
68
58
68
82
68
58
68
115
101
91
101
143
129
119
129
127
124
127
124
Página 11
Tabla 3: Códigos de Símbolos y Longitudes
Código
2DyeAr
Nnonh
DA E
dAY
JLAN
12 10 h
12 20 h
12 60 h
12 100 h
24 10 h
24 20 h
24 60 h
24 100 h
SLSh
dASh
SPCE
4dYEAr
SY-1
SY-2
SY-3
SY-4
SY-5
SY-6C
SY-7
SY-8
SY-9
SY-10
En
Ad
dL
Caracter
Año en 2 Dígitos
Mes
Fecha
Día
Fecha Juliana
th
12 Hr & 10 /Hr
th
12 Hr & 20 /Hr
th
12 Hr & 60 /Hr
th
12 Hr & 100 /Hr
th
24 Hr & 10 /Hr
th
24 Hr & 20 /Hr
th
24 Hr & 60 /Hr
th
24 Hr & 100 /Hr
Diagonal ( / )
Guión ( - )
Espacio ( )
Año en 4 Dígitos
RCV’D
SENT
FAX’D
VOID
PAID
FM’D
APR’D
CMPL’D
ORIGN
FILE
Fin de Archivo
Agregar Caracter
Eliminar Caracter
Longitud
25=16.45%
30=19.74%
20=13.16%
20=13.16%
30=19.74%
49=32.24%
59=38.82%
59=38.82%
59=38.82%
35=23.03%
45=29.61%
45=29.61%
5=29.61%
10=6.58%
07=4.61%
03=1.97%
28=14.00%
43=28.29%
40=26.32%
43=28.29%
40=26.32%
40=26.32%
43=28.29%
43=28.29%
53=34.87%
50=32.89%
40=26.32%
-
Ajustando el Idioma
1. Cuando la pantalla muestre intermitentemente I2 LAn9,
presione el botón ENTER.
2. Presione el botón CAMBIAR hasta que el idioma
elegido aparezca, luego presione el botón ENTER.
3. Cuando la pantalla muestre intermitentemente I2
LAn9, presione el botón CAMBIAR para mover la
Dirección de Impresión.
Inglés
LI En9
Página 12
Español
L2 SPn
Francés
L3 Frn
Portugues
L4 P 9
Amano TCX-22 Manual de Operación
Ajustando la Dirección de Impresión
1. Cuando la pantalla muestre intermitentemente I3 Prndr,
presione el botón ENTER.
2. Presione el botón ENTER hasta que la dirección
correcta aparezca, r 9ht para Impresión de Lado
Derecho, o LEF para Impresión de lado Izquierdo,
luego presione el botón ENTER.
3. Cuando la pantalla muestre intermitentemente I3 Prndr,
presione el botón CAMBIAR para moverse a la sección
Ajuste de Impresión Automatica.
Ajustando la Impresión Automática
1. Cuando la pantalla muestre intermitentemente I4 APr ,
presione el botón ENTER.
2. Presione el botón CAMBIAR hasta que el modo de
impresión elegido aparezca, luego presione el botón
ENTER.
Auto Print (on P: ): Automáticamente imprimirá una
sola vez cuando la tarjeta sea insertada.
Manual Print (OFF): Requiere utilizar el botón PRINT cuando se
desee imprimir.
Precision Print (on P:5 ): Permite la impresión multiple o
secuencias consecutivas de impresiónes manteniendo presionado el
botón PRINT.
3. Cuando la pantalla muestre intermitentemente I4
APr , presione el botón CAMBIAR para moverse a la
sección Ajustando el Cero a la Izquierda.
Ajustando el Cero a la Izquierda (On/Off)
Nota: El Cero a la Izquierda aparece en la impresión de salida antes del
dígito de la hora y fecha (Por ejemplo DEC. 06, 08:00)
1. Cuando la pantalla muestre de manera intermitente
I5 2ErO, presione el botón ENTER.
2. Cuando la pantalla muestre de manera intermitente
OFF o ON, presione el botón CAMBIAR para
intercambiar entre off y on. Presione el botón ENTER
para seleccionar.
3. Cuando la pantalla muestre de manera intermitente
I5 2ErO, presione el botón CAMBIAR para moverse
a la sección de Ajuste de Inicio de Horario de Verano.
Amano TCX-22 Manual de Operación
Página 13
Inicio de Horario de Verano
Nota: El estándar del gobierno para DST es sujeto de cambiarse. Su reloj es el
juego de fábrica para correcto DST basado sobre cuando fue fabricado,
pero cualquier revisión a DST comienzan o las fechas de final pueden
requerir la actualización del juego de sistema calendario de DST.
Los pasos debajo de cambio la fecha comenzaré para DST. El DST es
permitido y minusválido Menú que Programa por lo general. La
actualización la fecha comenzaré para DST tiene que ser hecha sólo un
tiempo *, desde la función de calendario de balanceo del reloj
autocalculará la fecha comenzaré para cada año a partir de entonces.
Para cambiar la fecha de final para DST, refiérase a la sección siguiente.
1. Cuando la pantalla muestre intermitentemente I6 bdL,
presione el botón ENTER.
2. Presione el botón CAMBIAR hasta que aparezca el
año correcto, luego presione el botón ENTER.
3. Presione el botón CAMBIAR hasta que aparezca el
mes correcto, luego presione el botón ENTER.
4. Presione el botón CAMBIAR hasta que aparezca la
fecha correcta, luego presione el botón ENTER.
5. Cuando la pantalla muestre intermitentemente el año,
mes y fecha correctos, presione el botón ENTER.
6. Cuando la pantalla muestre de manera intermitente
I6 bdL, presione el botón CAMBIAR para moverse a
la sección de Ajuste de Fin de Horario de Verano.
Fin del Horario de Verano
Nota: DST es activado y desactivado en el Menú Principal de
Programación. Esta funcion define la fecha de finalizacion del
DST. Solo requiere programar éste una sola vez, una vez
efectuado, éste se ajustará automáticamente después de un año.
Los pasos debajo de cambio la fecha de final para DST. El DST es
permitido y minusválido Menú que Programa por lo general. La
actualización de la fecha de final para DST tiene que ser hecha sólo un
tiempo *, ya que la función de calendario de balanceo del reloj
autocalculará la fecha de final para cada año a partir de entonces.
1. Cuando la pantalla muestre intermitentemente 17 EdL ,
presione el botón ENTER.
2. Presione el botón CAMBIAR hasta que el año correcto
aparezca en pantalla, luego presione ENTER.
3. Presione el botón CAMBIAR hasta que el mes correcto
aparezca en pantalla, luego presione el botón ENTER.
Página 14
Amano TCX-22 Manual de Operación
4. Presione el botón CAMBIAR hasta que la fecha
correcta aparezca en pantalla, luego presione el botón
ENTER.
5. Cuando la pantalla muestre intermitentemente el año,
mes y fecha correctos, presione el botón ENTER.
6. Cuando la pantalla muestre intermitentemente 17 EdL ,
presione el botón CAMBIAR para moverse a la Rutina de
Diagnóstico.
Rutina de Diagnóstico
La Rutina de Diagnóstico verifica los segmentos de la pantalla de LCD,
los números de impresión y el limpiado de memoria (Estilo de Impresión,
Idioma, Cero a la Izquierda, Reloj y Calendario, Impresión
Derecha/Izquierda y Características del Horario de Verano).
1.
2.
3.
4.
5.
6.
7.
8.
Cuando la pantalla muestre intermitentemente I8 dlA9,
presione el botón ENTER. La Rutina de Diagnóstico
consiste de lo siguiente:
Código de Menú
Menú
d1
d2
d3
LCd
NPr
Clr
Fución
Prueba los segmentos de la pantalla de LCD
Muestra el número total de impresiones
Limpia memoria y restablece valores por defecto
Cuando la pantalla muestre intermitentemente dl LCd
(verifique los segmentos de LCD), presione el botón
ENTER.
Cuando todos los segmentos de la pantalla de LCD esten
encendidos, presione el botón ENTER para avanzar al
siguiente paso.
Cuando la pantalla muestre intermitentemente d2 nPr
(número total de impresiones), presione el botón ENTER.
El número total de impresiones contabilizado será
mostrado. Presione ENTER y luego el botón CAMBIAR para
avanzar al siguiente paso.
Cuando la pantalla muestre intermitentemente d3 CLr
(limpiado de memoria), presione el botón ENTER.
Para limpiar la memoria y reiniciar los valores por defecto,
presione el botón CAMBIAR hasta aparecer 3, luego
presione el botón ENTER. Presione nuevamente CAMBIAR
hasta que aparezca 2, y vuelva a presionar el botón
ENTER.
Cuando la pantalla muestre intermitentemente 32, presione
el botón ENTER.
Modo de Programación de Salida
Mantenga presionado el botón PROGRAMA hasta que la pantalla
muestre la fecha actual. Las agujas del reloj reinicializarán al horario
actual.
Amano TCX-22 Manual de Operación
Página 15
Replazando el Cartucho de Cinta
Para cambiarlo:
1. Remueva la cubierta.
2. Presione y jale las dos pestañas de la
parte superior removiendo el cartucho
de cinta.
Para Insertar:
1. Si el mecanismo de impresión está
abajo y no puede ser insertado un
pedazo de papel o tarjeta registradora
de tiempo, presione el botón.
REINICIAR para mover el mecanismo
hacia arriba. Esto hará la instalación
del cartucho de cinta más fácil.
2. Inserte el cartucho de cinta. Asegurese de montar la cinta entre la
cabeza impresora y la guía como lo muestran las flechas en la
figura.
3. Gire el pequeño botón del cartucho de cinta en el sentido de las
agujas del reloj, con un ligero giro ajustará la cinta floja en el
cartucho.
4. Ponga en su sitio la cubierta nuevamente y verifique la calidad de la
impresión para confirmar que su instalación ha sido correcta.
Mensajes de Error
Códigos de Error
E1 Pr
E2 Pr
E3 Pr
E4 Pr
Er Pr
dL
Causa
Sensor local, motor de carro atorado
Error en sensor, carro atorado
Sensor local
Carro atorado
Error general de impresión
Programación de horario de verano
Para mensajes de error de E1 a E4, desconecte el cable de la
alimentación antes de verificar la unidad. También, verifique que el
cartucho de cinta esté en buenas condiciones. Después de reiniciar,
para evitar cualquier problema de bloqueo o congelamiento, restablezca
la alimentación y presionar el botón REINICIAR. Contacte a su
representante de Amano Cincinnati para asistencia técnica.
El mensaje de error dL significa que fue hecho un intento por entrar al
Modo de Programación en una hora no válida durante el cambio de
horario de verano. Espere una hora y el reloj podrá ser programado sin
problemas.
Página 16
Amano TCX-22 Manual de Operación
AJR-307403 z Derechos Reservados ©2007 Amano Cincinnati, Inc. z 1/07/0