Transcript
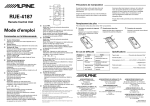
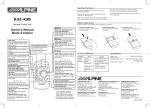
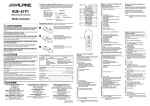
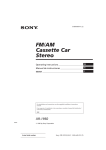
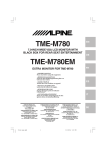
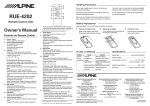
Handling Precautions
R
Do not drop or apply shock to the unit. It may be get
permanently damaged.
Clean with a soft, lint-free cloth or cotton swab slightly
dampened with a mild solution of detergent and water.
Keep the unit away from water and moisture, direct sun
and heat, and excessive dust.
Do not operate this unit in a manner that could distract
you from driving safety.
1
2
RUE-4187
Remote Control Unit
3
4
5
6
7
8
9
!
"
#
8
Controls on Remote Control
2
3
4
5
6
7
Power Button
Press the button to turn the power on/off.
Source Button
Press to select the audio source.
-/J /Enter Button
Press the button to switch between the Play and Pause
modes for CD or MD and Tape.
Audio Processor Mode: Enter button
Press this button to adjust the MODE that is called by
pressing the A.PROC button.
ANGLE 89 Buttons
Press the button to adjust the angle of the movable
display.
Band/Program Button
Radio mode: BAND Button
Changer mode: BAND Button
Switches changers (when a Multi-Changer Switching
device is connected).
TAPE mode: PROG Button
Press the button to change between the A and B side
of the tape.
Volume Adjustment Buttons
To increase the volume level:
Press the L button
To decrease the volume level:
Press the K button
8 Button
Radio mode: Pressing the button will select,
in ascending order, stations programed into the radio's
presets as shown below.
→ 1 → 2 ... 6
CD Changer mode: DISC Select (UP) Button
Press the button to select a disc in ascending order.
Tape mode: Pressing this button enters the Program
Sensor Up mode.This allows for music selection
towards the end of the tape.
Audio Processor Mode: Press this button to adjust the
MODE that is called by pressing the A.PROC button.
Battery Replacement
Applicable battery: Use two “AAA” sized dry batteries or equivalent.
1
Owner’s Manual
1
Never use scouring pads, steel wool, abrasive powders or
harsh chemical agents, such as lye solution, for cleaning.
9
!
"
#
g Button
Radio mode: SEEK (DN) Button
CD/CD changer mode: Press the button to go back to
the beginning of the current track.
Tape mode: REW Button
Audio Processor Mode: Press this button to adjust the
MODE that is called by pressing the A.PROC button.
f Button
Radio mode: SEEK (UP) Button
CD/CD changer mode: Press the button to advance to
the beginning of the next track.
Tape mode: FF Button
Audio Processor Mode: Press this button to adjust the
MODE that is called by pressing the A.PROC button.
9 Button
Radio mode: Pressing the button will select, in
descending order, stations programed into the radio's
presets as shown below.
→ 6 → 5 ... 1
CD Changer mode: DISC Select (DN) Button
Press the button to select a disc in descending order.
Tape mode: Pressing this button enters the Program
Sensor Down mode.This allows for music selection
towards the beginning of the tape.
Audio Processor Mode: Press this button to adjust the
MODE that is called by pressing the A.PROC button.
Mute Button
• Press the button to lower the volume by 20 dB
instantly. Press the button again to cancel.
• Press the button for at least 2 seconds to raise the
monitor. Press the button again to lower the monitor.
(Head unit with Monitor Display, etc.)
Audio Processor Button∗∗
Press the button to call the external audio processor
mode.∗
∗
For the operation of external audio processor, refer to the Owner's
Manual of the external audio processor you purchased.
∗∗ This button is used in conjunction with an optional Ai-NET processor.
NOTE
Depending on the device you are using, you cannot operate or may need
to operate differently some devices on the remote control.
For details, refer to the Owner’s Manual of the device you purchased.
2
Opening the battery cover.
Slide out the battery cover while
firmly pressing the direction of arrow.
Put the batteries in the case observing
the polarities as illustrated.
In Case of Difficulty
Problem
Remove
Control
Inoperative.
3
Replacing the battery.
Closing the cover.
Push the cover as illustrated
until a click is heard.
Specifications
Solution
Place the battery
correctry into its cradle
in the compartment.
Replace the battery with
a new one.
Remote Control not Point the remote control
pointed toward the directly toward your
head unit.
head unit.
Cause
Reverse
placement of
battery.
Dead battery.
Battery Type ................................. AAA sized dry batteries
Battery Quantity ................................................................ 2
Dimensions(W x H x D) ........................... 42 x 121 x 23mm
(1-21/32” x 4-25/32” x 29/32”)
Weight (without battery) .................................. 50g (1.8 oz)
Accessory ............................... Remote Control Unit Holder
R
ALPINE ELECTRONICS, INC.
Tokyo office: 1-1-8 Nishi Gotanda,
Shinagawa-ku,
Tokyo 141-8501, Japan
Tel.: (03) 3494-1101
ALPINE ELECTRONICS OF AMERICA, INC.
19145 Gramercy Place, Torrance,
California 90501, U.S.A.
Tel.: 1-800-ALPINE-1 (1-800-257-4631)
ALPINE ELECTRONICS OF CANADA, INC.
Suite 203, 7300 Warden Ave. Markham,
Ontario L3R 9Z6, Canada
Tel.: 1-800-ALPINE-1 (1-800-257-4631)
ALPINE ELECTRONICS OF AUSTRALIA PTY. LTD.
6-8 Fiveways Boulevarde Keysborough,
Victoria 3173, Australia
Tel.: (03) 9769-0000
ALPINE ELECTRONICS GmbH
Kreuzerkamp 7-11 40878 Ratingen, Germany
Tel.: 02102-45 50
ALPINE ITALIA S.p.A.
Via C. Colombo 8, 20090 Trezzano Sul Naviglio
MI, Italy
Tel.: 02-48 47 81
ALPINE ELECTRONICS FRANCE S.A.R.L.
(RCS PONTOISE B 338 101 280)
98, Rue De La Belle Etoile, Z.I. Paris Nord Il
B.P. 50016 F-95945, Roissy, Charles De Gaulle
Cedex, France
Tel.: 01-48 63 89 89
ALPINE ELECTRONICS OF U.K., LTD.
13 Tanners Drive, Blakelands, Milton Keynes
MK14 5BU, U.K.
Tel.: 01908-61 15 56
ALPINE ELECTRONICS DE ESPAÑA, S.A.
Portal De Gamarra 36, Pabellón 32
01013 Vitoria (Alava)-Apdo. 133, Spain
Tel.: 34-45-283588
68P01434K62-O
Printed in China(Y)