1
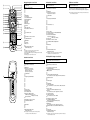
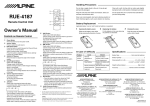
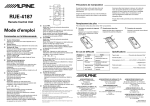
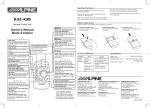
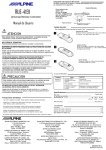
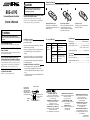
Battery Replacement
R
RUE-4190
Universal Remote Controller
Owner's Manual
CAUTION
Applicable battery: Use two "AAA" sized dry batteries or equivalent.
This symbol means important instructions.
Failure to heed them can result in injury or
material property damage.
DO NOT MIX NEW BATTERIES WITH OLD BATTERIES. INSERT
WITH THE CORRECT BATTERY POLARITY.
When inserting the batteries, be sure to observe proper
polarity (+ and –) as instructed. Rupture or chemical leakage
from the battery may cause fire or personal injury.
1
2
3
−
+
+
−
Opening the battery cover.
Push on the cover and slide it as
indicated by the arrows then the cover
will be removed.
Replacing the batteries.
Remove the old batteries. Insert new
ones matching the (+) and (–)
polarities as shown in the diagram
inside the remote control.
Closing the cover.
Push the cover in the arrow direction
until a click is heard.
WARNING
This symbol means important instructions.
Failure to heed them can result in serious injury
or death.
DO NOT DISASSEMBLE OR ALTER.
Doing so may result in an accident, fire or electric shock.
KEEP SMALL OBJECTS SUCH AS BATTERIES OUT OF THE
REACH OF CHILDREN.
Swallowing them may result in serious injury. If swallowed,
consult a physician immediately.
DO NOT OPERATE ANY FUNCTION THAT TAKES YOUR
ATTENTION AWAY FROM SAFELY DRIVING YOUR VEHICLE.
Any function that requires your prolonged attention should
only be performed after coming to a complete stop. Always
stop the vehicle in a safe location before performing these
functions. Failure to do so may result in an accident.
KEEP THE VOLUME AT A LEVEL WHERE YOU CAN STILL HEAR
OUTSIDE NOISE WHILE DRIVING.
Failure to do so may result in an accident.
Handling Precautions
Specifications
In Case of Difficulty
Do not drop or apply shock to the unit. It may get
permanently damaged.
Keep the unit away from water and moisture, direct sun
and heat, and excessive dust.
Never use scouring pads, steel wool, abrasive powders
or harsh chemical agents, such as lye solution, for
cleaning.
Clean with a soft, lint-free cloth or cotton swab slightly
dampened with a mild solution of detergent and water.
Do not operate this unit in a manner that could distract
you from driving safely.
Battery Type ....................................... AAA size batteries
Problem
Cause
Solution
Reverse
Remote
placement of
Control
Inoperative. battery.
Place the battery correctly
into its cradle in the
compartment.
Dead battery.
Replace the battery with a
new one.
Remote Control
not pointed
toward the head
unit or monitor.
Point the remote control
directly toward your head
unit or monitor.
Battery Quantity ............................................................. 2
Dimensions (W × H × D) .................. 56 × 142.5 × 37 mm
(2-1/4" × 5-5/8" × 1-7/16")
Weight (without battery) ............................. 72 gr (2.6 oz)
Accessories
Battery (AAA) ................................................................. 2
Remote Control Holder ............................................ 1 set
Double-Sided Adhesive Tape .................................. 1 set
Screw ............................................................................. 2
Installation of Remote Control Holder
• Do not leave the remote control mounted on the
holder, if it is direct sunlight. Remove the remote
control from the holder and put it in the glove compartment.
• If double-sided adhesive tape cannot install the holder
securely, use screws.
Double-Sided
Adhesive Tape
(Before attaching the
tape, make sure the
mounting locations are
free from dust or dirt)
Remote Control
R
Reinforcing Screws
Remote Control
Holder
Protective
Paper
Console Box etc.
ALPINE ELECTRONICS, INC.
Tokyo office: 1-1-8 Nishi Gotanda,
Shinagawa-ku, Tokyo 141-8501, Japan
Tel.: (03) 3494-1101
ALPINE ELECTRONICS OF AUSTRALIA PTY. LTD.
6-8 Fiveways Boulevarde Keysborough,
Victoria 3173, Australia
Tel.: (03) 9769-0000
ALPINE ELECTRONICS OF AMERICA, INC.
19145 Gramercy Place, Torrance,
California 90501, U.S.A.
Tel.: 1-800-ALPINE-1 (1-800-257-4631)
ALPINE ELECTRONICS GmbH
Kreuzerkamp 7, 40878 Ratingen, Germany
Tel.: 02102-45 50
ALPINE ELECTRONICS OF CANADA, INC.
7300 Warden Ave., Suite 203, Markham,
Ontario L3R 9Z6, Canada
Tel.: 1-800-ALPINE-1 (1-800-257-4631)
ALPINE ITALIA S.p.A.
Viale C. Colombo 8, 20090 Trezzano Sul
Naviglio (MI), Italy
Tel.: 02-48 47 81
ALPINE ELECTRONICS FRANCE S.A.R.L.
98, Rue de la Belle Etoile, Z.I. Paris Nord Il,
B.P. 50016 95945 Roissy
Charles de Gaulle Cedex, France
Tel.: 01-48 63 89 89
ALPINE ELECTRONICS OF U.K., LTD.
13 Tanners Drive, Blakelands,
Milton Keynes MK14 5BU, U.K.
Tel.: 01908-61 15 56
ALPINE ELECTRONICS DE ESPAÑA, S.A.
Portal de Gamarra 36, Pabellón 32
01013 Vitoria (Alava)-APDO 133, Spain
Tel.: 945-283588
68P20877Y88-O
Printed in China (Y)
Map type Navigation Control Mode
~
+
1
2
3
4
,
.
/
:
;
5
<
=
>
9
!
"
#
$
?
6
7
8
%
@
&
[
(
)
When operating the navigation, set the EXT DVD/AUDIO/NAV. Switch
to the “NAV.” side.
1
2
3
4
5
6
7
8
9
!
"
#
$
%
&
(
)
~
+
,
.
/
:
;
<
=
>
?
@
[
\
Remote Control Transmitter
—
—
—
—
—
MODE button
VOICE button
Zoom (Wide/Detail) button
DISP (MP/RG) button
CANC. button
DTR button
N/H button
Numeric Keypad
OK button
—
DEL. DEST. button
Status indicator for NAV. mode
—
—
Power ON/OFF button
—
—
LIGHT button for Remote Controller
—
Joystick/ENTER button
MENU button
—
LIST button
DEL. button
—
EXT DVD/AUDIO/NAV. Switch
TV/MONI. button (Push)
Notes:
• Depending on the unit, some operations cannot be performed.
For details, see the Owner’s Manual for the unit.
• After pressing the MODE button, press the following buttons while the status
indicator is blinking:
Numeric Keypad (0 to 9), DEL. button, OK button
Head Unit Control Mode
When operating the Head Unit, set the EXT DVD/AUDIO/NAV. Switch
to the “AUDIO” side.
1
2
3
4
5
\
6
7
8
9
!
"
#
$
%
&
(
)
~
+
,
.
/
:
;
<
=
>
?
@
[
\
Remote Control Transmitter
Status indicator for AUDIO mode
—
BAND button
Radio mode: Preset Selection
Changer mode: Disc Selection
MP3 mode: Folder Select
Tape mode: Program Sensor
SOURCE button
—
—
Display Angle UP/DOWN button
—
—
—
—
—
—
—
—
—
A.PROC. button
PLAY/PAUSE button
Power ON/OFF button
Radio mode: SEEK UP/DOWN
CD/MD/Changer mode: Music Sensor
BW/FF (press and hold)
Tape mode: REW/FF
—
LIGHT button for Remote Controller
VOLUME UP/DOWN button
—
—
MUTE button
—
—
—
EXT DVD/AUDIO/NAV. Switch
TV/MONI. button (Push)
Note: Depending on the unit, some operations cannot be performed.
For details, see the Owner’s Manual for the unit.
AV Head Unit Control Mode
When operating the AV Head Unit, set the EXT DVD/AUDIO/NAV.
Switch to the “AUDIO” side.
1
2
3
4
5
6
7
8
9
!
"
#
$
%
&
(
)
~
+
,
.
/
:
;
<
=
>
?
@
[
\
Remote Control Transmitter
Status indicator for AUDIO mode
—
BAND button
Radio mode: Preset Selection
Changer mode: Disc Selection
SOURCE button
—
—
Display Angle UP/DOWN button
—
—
—
—
Function button (1 to 7)
—
—
—
—
A.PROC. button
Audio mode Selection (VOL./BASS/TRE/BAL/FAD)
Power ON/OFF button
Radio mode: SEEK UP/DOWN
Changer mode: Music Sensor
BW/FF (press and hold)
V.SEL. button
LIGHT button for Remote Controller
VOLUME UP/DOWN, Audio Adjust button
—
—
MUTE button
—
—
—
EXT DVD/AUDIO/NAV. Switch
TV/MONI. button (Push)
Note: Depending on the unit, some operations cannot be performed.
For details, see the Owner’s Manual for the unit.
DVD Player/DVD Changer Control Mode
When operating the External DVD Player/DVD Changer, set the EXT
DVD/AUDIO/NAV. Switch to the “EXT DVD” side.
1
2
3
4
5
6
7
8
9
!
"
#
$
%
&
(
)
~
+
,
.
/
:
;
<
=
>
?
@
[
\
Remote Control Transmitter
—
Status indicator for EXT DVD mode
—
DVD Changer mode: Disc Selection
Audio SOURCE button
(When connected with the Ai-NET Head Unit)
L (STOP) button
—
—
Searching by Title/Chapter/elapsed time,
Press and hold for 2 seconds to display the DVD menu/Title menu
RTN (Return) button
—
—
Numeric Keypad
—
ANGLE button
SUB T. (Subtitle) button
Press and hold this for 2 seconds to turn the subtitles ON and OFF
—
A.PROC. button
(When connected with the Digital Audio Processor)
Playback
Press and hold for 2 seconds to playback the slow motion
Power ON/OFF button
Chapters and tracks skip
Press and hold for 2 seconds to BW/FF
—
LIGHT button for Remote Controller
VOLUME UP/DOWN button
(When connected with the Ai-NET Head Unit)
Joystick/ENTER button
MENU button
Press and hold for 2 seconds to display the setup menu
MUTE button (When connected with the Ai-NET Head Unit)
—
—
AUDIO button
EXT DVD/AUDIO/NAV. Switch
TV/MONI. button (Push)
Note: Depending on the unit, some operations cannot be performed. For details, see
the Owner’s Manual for the unit.
TV/Monitor Control Mode
When controlling the Monitor, press the EXT DVD/AUDIO/NAV. Switch
to activate the TV/MONI. mode.
Check which TV Tuner or Monitor functions corresponds to which
buttons on the remote control and attach the appropriate seal (supplied).
Note: Depending on the unit, some operations cannot be performed. For details, see
the Owner’s Manual for the unit.