1
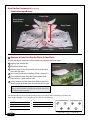
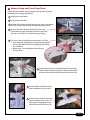
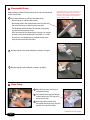
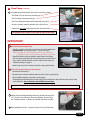
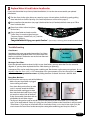
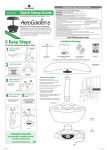
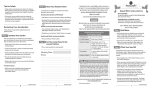
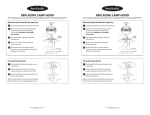
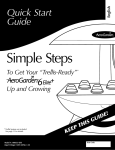
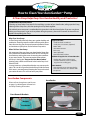
How to Clean Your AeroGardenTM Pump
A Clean Pump Helps Keep Your Garden Healthy and Productive!
A Note About These Instructions
Cleaning an AeroGarden Pump entails disassembling a portion of your AeroGarden, taking apart the Pump,
cleaning all the Pump Parts, and then putting the Pump back together.
We realize that not everyone is comfortable diving into the inside of an AeroGarden. If you are wary about
taking your Pump apart, or get stuck anywhere during the process, please call Customer Service to discuss
options for replacing your Pump.
Why Clean Your Pump
A clean Pump really does help keep your garden healthy and
productive. Cleaning removes nutrient residue and/or plant
roots that can clog your Pump and prevent the flow of water
and nutrients to your plants. It also reduces Pump noise.
Supplies Needed:
• Small flat-head screwdriver
• Small pliers or tweezers (optional)
• Butter knife
• Sink with hot water
• Dish soap
• Towel (optional)
• Extra AeroGarden Filters
When To Clean Your Pump
We recommend that you clean your AeroGarden Pump after
every Garden has reached the end of its life. This will ensure
that nutrients and/or plant roots do not clog the water flow
in your next Garden. The most convenient time to clean
the Pump is during the “Prepare for Your Next Garden”
cleaning steps, which can be found in the back of any Seed/
Plant Kit Guide.
In some instances, a planted AeroGarden may start to make
noise. This can be a sign of residue build-up inside the Pump.
If this occurs, we recommend cleaning the Pump at the time
you notice the noise. This will not harm your plants.
AeroGarden Components
Additional Supplies for a Planted Garden:
• Shallow dish (such as baking pan)
• 1 Gallon container (such as a bucket,
large bowl or cooking pot)
Time Needed:
Approximately 20-25 minutes the first
time and 15 minutes once familiar with
the process
AeroGarden
Please refer to these photos, and the one
on page 2, to identify parts referred to in
the Pump Cleaning instructions.
Lamp Hood
Lamp Arm
Grow Surface
Cross Beams & Brackets
Brackets
Cross Beams
Bowl
Base
Control Panel
Page 1
AeroGarden Components (continued)
Grow Surface (upside down)
Cover Plate
Pump located
behind Filter
Filter
Wire Slot
1
Pump Tower
Pump Wire
Contact Strips
Pump Connector
Remove & Save AeroGarden Water & Seed Pods
Skip this step if your AeroGarden is not planted and proceed to Step 2 on page 3.
A
Unplug your AeroGarden.
B
Remove Bowl from Base.
C
Remove Grow Surface and place in sink (or on towel) as
roots will drip water.
D
Pour water from Bowl into shallow dish to a depth of 1”.
E
Pour remaining water from Bowl into container that
holds at least 1 gallon and set aside.
F
Gently remove Seed Pods from Grow Surface* and place
plants upright in shallow dish. Be sure roots are in water.
1 Gallon Container
Grow Surface
Don’t worry if you tear a few roots or if the Cross Beams come out
with the roots. Cross Beams can easily be placed back in position (see
Troubleshooting for instructions).
*Use the illustration and corresponding numbered spaces to indicate where Seed Pods are located in the
Grow Surface Openings so you can replace them in the same position later.
1.
5.
2.
6.
3.
7.
4.
Page 2
Baking Dish
2
Remove Pump and Clean Pump Tower
Follow the steps whether your are cleaning a Pump from a planted
AeroGarden or an empty AeroGarden.
A
Unplug your AeroGarden.
B
Remove Bowl from Base.
C
Remove Grow Surface from Bowl and bring to sink or set on towel.
Hint: Lift the View Door and slide one hand into the Bowl to lift.
D
Grow Surface
Remove Filter from the back of the Pump Tower and
rinse under hot water or discard if you have a new Filter.
(Missing or torn Filter? See Troubleshooting on Page 7.)
Filter
Cover Plate
E
Turn Grow Surface upside down and remove Cover Plate.
1 Insert flat-head screwdriver at an angle into rectangular
slot on right side of Pump Tower and gently push down
on screwdriver.
2 Repeat step “1” on rectangular slot on left side
of Pump Tower.
2
1
Pump
F
Remove the Pump by inserting the flat-head screwdriver
into the space under the Pump. Push down on the handle
of the screwdriver to lift the Pump out of the Pump Tower.
G
Pull Pump Wire from Wire Slot but
keep it attached to Grow Surface.
H
Rinse out any residue or roots from
Pump and Pump Tower in sink. It is
okay to get everything (the Pump,
Pump Wire and Grow Surface) wet.
Page 3
3
Disassemble Pump
With the Pump removed from the Pump Tower, but still connected
to the Grow Surface:
A
Use a butter knife to pry off Face Plate from Pump.
Don’t worry if this piece (or the clear tube) is not
attached to your Pump when you remove it.
Sometimes they come out with the Pump and
sometimes they remain in the Pump Tower.
Either location is okay.
• Place Pump on its side on a flat surface.
• Rest butter knife in the seam between the Face Plate and
the rest of the Pump as shown in picture at right.
• Tilt the butter knife away from the Face Plate and gently
pry the Face Plate from the Pump.
Hint: Removing the Face Plate requires leverage, not strength.
And, don’t worry about breaking the Face Plate – it is sturdy.
Face Plate
• If necessary, use toothbrush to scrub off residue from
Pump to ease removal of Face Plate.
Impeller Cover
B
Remove Impeller Cover with small pliers, tweezers or fingers.
Impeller
C
4
Remove Impeller with small pliers, tweezers or fingers.
Clean Pump
A
Rinse all Pump Parts and Pump in
sink with hot water.
B
Put a drop of dish soap (any brand)
in the Impeller Hole. The soap will
be rinsed out later.
C
With soap still in Impeller Hole,
reassemble the Pump Parts (Impeller,
Impeller Cover and Face Plate).
Impeller Hole
Continued on next page
Page 4
4
Clean Pump (continued)
D
Insert the Pump back into the Pump Tower making sure that:
• The Rubber Feet on the Pump are facing up.
• The Face Plate is facing toward you.
• The Pump Wire goes behind and underneath the Pump.
• Pump is securely seated in the tube in the Pump Tower.
• Pump Wire does not need to go into Wire Slot at this time.
• Do not put Cover Plate or Filter back in place at this time.
IMPORTANT!
E
Run Dish Soap Through Pump
• Turn Grow Surface right side up and place it in AeroGarden Bowl
without water. (Yes, without water… just for this step!)
NOTE: If Pump falls out, it was improperly seated in the Pump Tower. Please
see Step 4D for instructions on proper placement of Pump in Pump Tower.
• Place Bowl back on Base and plug in AeroGarden. Your Pump
will start at this time (listen for a humming sound or put hand on
Grow Surface to feel vibration. If your Pump Does Not Start, see
Troubleshooting on page 7.)
• Allow Pump to run for 3 minutes and then unplug AeroGarden.
F
Rinse Dish Soap from Pump & AeroGarden
• Remove Bowl from Base.
• Remove Grow Surface from Bowl and turn Grow Surface upside down.
• Disassemble Pump Parts (see steps 1-3 on page 4).
• Thoroughly rinse all Pump Parts, Pump, Pump Tower and Bowl in sink with hot water until no soap
residue remains. Any remaining soap could harm your plants.
If you are cleaning your Pump due to noise, we recommend repeating “Clean Pump” steps 4A-4F for best results.
Face Plate Dial
G
When you are finished cleaning the Pump, set the Face Plate Dial
to “2”. (If your Face Plate does not have numbers, set the Dial to
the 2 o’clock position, as shown on the black Face Plate at right.)
H
Reassemble Pump Parts – Impeller, Impeller Cover and Face Plate.
Page 5
5
Reassemble Pump
A
With Grow Surface upside down, insert the Pump back into the
Pump Tower making sure that:
• The Rubber Feet of the Pump are facing up.
• The Face Plate is facing toward you.
• Pump is securely seated in the tube in the Pump Tower.
• The Pump Wire goes behind and underneath the Pump, and
lines up with Wire Slot.
B
Insert Cover Plate in the
bottom of the Pump Tower
and push down until all
corners snap in place.
C
Push Pump Wire back in
Wire Slot.
D
Turn Grow Surface right side up and place clean or new Filter back
in slots in front of the Pump. (If you do not have a Filter, please see
Troubleshooting on page 6.)
If you are working with a planted AeroGarden, skip
step E (below) and proceed to final steps on page 7.
E
Replace Grow Surface in Bowl*.
Congratulations!
Your AeroGarden is ready for its next planting!
*If you cleaned your Pump to reduce noise, fill the Bowl with water and plug in
your AeroGarden. If the Pump is still noisy, please contact Customer Service.
Page 6
6
Replace Water & Seed Pods in AeroGarden
If you have cleaned the Pump from a planted AeroGarden, it’s now the time to reassemble your planted
AeroGarden.
A
Turn the Grow Surface right side up on a towel or in your sink and replace Seed Pods by gently guiding
roots into the Grow Surface Openings. (Use Seed Pod placement reference from page 2.)
B
Pour water from the containers (see page 2) back into Bowl and, if needed, add fresh water up to “Fill to
Here” inside the Bowl.
C
Place Grow Surface in Bowl and place
Bowl on Base.
D
Plug in AeroGarden and make sure the
Control Panel is set to the right plant type
(Tomatoes/Peppers, Salad Greens, etc.), and that
the Pump is working.
Congratulations! Enjoy your quiet Garden!
If your Pump is still noisy, please contact Customer Service.
Troubleshooting
Cross Beams
Sometimes plant roots get tangled around the Cross Beams
and pull them out of the Bowl. Place Cross Beams back into
Brackets inside Bowl. The Brackets are on the inner front and
back walls of the Bowl.
Brackets
Cross Beams
Missing or Torn Filters
If you have planted more than three Seed Kits in your AeroGarden, you may notice the Filter has started to
degrade. Or, you may have misplaced the Filter while cleaning or replanting.
A temporary Filter can be made from a green scrubbing pad, like the ones used to scour pots and pans. Be sure
the pad is soap-free. Cut a 1-1/2” x 1-5/8” rectangle to use as your temporary Filter. New Pump Filters can be
ordered at www.aerogardendirect.com or by calling AeroGrow Customer Service at 1-800-476-9669.
Pump Does Not Start
If the Pump does not start, try each of the following:
• Make sure your AeroGarden is plugged
Back View of Bowl
Lamp Arm
into a working wall socket.
• Press down firmly on the Bowl, to make
sure it is securely seated on the Base.
• With AeroGarden unplugged, remove
Bowl and check the metal Contact Strips
Contact Strips
on Lamp Arm and on back of the Bowl.
Contact Strips
If they are corroded, clean them with an
old toothbrush and white vinegar.
• The Pump is designed to cycle on and off. It may not start because your AeroGarden is in a “Pump-Off”
cycle. To set AeroGarden to “Pump-On” cycle, press the “Select” button on the Control Panel until you reach
“Salad Greens.” (If you have an AeroGarden PRO or AeroGarden Deluxe, set it to the 24-Hour Light Cycle.) Be
sure to return the Control Panel to the correct plant setting after confirming your Pump has come on.
Page 7
AeroGrow Customer Service
Mon-Fri: 6am - 7pm, Sat-Sun: 8am - 4pm, Mountain Time
1-800-476-9669
www.aerogrow.com
© 2007-2008 AeroGrow International, Inc.
506003-0000 AB 1/29/08