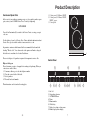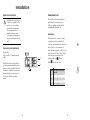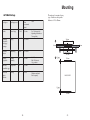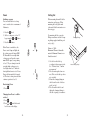
1
INSTRUCTION BOOK
FM 4803K-an
GB
325 88-8327 rev. 3-343
949 601 004
Your New Appliance
Thank you for purchasing an AEG appliance.
To enable you to use your new appliance efficiently and safely, please read this
instruction book carefully before installing or using the appliance, and retain for
future reference. Should the appliance be transferred to a new owner please
ensure this instruction book is left with the appliance in order that the new owner
can get to know the functions of the appliance and the relevant warnings.
If you require further assistance or advice, please contact our Customer Care
Department either by letter or telephone:
Customer Care Department
AEG Domestic Appliances
55-77 High Street
Slough
SL1 1DZ
Tel:
08705 350350*
* calls to this number may be recorded for training purposes
2
43
Contents
Page no.
For the User
Your New Appliance ........................................................................................
Safety Information ..........................................................................................
Product Description ........................................................................................
Ceramic Hob ..........................................................................................
Induction..................................................................................................
Before use ........................................................................................................
Protect the ceramic hob ..........................................................................
How to Use ......................................................................................................
Ceramic Hob ..........................................................................................
Touch Contols..........................................................................................
Cooking Zones ........................................................................................
Residual Heat Indicator ..........................................................................
Power ......................................................................................................
AUTOMAX ............................................................................................
Safety Switch-off .....................................................................................
Autostop ..................................................................................................
Activating the Child Safety Device ........................................................
Minute Minder ........................................................................................
Timer ......................................................................................................
Suitable pans ..........................................................................................
Advise and Tips for Using the Cooking Zones ......................................
Cleaning and Maintenance of ........................................................................
Aluminium ..............................................................................................
Ceramic Hob ..........................................................................................
What to do if ....................................................................................................
Service and Spare Parts ..................................................................................
Guarantee conditions ......................................................................................
42
3
2
5
7
8
8
10
10
11
11
12
12
13
14
15
17
17
18
20
21
23
24
25
25
25
36
38
39
Contents
Page no.
For the Installer
Unpacking ........................................................................................................
Technical Specifications ..................................................................................
Installation........................................................................................................
Mounting ..........................................................................................................
26
27
28
29
How to read the operating instructions
1... 2...Step by step
Hints and tips
Safety information
Environmental information
The products are continuously being developed and it may occur that some product specifications
are changed after this instruction book was printed. We therefore have to make reservation for any
changes or printing errors.
4
41
Safety Information
Exclusions
This guarantee does not cover:
· Damage or calls resulting from transportation, improper use or neglect, the
replacement of any light bulbs or removable parts of glass or plastic.
· Costs incurred for calls to put right an appliance which is improperly
installed or calls to appliances outside the United Kingdom.
· Appliances found to be in use within a commercial environment, plus those
which are subject to rental agreements.
· Products of AEG manufacture which are not marketed by AEG.
European Guarantee
If you should move to another country within Europe then your guarantee moves
with you to your new home subject to the following qualifications:
· The guarantee starts from the date you first purchased your product.
· The guarantee is for the same period and to the same extent for labour and
parts as exists in the new country of use for this brand or range of products.
· This guarantee relates to you and cannot be transferred to another user.
· Your new home is within the European Community (EC) or European Free
Trade Area.
· The product is installed and used in accordance with our instructions and is
only used domestically, i.e. a normal household.
· The product is installed taking into account regulations in your new country.
Before you move please contact your nearest Customer Care centre, listed below,
to give them details of your new home. They will then ensure that the local
Service Organisation is aware of your move and able to look after you and your
appliances.
France
Germany
Italy
Sweden
UK
Senlis
Nürnberg
Pordenone
Stockholm
Slough
+33 (0)3 44 62 29 29
+49 (0)800 234 7378
+39 (0)800 117511
+46 (0)8 672 53 60
+44 (0)1753 219899
40
hob while the zones are turned on.
Never place metal objects (spoons,
pan lids etc.) on an induction zone.
The hob is intended for domestic use
only. If it is used in any other way
there is a risk of accidents.
Children
Cleaning and Maintenance
Keep an eye on children when the
hob is in use. Pans get very hot
when used and remain warm for
some time after the hob has been
turned off. Never let children touch
or play with the controls.
For reasons of hygiene and safety
the cooking zones must be kept
clean. Grease and spilt food liberate
smoke when heated and could
cause a fire.
Service
Use
Service and repair must be performed by our service organisation
or an organisation approved by us.
Only spare parts supplied by our
service organisation may be used.
Never leave the hob unattended
when deep fat frying, or heating fat
and oils. In the event of fire turn off
all controls and if you have a cooker
hood this must be turned off as well.
Never leave paper, dish cloths, aluminium foil or any other easily ignited materials close to the
hob. A hot hob can cause foil, plastic
or paper to melt or burn.
Unpacking
Make sure the packaging is disposed
of in such a manner that children
cannot access the used packaging.
Installation
Put out flames with a lid, and
never use water.
Check that the hob is turned off
when not in use.
Persons with pacemakers should
keep their upper body at a minimum
distance of 30 cm from the zones
when turned on.
Never place any magnetically
charged objects (e.g. credit cards,
cassettes etc.) on the vitroceramic
The product may only be installed
by an authorised electrician or a person authorised by the manufacturer.
5
Work performed by unqualified
persons could lead to injuries or
damage to property, and spoil the
hob itself. During installation
make sure the electricity cable is
not pinched.
Customer Care
For general enquires concerning your AEG appliance or for further information
on AEG products, please contact our Customer Care Department at the address
below or visit our website at www.aeg.co.uk
Disposal
Help prevent accidents when disposing of the product. Remove the cable
from the wall plug and cut off the
cable close to the product.
Customer Care Department
AEG Domestic Appliances
55-77 High Street
Slough, Berkshire
SL1 1DZ
Tel 08705 350350*
*calls to this number may be recorded for training purposes
GUARANTEE CONDITIONS
Standard guarantee conditions
We, AEG, undertake that if within 12 months of the date of the purchase this
AEG appliance or any part thereof is proved to be defective by reason only of
faulty workmanship or materials, we will, at our discretion repair or replace the
same FREE OF CHARGE for labour, materials or carriage on condition that:
· The appliance has been correctly installed and used only on the electricity or
gas supply stated on the rating plate.
· The appliance has been used for normal domestic purposes only, and in
accordance with the manufacturer’s operating and maintenance instructions.
· The appliance has not been serviced, maintained, repaired, taken apart or
tampered with by any person not authorised by us.
· All service work under this guarantee must be undertaken by a Service Force
Centre. Any appliance or defective part replaced shall become the
Company’s property.
· This guarantee is in addition to your statutory and other legal rights.
· Home visits are made between 8.30am and 5.30pm Monday to Friday. Visits
may be available outside these hours in which case a premium will be
charged.
6
39
Product Description
Service and Spare Parts
In the event of your appliance requiring service, or if you wish to purchase spare
parts, contact your local AEG Service Force Centre by telephoning:
1. Cooking zone Ø 140 mm, 1400 W.
2. Cooking zone Ø 210 mm, 2200 W,
3000 W power.
3. Control panel
1
08705 929 929
Your call will automatically be routed to the Service Centre covering your post
code area.
2
For the address of your local Service Force Centre and further information about
Service Force, please visit the website at www.serviceforce.co.uk
In-guarantee customers should ensure that the recommended checks under the
heading “What to do if..” have been made as the engineer will make a charge if
the fault is not a mechanical or electrical breakdown.
Please note that proof of purchase is required for in-guarantee service calls.
3
Control Panel
Help us to help you
Please determine your type of enquiry before writing or telephoning. When you
contact us we need to know:
1. Your name, address, post code and telephone number
2. Clear and concise details of the fault.
3. Date of purchase
4. The model and serial number
This information can be found on the rating plate.
6
1.
2.
3.
4.
5.
6.
7.
8.
38
8
7
2
2
3
5
4
On / off
Heat setting selectors
AUTOMAX/Power
Timer
Minute minder
Child safety
Display for setting cooking zones
Minute display/timer display
7
7
4
3
2
2
1
Ceramic hob
Ceramic glass is insensitive to temperature shock and very robust:
however it is not unbreakable.
Especially sharp and hard
objects that fall on the cooking surface can damage it.
Induction
When you switch on a zone, a highfrequency magnetic field is formed
between the induction coil and the
magnetic base of the pan. This magnetic field contains induction currents. The base of the pan slows
down the induction currents, thus
forming heat which first heats the
pan base and then the food in the
pan.
Problems
Remedy
The zones won’t turn on. The display shows:
Child safety has been activated. You
can either press the
button at the
same time as you make a selection, or
you can cancel the child safety device,
see Section “How to use .. Child safety”.
The zones won’t turn on and the
display shows:
Autostop has been activated. Touch the
button. The hob is now ready for
use.
The display is flashing “F”.
Check whether the zones are sufficiently covered by the pan. See the
section “How to use...Suitable pans”
j
k
Saucepan base
Ceramic surface
Induction coil
Magnetic field
Check that the pans are suitable for
induction. See the section: “How to
use...Suitable pans” If “F” still flashes, contact service. See section
“Service and spare parts”.
Quicker cooking
With induction, your pans become
hot immediately. This means you
save time and energy when cooking
by induction. As the necessary heat
for cooking the food is formed in the
base of the pan, the hob hardly gets
hot. However, it does absorb the surplus heat from the pan base.
If the rear zone is set to levels 8
or 9 while the front zone is set to
Power, the front zone will revert
to level 9.
The front and rear zones are connected. If you wish to use setting 8 or 9
on the rear zone, the front zone cannot
be set higher than level 9. Power will
automatically be turned off.
In-guarantee customers should ensure that the above checks have been made as
the engineer will make a charge if the fault is not a mechanical or electrical
breakdown.
8
Please note that it will be necessary to provide proof of purchase for any in-guarantee service calls.
37
What to do if...
If the appliance is not working correctly, please carry out the following checks
before contacting your local AEG Service Force Centre.
IMPORTANT: If you call out an engineer to a fault caused by incorrect use or
installation, a charge will be made even if the aookuabce is under guarantee.
Problems
Remedy
The hob doesn’t work.............
Check that the hob is switched on.
Check the HPFI/HFI relay in the
main fuse box. Check the fuses for
the hob.
The hob gets hot.................
The hob may get as hot as 60°C.
The fuses are constantly blowing.....
Possibly, you have too many electrical appliance in use at one go. If
your hob is connected to a 10 Amp
fuse group, there is a high risk of
overload.
Overheating protection
When a pan is placed on a zone, the
pan will heat up. A sensor under
each zone measures the temperature
of the zone and the pan. If the temperature gets too high, the zone will
automatically switch off.
During use there will be noise from
the induction coil and the fan. This is
completely normal and has no effect
on cooking performance.
Quick adjustment
When you turn on a zone, the pan
will become hot very quickly. When
you turn the heat down, the heat
quickly dissipates.
The zones make clicking and
other noises
However, some pans can increase the
noise. If the noise becomes a nuisance, one option could be to use a
different pan.
At the low heat settings, clicks will
be heard. These occur when the heat
is being switched on and off. This is
completely normal and has no effect
on cooking performance.
36
Power
The front zone has a facility for
switching in extra heat to give an
even quicker boiling time. When
using Power on the front zone the
rear zone cannot be set at the highest
setting. Information on how to use
Power is given in the Section “How
to use....Power”.
High safety levels
The individual zones will only get
hot when a pan with a magnetic base
is placed on them. It is impossible to
turn on an empty zone. When you
remove the pan from a lighted zone,
the zone will turn off even if you do
not switch it off. Remember that
there will still be residual heat in the
ceramic hob. The zone will
remember the last setting for about
20 seconds.
Cooling fan
A fan protects the electronics from
overheating. When you have finished using the zones, the fan will
continue to run until the electronics
have cooled down.
Easy cleaning
Any spills will not burn onto the
ceramic hob as the area to the side
of the pan is not hot. This makes cleaning
the hob much easier.
9
Electronic control system
The hob has an electronic control
system to ensure precise heat control
of the zones. The electronics have
the following functions:
- Power, extra heat
- AUTOMAX, automatic boiling
- Safety switch-off
- Autostop. Automatic turning off
of zones
- Child safety
- Minute minder and timer
Before Use
Overview of the outside
width of the units
Protect the ceramic hob
Before using the hob for the first
time, clean off any manufacturing
residues such as dust, dirt etc.
Apply a protective coating on the
ceramic hob before you use it. This
way it becomes easier to clean the
glass and you prevent any spillage
from burning.
180 mm
Downdraft
360 mm
Glass ceramic hob with 2 cooking
zones
Gas hob with 2 burners
Induction hob with 2 cooking zones
Grill
Grill / Fryer
Wok
This is what you do:
1. Pour a few drops of the cleaning
agent supplied with the hob on
paper towel and rub it on to the
entire surface.
2. Polish the surface with a clean
cloth until it is dry.
580 mm
Glass ceramic hob with 4 cooking
zones
Gas hob with 4 burners
720 mm
Glass ceramic hob with 4 cooking
zones
Gas hob with 4 burners
Induction hob with 4 cooking zones
10
35
How to use
To optimise joints between the installed hobs, the gap between the ceramic hob
may be grouted with silicone:
1. Remove the aluminium panels from the hobs.
2. Apply a stripe of silicone to the gap between the two ceramic hob. Use only
the silicone supplied, as it is designed to tolerate the appliance’s high temperature. (Fig. 1)
3. Splash a little soapy water (washing-up liquid) on the silicone stripe
4. Press the rubber block hard against the ceramic hob and pull it slowly from
back to front (Fig. 2)
5. Leave the silicone to harden until the next day.
6. Remove surplus silicone coating from the ceramic hob with the razorblade
supplied. Be careful not to damage the silicone in the gap. Run tools only
along the joint, never across it.
7. Polish the ceramic hob with the supplied cleaning product for ceramic hobs.
1
2
Ceramic hob
Make sure there is no sand, sugar or
salt on the base of the pan. Sand can
cause scratches and sugar and salt
can damage the hob.
Always dry pans before placing
them on the hob. The coloured decoration on the hob may wear away or
suffer scratches depending on use.
Never use a cracked vitroceramic hob.
Water could boil over and/or
cleaning agents penetrate
into the live electrical parts.
Switch off the power to the
appliance and contact
Service.
Do not use the ceramic hob without
the aluminium strip in place.
Never place aluminium foil,
paper, plastic or similar on
the hob. A hot heating zone
could cause foil, plastic or
paper to melt or burn.
Do not use the ceramic hob as a
work surface as this could damage
the hob.
Never leave the hob unattended when deep frying or
melting fat, paraffin wax or
other easily ignited substances. In case of fire, turn
off all knobs and switch off
any cooker hood.
Put out the fire with a lid,
and never use water.
Scrape any spills from the
hob straight away with a
razor. Spills of sugar and
sugar-rich foods (jam, fruit
syrup etc.), melted plastic
and aluminium foil may
damage the hob. Never
place wet saucepans on the
hob.
34
11
Touch Controls
The sensor fields must be touched for minimum 1 sec. before activation.
Cooking Zones
The cooking zones can be adjusted from 0-9, where 9
is the highest setting.
1. Press the
button.
l
k
m button to set
or the
2. Press
the desired zone.
Adjustment of the zones must take
less than 10 seconds, otherwise the
cooking section will turn off again.
Mounting:
When mounting several hobs together you must use a reinforcement beam
between each hob as well as the silicone supplied with the hobs (see fig.)
1. Cut a hole of the calculated size in the table top
2. Place the individual hobs upside down on a mat. Take care that the top side is
not scratched.
3. Mount the clamping fittings in the holes in the side of the base panels (see
fig.)
4. Place the first hob in the hole.
5. Apply silicone to the two corners joining the next hob (see fig.)
Use only the silicone supplied with the hobs as this is intended to tolerate the
high temperatures of the appliance.
6. Push a reinforcement beam up against the hob. Apply silicone on the reinforcement beam (see fig.)
7. Tighten the clamping fittings to the table top using a screwdriver.
8. Repeat the process for the other hobs.
m
Press the
button to set the zone
level by level from 0-9.
l
button to set the zone
Press the
level by level from 9-0.
l m
or
If you keep pressing the
button, the adjustment will be quicker - the hob will run through the
adjustment levels 1-9 and stop when
you reach “0”.
If there is no pan on the zone or if
the pan is not magnetic, “F” will
show on the display for max. 10 sec,
after which the appliance will turn
off.
Silicone
12
33
Turn off a single zone by pressing
the
or
buttons until the display shows “0”. You can turn off a
zone quickly by pressing the
and
buttons simultaneously.
Mounting more than one
hob
m l
m
Distance to wall:
Min. 150 mm
(flammable material)
l
Turn off all zones by pressing the
button.
k
Distance to wall:
Min. 50 mm
(non-flammable material)
m
0m
49
Reinforcement beam
Residual Heat Indicator
Each cooking zone has a residual
heat indicator. When the cooking
zone is turned off the “H” is lit up in
the display until the cooking zone
has cooled. “H” is a warning that the
cooking zone is still hot.
Cutting out
The measurement of the selected combination is calculated in the following way:
Depth: 490 mm
Width:
1. Calculate the sum of all units’ width.
2. Subtract 20 mm from the total width.
Example:
A hob of 720 mm + a downdraft of 180 mm + a gas hob of 360 mm.
1. 720+180+360= 1260 mm
2. Width of the hole: 1260-20=1240 mm
Distance to Wall:
Min. 150 mm to flammable material.
Min. 50 mm to non-flammable material
32
13
Power
Cutting Out
Switching on power
You can switch the front cooking
zone to extra heat for a maximum of
10 minutes .
When mounting this unit: Read the
instructions on this page. When
mounting the hob together with
other units: Read the instructions on
the next page.
1. Press the
k knob.
For mounting the hob you need a
Philips screwdriver and the 4 clamping fittings supplied with this product (see fig.).
2. Set the cooking zone to level “9”
or
button.
by pressing the
3. Press the
l m
P button.
When Power is switched on, the
Power control lamp will light and
the cooking zone will output 3000
W. Meanwhile the rear right-hand
cooking zone will provide a maximum 600 W output, corresponding
to level 7. If you attempt to turn the
rear right-hand cooking zone to a
level higher than level 7 while the
front right-hand zone is set to Power,
Power will automatically be turned
off. The front cooking zone will then
continue operation at level 9.
Distance to Wall:
Minimum 150 mm to flammable
material. Minimum 50 mm to nonflamable material.
1. Cut a hole in the table top
according to the measures stated.
See “Technical data”, “built-in
measurement”.
2. Place the unit upside down on a
mat. Take care that the top side is
not scratched.
3. Mount the clamping fittings in
the holes in the side of the base
panel (see fig.)
4. Place the unit in the hole and
tighten the clamping fittings to
the table top using a screwdriver.
Deactivating Power
1. Press
Clamping fittings
P.
Changing from Power to a different level
.
1. Press
Mounted clamping fittings
P
1 m
or
until the desired
2. Press
level shows on the display.
14
31
Automax
Installation in cupboard
WITHOUT oven
With AUTOMAX you do not need
to turn down the temperature. When
using AUTOMAX the zone gets full
heat for a certain amount of time
where after the cooking zone automatically adjusts to the setting you
have chosen.
To ensure the necessary air supply to
the appliance, the top of any floor
cupboard must be removed. If this is
not done, the air supply will be correspondingly reduced and the guarantee will be invalid.
The distance between the lower surface of the appliance and
shelves/drawers must be min. 20
mm.
To adjust AUTOMAX you have to
do the following:
1. Turn on the hob, push
k.
2. Adjust the desired cooking zone
at the setting you wish to use.
If the appliance is installed with a
base shelf underneath, two cutouts
must be created in the shelf - one at
the front and one at the rear - to provide sufficient ventilation to the
electrical components.
The cutouts must be min. 10x250
mm.
3. Push
N.
When AUTOMAX is coded the control lamp for “A” will light up.
To turn off AUTOMAX, you have to
push
.
N
Installation in cupboard
WITH oven
The “AUTOMAX” chart on the following page gives guidelines for
suitable heat settings for different
types of cooking.
If the appliance is installed with an
oven located below it, there must be
no intervening shelf/panel.
The distance between the top of the
worktop and the top of the oven
must be min. 60 mm (thus ensuring
that the distance between the top of
the oven and the lower surface of the
appliance is greater than 20 mm.
30
15
Mounting
The unit may be mounted in any
type of kitchen worktop with a
thickness of 28 to 40 mm.
AUTOMAX Settings
Food types
Steaks
Cooking process
Quick frying
Schnitzels
Meat balls
Fried eggs
Sausages
Frying
Pancakes
Fritters
Gentle frying
Potatoes
Vegetables
Notes
A7-A8
2½ mins
Fry 3-4 min per side
depending on thickness.
Turn regularly
A6-A7
1½-2 mins
360 mm
HOB
1
BUNDHYLDE
49 mm
min. 20 mm
A6-A7
BASE SHELF
340 mm
1½-2 mins
2
Boiling/
steaming
Omelette,
Scrambled eggs Thickening
Chocolate
Butter
Gelatine
Time
to automatic
cutout
Melting
A6
1½ mins
A6
1½ mins
A2
16 secs
10 mm
Use little water:
Max 2 dl water to
1 kg potatoes
250 mm
BASE SHELF
Without water bath.
Stir frequently
10 mm
250 mm
16
29
38 mm
Installation
Safety Switch-off
Electrical Installation
If one of the keys are activated for
more than 10 seconds (e.g. by a
child, pot spillage etc.) the hob is
automatically switched off.
Installation may only be performed by a qualified electrician or a person authorised by the manufacturer.
Work performed by an
unqualified person may
cause injury or damages to
property and deteriorate the
hob.
Autostop
Connecting the Appliance
Single phase
Type of cable: 2,5 mm2 twin and
earth.
L
L2
L1
Installation must comply with any
special requirements laid down by
the local energy provider. The product must be connected via an external switch with a contact gap of at
least 3 mm. (May be the main
switch).
N
PE
If by mistake one or more cooking
zones have not been switched off
Autostop will automatically switch off
the hob after a certain amount of
time. The time depends on the heat setting selected. See below table. When
Autostop has been activated the
indicator light for
flashes.
Push
N
k
Setting Max hours before auto
turn-off
1-2
3-4
5
6-9
28
k
to reset Autostop.
6
5
4
1,5
17
Technical Data
Model FM 4803K-an:
Activating the Child Safety
Device
Product measurements:
Width:
360 mm
Depth:
520 mm
Height:
49 mm
With the child safety function children can be prevented from turning
on the hob unintentionally.
When the child safety is activated
you can still use the
key and the
minute minder.
k
Build-in measurements:
Width:
340 mm
Depth:
490 mm
Height:
38 mm
Activating the Child Safety Device
1. Turn on the hob, push the
key
k
Measurements / power
Front cooking zone: 210 mm
Rear cooking zone: 140 mm
j
key for 3 seconds.
2. Push the
The control lamp for child safety
lights up.
2200W , 3000 W Power
1400 W
This unit is
labelled to indicate conformity with the lowvoltage directive
(73/23/EEC) and the EMC directive (89/336/EEC).
If you try to turn on the hob when
the child safety is activated
and
will illuminate.
k
j
Push again on
k to turn off.
To use the hob when the child safety
is activated do the following:
k key.
Push the j key and the key you
1. Push the
2.
wish to use simultaneously.
The child safety is cancelled while
the hob is in use. When the hob is
turned off the child safety is automatically activated.
18
27
Unpacking
Cancelling the Child Safety
Check that the appliance has no
faults and is undamaged on delivery.
k key.
Push the j key for 3 seconds.
1. Push the
2.
Transport Damages
The control lamp for child safety
turns off.
Any damages resulting from a transport which you have not performed
yourself must be communicated to
the dealer within one week of receipt
of the product.
On the rating plate which is placed
on the back of the product you will
find the CE marking and the product’s serial number. Write the serial
number on the front of present
instruction book so it is easily accessible in the event of service.
Removal of Packaging
All packaging can be recycled.
Contact your local authority if you
do not know where to dispose of the
packaging.
26
19
Cleaning and Maintenance
Minute Minder
Aluminium
Setting the Minute Minder
Carry out daily cleaning with a well
wrung-out cloth. For more stubborn
soiling, use a cloth or a soft plastic
sponge together with washing-up
liquid or all-purpose cleaner.
The minute minder can only be used
when the timer is not in use.
1. Turn on the hob, push
A.
Push the l or m key till the
2. Push once on
3.
k.
4. Using a damp cloth wipe off any
excess cleaning liquid
Never use metal cleaning pads,
metal wool, hard plastic sponges,
scouring powder, soft soap or other
abrasive or caustic cleaning agents.
desired time is shown in the display.
When the time has run out you will
hear an acoustic signal.
5. Wipe with a dry cloth.
Make sure that the ceramic hob is
dry when heated. A damp surface
can develop rainbow-like stripes
when heated.
Ceramic hob
Immediately scrape off any sugar or
sugary food stains (jam, juice etc.),
melted plastic and aluminium foil
from the hot plate. If the plate cools
before these materials have been
removed it may become damaged. A
stained plate reduces the heat transfer between cooking zone and pan.
Dry off cooking zones with a damp
cloth with washing-up liquid. When
heavily stained you can do the following:
De-activating the Minute Minder
If you wish to de-activate the minute
minder before the time is up you
have to do the following.
Push simultaneously on the
keys for 3 seconds.
3. Wipe the plate with a damp cloth
or kitchen paper. Stubborn stains
are removed by rubbing hard on
the stain with a cleaning liquid on
paper towel.
l m
In the display it will say “0”. After a
few seconds the display is turned
off.
1. Remove stains etc. using the
ceramic hob scraper.
2. Make sure the ceramic hob has
cooled down. Use the cleaning
liquid supplied with the hob.
Follow the instructions on the
cleaning liquid.
20
25
Advise and Tips for Using the Cooking Zones
!
By using below advise you
can save energy and ease
cleaning.
!
!
Use close-fitting lids on the
pans.
Failure to use a lid on a pan uses
over three times as much electricity.
!
!
!
Save water: Boil in as little
water as possible. Cook potatoes
and vegetables in 1, 2 or 3 dl
water.
Use 1 dl water for the 14 cm
zone.
Use 3 dl water for the 21 cm
zone.
Cover the pan with a close-fitting
lid. Bring to the boil at the highest heat and then turn down to the
lowest possible heat when steam
starts emerging strongly from the
lid. Calculate the cooking time
from when you turn down the
heat. Avoid looking at
potatoes/vegetables until the
cooking time is complete.
Turn down immediately the
pan starts to boil. Choose the
correct heat setting. Start at the
highest setting and turn down as
far as possible without the food
going off the boil.
Use the hot zone for the next pan.
Timer
This function can automatically turn
off a cooking zone at any given
time.
When this function has not been
chosen the clock can be used as a
minute minder (see the section
“Minute minder”)
Defrost food in the refrigerator.
It saves energy to cook in a pan
on a zone rather than in the oven.
Timer and minute minder cannot be
used simultaneously.
Setting the Timer
Timer for the front cooking zone
Timer for the rear cooking zone
1. Turn on a cooking zone.
A
2. Push the
key 2 or 3 times to
select the cooking zone you wish
the timer to control. The control
lamp for the actual zone lights
up. The display shows “0”.
l m
3. Push the
or
key to set the
time. The time is shown in minutes. If the two keys are held
down for more than 3 seconds the
timer can be set faster with 5
minutes intervals (5-1015……minutes) The last minute
is shown in seconds.
24
21
Both cooking zones can be set
simultaneously with two different
timings. When both cooking zones
have a setting the time for the individual cooking zone is read in the
following way:
Size of pots
The zones automatically adapt their
size to the base of the cooking utensil, within certain limits. The pots
must have a definite minimum size,
which will depend on the diameter
of the zone, otherwise the zone will
not turn on.
Suitable pans
When using non-stick pans,
do not use level 9 or Power,
as the non-stick coating may
be damaged by the high
induction heat.
The time in the display belongs to
the cooking zone for which the conto see the
trol lamp is lit. Push
time for the other cooking zone.
·
A
When the set time has passed you
will hear an acoustic signal. The
timer and the cooking zones are
automatically turned off.
·
·
The control lamp for the other cooking zone will flash while the first
timer is activated. When the time for
the first zone expires the remaining
time for the other cooking zone is
shown in the display.
·
The induction hob can only be
turned on when a cooking utensil
with a magnetic base is placed on
one of the zones. You can use the
following utensils:
Pots marked as suitable for
induction.
Cast iron pans. Make sure the
base is smooth. A rough base
could scratch the vitroceramic
hob.
Enamelled steel pans. Make sure
the enamel is suitable for use on
vitroceramic surfaces. Some
enamels can scratch the vitroceramic hob.
Small zone: Ø 14 cm.
Base of cooking utensil min: Ø 10
cm.
Large zone: Ø 21 cm.
Base of cooking utensil min: Ø 18
cm.
Check the base diameter
when buying, as pan manufacturers often give the
diameter of the top edge of
the pan.
You can test whether your pans are
suitable by placing a magnet on their
base. If the magnet sticks, the pan is
suitable.
Cancelling the Timer
If you wish to cancel the timer
before the time is up you have to do
the following. Push the
keys for 3 seconds. The display will
show “0”. After a few seconds the
display will turn off.
l m
Unsuitable pots
Pans made of aluminium, copper,
brass, glass, porcelain and steel and
which do not have a magnetic base.
22
23
Both cooking zones can be set
simultaneously with two different
timings. When both cooking zones
have a setting the time for the individual cooking zone is read in the
following way:
Size of pans
The zones automatically adapt their
size to the base of the cooking utensil, within certain limits. The pans
must have a definite minimum size,
which will depend on the diameter
of the zone, otherwise the zone will
not turn on.
Suitable pans
When using non-stick pans,
do not use level 9 or Power,
as the non-stick coating may
be damaged by the high
induction heat.
The time in the display belongs to
the cooking zone for which the conto see the
trol lamp is lit. Push
time for the other cooking zone.
·
A
When the set time has passed you
will hear an acoustic signal. The
timer and the cooking zones are
automatically turned off.
·
·
The control lamp for the other cooking zone will flash while the first
timer is activated. When the time for
the first zone expires the remaining
time for the other cooking zone is
shown in the display.
·
The induction hob can only be
turned on when a cooking utensil
with a magnetic base is placed on
one of the zones. You can use the
following utensils:
Pans marked as suitable for
induction.
Cast iron pans. Make sure the
base is smooth. A rough base
could scratch the ceramic
hob.
Enamelled steel pans. Make sure
the enamel is suitable for use on
ceramic surfaces. Some
enamels can scratch the ceramic
hob.
Small zone: Ø 14 cm.
Base of cooking utensil min: Ø 10
cm.
Large zone: Ø 21 cm.
Base of cooking utensil min: Ø 18
cm.
Check the base diameter
when buying, as pan manufacturers often give the
diameter of the top edge of
the pan.
You can test whether your pans are
suitable by placing a magnet on their
base. If the magnet sticks, the pan is
suitable.
De-activating the Timer
If you wish to de-activate the timer
before the time is up you have to do
the following. Push the
keys for 3 seconds. In the display it
will say “0”. After a few seconds the
display will turn off.
l m
Unsuitable pans
Pans made of aluminium, copper,
brass, glass, porcelain and steel and
which do not have a magnetic base.
22
23
Advise and Tips for Using the Cooking Zones
!
By using the advise below you
can save energy and ease
cleaning.
!
!
Use close-fitting lids on the
pans.
Failure to use a lid on a pan uses
over three times as much electricity.
!
!
!
Save water: Boil in as little
water as possible. Cook potatoes
and vegetables in 1, 2 or 3 dl
water.
Use 1 dl water for the 14 cm
zone.
Use 3 dl water for the 21 cm
zone.
Cover the pan with a close-fitting
lid. Bring to the boil at the highest heat and then turn down to the
lowest possible heat when steam
starts emerging strongly from the
lid. Calculate the cooking time
from when you turn down the
heat. Avoid looking at
potatoes/vegetables until the
cooking time is complete.
Turn down immediately the
pan starts to boil. Choose the
correct heat setting. Start at the
highest setting and turn down as
far as possible without the food
going off the boil.
Use the hot zone for the next pan.
Timer
This function can automatically turn
off a cooking zone at any given
time.
When this function has not been
chosen the clock can be used as a
minute minder (see the section
“Minute minder”)
Defrost food in the refrigerator.
It saves energy to cook in a pan
on a zone rather than in the oven.
Timer and minute minder cannot be
used simultaneously.
Setting the Timer
Timer for the front cooking zone
Timer for the rear cooking zone
1. Turn on a cooking zone.
A
2. Push the
key 2 or 3 times to
select the cooking zone you wish
the timer to control. The control
lamp for the actual zone lights
up. The display shows “0”.
l m
3. Push the
or
key to set the
time. The time is shown in minutes. If the two keys are held
down for more than 3 seconds the
timer can be set faster with 5
minutes intervals (5-1015……minutes) The last minute
is shown in seconds.
24
21
Cleaning and Maintenance
Minute Minder
Aluminium
Setting the Minute Minder
Carry out daily cleaning with a well
wrung-out cloth. For more stubborn
soiling, use a cloth or a soft plastic
sponge together with washing-up
liquid or all-purpose cleaner.
The minute minder can only be used
when the timer is not in use.
1. Turn on the hob, push
A.
Push the l or m key till the
2. Push once on
3.
k.
4. Using a damp cloth wipe off any
excess cleaning liquid
Never use metal cleaning pads,
metal wool, hard plastic sponges,
scouring powder, soft soap or other
abrasive or caustic cleaning agents.
desired time is shown in the display.
When the time has run out you will
hear an acoustic signal.
5. Wipe with a dry cloth.
Make sure that the ceramic hob is
dry when heated. A damp surface
can develop rainbow-like stripes
when heated.
Ceramic hob
Immediately scrape off any sugar or
sugary food stains (jam, juice etc.),
melted plastic and aluminium foil
from the hot hob. If the hob cools
before these materials have been
removed it may become damaged. A
stained hob reduces the heat transfer between cooking zone and pan.
Dry off cooking zones with a damp
cloth with washing-up liquid. When
heavily stained you can do the following:
De-activating the Minute Minder
If you wish to de-activate the minute
minder before the time is up you
have to do the following.
Push simultaneously on the
keys for 3 seconds.
3. Wipe the hob with a damp cloth
or kitchen paper. Stubborn stains
are removed by rubbing hard on
the stain with a cleaning liquid on
paper towel.
l m
In the display it will say “0”. After a
few seconds the display is turned
off.
1. Remove stains etc. using the
ceramic hob scraper.
2. Make sure the ceramic hob has
cooled down. Use the cleaning
liquid supplied with the hob.
Follow the instructions on the
cleaning liquid.
20
25
Unpacking
Check that the appliance has no
faults and is undamaged on delivery.
De-activating the Child Safety
k key.
Push the j key for 3 seconds.
1. Push the
2.
Transport Damages
The control lamp for child safety
turns off.
Any damages resulting from a transport which you have not performed
yourself must be communicated to
the dealer within one week of receipt
of the product.
On the rating plate which is placed
on the back of the product you will
find the CE marking and the product’s serial number. Write the serial
number on the front of this
instruction book so it is easily accessible in the event of service.
Removal of Packaging
All packaging can be recycled.
Contact your local authority if you
do not know where to dispose of the
packaging.
26
19
Technical Data
Model FM 4803K-an:
Activating the Child Safety
Device
Product measurements:
Width:
360 mm
Depth:
520 mm
Height:
49 mm
With the child safety function children can be prevented from turning
on the hob unintentionally.
When the child safety is activated
you can still use the
key and the
minute minder.
k
Build-in measurements:
Width:
340 mm
Depth:
490 mm
Height:
38 mm
Activating the Child Safety Device
1. Turn on the hob, push the
key
k
Measurements / power
Front cooking zone: 210 mm
Rear cooking zone: 140 mm
j
key for 3 seconds.
2. Push the
The control lamp for child safety
lights up.
2200W , 3000 W Power
1400 W
This unit is
labelled to indicate conformity with the lowvoltage directive
(73/23/EEC) and the EMC directive (89/336/EEC).
If you try to turn on the hob when
the child safety is activated
and
will illuminate.
k
j
Push again on
k to turn off.
To use the hob when the child safety
is activated do the following:
k key.
Push the j key and the key you
1. Push the
2.
wish to use simultaneously.
The child safety is cancelled while
the hob is in use. When the hob is
turned off the child safety is automatically activated.
18
27
Installation
Safety Switch-off
Electrical Installation
If one of the keys are activated for
more than 10 seconds (e.g. by a
child, pot spillage etc.) the hob is
automatically switched off.
Installation may only be performed by a qualified electrician or a person authorised by the manufacturer.
Work performed by an
unqualified person may
cause injury or damages to
property and deteriorate the
hob.
Autostop
Connecting the Appliance
Single phase
Type of cable: 2,5 mm2 twin and
earth.
L
L2
L1
Installation must comply with any
special requirements laid down by
the local energy provider. The product must be connected via an external switch with a contact gap of at
least 3 mm. (May be the main
switch).
N
PE
If by mistake one or more cooking
zones have not been switched off
Autostop will automatically switch off
the hob after a certain amount of
time. The time depends on the heat setting selected. See below table. When
Autostop has been activated the
indicator light for
flashes.
Push
N
k
Setting Max hours before auto
turn-off
1-2
3-4
5
6-9
28
k
to reset Autostop.
6
5
4
1,5
17
Mounting
AUTOMAX Settings
Time
to automatic
cutout
Notes
A7-A8
2½ mins
Fry 3-4 min per side
depending on thickness.
Turn regularly
A6-A7
1½-2 mins
Food types
Cooking process
Steaks
Fierce frying
Schnitzels
Meat balls
Fried eggs
Sausages
Frying
Pancakes
Fritters
Thickening
A6-A7
1½-2 mins
Potatoes
Vegetables
Boiling/
steaming
A6
1½ mins
Coagulation
Omelette,
Scrambled eggs
A6
1½ mins
Chocolate
Butter
Gelatine
A2
16 secs
The unit may be mounted in any
type of kitchen worktop with a
thickness of 28 to 40 mm.
360 mm
HOB
1
BUNDHYLDE
49 mm
min. 20 mm
Melting
BASE SHELF
340 mm
Use little water:
Max 2 dl water to
1 kg potatoes
2
10 mm
Without water bath.
Stir frequently
250 mm
BASE SHELF
10 mm
250 mm
16
29
38 mm
Automax
Installation in cupboard
WITHOUT oven
With AUTOMAX you do not need
to turn down the temperature. When
using AUTOMAX the zone gets full
heat for a certain amount of time
where after the cooking zone automatically adjusts to the setting you
have chosen.
To ensure the necessary air supply to
the appliance, the top of any floor
cupboard must be removed. If this is
not done, the air supply will be correspondingly reduced and the guarantee will be invalid.
The distance between the lower surface of the appliance and
shelves/drawers must be min. 20
mm.
To adjust AUTOMAX you have to
do the following:
1. Turn on the hob, push
k.
2. Adjust the desired cooking zone
at the setting you wish to use.
If the appliance is installed with a
base shelf underneath, two cutouts
must be created in the shelf - one at
the front and one at the rear - to provide sufficient ventilation to the
electrical components.
The cutouts must be min. 10x250
mm.
3. Push
N.
When AUTOMAX is coded the control lamp for “A” will light up.
To turn off AUTOMAX, you have to
push
.
N
Installation in cupboard
WITH oven
The “AUTOMAX” chart on the following page gives guidelines for
suitable heat settings for different
types of cooking.
If the appliance is installed with an
oven located below it, there must be
no intervening shelf/panel.
The distance between the top of the
worktop and the top of the oven
must be min. 60 mm (thus ensuring
that the distance between the top of
the oven and the lower surface of the
appliance is greater than 20 mm.
30
15
Power
Cutting Out
Switching on power
You can switch the front cooking
zone to extra heat for a maximum of
10 minutes .
When mounting this unit: Read the
instructions on this page. When
mounting the hob together with
other units: Read the instructions on
the next page.
1. Press the
k knob.
For mounting the hob you need a
Philips screwdriver and the 4 clamping fittings supplied with this product (see fig.).
2. Set the cooking zone to level “9”
or
button.
by pressing the
3. Press the
l m
P button.
When Power is switched on, the
Power control lamp will light and
the cooking zone will output 3000
W. Meanwhile the rear right-hand
cooking zone will provide a maximum 600 W output, corresponding
to level 7. If you attempt to turn the
rear right-hand cooking zone to a
level higher than level 7 while the
front right-hand zone is set to Power,
Power will automatically be turned
off. The front cooking zone will then
continue operation at level 9.
Distance to Wall:
Minimum 150 mm to flammable
material. Minimum 50 mm to nonflamable material.
1. Cut a hole in the table top
according to the measures stated.
See “Technical data”, “built-in
measurement”.
2. Place the unit upside down on a
mat. Take care that the top side is
not scratched.
3. Mount the clamping fittings in
the holes in the side of the base
panel (see fig.)
4. Place the unit in the hole and
tighten the clamping fittings to
the table top using a screwdriver.
Deactivating Power
1. Press
Clamping fittings
P.
Changing from Power to a different level
.
1. Press
Mounted clamping fittings
P
1 m
or
until the desired
2. Press
level shows on the display.
14
31
Turn off a single zone by pressing
the
or
buttons until the display shows “0”. You can turn off a
zone quickly by pressing the
and
buttons simultaneously.
Mounting more than one
hob
m l
m
Distance to wall:
Min. 150 mm
(flammable material)
l
Turn off all zones by pressing the
button.
k
Distance to wall:
Min. 50 mm
(non-flammable material)
m
0m
49
Reinforcement beam
Residual Heat Indicator
Each cooking zone has a residual
heat indicator. When the cooking
zone is turned off the “H” is lit up in
the display until the cooking zone
has cooled. “H” is a warning that the
cooking zone is still hot.
Cutting out
The measurement of the selected combination is calculated in the following way:
Depth: 490 mm
Width:
1. Calculate the sum of all units’ width.
2. Subtract 20 mm from the total width.
Example:
A hob of 720 mm + a downdraft of 180 mm + a gas hob of 360 mm.
1. 720+180+360= 1260 mm
2. Width of the hole: 1260-20=1240 mm
Distance to Wall:
Min. 150 mm to flammable material.
Min. 50 mm to non-flammable material
32
13
Mounting:
When mounting several hobs together you must use a reinforcement beam
between each hob as well as the silicone supplied with the hobs (see fig.)
Finger Touch
The keys are to be touched for minimum 1 sec. before activation.
1. Cut a hole of the calculated size in the table top
2. Place the individual hobs upside down on a mat. Take care that the top side is
not scratched.
3. Mount the clamping fittings in the holes in the side of the base panels (see
fig.)
4. Place the first hob in the hole.
5. Apply silicone to the two corners joining the next hob (see fig.)
Use only the silicone supplied with the hobs as this is intended to tolerate the
high temperatures of the appliance.
6. Push a reinforcement beam up against the hob. Apply silicone on the reinforcement beam (see fig.)
7. Tighten the clamping fittings to the table top using a screwdriver.
8. Repeat the process for the other hobs.
Cooking Zones
Zones can be set from 1-9, where 9
is the highest level.
1. Press the
button.
l
k
m button to set
or the
2. Press
the desired zone.
Adjustment of the zones must take
less than 10 seconds, otherwise the
cooking section will turn off again.
m
button to set the zone
Press the
level by level from 0-9.
l
button to set the zone
Press the
level by level from 9-0.
l m
or
If you keep pressing the
button, the adjustment will be quicker - the hob will run through the
adjustment levels 1-9 and stop when
you reach “0”.
If there is no pan on the zone or if
the pan is not magnetic, “F” will
show on the display for max. 10 sec,
after which the appliance will turn
off.
Silicone
12
33
How to use
To optimise joints between the installed hobs, the gap between the ceramic hob
may be grouted with silicone:
1. Remove the aluminium panels from the hobs.
2. Apply a stripe of silicone to the gap between the two ceramic hob. Use only
the silicone supplied, as it is designed to tolerate the appliance’s high temperature. (Fig. 1)
3. Splash a little soapy water (washing-up liquid) on the silicone stripe
4. Press the rubber block hard against the ceramic hob and pull it slowly from
back to front (Fig. 2)
5. Leave the silicone to harden until the next day.
6. Remove surplus silicone coating from the ceramic hob with the razorblade
supplied. Be careful not to damage the silicone in the gap. Run tools only
along the joint, never across it.
7. Polish the ceramic hob with the supplied cleaning product for ceramic hobs.
1
2
Ceramic hob
Make sure there is no sand, sugar or
salt on the base of the pan. Sand can
cause scratches and sugar and salt
can damage the hob.
Always dry pans before placing
them on the hob. The coloured decoration on the hob may wear away or
suffer scratches depending on use.
Never use a cracked vitroceramic hob.
Water could boil over and/or
cleaning agents penetrate
into the live electrical parts.
Switch off the power to the
appliance and contact
Service.
Do not use the ceramic hob without
the aluminium strip in place.
Never place aluminium foil,
paper, plastic or similar on
the hob. A hot heating zone
could cause foil, plastic or
paper to melt or burn.
Do not use the ceramic hob as a
work surface as this could damage
the hob.
Never leave the hob unattended when deep frying or
melting fat, paraffin wax or
other easily ignited substances. In case of fire, turn
off all knobs and switch off
any cooker hood.
Put out the fire with a lid,
and never use water.
Scrape any spills from the
hob straight away with a
razor. Spills of sugar and
sugar-rich foods (jam, fruit
syrup etc.), melted plastic
and aluminium foil may
damage the hob. Never
place wet saucepans on the
hob.
34
11
Before Use
Overview of the outside
width of the units
Protect the ceramic hob
Before using the hob for the first
time it must be cleaned for manufacturing residues such as dust, dirt etc.
Apply a protective coating on the
ceramic hob before you use it. This
way it becomes easier to clean the
glass and you prevent any spillage
from burning.
180 mm
Downdraft
360 mm
Glass ceramic hob with 2 cooking
zones
Gas hob with 2 burners
Induction hob with 2 cooking zones
Grill
Grill / Fryer
Wok
This is what you do:
1. Pour a few drops of the cleaning
agent supplied with the hob on
paper towel and rub it on to the
entire surface.
2. Polish the surface with a clean
cloth until it is dry.
580 mm
Glass ceramic hob with 4 cooking
zones
Gas hob with 4 burners
720 mm
Glass ceramic hob with 4 cooking
zones
Gas hob with 4 burners
Induction hob with 4 cooking zones
10
35
What to do if...
If the appliance is not working correctly, please carry out the following checks
before contacting your local AEG Service Force Centre.
IMPORTANT: If you call out an engineer to a fault caused by incorrect use or
installation, a charge will be made even if the aookuabce is under guarantee.
Problems
Remedy
The hob doesn’t work.............
Check that the hob is switched on.
Check the HPFI/HFI relay in the
main fuse box. Check the fuses for
the hob.
The hob gets hot.................
The hob may get as hot as 60°C.
The fuses are constantly blowing.....
Possibly, you have too many electrical appliance in use at one go. If
your hob is connected to a 10 Amp
fuse group, there is a high risk of
overload.
Overheating protection
When a pan is placed on a zone, the
pan will heat up. A sensor under
each zone measures the temperature
of the zone and the pan. If the temperature gets too high, the zone will
automatically switch off.
During use there will be noise from
the induction coil and the fan. This is
completely normal and has no effect
on cooking performance.
Quick adjustment
When you turn on a zone, the pan
will become hot very quickly. When
you turn the heat down, the heat
quickly dissipates.
The zones make clicking and
other noises
However, some pans can increase the
noise. If the noise becomes a nuisance, one option could be to use a
different pan.
At the low heat settings, clicks will
be heard. These occur when the heat
is being switched on and off. This is
completely normal and has no effect
on cooking performance.
36
Power
The front zone has a facility for
switching in extra heat to give an
even quicker boiling time. When
using Power on the front zone the
rear zone cannot be set at the highest
setting. Information on how to use
Power is given in the Section “How
to use....Power”.
High safety levels
The individual zones will only get
hot when a pan with a magnetic base
is placed on them. It is impossible to
turn on an empty zone. When you
remove the pan from a lighted zone,
the zone will turn off even if you do
not switch it off. Remember that
there will still be residual heat in the
vitroceramic hob. The zone will
remember the last setting for about
20 seconds.
Cooling fan
A fan protects the electronics from
overheating. When you have finished using the zones, the fan will
continue to run until the electronics
have cooled down.
Electronic control system
The hob has an electronic control
system to ensure precise heat control
of the zones. The electronics have
the following functions:
- Power, extra heat
- AUTOMAX, automatic boiling
- Safety shutdown
- Autostop. Automatic turning off
of zones
- Child safety
- Minute minder and timer
Easy cleaning
Any spills will not burn onto the vitroceramic hob as the area to the side
of the pan is not hot. Cleaning of
spills is therefore easy.
9
Ceramic hob
Ceramic glass is insensitive to temperature shock and very robust:
however it is not unbreakable.
Especially sharp and hard
objects that fall on the cooking surface can damage it.
Induction
When you switch on a zone, a highfrequency magnetic field is formed
between the induction coil and the
magnetic base of the pan. This magnetic field contains induction currents. The base of the pan slows
down the induction currents, thus
forming heat which first heats the
pan base and then the food in the
pan.
Problems
Remedy
The zones won’t turn on. The display shows:
Child safety has been activated. You
can either press the
button at the
same time as you make a selection, or
you can cancel the child safety device,
see Section “How to use .. Child safety”.
The zones won’t turn on and the
display shows:
Autostop has been activated. Touch the
button. The hob is now ready for
use.
The display is flashing “F”.
Check whether the zones are sufficiently covered by the pan. See the
section “How to use...Suitable pans”
j
k
Saucepan base
Ceran surface
Induction coil
Magnetic field
Check that the pans are suitable for
induction. See the section: “How to
use...Suitable pans” If “F” still flashes, contact service. See section
“Service and spare parts”.
Quicker cooking
With induction, your pans become
hot immediately. This means you
save time and energy when cooking
by induction. As the necessary heat
for cooking the food is formed in the
base of the pan, the hob hardly gets
hot. However, it does absorb the surplus heat from the pan base.
If the rear zone is set to levels 8
or 9 while the front zone is set to
Power, the front zone will revert
to level 9.
The front and rear zones are connected. If you wish to use setting 8 or 9
on the rear zone, the front zone cannot
be set higher than level 9. Power will
automatically be turned off.
In-guarantee customers should ensure that the above checks have been made as
the engineer will make a charge if the fault is not a mechanical or electrical
breakdown.
8
Please note that it will be necessary to provide proof of purchase for any in-guarantee service calls.
37
Product Description
Service and Spare Parts
In the event of your appliance requiring service, or if you wish to purchase spare
parts, contact your local AEG Service Force Centre by telephoning:
1. Cooking zone Ø 140 mm, 1400 W.
2. Cooking zone Ø 210 mm, 2200 W,
3000 W power.
3. Control panel
1
08705 929 929
Your call will automatically be routed to the Service Centre covering your post
code area.
2
For the address of your local Service Force Centre and further information about
Service Force, please visit the website at www.serviceforce.co.uk
In-guarantee customers should ensure that the recommended checks under the
heading “What to do if..” have been made as the engineer will make a charge if
the fault is not a mechanical or electrical breakdown.
Please note that proof of purchase is required for in-guarantee service calls.
3
Control Panel
Help us to help you
Please determine your type of enquiry before writing or telephoning. When you
contact us we need to know:
1. Your name, address, post code and telephone number
2. Clear and concise details of the fault.
3. Date of purchase
4. The model and serial number
This information can be found on the rating plate.
6
1.
2.
3.
4.
5.
6.
7.
8.
38
8
7
2
2
3
5
4
On / off
Setting of steps
AUTOMAX/Power
Timer
Minute minder
Child safety
Display for setting cooking zones
Minute display
7
7
4
3
2
2
1
Customer Care
For general enquires concerning your AEG appliance or for further information
on AEG products, please contact our Customer Care Department at the address
below or visit our website at www.aeg.co.uk
Disposal
Help prevent accidents when disposing of the product. Remove the cable
from the wall plug and cut off the
cable close to the product.
Customer Care Department
AEG Domestic Appliances
55-77 High Street
Slough, Berkshire
SL1 1DZ
Tel 08705 350350*
*calls to this number may be recorded for training purposes
GUARANTEE CONDITIONS
Standard guarantee conditions
We, AEG, undertake that if within 12 months of the date of the purchase this
AEG appliance or any part thereof is proved to be defective by reason only of
faulty workmanship or materials, we will, at our discretion repair or replace the
same FREE OF CHARGE for labour, materials or carriage on condition that:
· The appliance has been correctly installed and used only on the electricity or
gas supply stated on the rating plate.
· The appliance has been used for normal domestic purposes only, and in
accordance with the manufacturer’s operating and maintenance instructions.
· The appliance has not been serviced, maintained, repaired, taken apart or
tampered with by any person not authorised by us.
· All service work under this guarantee must be undertaken by a Service Force
Centre. Any appliance or defective part replaced shall become the
Company’s property.
· This guarantee is in addition to your statutory and other legal rights.
· Home visits are made between 8.30am and 5.30pm Monday to Friday. Visits
may be available outside these hours in which case a premium will be
charged.
6
39
Safety Information
Exclusions
This guarantee does not cover:
· Damage or calls resulting from transportation, improper use or neglect, the
replacement of any light bulbs or removable parts of glass or plastic.
· Costs incurred for calls to put right an appliance which is improperly
installed or calls to appliances outside the United Kingdom.
· Appliances found to be in use within a commercial environment, plus those
which are subject to rental agreements.
· Products of AEG manufacture which are not marketed by AEG.
European Guarantee
If you should move to another country within Europe then your guarantee moves
with you to your new home subject to the following qualifications:
· The guarantee starts from the date you first purchased your product.
· The guarantee is for the same period and to the same extent for labour and
parts as exists in the new country of use for this brand or range of products.
· This guarantee relates to you and cannot be transferred to another user.
· Your new home is within the European Community (EC) or European Free
Trade Area.
· The product is installed and used in accordance with our instructions and is
only used domestically, i.e. a normal household.
· The product is installed taking into account regulations in your new country.
Before you move please contact your nearest Customer Care centre, listed below,
to give them details of your new home. They will then ensure that the local
Service Organisation is aware of your move and able to look after you and your
appliances.
France
Germany
Italy
Sweden
UK
Senlis
Nürnberg
Pordenone
Stockholm
Slough
+33 (0)3 44 62 29 29
+49 (0)800 234 7378
+39 (0)800 117511
+46 (0)8 672 53 60
+44 (0)1753 219899
40
The hob is intended for domestic use
only. If it is used in any other way
there is a risk of accidents.
hob while the zones are turned on.
Never place metal objects (spoons,
pan lids etc.) on an induction zone.
Children
Cleaning and Maintenance
Keep an eye on children when the
hob is in use. Pans get very hot
when used and remain warm for
some time after the hob has been
turned off. Never let children touch
or play with the controls.
For reasons of hygiene and safety
the cooking zones must be kept
clean. Grease and spilt food liberate
smoke when heated and may at
worst cause fire.
Service
Use
Service and repair must be performed by our service organisation
or an organisation approved by us.
Only spare parts supplied by our
service organisation may be used.
Never leave the hob unattended
when deep fat frying, or heating fats
and oils. In the event of fire turn off
all controls and if you have a cooker
hood this must be turned off as well.
Never leave paper, dish cloths, aluminium foil or any other easily ignited materials close to the
hob. A hot hob can cause foil, plastic
or paper to melt or burn.
Unpacking
Make sure the packaging is disposed
of in such a manner that children
cannot access the used packaging.
Put out flames with a lid, and
never use water.
Check that the hob is turned off
when not in use.
Persons with pacemakers should
keep their upper body at a minimum
distance of 30 cm from the zones
when turned on.
Never place any magnetically
charged objects (e.g. credit cards,
cassettes etc.) on the vitroceramic
Installation
The product may only be installed
by an authorised electrician or a person authorised by the manufacturer.
5
Work performed by an unauthorised
person may lead to injuries or building damages and deteriorate the
functionality of the product. When
installing make sure the cord does
not get jammed.
Your New Appliance
Thank you for purchasing an AEG appliance.
To enable you to use your new appliance efficiently and safely, please read this
instruction book carefully before installing or using the appliance, and retain for
future reference. Should the appliance be transferred to a new owner please
ensure this instruction book is left with the appliance in order that the new owner
can get to know the functions of the appliance and the relevant warnings.
If you require further assistance or advice, please contact our Customer Care
Department either by letter or telephone:
Customer Care Department
AEG Domestic Appliances
55-77 High Street
Slough
SL1 1DZ
Tel:
08705 350350*
* calls to this number may be recorded for training purposes
2
43
Contents
Page no.
For the Installer
Unpacking ........................................................................................................
Technical Specifications ..................................................................................
Installation........................................................................................................
Mounting ..........................................................................................................
26
27
28
29
How to read the operating instructions
1... 2...Step by step
Hints and tips
Safety information
Environmental information
The products are continuously being developed and it may occur that some product specifications
are changed after this instruction book was printed. We therefore have to make reservation for any
changes or printing errors.
4
41
Contents
Page no.
For the User
Your New Appliance ........................................................................................
Safety Information ..........................................................................................
Product Description ........................................................................................
Ceramic Hob ..........................................................................................
Induction..................................................................................................
Before use ........................................................................................................
Protect the ceramic hob ..........................................................................
How to Use ......................................................................................................
Ceramic Hob ..........................................................................................
Finger Touch ..........................................................................................
Cooking Zones ........................................................................................
Residual Heat Indicator ..........................................................................
Power ......................................................................................................
AUTOMAX ............................................................................................
Safety Turn-off ........................................................................................
Autostop ..................................................................................................
Activating the Child Safety Device ........................................................
Minute Minder ........................................................................................
Timer ......................................................................................................
Suitable pans ..........................................................................................
Advise and Tips for Using the Cooking Zones ......................................
Cleaning and Maintenance of ........................................................................
Aluminium ..............................................................................................
Ceramic Hob ..........................................................................................
What to do if ....................................................................................................
Service and Spare Parts ..................................................................................
Guarantee conditions ......................................................................................
42
3
2
5
7
8
8
10
10
11
11
12
12
13
14
15
17
17
18
20
21
23
24
25
25
25
36
38
39
INSTRUCTION BOOK
FM 4803K-an
GB
325 88-8327 rev. 3-343
949 601 004