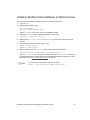
1
StorNext® 2.8 File System and Storage
Manager Installation Guide
ADVANCED DIGITAL INFORMATION CORPORATION
www.adic.com
Copyright © 2006 ADIC
The information contained in this document is subject to change without notice.
This document contains proprietary information which is protected by copyright. All rights are
reserved. No part of this document may be reproduced, modified, distributed, or translated to another
language without prior written consent of ADIC.
ADIC USA
11431 Willows Road NE
Redmond, Washington
98052-4952
Tel.: 1-800-336-1233
Fax: 1-425-881-2296
This document may describe designs for which patents are pending, or have been granted. By
publishing this information, ADIC conveys no license under any patent or any other right.
ADIC shall not be liable for errors contained herein or for incidental or consequential damages
(including lost profits) in connection with the furnishing, performance or use of this material whether
based on warranty, contract, or other legal theory. ADIC makes no representation or warranty with
respect to the contents of this document and specifically disclaims any implied warranties of
merchantability or fitness for any particular purpose. Further, ADIC reserves the right to revise or
change this document without obligation on the part of ADIC to notify any person or organization of
such revision or change.
Every effort has been made to acknowledge trademarks and their owners. All trademarks within this
document are the property of their respective owners. Trademarked names are used solely for
identification or exemplary purposes, and any omissions are unintentional. ADIC is a registered
trademark of Advanced Digital Information Corporation.
Published: July 2006
Document Number: 6-00360-08 Rev A
Advanced Digital Information Corporation Software
Licenses Agreement
This Software License is entered into and effective as of this _____, day of_____________ 2006 ("Effective
Date"), by and between:
and
Advanced Digital
Information Corporation
PO Box 97057
Redmond, WA 98073-9757
(Referred to as “ADIC")
Company: _______________________
Located at: _______________________
_______________________
_______________________
(Referred to as “Licensee")
This License sets forth the terms and conditions under which ADIC agrees to grant and Licensee agrees to
accept a license to use certain of ADIC's proprietary software and related documentation. Any software programs
or related materials provided to Licensee by ADIC will be subject to the terms and conditions of this License.
Definitions
“Designated Computer(s)” means that computer equipment, identified to ADIC in Exhibit A by serial number,
upon which the Software is installed.
“Documentation” means ADIC provided materials related to the Software, including, but not limited to operator
and user manuals, training materials, guides, listings, specifications, or other written documentation.
"Release" means a modification to the Software that does not change ADIC's base version number, but may add
functionality. New Releases are provided to the Licensee at no charge when Licensee maintains a current
Software Maintenance Agreement with ADIC.
“Software” means only the current version of those software products specified in Exhibit A hereto, in object code
form only, and the Documentation provided by ADIC in connection therewith or any portions thereof, and any
subsequent Releases.
"Upgrade" means a modification to the Software that adds significant features and/or functionality and causes a
change in ADIC's base version number. Upgrades may have a new initial License fee or upgrade charge
associated with it.
Software License
a.
License. In consideration of Licensee's full payment of the License fees and subject to the terms and
conditions of this License, ADIC hereby grants to Licensee a personal, non-exclusive, non-transferable
license to use and copy the Software. A separate license is required for use of each Software program on
each Designated Computer.
b.
Use. Licensee is authorized hereby to use the Software on the Designated Computer(s) only, or on backup
equipment if the Designated Computer is inoperative until such time as the Designated Computer is
restored to operation and processing on the back-up equipment is completed. This grant is specifically
limited to use by the Licensee for normal, customary internal data processing, and specifically excludes
Licensee's time-sharing or the rental of the Software or use of the Software in the development or
marketing of a competitive or compatible product. No right to use, print, copy or display the Software or
Documentation, in whole or in part, is granted hereby except as expressly provided in this License.
c.
Copying. Licensee may make one (1) copy of the Software in a non-printed, machine-readable form for
archival and back-up purposes only. In order to protect ADIC's trade secret and copyrights in the Software,
Licensee agrees to reproduce and incorporate Licensee's trade secret or copyright notice in any copy or
partial copy, and will maintain appropriate records of the location of such copy.
StorNext File System and Storage Manager Installation Guide
iii
d.
Transfer Rights. The Software will be installed initially on Licensee's Designated Computer(s) set forth in
Exhibit A. Licensee may thereafter transfer the Software to another one of its computers of the same
machine architecture, provided that the Software is installed on one (1) Designated Computer at a time, b)
is covered under a current maintenance support plan with ADIC, and c) provides ADIC with written notice
thirty (30) days prior to the transfer. If Licensee transfers the Software to a machine of a different
architecture, Licensee may be subject to a transfer fee.
e.
US Government Rights. If the Licensee is the United States government, Licensee understands and
agrees that ADIC Software and documentation are provided as "Commercial Items" as defined at 48 CFR
2.101 and are being licensed to U.S. Government end users consistent with 48 CFR 12.212.
Price and Payment
Licensee will make payment to ADIC for the Software license pursuant to those fees set forth in the agreement of
the parties. The Licensee must pay any such fees within thirty (30) days of the date of ADIC's invoice.
Software Ownership and Protection
a.
ADIC's Warranty. ADIC warrants that it is the owner of the Software and all portions thereof, except for any
embedded third party software for which ADIC holds a license that is not inconsistent with the license
granted under this agreement, and that it has the right to modify the Software and to grant this License for
its use.
b.
Title to Software. The Software and all copies thereof (except for any embedded third party software) are
proprietary to ADIC and title thereto remains in ADIC. All applicable rights to patents, copyrights,
trademarks, trade secrets or other proprietary rights in the Software and any modifications made at
Licensee's request are and will remain in ADIC.
c.
Restrictions. Licensee will not itself or permit others to:
i.
sell, sublicense, transfer, publish, disclose, display, provide access via a network or otherwise make or
allow available the Software or any copy thereof, in any form whatsoever, to others;
ii.
remove, obscure, or alter any copyright, trade secret, trademark, patent or other proprietary rights
notice affixed to or displayed on the Software or Documentation or affixed to or printed on any of its
factory packaging;
iii.
modify, merge with other programs or translate any portion of the Software into any other assembly or
foreign language; and
iv.
reverse-assemble, reverse-compile or attempt to derive a source code equivalent of the Software.
e.
Protections. Licensee agrees to secure and protect the Software, the Documentation and copies thereof in
a manner consistent with ADIC's rights therein and to take appropriate action to satisfy its obligations in
this Article by instruction or agreement with its employees, agents, subcontractors or others who are
permitted access to the Software. All programs or copies developed by or for the Licensee in violation of
this License, including translations, compilations, partial copies with modifications and up-dated works, are
the property of ADIC.
f.
Responsibility. Licensee has sole responsibility for use of the program and any information entered, used,
or stored thereon. This responsibility includes protection of data from modification, destruction, or
disclosure, and for the accuracy and integrity of the results from improper use. ADIC assumes no
responsibility for Licensee's negligence or failure to protect data from modification, destruction, or
disclosure.
iv
Advanced Digital Information Corporation Software Licenses Agreement
Installation
Installation. Licensee will, at its own expense, ensure that the installation site conforms to the requirements of the
Software and, at its own expense, prepare and maintain the environmental conditions at the installation site in
accordance with the requirements of the relevant hardware manufacturer. ADIC will be responsible for
reasonable support during the initial installation process.
Use and Training
Licensee will limit the use of the Software to those individuals who have been appropriately trained. ADIC will
make training for the Software available to Licensee pursuant to its standard training procedures. Unless
otherwise mutually agreed, any additional training will be provided at ADIC's Englewood, Colorado facility at
ADIC's then current rates.
Warranty and Warranty Servicing
a.
Warranty. ADIC warrants that for a period of ninety (90) days from installation the Software will conform to
all substantial operational features in ADIC's current published specifications and will be free of defects
which substantially affect performance of the Software. ADIC does not warrant that the Software will meet
the Licensee’s requirements or that the operation of the Software will be uninterrupted or error free.
b.
Compatibility. It is the intent of ADIC to provide Software which is compatible with the current releases of
common computer operating systems, however, ADIC does not warrant that the Software is compatible
with the current releases of all operating systems, nor that the Software, including any future Releases, will
be made compatible with new releases of the operating system within a specified amount of time, or at all.
At Licensee's request, ADIC will notify Licensee of the version level of the operating system with which the
current version of the Software is intended to be compatible, and the version level of operating systems for
which a subsequent release of the Software is intended to be compatible.
c.
Warranty Servicing. The Licensee must notify ADIC in writing, within ninety (90) days after installation of
the Software of Licensee’s claim of any defect. If the Software is found defective by ADIC, ADIC’s sole
obligation under this warranty is for ADIC, at its option, either to correct, in a manner consistent with
ADIC's regular support practices, any defect in the Software or to accept the return of the Software. Where
Software is returned for claims made during the warranty period, Licensee will be provided a full refund for
the Software and related products sold under the same Purchase Agreement.
d.
Warranty Exclusions. This warranty is made void if the Licensee or any other third party makes any
modifications to the Software. Licensee will pay ADIC for corrections necessitated by difficulties or defects
traceable to Licensee's errors or system changes in accordance with ADIC's then current standard time
and material charges.
e.
Warranty Disclaimer. EXCEPT FOR THE EXPRESS LIMITED WARRANTY STATED ABOVE, ADIC
MAKES NO WARRANTIES, EXPRESS OR IMPLIED, FOR THE SOFTWARE, INCLUDING THE
WARRANTIES OF MERCHANTABILITY AND FITNESS FOR A PARTICULAR PURPOSE.
f.
Third Party Warranties. No reseller or distributor of the Software who may have participated in offering,
demonstrating, promoting or delivering the Software subject to this License makes any warranty
whatsoever. All limitations and exclusions of warranty, disclaimers of warranty, limitations of damages and
remedies are as set forth hereinabove and the terms of all portions of this License apply to such reseller or
distributor to the full extent applicable to ADIC.
Maintenance
Maintenance, enhancements and Updates for the Software are not covered under this License. If desired by the
Licensee, such services must be provided for under separate agreement.
StorNext File System and Storage Manager Installation Guide
v
Infringement Indemnification
a.
ADIC will defend, indemnify, save, and hold Licensee harmless against claims, demands, liability,
damages, and judgments which are finally adjudicated, including attorney's fees and court costs arising or
resulting directly from any claim, suit or litigation brought against Licensee based on infringement of any U.
S. patent or copyright by the Software (except that indemnification does not apply to any third party
software which may be embedded therein), provided, however, that such indemnity is conditioned upon
receipt by ADIC of prompt notification in writing of such claim and that Licensee provides continuing
information and reasonable assistance for the defense and settlement of any claim. ADIC will retain
attorneys, as deemed necessary, and conduct the defense and settlement of such claim. ADIC may, at its
own expense and at its option, either (1) procure for Licensee the right to continue using the Software, or
(2) replace the same with non-infringing software, or (3) modify the Software so that it becomes noninfringing provided such modified intellectual property will reasonably meet Licensee's needs.
b.
Upon failure of (1), (2) or (3) above, despite the reasonable efforts of ADIC, Licensee may terminate this
License only with respect to the Software adversely affected by such action or claim. Upon such
termination ADIC will promptly refund to Licensee any License Fees paid and other payments made for the
adversely affected Software. ADIC may deduct from the refund a fair market value for usage, which will be
a pro rata share of the License charge for the time period used, assuming a three (3) year straight line
depreciation with no salvage value.
c.
Notwithstanding the foregoing ADIC has no liability if any such claim or suit is based upon or arises out of:
1) alterations of the Software by Licensee or any third party; 2) Licensee's failure to install updated
Software provided by ADIC for avoiding such infringement; 3) use of the Software in combination with
apparatus or software not furnished by ADIC; 4) use of the Software in a manner for which it was neither
designed nor contemplated; 5) third party software embedded in the Software; 6) Software modified by
ADIC for Licensee in accordance with Licensee's specifications or requests; or 7) a patent, trademark or
copyright in which Licensee or any of its affiliates or subsidiaries has a direct or indirect interest by license
or otherwise.
Term and Termination
a.
Term. The term of this License is perpetual, unless terminated by ADIC as provided herein.
b.
Termination. This License commences on the Effective Date and will continue in perpetuity unless
Licensee fails to comply with any of the material conditions of this License. ADIC may, after allowing
Licensee a reasonable time to cure its default, terminate this License upon written notice to the Licensee.
Within thirty (30) days after termination of this License, Licensee will certify, in writing, to ADIC, that
Licensee has discontinued the use of all Software; and either destroyed or, at ADIC’s election, returned to
ADIC the original and all copies of the Software and Documentation in any form maintained by Licensee.
c.
Termination for Cause. A violation of any provision of Paragraph 3. above will be deemed a material
breach and the basis for immediate termination of this License.
d.
Termination upon Insolvency. This License may be terminated by ADIC if the Licensee (i) terminates or
indefinitely suspends its business; (ii) becomes subject to any bankruptcy or insolvency proceeding under
governmental statute; or (iii) becomes insolvent or becomes subject to direct control by a trustee, receiver
or similar authority.
e.
Remedies upon Termination. If this License is terminated by ADIC, ADIC will have the right to take
immediate possession of the Software, Documentation, and all copies wherever located, without demand
or notice. Termination of this License is in addition to and not in lieu of any equitable or legal remedies
available to ADIC.
vi
Advanced Digital Information Corporation Software Licenses Agreement
Notices and Correspondence
All notices and correspondence sent by one party to the other in all matters will be sent to the addresses listed in
the initial paragraph hereof, except as otherwise requested in writing.
DISCLAIMER AND LIMITATION OF LIABILITY
THE LICENSEE HAS THE SOLE RESPONSIBILITY FOR THE ADEQUATE PROTECTION AND BACK-UP OF
ITS DATA USED IN CONNECTION WITH THE SOFTWARE. IN NO EVENT WILL ADIC BE LIABLE FOR
SPECIAL, INDIRECT, INCIDENTAL OR CONSEQUENTIAL DAMAGES OR ANY DAMAGES WHATSOEVER
RESULTING FROM THE LOSS OF USE, DATA OR PROFITS, RERUN TIME, INACCURATE INPUT OR WORK
DELAYS, OR ANY PERSONAL OR PROPERTY DAMAGE ARISING OUT OF OR IN CONNECTION WITH
THIS LICENSE OR THE USE, PERFORMANCE OR NON-PERFORMANCE OF THE SOFTWARE, WHETHER
IN ACTION, IN CONTRACT, OR TORT INCLUDING NEGLIGENCE, EVEN IF ADIC KNEW, SHOULD HAVE
KNOWN OR HAS BEEN ADVISED OF THE POSSIBILITY OF SUCH DAMAGES. ADIC's LIABILITY FOR
DAMAGES HEREUNDER WILL IN NO EVENT EXCEED THE AMOUNT OF FEES PAID BY LICENSEE
UNDER THIS LICENSE.
General
a.
No Assignment. This License is not assignable. None of the Software or Documentation may be
sublicensed, assigned, or transferred to any other party without ADIC’s prior written consent. Any effort
contradictory with this is null and void.
b.
Modification. This License or any Exhibit hereto can only be modified by a written agreement executed by
Licensee and ADIC.
c.
Governing Law. The laws of the state of Washington will govern this license. All litigation between the
parties, including all applications for injunctive relief, must be conducted before a court of competent
jurisdiction within King County, Washington, USA and both parties consent to personal jurisdiction of such
court. If any of the provisions of this License are held to be invalid under any applicable statute or law, they
are, to that extent, deemed omitted.
d.
Enforcement Costs. The party prevailing in any litigation or legal proceeding, including arbitration, arising
out of any dispute under this Agreement will be entitled to recover reasonable attorneys’ fees and costs
from the other party.
e.
Limitations on Actions. Any action, regardless of form, arising out of the transactions under this License,
may not be brought by either party more than one (1) year after the cause of action has accrued, except
that an action for nonpayment may be brought within four (4) years after the last payment date.
Entirety
Licensee acknowledges that it has read this Software License, understands it, and agrees to be bound by its
terms and conditions. Further, Licensee agrees that this is the complete and exclusive statement of the
agreement between the parties and supersedes all proposals or prior agreements, oral or written and all other
communications between the parties relating to the subject matter of this License. Any variance from the terms
and conditions of this License or any supplement in any Licensee purchase order or other written notification or
agreement will be of no effect.
StorNext File System and Storage Manager Installation Guide
vii
viii
Advanced Digital Information Corporation Software Licenses Agreement
Contents
Advanced Digital Information Corporation Software Licenses Agreement . . . . . . . . . . . iii
1 Introduction
1
Who Should Read this Book . . . . . . . . . . . . . . . . . . . . . . . . . . . . . . . . . . . . . . . . . . . . . .
How This Book is Organized . . . . . . . . . . . . . . . . . . . . . . . . . . . . . . . . . . . . . . . . . . . . . .
Explanation of Symbols. . . . . . . . . . . . . . . . . . . . . . . . . . . . . . . . . . . . . . . . . . . . . . . . . .
Conventions . . . . . . . . . . . . . . . . . . . . . . . . . . . . . . . . . . . . . . . . . . . . . . . . . . . . . . . . . .
1
2
2
2
2 Installing StorNext
5
Installation Requirements . . . . . . . . . . . . . . . . . . . . . . . . . . . . . . . . . . . . . . . . . . . . . . . . 5
Windows Prerequisites . . . . . . . . . . . . . . . . . . . . . . . . . . . . . . . . . . . . . . . . . . . . . . . 6
Red Hat Linux Prerequisites . . . . . . . . . . . . . . . . . . . . . . . . . . . . . . . . . . . . . . . . . . . 6
SuSE Linux Prerequisites . . . . . . . . . . . . . . . . . . . . . . . . . . . . . . . . . . . . . . . . . . . . . 8
Sun Solaris Prerequisites . . . . . . . . . . . . . . . . . . . . . . . . . . . . . . . . . . . . . . . . . . . . . 9
HP-UX Prerequisites . . . . . . . . . . . . . . . . . . . . . . . . . . . . . . . . . . . . . . . . . . . . . . . . . 9
IBM AIX Prerequisites . . . . . . . . . . . . . . . . . . . . . . . . . . . . . . . . . . . . . . . . . . . . . . . 10
SGI IRIX Prerequisites . . . . . . . . . . . . . . . . . . . . . . . . . . . . . . . . . . . . . . . . . . . . . . 10
RAM and Hard Disk Requirements . . . . . . . . . . . . . . . . . . . . . . . . . . . . . . . . . . . . . 11
2TB LUN Requirements . . . . . . . . . . . . . . . . . . . . . . . . . . . . . . . . . . . . . . . . . . . . . . . . 11
Label Types. . . . . . . . . . . . . . . . . . . . . . . . . . . . . . . . . . . . . . . . . . . . . . . . . . . . . . . 11
Using the Optional Pre-Installation Configuration . . . . . . . . . . . . . . . . . . . . . . . . . . . . . 13
Running the Pre-Installation Script . . . . . . . . . . . . . . . . . . . . . . . . . . . . . . . . . . . . . . . . 14
StorNext Support Directory Location Recommendations . . . . . . . . . . . . . . . . . . . . 15
Installing StorNext Software . . . . . . . . . . . . . . . . . . . . . . . . . . . . . . . . . . . . . . . . . . . . . 16
3 Configuring StorNext
21
Using the Configuration Wizard. . . . . . . . . . . . . . . . . . . . . . . . . . . . . . . . . . . . . . . . . . . 22
Step 1: Entering a License . . . . . . . . . . . . . . . . . . . . . . . . . . . . . . . . . . . . . . . . . . . 24
Step 2: Adding File Systems . . . . . . . . . . . . . . . . . . . . . . . . . . . . . . . . . . . . . . . . . . 28
StorNext File System and Storage Manager Installation Guide
ix
Step 3: Adding a Library . . . . . . . . . . . . . . . . . . . . . . . . . . . . . . . . . . . . . . . . . . . . .
Adding a SCSI Library . . . . . . . . . . . . . . . . . . . . . . . . . . . . . . . . . . . . . . . . . . . .
Adding an ACSLS Network Library. . . . . . . . . . . . . . . . . . . . . . . . . . . . . . . . . . .
Adding a DAS Network Library . . . . . . . . . . . . . . . . . . . . . . . . . . . . . . . . . . . . . .
Adding a Vault Library. . . . . . . . . . . . . . . . . . . . . . . . . . . . . . . . . . . . . . . . . . . . .
Step 4: Adding a Tape Drive . . . . . . . . . . . . . . . . . . . . . . . . . . . . . . . . . . . . . . . . . .
Step 5: Adding Media . . . . . . . . . . . . . . . . . . . . . . . . . . . . . . . . . . . . . . . . . . . . . . .
Step 6: Adding Secondary Storage Disks . . . . . . . . . . . . . . . . . . . . . . . . . . . . . . . .
Step 7: Adding a Storage Policy . . . . . . . . . . . . . . . . . . . . . . . . . . . . . . . . . . . . . . .
Step 8: E-mail Notification . . . . . . . . . . . . . . . . . . . . . . . . . . . . . . . . . . . . . . . . . . . .
4 Installing StorNext Client Software
71
Downloading the Client Software . . . . . . . . . . . . . . . . . . . . . . . . . . . . . . . . . . . . . . . . .
Installing StorNext Client Software on Windows . . . . . . . . . . . . . . . . . . . . . . . . . . . . . .
Installing StorNext Client Software on Red Hat Linux . . . . . . . . . . . . . . . . . . . . . . . . . .
Installing StorNext Client Software on SuSE Linux . . . . . . . . . . . . . . . . . . . . . . . . . . . .
Installing StorNext Client Software on Sun Solaris . . . . . . . . . . . . . . . . . . . . . . . . . . . .
Installing StorNext Client Software on HP-UX. . . . . . . . . . . . . . . . . . . . . . . . . . . . . . . .
Installing StorNext Client Software on IBM AIX. . . . . . . . . . . . . . . . . . . . . . . . . . . . . . .
Installing StorNext Client Software on SGI IRIX . . . . . . . . . . . . . . . . . . . . . . . . . . . . . .
5 Customer Assistance
35
36
39
41
47
49
53
58
61
66
72
77
91
92
93
94
95
96
97
StorNext Website . . . . . . . . . . . . . . . . . . . . . . . . . . . . . . . . . . . . . . . . . . . . . . . . . . 97
ADIC Technical Assistance Center . . . . . . . . . . . . . . . . . . . . . . . . . . . . . . . . . . . . . 97
Glossary
x
99
Contents
1
Introduction
StorNext is data management software that enables customers to complete projects faster and
confidently store more data at a lower cost. Used in the world's most demanding environments,
StorNext is the standard for high performance shared workflow operations and multi-tier archives.
StorNext consists of two components: StorNext File System (SNFS) a high performance data sharing
software, and StorNext Storage Manager (SNSM) the intelligent, policy based data mover.
StorNext File System streamlines processes and facilitates faster job completion by enabling multiple
business applications to work from a single, consolidated data set. Using SNFS, applications running
on different operating systems (Windows, Linux, UNIX, and Mac OS X) can simultaneously access
and modify files on a common, high speed SAN storage pool. This centralized storage solution
eliminates slow LAN based file transfers between workstations and dramatically reduces delays
caused by single client failures. With SNFS, any server can access files and pick up processing
requirements of a failed system to continue operations.
StorNext Storage Manager enhances the StorNext solution by reducing the cost of long term data
retention, without sacrificing accessibility. SNSM sits on top of SNFS and utilizes intelligent data
movers to transparently locate data on multiple tiers of storage. This enables customers to store
more files at a lower cost, without having to reconfigure applications to retrieve data from disparate
locations. Instead, applications continue to access files normally and SNSM automatically handles
data access – regardless of where the file resides. As data movement occurs, SNSM also performs
a variety of data protection services to guarantee that data is safeguarded both onsite and offsite.
This guide describes how to install the StorNext product. The StorNext installation process includes
steps for adding a file system, so you do not need to separately install the StorNext FS product, whose
installation is described in a separate guide.
Who Should Read this Book
This guide is intended for system administrators and service personnel who want to install both the
StorNext Storage Manager and StorNext File System. If you are installing only the StorNext File
System, refer to the StorNext File System Installation Guide.
StorNext File System and Storage Manager Installation Guide
1StorNext
1
SM consists of two components formerly known as FileServ (TSM) and VolServ (MSM). StorNext SM provides highperformance file migration and management services, and manages automated and manual media libraries, including library
volumes. StorNext FS consists of a single component, formerly known as CentraVision (DSM).
How This Book is Organized
This book contains the following chapters.
• Chapter 1: Introduction — Provides information on the audience for this guide, explains how
the guide is organized, and introduces symbols and document conventions used in the guide.
• Chapter 2: Installing StorNext — Provides instructions for installing StorNext on servers.
• Chapter 3: Configuring StorNext — Describes how to configure StorNext after installing the
software.
• Chapter 4: Installing StorNext Client Software — Describes how to install and configure
StorNext software on a client machine.
• Chapter 5: Customer Assistance — Provides information on different types of customer
assistance available for StorNext.
Explanation of Symbols
The following symbols indicate important information.
Symbol
Description
Definition
Consequence
WARNING:
Advises you to take or avoid
a specified action
Failure to take or avoid this
action could result in
physical harm to the user or
hardware
CAUTION:
Advises you to take or avoid
a specified action
Failure to take or avoid this
action could result in loss of
data
NOTE:
Indicates important
information that helps you
make better use of the
software
No hazardous or damaging
consequences
Conventions
The conventions used throughout this book are listed below
Convention
Example
For all UNIX-based commands, the
# prompt is implied, although it is not shown.
/usr/cvfs/bin/cvlabel -l
is the same as
# /usr/cvfs/bin/cvlabel -l
Screen text, file names, program names,
and commands are in Courier font.
2
mkdir -p <mount point>
How This Book is Organized
Site-specific variables are enclosed within
brackets < > .
chmod 777 <mount point>
Pressing Return or Enter after each
command is assumed.
A menu name with an arrow refers to a
sequence of menus.
Programs > StorNext File System > Help
StorNext File System and Storage Manager Installation Guide
3
4
Conventions
2
Installing StorNext
You can install the StorNext software on a server. When you have successfully installed the StorNext
software, use the Configuration Wizard to configure the software. (After initial configuration, you can
use the StorNext GUI to change your configuration parameters.) You are then ready to use the
StorNext software.
You can also run the StorNext software on a client machine by downloading the client files from the
server and then installing them on your client. You can install client files on machines that use an SGI
IRIX, Solaris, Linux, IBM AIX, HP-UX, or Windows (2000, 2003 Server, and XP) operating system.
This chapter includes:
• Installation Requirements on page 5
• 2TB LUN Requirements on page 11.
• Using the Optional Pre-Installation Configuration on page 13
• Running the Pre-Installation Script on page 14
Installation Requirements
Before installing StorNext on any machine, verify that you meet the installation prerequisites
described in this section. This section contains installation requirements for the following supported
operating systems:
• Windows Prerequisites on page 6
• Red Hat Linux Prerequisites on page 6
• SuSE Linux Prerequisites on page 8
• Sun Solaris Prerequisites on page 9
• HP-UX Prerequisites on page 9
• IBM AIX Prerequisites on page 10
• SGI IRIX Prerequisites on page 10
• RAM and Hard Disk Requirements on page 11
StorNext File System and Storage Manager Installation Guide
5
Windows Prerequisites
Before installing StorNext on a Windows server, verify that the following installation prerequisites
have been met.
A Windows machine that will be used as a StorNext server must meet these requirements.
• 512 MB of RAM minimum for the first two file systems. Each subsequent file system (up to
eight total) either passive or active, must have an additional 256 MB of RAM minimum.
• StorNext requires 350 MB of hard disk space for binaries, documentation, configuration, and
log files. If internal metadata is used, approximately 2.5 GB of additional hard disk space is
required per 1M files.
In addition, each StorNext-supported Windows platform must meet these service pack requirements.
• Windows 2000 — Service Pack 4
• Windows 2003 Server — Enterprise Edition SP1
• Windows XP — Service Pack 2
Red Hat Linux Prerequisites
Before installing StorNext on a Red Hat Linux machine, verify that the following installation
prerequisites have been met.
• Kernel Requirements - To run StorNext on Red Hat Linux, you must use the following kernels:
•
For Red Hat 3: 2.4.21 - 37.EL (Update 6); 2.4.21 - 40.EL (Update 7)
•
For Red Hat 4: 2.6.9 - 22 (Update 2); 2.6.9 - 34.EL (Update 3)
To verify the kernel information for Red Hat Enterprise Advanced Server, type: uname -a
The following is similar to what is shown:
Linux APU 2.4.21-27.EL # 1SMP <date><platform><compiler>
StorNext is distributed as a loadable kernel module. To build the kernel module, the Red Hat
Linux software must be installed with the Linux kernel source and tools, including compilers.
To build and install the StorNext modules, a symbolic link must exist in the /usr/src directory
that points to the kernel source for the running kernel.
Use this procedure to view the symbolic links.
1
Change to the /usr/src directory. Type:
cd /usr/src
2
To view the symbolic links type:
ls -l
For the Linux 2.4.21-27.EL kernel, the symbolic link is shown as:
linux-2.4 > linux-2.4.21-27.EL
6
Installation Requirements
3
Make sure the symbolic link is pointing to the correct kernel.
• If the symbolic link shows a kernel in the specified range (2.4.21.EL to 2.4.27.EL,) continue
with the next task.
• If the symbolic link is either missing or pointing to the source of a different kernel, the StorNext
modules will either not install or not function.
• Mapping LUNs - Before installing StorNext, it is necessary to correctly map LUNs in the customer
SAN.
A LUN is assigned to each device (target) that is visible locally and over the SAN. The process
of LUN mapping depends on many factors, including the operating system on which StorNext
is running on, the type of SCSI card installed on the machine, and the type of FC HBA installed
on the machine.
For each HBA, check the vendor documentation to determine the operating system files that
must be configured to correctly map LUNs to devices over the SAN. Configure the operating
system file as indicated below:
•
Edit the /etc/sysconfig/rawdevices file and use the rpm and insmod
commands to install the specific Fibre Channel HBA driver.
For additional requirements, see 2TB LUN Requirements on page 11.
For assistance configuring the operating system file, contact ATAC. Refer to Customer
Assistance on page 97.
• Multiple LUN support - If your file system storage device uses non-zero SCSI Logical Unit
Numbers (LUNs), configure the Red Hat Linux kernel to scan for all SCSI LUNs. By default, Red
Hat Linux only scans for LUN 0. Use this procedure to configure the Linux kernel for multiple LUNs:
1
Change directories. Type:
cd /etc
2
In the /etc/modules.conf file, add the following line:
options scsi_mod max_scsi_luns=nLUNs
where nLUNs equals the number of LUNs required by your file system storage device.
For example:
alias parport_lowlevel parport_pc
alias scsi_hostadapter aic7xxx
alias eth0 eepro100
alias eth1 e1000
alias scsi_hostadapter1 qla2300
options scsi_mod
options scsi_mod max_scsi_luns=128
StorNext File System and Storage Manager Installation Guide
7
3
Create a new initial RAM disk file by using the mkinitrd command.
For example:
• For IA64:
cd /boot/efi/efi/redhat
mkinitrd -f initrd-2.4.21-27.EL.img 2.4.21-27.EL
• For x86:
cd /boot
mkinitrd -f initrd-2.4.21-27.EL.img 2.4.21-27.EL
4
Reboot the machine.
SuSE Linux Prerequisites
Before installing StorNext on a SuSE Linux machine, verify that the following installation prerequisites
have been met.
• Kernel Requirements - Before installing StorNext on a SuSE Linux machine (either client or
server), verify that the required kernels are loaded: 2.6.5 - 7.191 (SP2); 2.6.5-7.244-SMP (SP3)
1
Run the rpm command. Type:
rpm -qf /boot/vmlinuz
The command output should display one of these kernels:
• For uniprocessor systems:
k_delft-2.6.5-7.191
• For multiprocessor systems:
k_smp-2.6.5-7.191
2
Do one of the following:
•
If the correct kernel is shown, continue with the installation.
•
If an incorrect kernel is shown, install the correct kernel and repeat Step 1.
• Mapping LUNs - Before installing StorNext, it is necessary to correctly map LUNs in the customer
SAN.
A LUN is assigned to each device (target) that is visible locally and over the SAN. The process
of LUN mapping depends on many factors, including the operating system on which StorNext
is running, the type of SCSI card installed on the machine, and the type of FC HBA installed
on the machine.
For each HBA, check the vendor documentation to determine the operating system files that
must be configured to correctly map LUNs to devices over the SAN. Configure the operating
system file as indicated below:
•
Edit the /etc/raw file and use the rpm and insmod commands to install the specific
Fibre Channel HBA driver.
For additional requirements, see 2TB LUN Requirements on page 11.
For assistance configuring the operating system file, contact ATAC. Refer to Customer
Assistance on page 97.
8
Installation Requirements
Sun Solaris Prerequisites
Before installing StorNext on a Solaris machine, verify that the following installation prerequisites
have been met. StorNext supports Solaris 9 and 10 only.
• Mapping LUNs - Before installing StorNext, it is necessary to correctly map LUNs in the customer
SAN.
A LUN is assigned to each device (target) that is visible locally and over the SAN. The process
of LUN mapping depends on many factors, including the operating system on which StorNext
is running, the type of SCSI card installed on the machine, and the type of FC HBA installed
on the machine.
For each HBA, check the vendor documentation to determine the operating system files that
must be configured to correctly map LUNs to devices over the SAN. Configure the operating
system files as indicated below:
•
Edit the sd.conf, st.conf, and the sgen.conf files and use the pkgadd command
to install the specific Fibre Channel HBA driver.
For additional requirements, see 2TB LUN Requirements on page 11.
For assistance configuring the operating system files, contact ATAC. Refer to Customer
Assistance on page 97.
HP-UX Prerequisites
Before installing StorNext on an HP-UX machine, verify that the following installation prerequisite has
been met. StorNext supports HP-UX 11 iv2.
• Mapping LUNs - Before installing StorNext, it is necessary to correctly map Logical Unit Numbers
(LUNs) in the customer SAN.
A LUN is assigned to each device (target) that is visible locally and over the SAN. The process
of LUN mapping depends on many factors, including the operating system on which StorNext is
running, the type of SCSI card installed on the machine, and the type of FC Host Bus Adaptor
(HBA) installed on the machine.
For each HBA, check the vendor documentation to determine the operating system files that
must be configured to correctly map LUNs to devices over the SAN.
For additional requirements, see 2TB LUN Requirements on page 11.
For assistance configuring the operating system files, contact the ADIC Technical Assistance
Center (ATAC). Refer to Customer Assistance on page 97.
• 64-bit Inodes - StorNext supports only 64-bit inodes for installations of the software on the
HP-UX operating system on IA64 and PA-RISC architectures.
StorNext File System and Storage Manager Installation Guide
9
IBM AIX Prerequisites
Before installing StorNext on an AIX machine, verify that the following installation prerequisite has
been met. StorNext supports AIX 5.2 and 5.3 only.
• Mapping LUNs - Before installing StorNext, it is necessary to correctly map Logical Unit Numbers
(LUNs) in the customer SAN.
A LUN is assigned to each device (target) that is visible locally and over the SAN. The process
of LUN mapping depends on many factors, including the operating system on which StorNext
is running, the type of SCSI card installed on the machine, and the type of FC Host Bus
Adaptor (HBA) installed on the machine.
For each HBA, check the vendor documentation to determine the operating system files that
must be configured to correctly map LUNs to devices over the SAN.
For additional requirements, see 2TB LUN Requirements on page 11.
For assistance configuring the operating system files, contact the ADIC Technical Assistance
Center (ATAC). Refer to Customer Assistance on page 97.
SGI IRIX Prerequisites
Before installing StorNext on an IRIX machine, verify that the following installation prerequisites have
been met.
• 64-bit Inodes - StorNext supports only 64-bit inodes for software installations on the IRIX operating
system.
• Mapping LUNs - Before installing StorNext, it is necessary to correctly map LUNs in the customer
SAN.
A LUN is assigned to each device (target) that is visible locally and over the SAN. The process
of LUN mapping depends on many factors, including the operating system on which StorNext
is running, the type of SCSI card installed on the machine, and the type of FC HBA installed
on the machine.
For each HBA, check the vendor documentation to determine the operating system files that
must be configured to correctly map LUNs to devices over the SAN. Configure the operating
system file as indicated below:
•
Edit the /var/sysgen/master.d/qlfc file.
For additional requirements, see 2TB LUN Requirements on page 11.
For assistance configuring the operating system file, contact ATAC. Refer to Customer
Assistance on page 97.
10
Installation Requirements
RAM and Hard Disk Requirements
The following are requirements for each StorNext mount.
• Client Memory - StorNext requires 512 MB of RAM minimum.
• Client Hard Disk - StorNext requires 200 MB of hard disk space for binaries, documentation,
configuration, and log files.
• Server Memory - For the first two file systems, a minimum of 512 MB of RAM for each file
system. Each subsequent file system (up to eight total) either passive or active, must have an
additional 256 MB of RAM minimum.
• Server Hard Disk - Depending on file system activity, StorNext binaries, documentation,
configuration, and log files require up to 30 GB of local hard disk space. An additional 2GB of
hard disk space is required per 1 million managed files.
2TB LUN Requirements
StorNext supports LUNs larger than 2TB. The level of support for this feature varies, depending on
the operating system you are using:
• Full support for LUNs larger than 2TB
• Full support for LUNs larger than 2TB, with a specific label type required
• Support for only the first 2TB for LUNs larger than 2TB
• No support for LUNs larger than 2TB
Label Types
The type of label you use determines whether your system supports LUNs larger than 2TB. Even if
your operating system provides support for LUNs larger than 2TB, you cannot use this feature if you
apply the incorrect label type.
There are three label types:
• VTOC
• EFI
• sVTOC (or short VTOC)
Generally speaking, the VTOC label is for LUNs less than 2TB, while the EFI and sVTOC labels are
used for LUNs greater than 2TB. However, in many cases, EFI labels can also be used for LUNs less
than 2TB.
The following table summarizes the operating system levels for the possible LUN sizes, the level of
support, and the type of label you should use for the LUN size you want to use. Where there are
multiple label types listed, the preferred label type is listed first.
StorNext File System and Storage Manager Installation Guide
11
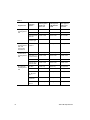
Table 1
Operating
System
Label Type For
LUNs Less
Than 1TB
Label Type For
LUNs Between
1-2TB
Label Type For
LUNs Larger
Than 2TB
IBM AIXa
VTOC or EFI
VTOC or EFI
EFI or sVTOC
Linux 2.6 kernel
VTOC or EFI
VTOC or EFI
EFI or sVTOC
Windows Server
2003 SP1
VTOC or EFI
VTOC or EFI
EFI or sVTOC
Apple Xsan 1.3
on OS X Tiger
VTOC or EFI
VTOC or EFI
EFI or sVTOC
Full support of
LUNs larger than
2TB, with
specific label
requirements
Solaris 10
Update 2
VTOC or EFI
EFI only
EFI only
Support for only
the first 2TB of
LUNs larger than
2TB
Apple Xsan 1.2
VTOC only
VTOC only
sVTOC only
Apple Xsan 1.3
on OS X Panther
VTOC or EFI
VTOC or EFI
sVTOC or EFI
HP-UX
VTOC or EFI
VTOC or EFI
sVTOC or EFI
Windows XP or
Windows 2000
VTOC or EFI
VTOC or EFI
sVTOC or EFI
SGI IRIX
VTOC only
VTOC only
Not supported
Linux 2.4 kernel
VTOC or EFI
VTOC or EFI
Not supported
Solaris 9 with
the “Big LUN”
patch
VTOC or EFI
EFI only
Not supported
Solaris 10 with
no patches
VTOC or EFI
EFI only
Not supported
Solaris 9 with no
patches
VTOC only
Not supported
Not supported
Support Level
Full support of
LUNs larger than
2TB
No support for
LUNs larger than
2TB
a.
12
AIX is limited to LUNs that are 2.2TB or smaller.
2TB LUN Requirements
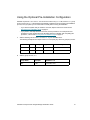
Using the Optional Pre-Installation Configuration
StorNext requires the tdlm and www user accounts to exist in the passwd file, and the adic group
account to be in the group file. StorNext automatically creates these accounts during the installation
process, but if you prefer you can create them manually before running the installation.
• If you want the system utility to create the accounts, skip this section and continue with
Running the Pre-Installation Script on page 14.
• If you prefer to manually add these accounts, use this procedure. You must perform this
procedure on each machine where the StorNext software is installed. After completing this
procedure, continue with Running the Pre-Installation Script on page 14.
1
Add the following user accounts tdlm and www to your metadata server.
The following example shows sample values. You can specify any user ID or group ID you wish.
2
Username
UserID
GroupID
Login Shell
Home Directory
tdlm
100
100
/bin/sh
/usr/adic
www
101
100
/bin/sh
/usr/adic/www
Add the group account adic.
Group Name
GroupID
Members List
adic
100
root, tdlm, www
StorNext File System and Storage Manager Installation Guide
13
Running the Pre-Installation Script
StorNext includes a script called snPreInstall that you can run before installing the software. The
output of this script indicates whether your system meets the minimum disk space requirements
required for the installation.
If your local system does not have sufficient disk space for the software installation, the script will warn
you so you can add more disk space before proceeding with the installation.
Note
The snPreInstall script ignores all unmounted file systems. Only mounted
local file systems are considered when the script runs and makes its
calculations. Before running the snPreInstall script, be sure to mount all
local file systems you want the script to consider.
Minimum disk space amounts (in MB) are provided for the following directories:
• Database
• Journal
• Mapping
• Metadata
• Backup
When you run the snPreInstall script, you must provide answers about your system configuration
so the script can determine space requirements. You will be asked to do the following:
• Specify whether you are performing a StorNext upgrade or a new installation
• Estimate the maximum number of additional directories (in millions) you anticipate
• Estimate the approximate number of additional files (in millions) you anticipate
• Enter the number of copies for each file
• Enter the number of versions you plan to keep for each file
Note
If you are performing an upgrade, the file systems that currently contain
existing TSM support directories will be reported. Additionally, you will be asked
about other local file systems to include when calculating space requirements.
If you are performing a new installation, you will be asked whether all local file
systems should be included when calculating space requirements.
When performing either an upgrade or new installation, you can eliminate from
consideration file systems you do not want used for StorNext support
directories.
Based on the information you provide about your system, the script will calculate space requirements.
If the script says you have sufficient space, you can proceed with the installation. If you do not have
sufficient space, you must add more disk space before installing the StorNext software.
14
Running the Pre-Installation Script
Script output might look similar to this:
Database dir space required: 1686 MB
Journal dir space required: 33 MB
Mapping dir space required: 3540 MB
Metadata dir space required: 4291 MB
Backup dir space required: 2791 MB (On a managed file system)
StorNext Support Directory Location Recommendations
The snPreInstall script also provides recommendations for StorNext support directory locations.
The recommendations are made with the following considerations:
1
In descending order (from greatest to least,) the order of space required is Database, Metadata,
Backup, Mapping, and Journal.
2
The Database and Journal should be on separate file systems for integrity reasons.
3
The Journal and Metadata should be on separate file systems for performance reasons. Both file
systems will have lots of head movement during normal operation.
4
The Database and Metadata should be on separate file systems for performance reasons. Both
file systems will have lots of head movement during normal operation.
5
The Mapping and Metadata should be on separate file systems for performance reasons (during
mapping operations).
6
The Backup directory should be on the largest of the managed file systems.
Note
ADIC recommends moving directories through the installation menu (option 1,
Installation Configuration) rather than moving them manually.
StorNext File System and Storage Manager Installation Guide
15
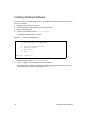
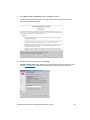
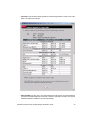
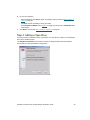
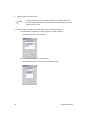
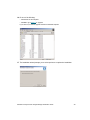
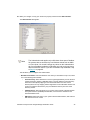
Installing StorNext Software
Use this procedure to install StorNext software. The installation process loads both server and client
files on your machine.
1
Designate one machine as the server.
2
Load the StorNext CD appropriate for your operating system.
3
Open the StorNext folder.
4
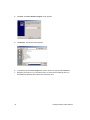
Launch the executable program install.stornext.
The StorNext Install Main Menu is shown.
Figure 1
StorNext Install Main Menu
Stornext Install 2.8.0 MAIN MENU
1)
2)
3)
4)
Installation Configuration
Install stornext
Show Status
Quit
Enter your choice <2>:
StorNext defaults to option 2) Install stornext.
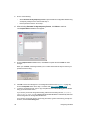
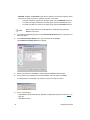
5
Type 1 to display a list of parameters that can be modified.
The following menu is shown. By default, the software is installed into the directory containing
the greatest amount of space (in this example, <disk1>).
16
Installing StorNext Software
Figure 2
StorNext Configuration Menu
Stornext 2.8.0 Configuration Menu
__VALUE_________________
1) /home/adic/perl
2) /home/adic/docs
3) /home/adic/PCL
4) /home/adic/database
5) /home/adic/SRVCLOG
6) /home/adic/PSE
7) /home/adic/MSM
8) /home/adic/TSM
9) /home/adic/TCM
10) /home/adic/www
11) /home/adic/apache
12) /usr/cvfs
13) /home/adic/database_meta
14) /home/adic/mapping_dir
15) /home/adic/database_jnl
16) LTO
17) LTO
__DESCRIPTION___________
Perl installation directory
Docs installation directory
Pcl installation directory
Dbm installation directory
Srvclog installation directory
Pse installation directory
Media Manager installation directory
Tertiary Manager installation directory
Trashcan Manager installation directory
GUI installation directory
Web installation directory
Disk Manager installation directory
Metadumps directory
TSM mapping directory
Database journal directory
Default media type
Backup media type
Enter number to modify or hit <RETURN> to continue install
6
Type the parameter number to modify the default parameters.
If you do not need to modify the parameters, then skip this step and go to Step 8.
CAUTION
If you do not use LTO media in your library, you must change
parameter numbers 16 and 17 to match the media type that is located
in your library.
For mixed media or multiple libraries, you must change the
parameter numbers to match the media type that you use as your
primary backup.
For increased reliability, install the database journal directory
(database_jnl) on a disk that is different from the one on which the
database installation directory is stored.
To maximize performance, place all four of the following support
directories on different file systems: database, database_jnl,
metadumps, and mapping_dir. If this is not possible, ADIC
recommends separating at least the first three support directories.
7
When you are satisfied with the parameter settings of the installation configuration, press ENTER
to return to return to the StorNext Install Main Menu and continue the install.
StorNext File System and Storage Manager Installation Guide
17
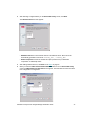
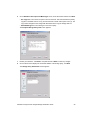
Stornext INSTALL 2.8.0 MAIN MENU
1)
2)
3)
4)
Installation Configuration
Install stornext
Show Status
Quit
Enter your choice <2>:
8
Type 2 or press ENTER to install the StorNext software.
• If you have set up your database and database journal to install on the same file system, the
following warning is shown:
The /home/adic/database and /home/adic/database_jnl are
defined to be on the same file system. It is recommended that
they reside on different file systems. To change the values,
answer 'No' to return to the configuration menu.
Database journal directory => /home/adic/database_jnl
Dbm installation directory => /home/adic/database
Do you wish to keep these settings
•
(quit, no or <yes>)?
Select quit, no, or yes.
•
If you select quit, you will exit the StorNext Installation
•
If you select no, you will return to the StorNext Configuration Menu (Figure 2 on
page 17)
•
If you select yes, you will proceed with the StorNext Install
• If you have set up your database and database journal to install on the separate file systems,
the StorNext Status Install Menu (Figure 3 on page 19) is shown and lists fourteen steps of
component-level status. As the installation progresses, the status menu updates and shows
steps as Complete.
18
Installing StorNext Software
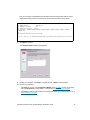
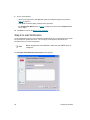
Figure 3
StorNext Install Status
Stornext Install 2.8.0 Status
1)
2)
3)
4)
5)
6)
7)
8)
9)
10)
11)
12)
13)
14)
Install Pre-Install
Install perl
Install docs
Install PCL
Install database
unbundle software
create database
start software
Install SRVCLOG
Install PSE
Install MSM
Install TSM
Install TCM
Install www
Install apache
Install DSM
Install Post-Install
2.8.0(9)
5.8.3_3.0.0(16)
2.8.0(7)
1.1.0(3)
5.9.25.50_4.1.0(2)
2.1.0(2)
1.1.0(3)
2.8.0(13)
2.8.0(11)
2.8.0(9)
2.8.0(8)
2.0.54_3.0.0(17)
2.8.0(9)
2.8.0(9)
Complete
Complete
Complete
Complete
Working /
Complete
Working
To do
To do
To do
To do
To do
To do
To do
To do
To do
To do
After exiting the install.stornext utility, the following information is shown
When the installation has completed you will point your browser
at the following address and port# to access the stornext home
page:
http://snsan.adic.com:81
Please make a note of this information.
Note
9
Note the machine name and port number from the above screen. You will
need this information to access the StorNext GUI.
If your operating system requires a restart, you will be notified that you
must reboot the machine.
When the installation process is complete, press ENTER to return to the Install Main Menu
(Figure 1 on page 16).
10 Type 3 to review the screen that displays the component-level status of the StorNext installation
(Figure 3 on page 19).
11 Type 4 to quit the installation process and exit the menu.
StorNext File System and Storage Manager Installation Guide
19
20
Installing StorNext Software
3
Configuring StorNext
After installing StorNext you must configure the software. A configuration wizard is provided to
simplify and streamline the configuration process.
Use this procedure to configure the StorNext software.
1
Open a Web browser.
Note
Supported browsers are:
• Internet Explorer 5.5 and later
• Netscape 7.x
• Mozilla 1.0 and later
• FireFox 1.0 and later
2
Type the full address of the machine and its port number http://<machine name>:<port
number> in the Address Field and press Enter. Use the name of the machine and port number
that you copied when you installed the StorNext software.
Note
Typically, the port number is 81. If port 81 is in use, use the next unused port
number. (I.e., 82, 83, etc.)
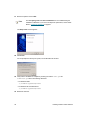
The following screen appears.
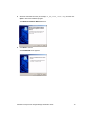
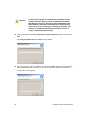
3
In the User ID Field, type admin and press TAB.
StorNext File System and Storage Manager Installation Guide
21
4
In the Password Field, type admin and click OK.
Note
For information on changing your password or setting up additional users,
refer to the StorNext System Administrator Guide.
The initial StorNext GUI appears. You are prompted to start non-running components.
5
Click OK to start the StorNext components.
The Configuration Wizard screen is shown and guides you through configuration of the StorNext
software.
CAUTION
Before using the StorNext GUI, you should first complete the
Configuration Wizard for licensing and configuring the software. If
you access the GUI before completing the Configuration Wizard, file
system failures will occur.
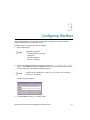
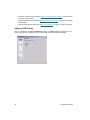
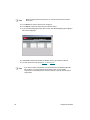
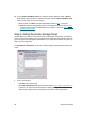
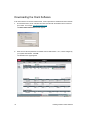
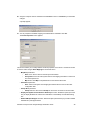
Using the Configuration Wizard
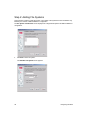
The Configuration Wizard provides step-by-step instructions for configuring the StorNext software.
Text for the active step is shown in a different color, and is followed by the word Completed after the
step is done. The Configuration Wizard opens every time the StorNext GUI is refreshed until all of the
configuration steps are completed. You can also launch the wizard at any time from the StorNext
home page by selecting Configuration Wizard from the Config menu.
Each configuration step contains its own wizard that provides step-by-step guidance. For each
configuration step, you must continue through all the related screens until the step is complete. For
example, you must complete all the screens associated with Step 1: Enter License before you can
continue to Step 2: Add File System. When you are finished with a step, click Done to continue to the
next step.
After you have completed a step, you can return to a previous step by clicking the step name. You
can also clear all of your entries and restart the process from the very beginning by clicking Reset.
22
Configuring StorNext
Figure 3
Configuration Wizard
If you do not complete all of the Configuration Wizard’s steps, the next time you access the StorNext
home page the Configuration Wizard resumes where you left off so you can continue the
configuration process.
If you click Cancel to proceed without continuing to the next step, a message reminds you that you
have not finished all steps, and that the Configuration Wizard will appear again until you complete all
configuration steps.
Note
If you do not want to use the Configuration Wizard, select Don’t Show CW
Again and click Cancel. The Configuration Wizard will not display again.
However, you can perform the same tasks in the Configuration Wizard by
accessing the Config menu from the StorNext Home Page.
StorNext File System and Storage Manager Installation Guide
23
1
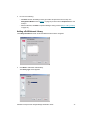
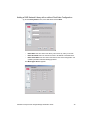
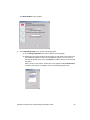
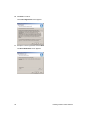
Click Next to begin using the Configuration Wizard.
The Enter License - Introduction screen appears.
Step 1: Entering a License
You must have a permanent or temporary license to configure or use StorNext. Use the Enter License
wizard to enter a permanent license string, or proceed using the 30-day temporary license that comes
with StorNext.
To obtain a permanent license, you must contact ATAC at [email protected] and give them the
following information:
• The product serial number from the StorNext box or CD
• The number of client machines you want to support
• The StorNext server identification number. You can find this number on the Configuration
Wizard’s Enter License String screen.
Alternatively, you can obtain a license by going to www.adic.com/swlicense and providing the
required information.
After ATAC receives the above information, an ATAC representative will send you a license string.
Enter this license screen on the Enter License String screen to use StorNext with your permanent
license.
Note
24
If you use the temporary license, be sure to obtain a permanent license
from ADIC before the 30-day temporary license expires.
Configuring StorNext
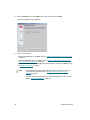
1
On the Enter License - Introduction screen, click Next to continue.
The ADIC license agreement appears. You must accept the license agreement in order to
continue with the licensing process.
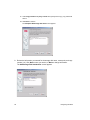
2
Read the license agreement and then click Accept.
The Enter License String screen appears. This screen summarizes the information you must
send to [email protected] in order to receive the license string you enter on this screen.
StorNext File System and Storage Manager Installation Guide
25
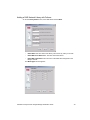
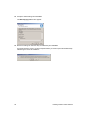
3
4
Do one of the following:
•
Select Generate 30 day temporary license to proceed with the Configuration Wizard using
a temporary 30-day license. Continue with step 4.
•
Enter a permanent license. Go to step 7.
After selecting Generate 30 day temporary license, click Next to continue.
The Complete Enter License screen appears.
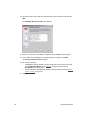
5
On the Complete Enter License screen, click Next to complete the task or Back to make
changes.
When you click Next, a message reminds you to contact ATAC within 30 days to receive your
permanent license string.
6
Click OK to close the message box. The Configuration Wizard screen (Figure 3 on page 23)
shows a Completed status next to Step 1. Continue with Step 2: Adding File Systems
7
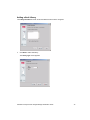
To enter a permanent license, type or copy and paste into the License String field the license
string you received from ATAC.
If you receive your license string electronically, paste the license string into the /usr/adic/
DSM/config/license.dat file. Updating this file enables StorNext to automatically detect the
license string when the Configuration Wizard runs.
If you receive your license string in a hard-copy document, type the license string, exactly as it
is shown, in the License String Field.
26
Configuring StorNext
Here is an example of a StorNext license file with the license string entered (below License
Authorization String). This is an example only. Do not enter the license screen shown.
# System:
emerald
# Identifier:
3FA781993
# Number Clients:
12
# Expiration Date:
None
# License: AAAAA/B2AAS/AJDQV/2DCKS/M7RA9/82XUR/CH3TL/9EES7/5ZEGV/
6ALVD/TA
#
# License Authorization String:
server 1 3FA781993 12 AAAAAB2AASAJDQV2DCKSM7RA982XURCH3TL9EES75ZEGV6ALVDTA emerald ADIC
8
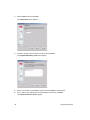
Click Next to continue.
The Complete Enter License screen appears.
9
Review your selections. Click Next to complete the task or Back to make changes.
10 Do one of the following:
• Click Done to continue. The Configuration Wizard screen (Figure 3 on page 23) is shown
with a Completed status next to Step 1. Continue with Step 2: Adding File Systems.
• Click Next to modify or enter another license. Repeat the Entering a License procedure. Go to
Step 1: Entering a License.
StorNext File System and Storage Manager Installation Guide
27
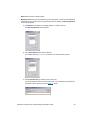
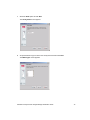
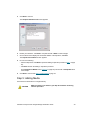
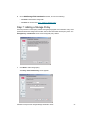
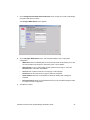
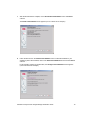
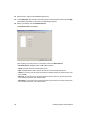
Step 2: Adding File Systems
This procedure creates an empty file system. The number of file systems that can be added is only
limited by the number of disks available for configuration.
The File System - Introduction screen displays both configured file systems and disks available for
configuration.
1
Click Next to add a file system.
The Add New File System screen appears.
28
Configuring StorNext
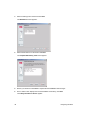
• Name field: The name of the file system.
• Mount Point field: The mount point (directory) for the file system. The mount point defaults to
/stornext/snfs. If you create a new mount point (other than the default), the Directory Browser
screen below appears.
1a. Click Browse to navigate to an existing directory or create a new one.
The Directory Browser screen appears.
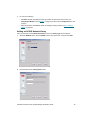
1b. In the Select Directory list, select a directory.
The selected directory (/stornext) is shown in the Current DIrectory Field.
1c. Click Create Directory to create the new mount point.
You are prompted to enter the new directory name. The new directory will reside as a
sub-directory of the directory created in Step 1 b, above.
StorNext File System and Storage Manager Installation Guide
29
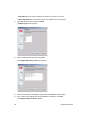
1d. Enter the name of the new directory and click OK.
The new directory is shown in the Current Directory Field.
1e. Click OK to accept the new directory.
The new directory is shown in the Add New File System screen.
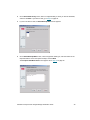
• Enable Data Migration check box: Select this option (check the box) if you want this file
system to be managed with automatic data movement between the primary disk storage and
secondary storage (either disk or tape). If you do not enable this option, this file system
remains unmanaged and does not move data to the tape library. Be sure to select this option
if you intend to use the file system as a storage disk.
• Enable Trashcan check box: Select this option (check the box) if you want to be able to
undelete files from the Trashcan. If you do not enable this option, files cannot be undeleted
from the Trashcan.
30
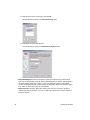
Configuring StorNext
CAUTION
The StorNext Trashcan feature should only be enabled on UNIX
platforms. Enabling the Trashcan in a mixed UNIX/Windows
environment causes file system failures due to conflicts with the
Windows Recycle Bin.
Do not select either the Enable Trashcan or Enable Data Migration
options if the file system will be used as a storage disk.
2
In the Add New File System screen, type valid values and click Next.
The Disk Settings screen appears.
• Block size field: The block size (in bytes) for the file system. The block size is the minimum
unit of data that will be accessed from physical devices. The default value of 16384 bytes is
the recommended setting for the best overall efficiency.
• Stripe group field: The number of stripe groups for the file system. Selecting a value greater
than one (1) enables customization to optimize performance and use StorNext features such
as dedicated Metadata, Journal and User Data stripe groups.
Note
ADIC recommends that you specify at least three stripe groups: one for
metadata, one for journals, and one for data.
StorNext File System and Storage Manager Installation Guide
31
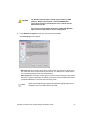
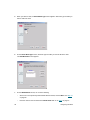
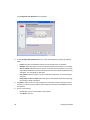
3
In the Disk Settings screen, type valid values and click Next.
A message reminds you to select more than one stripe group if you want an alternate
configuration other than the one that provides journal, metadata, and user date.
4
Click OK to continue.
The Customize Stripe Group screen appears.
• Name Field: The name of the stripe group.
• Select disks list: The disks available to assign to the stripe group. You must select at least
one disk for each stripe group.
• Label Type: If you plan to create LUNs larger than 2TB, you must specify the EFI label type
when configuring a file system.
VTOC labels were used for all operating systems in previous StorNext and Xsan releases, and
are still required for the SGI IRIX operating system, Solaris releases prior to Solaris 10 Update
2, and LUNs less than 1TB.
EFI labels are required if you plan to create LUNs that are larger than 2TB. (For Solaris, EFI
labels are also required for LUNs with a raw capacity greater than 1TB.) EFI labels will not work
with the IRIX operating system.
The correct value is automatically selected when you reach the Customize Stripe Groups
screen, so you can accept the default value unless you have a reason to change the label type.
For more information about 2TB LUN requirements, see 2TB LUN Requirements.
32
Configuring StorNext
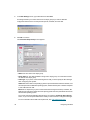
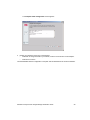
• Label Help: Click this link to display guidelines for determining whether to select VTOC or EFI
labels. The matrix looks like this:
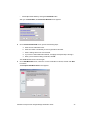
• Stripe breadth drop-down menu: The stripe breadth for the file system. The stripe breadth is
the number of kilobytes (KB) that is read from or written to each disk in the stripe. For a typical
StorNext installation, 64KB is the recommended setting.
StorNext File System and Storage Manager Installation Guide
33
• Metadata, Journal, and User Data check boxes: Enable one or more of these options (check
the boxes) to create a location for metadata, journaling or user data.
•
To enable metadata to be placed on the stripe group, select the Metadata check box.
•
To enable journaling to be placed on the stripe group, select the Journal check box.
•
To enable user data to be placed on the stripe group, select the User Data check box.
Note
ADIC recommends that your User Data be on a different stripe group than
Metadata and Journal.
5
If you selected multiple stripe groups on the Customize Stripe Group screen, repeat step 4 for
each stripe group.
6
In the Customize Stripe Group screen, type valid values and click Next.
The Complete File System Task screen appears.
7
Review your selections. Click Next to complete the task or Back to make changes.
8
Once the status screen displays the successful addition of the file system, click Next.
A message informs you that Step 2 is complete, and you can continue to step 3.
9
Do one of the following:
• Click Cancel to add more file systems. Repeat the Adding a File System procedure (Step 1 on
page 28).
• Click OK to continue.
34
Configuring StorNext
The Configuration Wizard screen (Figure 3 on page 23) is shown with a Completed status
next to Step 2. Click Next to continue with Step 3: Adding a Library.
Step 3: Adding a Library
Use the procedure in this section to add libraries to StorNext. The StorNext Storage Manager (SNSM)
component of StorNext supports three types of libraries: SCSI, Network (ACSLS or DAS), and Vault.
• SCSI button: Select SCSI if you have a SCSI or a fibre channel-attached library.
• Network button: Select Network if you have a network-attached library. There are two options
from for a network-attached library, ACSLS or DAS. For more information on ACSLS and
DAS, refer to the StorNext Release Notes.
• Vault button: Select Vault if your library stores media that has been moved from a robotic
library. A Vault library is a library used only to store media and cannot be reconfigured after it
has been designated as a vault.
Depending on the library type, refer to the appropriate procedure to add the library to StorNext.
• Adding a SCSI Library on page 36
• Adding an ACSLS Network Library on page 39
• Adding a DAS Network Library on page 41
• Adding a Vault Library on page 47
The Library Introduction screen shows the libraries that have been configured.
Do one of the following:
• Select “Skip to adding Storage Disks” and follow the procedure in Step 6: Adding Secondary
Storage Disks on page 58. (You would want to skip the steps for adding a library, tape drives,
and media if you plan to use only disk space for storage.)
• Click Next and follow the procedure in Adding a SCSI Library on page 36 to add a SCSI library.
StorNext File System and Storage Manager Installation Guide
35
• Click Next and follow the procedure in Adding an ACSLS Network Library on page 39 to add
an ACSLS network library.
• Click Next and follow the procedure in Adding a DAS Network Library on page 41 to add a DAS
network library.
• Click Next and follow the procedure in Adding a Vault Library on page 47 to add a vault library.
Adding a SCSI Library
After you click Next on the Library Introduction screen, the Library Type screen appears. If you
have no SCSI devices configured, you are informed that no SCSI devices were detected.
36
Configuring StorNext
1
Select the SCSI option and click Next.
The Library Name screen appears.
2
Accept the default or type a name in the Library Name Field and click Next.
The Media Types screen appears.
StorNext File System and Storage Manager Installation Guide
37
3
Select a media type from the list and click Next.
The SCSI Device screen appears.
4
Select a SCSI device from the list and click Next.
The Complete Add Library Task screen appears.
5
Review your selections. Click Next to complete the task or Back to make changes.
6
Once a status screen displays the successful addition of the library, click Next.
The Library Introduction Screen appears.
38
Configuring StorNext
7
Do one of the following:
• Click Done to finish the Adding a Library procedure and proceed to the next step. The
Configuration Wizard screen (Figure 3 on page 23) is shown with a Completed status next
to Step 3.
• Add more libraries. Click Next to repeat the Adding a Library procedure (Step 3: Adding a
Library on page 35).
Adding an ACSLS Network Library
After you click Next on the Library Introduction screen, the Library Type screen appears.
1
Select the Network option, choose ACSLS from the drop-down menu, and then click Next.
2
Enter the fields on the Library Name screen.
StorNext File System and Storage Manager Installation Guide
39
• Enter Name field: The name of the library. This can be any name you choose.
• Enter Host Name field: The actual host name or IP address of the ACSLS server.
3
Type valid values for each field and click Next.
The Media Types screen appears.
4
Select a media type from the list and click Next.
The Complete Add Library Task screen appears.
5
Review your selections. Click Next to complete the task or Back to make changes.
6
Once a status screen displays the successful addition of the library, click Next.
The Library Introduction Screen appears.
40
Configuring StorNext
7
Do one of the following:
• Click Done to finish the Adding a Library procedure and proceed to the next step. The
Configuration Wizard screen (Figure 3 on page 23) is shown with a Completed status next
to Step 3.
• Add more libraries; click Next to repeat the Adding a Library process (Step 3: Adding a Library
on page 35).
Adding a DAS Network Library
The Library Introduction screen shows the libraries that have been configured.
1
Click Next to add a DAS network library.
The Library Type screen appears.
StorNext File System and Storage Manager Installation Guide
41
2
Click the Network option, select DAS from the drop-down list, and click Next.
The DAS Configuration screen appears.
3
Do one of the following:
• Select the Failover option, click Next, and go to Adding a DAS Network Library with Failover
on page 43.
• Select the Dual Aisle option, click Next, and go to Adding a DAS Network Library with or
without Dual Aisle Configuration on page 45.
• If your DAS Network library is not configured for either failover or dual aisle, click Next, and go
to Adding a Vault Library on page 47.
Note
If you select both the failover and dual aisle options, the library is set up as if
only failover was selected. Refer to Adding a DAS Network Library with
Failover on page 43.
For more information about failover or dual aisle configurations, contact ATAC.
Refer to Customer Assistance on page 97.
42
Configuring StorNext
Adding a DAS Network Library with Failover
3a. On the Library Name screen, enter valid values and click Next.
•
Enter Name Field: The name of the library. This can be any name you choose.
•
Enter DAS Server Name Field: The name of the DAS server.
•
Enter DAS Client Name Field: The name of the DAS client configured on the
library’s network.
The Media Types screen appears.
StorNext File System and Storage Manager Installation Guide
43
3b. Use the drop-down lists to map the mail boxes (EIF ports) to specific media and click
Next.
The Complete Add Library Task screen appears.
3c. Review your selections. Click Next to complete the task or Back to make changes.
3d. Once a status screen displays the successful addition of the library, click Next.
The Library Introduction Screen appears.
3e. Do one of the following:
•
Click Done to finish the Adding a Library procedure and continue to the next step.
The Configuration Wizard screen (Figure 3 on page 23) is shown with a
Completed status next to Step 3.
•
Add more libraries. Click Next and repeat the Adding a Library procedure (Step 3:
Adding a Library on page 35).
3f. Click Next to continue.
44
Configuring StorNext
Adding a DAS Network Library with or without Dual Aisle Configuration
3g. On the Library Name screen, enter valid values and click Next.
•
Enter Name Field: The name of the library. This can be any name you choose.
•
Enter Host Name Field: The actual host name or IP address of the DAS server.
•
Enter Client Name Field: The name of the client for the current configuration. It is
queried by StorNext and automatically populated.
The Media Types Screen appears.
StorNext File System and Storage Manager Installation Guide
45
3h. Use the drop-down lists to map the mail boxes (EIF ports) to specific media and click
Next.
The Complete Add Library Task screen appears.
3i. Review your selections. Click Next to complete the task or Back to make changes.
3j. Once a status screen displays the successful addition of the library, click Next.
The Library Introduction Screen appears.
4
46
Do one of the following:
•
Click Done to finish the Adding a Library procedure, and proceed to the next step. The
Configuration Wizard screen (Figure 3 on page 23) is shown with a Completed status
next to Step 3.
•
Add more libraries. Click Next to repeat the Adding a Library procedure (Step 3: Adding
a Library on page 35).
Configuring StorNext
Adding a Vault Library
The Library Introduction screen shows the libraries that have been configured.
1
Click Next to add a vault library.
The Library Type screen appears.
StorNext File System and Storage Manager Installation Guide
47
2
Click the Vault option and click Next.
The Library Name screen appears.
3
Accept the defaults or type a name for the library and click Next.
The Complete Add Library Task screen appears.
4
Review your selections. Click Next to complete the task or Back to make changes.
5
Once a status screen displays the successful addition of the library, click Next.
The Library Introduction Screen appears.
48
Configuring StorNext
6
Do one of the following:
• Add more libraries. Click Next to repeat the Adding a Library procedure (Step 3: Adding a
Library on page 35).
• Click Done to finish the Adding a Library procedure.
The Configuration Wizard screen (Figure 3 on page 23) is shown with a Completed status
next to Step 3.
7
Click Next to continue with Step 4: Adding a Tape Drive on page 49.
Step 4: Adding a Tape Drive
Use this procedure to add tape drives to your libraries. You can add any number of connected tape
drives to the StorNext system.
The Tape Drive Introduction screen lists the number of configured tape drives and hardware
devices that are currently available for configuration.
StorNext File System and Storage Manager Installation Guide
49
1
Click Next to add a tape drive.
The Associated Library screen appears.
• Configured Libraries list: Select the configured library to associate with added tape drives.
• Fibre-Channel Attached Drives check box: Check this box if you have fibre channelattached tape drives. If you check this box, the Match Devices with Slots screen appears. Go
to Step 4 on page 51.
Note
50
For SCSI direct-attached tapes that are not fibre channel, it is not necessary to
match the device with the correct slot because slot-to-drive matching is
automatically performed. If StorNext cannot perform slot matching, the screen
shown in Step 4 on page 51 appears.
Configuring StorNext
2
After selecting a configured library on the Associated Library screen, click Next.
The Hardware Devices screen appears.
• Hardware Devices list: The hardware devices to be added as drives. Drive names are
automatically generated in this format: <library_dr1>, <library_dr2>
• Enable Compression check box: Enable this option (check the box) to allow data
compression on added tape drives.
3
After adding hardware devices, click Next. Go to Step 5 on page 53
4
When you select the Fibre-Channel Attached Drives check box on the Associated Library
screen, the Matched Devices with Slots screen appears. The information on this screen varies
from configuration to configuration.
StorNext File System and Storage Manager Installation Guide
51
Note
Before continuing with this procedure, you must know which devices match
which slots.
3a. In the Device list, select a device to be configured.
3b. In the Slot list, select a slot with which to match the device.
3c. If you need help mapping the tape drive to a slot, click Show Mapping Help to display a
list of device mappings.
3d. Click Insert to add the device/slot combination to the Type>>Device>>Slot list.
3e. For each device and slot, repeat Step 3a. and Step 3b..
Note
52
If you want to enable compression on some devices in the Type/Device/Slot list,
but not others, you must complete this procedure twice: once to enable
compression on selected devices, and a second time to specify devices without
compression.
Configuring StorNext
5
Click Next to continue.
The Complete Add Drive Task screen appears.
6
Review your selections. Click Next to complete the task or Back to make changes.
7
Once a status screen displays the successful addition of the tape drive, click Next.
The Tape Drive Introduction screen appears.
8
Do one of the following:
• Add more tape drives. Click Next to repeat the Adding a Tape Drive procedure (Step 1 on page
50).
• Click Done to finish the Adding a Tape Drive procedure.
The Configuration Wizard screen (Figure 3 on page 23) is shown with a Completed status
next to Step 4.
9
Click Next to continue with Step 5: Adding Media on page 53.
Step 5: Adding Media
Use this task to add media to a configured library.
CAUTION
Make sure there are no media in your tape drives before continuing
with this procedure.
StorNext File System and Storage Manager Installation Guide
53
The Add Media - Introduction screen shows a list of libraries along with the number of media that
each library can hold.
CAUTION
1
Make sure that only media you want StorNext to use is in the library.
StorNext will use all available tapes and overwrite them.
Click Next to add media to a configured library.
The Associated Library screen appears.
54
Configuring StorNext
2
On the Associated Library screen, select a configured library to which you want to add media,
and then click Next. If you select a vault, go to Step 5 on page 56.
3
If you do not select a vault, the Select Backup Media screen appears.
4
On the Select Backup Media screen, select a supported media type, enter the number of the
imported media to use for the system backups, and click Next.
The Complete Add Media Task screen appears. Go to Step 10 on page 58.
StorNext File System and Storage Manager Installation Guide
55
5
When you select a vault, the Select Media Type screen appears. Select the type of media you
want to add to the vault.
6
On the Select Media Type screen, select the type of media you want to add to the vault.
The Add Media IDs screen appears.
7
56
On the Add Media IDs screen, do one of the following:
•
Select one or more previously entered media IDs from the list, and click Next. Go to Step 10
on page 58.
•
Enter the name for the new media in the Media Name field. Go to Step 9 on page 57.
Configuring StorNext
•
Add multiple media labels by clicking the New Media button.
After you click New Media, the Create New Media ID screen appears.
8
On the Create New Media ID screen, perform the following steps:
a. Enter the new media label name.
b. Enter the number of media IDs you want to generate for the label.
c. Enter a starting value for the new media ID.
d. If you want to create additional media IDs, click Apply and repeat steps a through c.
e. When you are finished creating media IDs, click OK.
The Add Media IDs screen is shown again.
9
On the Add Media IDs screen, select one or more media IDs from the list, and then click Next
to continue.
The Complete Add Media Task screen appears.
StorNext File System and Storage Manager Installation Guide
57
10 On the Complete Add Media Task screen, click Next to finish adding the media, or Back to
make changes. After the process completes successfully and the Complete Add Media Task
screen is shown again, do one of the following:
• Add more media. Click Next to repeat the Add Media procedure (Step 1 on page 54).
• Click Done to finish the Adding Media procedure. The Configuration Wizard screen (Figure 3
on page 23) is shown with a Completed status next to Step 5. Continue with Step 6: Adding
Secondary Storage Disks.
Step 6: Adding Secondary Storage Disks
StorNext allows you to specify a file system to use as a storage disk. Storage disks, when defined,
become a media type available for use in storage policies as a destination target just like tape media
types. This portion of the Configuration Wizard allows you to specify the name of the file system you
want to use as a storage disk.
The Storage Disk - Introduction screen shows currently configured storage disks and their mount
points.
1
Do one of the following:
• Click Next to add a storage disk.
• Select Skip to Add Policy Class and follow the procedure in Step 7: Adding a Storage Policy
on page 61. (You would want to skip the steps for adding a storage disk if a suitable storage
disk is already configured and its name appears in the list of Current Storage Disks.)
58
Configuring StorNext
The Add Disk Media screen appears.
2
On the Add Storage Disk screen, perform the following steps:
2a. At the Storage Disk Name field, enter the label for the storage disk.
2b. Specify the mount point location for the file system you just named. First, select one of
the available file systems. If there are no available file systems, you can use a nonmanaged file system (nfs or cvrfs). Click Browse to create a directory on the mounted
file system.
When you enter a new location, the directory screen appears. Click Create Directory
to create a new directory. Click OK to return to the Add Storage Disk screen.
StorNext File System and Storage Manager Installation Guide
59
2c. At the Copy # used for all policy classes field, specify which copy (1-4) policies will
write to.
2d. Click Next to continue.
The Complete Add Storage Disk Task screen appears.
3
Review the information you entered for the storage disk name, mount point, and copy
number (1-4). Click Next to save your entries, or Back to change information.
The Add Storage Disk Introduction screen appears.
60
Configuring StorNext
4
On the Add Storage Disk Introduction screen, do one of the following:
• Click Next to add another storage disk.
• Click Done to continue with Step 7: Adding a Storage Policy.
Step 7: Adding a Storage Policy
Use this procedure to create policy classes that logically segregate and control data. Policy class
parameters determine storage and truncation rules for files associated with the policy class. The
Storage Policy - Introduction screen shows configured policy classes.
1
Click Next to add a storage policy.
The Policy Class and Directory screen appears.
StorNext File System and Storage Manager Installation Guide
61
2
Enter the name of the policy class.
Note
3
The policy class can be any combination of letters and numbers, but it must
start with a letter and is limited to 16 characters. Do not include periods (.) when
naming the policy class.
Enter the name of the directory that will contain files to be migrated to media.
3a. Click Browse to navigate to an existing directory or create a directory.
The Directory Browser screen appears.
3b. In the Select Directory list, select a directory.
The selected directory is shown in the Current Directory Field.
62
Configuring StorNext
3c. Click Create Directory.
You are prompted to add a directory name.
3d. Enter the directory name and then click OK.
The directory appears.
3e. Click OK to continue. The Store, Truncate, and Relocate Times screen appears. Note
that you need to enter the minimum relocation time only if you selected the Enable DiskTo-Disk option on the The Policy Class and Directory screen. .
•
Minimum Store Time (Minutes): The minimum amount of time a file must remain
unaccessed before it is considered a candidate for storage.
StorNext File System and Storage Manager Installation Guide
63
•
Minimum Truncation Time (Days): The minimum number of days a file must
remain unaccessed before it is considered a candidate for truncation.
•
Minimum Relocation Time (Days): The minimum number of days a file must
remain unaccessed on the primary affinity before it is considered a candidate for
relocation to a secondary affinity.
4
If you selected the Enable Disk-To-Disk option on the Policy Class and Directory screen, the
Relocation Policy Selection screen appears.
5
On the Relocation Policy Selection screen, specify the affinity from which to move data, and the
destination affinity to which data is moved. Click Next to continue.
The Number of File Copies and Media Type screen appears.
64
Configuring StorNext
6
On the Number of File Copies and Media Type screen, enter valid values and then click Next.
• File Copy fields: The number of copies to store for each file. This value includes the primary
copy file. The default value is one (1) and the maximum number of file copies is four (4). The
copy number assigned to the storage disk determines which copy the storage disk is in.
• Select Media Type list: The media type to use for this policy.
The Complete Storage Policy Task screen appears.
7
Review your selections. Click Next to complete the task or Back to make any changes.
8
Once a status screen displays the successful addition of the storage policy, click Next.
The Storage Policy Introduction screen appears.
StorNext File System and Storage Manager Installation Guide
65
9
Do one of the following:
• Add more storage policies. Click Next and repeat the Adding a Storage Policy procedure
(Step 1 on page 61).
• Click Done to finish the Adding a Storage Policy procedure.
The Configuration Wizard screen (Figure 3 on page 23) is shown with a Completed status
next to Step 6.
10 Click Next to continue with Step 8: E-mail Notification.
Step 8: E-mail Notification
The E-mail Notification portion of the Configuration Wizard allows you to specify parties who should
be contacted when system alerts occur. You can specify e-mail recipients, alert levels, and
information about your e-mail configuration.
Note
Before configuring e-mail notification, make sure your SMTP server is
configured.
The Configure E-mail Notification Introduction screen appears.
66
Configuring StorNext
1
On the Configure E-mail Notification Introduction screen, review your current e-mail settings
(if any) and click Next to continue.
The Configure SMTP E-mail screen appears.
2
3
On the Configure SMTP E-mail screen, enter the fields related to your e-mail system
configuration:
•
SMTP Server: Enter the identification for the server that stores and processes your e-mail
account information.This might be a valid server name or an IP address.
•
Authentication: If your e-mail provider requires a password upon sign on, select the
Password option. Otherwise, select None.
•
Account: Enter a valid e-mail account for outgoing e-mail messages.
•
Password: Enter the e-mail account’s sign-on password, if required.
•
Sender Address: Enter the e-mail address for the entity sending alert messages to
recipients.
•
Send Test E-mail to: Enter an e-mail address to which you can send test messages in order
to confirm successful configuration.
Click Next to continue.
StorNext File System and Storage Manager Installation Guide
67
The Configure E-mail Addresses screen appears.
4
On the Configure E-mail Addresses screen, add e-mail recipients by entering the following
fields:
•
E-mail: Enter the e-mail address of the person who should receive e-mail alerts.
•
Backups: Select this option to receive e-mail after a backup has occurred on your system.
•
Service Tickets: Select this option to receive e-mail when a service ticket for your system
is generated. Notifications for service tickets will be sent for events at the specified alert level
and higher. You must specify an alert level.
•
Policy Class: Select this option to receive e-mail about policy class. You must specify an
alert level.
•
Notify ATAC on Service Ticket: Select this option to automatically send ATAC a message
when a service ticket is generated.
5
Click Add to add to the list of e-mail recipients the e-mail recipient whose information you just
entered. Or, select a previously added e-mail recipient from the list and click Delete to remove
that recipient.
6
Do one of the following:
68
•
Repeat steps 4 and 5 to add another e-mail recipient.
•
Click Next to continue.
Configuring StorNext
The Complete E-mail Configuration screen appears.
7
Review your selections and do one of the following:
•
Click Back to change information you entered, or add or remove another e-mail recipient.
•
Click Next to continue.
The initial StorNext software configuration is complete. Use the StorNext GUI to access the software.
StorNext File System and Storage Manager Installation Guide
69
70
Configuring StorNext
4
Installing StorNext Client Software
Once the StorNext software is configured, you can download StorNext client files from the server and
install them on StorNext clients. To download client software from a StorNext server, use a supported
Web browser. (For a list of supported Web browsers, see Configuring StorNext.)
StorNext client software allows one or more StorNext file systems to be mounted and enables the
client to communicate with the StorNext server.
The following procedures provide instructions for installing the StorNext client software in Windows,
SGI IRIX, Sun Solaris, Linux (SuSE or Red Hat), IBM AIX, and HP-UX environments.
Note
If you used the optional pre-installation configuration, you must first
perform the steps for adding a user account and a group account on each
machine that you set up as a client. (To perform these steps, refer to Using
the Optional Pre-Installation Configuration on page 13).
This chapter contains the following procedures:
•
Downloading the Client Software on page 72
•
Installing StorNext Client Software on Windows on page 77
•
Installing StorNext Client Software on Red Hat Linux on page 91
•
Installing StorNext Client Software on SuSE Linux on page 92
•
Installing StorNext Client Software on Red Hat Linux on page 91
•
Installing StorNext Client Software on Sun Solaris on page 93
•
Installing StorNext Client Software on IBM AIX on page 95
•
Installing StorNext Client Software on SGI IRIX on page 96
StorNext File System and Storage Manager Installation Guide
71
Downloading the Client Software
If the client machine can access a Web browser, use this procedure to download the client software.
1
On a StorNext client, launch a browser and enter the URL with the StorNext server name and
port number. For example, http://StorNextServer:81.
The Enter Network Password window appears.
2
Enter the User ID and password. The default value for both fields is admin, unless changed by
your system administrator. Click OK.
The StorNext home page appears.
72
Installing StorNext Client Software
3
From the Admin menu, select Download Client Software.
The Select Platform screen appears.
4
Select the platform that corresponds to the operating system on the StorNext client and then click
Next.
The Download Client Software screen appears. (Linux is shown as an example.)
StorNext File System and Storage Manager Installation Guide
73
The following client packages are available to download:
Operating System
Download File Name
IBM AIX 52
sn_dsm_aix52_client.tar
IBM AIX 53
sn_dsm_aix53_client.tar
HP-UX 11.23 IA64
sn_dsm_hpux_B.11.23ia64_client.tar
HP-UX 11.23 PA-RISC
sn_dsm_hpux_B.11.23pa-risc_client.tar
IRIX 6.5.xx
sn_dsm_irix65m_client.tar
Linux RedHat 9.0 (Intel 32 bit)
sn_dsm_linuxRH_9i386_client.tar
Linux RedHat AS 3.0 (Intel 32 bit)
sn_dsm_linuxRH_AS_3i386_client.tar
Linux RedHat AS 3.0 (Intel 64 bit)
sn_dsm_linuxRH_AS_3x86_64_client.tar
Linux RedHat AS 3.0 (Intel IA64)
sn_dsm_linuxRH_AS_3ia64_client.tar
Linux RedHat AS 4.0 (Intel 32 bit)
sn_dsm_linuxRH_AS_4i386_client.tar
Linux RedHat AS 4.0 (Intel 64 bit)
sn_dsm_linuxRH_AS_4x86_64_client.tar
Linux RedHat AS 4.0 (Intel IA64)
sn_dsm_linuxRH_AS_4ia64_client.tar
Linux SuSE ES 9.0 (Intel 32 bit)
sn_dsm_linuxSuSE_90i386_client.tar
Linux SuSE ES 9.0 (Intel 64 bit)
sn_dsm_linuxSuSE_90x86_64_client.tar
Linux SuSE ES 9.0 (Intel IA64)
sn_dsm_linuxSuSE_90ia64_client.tar
Solaris Sparc 510
sn_dsm_solaris510sparc64_client.tar
Solaris Sparc 59
sn_dsm_solaris59sparc64_client.tar
Windows 2000/XP/2003
sn_dsm_win2k_client.exe
5
Select the software package that corresponds to your system by clicking the link.
6
Save the file to a location on your local hard drive. Be sure to make a note of this location,
because you will need to navigate to it when you’re ready to install the client software.
74
Installing StorNext Client Software
7
After the file download is complete, on the Download Client Software screen click Next to
continue.
The Install Client Software screen appears. (Linux is shown as an example.)
8
Follow the directions on the Install Client Software screen to install the software for your
operating system. When finished, return to the Install Client Software screen and click Next to
continue.
For all operating systems except Windows, the Configure Client Software screen appears.
(Linux is shown as an example.)
StorNext File System and Storage Manager Installation Guide
75
9
Do one of the following:
•
If you are installing on a Windows operating system, proceed to Step 10 on page 76.
•
For all other operating systems, right-click on the Client Configuration File link and save
the file to the location specified on the Configure Client Software screen.
10 Click Finish.
Continue with the Installing Client Software procedure for your operating system.
76
Installing StorNext Client Software
Installing StorNext Client Software on Windows
Use this procedure to install StorNext software on a Windows client.
1
Open the Control Panel (Start > Settings > Control Panel).
2
Launch the Add/Remove Programs utility, and then click Add New Programs.
3
On the Add New Programs window, click CD or Floppy. The Install Program From Floppy
Disk or CD screen appears.
StorNext File System and Storage Manager Installation Guide
77
4
Click Next. The Run Installation Program screen appears.
5
Click Browse. The Browse window appears.
6
In the Browse window’s Files of type field, click the arrow to the right and select All Files.
7
Navigate to the location on your hard drive where you saved the executable file when you
downloaded the StorNext client software from the Admin menu.
78
Installing StorNext Client Software
8
Select the executable file name (for example, sn_dsm_win2k_client.exe), and then click
Open to launch the installation program.
The Windows Installation Wizard launches.
9
Click Next to continue.
The InstallShield screen appears.
StorNext File System and Storage Manager Installation Guide
79
10 Click Next to continue.
The License Agreement screen appears.
11 Accept the License Agreement and click Next.
The Select Destination screen appears.
80
Installing StorNext Client Software
12 Do one of the following:
• Accept the default destination and click Next.
• Click Browse to select an installation destination directory and click Next.
The Select Components screen appears.
13 Accept the default settings and click Next.
The Select Program Folder screen appears.
StorNext File System and Storage Manager Installation Guide
81
14 Accept the default settings and click Next.
The Start Copying Files screen appears.
15 Review the settings to make sure they are satisfactory and click Next.
A progress window in shown. You are prompted whether you want to explore the StorNext Help
Files during the rest of the installation.
82
Installing StorNext Client Software
16 Do one of the following:
• Click Yes to see the help files.
• Click No to go to Step 17 on page 83.
If you click Yes, a browser appears that lists the StorNext help files.
17 The installation wizard prompts you to select options to complete the installation.
StorNext File System and Storage Manager Installation Guide
83
CAUTION
On the Choose Options to Complete the Installation screen,
do NOT select the option to Label my StorNext File System
Disk Devices check box. During the initial installation of the
SNFS software, the disks have already been labeled during
server setup. If you re-label your operating system disk, you
will have to completely rebuild your machine or restore it
using an operating system backup.
18 Select or leave blank the Label my StorNext File System Disk Devices option, and then click
Next.
The File System Name Service Locations screen appears.
19 Enter the computer name or IP address in the field and click Next. ADIC recommends entering
the IP address rather than a computer name. You can also enter more than one IP address.
A confirmation screen appears.
84
Installing StorNext Client Software
20 Verify the computer name or IP address and click Next if correct or click Back if you need make
changes.
A prompt appears.
21 You are prompted to establish mapping and authentication credentials. Click Yes.
The Client Properties screen appears.
This screen enables you to modify StorNext FS client properties on the drives. It consists of six tabs
in which to make changes. Drive Mappings is the first tab shown.
• Map Drive parameters:
•
Drive menu: Select a drive for the file system association.
•
File System menu: Enter a file system name for the mapping association or select one
from the drop-down list.
•
Map button: Click Map to map StorNext FS to the selected drive letter.
• Select Drive parameter:
•
Drive: Select a file system drive mapping that will become the focus for the other
configuration tabs.
• Unmap Drive parameter:
•
Unmap: Select a drive and click Unmap to remove the connection to the drive letter.
• Display File System Critical Events to Desk Top check box: Enable this option (check the
box) to display StorNext FS critical event notifications to the Desktop via a Windows dialog
box.
• Disable SNFS portmapper check box: Select this option (check the box) if you want to disable
StorNext FS’s portmapper feature.
StorNext File System and Storage Manager Installation Guide
85
22 Select a drive to map to from the Drive drop-down list.
23 In the File System drop-down list, select a file system to associate with the drive and click Map.
The remaining information on the screen is automatically populated.
24 Review your settings and click FS Name Servers.
The FS Name Servers tab appears.
From this tab you can add, remove, or change the name of the Name Servers.
• FS Name Servers: Displays the list of SNFS Name Servers.
• Blank: Enter the name of a new FS Name Server.
• Add: Click this button to add a new FS name server to the FS Name Servers list.
• Remove: To remove a server, select one from the FS Name Servers list, click this button, and
then click OK.
• Move Up: To move the server one place above the previous server on the list, select it from
the FS Name Servers list, and click this button.
• Move Down: To move the server one place below the previous server on the list, select it from
the FS Name Servers list, and click this button.
86
Installing StorNext Client Software
25 Make your changes or verify your servers are properly named and click Authentication.
The Authentication tab appears.
Note
The Authentication tab applies only to Windows clients part of StorNext
file systems that are accessed by non-Windows clients such as UNIX
or Linux clients. You needn’t change any values on the Authentication
tab if your StorNext installation is Windows only and you do not plan to
add non-Windows clients. If you have a Windows-only installation, skip
to Step 26 on page 88.
This tab allows you to configure user authentication.
• Windows User Names: Select the Windows user name you would like to map. Then, select
one of the following three methods:
•
Active Directory: Select this button to use the Lightweight Directory Access Protocol
(LDAP) method for mapping. LDAP/RFC 2307 is used to obtain the Active Directory/
Services for UNIX (SFU) mapping for the selected Windows user name. Active
Directory will be the only mapping method supported in a future StorNext release. This
check box enables Active Directory only if the Windows client is part of an Active
Directory domain.
•
PCNFSD Server: Select this button if your system uses Personal Computer Network
File System Daemon (PCNFSD) authentication, and enter the IP address for the
desired PCNFSD server.
•
NIS Domain: Select this button if your system uses NIS authentication, and enter the
NIS domain and server names.
StorNext File System and Storage Manager Installation Guide
87
• File Creation Permissions check boxes: Select any combination of these check boxes to set
the default UNIX R (Read) or W (Write) access permissions for files created by the selected
user. These permission check boxes apply only to PCNFSD and NIS mapping methods, not
to the Active Directory method. This is an optional step, so you needn’t select any of the check
boxes to authenticate user names.
•
User: Specifies read and/or write capabilities for the owner of the file.
of the file.
•
Group: Specifies read and/or write capabilities for the file’s group.
•
Everyone: Specifies read and/or write capabilities for all other users and groups.
26 Enter valid values and click Mount Options.
The Mount Options tab appears.
The mount options shown are associated with the initial disk drive mapping that you set for Drive
Mappings.
CAUTION
Changing these options could adversely affect your system or
performance, so exercise extreme caution when changing any
of these values. You should not change the default values
unless you have been instructed to do so by a Professional
Services representative.
• Async I/O Threads: The number of threads created to be used as asynchronous I/O threads
for user applications.
• System Threads: The number of threads created for use by the file system.
• Retransmissions: The number of attempts to be made for sending a message to the FSS.
• TimeOut (1/10 sec): The amount of time before a message to the FSS times out.
• Mount Retransmits: The number of times the driver will re-transmit a message to the FSS.
88
Installing StorNext Client Software
• QOS Token Hold Time: This parameter is only applicable when using the StorNext FS Quality
of Service (QOS) feature for real-time I/O. This parameter determines the number of seconds
that a client stripe group will hold on to a non-realtime I/O token during periods of inactivity.
• Debug: Check this box to place debug logs in the System Event log.
• Hard Reconnect: Check this box to endlessly attempt reconnects to the FSS.
• Hard Mount: Check this box to endlessly attempt to mount the file system.
• Read Only: Check this box to mount the file system in read-only mode.
• Paged DirCache: This option controls how the directory cache buffer is allocated. The default
is to allocate the buffer from the Windows "non-paged" pool, which is a limited memory
resource. For backward compatibility reasons the default for this option is unchecked, which
causes the directory cache buffer to be allocated from the non-paged pool. Checking this box
allocates the buffer from the paged pool. To reduce memory contention in the non-paged pool,
this box should be checked
• I/O Timeout (60 sec): This option controls whether SNFS times out an I/O after 60 seconds.
When this option is checked (the default), SNFS will attempt to cancel a request made to the
disk driver if the I/O does not complete before the timeout expires. In this case,
STATUS_TIMEOUT is returned to the application. When this option is unchecked, SNFS waits
indefinitely for an I/O to complete.
• Disable Buffer Cache: Check this box to disable the system from buffering any files.
• Allow Diskless Mount: Check this box to allow the file system to be mounted and accessed
without all disks being accessible in the stripe group.
• Fast Failover Detection: Check this box to enable a more aggressive detection of a file
system failure.
• Delay Atime Updates: Check this box to have the file system delay the access time when
reading a file to when the file is closed.
• Readonly Directories: Check this box to have all directories set to read-only mode.
• Protect Preallocation: This option disables the preallocation parts of the extapi (used by
cvmkfile and cvcp) for users other than root/administrator. Enabling this option prevents
unauthorized users from preallocating regions of the file system for a file and then searching
the data. When this option is selected, only root/administrator can preallocate.
• File Name Case Insensitive Check this box to activate the New File Name Case area.
• New File Name Case area:
•
Preserve Case: Select this button to keep text as it is entered.
•
Convert to Lower: Select this button to convert all text to lower-case.
•
Convert to Upper: Select this button to convert all text to upper-case.
StorNext File System and Storage Manager Installation Guide
89
27 Review the options and click OK.
Note
The tabs Syslog Level and Cache Parameters are not modified during the
installation of StorNext. If you need to modify these parameters, contact ATAC.
Refer to .Customer Assistance on page 97.
The Setup Finish screen appears.
28 Click Finish.
You are prompted to reboot your system, but do not reboot at this time.
29 Verify that the installation is complete by checking for both the cvfs.sys and
cvfsfilter.sys files in the following directories:
• For Windows 2000:
c:\%windir%\system32\drivers
• For Windows XP and 2003 Server:
c:\%windir%\system32\drivers
30 Restart the machine.
90
Installing StorNext Client Software
Installing StorNext Client Software on Red Hat Linux
Use this procedure to install the StorNext software on a Red Hat Linux client.
1
Log on as root.
2
Install the client software. Type:
tar xf <filename>
rpm -ivh <client package name>
Where <filename> is the name of the client installation program.
3
Enable the chkconfig levels to start automatically on reboot Type:
chkconfig --level 3456 cvfs on
4
Make sure the /usr/cvfs/config/fsnameservers file contains the name of the server
machine.
5
Create the mount points for the file systems. Type:
mkdir -p <mount point>
chmod 777 <mount point>
6
Add the following line to the /etc/fstab file to enable automount after reboot.
<file system name> <mount point> cvfs verbose=yes 0 0
where <file system name> is the name of the file system and <mount point> is the mount
point specified during the Add File System step of the StorNext software configuration. For more
information, refer to Step 2: Adding File Systems on page 28.
Note
To manually mount a file system, type this command:
mount -t cvfs <file system name> <mount point>
StorNext File System and Storage Manager Installation Guide
91
Installing StorNext Client Software on SuSE Linux
Use this procedure to install StorNext software on a SuSE Linux client.
1
Log on as root.
2
Install the client software. Type:
tar xf <filename>
rpm -ivh <client package name>
Where <filename> is the name of the client installation program.
3
Enable the chkconfig levels to start automatically on reboot. Type:
chkconfig -s raw 235
chkconfig -s cvfs 345
4
Make sure the /usr/cvfs/config/fsnameservers file contains the name of the server
machine.
5
Create the mount points for the file systems. Type:
mkdir -p <mount point>
chmod 777 <mount point>
6
Add the following line to the /etc/fstab file to enable automount after reboot.
<file system name> <mount point> cvfs verbose=yes 0 0
where <file system name> is the name of the file system and <mount point> is the mount
point specified during the Add File System step of the StorNext software configuration. For more
information, refer to Step 2: Adding File Systems on page 28.
Note
92
To manually mount a file system, type this command:
mount -t cvfs <file system name> <mount point>
Installing StorNext Client Software
Installing StorNext Client Software on Sun Solaris
Use this procedure to install StorNext software on a Solaris client.
1
Log on as root.
2
Install the client software. Type:
tar xf
pkgadd
Select
type y
type q
<filename>
-d .
to add the package ‘ADICsnfs’
(yes, add the package)
(quit the pkgadd program)
Where <filename> is the name of the client installation program.
3
Make sure the /<usr>/cvfs/config/fsnameservers file contains the name of the
StorNext server.
4
Create the mount points for the file systems.
mkdir -p <mount point>
chmod 777 <mount point>
5
Add the following line to the /etc/vfstab file to enable automount after reboot.
<file system name> - <mount point> cvfs - auto verbose=yes
where <file system name> is the name of the file system and <mount point> is the mount
point specified during the Add File System step of the StorNext software configuration. For more
information, refer to Step 2: Adding File Systems on page 28.
Note
To manually mount a file system, type this command:
mount -F cvfs <file system name> <mount point>
StorNext File System and Storage Manager Installation Guide
93
Installing StorNext Client Software on HP-UX
Use this procedure to install StorNext software on an HP-UX client.
1
Log on as root.
2
Install the client software. Type:
tar xf <filename>
swinstall -s <full path of depot file> -x mount_all_filesystems=false \*
Where <filename> is the name of the client installation program. Make sure the /usr/cvfs/
config/fsnameservers file contains the name of the StorNext server.
3
Create the mount points for the file systems. Type:
mkdir -p <mount point>
chmod 777 <mount point>
4
Add the following line to the /etc/fstab file to enable automount after reboot. Type:
<mount point> <mount point> cvfs rw,fsname=<fsname> 0 0
where <file system name> is the name of the file system and <mount point> is the mount
point specified during the Add File System step of the StorNext software configuration. For more
information, refer to Step 2: Adding File Systems on page 28.
5
Reboot the client to rebuild the UNIX kernel.
Note
To manually mount a file system not listed in the fstab file, type the
following command:
mount -F cvfs <mount point> <mount point>
If listed in the fstab file, use the command mount -F cvfs <mount
point>
94
Installing StorNext Client Software
Installing StorNext Client Software on IBM AIX
Use this procedure to install StorNext software on an AIX client.
1
Log on as root.
2
Copy the .tar file to your hard drive.
For example:
cp sn_dsm_aix_client.tar <directory>
3
Install the client software.
tar xf <filename>
installp -ac -d filename all
Where <filename> is the name of the client installation program.
4
Make sure the /usr/cvfs/config/fsnameservers file contains the name of your server
machine.
5
Create the mount points for the file systems.
mkdir -p <mount point>
chmod 777 <mount point>
6
Add the following line to /etc/filesystems to enable automount after reboot.
crfs -v cvfs -d <file system name> -a verbose=yes -a type=cvfs -A yes m <mount point>
where <file system name> is the name of the file system and <mount point> is the mount
point specified during the Add File System step of the StorNext software configuration. For more
information, refer to Step 2: Adding File Systems on page 28.
StorNext File System and Storage Manager Installation Guide
95
Installing StorNext Client Software on SGI IRIX
Use this procedure to install StorNext software on an IRIX client.
1
Log on as root.
2
Install the client software. Type:
tar xf <filename>
inst -f .
Inst> go
Inst> quit
Where <filename> is the name of the client installation program.
3
Enable StorNext to start automatically on reboot. Type:
chkconfig cvfs on
chkconfig verbose on
4
Make sure the /<usr>/cvfs/config/fsnameservers file contains the name of the
StorNext server.
5
Create the mount points for the file systems. Type:
mkdir -p <mount point>
chmod 777 <mount point>
6
Add the following line to the /etc/fstab file to enable automount after reboot. Type:
<file system name> <mount point> cvfs verbose=yes 0 0
where <file system name> is the name of the file system and <mount point> is the mount point
specified during the Add File System step of the StorNext software configuration. For more
information, refer to Step 2: Adding File Systems on page 28.
7
Reboot the client to rebuild the UNIX kernel.
Note
96
To manually mount a file system, type the following command:
mount -t cvfs <file system name> <mount point>
Installing StorNext Client Software
5
Customer Assistance
If you want more information about your product, go to the StorNext website or contact the ADIC
Technical Assistance Center (ATAC).
StorNext Website
For the latest information and accessories for the StorNext, visit the product website at
www.adic.com/stornext. The most recent versions of all documents are also located here.
ADIC Technical Assistance Center
If problems cannot be solved with the aid of this document or if training is desired, contact ATAC.
In the USA:
800-827-3822
In Europe and Japan:
00-800-9999-3822
For other contact numbers:
www.adic.com/contact
To open a Service Request online:
www.adic.com/techsup
StorNext File System and Storage Manager Installation Guide
97
98
Glossary
ADIC Technical Assistance Center (ATAC)
The ADIC customer help desk.
Affinity
An association between a relation point in the file system and a stripe group. It allows the
user to direct data to specific primary disks by writing to the affinities associated relation
point.
Clean Media
The operation of logically removing old file versions from a piece of media. This is a
database operation that removes knowledge of managed files that have been updated or
removed. A piece of media that contains nothing but removed files will not be considered
blank until it is cleaned.
Configuration Wizard
A tool for setting up a basic environment for the management of data, both on disk and on
removable media (tape or disk). It appears the first time the administrator connects to the
browser after installing StorNext.
Data Storage Manager (DSM)
One of several components that make up StorNext. The DSM corresponds to the StorNext
File System.
Drive Pool
A grouping of drives for use in storing and retrieving data.
Fibre Channel (FC)
A high speed data transfer architecture.
File Transfer Protocol (FTP)
The protocol used on the Internet for sending files.
GUI
Graphical User Interface.
Managed Directory
A directory that has a policy class relationship.
Managed File System
A file system that enables automatic data movement managed by StorNext Storage
Manager between the primary disk and secondary storage (either disk or tape).
StorNext File System and Storage Manager Installation Guide
99
MediaClass
A grouping of media used for storing or retrieving data.
Media Storage Manager (MSM)
The Media Storage Manager is responsible for controlling media and archives.
PolicyClass
A set of rules and criteria set up by SNSM that control the movement of data between
primary disk to secondary storage (either disk or tape).
Quota
This variable enables or disables the enforcement of the file system quotas.
Recover
The process of bringing back to disk a managed file that was previously removed from the
disk. This can only be done if the file had been successfully stored to media. Also, the file
cannot not exist in the Trash can. (See Undelete) File recovery can be done regardless of
whether the Trash can is enabled, up until the time the containing media is cleaned.
Relation Point/Relations
A mapping of a policy class to a directory in a managed file system.
Relocation
The process of moving a file from one affinity on a file system to another affinity on that file
system.
Restore
The process of replacing a file system's contents after some sort of disaster. Also known
as disaster recovery.
Retrieve
The process of retrieving data for a file from secondary storage (either disk or tape).
RHAS
Red Hat Advanced Server
RHEL
Red Hat Enterprise Linux
SCSI
Small Computer System Interface. The interface that is used to talk to most hardware
devices such as tape and libraries.
100
StorNext
A scalable, high performance, data management solution that ensures the long-term safety
and recoverability of data in SAN environments, while optimizing the use of storage
resources. It consists of two components, the StorNext Storage Manager (SNSM) and the
StorNext File System (SNFS).
Storage Area Network (SAN)
A SAN is a dedicated, high-performance network whose primary purpose is the transfer of
data along FC or high-speed Ethernet connections between servers, interconnect devices,
and storage peripherals.
StorNext File System (SNFS)
One of the two components that make up StorNext. SNFS is primarily used to provide Fibre
Channel connections (but supports other types of connections) in a serverless environment
which enables clients to access data and share files.
StorNext Storage Manager (SNSM)
One of two components that make up StorNext. One of two components that make up
StorNext. SNSM provides archive functionality, including file migration and management
services.
Store
The process of copying data for a file to secondary storage (either disk or tape).
Stripe Group
A set of similar storage devices that can be maintained as a group.
Tertiary Storage Manager (TSM)
The Tertiary Storage Manger is responsible for policy management and controlling data
movement between primary disk and secondary storage (either disk or tape).
Trash can
A repository for files deleted from the file system but not yet permanently removed.Files in
the trash can may be recovered or undeleted if necessary.
Truncation
The process of freeing data blocks stored to secondary storage (either disk or tape). The
file name remains visible in the file system.
Undelete
The process of returning a file from the Trash can to its original location on disk. This can
be done only if the Trash can is enabled.
Unmanaged File System
A file system that does not have archive capability controlled by SNSM.
StorNext File System and Storage Manager Installation Guide
101
102
Index
A
H
assistance, customer . . . . . . . . . . . . . . . . . . 97
ATAC . . . . . . . . . . . . . . . . . . . . . . . . . . . . . . 97
help, StorNext website . . . . . . . . . . . . . . . . . 97
how this document is organized . . . . . . . . . . 2
HP-UX
installation requirements
64-bit inodes . . . . . . . . . . . . . . . . . . 9
installation requirements, mapping LUNs 9
StorNext installation requirements . . . . . . 9
C
client
StorNext FS, installing software
SuSE Linux . . . . . . . . . . . . . . . . . . 92
StorNext, installing software
HP-UX . . . . . . . . . . . . . . . . . . . 94, 96
IBM AIX . . . . . . . . . . . . . . . . . . . . . 95
Red Hat Linux . . . . . . . . . . . . . . . . 91
SGI IRIX . . . . . . . . . . . . . . . . . . . . . 96
Solaris . . . . . . . . . . . . . . . . . . . . . . 93
Windows . . . . . . . . . . . . . . . . . . . . 77
Configuration Wizard
Step 1, entering a license . . . . . . . . . . . . 24
Step 2, adding file systems . . . . . . . . . . . 28
Step 3, adding a library . . . . . . . . . . . . . . 35
Step 4, adding a tape drive . . . . . . . . . . . 49
Step 5, adding media . . . . . . . . . . . . . . . 53
Step 6, adding storage disks . . . . . . . . . 58
Step 7, adding a storage policy . . . . . . . . 61
Step 8, e-mail notification . . . . . . . . . . . . 66
using, StorNext . . . . . . . . . . . . . . . . . . . . 22
conventions, document . . . . . . . . . . . . . . . . . . 2
customer assistance . . . . . . . . . . . . . . . . . . . 97
D
document
audience . . . . . . . . . . . . . . . . . . . . . . . . . . 1
conventions . . . . . . . . . . . . . . . . . . . . . . . . 2
organization . . . . . . . . . . . . . . . . . . . . . . . 2
document, symbols . . . . . . . . . . . . . . . . . . . . . 2
DSM. See StorNext File System . . . . . . . . . . 1
StorNext System Administrator Guide
I
IBM AIX
installation requirements, mapping LUNs 10
StorNext installation requirements . . . . . 10
inst.StorNext script . . . . . . . . . . . . . . . . . . . 16
installation requirements
client hard disk . . . . . . . . . . . . . . . . . . . . 11
HP-UX
64-bit inodes . . . . . . . . . . . . . . . . . . 9
HP-UX, mapping LUNs . . . . . . . . . . . . . . 9
IBM AIX, mapping LUNs . . . . . . . . . . . . 10
Red Hat Linux
mapping LUNs . . . . . . . . . . . . . . . . 7
multiple LUN support . . . . . . . . . . . . 7
required kernels . . . . . . . . . . . . . . . 6
server hard disk . . . . . . . . . . . . . . . . . . . 11
server memory . . . . . . . . . . . . . . . . . . . . 11
SGI IRIX
64-bit inodes . . . . . . . . . . . . . . . . . 10
mapping LUNs . . . . . . . . . . . . . . . 10
Solaris
mapping LUNs . . . . . . . . . . . . . . . . 9
StorNext . . . . . . . . . . . . . . . . . . . . . . . . . . 5
HP-UX . . . . . . . . . . . . . . . . . . . . . . . 9
IBM AIX . . . . . . . . . . . . . . . . . . . . . 10
Red Hat Linux . . . . . . . . . . . . . . . . . 6
SGI IRIX . . . . . . . . . . . . . . . . . . . . 10
Solaris . . . . . . . . . . . . . . . . . . . . . . . 9
SuSE Linux . . . . . . . . . . . . . . . . . . . 8
303
SuSE Linux
mapping LUNs . . . . . . . . . . . . . . . . . 8
required kernels . . . . . . . . . . . . . . . . 8
installing software
StorNext . . . . . . . . . . . . . . . . . . . . . . . . . 16
M
MSM. See StorNext Storage Manager . . . . . . 1
O
optional pre-installation
StorNext . . . . . . . . . . . . . . . . . . . . . . . . . 13
R
Red Hat Linux
installation requirements
mapping LUNs . . . . . . . . . . . . . . . . . 7
multiple LUN support . . . . . . . . . . . . 7
required kernels . . . . . . . . . . . . . . . . 6
StorNext installation requirements . . . . . . 6
S
script
inst.StorNext . . . . . . . . . . . . . . . . . . . . . . 16
SGI IRIX
installation requirements
64-bit inodes . . . . . . . . . . . . . . . . . 10
mapping LUNs . . . . . . . . . . . . . . . . 10
StorNext installation requirements . . . . . 10
software
installing, client, HP-UX . . . . . . . . . . 94, 96
installing, client, IBM AIX . . . . . . . . . . . . 95
installing, client, Red Hat Linux . . . . . . . . 91
installing, client, SGI IRIX . . . . . . . . . . . . 96
installing, client, Solaris . . . . . . . . . . . . . 93
installing, client, SuSE Linux . . . . . . . . . . 92
installing, client, Windows . . . . . . . . . . . . 77
Solaris
installation requirements
mapping LUNs . . . . . . . . . . . . . . . . . 9
StorNext installation requirements . . . . . . 9
StorNext
client software, installing on HP-UX . 94, 96
client software, installing on IBM AIX . . . 95
client software, installing on Red Hat Linux
. . . . . . . . . . . . . . . . . . . . . . . . . . . . . . 91
client software, installing on SGI IRIX . . . 96
304
client software, installing on Solaris . . . . 93
client software, installing on SuSE Linux 92
client software, installing on Windows . . 77
Configuration Wizard
Step 1, entering a license . . . . . . . 24
Step 2, adding file systems . . . . . . 28
Step 3, adding a library . . . . . . . . . 35
Step 4, adding a tape drive . . . . . . 49
Step 5, adding media . . . . . . . . . . 53
Step 6, adding storage disks . . . . . 58
Step 7, adding a storage policy . . . 61
Step 8, e-mail notification. . . . . . . . 66
configuring, Configuration Wizard . . . . . 22
installation requirements . . . . . . . . . . . . . 5
client hard disk . . . . . . . . . . . . . . . 11
server hard disk . . . . . . . . . . . . . . . 11
server memory . . . . . . . . . . . . . . . 11
installing software . . . . . . . . . . . . . . . . . 16
installing the software . . . . . . . . . . . . . . . 5
pre-installation, optional . . . . . . . . . . . . . 13
SuSE Linux
installation requirements
mapping LUNs . . . . . . . . . . . . . . . . 8
required kernels . . . . . . . . . . . . . . . 8
StorNext installation requirements . . . . . . 8
symbols in document, explanations . . . . . . . . 2
T
TSM. See StorNext Storage Manager . . . . . . 1
W
who should read this document . . . . . . . . . . . 1
Index