1
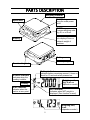
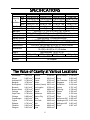
SJ-1000H
SJ-2000H
SJ-5000H
SJ-12KH
WM+PD4001280A
SAFETY PRECAUTIONS
All safety messages are identified by the following, “WARNING” or
“CAUTION”, of ANSI Z535.4 (American National Standard Institute:
Product Safety Signs and Labels). The meanings are as follows:
WARNING
CAUTION
A potentially hazardous situation which, if not avoided,
could result in death or serious injury.
A potentially hazardous situation which, if not avoided,
may result in minor or moderate injury.
This manual is subject to change without notice at any time to improve the
product.
Product specifications are subject to change without any obligation on the
part of the manufacture.
When using the SJ-H, the following safety precautions should always be
followed.
WARNING
Use only specified AC adapter for the scale. Other
adapter may cause damage (AC adapter is optional).
Internal service or adjustment to this product should be
performed by a qualified person.
CAUTION
Avoid installing the scale in direct sunlight, which may cause
discoloration or malfunctions.
Avoid over and/or shock load that could cause damage to the
scale.
Avoid using the weighing pan to move the scale, as that
could cause damage to the scale.
Do not mix the type of batteries. Replace all other batteries at
the same time.
If the scale is not to be used for a long period of time, remove
all batteries from the battery room to avoid leakage.
The scale is not watertight and avoid exposure to water.
1
PARTS DESCRIPTION
Weighing Platform
ON/OFF key
Spirit level
Turns the scale power
on/off.
UNITS key
Changes weighing units,
(k)g, lb, oz or lb-oz.
RE-ZERO key
Display
Sets display to zero or
subtracts weight of
container.
Battery cover
AC adapter jack
Four leveling feet
Battery indicator
STABLE indicator
Indicates when the
reading is stable.
Indicates battery remaining amount. It turns on
about for 10 seconds when powered on.
Weighing unit,
(k)g, lb or oz
Polarity
(depends on model)
ZERO indicator
NET indicator
Indicates when the
scale is at zero point.
Indicates when NET weight is
displayed (Tare function is used).
`
Weighing unit,
lb-oz
(depends on model )
2
PREPARATION
Installing Batteries
CAUTION
Take great care of the polarity of batteries. The polarity marks are
shown in the battery box.
Replace used batteries with four new ones when lb is displayed.
Do not mix used and new batteries. Do not mix the battery type.
Remove batteries when the scale is not to be used for a long time.
Battery box
2
1
3
New four batteries
(R20P / LR20 / D size)
Battery cover
1 Slide the battery cover downward to open.
2 Push the battery box to unhook and pull it out.
3 Insert new four batteries (R20P / LR20 / D size) into the battery box, taking
extreme care of the polarities.
Batteries are not included with shipment.
Connecting an AC adapter (Optional)
Open rubber cap.
The AC input requirement could be 100, 120 or
230 volts (50/60Hz) depending on the area where
used, so please verify that the adapter is correct.
Open the rubber cap and plug the AC adapter.
Setting up the Scale
AC adapter plug
Place the scale on the firm surface and adjust
the feet so that the sprit level shows the scale is
level for an accurate weighing.
OK
3
NG
Before Weighing
WEIGHING
Automatic power-off function.
If the scale left ON and the stable indicator is displayed, an automatic
power-off function turns power off after approximately 5 minutes.
To disable/enable this function, turn the scale on while pressing the
[RE-ZERO] key. Then poff0 or poff1 will be displayed.
poff0
Function disabled.
poff1
Function enabled.
Select the setting by pressing the [RE-ZERO] key which toggles the display
above, and press the [UNITS] key. The scale shows end and returns to the
weighing mode.
Error message
e
-----
lb
Overload: remove excess load on the weighing platform.
The scale zero is out of zero range or unstable when powered
on. Make sure no load is on the weighing platform or nothing
touches the platform.
Low battery: replace the batteries or use the AC adapter.
Calibration may be required before weighing
Read “CALIBRATION” first and if necessary, calibrate your scale for
accurate weighing.
Weighing Procedures
1. Turn on the scale.
Press the [ON/OFF] key to turn on the scale. Then the scale displays all
0 will be displayed.
segments for a few seconds and then
2. Start weighing
If you do not use a container for weighing,
0 . If not, press the [RE-ZERO] key to display
Verify the reading is
0 . Place objects on the weighing platform to weigh. When the reading
becomes stable, the stable indicator is displayed.
If you use a container for weighing,
Place an empty container on the platform. Wait for the stable indicator to
be displayed and press the [RE-ZERO] key. Place the objects to be
weighed in the container. When the reading becomes stable, the stable
indicator is displayed.
Select the weighing unit
Press the [UNITS] key to select weighing unit either “(k)g”, “lb”, “oz” or
“lb-oz”. The scale will power up with the weighing unit that had been used
when turned off last time.
4
CALIBRATION
When to Calibrate
Calibration may be required when it initially installed or it is moved a
substantial distance. Also periodical calibration will be recommended.
Calibration using a Calibration Weight
Calibration switch
1. Enter calibration mode.
Press the [ON/OFF] key to turn the power off. While
pressing both the [RE-ZERO] and [UNITS] keys,
press the [ON/OFF] key. Cal will be displayed.
Or remove the calibration switch cover on the bottom
and press the calibration switch while in the weighing
mode. Then Cal will be displayed.
Calibration switch cover
2. Zero calibration
Press the [RE-ZERO] key to calibrate zero. Cal0 will be displayed.
Wait for the stable indicator to be displayed and press the [RE-ZERO] key.
Calf will be displayed in a few seconds. If the zero calibration only is to
be done, press the [UNITS] key. The scale will automatically return to the
weighing mode.
3. Span calibration
When Calf is displayed, place the weight at the center of the platform.
Wait for the stable indicator to be displayed, then press the [RE-ZERO] key.
The display will show end and the scale will automatically return to the
weighing mode. See “SPECIFICATIONS” about the calibration weight.
Calibration by Gravity Compensation
2
The scale is calibrated at 9.798 m/s at the factory. If the acceleration of
gravity at your location is not same and if you do not have calibration
weights, you can calibrate the scale by compensating the acceleration of
gravity. (Refer “The Value of Gravity at Various Locations”.)
1. Set a new acceleration value.
When Cal is displayed, press the [UNITS] key and 9.798 will be
displayed. Press the [RE-ZERO] key to increment the blinking digit and
press the [UNITS] key to move the blinking digit.
2. Store the value in memory.
While pressing the [UNITS] key, press and hold the [RE-ZERO] key and
release the [UNITS] key. Then the display will show end and return to
Cal . Turn the scale off to finish the procedure.
5
SPECIFICATIONS
MODEL
(k)g
Capacity
lb
x
Resolution oz
lb-oz
Non-linearity
Repeatability
Span drift
Operating temp.
Display
Display update
Power
Battery life
Platform size
SJ-1000H
SJ-2000H
SJ-5000H
SJ-12KH
1000 g x 0.5 g 2000 g x 1 g
5000 g x 2 g
12 kg x 5g
2.2 lb x 0.001 lb 4.4 lb x 0.002 lb 11 lb x 0.005 lb 26 lb x 0.01 lb
35 oz x 0.02 oz 70 oz x 0.05 oz 176 oz x 0.1 oz 423 oz x 0.2 oz
2.2 lb x 0.1 oz 4.4 lb x 0.1 oz 11 lb x 0.1 oz
26 lb x 1 oz
±1 g
±2 g
±5 g
±10 g
1g
2g
5g
10 g
±0.015% / °C TYP (5°C~35°C / 41°F~95°F)
-10°C~40°C / 14°F~104°F, Less than 85%RH (No condensation)
25 mm / 0.98 inches, 7 segment liquid crystal display
Approximately 10 times per second
4 x R20P / LR20 / “D” size batteries or AC adapter
Approximately 800 hours with alkaline cells at 20°C / 68°F
230 (W) x 190 (D) mm / 9.05 (W) x 7.48 (D) inches
265 (W) x 250 (D) x 103 (H) mm
Dimensions
10.4 (W) x 9.8 (D) x 4.1 (H) inches
Weight
Approximately 1.9 kg / 4.2 lb
Calibration weight 1000g ± 0.1g 2000g ± 0.2g 5000g ± 0.5g
10 kg ± 1g
Accessories
This manual
Options
AC adapter
The Value of Gravity at Various Locations
Amsterdam
Athens
Auckland NZ
Bangkok
Birmingham
Brussels
Buenos Aires
Calcutta
Cape Town
Chicago
Copenhagen
Cyprus
Djakarta
Frankfurt
Glasgow
9.813 m/s2
9.807 m/s2
9.799 m/s2
9.783 m/s2
9.813 m/s2
9.811 m/s2
9.797 m/s2
9.788 m/s2
9.796 m/s2
9.803 m/s2
9.815 m/s2
9.797 m/s2
9.781 m/s2
9.810 m/s2
9.816 m/s2
Havana
Helsinki
Kuwait
Lisbon
London (Greenwich)
Los Angeles
Madrid
Manila
Melbourne
Mexico City
Milan
New York
Oslo
Ottawa
Paris
6
9.788 m/s2
9.819 m/s2
9.793 m/s2
9.801 m/s2
9.812 m/s2
9.796 m/s2
9.800 m/s2
9.784 m/s2
9.800 m/s2
9.779 m/s2
9.806 m/s2
9.802 m/s2
9.819 m/s2
9.806 m/s2
9.809 m/s2
Rio de Janeiro
Rome
San Francisco
Singapore
Stockholm
Sydney
Taichung
Taiwan
Taipei
Tokyo
Vancouver, BC
Washington DC
Wellington NZ
Zurich
9.788 m/s2
9.803 m/s2
9.800 m/s2
9.781 m/s2
9.818 m/s2
9.797 m/s2
9.789 m/s2
9.788 m/s2
9.790 m/s2
9.798 m/s2
9.809 m/s2
9.801 m/s2
9.803 m/s2
9.807 m/s2
3-23-14 Higashi-Ikebukuro, Toshima-ku, Tokyo 170-0013 JAPAN
Telephone: [81] (3) 5391-6132 Fax: [81] (3) 5391-6148
http://www.aandd.co.jp/
A&D ENGINEERING, INC.
1555, McCandless Drive, Milpitas, CA. 95035 U.S.A.
Telephone: [1] (408) 263-5333 Fax: [1] (408)263-0119
A&D INSTRUMENTS LTD.
Unit 24/26 Blacklands Way, Abingdon Business Park, Abingdon, Oxon OX14 1DY United Kingdom
Telephone: [44] (1235) 550420 Fax: [44] (1235) 550485
<German Scales Office>
Großbe Straße 13 b 22926 Ahrensburg GERMANY
Telephone: [49] (0) 4102 459230 Fax:[49] (0) 4102 459231
A&D MERCURY PTY. LTD.
32 Dew Street, Thebarton, South Australia 5031 AUSTRALIA
Telephone: [61] (8) 8301-8100 Fax: [61] (8) 8352-7409
A&D KOREA Limited
8th Floor, Manhattan Bldg. 36-2 Yoido-dong, Youngdeungpo-ku, Seoul, KOREA
Telephone: [82] (2) 780-4101 Fax: [82] (2) 782-4280
7