1
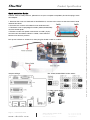
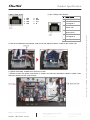
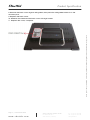
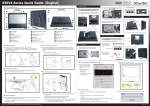
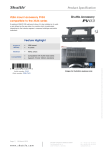
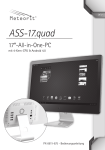
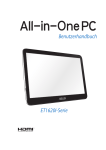
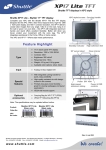
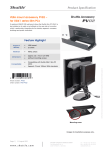
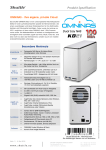
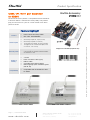
Product Specification Shuttle Accessory COM / LPT / RJ11 port expansion for X50V4 POS01 The Shuttle accessory POS01 is compatible with the Shuttle Allin-One-PC X50V4. It will add four serial (COM), one parallel (LPT) port and one RJ11 port for a cash drawer to the back panel of the PC. Product External ports External power Scope of delivery Compatibility Name: Shuttle Accessory POS01 UPC code: 887993800004 2x Serial port (Sub-D, 9 pins, male) 2x Serial port (RJ45 connector) 1x Parallel port (Sub-D, 25 pins, female) 1x Digital I/O for cash drawer (DIO, RJ11 connector, 12V or 24V) Both serial ports with D-Sub connector can provide an auxiliary voltage supply of either 5V or 12V Printed Circuit Board (PCB) 4 screws Power connector cable (4 pin) Ribbon cable Type label sticker (Rating label) Multi-language quick installation guide (EN, DE, FR) Compatible with the Shuttle All-in-OnePC X50V4 Images for illustration purposes only. X50V4 without POS01 Page 1 | 19 December 2014 www.shuttle.com X50V4 with POS01 installed Shu t tl e Computer Han dels GmbH Fritz- Strassmann-S t r. 5 25337 Elmshorn | Germany Tel. +49 (0) 4121-47 68 60 Fax +49 (0) 4121-47 69 00 [email protected] © 2015 by Shuttle Computer Handels GmbH (Germany). All information subject to change without notice. Pictures for illustration purposes only. Feature Highlight Product Specification Quick Installation Guide: 1. Remove the cover on the back of the X50V4 first, unscrew four screws of the stand mount and remove the stand. 2. Unscrew four screws of the back cover and remove it. 3. The back cover to prejudge the holes (COM3,COM4,DIO) must first break open. 4. Please connect the power connectors to CON1 (4-pin) and connect the ribbon cable to "CON2", then slide two latches into the lock position. Pull up two latches of "CON2" first, then plug the ribbon cable to "CON2". Jumper settings: JP2: COM1,COM2 PIN9 Fuction Select J1 PIN3: Power Select Default: Page 2 | 19 December 2014 www.shuttle.com 24V 12V JP3 JP3 JP7 JP7 Shu t tl e Computer Han dels GmbH Fritz- Strassmann-S t r. 5 25337 Elmshorn | Germany Tel. +49 (0) 4121-47 68 60 Fax +49 (0) 4121-47 69 00 [email protected] © 2015 by Shuttle Computer Handels GmbH (Germany). All information subject to change without notice. Pictures for illustration purposes only. Caution: Due to safety reasons, please turn off your computer completely first and unplug it from the adapter. Product Specification COM3,COM4 (RJ45): J1 (RJ11:6P6C) Cash Drawer: RXD TXD DSR DTR 5 6 7 8 Pin Signal Name 1 Ground (GND) Drawer kick-out 2 drive signal 1 RTS DCD CTS RI 3 Power 12V/24V, Default 24V 4 Drawer open/ close signal (input) 5 Drawer kick-out drive signal 2 6 Ground (GND) 5. Tear off the adhesive membrane, fold and fix the adhesive ribbon cable to the chassis rail. 6. Tighten the POS01 COM/LPT Port with four screws. 7. Please connect the power connectors to "CON6" and connect the ribbon cable to "CON3", then slide two latches into the lock position. Page 3 | 19 December 2014 www.shuttle.com Shu t tl e Computer Han dels GmbH Fritz- Strassmann-S t r. 5 25337 Elmshorn | Germany Tel. +49 (0) 4121-47 68 60 Fax +49 (0) 4121-47 69 00 [email protected] © 2015 by Shuttle Computer Handels GmbH (Germany). All information subject to change without notice. Pictures for illustration purposes only. 1 2 3 4 Product Specification © 2015 by Shuttle Computer Handels GmbH (Germany). All information subject to change without notice. Pictures for illustration purposes only. 8. Remove the back cover original rating label, then paste the rating label which sits in the accessory box. 9. Replace the back cover. 10. Refasten the stand and the back cover with eight screws. 11. Replace the cover, complete. Page 4 | 19 December 2014 www.shuttle.com Shu t tl e Computer Han dels GmbH Fritz- Strassmann-S t r. 5 25337 Elmshorn | Germany Tel. +49 (0) 4121-47 68 60 Fax +49 (0) 4121-47 69 00 [email protected]