Transcript
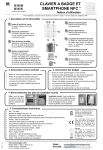
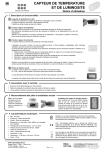
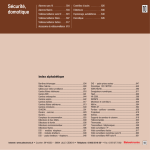
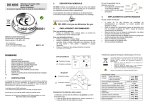
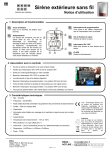
EN IT PT GR ES NL PL KEYPAD WITH BADGE READER AND NFC SMARTPHONE * User Guide Internet user interface * In the interest of simplicity, the term "badge" shall refer to both the badge and the NFC smartphone throughout this document 1. Overview and features 1 Keypad "ON" light This light indicates that the keypad is on. 2 Confirmation light This light indicates whether the command function is active (green for active, red for inactive). 3 4 Badge reader area For authentication, swipe your badge within 3 cm of the badge reader area. 1 Partial activation button Works in the same way as the full activation button. 6 Deactivation button Works in the same way as the full activation button. 7 Battery protection tab Remove this tab to power up the keypad and begin the pairing process with the central unit. 8 Wall bracket plate The keypad must be fixed to the wall bracket, otherwise the selfprotection system will not work properly. 9 Self-protection system The self-protection system is activated automatically if the keypad is removed from its wall bracket. An alert is emitted. 6 3 7 Full activation button Press the button. The light will blink slowly. Swipe your badge across the badge reader area. The light will blink quickly. The confirmation light will turn green and will be permanently lit, and you will hear two beeps from the keypad, confirming that the central unit has processed the command. Switch to learning mode on your central unit Remove the battery protection tab The keypad activity light will blink orange The confirmation light will turn green The central unit and keypad will emit two beeps to confirm successful pairing 5 5 9 8 2. Pairing with the central unit 4 2 3. Pairing badges Switch to learning mode on your central unit Switch to learning mode on your keypad by pressing the full activation and deactivation buttons simultaneously The keypad activity light will blink orange Swipe your badge over the reader area on the keypad The keypad activity light will turn green and blink quickly The confirmation light will turn green The central unit and keypad will emit a beep to confirm successful pairing 4. Replacing the batteries and fixing to the wall Batteries: open the battery compartment with a screwdriver and insert the batteries, taking care to match the poles correctly. Keypad installation: fix the plate to the wall using screws or double-sided tape. Slide the keypad onto the plate and tighten the holding screw at the bottom of the keypad. The keypad and plate cannot be used separately. 5. Technical specifications 120705 – V1.0 Ref: FO 3005 Max. no. of paired badges: 48 Frequency: Radio 433.92 MHz and RFID 13.56 MHz Two-way radio function for acknowledging activation and deactivation Range: 150 m (free field) Low battery indicator on the central unit Self-protection system (push-button anti-removal detection mechanism) Operating temperature: -10°C to +50°C Maximum operating altitude: 2,000 m Protection rating: IP 54 and IK 07 Batteries: 2 x AA LR6 Battery life: 3 years (8 activations per day) Dimensions: H=120 mm x L=100 mm x D=24 mm Weight: 137 g (keypad only - batteries not included) TAG Technologies S.A.S. Regent Park II, Bât 1, Rue du Lac 31670 Labège, France © TAG Technologies. All rights reserved. EMAIL : HOTLINE : Warning: explosion hazard if the batteries are not replaced with the correct type. Always dispose of used batteries appropriately. TAG Technologies hereby certifies that this product complies with the essential requirements of the R&TTE Directive 1999/5/CE. A full copy of the declaration of conformity can be found at www.myfox.fr/certificats Important Please sort and dispose of your waste in accordance with applicable legislation. All waste should be disposed of in a suitable location and in a way that does not harm the environment. [email protected] +33 (0)5 61 00 07 11