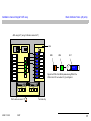
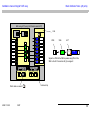
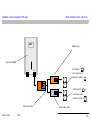
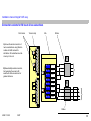
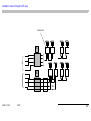
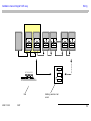
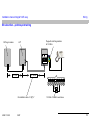
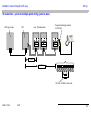
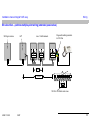
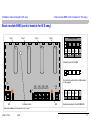
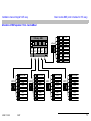
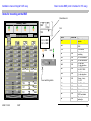
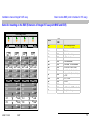
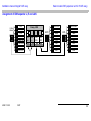
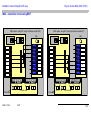
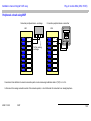
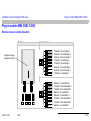
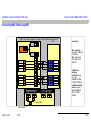
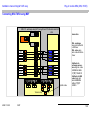
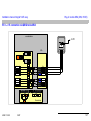
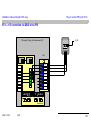
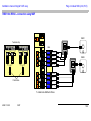
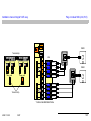
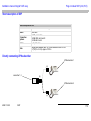
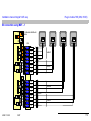
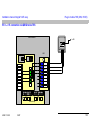
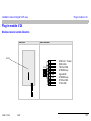
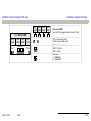
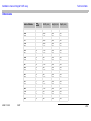
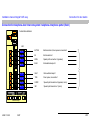
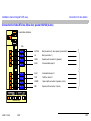
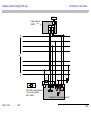
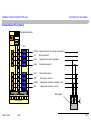
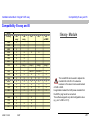
1
IP Telephony
Contact Centers
Mobility
Installation Integral 5 easy
Services
User’s guide
Bedienungsanleitung
Operating instructions
Avaya-Tenovis GmbH & Co. KG
Kleyerstraße 94
60326 Frankfurt am Main
© 2005 All rights reserved for Avaya Inc. and Tenovis GmbH & Co. KG.
4.999.000.000 · 00/00/03 · T3 · de · es · gb · fr · it · nl ·
Telefon
0 800 266 - 10 00
Fax
0 800 266 - 12 19
[email protected]
avaya.tenovis.de
Manual de manejo
Notice d’utilisation
Istruzioni d’uso
Gebruiksaanwijzing
Installation manual Integral 5 D/E easy
Copyright ................................................................................. 7
EU-Declaration of Conformity ............................................... 9
CE Declaration of Conformity ..........................................................9
Introduction ........................................................................... 11
Integral 5 D easy ...........................................................................13
Integral 5 E easy ...........................................................................15
Earthing ................................................................................. 17
BNx from below with earthing connections ....................................18
BNx and EXE from below with earthing connections ....................19
Earthing plug ..................................................................................20
Example of earthing using an earthing plug ..................................21
Cable channel ....................................................................... 23
Install the cable channel ................................................................24
Cables .................................................................................... 25
Cables particular to the I5 ..............................................................25
Installation cable ............................................................................29
Main distributor frame (20 ports) ........................................ 31
Short description of main distributor frame ...................................33
Patch cables – MDF for further illustrations ...................................34
Connection variants for S0 bus to 2 bus subscribers ....................39
Star S0 bus using MDF ..................................................................43
Power supply ........................................................................ 47
Plug-in mains unit ..........................................................................47
Connection conditions for the plug-in mains unit ...........................48
Wiring ..................................................................................... 51
S0 subscriber – classic S0 wiring ..................................................51
S0 subscriber – point-to-point wiring .............................................53
S0 subscriber – point-to-multiple-point wiring (passive bus) .........54
4.999.112.593
06/07
S0 subscriber –
point-to-multiple-point wiring (extended passive bus) ....................55
S0 subscriber – Y wiring ................................................................56
Analog subscribers / UPN subscribers ..........................................57
Connection T0 to NTBA (TK and MSN) .........................................58
Direct connection (preferred connection option) .....................58
Connection via UAE socket(s)
(required, if distance from NTBA to PABX >10 m) ..................59
Connection PRI to NTPM: .............................................................60
Direct connection (preferred connection option) .....................60
Connection using MDF ............................................................61
Connection RBS to UPD port ........................................................62
Connection using MDF ............................................................62
Basic module BND (control module for I5 D easy) ............ 63
Short description of BND (control module for I5 D easy) ...............64
Allocation of plug-in mains unit and SVin socket on
BND, BNS, BNE, EXE ...................................................................65
Allocation of IOM expander 1 and 2 ..............................................66
Allocation of V.24 Interface ............................................................66
LEDs on the BND ..........................................................................67
Items for mounting on the BND .....................................................68
Items for mounting on the EXE
(Extension of Integral 5 D easy with BND and EXE) .....................69
Basic module BNE (control module for I5 E easy) ............ 71
Short description of BNE ...............................................................72
Allocation of IOM expander 1 thro 4 and LANout ....................73
Items for mounting on the BNE ......................................................74
Items for mounting on the EXE
(Extension of Integral 5 E easy with BNE and EXE) ......................75
3
Installation manual Integral 5 D/E easy
Basic module BNS (slave module for I5 E easy) ............... 77
Short description BNS (slave module) ........................................... 78
Allocation of IOM expander 1 thro 4 and LANin ...................... 79
Items for mounting on the BNS ..................................................... 80
Items for mounting on the EXE
(Extension of Integral 5 E easy with BNS and EXE) ..................... 81
Basic module IPU (IP unit) ................................................... 83
Short description of IPU 84
Assignment of LANin, LANout, plug-in mains unit,
SV socket IPU ............................................................................... 85
LEDs and DIP switch on the IPU ................................................... 86
LED displays ........................................................................... 87
Dip switch ................................................................................ 88
Basic module EXE (expansion unit for I5 D/E easy) .......... 89
Short description of EXE ............................................................... 90
Items for mounting on the EXE, connected to a BND ................... 91
Items for mounting on the EXE, connected to a BNE/BNS ........... 93
Assignment of IOM expander L, R and LAN ................................. 96
DIP switch on the EXE .................................................................. 97
DIP switch on the EXE ............................................................ 98
Plug-in module CV1 (LAN, I5 D/E) ..................................... 101
Module view and socket allocation .............................................. 101
Short description CV1 ................................................................. 102
Further information ...................................................................... 103
Plug-in module DIA (IOM, I5 D/E) ...................................... 105
Module view and socket allocation .............................................. 105
Short description of DIA .............................................................. 106
Specific features .......................................................................... 107
Plug-in module DSI (IOM, I5 D/E) ....................................... 109
Module view and socket allocation .............................................. 109
4.999.112.593
06/07
Short description DSI, DHI, FSP ................................................. 110
Plug-in module M4A (IOM, I5 D/E) ..................................... 111
Module view and socket allocation .............................................. 111
Short description M4A ................................................................. 112
M4A – subs circuit using MDF .................................................... 114
M4A – exchange circuit using MDF ............................................ 115
Peripherals circuit using MDF ..................................................... 116
Plug-in module MA2 (IOM, I5 D/E) ..................................... 117
Module view and socket allocation .............................................. 117
Short description of the MA2 ....................................................... 118
MA2 – subscriber circuit using MDF ........................................... 120
Plug-in module MS4 (IOM, I5 D/E) ...................................... 123
Module view and socket allocation .............................................. 123
Short description of MS4 ............................................................. 124
Connecting MS4 T0/S0 using MDF ............................................. 125
Connecting MS4 T0/S0 using MDF ............................................. 126
I55 <---> I5 connection via QSIG to/via MS4 .............................. 127
PB1 (emergency power supply) ......................................... 129
Module views .............................................................................. 129
Short description PB1 ................................................................. 131
Further information ...................................................................... 132
LED (flashing rhythm / signalling) ............................................... 133
Battery Test ................................................................................. 137
Re-charging Battery .................................................................... 138
Switching off the supply voltage (to BNx or IP module) .............. 139
Battery/accumulator change ....................................................... 139
Plug-in module PRI (LAN, I5 E) .......................................... 141
Module view and socket allocation .............................................. 141
Short description PRI ................................................................. 142
Module-specific data ................................................................... 142
4
Installation manual Integral 5 D/E easy
Connection to NTPM using a UAE socket ...................................144
Connection to NTPM using the MDF ...........................................145
IPO <---> I5 connection via QSIG to/via PRI ...............................146
I55 <---> I5 connection via QSIG to/via PRI ................................147
Short description of SXS ..............................................................174
S0 connection using MDF (usual) – 1 ..........................................175
Plug-in module T8S (IOM, I5 D/E) ...................................... 177
Module view and socket allocation ..............................................149
Short description of S4A ..............................................................150
Analog connection using MDF .....................................................151
Module view and socket allocation ..............................................177
Short description T8S .................................................................178
S0 connection using MDF – 1 ......................................................179
T0 connection using MDF ............................................................181
I55 <---> I5 connection via QSIG to/via T8S ................................183
Plug-in module S4D (IOM, I5 D/E) ...................................... 153
Plug-in module V.24 ........................................................... 185
Module view and socket allocation ..............................................153
Short description of S4D ..............................................................154
Summary of the radio ranges ......................................................155
Connecting RBS1 and RBS2 using MDF ....................................156
Connecting RBS1 and RBS2 using MDF ....................................157
Maximum number of DECT units that can be installed
on the system ..............................................................................158
Module view and socket allocation ..............................................185
Short description of V.24 .............................................................186
Plug-in module S4A (IOM, I5 D/E) ...................................... 149
Plug-in module S8D (LAN, I5 E) ......................................... 161
Module view and socket allocation ..............................................161
Short description of S8D ..............................................................162
RBS connection using Y cable ....................................................163
RBS1 thro RBS4 – connection using MDF ..................................164
DECT mounting ...........................................................................166
Plug-in module S8P (LAN, I5 E) ......................................... 169
Module view and socket allocation ..............................................169
Short description of S8P ..............................................................170
Directly connecting UPN subscriber ............................................170
Connecting UPN subs 1 to UPN subs 4
(UPN subs 5 to UPN subs 8) using distributor .............................171
Plug-in module SXS / S4S (IOM, I5 D/E) ............................ 173
Module view and socket allocation ..............................................173
4.999.112.593
06/07
Installation examples I5 D easy ......................................... 187
Explanation of the BND block diagram ........................................188
Plug-in modules, B-channels, Arrangements in principle ............190
Example 1 – 1 x BND ..................................................................195
Explanation of example 1 ......................................................195
Example 2 – BND plus EXE - maximum S0 expansion ...............196
Explanation of example 2 ......................................................196
Example 3 – BND plus EXE - maximum UPN expansion ............197
Explanation of example 3 ......................................................197
Example 4 – BND plus EXE - maximum analog expansion ........198
Explanation of example 4 ......................................................199
Example 5 – BND plus EXE - maximum DECT expansion .........200
Explanation of example 5 ......................................................201
Installation examples I5 E easy ......................................... 203
Explanation of the BNE block diagram ........................................204
Explanation of the EXE block diagram ........................................204
Explanation of the BNS block diagram ........................................205
Explanation of the IPU block diagram ..........................................205
Plug-in modules, B channels, arrangements in principle .............206
5
Installation manual Integral 5 D/E easy
Example 1 – max. S0 expansion ................................................. 211
Explanation of example 1 ...................................................... 212
Example 2 – max. UPN expansion .............................................. 213
Explanation of example 2 ...................................................... 214
Example 3 – max. analog expansion .......................................... 216
Example 4 – max. DECT expansion ........................................... 218
Explanation of example 4 ...................................................... 219
Example 5 – mixed expansion (T0, S0, DECT, UPN)) ................ 221
Explanation of example 5 ...................................................... 222
Example 6 – Expansion with IPU ................................................ 223
Commissioning ................................................................... 225
Check List .................................................................................... 225
Start up the system ..................................................................... 226
Reset ........................................................................................... 226
Cold start ..................................................................................... 227
Switch-on test .............................................................................. 227
Upgrading / reconfiguring modules ............................................. 228
Extending with EXE, BNS, IPU /
substituting a BNx, EXE, IPU ...................................................... 230
Connection for door station ............................................... 237
Connection for Siedle TLM/TK 511-0 (4-wire)
TLM 611-0 (4-wire) ...................................................................... 237
Grothe door station (4-wire) ........................................................ 239
Connection for Siedle PVG 601 (FTZ 123 D) (2-wire) ................ 241
Connection for telephone-door intercom system /
telephone-interphone porter (Koch) ............................................ 243
Connection for Seko-BTicino,
Sfera door speaker 302120 (4-wire) ........................................... 245
Connection for ELA (4-wire) ........................................................ 247
Potential-free contacts, sensor contact ....................................... 249
Compatibility I5 easy and I5 ............................................... 251
Technical Data .................................................................... 231
Power supply (plug-in mains unit) ............................................... 231
PB1 (converter module) .............................................................. 231
Connection specification for a/b subscriber ................................. 232
Connection specifications for DECT subscriber ......................... 232
Connection specification for S0 Telephone ................................. 233
Connection specification for UPN subscribers ............................ 233
Dimensions .................................................................................. 234
Heat dissipation ........................................................................... 235
Ambient conditions ...................................................................... 235
Transmission Technical Values of the Data Connection ............. 235
4.999.112.593
06/07
6
Installation manual Integral 5 D/E easy
Copyright
Copyright
© Avaya Inc. and Avaya GmbH & Co. KG, Frankfurt am Main
All rights reserved.
Ref. no: 4.999.112.593
Version: 06 / 07
Reproduction and disclosure of information contained in this document, in whole or in part, require the prior written consent of Avaya GmbH & Co. KG.
All technical data, information and properties of the product described in this document have been compiled to the best of our knowledge at the time printing.
Modifications and improvements to the product are possible because of new technical developments.
Avaya GmbH & Co. KG
4.999.112.593
06/07
7
Installation manual Integral 5 D/E easy
4.999.112.593
06/07
Copyright
8
Installation manual Integral 5 D/E easy
EU-Declaration of Conformity
EU-Declaration of Conformity
CE Declaration of Conformity
We Avaya GmbH & Co. KG declare that the products I1/I3/I5 (telecommunication systems in various upgrade stages) concur with the basic requirements and
other relevant provisions of EC guideline 1999/5/EC concerning on radio equipment and telecommunications terminal equipment and the mutual recognition
of their conformity.
The complete Declaration of Conformity can be requested at the following Internet address:
www.avaya.de/gcm/emea/de/includedcontent/conformity.html
or look for „Conformity“ in the index.
The telecommunications systems are intended to be connected to analogue 2-wire interfaces (analogue connection) and digital Euro-ISDN interfaces (base
and primary multiplex connection, NTBA or NTPM) of public telecommunication networks within the European Community. The telecommunications systems
support radio interfaces in accordance with the DECT standard. The technical details for connecting to the above named public interfaces can be found in the
system documentation.
Due to the differences in public telecommunication networks of different states and network providers, this EU conformity with the mentioned EU guidelines is
not an absolute guarantee for successful operation in every existing or future telecommunications network.
At present, we are not aware of any public telecommunication network on which this product cannot be operated.
In the event of any problems, please contact your dealer.
4.999.112.593
06/07
9
Installation manual Integral 5 D/E easy
4.999.112.593
06/07
EU-Declaration of Conformity
10
Installation manual Integral 5 D/E easy
Introduction
Introduction
This document describes the installation of both systems, Integral 5 D easy and Integral 5 E easy. The basis of both these systems id the Integral 5.
Both systems contain a standard client set (basic programming), so that they are immediately functional after switching on.
The special configuration of both systems is achieved by use of the "ISA" tool.
Service and customer data can be edited,
on site -
using the system telephone and input of codes
on site -
using a PC (S0, modem, V24)
remotely -
using a PC
The Integral 5 easy is designed for universal use, e.g.
as a communication system
in the office
for self-employed people
in a medical practice
for freelancers
in a legal practice
for private households
in administration
in a hotel
as a central system
etc.
as a serial system (key system)
4.999.112.593
06/07
11
Installation manual Integral 5 D/E easy
Introduction
This system is driven by software that contains all features described in the "Data Input" handbook.
The system is connected to the exchange by either an ISDN and/or analog connections.
Interfaces:
digital interfaces for operating system
telephones and ISDN/DSS1-compatible end
devices such as PCs, terminal adapters,
fax (group 4), etc.
analog interfaces for standard telephones or
other analog end devices (e.g. fax, modem,
speech recorder).
Ethernet interfaces for IP phones using
Ethernet release 5 or higher
The lines for the internal and external communication network (digital / analog subscribers / exchanges) can be plugged in:
Interfaces:
plugged directly into the individual socket
module
attached to LSA + terminal strips in
the distribution box and thence plugged into
the individual modules using WE-WE patch
cables
A mixed system configuration with direct power supply and emergency power supply (with and without PB1) is not permissible!
The system layout rules can be found under
http://ucpn.intranet.tenovis.com/unternehmen/marketing/tksysteme/integral5/Konfiguration-Datenblatt/Systemaufbauregel-I5D.pdf
and
http://ucpn.intranet.tenovis.com/unternehmen/marketing/tksysteme/integral5/Konfiguration-Datenblatt/Systemaufbauregel-I5E.pdf
4.999.112.593
06/07
12
Installation manual Integral 5 D/E easy
Introduction
Integral 5 D easy
The Integral 5 D easy is the "smaller" system of the two.
Slot 4 / Adress 3
Slot 3 / Adress 2
Slot 2 / Adress 1
Slot 4 / Adress 3
Slot 6 / Adress 5
Slot 2 / Adress 1
Slot 1 / Adress 0
EXE
Slot 8 / Adress 7
BND
V.24
DC in
EXP1
EXPL
EXPR
DC out
DC in
EXP2
Refer to the chapters identical to the Integral 5 such as "Earthing", "HVT", "Cable channel", "Cable", "Power supply" and "Installation" and also to the module
descriptions and "System layout I5 D easy".
4.999.112.593
06/07
13
Installation manual Integral 5 D/E easy
Introduction
The system layout is modular and can comprise the following basic modules and plug-in modules:
Name
LAN/IOM
Name
LAN/IOM
BND
Basic exchange module
1 x per system
4 slots for IOM/LAN plug-in modules
2 IOM outputs for EXE connections
V24 output
16 internal IOM channels
16 external IOM channels
CV1
LAN
Voice controller
EXE
(here on BND)
Extension module EXE
controlled by BND
max. 2 x per system
4 slots for IOM plug-in modules
2 x IOM inputs
T8S
LAN
4 x S0 fixed, 4 x S0/T0 switchable
DIA
IOM
Integral automatic call recording switchboard
STN
Plug-in mains unit
SXS/S4S
IOM
4 x S0 subscribers
PB1
Emergency power supply
S4A
IOM
4 x a/b subscribers
M4A
IOM
3 x a/b lines, 1 x a/b subscriber
S4D
IOM
4 x UPN for 2 x DECT-RBS
MA2
IOM
1 x a/b line, 1 x a/b subscriber
DSI
IOM
1 x door station (2-wire, 4-wire), 1 x FSP
MS4
IOM
2 x T0, 2 x S0
4.999.112.593
06/07
14
Installation manual Integral 5 D/E easy
Introduction
Integral 5 E easy
EXE
EXE
BNE
The Integral 5 E easy is the "smaller" system of the two. As well as the
IOM plug-in modules on the EXE, the LAN plug-in modules on the EXE
can also be used here.
EXE
IPU
Refer to the chapters identical to the Integral 5 such as
"Earthing",
"HVT",
"Cable channel",
EXE
EXE
BNS
"Cable",
"Power supply" and "Installation"
and also to the module descriptions and "System layout I5 E
easy“.
4.999.112.593
06/07
15
Installation manual Integral 5 D/E easy
Introduction
The system layout is modular and can comprise the basic modules and plug-in modules:
Name
LAN/IOM
Name
LAN/IOM
BNE
Basic exchange module
1 x per system
4 slots for IOM/LAN plug-in modules
4 IOM outputs for EXE connections
1 LAN output
in contrast to the BND, no V24 output (slot 2)
16 internal IOM channels
32 external IOM channels
S8P
IOM
8 x UPN 2-wire
BNS
Slave module
16 internal IOM channels
32 external IOM channels
PRI
LAN
Primary Rate Interface
EXE
(here on BNE/
BNS)
Extension module EXE
max. 12 x per system
4 x on BNE
4 x on BNS
4 x LAN
CV1
LAN
Voice controller
IPU
Internet protocol unit
max. 2 x per system
S8D
LAN
8 x UPD for 4 x DECT-RBS,
7 channels
LAN
4 x S0 fixed, 4 x S0/T0 switchable
DIA
IOM
Integral automatic call recording switchboard
T8S
SXS/S4S
IOM
4 x S0 subscribers
STN
Plug-in mains unit
S4A
IOM
4 x a/b subscribers
PB1
Emergency power supply
M4A
IOM
3 x a/b lines, 1 x a/b subscriber
S4D
IOM
4 x UPN for 2 x DECT-RBS - 4 channels
MA2
IOM
1 x a/b line, 1 x a/b subscriber
DSI
IOM
1 x door station (2-wire, 4-wire), 1 x FSP
MS4
IOM
2 x T0, 2 x S0
4.999.112.593
06/07
16
Installation manual Integral 5 D/E easy
Earthing
Earthing
The PABX Integral 5 easy must be earthed for safety reasons.
Pertinent regulations: DIN EN 60950 "Safety of information technology systems"
The Earthing and Potential Equalisation of the I5 System must comply with relevant national installation regulations.
For instance, for Germany: VDE 800 part 2, or also generally EN 50310.
Earthing is provided
using a separate earthing wire (green and yellow) from the potential equalization strip
of the building to the earthing terminal of the BNx module.
either
or
4.999.112.593
06/07
Make sure that:
The absolute minimum cross-section of the separately laid protective earths PE
is 2.5 mm2, if mechanical protection (e.g.: conductors sheathed in a cable,
in a cable duct or conduit),
otherwise it must be 4 mm2
by a lockable earthing plug (via the earthing wire of the wall socket) (special earthed
plug with cable).
17
Installation manual Integral 5 D/E easy
Earthing
BNx from below with earthing connections
For a system layout with one BNx and several EXE / IP modules, the
EXE / IP modules must also be earthed. The earthing connections
between modules are made using pre-assembled earthing flexes with
4.8 mm Faston tongues. The link to the external earthing point (potential
equalisation rail in the building) is made using a green and yellow
earthing wire of 2.5 or 4 mm² cross-section with a module (screw).
Alternatively a special earthing plug can be used.
Fastening tongue
Fastening tongue for connecting a
pre-assembled earthing flex for
connecting the modules to each other.
When installing, the module with the earthing connection must first be
connected to the external earthing point, to establish an effective earth.
Only then can further modules be installed. Disassembly should be
performed in the reverse order.
No analog exchange line may be connected to / plugged into an MA2 or
M4A module unless the I5 systems are earthed.
Screw
4.999.112.593
06/07
And to the external earthing point using:
2,5 / 4 mm² earthing wire (green/yellow)
Special module with earthed plug.
18
Installation manual Integral 5 D/E easy
Earthing
BNx and EXE from below with earthing connections
Earthing flex to connect the
modules
Fastening tongue
Screw
4.999.112.593
06/07
to external earthing point
E.g. Common earth for both
BNX and EXE
Earthing flex to connect the
modules
Fastening tongue
Screw
19
Installation manual Integral 5 D/E easy
Earthing
Earthing plug
Earthing plug
Permanent earth for PABX Integral 5 easy via the earth wire of the wall-mounted socket with lockable grounded
plug (earthing-pin plug with cable 49.9804.5750)
Connecting Earthing
Cable to PABX Integral 5
easy
Unlock and remove the
grounded plug
1. Connect the protective conductor (green/yellow) of the grounded plug to the earth
terminal on the module
2. Insert the grounded plug into the wall socket and press in the black bar, the plug is
now locked.
1. Use a screwdriver to pull out the black bar by approx. 10 mm.
2. The plug is unlocked and can be removed
Always plug the grounded plug directly into the wall socket and never into a multiple adapter!
4.999.112.593
06/07
20
Installation manual Integral 5 D/E easy
Earthing
Example of earthing using an earthing plug
Locking the grounded plug
Unlocking the grounded plug
Catch (black)
Wall socket
Wall socket
Catch (black)
Screwdriver
Earthing plug can be
locked by the cable
4.999.112.593
06/07
21
Installation manual Integral 5 D/E easy
4.999.112.593
06/07
Earthing
22
Installation manual Integral 5 D/E easy
Cable channel
Cable channel
Cable channel carrier
The BNx and EXE are always delivered with cable channel racks engaged and with cable channel covers mounted.
Delivery of the PB1 is without cable channel racks and cable channel cover.
4.999.112.593
06/07
23
Installation manual Integral 5 D/E easy
Cable channel
Install the cable channel
The "nose" of the cable channel rack
should engage in the recess "Engagement
point for cable channel rack" on the BNx,
EXE or IP modules, and click into place by
"Pressing home".
4.999.112.593
06/07
24
Installation manual Integral 5 D/E easy
Cables
Cables
Cables particular to the I5
Cables
Type
Length
Work lead
250 mm
Information
250 mm
2
4
6
8
2
4
6
8
4.999.112.593
1
1
3
3
5
5
7
100 mm
7
SV cable
2
4
Power supply
between the basic
modules
6
8
1
1
3
3
5
5
7
1900 mm
06/07
100 mm
7
2
4
V24 cable
1,900 mm
6
8
25
Installation manual Integral 5 D/E easy
Cables
Cables
2
4
6
8
1
1
3
3
5
5
7
7
550 mm
Type
Length
Expansion cable
550 mm
or
900 mm
Information
2
4
6
8
900 mm
2
4
6
8
1
1
3
3
5
5
7
350 mm
600 mm
7
2
4
6
LAN cable
8
CAT5
350 mm
or
600 mm
or
900 mm
900 mm
4.999.112.593
06/07
26
Installation manual Integral 5 D/E easy
Cables
Cables
3
3
4
4
5
5
6
350 mm
1
2
3
4
5
6
7
8
Length
Patch cable 6 / 6
MDF
350 mm
Information
6
3
4
5
6
350 mm
Type
Patch cable 8 / 6
MDF plug-in module
600 mm
900 mm
4.999.112.593
06/07
27
Installation manual Integral 5 D/E easy
Cables
Cables
2
3
4
5
a
b
c
d
1
2
3
4
5
6
7
8
Y cable
2
3
4
5 YR
2
3
4
5 YL
1
e
f
g
h
YL
YR
2
3
4
5
Length
Information
1
YL
1
a
b
c
d
e
f
g
h
YR
1
2
3
4
5
6
7
8
Type
MDF plug-in
module
550 mm
or
900 mm
550 mm
900 mm
4.999.112.593
06/07
28
Installation manual Integral 5 D/E easy
Cables
Installation cable
a
d
b
Installation cable to VDE 0815
c
a
c
d
b
6 5 4 3
Type
I-2Y2Y(St)(Zg)2Y ... St III Bd
NT to last UAE socket 180 m
I-Y(St)Y ...LG or I-Y(St)Y ...Bd
NT to last UAE socket 130 m
I-H(St)H ...Bd
NT to last UAE socket 120 m
I-Y(St) ...Bd
NT to last UAE socket 120 m
Installation cable to VDE 0816
Type
A-2YF(L)2Y ... St III Bd
NT to last UAE socket 180 m
UAE circuit
The cable has two twisted pairs a/b and c/d
UAE: a -> 3, b ->6, c -> 4, d -> 5
Be careful not to transpose the wires within a pair!
1. Twisted pair: a = white, b = brown
2. Twisted pair: c = green, d = yellow
4.999.112.593
06/07
29
Installation manual Integral 5 D/E easy
4.999.112.593
06/07
Cables
30
Installation manual Integral 5 D/E easy
Main distributor frame (20 ports)
Main distributor frame (20 ports)
Circuit board rack
Main distributor frame, general view
4.999.112.593
06/07
31
Installation manual Integral 5 D/E easy
Main distributor frame (20 ports)
Internal Switching Circuit Board
a1 b1 a2 b2 a3 b3 a4 b4
3
4
2
5
3
4
2
a1 b1 a2 b2 a3 b3 a4 b4
5
3
a1 b1 a2 b2 a3 b3 a4 b4
4
2
5
3
4
2
5
a1 b1 a2 b2 a3 b3 a4 b4
2 LSA+ strips, 8-pin
6
Western sockets 6-pin
4.999.112.593
06/07
1 6
1
1 6
2
1 6
3
1 6
4
1 6
5
1 6
6
1 6
7
1
8
32
Installation manual Integral 5 D/E easy
Main distributor frame (20 ports)
Short description of main distributor frame
Short description of main distributor frame
Function
Main distributor frame for connecting 20 ports
Width
123 / 120 mm (corresponding to half the BNx width)
Height
180 / 175 mm (corresponding to height of BNx plus height of cable
channel)
Mounting
with 2 screws
Components
Expansion
Layout
Installation base
Printed circuit board rack
Cover
max. 5 circuit board racks (for each of 4 ports)
8 Western sockets 6-pin
2 LSA+ strips, 8-pin
Always mount the MDF to the right of the modules!
Slide the circuit board rack with the LSA+ strips upward, the Western plugs downward,
into the guides in the main distributor frame.
4.999.112.593
06/07
33
Installation manual Integral 5 D/E easy
Main distributor frame (20 ports)
Patch cables – MDF for further illustrations
ABC
Plug modul „ABC“
A
B
to WE-socket 1
board rack
1
1
1
1
WE plug 8-pin
4.999.112.593
06/07
Patch cable 8/6
1
on circuit
1
3
to WE-socket 3
board rack
3
1
on circuit
WE plug 6-pin
34
Installation manual Integral 5 D/E easy
Main distributor frame (20 ports)
ABC using HVT (using 1st Western socket HVT)
1
1
2
3
4
LSA
8
6
8
7
6
5
4
3
2
1
a1 (1)
b1 (2)
a2 (3)
b2 (4)
a3 (5)
b3 (6)
a4 (7)
b4 (8)
6
5
4
3
2
1
1
8
11 2
3 4
Patch cable on socket 1
4.999.112.593
11
1
06/07
1
HVT
WE6
WE8
2
5
4
1
b1 (2)
2
Signal 2 on PIN5 of the WE8 is passed using PIN4 of the
WE6 to the HVT connection b1 (2) als Signal 2.
8
5 6
1
3
2
4
1
7 8
Terminal strip
35
Installation manual Integral 5 D/E easy
Main distributor frame (20 ports)
ABC using HVT (using 3rd Western socket HVT)
1
1
2
3
4
8
8
7
6
5
4
3
2
1
13
1
a1 (1)
b1 (2)
a2 (3)
b2 (4)
a3 (5)
b3 (6)
a4 (7)
b4 (8)
6
5
4
3
2
1
1
8
1 2
Patch cable on socket
4.999.112.593
LSA
6
06/07
1
33 4
3
1
1
WE6
WE8
3
2
4
1
2
5
HVT
4
3
1
b3 (6)
2
Signal 2 on PIN5 of the WE8 is passed using PIN4 of the
WE6 to the HVT connection b3 (6) as signal 2.
8
5 6
7 8
Terminal strip
36
Installation manual Integral 5 D/E easy
Main distributor frame (20 ports)
DEF
WE plug 6-pin
Plug module „DEF“
A
to WE socket 1
B
on
1
circuit board rackr or
6
1
1
1
1
3
4
4.999.112.593
06/07
2
2
6
Patch cable 8/2x6
alternate to socket 2
to WE socket 3
3
1
on
circuit board rack or
alternate to socket 4 4
Western plug 6-pin
37
Installation manual Integral 5 D/E easy
4.999.112.593
06/07
Main distributor frame (20 ports)
38
Installation manual Integral 5 D/E easy
Connection variants for S0 bus to 2 bus subscribers
Patch cable
LSA
1
2
A
3
1
4
8
1
1
B) shows like A) a serial connection,
but bypassing the series UAE
socket with cable connections for
greater distances.
S0-Bus
1
A) shows the serial connection of
two bus subscribers using Western
cables with UAE sockets for
distribution. S0 subscribers must be
close by to the unit.
Terminal strip
5
6
3
1
7
a1 (1)
T- 1
b1 (2)
T+ 1
a2 (3)
R- 1
b2 (4)
R+ 1
a3 (5)
T- 2
b3 (6)
T+ 2
a4 (7)
R- 2
b4 (8)
R+ 2
B
8
8
S0-Bus
4.999.112.593
06/07
39
Installation manual Integral 5 D/E easy
UAE-socket
A
B
4.999.112.593
06/07
40
Installation manual Integral 5 D/E easy
1
C) shows a Y cable arrangement
installed by the client using the
series UAE socket and cable
connections.
1
2
C
3
1
4
8
D) shows like C) a Y cable
arrangement, but using the main
distributor frame (MDF).
The next illustrations show the
properties of a Y cable arrangement
on the MDF.
1
1
5
6
3
1
7
a1 (1)
T- 1
b1 (2)
T+ 1
a2 (3)
R- 1
b2 (4)
R+ 1
a3 (5)
T- 2
b3 (6)
T+ 2
a4 (7)
R- 2
b4 (8)
R+ 2
D
8
8
4.999.112.593
06/07
41
Installation manual Integral 5 D/E easy
C
D
4.999.112.593
06/07
42
Installation manual Integral 5 D/E easy
Star S0 bus using MDF
Y-Patch cable 8/2x6
Western plug 6-pin
DEF
6
1
1
2
1
3
4
A
B
6
6
1
6
5
6
6
7
8
6
Only a single wire can be attached to each contact (1 - 8) of the terminal strip. If only one S0 bus is plugged in, e.g. to the socket 1
then the terminal
(in the lower illustration),
4 3 2 1 are not available for creating an external Y bus.
The solution is shown in the next illustration.
4.999.112.593
06/07
43
Installation manual Integral 5 D/E easy
4.999.112.593
06/07
44
Installation manual Integral 5 D/E easy
2 separate S0-connections using Y-cables
Y-cable
Only a single wire can be attached to each
contact (1 - 8) of the terminal strip.
If only one S0 bus is plugged in, e.g. to the
socket 1 (in the lower illustration), then the
1
8
terminals 4 3 2 1 are not available for
creating an external Y bus.
The solution is shown in the next illustration.
6
6
6
6
6
6
1
7
6
2
1
6
4
1
6
06/07
1
6
1
3
5
6
4.999.112.593
1
8
1
Example:
Using the Y cable (YL), bus 2 is plugged into the
Western socket 1. Using LSA contacts 1-4 an
S0 unit (S0 subs 2) can be connected.
Western sockets 2 and 4 are connected using a
6-pin patch cable. This leaves Western socket
3, corresponding to LSA contacts 5-8, available
for connecting a further S0 unit (S0 subs 1).
Bus 2 is now wired in star layout.
A further bus, corresponding to bus 2, can now
be attached to the Y cable (YR).
In this way 2 S0 busses, each with 2 S0 units
for an external Y network can be connected to
a single MDF circuit board
45
Installation manual Integral 5 D/E easy
A further bus, corresponding to bus 2,
can now be attached to the Y cable (YR).
In this way 2 S0 busses, each with 2 S0
units for an external Y network can be
connected to a single MDF circuit board.
8 7 6 5 4 3 2 1
S0subs. 1
4.999.112.593
Bus 1 using YR
star configured equipment
connection
06/07
8 7 6 5 4 3 2 1
S0subs. 2
S0subs. 1
Bus 2 using YL
star configured equipment
connection
Sosubs. 2
46
Installation manual Integral 5 D/E easy
Power supply
Power supply
Plug-in mains unit
8
0V
7
0V
6
5
---
4
3
---
2
-40V
1
-40V
SV in BNx, EXE, IPU
The diagram shows the plug-in mains unit for use with the Integral 5 D/E easy.
The following diagrams show where the plug-in mains unit should be connected and how many plug-in mains units should be connected.
- Any possible IOM or LAN connections are not shown in the diagrams.
4.999.112.593
06/07
47
Installation manual Integral 5 D/E easy
Power supply
Connection conditions for the plug-in mains unit
The rule is, one plug-in mains unit can supply 1 x BNx plus 1 x EXE, or 2 x EXE.
I5 easy - EXE
1
DC
in
4.999.112.593
06/07
2
3
I5 easy - BNx
4
DC
out
2
4
6
8
DC
in
48
Installation manual Integral 5 D/E easy
Power supply
For a combination of 1 x BNx and 2 x EXE the diagram is as follows:
I5 easy - EXE
1
DC
in
4.999.112.593
06/07
2
3
I5 easy - BNx
2
4
DC
out
DC
in
4
6
I5 easy - EXE
8
1
DC
in
2
DECT
3
4
DC
out
49
Installation manual Integral 5 D/E easy
Power supply
If an EXE is fitted with DECT modules (max. 4 x S4D or max. 2 x S8D), the EXE should have its own separate power supply,
even in the minimum configuration.
I5 easy - EXE
1
DC
in
4.999.112.593
06/07
2
3
I5 easy - BNx
2
4
DC
out
DC
in
4
6
I5 easy - EXE
8
1
DC
in
2
DECT
3
4
DC
out
50
Installation manual Integral 5 D/E easy
Wiring
Wiring
S0 subscriber – classic S0 wiring
The S0 bus is looped into all UAE sockets.
Only two S0 system instruments are permitted on the Integral 5 S0 module bus.
The last UAE socket must have a terminating resistors fitted.
HVT 2 System sets
Last UAE at I5
Further functional EDSS1 sets can be installed
10m
35m
500m
Matching resistor
in last socket
4.999.112.593
06/07
Terminating resistors and Western socket for accepting
an S0 instrument, incorporated in a single plug
51
Installation manual Integral 5 D/E easy
Wiring
100 Ohm
8 7 6 5 4 3 2 1
6 5 4 3
100 Ohm
UAE
4.999.112.593
06/07
Matching resistors in last
socket
52
Installation manual Integral 5 D/E easy
Wiring
S0 subscriber – point-to-point wiring
S0 Plug-in module
Plugs with matching resistors
2x 100 Ohm
HVT
<= 10m
<= 750 m
1
06 installation cable J-Y (ST) Y
4.999.112.593
06/07
2
3
4
5
6
7
8
100 Ohm 1/8 Watt in each case
53
Installation manual Integral 5 D/E easy
Wiring
S0 subscriber – point-to-multiple-point wiring (passive bus)
S0 Plug-in modul
HVT
max. 12 UAE-sockets
Plugs with matching resistors
2x 100 Ohm
<= 150 m
<= 150 m
1
2
3
4
5
6
7
8
100 Ohm 1/8 Watt in each case
4.999.112.593
06/07
54
Installation manual Integral 5 D/E easy
Wiring
S0 subscriber – point-to-multiple-point wiring (extended passive bus)
S0 Plug-in module
HVT
Plugs with matching resistors
2x 100 Ohm
max. 12 UAE-sockets
<= 50 m
<= 750 m
1
2
3
4
5
6
7
8
100 Ohm 1/8 Watt in each case
4.999.112.593
06/07
55
Installation manual Integral 5 D/E easy
Wiring
S0 subscriber – Y wiring
Alternative plugs with
matching resistors
Plugs with matching resistors 2x100 Ohm
l1
UAE
S0
Plug-in
module
UAE
HVT
l2
l3
The wired lengths of l1 and l2 must not differ by more than 50 m.
4.999.112.593
06/07
l1 <= 250m
l2 <= 250 m
l3 <= 10 m
1
2
3
4
5
6
7
8
100 Ohm 1/8 Watt in each case
56
Installation manual Integral 5 D/E easy
Wiring
Analog subscribers / UPN subscribers
HVT
UAE
max.
1350m with 0,4 cable
2900m with 0,6 cable
4.999.112.593
06/07
87654321
57
Installation manual Integral 5 D/E easy
Wiring
Connection T0 to NTBA (TK and MSN)
Direct connection (preferred connection option)
MS4
2 digital exchanges
2 digital subscribers
NTBA
1
T01,2
NTBA
2
S01,2
<= 10m
<= 10m
4.999.112.593
06/07
58
Installation manual Integral 5 D/E easy
Wiring
Connection via UAE socket(s) (required, if distance from NTBA to PABX >10 m)
Connection using MDF
MS4
2digital exchanges
2 digital subscribers
NTBA
NTBA
UAE
UAE
HVT
S01,2
1
T01,2
2
<= 750m
<= 10m
4.999.112.593
06/07
<= 750m
59
Installation manual Integral 5 D/E easy
Wiring
Connection PRI to NTPM:
Direct connection (preferred connection option)
PRI
Primary Rate
NTPM
S2M
<= 10m
4.999.112.593
06/07
60
Installation manual Integral 5 D/E easy
Wiring
Connection using MDF
PRI
Primary Rate
NTPM
<= 10m
HVT
UAE
S2M
<= 10m
<= 100m
The connection from the PRI distribution strip to the NTPM should always by made using a separate cable (J-Y(ST)Y Lg 2 x 2 x 0.6 mm² (120nF).
4.999.112.593
06/07
61
Installation manual Integral 5 D/E easy
Wiring
Connection RBS to UPD port
Connection using MDF
S4D
4 UPD-Ports
RBS
RBS1
RBS2
HVT
<= 10m
UAE
<= 1000m
Terminating resistors must be fitted in each final UAE connection socket. The connection cable between RBS and UAE socket has a default length of 0.5 m.
4.999.112.593
06/07
62
Installation manual Integral 5 D/E easy
Basic module BND (control module for I5 D easy)
Basic module BND (control module for I5 D easy)
I5 D easy - BND
Slot 2
Slot 4
Slot 6
Slot 8
LAN
IOM
2
4
6
8
IOM IOM
EXP2 EXP1
Schematic layout of the BND
LAN
IOM
DC
IOM IOM
EXP2 EXP1
V.24
Cold start switch
4
6
8
The 4 slots into which LAN and / or IOM
modules can be plugged
IOM
EXP2
LED
2
IOM
EXP1
LED
Expansion interface for EXE
Basic module BND, control module for I5 D easy
4.999.112.593
06/07
63
Installation manual Integral 5 D/E easy
Basic module BND (control module for I5 D easy)
Short description of BND (control module for I5 D easy)
Short description of BND
Function
Control module for I5 D easy. 1x per system required
Slots
There are 4 slots on the BND
Plug-in
modules
IOM
LAN
Slot 2 (slot address 1)
Slot 4 (slot address 3)
Slot 6 (slot address 5)
Slot 8 (slot address 7)
2-slot and / or 4-slot plug-in module (IOM and LAN)
Single 1-slot plug-in module "DIA" (IOM)
IOM is a connection local to BND, which is available at all slots. IOM modules can be driven through this connection. IOM
modules have no switching matrix control of their own and are generally controlled only by the BND through the IOM connection.
For an IOM extension using EXE modules, 2 sockets EXP1 and EXP2 are provided. Each socket drives 8 x 2B channels
(16 B channels) for further applications
LAN is a 128 B channel connection, which is available at all slots. LAN modules that are connected "draw" this connection
from their total of available B channels.
LAN modules are intelligent plug-in modules with their own switching matrix control
The LAN connection is not brought out from the BND for further applications
4-slot plug-in module at slots 4 and 8
BND has a cold-start switch, which is accessed through a hole in the casing. There is no "cold-start plug".
If pressed for less than 5 sec: Reset, warm start. If pressed for more than 5 sec: Cold start
Note
Left hand LED, see "LEDs on the BNE" on the back
Right hand LED, see "LEDs on the BNE" on the back
V.24 plug-in module cannot be inserted into slot 2, the V.24 connection has its own port on the basic module casing
The BND can be powered using a separate plug-in mains unit (Vin) or it can be fed from another EXE module (Vin). See plug-in mains unit
Max. 1 x CV1 and max. 1 x T8S on a BND. 1 x CV1 plus 1 x T8S permissible on a BND.
4.999.112.593
06/07
64
Installation manual Integral 5 D/E easy
Basic module BND (control module for I5 D easy)
Allocation of plug-in mains unit and SVin socket on BND, BNS, BNE, EXE
I5 D easy - BND
LAN
2
IOM
4
6
8
DC
in
8
7
6
5
4
3
2
1
4.999.112.593
06/07
0V
0V
-----40V
-40V
SVin
8
1
2
3
4
5
6
7
8
-40VDC
----GND
65
Installation manual Integral 5 D/E easy
Basic module BND (control module for I5 D easy)
Allocation of IOM expander 1 and 2
1
2
3
4
5
6
7
8
EXP2
8
SDA-IOM4
SCL-IOM4
GND
DCL
+5V
FSC
DU4
DD4
I5 D easy - BND
LAN
IOM
2
4
6
IOM IOM
EXP2 EXP1
8
EXP1
8
1
2
3
4
5
6
7
8
SDA-IOM1
SCL-IOM1
GND
DCL
+5V
FSC
DU1
DD1
Allocation of V.24 Interface
I5 D easy - BND
LAN
2
IOM
4
6
V.24
8
8
V.24
4.999.112.593
06/07
1
2
3
4
5
6
7
8
-RXD
TXD
DTR
GND
DSR
RTS
CTS
V.28: -V.28: TXD
V.28: RXD
V.28: -V.28: GND
V.28: -V.28: CTS
V.28: RTS
Transmitted data from BND to PC/printer
Received data from PC/printer to BND
DTR-DSR-bridge auf BND
System-GND
DTR-DSR-bridge
CTS-signal from PC/printer to BND
RTS-signal from BND to PC/printer
66
Installation manual Integral 5 D/E easy
Basic module BND (control module for I5 D easy)
LEDs on the BND
LED left
The left hand LED indicates whether the BNx is supplied with power. As long as the power supply is present, the red LED remains lit.
LED right
The right hand LED relates to the
local download.
The loading time is 11 minutes.
Deleting resistent and transient software
Local download approx.. 11 min
4.999.112.593
06/07
Rapid flashing
Continuously
lit
During these 11 minutes the LED
flashes rapidly, except for the
periods during which the resident
and transient memories are being
cleared down.
On completion of the download, the
LED remains lit.
The LED is lit also during downloading of an intelligent LAN module
(CV / T8S)
67
Installation manual Integral 5 D/E easy
Basic module BND (control module for I5 D easy)
Items for mounting on the BND
I5Deasy - BND
2B
DIA
2B
DIA
2B
DIA
2B
DIA
SXS 4x2B
SXS 4x2B
SXS 4x2B
SXS 4x2B
S4A
4xB
S4D
2x4B
DSI
MA2
2x4B
2xB
4xB
S4A
4xB
S4A
4xB
S4D 2x4B
S4D
2x4B
S4D
2x4B
S4A
DSI
DSI
2x4B
DSI
MA2
M4A
4xB
M4A
4xB
S8P
8x2B
S8P
8x2B
T8S
CV1
4.999.112.593
MS4 4x2B
8x2B
8x2B
06/07
2xB
MS4 4x2B
T8S
CV1
MA2
2x4B
2xB
MS4 4x2B
MA2
2x4B
2xB
MS4 4x2B
8x2B
8x2B
Name
LAN/
IOM
Basic exchange module
Extension module EXE
BND
EXE
DIA
IOM
Integral call recording
SXS
IOM
4 x S0 subscribers
S4A
IOM
M4A
IOM
S4D
IOM
MA2
IOM
DSI
IOM
MS4
IOM
4 x a/b subscribers
3 x a/b lines,
1 x a/b subscriber
4 x UPD for
2 x DECT-RBS
1 x a/b line,
1 x a/b subscriber
1 x door station (2wire, 4-wire),
1 x FSP
2 x T0, 2 x S0
S8P
IOM
8 x UPN
CV1
LAN
T8S
LAN
Voice controller
4 x S0 fixed, 4 x S0/T0
switchable
68
Installation manual Integral 5 D/E easy
Basic module BND (control module for I5 D easy)
Items for mounting on the EXE (Extension of Integral 5 D easy with BND and EXE)
Alternative Slot
I5Deasy - EXE
M4S
SVin
DIA
SVout
2B
SXS
4x2B
S4A
4xB
S4D 2x4B
DSI
MA2
2B
DIA
2B
DIA
2B
DIA
SXS 4x2B
SXS 4x2B
SXS 4x2B
S4A
S4A
4xB
S4A
2x4B
S4D
2x4B DSI
MA2
S4D
2x4B
S4D 2x4B
2x4B DSI
2x4B
DSI
MA2
M4A
4xB
M4A
4xB
S8P
8x2B
S8P
8x2B
06/07
2xB
MA2
2x4B
Slot
T8S
2, 4, 6, 8 BNX
1, 2, 3, 4 EXE
IOM
4xB
2xB
4.999.112.593
2xB
4xB
DIA
DIA
Name
LAN
T8S
2xB
= own switching matrix
LAN/
IOM
BND
Basic exchange module
EXE
Extension module EXE
DIA
IOM
Integral call recording
SXS
IOM
4 x S0 subscribers
S4A
IOM
M4A
IOM
S4D
IOM
MA2
IOM
DSI
IOM
MS4
IOM
4 x a/b subscribers
3 x a/b lines,
1 x a/b subscriber
4 x UPD for
2 x DECT-RBS
1 x a/b line,
1 x a/b subscriber
1 x door station
(2-wire, 4-wire),
1 x FSP
2 x T0, 2 x S0
S8P
IOM
8 x UPN
CV1
LAN
T8S
LAN
Voice controller
4 x S0 fixed, 4 x S0/T0
switchable
69
Installation manual Integral 5 D/E easy
4.999.112.593
06/07
Basic module BND (control module for I5 D easy)
70
Installation manual Integral 5 D/E easy
Basic module BNE (control module for I5 E easy)
Basic module BNE (control module for I5 E easy)
Slot 2
Slot 4
Slot 6
Slot 8
I5 E easy - BNE
LAN
IOM
2
4
6
8
IOM IOM IOM IOM LAN
EXP4 EXP3 EXP2 EXP1 out
Schematic layout of the BNE
LAN
IOM
2
4
6
8
The 4 slots into which LAN or IOM modules
can be plugged
DC
IOM IOM IOM IOM
EXP4 EXP3 EXP2 EXP1
LED
Cold start switch
LAN
out
LED
IOM IOM IOM IOM LAN
EXP4 EXP3 EXP2 EXP1 out
Interfaces available for the EXE/BNS/IPU
Basic module BNE, control module for I5 E easy
4.999.112.593
06/07
71
Installation manual Integral 5 D/E easy
Basic module BNE (control module for I5 E easy)
Short description of BNE
Short description of BNE
Function
Control module for I5 E easy. 1x per system required
Slots
There are 4 slots on the BNE
Plug-in
modules
IOM
Slot 2 (slot address 1)
Slot 4 (slot address 3)
Slot 6 (slot address 5)
Slot 8 (slot address 7)
2-slot and / or 4-slot plug-in module (IOM and LAN)
Single 1-slot plug-in module "DIA" (IOM)
IOM is a connection local to BNE, which is available at all slots. IOM modules can be driven through this connection. IIOM
modules have no switching matrix control of their own and are generally controlled only by the BNE through the IOM connection. Max. 96 IOM channels, 48 per BNE/BNS
For an IOM extension using EXE modules, 4 sockets EXP1 thro EXP4 are provided. Each socket drives 8 x 2B channels
(16 B channels) for further applications
LAN
LAN is a 128 B channel connection, which is available at all slots. LAN modules that are connected "draw" this connection
from their total of available B channels.
LAN modules are intelligent plug-in modules with their own switching matrix control
The LAN connection (LANout) is brought out from the BNE for further applications
4-slot plug-in module at slot 4 and 8, V24 available only at slot 2 (module V24)
BNE has a cold-start switch, which is accessed through a hole in the casing. There is no "cold-start plug".
If pressed for less than 5 sec: Reset, warm start. If pressed for more than 5 sec: Cold start.
Note
Left hand / right hand LEDs, see "LEDs on the BNE" on the back
The BNE can be powered using a separate plug-in mains unit (Vin) or it can be fed from another EXE module (Vin).
See plug-in mains unit
Max. 1 x CV1 and max. 1 x T8S on a BND. 1 x CV1 plus 1 x T8S permissible on a BND.
Max 4 x EXE between BNE and BNS using LAN
4.999.112.593
06/07
72
Installation manual Integral 5 D/E easy
Basic module BNE (control module for I5 E easy)
Allocation of IOM expander 1 thro 4 and LANout
8
1
2
3
4
5
6
7
8
1
2
3
4
5
6
7
8
SDA-IOM4
SCL-IOM4
GND
DCL
+5V
FSC
DU4
DD4
I5 E easy - BNE
LAN
IOM
2
4
6
LANout
8
IOM IOM IOM IOM LAN
EXP4 EXP3 EXP2 EXP1 out
EXP4
8
4.999.112.593
1
2
3
4
5
6
7
8
SDA-IOM7
SCL-IOM7
GND
DCL
+5V
FSC
DU7
DD7
06/07
EXP3
8
1
2
3
4
5
6
7
8
SDA-IOM6
SCL-IOM6
GND
DCL
+5V
FSC
DU6
DD6
EXP2
8
-RXD
TXD
DTR
GND
DSR
RTS
CTS
PDC
GND
PFS
PCM0-TRX
PCM2-TRX
FREF-AUS
ZC-AUS-WE
LAN-TRX
EXP1
8
1
2
3
4
5
6
7
8
SDA-IOM1
SCL-IOM1
GND
DCL
+5V
FSC
DU1
DD1
73
Installation manual Integral 5 D/E easy
Basic module BNE (control module for I5 E easy)
Items for mounting on the BNE
Alternative slot
I5Eeasy - BNE
M4S
DIA
Slot
T8S
Name
V24
DIA 2B
SXS
4x2B
S4A
4xB
S4D
2x4B
DSI
2x4B
MA2
SXS 4x2B
DIA2B
SXS 4x2B
DIA2B
SXS 4x2B
S4A
S4A
S4A
DIA 2B
4xB
S4D 2x4B
DSI
2x4B
4xB
S4D 2x4B
DSI
2x4B
2, 4, 6, 8 BNX
1, 2, 3, 4 EXE
IOM
4xB
LAN/IOM
BNE
EXE
LAN
V.24
DIA
IOM
S4D 2x4B
SXS
IOM
DSI
S4A
IOM
M4A
IOM
S4D
IOM
MA2
IOM
DSI
IOM
2x4B
2xB
MA2 2xB
MA2
2xB
MA2 2xB
MS4 4x2B
MS4 4x2B
MS4 4x2B
MS4 4x2B
DIA
T8S
Basic exchange
module
Extension module
EXE
V24 interface
Integral call
recording
4 x S0 subscribers
4 x a/b subscribers
3 x a/b lines,
1 x a/b subscriber
4 x UPD for
2 x DECT-RBS
1 x a/b line,
1 x a/b subscriber
1 x door station
(2-wire, 4-wire),
1 x FSP
2 x T0, 2 x S0
M4A
4xB
M4A
4xB
S8P
8x2B
S8P
8x2B
T8S
8x2B
T8S
8x2B
MS4
IOM
CV1
8x2B
CV1
8x2B
S8P
IOM
8 x UPN
CV1
LAN
T8S
LAN
PRI
LAN
Voice controller
4 x S0 fixed, 4 x
S0/T0 switchable
30 x digital
exchange
PRI
4.999.112.593
30xB
06/07
PRI
30xB
= own switching matrix
74
Installation manual Integral 5 D/E easy
Basic module BNE (control module for I5 E easy)
Items for mounting on the EXE (Extension of Integral 5 E easy with BNE and EXE)
I5 E easy - EXE
Name
SXS 4x2B
SXS 4x2B
S4A
S4A
S4A
4xB
S4D 2x4B
2B
DIA
2B
2B
DIA
SXS 4x2B
4xB
S4D 2x4B
DSI
2x4B
DSI
2x4B
MA2
2xB
MA2 2xB
DIA
4xB
S4D 2x4B
DSI
MA2
2B
DIA
Basic exchange module
Extension module EXE
V.24
V24 interface
IOM
Integral call recording
SXS 4x2B
SXS
IOM
4 x S0 subscribers
S4A
S4A
IOM
4 x a/b subscribers
M4A
IOM
3 x a/b lines, 1 x a/b subscriber
S4D
IOM
4 x UPD for 2 x DECT-RBS
MA2
IOM
DSI
IOM
MS4
IOM
1 x a/b line, 1 x a/b subscriber
1 x door station (2-wire, 4-wire),
1 x FSP
2 x T0, 2 x S0
S8P
IOM
8 x UPN
CV1
LAN
Voice controller
T8S
LAN
4 x S0 fixed, 4 x S0/T0 switchable
PRI
LAN
30 x digital exchange
4xB
S4D 2x4B
2x4B
DSI
2x4B
2xB
MA2
2xB
4xB
M4A
4xB
S8P
8x2B
S8P
8x2B
T8S
8x2B
T8S
8x2B
CV1
8x2B
CV1
8x2B
PRI
30xB
PRI
30xB
S8D
4x8B
S8D
4x8B
06/07
BNE
EXE
DIA
M4A
4.999.112.593
LAN/
IOM
75
Installation manual Integral 5 D/E easy
4.999.112.593
06/07
Basic module BNE (control module for I5 E easy)
76
Installation manual Integral 5 D/E easy
Basic module BNS (slave module for I5 E easy)
Basic module BNS (slave module for I5 E easy)
Slot 2
Slot 4
Slot 6
Slot 8
I5 E easy - BNS
LAN
IOM
2
4
6
8
IOM IOM IOM IOM LAN
EXP4 EXP3 EXP2 EXP1
in
Schematic layout of the BNS
LAN
IOM
2
4
6
8
The 4 slots into which LAN and / or IOM
modules can be plugged
DC
IOM IOM
IOM IOM
EXP4 EXP3 EXP2 EXP1
LED
Cold start switch
Basic module BNS (slave unit), connected through another LAN unit
4.999.112.593
06/07
LAN
out
LED
IOM
EXP4
IOM
EXP3
IOM
EXP2
IOM
EXP1
LAN
in
8
8
8
8
8
Interfaces available for the EXE and LANin
77
Installation manual Integral 5 D/E easy
Basic module BNS (slave module for I5 E easy)
Short description BNS (slave module)
Short description of BNE
Function
Slave module for I5 E easy. This is the last module for connection to the LAN channels. It undertakes independently the management of its own local IOM
channels.
Slots
There are 4 slots on the BNS
Plug-in
modules
IOM
LAN
Note
4.999.112.593
Slot 2 (slot address 1)
Slot 4 (slot address 3)
Slot 6 (slot address 5)
Slot 8 (slot address 7)
2-slot and / or 4-slot plug-in module (IOM and LAN)
Single 1-slot plug-in module "DIA" (IOM)
IOM is a connection local to BNS, which is available at all slots. IOM modules can be driven through this connection. IIOM modules have no
switching matrix control of their own and are generally controlled only by the BNS through the IOM connection. Max. 96 IOM channels, 48 per
BNE/BNS
For an IOM extension using EXE modules, 4 sockets EXP1 thro EXP4 are provided. Each socket drives 8 x 2B channels (16 B channels) for further applications
LAN is a 128 B channel connection, which is available at all slots. LAN modules that are connected "draw" this connection from their total of available B channels.
LAN modules are intelligent plug-in modules with their own switching matrix control
The LAN connection is not brought out from the BNS for further applications, i.e. no LAN connections can be used on an EXE connected to the
BNS
4-slot plug-in module at slot 4 and 8, V24 available only at slot 2 (module V24)
BNS has a cold-start switch, which is accessed through a hole in the casing. There is no "cold-start plug".
Local reset for the BNS, no time-based differentiation as offered on BND/BNE.
Left hand / right hand LEDs, see "LEDs on the BNS" on the back
The BNS can be powered using a separate plug-in mains unit (Vin) or it can be fed from another EXE module (Vin). See plug-in mains unit
Max. 1 x CV1 and max. 1 x T8S on a BND. 1 x CV1 plus 1 x T8S permissible on a BND.
Max 4 x EXE between BNE and BNS using LAN
06/07
78
Installation manual Integral 5 D/E easy
Basic module BNS (slave module for I5 E easy)
Allocation of IOM expander 1 thro 4 and LANin
8
1
2
3
4
5
6
7
8
1
2
3
4
5
6
7
8
SDA-IOM4
SCL-IOM4
GND
DCL
+5V
FSC
DU4
DD4
I5 E easy - BNS
LAN
IOM
2
4
6
LANin
8
IOM IOM IOM IOM LAN
EXP4 EXP3 EXP2 EXP1
in
EXP4
8
4.999.112.593
1
2
3
4
5
6
7
8
SDA-IOM7
SCL-IOM7
GND
DCL
+5V
FSC
DU7
DD7
06/07
EXP3
8
1
2
3
4
5
6
7
8
SDA-IOM6
SCL-IOM6
GND
DCL
+5V
FSC
DU6
DD6
EXP2
8
-RXD
TXD
DTR
GND
DSR
RTS
CTS
PDC
GND
PFS
PCM0-TRX
PCM2-TRX
FREF-AUS
ZC-AUS-WE
LAN-TRX
EXP1
8
1
2
3
4
5
6
7
8
SDA-IOM1
SCL-IOM1
GND
DCL
+5V
FSC
DU1
DD1
79
Installation manual Integral 5 D/E easy
Basic module BNS (slave module for I5 E easy)
Items for mounting on the BNS
Alternative slot
I5Eeasy - BNS
M4S
DIA
Slot
T8S
V24
2B
DIA
DIA
2B
DIA2B
DIA 2B
SXS 4x2B
SXS 4x2B
SXS
4x2B
SXS
4xB
S4A
4xB
S4A
4xB
S4A
4xB
S4A
4xB
S4D 2x4B
S4D
S4D
2x4B
S4D 2x4B
DSI
2x4B
DSI
2xB
2x4B
2x4
DSI
B
MA2 2xB
MS4 4x2B
MS4 4x2B
MS4 4x2B
DSI
MA2
2x4B
MA2
2xB
MA2
IOM
2x4B
2xB
Name
2, 4, 6, 8 BNX
1, 2, 3, 4 EXE
DIA
LAN
T8S
MS4 4x2B
LAN/
IOM
BNS
Basic exchange module
EXE
Extension module EXE
V.24
V24 interface
DIA
IOM
Integral call recording
SXS
IOM
4 x S0 subscribers
S4A
IOM
M4A
IOM
S4D
IOM
MA2
IOM
DSI
IOM
MS4
IOM
4 x a/b subscribers
3 x a/b lines,
1 x a/b subscriber
4 x UPD for 2 x DECT-RBS
1 x a/b line,
1 x a/b subscriber
1 x door station
(2-wire, 4-wire),
1 x FSP
2 x T0, 2 x S0
S8P
M4A
4xB
M4A
4xB
S8P
8x2B
S8P
8x2B
T8S
8x2B
T8S
8x2B
IOM
8 x UPN
CV1
8x2B
CV1
8x2B
CV1
LAN
PRI
30xB
PRI
30xB
T8S
LAN
PRI
LAN
Voice controller
4 x S0 fixed, 4 x S0/T0
switchable
30 x digital exchange
4.999.112.593
06/07
= own switching matrix
80
Installation manual Integral 5 D/E easy
Basic module BNS (slave module for I5 E easy)
Items for mounting on the EXE (Extension of Integral 5 E easy with BNS and EXE)
I5 E easy - EXE
Name
DIA
2B
SXS
4x2B
S4A
4xB
S4D
2x4B
2B
DIA
2B
DIA
2B
DIA
BNS
Basic exchange module
EXE
Extension module EXE
V.24
V24 interface
DIA
IOM
Integral call recording
IOM
4 x S0 subscribers
SXS 4x2B
SXS 4x2B
SXS 4x2B
SXS
S4A
S4A
S4A
S4A
IOM
4 x a/b subscribers
M4A
IOM
3 x a/b lines, 1 x a/b subscriber
S4D
IOM
4 x UPD for 2 x DECT-RBS
MA2
IOM
DSI
IOM
MS4
IOM
1 x a/b line, 1 x a/b subscriber
1 x door station (2-wire, 4-wire),
1 x FSP
2 x T0, 2 x S0
S8P
IOM
8 x UPN
CV1
LAN
Voice controller
T8S
LAN
4 x S0 fixed, 4 x S0/T0 switchable
PRI
LAN
30 x digital exchange
4xB
S4D 2x4B
4xB
S4D 2x4B
4xB
S4D 2x4B
DSI
2x4B
DSI
2x4B
DSI
2x4B
DSI
2x4B
MA2
2xB
MA2
2xB
MA2
2xB
MA2
2xB
M4A
4xB
M4A
4xB
S8P
8x2B
S8P
8x2B
T8S
8x2B
T8S
8x2B
CV1
8x2B
CV1
8x2B
PRI
30xB
PRI
30xB
S8D
4x8B
S8D
4x8B
4.999.112.593
LAN/
IOM
06/07
81
Installation manual Integral 5 D/E easy
4.999.112.593
06/07
Basic module BNS (slave module for I5 E easy)
82
Installation manual Integral 5 D/E easy
Basic module IPU (IP unit)
Basic module IPU (IP unit)
LEDs for status display
DIP-switch for LAN-addressing Reset
DSP-module (inserted)
I5 E easy - IPU
LAN
out
DSP-Modul
DSP-Modul
LAN
in
ETH1
10
ETH0
10/100
Schematic layout of the IPU
2 DSP plug-in modules can be plugged into
the IPU
LAN
out
LAN
in
ETH1
10
ETH0
10/100
8
8
8
8
Available interfaces (LANin, LANout) for
EXE, BNS, ETH = Ethernet
Basic module IPU
LED
4.999.112.593
06/07
LED
83
Installation manual Integral 5 D/E easy
Basic module IPU (IP unit)
Short description of IPU
Short description of IPU
The IPU allows connection of IP phones or PCs using the Ethernet interface
The IPU is supplied without a DSP, this must be ordered separately
Max. 2 IPUs per system (using series EXE units)
Max. 15 IP phones per IPU
2 slots for DSP modules
DIP switch for addressing and reset
LEDs for status indication
The IPU can be powered using a separate plug-in mains unit (Vin) or it can be fed from
another EXE module (Vin). See plug-in mains unit
4.999.112.593
06/07
84
Installation manual Integral 5 D/E easy
Basic module IPU (IP unit)
Assignment of LANin, LANout, plug-in mains unit, SV socket IPU
LANin
LANout
8
4.999.112.593
06/07
1
2
3
4
5
6
7
8
-RXD
TXD
DTR
GND
DSR
RTS
CTS
PDC
GND
PFS
PCM0-TRX
PCM2-TRX
FREF-AUS
ZC-AUS-WE
LAN-TRX
I5 E easy - IPU
LAN
out
LAN
in
ETH1
10
ETH0
10/100
85
Installation manual Integral 5 D/E easy
Basic module IPU (IP unit)
LEDs and DIP switch on the IPU
LEDs for status display
DIP-switch for LAN-addressing Reset
DSP-Modul
LED
4.999.112.593
06/07
DSP-module (inserted)
DSP-Modul
LED
86
Installation manual Integral 5 D/E easy
Basic module IPU (IP unit)
LED displays
LEDs for status display
DIP-switch for LAN-addressing
Reset
DSP-Modul
Status indications by LEDs
LED 1
LED 2
Status
LED 3
LED 4
LED 5
LED 6
off
off
off
off
off
off
off
flashing
green
on
green
flashing
green
on
green
on
green
flashing
green
Starting up
on
green
4.999.112.593
ETH1 10Mbit/s
Connection available
on
red
Collision detected
on
green
ETH0 10/100Mbit/s
Connection available
on
10Mbit/s
ETH0
10/100Mbit/
s ETH0
Running
Error
06/07
87
Installation manual Integral 5 D/E easy
Basic module IPU (IP unit)
Dip switch
The DIP switch on the IPU has the following functions
Setting the LAN address
Resetting the IPU
LEDs for status
display
DIP-switch for LAN-addressing
Reset
LAN-address
LAN-address
IPU1
IPU2
Factory Default
setting
ON
1
2
DIP
3
ON
4
1
2
Reset
IPU1
DIP
3
ON
4
1
2
Reset
IPU2
DIP
3
ON
4
1
2
DIP
3
4
DSP-Modul
The LAN address setting is independent of the physical configuration of
the IPU.
Resetting the IPU:
Briefly switch DIP switch 1 to the OFF position, then switch it back to ON.
Arrangement of switches on the IPU
4.999.112.593
06/07
Resetting the IPU has the effect that the connection to / from all
connected IP phones is broken off, and the displays shown on IP phones
will be “frozen" from the duration of the reset. All other system functions
will be unaffected.
88
Installation manual Integral 5 D/E easy
Basic module EXE (expansion unit for I5 D/E easy)
Basic module EXE (expansion unit for I5 D/E easy)
Slot 1
Slot 2
Slot 3
I5 easy - EXE
Slot 4
LAN
IOM
1
LAN
out
2
LAN
in
3
4
IOM
EXPL
IOM
EXPR
1
ON
2
4
DIP
3
Schematic layout of the EXE
LAN
IOM
1
2
3
4
The 4 slots into which LAN and / or IOM
modules can be plugged, in connection with
a BNE
DC
LAN
out
LED
LAN IOM IOM
in EXPL EXPR
LED
DC
out
LAN
out
LAN
in
IOM
IOM
EXPL EXPR
Expander interfaces for the BNE (EXPL/R)
LAN out/in are functional in the BNE-EXE
connection
Basic module EXE (expansion unit), connected to a BNE
4.999.112.593
06/07
89
Installation manual Integral 5 D/E easy
Basic module EXE (expansion unit for I5 D/E easy)
Short description of EXE
Short description of EXE
Function
Expansion module for the I5 D/E easy (no control functions).
Slots
There are 4 slots on the EXE
Plug-in
modules
IOM
LAN
Slot 1 (slot address 0)
Slot 2 (slot address 1)
Slot 3 (slot address 2)
Slot 4 (slot address 3)
2-slot and / or 4-slot plug-in module (IOM and LAN)
Single 1-slot plug-in module "DIA" (IOM)
IOM is a connection local to BND/BNE/BNS, which is available at all slots. IOM modules can be driven through this connection.
IOM modules have no switching matrix control of their own and are generally controlled only by the BND/BNE/BNS through the
IOM connection.
- For an IOM extension using EXE modules, 2 sockets EXPL and EXPR are provided. Each socket can accept 8 x 2B
channels (16 B channels) from the BND/BNE/BNS
- The EXE IOM modules can only be used if the EXE is connected using its EXP-L/R socket(s) with the BND/BNE/BNS
EXP1/2 and/or EXP3/4
- If there is only a single connection from the BND/BNE/BNS to the EXE, there are 8 x 2 B channels (16 B channels)
available on the EXE for IOM modules. This "simple" connection type is permitted only for connecting pure analog
units to the EXE.
- If there are two connections from the BND/BNE/BNS to the EXE, there are 2 x 8 x 2 B channels (32 B channels) available
on the EXE for IOM modules. This type of circuit is essential
- for operating mixed analog and digital modules
- for pure digital circuits
- or for an incomplete analog circuit to the EXE where there are options for additional digital circuits
LAN is a 128 B channel connection, which is available at all slots. LAN modules that are connected "draw" this connection
from their total of available B channels.
LAN modules are intelligent plug-in modules with their own switching matrix control
Note
The EXE can be powered using a separate plug-in mains unit (Vin) or it can be fed from another EXE module (Vin).
See plug-in mains unit
Max 4x EXE between BNE and BNS using LAN
4.999.112.593
06/07
90
Installation manual Integral 5 D/E easy
Basic module EXE (expansion unit for I5 D/E easy)
Items for mounting on the EXE, connected to a BND
Alternative slot
I5 D easy - BND
M4S
DIA
Slot
T8S
DIA
2B
2B
DIA
DIA
2B
2B
DIA
SXS 4x2B
SXS 4x2B
SXS 4x2B
SXS 4x2B
S4A
S4A
S4A
S4A
4xB
S4D 2x4B
DSI
MA2
2x4B
2xB
M4A
S8P
MS4 4x2B
T8S
CV1
4.999.112.593
4xB
S4D 2x4B
DSI
MA2
2x4B
S4D
DSI
2xB
MA2
4xB
M4A
8x2B
MS4 4x2B
8x2B
8x2B
06/07
4xB
2x4B
2x4B
2xB
S8P
MS4 4x2B
T8S
CV1
2, 4, 6, 8 BNX
1, 2, 3, 4 EXE
IOM
LAN
4xB
MA2
2x4B
DIA
T8S
4xB
MS4 4x2B
8x2B
8x2B
Basic exchange module
EXE
2xB
8x2B
LAN/IOM
BND
S4D 2x4B
DSI
Name
= own switching matrix
Extension module EXE
DIA
IOM
SXS
IOM
Integral call recording
4 x S0 subscribers
S4A
IOM
M4A
IOM
S4D
IOM
MA2
IOM
DSI
IOM
MS4
IOM
4 x a/b subscribers
3 x a/b lines,
1 x a/b subscriber
4 x UPD for 2 x DECT-RBS
1 x a/b line,
1 x a/b subscriber
1 x door station
(2-wire, 4-wire),
1 x FSP
2 x T0, 2 x S0
S8P
IOM
8 x UPN
CV1
LAN
T8S
LAN
Voice controller
4 x S0 fixed, 4 x S0/T0
switchable
91
Installation manual Integral 5 D/E easy
Basic module EXE (expansion unit for I5 D/E easy)
I5 D easy - EXE
DIA
2B
DIA
2B
2B
DIA
DIA
2B
SXS 4x2B
SXS 4x2B
SXS 4x2B
SXS
4x2B
S4A
S4A
S4A
S4A
4xB
4xB
S4D 2x4B
4xB
S4D 2x4B
4xB
S4D 2x4B
DSI
2x4B
DSI
2x4B
MA2
2xB
MA2
2xB
MA2 2xB
4xB
M4A
M4A
S8P
8x2B
DSI
S8P
2x4B
S4D 2x4B
DSI
MA2
Name
BND
06/07
Basic exchange module
EXE
Extension module EXE
DIA
IOM
SXS
IOM
4 x S0 subscribers
2xB
S4A
IOM
4 x a/b subscribers
M4A
IOM
3 x a/b lines, 1 x a/b subscriber
4xB
S4D
IOM
4 x UPD for 2 x DECT-RBS
MA2
IOM
DSI
IOM
MS4
IOM
1 x a/b line, 1 x a/b subscriber
1 x door station (2-wire, 4-wire),
1 x FSP
2 x T0, 2 x S0
S8P
IOM
8 x UPN
CV1
LAN
Voice controller
T8S
LAN
4 x S0 fixed, 4 x S0/T0 switchable
2x4B
8x2B
BND
4.999.112.593
LAN/
IOM
Integral call recording
Basic exchange module
92
Installation manual Integral 5 D/E easy
Basic module EXE (expansion unit for I5 D/E easy)
Items for mounting on the EXE, connected to a BNE/BNS
Alternative slots
I5 E easy - BNE
M4S
DIA
Slot
T8S
V24
2B
DIA
SXS 4x2B
S4A
4xB
DIA 2B
DIA2B
DIA 2B
SXS 4x2B
SXS 4x2B
SXS 4x2B
S4A
4xB
S4A
4xB
S4A
2, 4, 6, 8 BNX
1, 2, 3, 4 EXE
IOM
Name
LAN
4xB
LAN/IOM
BNE
Basic exchange module
EXE
Extension module EXE
V.24
V24 interface
S4D 2x4B
S4D 2x4B
S4D 2x4B
S4D 2x4B
DIA
IOM
DSI 2x4B
DSI
2x4B
DSI 2x4B
DSI 2x4B
SXS
IOM
4 x S0 subscribers
MA2
MA2
2xB
MA2
MA2
S4A
IOM
M4A
IOM
S4D
IOM
4 x a/b subscribers
3 x a/b lines,
1 x a/b subscriber
4 x UPD for 2 x DECT-RBS
MA2
IOM
2xB
MS4 4x2B
MS4 4x2B
2xB
MS4 4x2B
2xB
DIA
T8S
MS4 4x2B
= own switching matrix
Integral call recording
M4A
4xB
M4A
4xB
S8P
8x2B
S8P
8x2B
DSI
IOM
T8S
8x2B
T8S
8x2B
MS4
IOM
CV1
8x2B
CV1
8x2B
S8P
IOM
8 x UPN
CV1
LAN
T8S
LAN
PRI
LAN
Voice controller
4 x S0 fixed, 4 x S0/T0
switchable
30 x digital exchange
PRI
4.999.112.593
30xB
06/07
PRI
30xB
1 x a/b line, 1 x a/b subscriber
1 x door station
(2-wire, 4-wire),
1 x FSP
2 x T0, 2 x S0
93
Installation manual Integral 5 D/E easy
Basic module EXE (expansion unit for I5 D/E easy)
I5 E easy - EXE
DIA 2B
DIA2B
DIA2B
DIA 2B
SXS 4x2B
SXS 4x2B
SXS 4x2B
SXS 4x2B
S4A
4xB
S4A
4xB
S4A
4xB
S4A
4xB
Name
LAN/
IOM
BNE
Basic exchange module
EXE
Extension module EXE
V.24
V24 interface
S4D 2x4B
S4D 2x4B
S4D 2x4B
S4D 2x4B
DIA
IOM
DSI
DSI
DSI
DSI
SXS
IOM
4 x S0 subscribers
S4A
IOM
4 x a/b subscribers
M4A
IOM
3 x a/b lines, 1 x a/b subscriber
S4D
IOM
4 x UPD for 2 x DECT-RBS
MA2
IOM
DSI
IOM
MS4
IOM
1 x a/b line, 1 x a/b subscriber
1 x door station (2-wire, 4-wire),
1 x FSP
2 x T0, 2 x S0
2x4B
MA2
2xB
MA2
2x4B
2xB
MA2
2x4B
2xB
MA2
2x4B
2xB
Integral call recording
M4A
4xB
M4A
4xB
S8P
8x2B
S8P
8x2B
T8S
8x2B
T8S
8x2B
S8P
IOM
8 x UPN
CV1
8x2B
CV1
8x2B
CV1
LAN
Voice controller
PRI
30xB
PRI
30xB
T8S
LAN
4 x S0 fixed, 4 x S0/T0 switchable
PRI
LAN
30 x digital exchange
S8D
4x8B
S8D
4x8B
4.999.112.593
06/07
94
Installation manual Integral 5 D/E easy
Basic module EXE (expansion unit for I5 D/E easy)
Assignment of plug-in mains unit and SVin and SVout socket on BND
I5 easy - EXE
IOM
1
2
3
DC
in
8
7
6
5
4
3
2
1
4.999.112.593
06/07
0V
0V
-----40V
-40V
4
DC
out
8
1
2
3
4
5
6
7
8
-40VDC
----GND
95
Installation manual Integral 5 D/E easy
Basic module EXE (expansion unit for I5 D/E easy)
Assignment of IOM expander L, R and LAN
LANin
LANout
8
4.999.112.593
1
PDC
2
GND
3
PFS
4 PCM0-TRX
5 PCM2-TRX
6 FREF-AUS
7 ZC-AUS-WE
8
LAN-TRX
06/07
I5 easy - EXE
1
LAN
out
2
LAN
in
3
4
IOM
EXPL
IOM
EXPR
EXPR
8
1
2
3
4
5
6
7
8
SDA-IOM1
SCL-IOM1
GND
DCL
+5V
FSC
DU1
DD1
EXPL
8
1
2
3
4
5
6
7
8
SDA-IOM4
SCL-IOM4
GND
DCL
+5V
FSC
DU4
DD4
96
Installation manual Integral 5 D/E easy
Basic module EXE (expansion unit for I5 D/E easy)
DIP switch on the EXE
EXE settings required if the module is wired using LAN
Slot 1
Slot 2
Slot 3
Slot 4
1
ON
2
4
DIP
3
1
4
DC
out
Slot 2
LED
DIP
3
LAN LAN IOM IOM
out in EXPL EXPR
ON
2
DC
DC
Slot 4
LED
DIP-switch EXE
4.999.112.593
06/07
97
Installation manual Integral 5 D/E easy
Basic module EXE (expansion unit for I5 D/E easy)
DIP switch on the EXE
Addressing for IOM-operation
I5 E easy - BNE
LAN
2
IOM
4
8
6
ON
IOM IOM IOM IOM LAN
EXP4 EXP3 EXP2 EXP1 out
DIP
1 2 3 4
I5 E easy - EXE 1
LAN
in
LAN
out
I5 E easy - EXE 3
LAN
in
IOM
IOM
EXPL EXPR
I5 E easy - EXE 4
1234
LAN
in
1 2 3 4
ON
DIP
1 2 3 4
ON
DIP
1 2 3 4
1234
IOM
IOM
EXPL EXPR
ON
DIP
1 2 3 4
LAN
out
DIP
I5 E easy - EXE 2
1234
LAN
out
ON
1234
IOM
IOM
EXPL EXPR
LAN
out
LAN
in
IOM
IOM
EXPL EXPR
ON
DIP
1 2 3 4
ON
DIP
1 2 3 4
ON
DIP
1 2 3 4
DIP switch on the EXE (for IOM operation without LAN):
Positions 0,1 and 6,7 are reserved. Switch 4 is inoperative.
The EXE wired to the BNE is driven in position 2, the following looped through
EXEs take sequentially positions 3, 4 and 5.
This completes the address allocation of EXE modules for the BNE.
4.999.112.593
06/07
98
Installation manual Integral 5 D/E easy
Basic module EXE (expansion unit for I5 D/E easy)
Compatibility
The modul EXE can be used to replace the moduls EUE or EUD or for extension business. In this case it can be used instead of EUE
or EUD.
In application instead of a EUD please consider that the EXP-L plug has to be connected.
The software supports only valid configuration rules (e.g. nur 1x S8D or CC1).
4.999.112.593
06/07
99
Installation manual Integral 5 D/E easy
4.999.112.593
06/07
Basic module EXE (expansion unit for I5 D/E easy)
100
Installation manual Integral 5 D/E easy
Plug-in module CV1 (LAN, I5 D/E)
Plug-in module CV1 (LAN, I5 D/E)
Module view and socket allocation
Module view
Voice Mail Box
Auto. call forwarding
Announcement before answering
MOH
Socket allocation
CV1
none
4.999.112.593
06/07
101
Installation manual Integral 5 D/E easy
Plug-in module CV1 (LAN, I5 D/E)
Short description CV1
Short description CV1
Function
Voice mailbox, announcement before answering,
Automatic call transfer, automatic call forwarding AWV
Width
4-slot width
Connection
options
max. 1 x on BND, slot 4 or 8, not with DIA within a system
max. 1 x per system, BNE, BNS, slot 4 or 8
max. 1 x per system, EXE slot 4 or 2
Cables
Note
4.999.112.593
06/07
102
Installation manual Integral 5 D/E easy
Plug-in module CV1 (LAN, I5 D/E)
Further information
Further Information
Funktions "CV1"
Auto. call transfer
Announcement before answering
Music On Hold (MOH)
Configuration only possible using the ISA tool (remote)
4.999.112.593
06/07
103
Installation manual Integral 5 D/E easy
4.999.112.593
06/07
Plug-in module CV1 (LAN, I5 D/E)
104
Installation manual Integral 5 D/E easy
Plug-in module DIA (IOM, I5 D/E)
Plug-in module DIA (IOM, I5 D/E)
Module view and socket allocation
Module view
Socket allocation
Call recording
none
4.999.112.593
06/07
105
Installation manual Integral 5 D/E easy
Plug-in module DIA (IOM, I5 D/E)
Short description of DIA
Short description of DIA
Function
Width
1-slot width
Connection
options
BND, BNE, BNS, EXE all slots
Cables
no cables required
Note
4.999.112.593
Integrated answering machine with max. two channels
2 x answering machines or 2 x automatic call forwarding
Each channel can be operated as either an answering machine or for
automatic call forwarding.
Voice message capacity of 29 minutes per channel (incl. all
announcements)
06/07
BND: max. 2 x per system
BND, BNE: not with CV1 within a system
For a uniform appearance a dummy module is plugged into the free slot
of the DIA
106
Installation manual Integral 5 D/E easy
Plug-in module DIA (IOM, I5 D/E)
Specific features
Specific features (plug-in module details)
Own subscriber number per channel
Control via DTMF (external, internal via DTMF post dialling)
different messages per channel
Editing the messages
Messages 1 and 2, if there is still space for the set recording time
Message 3, if there is no more recording capacity
Error message
Call up with DTMF character and enter PIN
Message Waiting is checked (Mailbox) by query to a permanently assigned number
Message Information (the time of message is announced in the local language when listening
to messages)
4-digit individually set PIN, non-volatile on reset and loss of power
Maximum number of messages per channel: 124
Configurable recording time: 30 seconds, 1 minute, 2 minutes
Activate message call up by entering a DTMF tone in answering machine mode
Listen: continuously, by individual step
Changing PIN number
Acoustic operation prompting (menu prompting with set help texts)
Automatic Attendant, direct switching of incoming calls (analog or ISDN) by means of DTMF
post dialling
4.999.112.593
06/07
107
Installation manual Integral 5 D/E easy
Plug-in module DIA (IOM, I5 D/E)
Specific features (plug-in module details)
All DIAs can be configured
as Automatic Attendant
subscribers either individually
or collectively
Function:
If a DIA which is set up as an automatic attendant subscriber is called,
its general greeting message is first output.
The caller can have the call forwarded to the desired subscriber by
DTMF post dialling (also via call diversion to another DIA which is
configured as an answering machine).
Up to two / four Automatic Attendant exchange connections (one fixed exchange line assigned
per channel, allocation can be to a hunt group).
Greeting message (changeable individual message per channel)
Continued dialling
additional communication with operator control
Recognition of end
of connection
4.999.112.593
06/07
if speech pause of approx. 8 sec. occurs
Timeout of approx. 2.5 min
using busy signal recognition
108
Installation manual Integral 5 D/E easy
Plug-in module DSI (IOM, I5 D/E)
Plug-in module DSI (IOM, I5 D/E)
Module view and socket allocation
Module view
Socket allocation DHI 4-wire
Door handsfree operation
Free switching points
8
1
2
3
4
5
6
7
8
Socket allocation FSP
MIC Speech path connection 1(micro)
LS/MIC Speech path connection 2(Speaker, micro)
TOE Door opener, connection 1
ELA1 ELA-switched output 1
ELA2 ELA-switched output 2
LS/KL Speech path connection 3 (speaker)
KL
Bell (connection 1)
KL/TOE Bell (conn. 2), Door opener (conn.2)
8
1
2
3
4
5
6
7
8
FSP3_1 Free switched point 3
FSP3_2 Free switched point 3
FSP1_1 Free switched point 1
FSP2_1 Free switched point 2
FSP2_2 Free switched point 2
PFK1 Potential-free sensor
PFK2 Potential-free sensor
FSP1_1 Free switched point 1
Socket allocation DHI 2-wire
8
FSP
4.999.112.593
DHI
06/07
1
2
3
4
5
6
7
8
MIC
Speech path connection 1 to door station
LS/MIC Speech path connection 2 to door station
TOE
Door opener, connection 1
ELA1 ELA-switched output 1
ELA2 ELA-switched output 2
LS/KL Bell (connection 1)
KL
Bell (connection 2)
KL/TOE Bell (conn. 2), Door opener (conn. 2)
109
Installation manual Integral 5 D/E easy
Plug-in module DSI (IOM, I5 D/E)
Short description DSI, DHI, FSP
Short description DSI, DHI, FSP
Function
1x door station, 2-wire or 4-wire (SW switchable)
1x FSP = free switching points plus sensor input
Width
2-slot width
Connection
options
BND, BNE, BNS, EXE all slots
Cables
2 x patch cables
Note
DHI and FSP functions available concurrently
DHI for connection to a 2-wire or 4-wire door station
DHI 4-wire and DHI 2-wire are software switchable
Door stations from Siedle and Grothe can be directly connected with no adaptation
Can also be used by floor (multi-family systems)
The door station module can incorporate a suitable amplifier both for the microphone and
also for the speaker
FSP with 3 free switching points and 1 potential-free sensor input
Max. permissible voltage at the switching points: < 30 Veff or < 60 V DC
Max permissible current at the switching points: 1A
At the potential-free sensor input a voltage of >7.3 V .. 20 V AC or DC must be present;
this corresponds to an input current of >1 mA, which activates the sensor
There must be no transfer of mains voltage to the system via the Western socket.
The description of the connection of the Door stations is found in appendix 1.
4.999.112.593
06/07
110
Installation manual Integral 5 D/E easy
Plug-in module M4A (IOM, I5 D/E)
Plug-in module M4A (IOM, I5 D/E)
Module view and socket allocation
Module view
1 analog
subscriber
3 analog
exchanges
Exchng. 1
Socket allocation
Exchng. 2
Exchng. 3
8
1
2
3
4
5
6
7
8
---a
b
----
M4A subscriber
8
1
2
3
4
5
6
7
8
---L-a
L-b
----
M4A exchange
subscriber
4.999.112.593
06/07
111
Installation manual Integral 5 D/E easy
Plug-in module M4A (IOM, I5 D/E)
Short description M4A
Short description M4A
Short description M4A
Function
3 x analog exchange lines, 1x analog subscriber
Width
4-slot width
Connection
options
4.999.112.593
BND, slot 4 or 8
BNE, BNS, slot 4 or 8
EXE slot 2 or 4
Cables
4 x patch cables
Note
Only for Austria
analog direct dial-in possible
Inward dialling to an analog exchange line in accordance with
the Austrian ÜFS standard.
Direct dialling to a system subscriber possible (corresponds to
point-to-point connection on an analog basis)
Prior to disconnecting the module the exchange line must be
disconnected
06/07
112
Installation manual Integral 5 D/E easy
Plug-in module M4A (IOM, I5 D/E)
Short description of the M4A exchange connection
Short description of the M4A exchange connection
Exchange
Connections
Overvoltage protection to 4 kV
Pulse dialling or DTMF dialling procedures with country-specific settings
Country-specific meter pulse counting 12 kHz, 16 kHz
Call recognition with frequency and level evaluation, DC decoupling for NTA (network termination, analog)
a/b polarity reversal detection with loop current evaluation
Flash signalling
Reverse polarity protection
2-wire/4-wire interface (fork switching)
max. feed voltage 57 V=
Power-cut switching with direct connection of the subscriber to the exchange line
Calling Line Identification Presentation (CLIP), symmetrical connection
Coherer circuit (fitting option)
Feed current 20 .... 40 mA (country specific configuration possible with variant fittings)
PTC input protection configuration (fitting option, France)
In the event of a power-cut, the subscriber (Western socket 1) is connected directly to the exchange
(Western socket 2).
Short description of the M4A subscriber connection
Short description of the M4A subscriber connection
Subscriber
Connection
4.999.112.593
06/07
Symmetrical call connection (35 .... 40 Veff)
2-wire/4-wire interface (fork switching)
Feed polarity reversal
Loop current identification (flash, on-hook, off-hook)
Ranges for telephone station feed with -40 V, permissible cable resistance included Device
resistance 800 Ohm (range for 20 mA):
Installation cable 0.4 mm2 (J-Y(St)Y2x2x0.4) :ca. 1350 m
Installation cable 0.6 mm2 (J-Y(St)Y2x2x0.6) :ca. 2900 m
Clip display on subscriber instrument
113
Installation manual Integral 5 D/E easy
Plug-in module M4A (IOM, I5 D/E)
M4A – subs circuit using MDF
M4A- subscr. using HVT (using 1st Western socket HVT)
M4A subscr.
M4A- subscr. using HVT (using 3rd Western socket HVT)
M4A subscr.
M4A subscr.
M4A subscr.
LSA
1
-b
a
--
8
6
8
7
6
5
4
3
2
1
a1 (1)
b1 (2)
a2 (3)
b2 (4)
a3 (5)
b3 (6)
a4 (7)
b4 (8)
8
11 2
3 4
Patch cable
4.999.112.593
11
1
6
5
4
3
2
1
1
1
8
5 6
Terminal strip
06/07
LSA
1
7 8
a
b
---
8
6
1
3
1
a1 (1)
8
7
6
--
6
5
b
5
4
a
4
3
--
3
2
2
1
b1 (2)
a2 (3)
b2 (4)
a3 (5)
1
1
8
1 2
Patch cable
31 4
a
b3 (6)
b
a4 (7)
--
b4 (8)
--
1
8
5 6
7 8
Terminal strip
114
Installation manual Integral 5 D/E easy
Plug-in module M4A (IOM, I5 D/E)
M4A – exchange circuit using MDF
M4A- exchange using HVT (using 1st Western socket HVT)
M4A- exchange using HVT (using 3rd Western socket HVT)
M4A subscr.
M4A subscr.
M4A subscr.
M4A subscr.
LSA
1
8
6
1
1
8
7
6
--
6
5
L-a
5
4
L-b
4
3
--
3
2
2
1
Patch cable
4.999.112.593
3 4
L-b
a2 (3)
--
b2 (4)
--
a4 (7)
b4 (8)
1
8
5 6
Terminal strip
06/07
L-a
b1 (2)
b3 (6)
8
1 2
a1 (1)
a3 (5)
1
1
LSA
1
8
6
1
3
1
a1 (1)
8
7
6
--
6
5
L-a
5
4
L-b
4
3
--
3
2
2
1
b1 (2)
a2 (3)
b2 (4)
1
1
8
1 2
7 8
Patch cable
3 4
1
a3 (5)
L-a
b3 (6)
L-b
a4 (7)
--
b4 (8)
--
1
8
5 6
7 8
Terminal strip
115
Installation manual Integral 5 D/E easy
Plug-in module M4A (IOM, I5 D/E)
Peripherals circuit using MDF
Connection peripheral device - exchange
LSA
4.999.112.593
06/07
b2 b1 a1 a2
Connection peripheral device - subscriber
LSA
a1 (1)
L-a
a1 (1)
a
b1 (2)
L-b
b1 (2)
b
a2 (3)
--
a2 (3)
--
b2 (4)
--
b2 (4)
--
From / to
analog exchange
a3 (5)
a3 (5)
b3 (6)
b3 (6)
a4 (7)
a4 (7)
b4 (8)
b4 (8)
8
54
1
116
Installation manual Integral 5 D/E easy
Plug-in module MA2 (IOM, I5 D/E)
Plug-in module MA2 (IOM, I5 D/E)
Module view and socket allocation
Module view
Socket allocation
---a
b
----
subscriber
8
1
2
3
4
5
6
7
8
---L-a
L-b
----
exchange
8
1
2
3
4
5
6
7
8
Exchange
1 analog subscriber
1 analog exchange
subscriber
4.999.112.593
06/07
117
Installation manual Integral 5 D/E easy
Plug-in module MA2 (IOM, I5 D/E)
Short description of the MA2
Short description of the MA2
Short description of the MA2
Function
1 x analog line, 1 x analog subscriber
Width
2-slot width
Connection
options
BND, BNE, BNS, EXE, all slots
Cables
2 x patch cable 1
Note
Prior to disconnecting the module the exchange line must be
disconnected
Short description of the MA2 exchange connection
Short description of the MA2 exchange connection
Pulse dialling or DTMF dialling procedures with country-specific settings
Country-specific meter pulse counting 12 kHz, 16 kHz
Call recognition with frequency and level evaluation
DC decoupling for NTA (network termination, analog)
a/b polarity reversal with loop current evaluation
Flash signalling
Reverse polarity protection
Power-cut switching with direct connection of the subscriber to the exchange line
CLIP
Coherer circuit (fitting option) / country variants
PTC input protection configuration (fitting option, France)
4.999.112.593
06/07
118
Installation manual Integral 5 D/E easy
Plug-in module MA2 (IOM, I5 D/E)
Short description of the MA2 subscriber connection
Short description of the MA2 subscriber connection
Feed current 20..40 mA (country-specific configuration using variant fittings)
Ringing voltage (35...40 Veff)
Feed polarity reversal
Loop current identification (flash, on-hook, off-hook)
Ranges for telephone station feed with –40 V, permissible cable resistance included
Instrument resistance 800 Ohm
Ranges when using 20 mA:
with installation cable with 0.4 mm Ø up to approx. 1350 m
with installation cable with 0.6 mm Ø up to approx. 2900 m
CLIP display on subscriber instrument
Only Austria:
Analog direct dial-in possible
- Inward dialling of an analog exchange line in accordance with the ÜFS standard.
Direct dialling to a system subscriber possible (corresponds to point-to-point connection on
an analog basis).
4.999.112.593
06/07
119
Installation manual Integral 5 D/E easy
Plug-in module MA2 (IOM, I5 D/E)
MA2 – subscriber circuit using MDF
MA2- subscr. using HVT (using 1st Western socket HVT)
MA2- subscr. using HVT (using 3rd Western socket HVT)
LSA
1
8
6
--
6
5
b
5
4
a
4
3
--
3
2
2
1
Patch cable
4.999.112.593
2
3
b
a2 (3)
--
b2 (4)
--
a4 (7)
1
3
1
1
a1 (1)
7
6
--
6
5
b
5
4
a
4
3
--
3
2
2
1
b1 (2)
a2 (3)
b2 (4)
a3 (5)
1
1
8
7
6
8
b4 (8)
4
5 6
Terminal strip
06/07
a
b1 (2)
b3 (6)
8
1
a1 (1)
a3 (5)
1
1
8
1
1
8
7
LSA
1
6
8
1
8
Patch cable
2
1
3
4
b
a4 (7)
--
b4 (8)
--
1
5 6
Terminal strip
a
b3 (6)
8
7
8
120
Installation manual Integral 5 D/E easy
Plug-in module MA2 (IOM, I5 D/E)
MA2 – exchange circuit using MDF
MA2- exchange using HVT (using 3rd Western socket HVT)
MA2- exchange using HVT (using 1st Western socket HVT)
LSA
1
8
6
--
6
5
L-a
5
4
L-b
4
3
--
3
2
2
1
2
Patch cable
4.999.112.593
3
b1 (2)
L-b
a2 (3)
--
b2 (4)
--
a4 (7)
b4 (8)
1
4
5 6
Terminal strip
06/07
L-a
b3 (6)
8
1
a1 (1)
a3 (5)
1
1
8
1
1
8
7
LSA
1
6
8
3
1
1
a1 (1)
8
7
6
--
6
5
L-a
5
4
L-b
4
3
--
3
2
2
1
b1 (2)
a2 (3)
b2 (4)
1
8
7
6
1
8
1
2
Patch cable
1
3
a3 (5)
L-a
b3 (6)
L-b
a4 (7)
--
b4 (8)
--
1
4
5 6
Terminal strip
8
7
8
121
Installation manual Integral 5 D/E easy
Plug-in module MA2 (IOM, I5 D/E)
Peripherals circuit using MDF
Connection peripheral device - exchange
LSA
Connection peripheral device - subscriber
LSA
b2 b1 a1 a2
a1 (1)
L-a
a1 (1)
a
b1 (2)
L-b
b1 (2)
b
a2 (3)
--
a2 (3)
--
b2 (4)
--
b2 (4)
--
To/from analog
exchange
a3 (5)
a3 (5)
b3 (6)
b3 (6)
a4 (7)
a4 (7)
b4 (8)
b4 (8)
8
54
1
Connections from distributor to external connection points can be made using installation cable J-Y(St)Y 2 x 2 x 0.6.
In this case to the analog connection socket of the network operator, or to a UAE socket for connection to an analog telephone.
4.999.112.593
06/07
122
Installation manual Integral 5 D/E easy
Plug-in module MS4 (IOM, I5 D/E)
Plug-in module MS4 (IOM, I5 D/E)
Module view and socket allocation
Modul view
Socket allocation
8
1
2
3
4
5
6
7
8
T1-2
R1-2
R2-2
T2-2
T1-1
R1-1
R2-1
T2-1
Transmit + to exchange 2
Receive + from exchange 2
Receive - from exchange 2
Transmit - to exchange 2
Transmit + to exchange 1
Receive + from exchange 1
Receive - from exchange 1
Transmit - to exchange 1
8
1
2
3
4
5
6
7
8
R1-4
T1-4
T2-4
R2-4
R1-3
T1-3
T2-3
R2-3
Receive + to subscriber 2
Transmit + from subscriber 2
Transmit - from subscriber 2
Receive - to subscriber 2
Receive + to subscriber 1
Transmit + from subscriber 1
Transmit - from subscriber 1
Receive - to subscriber 1
2 digital exchanges
2 digital subscriber
4.999.112.593
06/07
1
2
1
2
T01
T02
S01
S02
123
Installation manual Integral 5 D/E easy
Plug-in module MS4 (IOM, I5 D/E)
Short description of MS4
Short description of module
Short description of module
Function
2 x T0, 2 x S0
Width
2-slot width
Connection options
Cables
BND: max. 2 x per system
BNE/BNS: max. 2 x
BND, BNE, BNS, all slots
2 x Y patch cables
Left hand socket: 2 x T0
Right hand socket: 2 x S0, each terminated with 100 Ohm
Unplugging and plugging in under power is permissible
Note
Short description of exchange connection
Short description of exchange connection
Left hand socket: 2 x T0, the T0 connection does not require a power supply
No 100 Ohm termination, no earth reference for the rough lightning strike protection, insulation principle
Without exchange synchronisation operates at high precision internal clock, otherwise synchronised
to the exchange
T0 data see T8S
Short description of subscriber connection
Short description of subscriber connection
Right hand socket: 2 x S0, each terminated with 100 Ohm
Range: Point to point: <= 1000m, shorter passive bus: <= 100m, extended passive bus: <= 500 m
See SXS for further data
4.999.112.593
06/07
124
Installation manual Integral 5 D/E easy
Plug-in module MS4 (IOM, I5 D/E)
Connecting MS4 T0/S0 using MDF
MS4 - S0 - subscr. using HVT (using 1st und 3rd Western socket HVT)
LSA
6
1
8
6
R2-3
T2-3
T1-3
R1-3
R2-4
T2-4
T1-4
R1-4
1
8
7
6
5
YL
5
4
3
2
a1 (1)
b1 (2)
a2 (3)
b2 (4)
T1-3
T2-3
R1-3
R2-3
4
3
2
1
YR
5
4
3
2
a3 (5)
b3 (6)
a4 (7)
b4 (8)
T1-4
T2-4
R1-4
R2-4
1
8
1 2
YL
3 4
YR
Connection:
1
1
8
5
6
7
8
MS4 - exchange
using patch cable 8/6
to distributor
MS4 - subs using
patch cable 8/6 to
distributor
Distributor to
exchange
connection using
inst. cable
installation cable
J-Y(St)Y 2x2x0.6
Distributor to UAE
socket using inst.
cable installation
cable J-Y(St)Y
2x2x0.6
Terminal strip
Patch cable
4.999.112.593
06/07
125
Installation manual Integral 5 D/E easy
Plug-in module MS4 (IOM, I5 D/E)
Connecting MS4 T0/S0 using MDF
MS4 -T0 - exchange using HVT (using 5th and 7th Western socket HVT)
LSA
1
6
1
6
1
T2-1
R2-1
R1-1
T1-1
8
7
6
5
YL
5
4
3
2
a1 (1)
b1 (2)
a2 (3)
b2 (4)
R1-1
R2-1
T1-1
T2-1
T2-2
R2-2
R1-2
T1-2
4
3
2
1
YR
5
4
3
2
a3 (5)
b3 (6)
a4 (7)
b4 (8)
R1-2
R2-2
T1-2
T2-2
1
8
1 2
4.999.112.593
Connection:
8
06/07
3 4
1
5 6
YL
Terminal strip
MS4 - exchange
using patch cable 8/6
to distributor
MS4 - subs using
patch cable 8/6 to distributor
Distributor to
exchange connection using inst. cable
installation cable
J-Y(St)Y 2x2x0.6
Distributor to UAE
socket using inst.
cable installation
8
7 8
YR
Patch cable
cable J-Y(St)Y
2x2x0.6
126
Installation manual Integral 5 D/E easy
Plug-in module MS4 (IOM, I5 D/E)
I55 <---> I5 connection via QSIG to/via MS4
main distributor
to I55
8
1
LSA
1
RXL1
TXL1
TXL2
RXL2
6
1
6
1
8
8
7
6
5
YL
5
4
3
2
a1 (1)
b1 (2)
a2 (3)
b2 (4)
4
3
2
1
YR
5
4
3
2
a3 (5)
b3 (6)
a4 (7)
b4 (8)
1
8
1 2
YL
3 4
YR
1
TXL1
TXL2
RXL1
RXL2
8
5
6
7
8
Terminal strip
4.999.112.593
06/07
127
Installation manual Integral 5 D/E easy
4.999.112.593
06/07
Plug-in module MS4 (IOM, I5 D/E)
128
Installation manual Integral 5 D/E easy
PB1 (emergency power supply)
PB1 (emergency power supply)
Module views
PB1 is the emergency power supply for the Integral
5 easy
PB1 open, view from below
LED radiating upwards
Reset-button
Power supply unit connection
to BNx
key accessible from underneath
4.999.112.593
06/07
129
Installation manual Integral 5 D/E easy
PB1 (emergency power supply)
PB1 open, view from below
LED (light emitting diode)
low-profile plug
Socket for low-profile plug
Installation position for
NiCa-battery
(rechargeable)
Battery clip
4.999.112.593
06/07
Battery
130
Installation manual Integral 5 D/E easy
PB1 (emergency power supply)
Short description PB1
Short description of PB1
Width
The PB1 plug-in module is the integral emergency power supply for the
Integral 5.
123 / 120 mm (corresponding to half the BNx width)
Height
140 / 125 mm (corresponding to height of BNx)
Mounting
with one screw
Cables
1 x patch cable
Function
Note
4.999.112.593
06/07
I5 D: 1x PB1 is connected between plug-in mains unit and system.
I5 E: The number of PB1 modules depends on the number of required
plug-in mains units.
131
Installation manual Integral 5 D/E easy
PB1 (emergency power supply)
Further information
Further information
The plug-in module is fed only with a voltage of (–40 Volt) from the external plug-in mains unit; this supplies the
BNx basic modules.
All other system voltages +14 Volt, +5 Volt are created directly on the PB1 circuit board by DC/DC converters.
In the case of a power-cut, the negative feed voltage of -39 Volt is produced by the discreetly assembled DC/DC
converter and sent to the output socket.
There is space in the PB1 module for an NC battery pack with 8 cells (9.6 V), which provides power during a
power-cut.
The battery cells are charged during normal operation by means of a charging switching.
It is, however, possible to connect an external lead-acid battery (+12 Volt) instead.*
The µP system monitors the charging and switches off as required. (Protection against total discharge)
An LED with optical fibres is installed on the circuit board for signalling the internal status.
The rechargeable NC battery directly within the module provides a direct emergency power supply even if no
other rechargeable batteries are connected.
The battery operation time varies between approx. 15 and 60 minutes between min. and max. load operation,
depending on configuration and activity in the Integral 5.
The µP system measures all necessary times, states and voltages, controls charging and
the need for discharging "for maintenance" and also battery testing.
The plug-in mains unit is of protection class 2. Its output voltage is an
Dangerous Voltages innocuous SELV voltage. All voltages produced internally and sent to the
PB1 module are also SELV voltages.
LED to the Status
Display
The various states of the charging and discharging are signalled by the
flashing LED. During charging, the signalling is via pauses in blinking. In
the case of a power-cut, signalling is via pulses. A pause of 5 sec. follows
a blink sequence to avoid ambiguity.
* an external battery (e.g. car battery (lead gel)) requires its own charger.
4.999.112.593
06/07
132
Installation manual Integral 5 D/E easy
PB1 (emergency power supply)
LED (flashing rhythm / signalling)
The charging cycle always begins after inserting the plug-in mains unit
Charging phase (charging time approx. 15 hr. with known NiCd batteries) 1 pulse end of the loading phase
LED on
5sec
5sec
etc
Xn (pulse), start of the loading phase
LED on
5sec
5sec
usw
(b)
3
(a)
2
1
4.999.112.593
06/07
133
Installation manual Integral 5 D/E easy
PB1 (emergency power supply)
Further information on the charging phase
Further information on the charging phase
PB1 is installed, battery is connected, the supplied, coded SV cable between PB1 and BNx is
plugged in:
the status of the PB1 is signalled after inserting the plug-in mains unit as follows:
The initialization phase begins (phase 1)
LED flashes very rapidly (duration approx. 10 sec.) -----> after which
the LED
in the case of a NiCd battery is unlit (also for approx. 10 sec.)
in the case of a lead gel battery remains on -----> after which the LED
starts to flash (pulse) once a second
When it is detected that a battery is connected, the charging phase
begins (phase 2); the number of flash pulses changes during
the charging phase
At the start of the charging phase (a) the number flash pulses is high
(xn pulses) LED 5sec. on > xn pulses > LED 5 sec. on > xn pulses etc.
and decreases towards the end of the charging phase (b)
After the battery has been charged (phase 3), the LED flashes at a constant rate (b), i.e.
LED 5sec. on ---> 1 pulse ---> LED 5 sec. on ---> 1 pulse etc.
4.999.112.593
06/07
134
Installation manual Integral 5 D/E easy
PB1 (emergency power supply)
Discharge Phase
1 pulse
LED off
5sec
5sec
(c)
Xn pulse
usw.
LED off
3
5sec
5sec
etc.
(d)
4
5
4.999.112.593
06/07
135
Installation manual Integral 5 D/E easy
PB1 (emergency power supply)
Further information on the charging phase
In the event of power failure or removal of the plug-in mains unit, the PABX Integral 5 is powered
from battery; the battery discharges.
The discharge phase begins (4); the number of flash pulses changes during the discharge phase.
The start of the discharge phase (c) is signalled by a flash pulse, LED 5sec. off -> 1 pulse --> LED
5 sec. off -> 1 pulse etc.
The end of the discharge phase (d) is signalled by xn pulses, LED 5 sec. off -> xn pulses -> LED
5 sec. off -> xn pulses etc.
If point d is reached, the PB1 switches off (protection against total discharge).
4.999.112.593
06/07
136
Installation manual Integral 5 D/E easy
PB1 (emergency power supply)
Battery Test
2sec
LED on
LED off
2sec
4
R
2sec
2
Testing of the charged battery
In network operation (i.e. plug-in mains unit inserted), the battery test is activated by a button accessible
from outside.
Press key for approx. 2 sec. (release in area 4) ---> test starts (at present, preset test duration time is
15 min.)
if the reference voltage (Umin) is not reached during the test duration time, the test is
o.k., i.e. the PABX Integral 5 may be powered in the existing configuration for at least
15 min. with this battery in the case of power failure.
After the successful test, the PB1 begins again with charging of the battery automatically, i.e. with the
initialization phase (see "Charging phase (1)").
If the reference voltage (U min) is reached during the test duration time, the test is
not o.k., i.e. the PABX Integral 5 can no longer be powered in the existing configuration for at least 15 min. with this battery in the case of power failure.
This is signalled by needle pulses and the PB1 begins again with charging of the
battery automatically
This needle pulse signalling remains visible until a reset of this display is executed
This reset is executed by pressing and holding the key approx. 4 sec. and releasing
in area R.
4.999.112.593
06/07
137
Installation manual Integral 5 D/E easy
PB1 (emergency power supply)
Re-charging Battery
Re-charging Battery
Under certain circumstances, it may be vital to restart the charging process, e.g. if a battery replacement during operation
is required.
To do this, press the button for approx. 6 sec (release in area 2).
Charging process is started beginning with the initialization phase (see "Charging phase (phase 1)").
4.999.112.593
06/07
138
Installation manual Integral 5 D/E easy
PB1 (emergency power supply)
Switching off the supply voltage (to BNx or IP module)
Switching off the Integral 5 easy
Proceed as follows to switch off the supply voltage to the BUx or EUx or IP module:
Variant 1:
Open the battery cover and unplug the battery plug (from all PB1 modules)
Then unplug the plug-in mains units or switch off the multi-socket extension
After reconnecting the mains supply, plug in the battery plugs again
Variant 2:
(only if there is only 1 x PB1 in the system)
First unplug the plug-in mains units or switch off the multi-socket extension from the socket, or switch off
the main supply.
Press button for approx. 6 sec. (release in area 2) ---> the power supply to the BUx or EUx or IP module will
be switched off.
Check whether the LED is really unlit.
To switch the system back on, insert the plug-in mains unit back into the socket.
Never remove the supplied, coded SV cable between PB1 and BNx or EXE or IP module during operation!
Always carry out procedure for switching off! Never unplug or insert a live IOM or LAN extension cable!
Battery/accumulator change
Battery/accumulator change
Changing NiCd battery (accumulator):
Withdraw the flat plug (3) (of battery)
Remove the rechargeable battery from its holder
4.999.112.593
06/07
139
Installation manual Integral 5 D/E easy
4.999.112.593
06/07
PB1 (emergency power supply)
140
Installation manual Integral 5 D/E easy
Plug-in module PRI (LAN, I5 E)
Plug-in module PRI (LAN, I5 E)
Module view and socket allocation
Modul view
Socket allocation
Primary Rate
8
1
2
3
4
5
6
7
8
--RXL2
TXL1
TXL2
RXL1
---
S2M
4.999.112.593
06/07
141
Installation manual Integral 5 D/E easy
Plug-in module PRI (LAN, I5 E)
Short description PRI
Short description of PRI
Function
Width
Connection
options
Cables
The PRI (Primary Rate Interface) is an intelligent plug-in module which
creates the connection within the system to a Primary Rate Connection
(2 Megabit).
4-slot width
BND: no PRI
BND/BNS: max. 1 x per system
BNE, BNS, slot 4 or 8
EXE slot 2 or 4
1 x patch cable
Module-specific data
Module-specific data
32 channels each with 64 kbps (2048 kbps in total); 30 B channels, one D channel and
one channel used for purposes of synchronisation
Transmission medium: 2 symmetrical twin wires (screened)
Range: approx. 100 m (6dB)
Pure point to point connection
Level 1 is always active (no up or down procedures)
Constant automatic monitoring of the correct level 1 functions
4.999.112.593
06/07
142
Installation manual Integral 5 D/E easy
Plug-in module PRI (LAN, I5 E)
Module-specific data (continued)
Two isolating transformers ensure the necessary electrical separation from the peripherals.
All the instructions for programming digital or analog exchange lines also apply to the PRI module.
The code numbers correspond to the criteria for programming T0 lines.
The management of the lines is dynamic. The assignment of a line number proceeds independently
of the B channel number. (I.e. line 4 can have the channel number 30 and line 30 the channel number 2).
In Germany the installation of an S2M connection is always combined with the allocation of 30 B channels.
As the use of all 30 B channels of the PRI module corresponds to the maximum extension of the system from
the exchange side, in this case no further T0 connections or analog exchange line junctions are allowed to be
configured.
If nevertheless additional digital or analog exchange connection organs are configured, the useable number
of B channels is reduced accordingly.
The synchronization of the Integral
5 clock generator to the reference
pulse of the public network can be
done:
4.999.112.593
06/07
Using a T0 interface (MSN or TK)
Using a S2M interface
In the case of an MSN connection, levels 1 and 2 of the T0 interface are
deactivated if the T0 line is not busy.
In the case of a TK connection, levels 1 and 2 are activated.
For an S2M interface, levels 1 and 2 remain activated. Consequently
the synchronization is prioritized principally on the S2M interface, since in the
case of the T0 line (MSN) the synchronisation clock is switched off at the end
of the connection.
If the PRI module fails or the S2M path is interrupted, the synchronization
takes place on an exchange plug-in module with T0 interface that has access
to a T0 line. If no T0 line is available synchronization is internal. (as for T0 with
MSN in inactive state, when there is no call connection)
When the PRI module reports back again, the system ends the synchronization process on the T0 interface and changes over to the S2M interface.
143
Installation manual Integral 5 D/E easy
Plug-in module PRI (LAN, I5 E)
Connection to NTPM using a UAE socket
max. cable length between PRI and NTPM: 100 m
4.999.112.593
06/07
144
Installation manual Integral 5 D/E easy
Plug-in module PRI (LAN, I5 E)
Connection to NTPM using the MDF
PRI using HVT (using 1st Western socket HVT)
to NTPM
8
1
LSA
1
8
6
1
1
8
7
6
RXL1
6
5
TXL1
5
4
TXL2
4
3
RXL2
3
2
2
1
2
3
4
TXL2
a2 (3)
RXL1
b2 (4)
RXL2
b3 (6)
a4 (7)
b4 (8)
8
1
TXL1
b1 (2)
a3 (5)
1
1
a1 (1)
1
8
5
6
7
8
Terminal strip
4.999.112.593
06/07
145
Installation manual Integral 5 D/E easy
Plug-in module PRI (LAN, I5 E)
IPO <---> I5 connection via QSIG to/via PRI
to IPO
PRI using HVT (using 1st Western socket HVT)
8
1
LSA
1
8
6
1
1
8
7
6
RXL1
6
5
TXL1
5
4
TXL2
4
3
RXL2
3
2
2
1
2
3
4
TXL2
a2 (3)
RXL1
b2 (4)
RXL2
b3 (6)
a4 (7)
b4 (8)
8
1
TXL1
b1 (2)
a3 (5)
1
1
a1 (1)
1
8
5
6
7
8
Terminal strip
4.999.112.593
06/07
146
Installation manual Integral 5 D/E easy
Plug-in module PRI (LAN, I5 E)
I55 <---> I5 connection via QSIG to/via PRI
PRI using HVT (using 1st Western socket HVT)
to I55
8
1
LSA
1
8
6
1
1
8
7
6
RXL1
6
5
TXL1
5
4
TXL2
4
3
RXL2
3
2
2
1
2
3
4
TXL2
a2 (3)
RXL1
b2 (4)
RXL2
b3 (6)
a4 (7)
b4 (8)
8
1
TXL1
b1 (2)
a3 (5)
1
1
a1 (1)
1
8
5
6
7
8
Terminal strip
4.999.112.593
06/07
147
Installation manual Integral 5 D/E easy
4.999.112.593
06/07
Plug-in module PRI (LAN, I5 E)
148
Installation manual Integral 5 D/E easy
Plug-in module S4A (IOM, I5 D/E)
Plug-in module S4A (IOM, I5 D/E)
Module view and socket allocation
Modul view
Socket allocation
subscr. 3, 4
subscr. 1, 2
4 analog subscriber
subscriber 3, 4
subscriber 1, 2
8
1
4.999.112.593
06/07
2
1
1
2
3
4
5
6
7
8
-b
a
--b
a
--
8
1
2
3
4
5
6
7
8
-b
a
--b
a
--
2
149
Installation manual Integral 5 D/E easy
Plug-in module S4A (IOM, I5 D/E)
Short description of S4A
Short description of module
Short description of module
Function
Width
Connection
options
Cables
Note
4.999.112.593
06/07
4 x analog subscribers
2-slot width
BND, BNE, BNS, EXE all slots
2 x Y patch cables
Left hand socket: 2 x analog subscribers 1, 2
Right hand socket: 2 x analog subscribers 3, 4
150
Installation manual Integral 5 D/E easy
Plug-in module S4A (IOM, I5 D/E)
Analog connection using MDF
YL
S4A using HVT (using 1st und 3rd Western socket HVT)
6
1
S4A 1, 2
1
LSA
8
6
a
b
8
7
6
5
YL
5
4
3
2
a1 (1)
b1 (2)
a2 (3)
b2 (4)
b
a
a
b
4
3
2
1
YR
5
4
3
2
a3 (5)
b3 (6)
a4 (7)
b4 (8)
b
a
YR
1
8
1 2
YL
Patch cable
4.999.112.593
06/07
1
3 4
YR
1
subscriber 1
subscriber 2
8
5
6
7
8
Terminal strip
151
Installation manual Integral 5 D/E easy
Plug-in module S4A (IOM, I5 D/E)
S4A using HVT (using 5th und 7th Western socket HVT)
YL
6
1
1
LSA
8
S4A 3, 3
6
1
a
b
8
7
6
5
YL
5
4
3
2
a1 (1)
b1 (2)
a2 (3)
b2 (4)
b
a
a
b
4
3
2
1
YR
5
4
3
2
a3 (5)
b3 (6)
a4 (7)
b4 (8)
b
a
YR
1
8
1
2
3
4
Terminal strip
4.999.112.593
06/07
1
subscriber 3
subscriber 4
8
5 6
YL
7 8
YR
Patch cable
152
Installation manual Integral 5 D/E easy
Plug-in module S4D (IOM, I5 D/E)
Plug-in module S4D (IOM, I5 D/E)
Module view and socket allocation
RBS
Modul view
Socket allocation
4 UPD-Ports
1
2
3
4
5
6
7
8
RBS1
U- /2
U- /1
U+ /1
U+ /2
RBS
RBS 1, 2
4.999.112.593
06/07
153
Installation manual Integral 5 D/E easy
Plug-in module S4D (IOM, I5 D/E)
Short description of S4D
Short description of S8D
Function
Width
Connection
options
Cables
If an S4D is plugged into an EXE, the EXE must have its own plug-in mains unit
Note
4.999.112.593
4 UPD ports for connecting 2 DECT RBSs (4 B channels ADPCM per RBS)
1 digital signal processor (DSP), 8 simultaneous calls possible
2-slot width
BND: all slots, max. 4 x per system
BNE, BNS, EXE: all slots, max. 4 x using IOM-EXE -> max. 8 x per system
2 x patch cables
Installation cable 0.6 mm2 (J-Y(St)Y2x2x0.6): length approx. 1,000 m
06/07
154
Installation manual Integral 5 D/E easy
Plug-in module S4D (IOM, I5 D/E)
Summary of the radio ranges
Overlapping radio range with automatic handover
4.999.112.593
06/07
Non-overlapping radio ranges, no handover, connection is lost
155
Installation manual Integral 5 D/E easy
Plug-in module S4D (IOM, I5 D/E)
Connecting RBS1 and RBS2 using MDF
S4D-RBS1 using HVT (using 1st Western socket HVT)
LSA
S4D-RBS using HVT (using 3rd Western socket HVT)
LSA
RBS
1
RBS
2
1
8
RBS
1
6
1
1
8
7
6
U+ /2
6
5
U+ /1
5
4
U- /1
4
3
U- /2
3
2
2
1
Patch cable
4.999.112.593
a2 (3)
U- /2
b2 (4)
U+ /2
a4 (7)
b4 (8)
3 4
Terminal strip
06/07
U+ /1
b3 (6)
8
1 2
U- /1
b1 (2)
a3 (5)
1
1
a1 (1)
1
8
5 6
7 8
1
8
RBS
2
6
1
3
1
a1 (1)
8
7
6
U+ /2
6
5
U+ /1
5
4
U- /1
4
3
U- /2
3
2
2
1
b1 (2)
a2 (3)
b2 (4)
1
1
8
1 2
1
3 4
Patch cable
a3 (5)
U- /1
b3 (6)
U+ /1
a4 (7)
U- /2
b4 (8)
U+ /2
1
8
5 6
7 8
Terminal strip
156
Installation manual Integral 5 D/E easy
Plug-in module S4D (IOM, I5 D/E)
Connecting RBS1 and RBS2 using MDF
Peripheral device connection - RBS using UAE
LSA
1
3
1
4.999.112.593
06/07
a1 (1)
U- /1
5
b1 (2)
U+ /1
4
a2 (3)
U- /2
6
b2 (4)
U+ /2
3
a3 (5)
U- /1
5
b3 (6)
U+ /1
4
a4 (7)
U- /2
6
b4 (8)
U+ /2
3
8
1
RBS
8
1
157
Installation manual Integral 5 D/E easy
Plug-in module S4D (IOM, I5 D/E)
Maximum number of DECT units that can be installed on the system
Definition
max. 4 x per system
4 x RBS per S8D
No S8D may be driven from a BNx
S4D (IOM)
max. 4 x per BNE/BND 2 x RBS per S4D
S4D (IOM)
max. 4 x per BNS
2 x RBS per S4D
Max. total of all possible RBS units in the system
S8D (LAN)
4.999.112.593
06/07
16 x RBS per 4 x S8D
8 x RBS per 4 x S4D
8 x RBS per 4 x S4D
32 x RBS
158
Installation manual Integral 5 D/E easy
EXE 3
Plug-in module S4D (IOM, I5 D/E)
EXE 2
S4D S4D S4D S4D
2 RBS 2 RBS 2 RBS 2 RBS
IOM
S8D
4 RBS
LANout
EXE 1
S8D
4 RBS
S8D
4 RBS
LANin
LANout
BNE
S8D
4 RBS
LANin
IOM
LANout
The diagram shows the
maximum number of DECT
units that can be installed
on the system.
4 x S8D, controlled by
the BNE (16 x RBS)
4 x S4D, controlled by
the BNE (8 x RBS)
This allows a maximum of
24 x RBS to be driven by
the BNE.
EXE 4
BNS
S4D S4D S4D S4D
2 RBS 2 RBS 2 RBS 2 RBS
IOM
4.999.112.593
06/07
IOM
LANin
4 x S4D, controlled by
the BNS (8 x RBS)
So as to achieve 32, the
maximum possible
number of RBS units, the
remaining 8 RBS units are
driven by the BNS-IOM.
159
Installation manual Integral 5 D/E easy
4.999.112.593
06/07
Plug-in module S4D (IOM, I5 D/E)
160
Installation manual Integral 5 D/E easy
Plug-in module S8D (LAN, I5 E)
Plug-in module S8D (LAN, I5 E)
Module view and socket allocation
Modul view
Socket allocation
S8D
RBS
1,2
8xUPD
8
RBS
3,4
8
1
RBS1
4.999.112.593
06/07
RBS2
2
1
RBS3
2
1
2
3
4
5
6
7
8
U- /2
U- /1
U+ /1
U+ /2
U- /2
U- /1
U+ /1
U+ /2
1
2
3
4
5
6
7
8
U- /2
U- /1
U+ /1
U+ /2
U- /2
U- /1
U+ /1
U+ /2
RBS1
RBS2
RBS3
RBS4
RBS4
161
Installation manual Integral 5 D/E easy
Plug-in module S8D (LAN, I5 E)
Short description of S8D
Short description of S8D
Function
Width
Connection
options
Cables
Note
4.999.112.593
06/07
8 x UPD ports for 4 x DECT-RBS
7 B channels ADPCM per RBS
4 digital speech processors (DSP) allowing 28 simultaneously
processed speech channels.
Power supply, message exchange (LAN) as well as speech
transmission (PCM highway) via D-sub plug.
4-slot width
EXE slot 2 or 4, max. 1 x per system
2 x Y patch cables
If an S8D is plugged into an EXE, the EXE must have its own plug-in
mains unit.
The module become hot on the underside (metal cover) (approx. 60 °C).
Please be careful when servicing (e.g. exchanging) the plug-in module,
or wear gloves!
162
Installation manual Integral 5 D/E easy
Plug-in module S8D (LAN, I5 E)
RBS connection using Y cable
RBS 1
RBS2
2
RBS 1, 2
1
(6)
(8)
(6)
(6)
1
2
(6)
4.999.112.593
06/07
(8)
RBS 3, 4
163
Installation manual Integral 5 D/E easy
Plug-in module S8D (LAN, I5 E)
RBS1 thro RBS4 – connection using MDF
YL
1
Y
R
Terminal strip
8
YL
8
15 6
1
13 4
1
1
1 2
1
YR
17 8
1
1
YL
YR
1
1
YL
8
7
6
1
5
RBS1
LSA
5
b2 (4)
U+ /2
3
4
b1 (2)
U+ /1
4
3
a1 (1)
U- /1
5
2
a2 (3)
U- /2
6
1
1
4
5
b4 (8)
U+ /2
3
3
4
b3 (6)
U+ /1
4
3
a3 (5)
U- /1
5
2
a4 (7)
U- /2
6
2
1
3
1
1
RBS2
8
YR
Patch cable
8
1
Y-cable main distributor frame
4.999.112.593
06/07
164
Installation manual Integral 5 D/E easy
Plug-in module S8D (LAN, I5 E)
YL
1
Y
R
Terminal strip
1 2
1
3 4
1
5 6
1 8
7
1
8
1
1
1
8
1
1
YL
YR
YL
YR
1
1
YL
8
7
6
5
1
5
RBS3
LSA
5
b2 (4)
U+ /2
3
4
b1 (2)
U+ /1
4
3
a1 (1)
U- /1
5
2
a2 (3)
U- /2
6
1
1
3
Terminal strip
2
1
7
1
1
RBS4
8
YR
4
8
5
b4 (8)
U+ /2
3
4
b3 (6)
U+ /1
4
3
a3 (5)
U- /1
5
2
a4 (7)
U- /2
6
1
Y-cable main distributer frame
4.999.112.593
06/07
165
Installation manual Integral 5 D/E easy
Plug-in module S8D (LAN, I5 E)
DECT mounting
Definition
max. 4 x per system
4 x RBS per S8D
No S8D may be driven from a BNx
S4D (IOM)
max. 4 x per BNE/BND 2 x RBS per S4D
S4D (IOM)
max. 4 x per BNS
2 x RBS per S4D
Max. total of all possible RBS units in the system
S8D (LAN)
4.999.112.593
06/07
16 x RBS per 4 x S8D
8 x RBS per 4 x S4D
8 x RBS per 4 x S4D
32 x RBS
166
Installation manual Integral 5 D/E easy
EXE 3
Plug-in module S8D (LAN, I5 E)
EXE 2
S4D S4D S4D S4D
2 RBS 2 RBS 2 RBS 2 RBS
IOM
S8D
4 RBS
LANout
EXE 1
S8D
4 RBS
S8D
4 RBS
LANin
LANout
BNE
The diagram shows the maximum number of
DECT units that can be installed on the system.
S8D
4 RBS
LANin
IOM
LANout
4 x S8D, controlled by the BNE (16 x RBS)
4 x S4D, controlled by the BNE (8 x RBS)
This allows a maximum of 24 x RBS to be
driven by the BNE.
EXE 4
BNS
So as to achieve 32, the maximum possible
number of RBS units, the remaning 8 RBS
units are driven by the BNS-IOM.
S4D S4D S4D S4D
2 RBS 2 RBS 2 RBS 2 RBS
IOM
4.999.112.593
06/07
4 x S4D, controlled by the BNS (8 x RBS)
IOM
LANin
167
Installation manual Integral 5 D/E easy
4.999.112.593
06/07
Plug-in module S8D (LAN, I5 E)
168
Installation manual Integral 5 D/E easy
Plug-in module S8P (LAN, I5 E)
Plug-in module S8P (LAN, I5 E)
Module view and socket allocation
subscriber 7, 8
subscriber 5, 6
Modul view
Socket allocation
8 UPN-subscriber
8
subscriber 3, 4
subscriber 1, 2
1
4.999.112.593
06/07
2
1
2
1
2
1
2
1
2
3
4
5
6
7
8
-a
b
--a
b
--
subs.1
subs.2
Sockets for
Subs 3, 4
Subs 5, 6
Subs 7, 8
as above
169
Installation manual Integral 5 D/E easy
Plug-in module S8P (LAN, I5 E)
Short description of S8P
Short description of S8P
Function
Width
Connection
options
Cables
Note
Module for the connection of 8 digital subscribers with UPN interface:
4-slot width
BND, slot 4 and 8
BNE, BNS, slot 4 and 8
EXE slot 2 and 4
4 x Y patch cable
Ranges when powered with –40 V and installation cable 0.6 mm²
(J-Y(St)Y2 x 2 x 0.6) approx. 1000 m
Directly connecting UPN subscriber
UPN-subscriber 1
1
(6)
subscriber 1, 2
(8)
2
UPN-subscriber 2
(6)
4.999.112.593
06/07
170
Installation manual Integral 5 D/E easy
Plug-in module S8P (LAN, I5 E)
Connecting UPN subs 1 to UPN subs 4 (UPN subs 5 to UPN subs 8) using distributor
YL
1
YR
1
YL
1
YR
1
LSA
YL
b2 (4)
--
8
5
b2 (4)
--
7
4
b1 (2)
a
7
4
b1 (2)
a
3
a1 (1)
b
3
a1 (1)
b
2
a2 (3)
--
2
a2 (3)
--
1
subscriber1
5
1
6
5
YR
5
b4 (8)
--
4
5
b4 (8)
--
3
4
b3 (6)
a
3
4
b3 (6)
a
3
a3 (5)
b
3
a3 (5)
b
2
a4 (7)
--
2
a4 (7)
--
1
YR
1
YL
YL
Patch cable
71
YR
8
sub7
8
11
2
33
1
4
YL
YR
sub8
1
8
5
1
6
YL
Patch cable
7
1
8
Terminal strip 2
1
6
sub6
1
1
5
1
1
4
sub5
8
1
3
1
1
2
1
1
sub4
1
YR
1
sub3
8
1
sub2
1
sub1
sub4
Y - cable - main distributor frame
Y - cable - main distributor frame
1
7
1
2
1
1
subscriber2
1
3
1
sub3
YR
4
2
06/07
LSA
5
5
4.999.112.593
1
YL
8
6
Terminal strip 1
1
171
Installation manual Integral 5 D/E easy
4.999.112.593
06/07
Plug-in module S8P (LAN, I5 E)
172
Installation manual Integral 5 D/E easy
Plug-in module SXS / S4S (IOM, I5 D/E)
Plug-in module SXS / S4S (IOM, I5 D/E)
Module view and socket allocation
Modul view
Socket allocation
4 S0 subscriber
SXS
S01,2
8
S02
1
2
3
4
5
6
7
8
R+
T+
TRR+
T+
TR-
SXS
S03,4
8
1
2
3
4
5
6
7
8
R+
T+
TRR+
T+
TR-
S03
S01
1
4.999.112.593
06/07
2
1
2
S04
173
Installation manual Integral 5 D/E easy
Plug-in module SXS / S4S (IOM, I5 D/E)
Short description of SXS
Short description of SXS
Short description of SXS
Function
Width
Connection
options
Cables
Note
4.999.112.593
06/07
4 x S0
2-slot width
BND, BNE, BNS, EXE all slots
2 x Y patch cables
Left hand socket: 2 x S0 (1, 2)
Right hand socket: 2 x S0 (3, 4)
174
Installation manual Integral 5 D/E easy
Plug-in module SXS / S4S (IOM, I5 D/E)
S0 connection using MDF (usual) – 1
YL
1
1
1
YR
Y-cable-main-distributor frame
YL
5
4
1
3
2
8
7
6
5
1
1
YR
5
4
15
3
2
4
3
2
1
1
4.999.112.593
06/07
1
The diagram here shows the
connection of only one Y patch
cable
12
13
14
16
17
18
8
LSA
p
a
r
a
l
l
e
l
b2 (4)
b1 (2)
a1 (1)
a2 (3)
b4 (8)
b3 (6)
a3 (5)
a4 (7)
R+
T+
TRR+
T+
TR-
3
4
5
6
3
4
5
6
p
a
r
a
l
l
e
l
b2 (4)
b1 (2)
a1 (1)
a2 (3)
b4 (8)
b3 (6)
a3 (5)
a4 (7)
R+
T+
TRR+
T+
TR-
3
4
5
6
3
4
5
6
1
8
1
8
1
8
1
S0-sub2
BUS
S0-sub1
S0-sub2
BUS
S0-sub1
175
Installation manual Integral 5 D/E easy
Plug-in module SXS / S4S (IOM, I5 D/E)
S01
S02
S01
Bus2
Bus1
1
3
4
1
1
2
1
1
YL
1
8
1
5
6
1
8
1
1
7
1
8
1
S02
YR
Terminal strip
1
Y-Patch cable
4.999.112.593
06/07
176
Installation manual Integral 5 D/E easy
Plug-in module T8S (IOM, I5 D/E)
Plug-in module T8S (IOM, I5 D/E)
Module view and socket allocation
S0 5, 6
S0 7, 8
Modul view
Socket allocation
S0 subscriber
8 S0-sub or exchange
8
1
2
3
4
5
6
7
8
8
1
2
3
4
5
6
7
8
S0 3, 4
S0 1, 2
RTT+
R+
RTT+
R+
T0 exchange
1
2
1
2
1
Sub/exchange interchangeable
4.999.112.593
06/07
2
1
Sub fixed
2
RTT+
R+
RTT+
R+
177
Installation manual Integral 5 D/E easy
Plug-in module T8S (IOM, I5 D/E)
Short description T8S
Short description of S8D
4 digital connection units each with 2 B channels, software configurable as T0 / S0
8 S0 subs
7 S0 subs and 1 T0 exchange line
6 S0 subs and 2 T0 exchange lines
5 S0 subs and 3 T0 exchange lines
4 S0 subs and 4 T0 exchange lines
On powering up the system, the T8S is always configured as 4 S0 subs and 4 T0 exchange lines
Function
S01
Exch
Width
Connection
options
Cables
Note
4.999.112.593
06/07
S02
Exch
S03
Exch
S04
Exch
S05
Sub
S06
Sub
S07
Sub
S08
Sub
4-slot width
max. 1 x on a BND, slot 4 and 8
BNE, BNS, slot 4 and 8
EXE slot 2 and 4
4 x Y patch cable
The attachment of the NTBA to terminals configured for S0 operation can lead to damage to the
NTBA.
Care must be taken that the Western plug of an S0 subscriber is not inserted into the T0 exchange
configured interface (Western socket).
T0 can be reprogrammed to S0 using codes #5 and #6 (see the manual under Data Entry).
Make absolutely sure prior to re-programming from T0 to S0 that there is no NTBA connected to the
relevant Western sockets.
An NTBA may only be connected to (plugged into) those Western sockets that are configured for the
T0 connection.
In order to be quite certain of this, attach the NTBA only after the system has been put into operation.
178
Installation manual Integral 5 D/E easy
Plug-in module T8S (IOM, I5 D/E)
S0 connection using MDF – 1
YL
1
1
1
YR
YL
5
4
1
3
2
8
7
6
5
1
1
1
1
4.999.112.593
12
13
14
YR
5
4
15
3
2
4
3
2
1
Y-cable-main distributor
frame
16
17
18
06/07
8
LSA
p
a
r
a
l
l
e
l
b2 (4)
b1 (2)
a1 (1)
a2 (3)
b4 (8)
b3 (6)
a3 (5)
a4 (7)
R+
T+
TRR+
T+
TR-
3
4
5
6
3
4
5
6
p
a
r
a
l
l
e
l
b2 (4)
b1 (2)
a1 (1)
a2 (3)
b4 (8)
b3 (6)
a3 (5)
a4 (7)
R+
T+
TRR+
T+
TR-
3
4
5
6
3
4
5
6
1
8
1
8
1
8
1
subscr2
BUS
subscr1
subscr2
BUS
subscr1
179
Installation manual Integral 5 D/E easy
Plug-in module T8S (IOM, I5 D/E)
S02
S01
S02
S01
BUS2
BUS1
1
3
4
1
YL
8
1
5
6
7
1
8
1
2
1
1
1
1
1
8
1
1
YR
Y-Patch cable
4.999.112.593
06/07
1
Terminal strip
180
Installation manual Integral 5 D/E easy
Plug-in module T8S (IOM, I5 D/E)
T0 connection using MDF
To NTBA
NTBA
To NTBA
NTBA
Y-cable-main distributor frame
YL
1
1
a
1
1
YR
8
YL
8
7
6
1
5
LSA
5
b2 (4)
R+
4
b1 (2)
T+
3
a1 (1)
T-
2
a2 (3)
R-
1
b
1
a
2
b
2
(4) (5) (3) (6)
a
1
8
1
b
1
a
2
b
2
(4) (5) (3) (6)
YR
4
3
2
1
4.999.112.593
3
1
5
b4 (8)
R+
4
b3 (6)
T+
3
a3 (5)
T-
2
a4 (7)
R-
06/07
181
Installation manual Integral 5 D/E easy
Plug-in module T8S (IOM, I5 D/E)
Sub2
8
1
6
Patch cable
1 8
7
1
1
5
4
YR
1
YL
06/07
1
3
Sub4
1
1
2
1
1
4.999.112.593
Sub3
8
YL
YR
1
Sub1
1
Patch cable
182
Installation manual Integral 5 D/E easy
Plug-in module T8S (IOM, I5 D/E)
I55 <---> I5 connection via QSIG to/via T8S
main distributor
to I55
8
1
LSA
1
8
6
1
1
8
7
6
RXL1
6
5
TXL1
5
4
TXL2
4
3
RXL2
3
2
2
1
2
3
4
TXL2
a2 (3)
RXL1
b2 (4)
RXL2
b3 (6)
a4 (7)
b4 (8)
8
1
TXL1
b1 (2)
a3 (5)
1
1
a1 (1)
1
8
5
6
7
8
Terminal strip
4.999.112.593
06/07
183
Installation manual Integral 5 D/E easy
4.999.112.593
06/07
Plug-in module T8S (IOM, I5 D/E)
184
Installation manual Integral 5 D/E easy
Plug-in module V.24
Plug-in module V.24
Module view and socket allocation
Modul view
Socket allocation
1xV.24
V.24
8
4.999.112.593
06/07
1
2
3
4
5
6
7
8
RXD
TXD
DTR
GND
DSR
RTS
CTS
DCD from 1:1 Kabel
RXD to DDe
TXD from DDE
DTR-DSR-loop
signal-GND
DTR-DSR-loop
RTS from DEE
CTS to DEE
185
Installation manual Integral 5 D/E easy
Plug-in module V.24
Short description of V.24
Short description of V.24
Width
Serial interface
2-slot width
Connection
options
max. 1 x on BNE, slot 2
Function
Cables
Note
4.999.112.593
06/07
1 x V.24 cable
Even if plugged into the wrong slot X will not damage other modules.
The plug-in module can be unplugged and plugged in whilst under
power, however no connection using the V.24 cable should be made
to the module from a PC which is switched on.
186
Installation manual Integral 5 D/E easy
Installation examples I5 D easy
Installation examples I5 D easy
The preceding chapters have given you information on:
Earthing
Power supply
Cable channels
Cables
Basic modules
Plug-in modules
You now know how plug-in modules can be connected to their peripherals, where applicable.
This chapter shows you how the Integral 5 D easy can be assembled using the available components; for this purpose the modules are represented
schematically.
An Integral 5 easy should always be configured using the "ISA" tool, which will then automatically also generate the installation.
The following examples give information regarding the essentials of installation and what points must be specially complied with.
4.999.112.593
06/07
187
Installation manual Integral 5 D/E easy
Installation examples I5 D easy
Explanation of the BND block diagram
I5 D easy BND
MS4
4x2B
SXS
4x2B
SXS
4x2B
IOM
2 1
DC in
SXS
4x2B
V.24
MS4
4x2B
SXS
4x2B
SXS
4x2B
SXS
4x2B
2
4
6
8
2 1
Slots on the BND:
here an MS4 is plugged into slot 2
An SXS is plugged into each of slots 4, 6 and 8
Socket for connecting a plug-in mains unit or power
supply taken from an EXE (SVout)
IOM outputs
1 = IOM-EXE1
2 = IOM-EXE2
V.24 socket for connecting a V.24 device
Explanation of the BND block diagram
4.999.112.593
06/07
188
Installation manual Integral 5 D/E easy
I5 D easy EXE
SXS
4x2B
DC in
SXS
4x2B
SXS
4x2B
LAN IOM
o i L R
Installation examples I5 D easy
SXS
4x2B
SXS
4x2B
SXS
4x2B
SXS
4x2B
1
2
3
4
SVin = power supply input
SVout = power supply output
SXS
4x2B
DC out
o i
L R
4.999.112.593
06/07
Slots on the EXE:
here an SXS is plugged into each of slots 1 thro 4
LAN sockets (here not used)
LAN O = LAN out
LAN I = LAN in
IOM inputs
L = IOM-EXEL
R = IOM-EXER
189
Installation manual Integral 5 D/E easy
Installation examples I5 D easy
Plug-in modules, B-channels, Arrangements in principle
Plug-in
module
Function
B channels
Total
B channels
SXS (IOM)
4 x S0 bus
per bus 2 x subs
max. 8 S0 subs
4 x (2 x B)
=8xB
S8P (IOM)
8 x UPN
per UPN 1 x UPN
subs
= max. 8 UPN subs
8 x (2 x B)
16 x B
4.999.112.593
06/07
Arrangements in principle
190
Installation manual Integral 5 D/E easy
MS4
(IOM)
4.999.112.593
2 x S0 bus
per bus 2 x subs
max. 4 S0 subs
2 x T0 exchange
per bus 2 x exchange
max. 4 x exchange
06/07
2 x (2 x B) S0
subs
2 x (2 x B) T0
exchange
Installation examples I5 D easy
4 x B S0 subs
4 x B T0
exchange
8x B
191
Installation manual Integral 5 D/E easy
Plug-in module
T8S (LAN)
M4A (IOM)
MA2 (IOM)
4.999.112.593
Function
8 x S0 bus or
7 x S0 bus 1x T0 bus or
6 x S0 bus 2x T0 bus or
5 x S0 bus 3x T0 bus or
4 x S0 bus 4x T0 bus
1 x analog subs
3 x analog exchange
1 x analog subs
1 x analog exchange
06/07
Installation examples I5 D easy
B channels
8 x (2 x B)
8 x (2 x B)
8 x (2 x B)
8 x (2 x B)
8 x (2 x B)
Total
B channels
Arrangements in principle
16 x B
1 x (B)
3 x (B)
4xB
1 x (B)
1 x (B)
2xB
192
Installation manual Integral 5 D/E easy
Plug-in
module
S4A (IOM)
Function
Installation examples I5 D easy
B channels
4 x a/b subs
4 x (B)
Total
B channels
Arrangements in principle
4xB
S2M
PRI (LAN)
4.999.112.593
30 x Primary Rate
06/07
30 x B
30 x B
S2M- 1
S2M-2
S2M-3
S2M-29
S2M-30
1
2
3
29
30
193
Installation manual Integral 5 D/E easy
Plug-in
module
S4D (IOM)
S8D (LAN)
4.999.112.593
Function
B channels
4 x UPD
8 x UPD
06/07
2 x (4 x B)
4 x (7 x B)
Installation examples I5 D easy
Total B channels
8xB
28 x B
Arrangements in principle
2xUPN
2xUPN
RBS1
RBS2
2xUPN
2xUPN
2xUPN
2xUPN
RBS1
RBS2
RBS3
RBS4
194
Installation manual Integral 5 D/E easy
Installation examples I5 D easy
Example 1 – 1 x BND
I5 D easy BND
MS4
4x2B
SXS
4x2B
DC in
SXS
4x2B
IOM
2 1
SXS
4x2B
V.24
Displ. module
B channels
Telephones
Exchan
ges
1 x MS4
8
24
4 x S0
24 x S0
4 x T0
3 x SXS
Total
32
28 x S0
4 x T0
Explanation of example 1
On to a BND it is possible to attach IOM plug-in modules and also LAN plug-in modules. Slots 2, 4, 6 and 8 are designed so that they can accept IOM plug-in
modules (without switching matrix) or intelligent LAN plug-in modules (with switching matrix).
In the upper diagram an S0-T0 combination has been selected; other permutations can be found in the "Summary of items for fitting to BND/EXE".
The equipment must be earthed.
Externally the sole requirement is to plug the plug-in mains unit into the socket provided for it.
4.999.112.593
06/07
195
Installation manual Integral 5 D/E easy
Installation examples I5 D easy
Example 2 – BND plus EXE - maximum S0 expansion
I5 D easy EXE
S8P
8x2B
LAN o
S8P
8x2B
i
I5 D easy BND
MS4
4x2B
S8P
8x2B
L R IOM
2 1
IOM
V.24
Displ. module
B channels
Telephones
Exchan
ges
1 x MS4
8
56
4 x S0
56 x S0
4 x T0
7 x SXS
Total
64
60
4 x T0
Explanation of example 2
On a BND it is possible to drive IOM plug-in modules and also LAN plug-in modules. Slots 2, 4, 6 and 8 are designed so that they can drive IOM plug-in
modules (without switching matrix) or intelligent LAN plug-in modules (with switching matrix).
On the EXE, IOM or LAN plug-in modules can be driven only if the EXE is also attached to the IOM and / or LAN connections of the BNx which is driving
them. In the diagram the IOM channels of the BND are provided on the EXE, so that 2 x (8 x 2B) are available for IOM use.
Since the BND has no LAN connection available, no LAN plug-in modules can be driven by the EXE, therefore here only IOM plug-in modules.
In the upper diagram the maximum S0 expansion has been selected; other permutations can be found in the "Summary of items for fitting to BND/EXE".
All modules must be earthed.
Since the BND has no power supply output, the plug-in mains unit is now plugged into the EXE. From there the BND is fed using a power cable from the EXE.
Except where the connections of the EXE are purely analog, 2 IOM connections should always be made from the BND to the EXE.
4.999.112.593
06/07
196
Installation manual Integral 5 D/E easy
Installation examples I5 D easy
Example 3 – BND plus EXE - maximum UPN expansion
I5 D easy EXE
S8P
8x2B
S8P
8x2B
I5 D easy BND
MS4
4x2B
o i L R
S8P
8x2B
2 1
Displ. module
B channels
Telephones
Exchan
ges
1 x MS4
8
24
4 x S0
24 x UPN
4 x T0
3 x S8P
Total
32
4 x S0 / 24 x UPN
4 x T0
Explanation of example 3
The IOM and LAN designs from example 2 apply here also.
In the upper diagram the maximum UPN expansion has been selected; other permutations can be found in the "Summary of items for fitting to BND/EXE".
All modules must be earthed.
Since the BND has no power supply output, the plug-in mains unit is now plugged into the EXE. From there the BND is fed using a power cable from the EXE.
Except where the connections of the EXE are purely analog, 2 IOM connections should always be made from the BND to the EXE.
4.999.112.593
06/07
197
Installation manual Integral 5 D/E easy
Installation examples I5 D easy
Example 4 – BND plus EXE - maximum analog expansion
I5 D easy EXE
S4A
4xB
S4A
4xB
S4A
4xB
S4A
4xB
I5 D easy EXE
S4A
4xB
o i LR
4.999.112.593
06/07
S4A
4xB
S4A
4xB
I5 D easy BND
S4A
4xB
MA2
2xB
S4A
4xB
S4A
4xB
S4A
4xB
2 1
o i LR
Displ. module
B channels
Telephones
Exchange
s
1 x MA2
2
44
1 x analog
44 x analog
1 x analog
11 x S4A
Total
46
45 x analog
1 x analog
198
Installation manual Integral 5 D/E easy
Installation examples I5 D easy
Explanation of example 4
Since the BND has no external LAN connection, no LAN plug-in modules can be driven by the EXE.
There is however one difference from example 3 in relation to the IOM connection:
An EXE into which 4 analog plug-in modules (S4A) are plugged requires 16 B channels for the four S4A plug-in modules. Since one IOM connection has
8 x 2 B channels, a single IOM connection is sufficient here. The second IOM connection from the BND can be used for a further EXE.
It applies here that:
Only are where the connections of the EXE purely analog is a singleton IOM connection BND-EXE permissible.
Except where the connections of the EXE are purely analog, 2 IOM connections should always be made from the BND
to the EXE.
If in example 4 a purely analog connection were selected for a single EXE, and it was wished to extend this with a second EXE,
this second EXE could still only carry analog plug-in modules.
In the upper diagram the maximum analog expansion is selected, and it is not permissible to mount other items.
All modules must be earthed.
Since each plug-in mains unit can feed only a maximum of 2 modules, the BND is now supplied using its own plug-in mains unit. Both the EXE units have a
single plug-in mains unit of their own, which is plugged into the first EXE unit. The Vout on the first EXE provides the power to the second EXE (Vin).
4.999.112.593
06/07
199
Installation manual Integral 5 D/E easy
Installation examples I5 D easy
Example 5 – BND plus EXE - maximum DECT expansion
I5 D easy EXE
S4D
2x4B
S4D
2x4B
S4D
2x4B
S4D
2x4B
B
channels
Telephones
4 x S4D
8
24
32
4 x S0
24 x S0
8 x RBS
Total
64
28 x S0 /
8 x RBS
1 x MS4
3 x SXS
4.999.112.593
06/07
SXS
4x2B
SXS
4x2B
SXS
4x2B
2 1
o i LR
Displ. module
I5 D easy BND
MS4
4x2B
Exchange
s
4 x T0
4 x T0
200
Installation manual Integral 5 D/E easy
Installation examples I5 D easy
Explanation of example 5
Since the BND has no external LAN connection, no LAN plug-in modules can be driven by the EXE.
The items attached to the EXE are here purely analog.
Therefore here also it applies that:
Only are where the connections of the EXE purely analog is a singleton IOM connection BND-EXE permissible.
Except where the connections of the EXE are purely analog, 2 IOM connections should always be made from the BND
to the EXE.
Furthermore, because of the DECT connections:
Max. 8 x RBS are permissible within the system (in the example there are also 8 x RBS).
One module with DECT module(s) requires its own power supply.
In the upper diagram the maximum DECT expansion has been selected; other permutations can be found in the "Summary of items for fitting to BND/EXE".
All modules must be earthed.
4.999.112.593
06/07
201
Installation manual Integral 5 D/E easy
4.999.112.593
06/07
Installation examples I5 D easy
202
Installation manual Integral 5 D/E easy
Installation examples I5 E easy
Installation examples I5 E easy
The preceding chapters have given you information on:
Earthing
Power supply
Cable channels
Cables
Basic modules
Plug-in modules
You now know how plug-in modules can be connected to their peripherals, where applicable.
This chapter shows you how the Integral 5 E easy can be assembled using the available components; for this purpose the modules are represented
schematically.
An Integral 5 easy should always be configured using the "ISA" tool, which will then automatically also generate the installation.
The following examples give information regarding the essentials of installation and what points must be specially complied with.
4.999.112.593
06/07
203
Installation manual Integral 5 D/E easy
Installation examples I5 E easy
Explanation of the BNE block diagram
I5 E easy BNE
MS4
4x2B
DC
DCin
in
MS4
4x2B
SXS
4x2B
IOM
4 3 2 1
SXS
4x2B
LAN out
MS4
4x2B
MS4
4x2B
SXS
4x2B
SXS
4x2B
2
4
6
8
Slots on the BNE:
here an MS4 is plugged into each of slots 2 and 4
An SXS is plugged into each of slots 6 and 8
Socket for connecting a plug-in mains unit or power
supply taken from an EXE (SVout)
IOM outputs
1 = IOM-EXE1 2 = IOM-EXE2
3 = IOM-EXE3 4 = IOM-EXE4
4 3 2 1
LANout socket for propagating the LAN connection
Explanation of the EXE block diagram
I5 E easy EXE
SXS
4x2B
DC in
SXS
4x2B
SXS
4x2B
LAN IOM
o i L R
SXS
4x2B
SXS
4x2B
SXS
4x2B
SXS
4x2B
1
2
3
4
SXS
4x2B
DC out
SVin = power supply input
SVout = power supply output
o i
L R
4.999.112.593
06/07
Slots on the EXE:
here an SXS is plugged into each of slots 1 thro 4
LAN sockets
LAN O = LAN out
LAN I = LAN in
IOM inputs
L = IOM-EXEL
R = IOM-EXER
204
Installation manual Integral 5 D/E easy
Installation examples I5 E easy
Explanation of the BNS block diagram
I5 E easy BNS
MS4
4x2B
DC
DCin
in
MS4
4x2B
SXS
4x2B
IOM
4 3 2 1
MS4
4x2B
MS4
4x2B
SXS
4x2B
SXS
4x2B
2
4
6
8
Slots on the BNS:
here an MS4 is plugged into each of slots 2 and 4,
an SXS is plugged into each of slots 6 and 8
Socket for connecting a plug-in mains unit or power
supply taken from an EXE (SVout)
SXS
4x2B
LAN sockets
LANin, no capability for onward linking to other
modules, BNS is the end point of the LAN chain
LAN in
4 3 2 1
IOM outputs
1 = IOM-EXE1 2 = IOM-EXE2
3 = IOM-EXE3 4 = IOM-EXE4
Explanation of the IPU block diagram
Slots on the IPU:
No slots for IOM/LAN plug-in modules
I5 E easy IPU
DC in
LAN ETH
o i 10/100
Socket for connecting a plug-in mains unit or power
supply taken from an EXE (SVout)
o i
DC out
10/100
4.999.112.593
06/07
LAN sockets
LAN O = LAN out
LAN I = LAN in
ETH 10/100
For connecting Ethernet interfaces
205
Installation manual Integral 5 D/E easy
Installation examples I5 E easy
Plug-in modules, B channels, arrangements in principle
Plug-in
module
Function
B channels
Total
B channels
SXS (IOM)
4 x S0 bus
per bus 2 x subs
max. 8 S0 subs
4 x (2 x B)
=8xB
S8P (IOM)
8 x UPN
per UPN 1 x UPN
subs
= max. 8 UPN subs
8 x (2 x B)
16 x B
MS4
(IOM)
2 x S0 bus
per bus 2 x subs
max. 4 S0 subs
2 x T0 exchange
per bus 2 x
exchange
max. 4 x exchange
2 x (2 x B) S0
subs
2 x (2 x B) T0
exchange
4 x B S0
subs
4 x B T0
exchange
8x B
4.999.112.593
06/07
Arrangements in principle
206
Installation manual Integral 5 D/E easy
Plug-in module
T8S (LAN)
M4A (IOM)
MA2 (IOM)
4.999.112.593
Function
8 x S0 bus or
7 x S0 bus 1x T0 bus or
6 x S0 bus 2x T0 bus or
5 x S0 bus 3x T0 bus or
4 x S0 bus 4x T0 bus
1 x analog subs
3 x analog exchange
1 x analog subs
1 x analog exchange
06/07
Installation examples I5 E easy
B channels
8 x (2 x B)
8 x (2 x B)
8 x (2 x B)
8 x (2 x B)
8 x (2 x B)
Total
B channels
Arrangements in principle
16 x B
1 x (B)
3 x (B)
4xB
1 x (B)
1 x (B)
2xB
207
Installation manual Integral 5 D/E easy
Plug-in
module
S4A (IOM)
Function
4 x a/b subs
Installation examples I5 E easy
B channels
4 x (B)
Total
B channels
Arrangements in principle
4xB
S2M
PRI (LAN)
4.999.112.593
30 x Primary Rate
06/07
30 x B
30 x B
S2M- 1
S2M-2
S2M-3
S2M-29
S2M-30
1
2
3
29
30
208
Installation manual Integral 5 D/E easy
Plug-in
module
S4D (IOM)
4.999.112.593
Function
Installation examples I5 E easy
B channels
4 x UPD
06/07
2 x (4 x B)
Total
B channels
8xB
Arrangements in principle
2xUPN
2xUPN
RBS1
RBS2
209
Installation manual Integral 5 D/E easy
S8D (LAN)
4.999.112.593
8 x UPD
06/07
Installation examples I5 E easy
4 x (7 x B)
28 x B
2xUPN
2xUPN
2xUPN
2xUPN
RBS1
RBS2
RBS3
RBS4
210
Installation manual Integral 5 D/E easy
Installation examples I5 E easy
Example 1 – max. S0 expansion
I5 E easy EXE
SXS
4x2B
SXS
4x2B
o i
SXS
4x2B
SXS
4x2B
SXS
4x2B
o i L R
4.999.112.593
06/07
MS4
4x2B
L R
I5 E easy EXE
SXS
4x2B
I5 E easy BNE
SXS
4x2B
SXS
4x2B
MS4
4x2B
SXS
4x2B
4 3 2 1
SXS
4x2B
Displ. module
B
channels
Telephones
Exchanges
4 x MS4
32
96
16 x S0
96 x S0
16 x T0
12 x SXS
Total
128
112 x S0
16 x T0
I5 E easy BNS
MS4
4x2B
MS4
4x2B
SXS
4x2B
SXS
4x2B
4 3 2 1
211
Installation manual Integral 5 D/E easy
Installation examples I5 E easy
Explanation of example 1
On a BNE it is possible to drive IOM plug-in modules and also LAN plug-in modules. Slots 2, 4, 6 and 8 are designed so that they can drive IOM plug-in
modules (without switching matrix) or intelligent LAN plug-in modules (with switching matrix).
On the EXE, IOM or LAN plug-in modules can be driven only if the EXE is also attached to the IOM and / or LAN connections of the BNx which is driving them.
In the diagram the IOM channels of the BNE are provided on the EXE, so that 2 x (8 x 2B) are available for IOM use.
Since the BNE has no LAN connection available on its EXE, no LAN plug-in modules can be driven by the EXE, therefore here only IOM plug-in modules.
The BNE offers the availability of the LAN connection of the BNS. This allows LAN plug-in modules to be driven also by the BNS.
The EXE, which is connected to the BNS through the IOM, can drive only IOM plug-in modules.
In the upper diagram the maximum S0 expansion has been selected; other permutations can be found in the "Summary of items for fitting to BNE/BNS/EXE".
All modules must be earthed.
Since the BNE has no power supply output, the plug-in mains unit is now plugged into the EXE. From there the BNE is fed using a power cable from the
EXE.
Since the BNS has no power supply output, the plug-in mains unit is now plugged into the EXE. From there the BNS is fed using a power cable from the
EXE.
.
Except where the connections of the EXE are purely analog, 2 IOM connections should always be made from the BND
to the EXE.
4.999.112.593
06/07
212
Installation manual Integral 5 D/E easy
Installation examples I5 E easy
Example 2 – max. UPN expansion
I5 E easy EXE
I5 E easy EXE
S8P
8x2B
S8P
8x2B
S8P
8x2B
o i
o
I5 E easy EXE
S8P
8x2B
S8P
8x2B
S8P
8x2B
06/07
L R
S8P
8x2B
o
i L R
MS4
4x2B
i L R
I5 E easy EXE
o i
4.999.112.593
L R
I5 E easy BNE
S8P
8x2B
MS4
4x2B
S8P
8x2B
4 3 2 1
I5 E easy BNS
MS4
4x2B
MS4
4x2B
S8P
8x2B
4 3 2 1
213
Installation manual Integral 5 D/E easy
Installation examples I5 E easy
Displ. module
B channels
Telephones
Exchanges
4 x MS4
16 x S0
80 x UPN
16 x T0
10 x S8P
32
80
Total
112
16 x S0 / 80 x UPN
16 x T0
Explanation of example 2
In principle, the layout of example 2 is similar to that of example 1, the difference lies in the connection of a further EXE to the BNE and the BNS.
Each EXE takes up the max. possible number of IOM channels from the BNE/BNS.
No LAN operation is possible on the EXE.
In the upper diagram the maximum UPN expansion has been selected; other permutations can be found in the "Summary of items for fitting to BNE/BNS/EXE".
All modules must be earthed.
Since each plug-in mains unit can feed only a maximum of 2 modules, the BNE/BNS is now supplied using its own plug-in mains unit. Both EXE units share
their own plug-in mains unit, which is plugged into the first EXE unit. The Vout on the first EXE provides the power to the second EXE (Vin).
.
Except where the connections of the EXE are purely analog, 2 IOM connections should always be made from the BND to the EXE.
4.999.112.593
06/07
214
Installation manual Integral 5 D/E easy
4.999.112.593
06/07
Installation examples I5 E easy
215
Installation manual Integral 5 D/E easy
Installation examples I5 E easy
Example 3 – max. analog expansion
I5 E easy EXE
S4A
4xB
S4A
4xB
o i
S4A
4xB
S4A
4xB
S4A
4xB
o i
4.999.112.593
S4A
4xB
L R
S4A
4xB
S4A
4xB
I5 E easy EXE
S4A
4xB
S4A
4xB
S4A
4xB
o i
S4A
4xB
L R
o i
I5 E easy EXE
S4A
4xB
L R
06/07
S4A
4xB
o i
I5 E easy EXE
S4A
4xB
I5 E easy EXE
S4A
4xB
S4A
4xB
S4A
4xB
S4A
4xB
S4A
4xB
S4A
4xB
L R
o
S4A
4xB
i L R
Displ. module
Ports
Telephones
Exchanges
2 x M4A
8
112
2 x analog
112 x analog
6 x analog
28 x S4A
Total
120
114 x analog
6
M4A
4xB
L R
S4A
4xB
S4A
4xB
4 3 2 1
I5 E easy EXE
S4A
4xB
I5 E easy BNE
S4A
4xB
I5 E easy BNS
M4A
4xB
S4A
4xB
S4A
4xB
4 3 2 1
216
Installation manual Integral 5 D/E easy
Installation examples I5 E easy
In principle the layout of this example is similar to that of the previous example.
The difference lies in that 3 EXE are connected to each BNE and BNS using IOM, with each EXE connected to only one IOM.
An EXE into which 4 analog plug-in modules (S4A) are plugged requires 16 B channels for the S4A plug-in modules. Since one IOM connection has 8 x 2 B
channels, a single IOM connection is sufficient here. Further IOM connections from the BNE/BNS can be taken from further EXE units.
No LAN operation is possible on the EXE.
In the upper diagram the maximum analog expansion is selected, and it is not permissible to mount other items.
It applies here that:
Only are where the connections of the EXE purely analog is a singleton IOM connection BND-EXE permissible.
Except where the connections of the EXE are purely analog, 2 IOM connections should always be made from the BND to the EXE.
Since each plug-in mains unit can feed only a maximum of 2 modules, the combination BNE-EXE / BNS-EXE is now supplied using its own plug-in mains unit.
Both the additional EXE units on the BNE and BNS have a single plug-in mains unit of their own. The Vout on the first EXE provides the power to the second
EXE (Vin).
4.999.112.593
06/07
217
Installation manual Integral 5 D/E easy
Installation examples I5 E easy
Example 4 – max. DECT expansion
I5 E easy EXE
S4D
S4D
S4D
S4D
2xRBS 2xRBS 2xRBS 2xRBS
o
I5 E easy EXE
S8D
4xRBS
i L R
I5 E easy EXE
S8D
4xRBS
o
i
S8D
4xRBS
L R
S8D
4xRBS
o i
I5 E easy EXE
Displ. module
4 x S8D
8 x S4D
2 x M4A
Total
4.999.112.593
06/07
M4A
4xB
L R
S4D
S4D
S4D
S4D
2xRBS 2xRBS 2xRBS 2xRBS
o i
I5 E easy BNE
L R
B
channels
Telephones
Exchanges
128
64
8
16 x RBS
16 x RBS
2 x analog
6 x analog
200
32 x RBS /
2 x analog
6 x analog
4 3 2 1
I5 E easy BNS
M4A
4xB
4 3 2 1
218
Installation manual Integral 5 D/E easy
Installation examples I5 E easy
Explanation of example 4
The BNE is connected to the first two EXE by LAN, so the 4 LAN S8D plug-in modules can also be driven from the EXE. The enables 16 RBS connections.
All further RBS connections must be achieved using IOM plug-in modules, 3 x EXE on BNE and 1 x EXE on BNS.
The rule here for DECT is:
Max. 32 x RBS are permissible within the system (in the example there are 32 x RBS).
No S8D modules are permitted on the BNE and BNS control modules.
One module with DECT module(s) requires its own power supply.
An additional rule applies:
Only are where the connections of the EXE purely analog is a singleton IOM connection BND-EXE permissible.
Except where the connections of the EXE are purely analog, 2 IOM connections should always be made from the BND
to the EXE.
In the upper diagram the maximum DECT expansion has been selected; other permutations can be found in the "Summary of items for fitting to BND/EXE".
All modules must be earthed.
4.999.112.593
06/07
219
Installation manual Integral 5 D/E easy
4.999.112.593
06/07
Installation examples I5 E easy
220
Installation manual Integral 5 D/E easy
Installation examples I5 E easy
Example 5 – mixed expansion (T0, S0, DECT, UPN))
I5 E easy EXE
S8D
4x8B
S4D
2x4B
LAN IOM
o i L R
DC in
I5 E easy EXE
S4D
2x4B
S8P
8x2B
DC out
DC in
I5 E easy EXE
S8P
8x2B
DC in
4.999.112.593
S4A
4xB
LAN IOM
o i L R
06/07
S4A
4xB
LAN IOM
o i L R
I5 E easy BNE
S4A
4xB
DC out
MS4
4x2B
DC in
MS4
4x2B
SXS
4x2B
IOM
4 3 2 1
SXS
4x2B
LAN out
I5 E easy BNS
S4A
4xB
DC out
MS4
4x2B
DC in
MS4
4x2B
SXS
4x2B
IOM
4 3 2 1
SXS
4x2B
LAN in
221
Installation manual Integral 5 D/E easy
Installation examples I5 E easy
Explanation of example 5
The example shows a mixture of attached items.
Certain restrictions apply here:
Max. 32 x RBS are permissible within the system (in the example there are 32 x RBS).
No S8D modules are permitted on the BNE and BNS control modules.
One plug-in mains unit supplies 1 x BNx plus 1 x EXE, or 2 x EXE.
One module with DECT module(s) requires its own power supply.
An EXE with one LAN module attached, requires only one IOM connection
(See previous diagram, upper).
All modules must be earthed.
4.999.112.593
06/07
222
Installation manual Integral 5 D/E easy
Installation examples I5 E easy
Example 6 – Expansion with IPU
I5 E easy IPU
I5 E easy EXE
SXS
4x2B
DC in
4.999.112.593
LAN ETH
o i 10/100
06/07
DC out
DC in
SXS
4x2B
SXS
4x2B
LAN IOM
o i L R
I5 E easy BNE
SXS
4x2B
DC out
MS4
4x2B
DC in
MS4
4x2B
SXS
4x2B
IOM
4 3 2 1
SXS
4x2B
LAN out
223
Installation manual Integral 5 D/E easy
Installation examples I5 E easy
Conditions for IPU connection
IPU units require a driver module in series (BNE, EXE)
Allows possibility of larger LAN expansion
BNE
4.999.112.593
LAN
06/07
IPU1
LAN
EXE
LAN
IPU2
Further possibilities
LAN
EXE
BNS
BNE
LAN
IPU1
LAN
IPU2
LAN
BNS
224
Installation manual Integral 5 D/E easy
Commissioning
Commissioning
Before you switch on the system and begin to operate it, it is essential to carry out the earthing procedures
(the green-yellow earth wires must be stripped and connected).
Check List
Check List
Before commissioning the system, run through the check list to ensure that all
preparations have been completed correctly:
System modules connected correctly?
Connection cables to the UAE sockets and exchange lines (a/b) connected correctly
on the LSA+ strips of the distributor according to diagram?
Patch cables connected correctly?
System earthed properly?
UAE sockets connected correctly and telephones connected?
For S0 bus operation:
Termination resistances fitted and connected at each final bus-UAE connection socket?
Bus cable lengths correct?
4.999.112.593
06/07
225
Installation manual Integral 5 D/E easy
Commissioning
Start up the system
Start up the system
Before starting up the system, ensure that the mains socket to which the system is connected
is at 230 V AC.
Observe the instructions in the section on earthing
Insert the common multi-socket extension (with the plugs of the units inserted)
into the appropriate mains socket or switch multi-socket extension on
The operating software is loaded.
Reset
Reset - warm start
Warm start the PABX Integral 5 as follows:
Use either ISA or
Terminal code
or
Integral 5 without battery (PB1):
Unplug the common multi-socket extension
Wait approx. 15 seconds and plug the common multi-socket extension in again
Integral 5 with battery (PB1):
Remove the cover of PB1 (open PB1)
Disconnect the (battery) low-profile plug
Unplug the common multi-socket extension
Wait approx. 15 seconds and plug the common multi-socket extension in again
Reconnect the (battery) low-profile plug
The system will start up with the customer data
4.999.112.593
06/07
226
Installation manual Integral 5 D/E easy
Commissioning
Cold start
Cold start
A backup should always be done before a cold start!
Press the cold start switch on the BNx.
The system will boot up, loading the default data.
During this time (approx. four minutes), the system is not ready to operate.
The customer data is lost.
When the system is once again operational, input the saved customer backup data into
the system.
Switch-on test
Switch-on test
Standard devices:
System telephone:
4.999.112.593
06/07
The standard devices are functioning correctly if feed current flows and
the dial tone is heard when the receiver is lifted
The system telephones are functioning correctly (i.e. feed current flows,
S0 interface is operational and the date and time appear in the display),
if the following appear in the display in rapid succession before the date
and time appear:
3. Software status and
4. TEI setting
227
Installation manual Integral 5 D/E easy
Commissioning
Upgrading / reconfiguring modules
Every time a change is made (unplugging a module / plugging a module in), the system configuration should be read in again using code 0
Upgrading / reconfiguring modules
Connecting and Disconnecting Under
Voltage:
Code *0 is a code number issued to the customer, it allows the software
version identities to be displayed.
The system data is displayed in the form Lx Ty by pressing the speed
dialling key. (x = number of lines; y = number of subscribers.)
The CD function is extended at this stage.
Using code *0
If the CD function is called up by service data input (service registration with
CD**), the PSW is activated after the Lx Ty output. The message described
above is sent to the PSW of the BUxs.
The PSW sends acknowledgement when the configuration data has been
read.
When the acknowledgement is received, (the cursor is positioned at the
10th position in the display and) the Lx Ty output is repeated.
If no acknowledgement is received, it is still possible to operate the CD
function or to leave it.
So that this function can be used from an end terminal without a speed
dialling key, the function can also be activated using the redial key.
4.999.112.593
06/07
228
Installation manual Integral 5 D/E easy
Commissioning
Example
Example
The service technician connects an additional M2A plug-in module with one
line and one subscriber.
The programming mode is activated at a system terminal (menu option or
function *48). The service data input commences (CD **). After the service
password has been entered, the code digit function *0 must be executed.
The identification of all software appears in the display (e.g. ZE5009DE)
The system is configured for 4 lines
and 15 subscribers.
After pressing key
L4 S15 L5 S16
or key
, the display shows:
The text L4 S15 is displayed before activation, L5 S16 appears in the
display after the PSW acknowledgement has been received.
If the service technician once again presses key
display shows: L5 S16 L5 S16
4.999.112.593
06/07
or key
the
229
Installation manual Integral 5 D/E easy
Commissioning
Extending with EXE, BNS, IPU / substituting a BNx, EXE, IPU
Extending with EXE, BNS, IPU / substituting a BNx, EXE, IPU
If the customer wishes to expand the system by an EXE or BNx or IP module or replace a BNx/EXE or an
IP module, it is essential to comply with the following instructions / steps:
The entire system must be disconnected from the power supply before it is expanded by an
EXE, a BNx or an IP module, or before an EXE / BNx or an IP module is exchanged.
Never unplug or plug in a live IOM or LAN extension cable.
General information:
The Integral 5 easy must always be connected via a common power outlet (individual EXE and
BNx components and IP modules may be damaged if they are connected to different power
circuits)
All plug-in modules can be unplugged and plugged whilst they are electrically live, and they will
not be damaged thereby – but the functionality of the system can be deranged by plugging and
unplugging modules!
4.999.112.593
06/07
230
Installation manual Integral 5 D/E easy
Technical Data
Technical Data
Power supply (plug-in mains unit)
Power supply (plug-in mains unit)
Protection class 2
Input voltage 230 V AC ±10%, 50 Hz
Input voltage 110 V AC ±10%, 50/60 Hz
Input current 450 mA DC
Output voltage 40 V DC
Output current 1 A
PB1 (converter module)
PB1 (converter module)
Input voltage: 40 V DC
Output voltages / currents: 40 V DC / 850 mA
Battery: 9.6 V / 2 Ah
4.999.112.593
06/07
231
Installation manual Integral 5 D/E easy
Technical Data
Connection specification for a/b subscriber
Connection specification for a/b subscriber
a/b Interface
Feed voltage: –40 V
Feed current: approx. 20 mA
Permissible line resistance: 550 Ohm (incl. device)
Ranges for 2 x 130 Ohm line
resistance:
Installation cable 0.4 mm2 (J-Y(St)Y2x2x0.4): approx. 1350 m
Installation cable 0.6 mm2 (J-Y(St)Y2x2x0.6): approx. 2900 m
Connection specifications for DECT subscriber
Connection specifications for DECT subscriber
UPD Interface (4-wire):
Feed voltage: –40 V
Transmission rate: 4xB per 64 kBit/s and 2xD per 16 kBit/s
Bit rate on lines: 384 kBit/s in send and receive directions
Ranges with 4 x 100 Ohm, installation cable 0.6 mm2 J-Y(St)Y2 x 2 x 0.6)
Point to point connection: approx. 1,000 m
4.999.112.593
06/07
232
Installation manual Integral 5 D/E easy
Technical Data
Connection specification for S0 Telephone
Connection specification for S0 Telephone
S0 Interface (4-wire):
Feed voltage: –40 V
Transmission rate: 2xB per 64 kBit/s and 1xD 16 kBit/s
Bit rate on the line: 192 kBit/s in send and receive directions
Ranges for 4 x 100 Ohm,
Installation cable 0.6 mm2
(J-Y(St)Y2 x 2 x 0.6)
Point to point connection: approx. 750 m
Point-to-multipoint connection (bus): approx. 150 m
Connection specification for UPN subscribers
Connection specification for UPN subscribers
4.999.112.593
UPN Interface (2-wire):
Feed voltage: –40 V
Transmission rate: 2xB per 64 kBit/s and 1xD 16 kBit/s
Bit rate on the line: 384 kBit/s in send and receive directions
Ranges for 2 x 100 Ohm,
Installation cable 0.6 mm2
(J-Y(St)Y2 x 2 x 0.6)
Point to point connection: approx. 1000 m
06/07
233
Installation manual Integral 5 D/E easy
Technical Data
Dimensions
Module / Module
Slot
width
BND
BNE
BNS
IPU
EXE
PB1
T8S
PRI
M2A
SXS
S8P
S4A
M4A
S4D
S8D
DIA
CV1
4
4
2
2
4
2
4
2
4
1
4
MDF
V.24
DSI
MS4
4.999.112.593
06/07
1
2
2
Width (mm)
Height (mm)
Depth (mm)
245
245
245
245
245
123
120
120
60
60
120
60
120
60
120
30
120
123
30
60
60
145
145
145
145
145
145
125
125
125
125
125
125
125
125
125
125
125
180
125
125
125
30
30
30
30
30
30
25
25
25
25
25
25
25
25
25
25
25
35
25
25
25
234
Installation manual Integral 5 D/E easy
Technical Data
Heat dissipation
Heat dissipation per plug-in mains unit
max. 20 W (at maximum expansion and least favourable circuitry)
Ambient conditions
Connection specification for S0 Telephone
Area of application in standard living and work space
Permissible room temperature: 0 to max. +40°C
Permissible limit values for relative humidity of air: 5 to max. 93% at 30 °C
Condensation during operation: Not permissible
Transmission Technical Values of the Data Connection
Transmission Technical Values of the Data Connection
These are established according to:
ITU-T (CCITT)..., ETS...and corresponding to the individual national circumstances
4.999.112.593
06/07
235
Installation manual Integral 5 D/E easy
4.999.112.593
06/07
Technical Data
236
Installation manual Integral 5 D/E easy
Connection for door station
Connection for door station
Connection for Siedle TLM/TK 511-0 (4-wire)TLM 611-0 (4-wire)
YL
1
YR
1
Y-cable Main distributor
1
YL
LSA
8
5
b2 (4)
KL/TOE
7
4
b1 (2)
KL
Bell (connection 1)
6
3
a1 (1)
LS/KL
Speech path connection 3 (speaker)
5
2
a2 (3)
ELA2
Bell (connection 2) Door opener (connection 2)
ELA- switched output 2
YR
4
5
b4 (8)
ELA1
ELA-switched output .1
3
4
b3 (6)
TOE
Door opener connection 1
2
3
a3 (5)
LS/MIC
Speech path connection2 (speaker, micro)
1
2
a4 (7)
MIC
Speech path connection 1 (micro)
1
YL
8 1
8
YR
Terminal strip
4.999.112.593
06/07
237
Installation manual Integral 5 D/E easy
Connection for door station
Power supply NG402
9
12
~12V +8,3V =0V
+
11
6
7.1
~0V
Door opener
Push button module ZM611 Door module TLM/TK 611-0
or ZM511
or TLM/TK 511-0
4.999.112.593
06/07
238
Installation manual Integral 5 D/E easy
Connection for door station
Grothe door station (4-wire)
1
1
Y-cable Main distributor
Power supply 9+ DC
1
LSA
YL
8
5
b2 (4)
KL/TOE Bell (connection 2), door opener (connection.2)
7
4
b1 (2)
KL
Bell (conection.1)
6
3
a1 (1)
LS/KL
Speech path connection 3 (speaker)
5
2
a2 (3)
ELA2
LAE-switched output.2
0V
+9V
0
8V/
12V
YR
4
5
b4 (8)
ELA1
ELA-switched output 1
3
4
b3 (6)
TOE
Door opener, connection1
Speech path connection 2 (speaker, micro)
Speech path connection 1 (micro)
2
3
a3 (5)
LS/MIC
1
2
a4 (7)
MIC
1
YL
8 1
8
YR
Yellow wire
Terminal strip
View of the rearside
4.999.112.593
06/07
U
B
O
L
M
LD
Ext. resistor 1kOhm
239
Installation manual Integral 5 D/E easy
Connection for door station
An external resistor of 1 kOhm must be connected between terminals 0 and M.
A bridge must be inserted from 8 V/12 V to terminal B.
The yellow wire that comes from the rear of the module must be connected to terminal B.
Pins 3, 4 and 5 are used for connecting to the door opener and are not shown here.
4.999.112.593
06/07
240
Installation manual Integral 5 D/E easy
Connection for door station
Connection for Siedle PVG 601 (FTZ 123 D) (2-wire)
YL
1
YR
Y-cable Main distributor
1
1
YL
LSA
8
5
b2 (4)
KL/TOE
Bell (connection 2), door opener (connection 2)
7
4
b1 (2)
KL
Bell (connection1)
6
3
a1 (1)
LS/KL
Speech path connection 3 (speaker)
a2 (3)
ELA2
ELA-switched output 2
b4 (8)
ELA1
ELA-switched output 1
Door opener, connection 1
5
2
YR
4
5
3
4
b3 (6)
TOE
2
3
a3 (5)
LS/MIC
Speech path connection 2 (speaker,micro)
1
2
a4 (7)
MIC
Speech path connection1 (micro)
1
YL
8 1
8
YR
Terminal strip
4.999.112.593
06/07
241
Installation manual Integral 5 D/E easy
Connection for door station
Power supply NG602-0
TK-connection box PVG602-0
4.999.112.593
06/07
Tö
b
6
11
7.1
c
b
+
1
+
c
Tö
11
6
7
La
Lb
b
c
S2
S1
To
To’
Ts
Ts’
1
+ - c b
Door module TLM612-0 Push button module TM611
Door opener
242
Installation manual Integral 5 D/E easy
Connection for door station
Connection for telephone-door intercom system / telephone-interphone porter (Koch)
YL
1
YR
Y-cable Main distributor
1
1
YL
LSA
8
5
b2 (4)
KL/TOE
Bell connection 2, door opener connection 2
7
4
b1 (2)
KL
Bell connection1
6
3
a1 (1)
LS/KL
Speech path connection 3 (speaker)
a2 (3)
ELA2
ELA-switched output 2
5
2
YR
4
5
b4 (8)
ELA1
ELA-switched output1
3
4
b3 (6)
TOE
Door opener, connection 1
2
3
a3 (5)
LS/MC
Speech path connection 2 (speaker, micro)
1
2
a4 (7)
MC
Speech path connection 1 (micro)
1
YL
8 1
8
YR
Terminal strip
4.999.112.593
06/07
243
Installation manual Integral 5 D/E easy
Connection for door station
0 L
SD
Option bell provided
by contractor
8V~ (max 1.25A)
LS
U B
Mikr
o
SSKMT
External speech cell
4.999.112.593
06/07
- + ~ ~
12V= 9V~
230V
Power supply unit Door opener
PW12T/9
- +BADE
5V
Switch unit V5/SP
in KS03-casing
244
Installation manual Integral 5 D/E easy
Connection for door station
Connection for Seko-BTicino, Sfera door speaker 302120 (4-wire)
YL
1
YR
Y-cable Main distributor
1
1
YL
LSA
8
5
b2 (4)
KL/TOE
Bell (connection 2), door opener (connection 2)
7
4
b1 (2)
KL
Bell (connection 1)
6
3
a1 (1)
LS/KL
Speech path connection 3 (speaker.)
a2 (3)
ELA2
ELA-switched output 2
b4 (8)
ELA1
ELA-switched output 1
Türöffner, Anschl.1
5
2
YR
4
5
3
4
b3 (6)
TOE
2
3
a3 (5)
LS/MIC
Speech path connection 2 (speaker, micro)
1
2
a4 (7)
MIC
Speech path connection 1 (micro)
1
YL
8 1
8
YR
Terminal strip
4.999.112.593
06/07
245
Installation manual Integral 5 D/E easy
Connection for door station
230V~
Power supply unit
306000
~
DC AC
- + 0 ~
1 12 2224
1
Min.150 Ohm resistor between
1 and 4 to be inserted!!!
Max. 15 kOhm
4.999.112.593
06/07
~
3 12 4
5A
10
22 24
9
Connection 9-10 to be disconnected !!!
246
Installation manual Integral 5 D/E easy
Connection for door station
Connection for ELA (4-wire)
YL
1
YR
Y-cable Main distributor
1
1
YL
LSA
8
5
b2 (4)
KL/TOE
Bell (connection 2), door opener (connection 2)
7
4
b1 (2)
KL
Bell (connection1)
6
3
a1 (1)
LS/KL
Speech path connection 3 (speaker)
5
2
a2 (3)
ELA2
ELA-switched output 2
YR
4
5
b4 (8)
ELA1
ELA-switched output 1
3
4
b3 (6)
TOE
Door opener , Anschl.1
2
3
a3 (5)
LS/MIC
Speech path connection 2 (speaker, micro
1
2
a4 (7)
MIC
Speech path connection 1 (micro)
1
YL
8 1
8
ELA-amplifier
YR
Terminal strip
4.999.112.593
06/07
247
Installation manual Integral 5 D/E easy
4.999.112.593
06/07
Connection for door station
248
Installation manual Integral 5 D/E easy
Connection for door station
Potential-free contacts, sensor contact
YL
1
YR
1
Y-cable Main distributor
1
YL
LSA
8
5
b2 (4)
FSP1 2
Free switching point 1
7
4
b1 (2)
PFK2
Potential free Sensor
Potential free Sensor
6
3
a1 (1)
PFK1
5
2
a2 (3)
FSP2 2
Free switching point 2
b4 (8)
FSP2 1
Free switching point2
Free switching point1
YR
4
5
3
4
b3 (6)
FSP1 1
2
3
a3 (5)
FSP3 2
Free switching point3
1
2
a4 (7)
FSP3 1
Free switching point3
1
YL
8 1
8
YR
Terminal strip
4.999.112.593
06/07
249
Installation manual Integral 5 D/E easy
FSP1
4.999.112.593
06/07
Connection for door station
FSP2
FSP3
Sensor
250
Installationshandbuch Integral 5 D/E easy
Compatibility I5 easy and I5
Compatibility I5 easy and I5
Module
I5 easy
BNE
BND
BNS
EXE
MS4
DSI
MA2
V24
I5E
easy
X
I5D
easy
I5E
I5D
I5C
auf BXC
X
X
X
X
X
X
X
X
X
X
X
(integr.)
X
X
(integr.)
(integr.)
(integr.)
SXS
S4S
S4A
M4A
S8P
S4D
DIA
X
X
X
X
X
X
X
X
X
X
X
X
X
X
X ab R1.5
X
X
X
X
X
X
X ab R1.5
X
X
X
X
X
X
X
X
X
X
X
X
X
S8D
PRI
T8S
CV1
X
X
X
X
X
X
X
X
X
X
4.999.112.593
I5easy- Module
06/07
The modul EXE can be used to replace the
moduls EUE or EUD or for extension
business. In this case it can be used instead
of EUE or EUD.
In application instead of a EUD please consider that
the EXP-L plug has to be connected.
The software supports only valid configuration rules
(e.g. nur 1x S8D or CC1).
251
Installationshandbuch Integral 5 D/E easy
Module
I5 classic
I5E
easy
T1S
S1S
M2S
M2A
DHI
FSP
LNK
BUS
EUE
EUD
CC1
4.999.112.593
I5D
easy
I5E
I5D
X
X
X
X
X
X
X
X
X
X
X
X
X
X
X
I5C
auf BXC
X
X
X
X
X
X
I5 Module
X
X
06/07
252
IP Telephony
Contact Centers
Mobility
Services
Blindtext Blindtext Blindtext –
Blindtext Blindtext Blindtext Blindtext
Bedienungsanleitung
Operating instructions
Manual de manejo
Notice d’utilisation
Istruzioni d’uso
Gebruiksaanwijzing
IP Telephony
Contact Centers
Mobility
Services
Blindtext Blindtext Blindtext –
Blindtext Blindtext Blindtext Blindtext
Avaya GmbH & Co. KG
Kleyerstraße 94
D-60326 Frankfurt am Main
(Germany)
T
0 800 266 - 10 00
F
0 800 266 - 12 19
(International)
© 2007 All rights reserved for Avaya Inc. and Avaya GmbH & Co. KG
4.999.112.593 · 06/07 · Integral 5 Installation User's Guide · en ·
T
+49 69 7505 - 28 33
F
+49 69 7505 - 5 28 33
[email protected]
avaya.co.uk
Bedienungsanleitung
Operating instructions
Manual de manejo
Notice d’utilisation
Istruzioni d’uso
Gebruiksaanwijzing