1
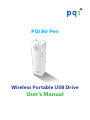
PQI Air Pen Wireless Portable USB Drive User’s Manual Air Pen User’s Manual REGULATORY AND SAFETY INFORMATION FCC Compliance and Advisory Statement This device complies with Part 15 of the FCC rules. Operation is subject to the following two conditions: (1) this device may not cause harmful interference, and (2) this device must accept any interference received, including interference that may cause undesired operation. This equipment has been tested and found to comply with the limits for a Class B digital device, according to Part 15 of the FCC rules. These limits are designed to provide reasonable protection against harmful interference in a residential installation. This equipment generates, uses and can radiate radio frequency energy and if not installed and used in accordance with the instructions, may cause harmful interference to radio communications. However, there is no guarantee that interference will not occur in a particular installation. If this equipment does cause harmful interference to radio or television reception, which can be determined by turning the equipment off and on, the user is encouraged to try to correct the interference by one or more of the following measures: • Reorient the receiving antenna. • Increase the separation between the equipment and receiver. • Connect the equipment into an outlet on a circuit different from that to which the receiver is connected. • Consult the dealer or an experienced radio/TV technician for help. Any special accessories needed for compliance must be specified in the instruction manual. WARNING: A shielded-type power cord is required in order to meet FCC emission limits and also to prevent interference to the nearby radio and television reception. It is essential that only the supplied power cord be used. Use only shielded cables to connect I/O devices to this equipment. CAUTION: Any changes or modifications not expressly approved by the party responsible for compliance could void your authority to operate the equipment. For product available in the USA/Canada market, only channel 1~11 can be operated. Selection of other channels is not possible. This device and its antenna(s) must not be co-located or operation in conjunction with any other antenna or transmitter. FCC SAR Statement Federal Communication Commission (FCC) Radiation Exposure Statement This EUT is compliance with SAR for general population/uncontrolled exposure limits in ANSI/IEEE C95.1-1999 and had been tested in accordance with the measurement methods and procedures specified in OET Bulletin 65 Supplement C. This equipment should be installed and operated with minimum distance 1 cm between the radiator & your body. EN-2 Air Pen User’s Manual NCC/DGT Advisory Statement Article 12 Any changes or modifications to the frequency, amplifier power, or original specifications and functionality of this certified low-power radio without express approval is prohibited. Article 14 Operation of the low power radio shall not interfere with aviation safety and legitimate communication; in case of radio interference, operation of the device shall immediately be stopped until radio interference is reduced. The legitimate communication mentioned in the preceding paragraph is the radio communication regulated by the Telecommunication Act. The low power radio shall tolerate radio interference from legitimate communication or industrial, scientific, and medical instruments. Safety Precautions Read the following safety precautions before you start using the device: 0 Do not place the device on an unstable surface. The device may fall and cause the device to malfunction. 0 Do not subject the device to severe impacts. 0 Keep the device away from extreme heat and humidity. 0 Do not touch the device with wet hands. 0 Do not use this device near water. 0 Wipe the device with a clean and dry cloth. 0 Only use accessories specified by the manufacturer. 0 Always handle the device with care. EN-3 Air Pen User’s Manual Contents REGULATORY AND SAFETY INFORMATION................................................. 2 FCC Compliance and Advisory Statement...........................................................2 FCC SAR Statement.......................................................................................................2 NCC/DGT Advisory Statement..................................................................................3 Safety Precautions.........................................................................................................3 INTRODUCTION............................................................................................. 5 Features.............................................................................................................................5 Package Contents..........................................................................................................5 Product Overview..........................................................................................................6 LED Indicators.................................................................................................................6 GETTING STARTED......................................................................................... 7 Charging the Device.....................................................................................................7 Powering the Device On/Off.....................................................................................7 Transferring Data from a PC.......................................................................................7 Using the microSD Slot................................................................................................8 Resetting the Device....................................................................................................8 USING THE PQI AIR PEN+ APPLICATION....................................................11 Main Screen.................................................................................................................. 11 Viewing Photos........................................................................................................... 12 Playing Music............................................................................................................... 13 Viewing Videos............................................................................................................ 14 Viewing My Folder..................................................................................................... 15 Configuring Settings................................................................................................. 17 WEB MANAGEMENT....................................................................................18 Air Pen Configuration................................................................................................ 19 USING THE DEVICE AS WIRELESS AP..........................................................19 Connecting to a Hotspot......................................................................................... 20 Backing Up Wirelessly............................................................................................... 20 SPECIFICATIONS..........................................................................................21 EN-4 Air Pen User’s Manual INTRODUCTION Features • World’s smallest wireless AP, ultra-lightweight at 40 g • Ultra-portable storage drive and personal cloud • Wireless sharing of photos, videos, music and documents, supporting up to 5 wireless devices accessing different files • Built-in Ethernet port for portable wireless access point functionality, connecting up to 5 wireless devices to the Internet simultaneously • Secure wireless setup • Free downloadable PQI Air Pen+ application for data playback and management on iOS and Android devices • High-capacity storage, supporting microSD/SDHC card up to 32 GB • Built-in Lithium battery for up to 2 hours of media playback • USB 2.0 charging Package Contents The package contains the following items. A400 Pen Quick Start Guide Air Pen Quick Start Guide EN-5 Air Pen User’s Manual Product Overview j k m l n p o 1. Power button 2. Wi-Fi indicator LED 3. Sync indicator LED q r 4. Battery indicator LED 7. USB connector 5. Sync button 8. Reset pinhole 6. microSD slot 9. Ethernet (RJ-45) port LED Indicators The LED indicators light up or blink when a particular function of the device is active. Item Power ( ) LED color Description Blue (solid) Device is turned on. Orange (solid) Battery is charging and the device is turned on. Orange (solid) Battery is charging and the device is turned off. The indicator turns when charging is complete. Wi-Fi ( ) Blue (blinking) Blue (rapid blinking) Wi-Fi connection is activated. Data transfer is in progress. Battery ( ) Red (solid) Battery level is lower than 20%. Sync ( ) Green (solid) Device is backing up files to Air Bank. EN-6 Air Pen User’s Manual GETTING STARTED Charging the Device Before using this device for the first time, you need to charge the device. Simply insert the USB connector on the device to an available USB port on your computer. The battery indicator LED turns off when charging is complete. 2NOTE: • The Wi-Fi function is deactivated when the device is being charged. Powering the Device On/Off To turn the device on: • Press the Power button. The Power LED lights up in blue, indicating that the device is ready. To turn the device off: • Press and hold the Power button until the Power LED is turned off. Transferring Data from a PC Computer System Requirements • Microsoft Windows® XP • Microsoft Windows Vista® • Microsoft Windows® 7 • Microsoft Windows® 8 • Mac® OSX 10.5 or newer • Linux® Kernel 2.4 or newer Supported File Formats Operating System Type Android iOS Document Type Documents Images Audio Video Documents Images Audio Video File Format *.pdf, *.txt, *.doc, *.docx, *.xls, *.xlsx, *.ppt, *.pptx *.jpg, *.png, *.bmp, *.gif *.mp3, *.mp4, *.3gp, *.wav, *.ogg, *.imy, *.aif *.mp4, *.3gp *.pdf, *.txt, *.doc, *.docx, *.xls, *.xlsx, *.ppt, *.pptx *.jpg, *.png *.mp3, *.wav, *.aif *.mp4, *.mov EN-7 Air Pen User’s Manual Connecting to a PC 1. Plug the USB connector into an available USB port on your computer. Your computer automatically detects the device. 2. Copy the desired files to a folder on your computer, or select files from your computer and drag them into respective folders in the device. 2NOTE: To ensure the file can be played back, make sure the file formats are supported on your Android/iOS device. Using the microSD Slot The microSD slot on the device provides high-capacity storage for photos, videos, and documents. The slot supports a microSD/SDHC card with up to 32 GB capacity. 1. Save files to a microSD card, and organize them into folders. 2NOTE: For best results, place images in /Photo, music or audio files in /Music, and videos in /Video. 2. At the far right corner of your computer’s task bar, find and click the Safely Remove Hardware icon ( ). 3. Choose the device name corresponding to the microSD card, and then remove the microSD card from your computer. 4. Insert the microSD card into the device, making sure it is in the correct orientation as illustrated on the device. Resetting the Device When the device hangs or you forgot the password, insert a paper clip into the Reset Hole. The system will automatically reboot and the device is ready to use. EN-8 Air Pen User’s Manual Connecting to Your Smartphone/Tablet PC Supported Smartphones/Tablet PC Android iOS Android 2.1 or higher iPhone 3GS, 4, 4S, 5, iPod touch (Gen4) and iPad, iPad2, New iPad, iPad Mini. (iOS4.0 or above is recommended) Installing the PQI Air Pen+ Application You need to install the PQI Air Pen+ application on your smartphone or tablet PC to enable wireless access to files stored in the Air Pen. a. Android Devices 1. Make sure your smartphone/tablet PC is connected to the Internet. 2. Launch Play Store. 3. Enter “pqi air pen” to search for PQI Air Pen+. 4. Select and install the application. After installation is complete, the PQI Air Pen+ icon ( ) appears on the home screen. b. iOS Devices 1. Make sure your smartphone/tablet PC is connected to the Internet. 2. Launch App Store. 3. Enter “pqi air pen” to search for PQI Air Pen+. 4. Select and install the application. After the installation is complete, the PQI Air Pen+ icon ( appears on the home screen. EN-9 ) Air Pen User’s Manual Connecting to the Air Pen via Wi-Fi a. Android Devices 1. Go to Settings. 2. In WIRELESS & NETWORKS, tap Wi-Fi and set it to ON. Available networks are listed. 3. Tap PQI Air Pen to connect to the device. b. iOS Devices 1. Go to Settings. 2. Tap Wi-Fi and set it to ON. The available networks are listed. 3. Tap PQI Air Pen to connect to the device. EN-10 Air Pen User’s Manual USING THE PQI AIR PEN+ APPLICATION Main Screen Launch the PQI Air Pen+ application. The main screen is displayed on the screen. Android Devices iOS Devices No. 1 2 3 4 5 6 7 Item Air Pen Image Music Video My Folder Setting More Description View the folders/files stored in the device. View the photos stored in the device. View the audio files or songs stored in the device. View the videos stored in the device. View the folders/files stored in the Android device. Configure the connection settings. View the folders/files on the iOS device and configure the connection settings. 2NOTE: • The application user interface varies depending on the device operating system and design. EN-11 Air Pen User’s Manual Viewing Photos 1. Tap Image to view photos. 2. Tap a thumbnail to view it in full screen, and then swipe across the screen to view other photos. Android Devices iOS Devices Save Photos Android Devices To save the desired photo(s): a. Android Devices 1. Press Menu, and then tap Download. 2. Select the photo(s). A “4“ icon appears on the selected photo(s). 3. Press Menu, and then tap Download. iOS Devices b. iOS Devices 1. Tap > Download. 2. Select the photo(s). A “4“ icon appears on the selected photo(s). 3. Tap > Save. 2NOTE: • Tap Refresh to refresh the files list. EN-12 Air Pen User’s Manual Sharing Photos (iOS devices only) 1. Tap > Share. 2. Select the photo(s) that you want to share via a sharing application. A “4“ icon appears on the selected photo(s). 3. Tap > Email or Facebook. Playing Music Android Devices iOS Devices 1. Tap Music to play songs or audio files. 2. Select the song or audio file you want to play. 3. Tap the on-screen controls to play, pause, stop, repeat, or skip to the next/previous songs. 2NOTE: • The music playback application user interface varies depending on your smartphone/ tablet PC operating system and design. EN-13 Air Pen User’s Manual Viewing Videos Android Devices iOS Devices 1. Tap Videos to play back videos. 2. Select the video you want to play. The video opens in full screen. 3. During playback, tap the on-screen controls to play, pause, or stop the video, or adjust the volume. 2NOTE: • The video playback interface varies depending on your smartphone/tablet PC operating system and design. EN-14 Air Pen User’s Manual Viewing My Folder Tap My Folder to view the folders and files stored in your Android device. Tap More > My Folder to view the folders and files stored in your iOS device. Android Devices iOS Devices Uploading Files from Your Smartphone/Tablet PC to Air Pen a. Android Devices Android Devices 1. Press Menu, and then tap Upload. 2. Select the file(s). A “4“ icon appears on the selected item. 3. Press Menu, and then tap Upload. Select the location where you want to save the file(s) into the Air Pen and tap OK. iOS Devices b. iOS Devices 1. Select the file(s). Then, tap > Upload. 2. Select the location where you want to save the file(s) into the Air Pen and tap Upload. 2NOTE: • To access the built-in gallery in iOS device, tap EN-15 . Air Pen User’s Manual Deleting Files a. Android Devices 1. Select the file(s). A “4“ icon appears on the selected item. 2. Press Menu > Delete. 3. Tap OK to confirm. b. iOS Devices 1. Tap > Delete. 2. Select the file and tap the 3. Tap Delete to confirm. icon. A “Delete” dialog box appears on the screen. Creating a New Folder a. Android Devices 1. Press Menu, then tap Create Folder. 2. Enter a folder name. 3. Tap OK to confirm. b. iOS Devices 1. Tap > Create Folder. 2. Enter a folder name. Then, tap OK to confirm. EN-16 Air Pen User’s Manual Configuring Settings Tap Setting to configure the connection settings. By default, you can directly access the configuration screen without a Login ID or Password. On Android devices, tap Login to enter the configuration screen. On iOS devices, tap More > Settings. Android Devices iOS Devices Factory Reset Tap Factory Reset to reset all settings to the default settings. A warning message appears on the screen. Tap OK to continue. The Wi-Fi connection is automatically disconnected. Reboot Tap Reboot to restart the device. A warning message appears . Tap OK to continue. The Wi-Fi connection is automatically disconnected.. Firmware Upgrade Tap Firmware Upgrade to upgrade to the latest firmware. 2NOTES: • For the availability on the latest firmware update, visit the company website. • Be sure to copy first the latest firmware into the Air Pen via PC connection. EN-17 Air Pen User’s Manual Set Login Account Set the login ID and password to prevent unauthorized access to the Setting page. 1. In Admin Account Settings, enter your login ID and password. 2. Tap Save to save the login data. A warning message appears on the screen 3. Tap OK to continue. The Wi-Fi connection is automatically disconnected. 2NOTE: • If you forget the login ID or password, reset the device to the factory default settings. See “Resetting the Device” on page 8. WEB MANAGEMENT Use PQI Air Pen Web Management to remotely access the Air Pen anytime. 1. Connect your notebook or mobile device to the Air Pen. 2. After connection is established, open your web browser and enter “192.168.200.1” in the URL box. 3. Enter the Login ID and password, and then tap LOGIN. 4.Do the following: • To configure the network connection, click the Configuration tab on the left panel. Change the necessary settings. • To view the file directory on the Air Pen, tap File List tab on the left panel. 2NOTES: • If you forget the login ID or password, reset the device to the factory default settings. See “Resetting the Device” on page 8. • The setting parameters on the Configuration tab would be similar to the settings configured on the Setting page of the Air Pen+ application. EN-18 Air Pen User’s Manual Air Pen Configuration Configure the wireless AP settings here. 1. Go to Settings > Air Pen Configuration. 2. Specify the channel, SSID, WAN mode, and Wi-Fi password. 3. Tap Save to save the data. 4. A warning message appears. Tap OK to continue. The Wi-Fi connection is automatically disconnected. 5. A message appears, prompting you to reconnect and restart the application. Tap OK to continue, and the PQI Air Pen+ application closes. 2NOTES: • If you are not sure which channel to choose, set the setting to Auto. The system will automatically assign to an available channel to avoid conflicts with existing wireless networks. • To specify the IP address on the Air Pen, set the WAN mode setting to STATIC. • The minimum password length is 8. However, you can set the password up to 63 alphanumerical characters (case sensitive). USING THE DEVICE AS WIRELESS AP 1. Connect one end of the network cable (Ethernet RJ-45) to the Ethernet port on the device. Network 2. Plug the other end of the network cable to an Ethernet port on a router or network switch. 3. Connect your mobile device such as a smartphone, tablet or notebook to the Air Pen. See “Connecting to the Air Pen via Wi-Fi” on page 10. EN-19 Air Pen User’s Manual Connecting to a Hotspot With this feature, you can use the network service shared by a Wi-Fi enabled device. 1. Go to Settings > Connect to a Hotspot, and then select the hotspot you want to connect to. 2. Enter the password and tap Connect. 3. Enter Login ID and password and then tap LOGIN. 4. Do the following: • To configure the network connection, click Configuration tab on the left panel. Change the necessary setting. • To view the file directory on the Air Pen, tap File List tab on the left panel. Backing Up Wirelessly If you also own a PQI Air Bank, you can use it to wirelessly back up files stored in the PQI Air Pen. To sync files between the two devices, do the following: 1. Press the Sync button on the PQI Air Bank. 2. Press the Sync button on the PQI Air Pen. The files in the Air Pen will be copied to the Air Bank. EN-20 Air Pen User’s Manual SPECIFICATIONS Item Interface Capacity Supported OS Power Supply Dimensions Weight Environment Other Information Applications Specifications USB2.0, IEEE 802.11b/g/n, Ethernet 10/100 Mbps Supports microSD/SDHC card up to 32 GB iOS 4.0 or higher; Android 2.1 or higher Embedded Lithium-ion battery 16.5 x 91.5 x 25 mm (0.64” x 3.57” x 0.98”) 40 g ± 2 g (1.4 oz) 0°C to 40°C 1 year warranty Dedicated Mobile App: PQI Air Pen+ EN-21