Transcript
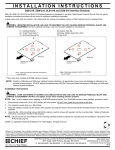
I N S T A L L AT I O N I N S T R U C T I O N S
NAC25H E1/G1/S1 Racks Casters
The NAC25H casters are designed for use with Chief® E1, G1 or S1 Series racks. See the specific installation instructions provided with the
rack for additional installation information.
TOOLS REQUIRED / PARTS INCLUDED
7/16"
B (16)
1/4-20
A (4)
[Casters]
C (16)
1/4-20 x 5/8"
D (16)
1/4-20 x 1/2"
NOTE: Not all fasteners will be used.
WARNING: FAILURE TO READ, THOROUGHLY UNDERSTAND, AND FOLLOW ALL INSTRUCTIONS CAN RESULT IN SERIOUS
PERSONAL INJURY, DAMAGE TO EQUIPMENT, OR VOIDING OF FACTORY WARRANTY! It is the installer’s responsibility to make
sure all components are properly assembled and installed using the instructions provided.
NOTE: Casters may be installed using a torque wrench, and torque not to exceed 5 ft-lbs.
E1/G1 Racks Caster Installation
S1 Racks Caster Installation
1.
1.
Attach a caster (A) to each lower corner of the E1 rack using four
1/4-20 x 5/8" Phillips truss head machine screws (C) [OR four
1/4-20 x 1/2" hex head cap screws (D)] and four 1/4-20 lock nuts
(B) for each caster. (See Figure 1)
Attach a caster (A) to each lower corner of the S1 rack using four
1/4-20 x 1/2" hex head cap screws (D) [OR four 1/4-20 x 5/8"
Phillips truss head machine screws (C)] for each caster. (See
Figure 2)
(C) x 4
1
OR
1
(A)
(D) x 4
(D) x 4
1
(A)
OR
(B) x 4
1
(NE1F2823 rack shown with fasteners B & C)
(C) x 4
(NS1F1223 rack shown with fasteners D)
Figure 1
Figure 2
NOTE: If levelers are already installed in the rack, leave
levelers installed and adjust them using a 13mm
wrench so they are as close to the floor as possible,
yet still allow movement of the rack on the casters.
NOTE: If levelers are already installed in the rack, leave
levelers installed and adjust them using a 13mm
wrench so they are as close to the floor as possible,
yet still allow movement of the rack on the casters.
®Chief is a registered trademark of Milestone AV Technologies. All rights reserved.
Milestone AV Technologies, and its affiliated corporations and subsidiaries (collectively, "Milestone"), intend to make this manual accurate and complete. However, Milestone makes
no claim that the information contained herein covers all details, conditions or variations, nor does it provide for every possible contingency in connection with the installation or use
of this product. The information contained in this document is subject to change without notice or obligation of any kind. Milestone makes no representation of warranty, expressed or
implied, regarding the information contained herein. Milestone assumes no responsibility for accuracy, completeness or sufficiency of the information contained in this document.
Chief Manufacturing, a products division of Milestone AV Technologies
8821-002014 Rev01
©2012 Milestone AV Technologies,
6436 City West Parkway, Eden Prairie, MN 55344
a Duchossois Group Company
• P: 800.582.6480 / 952.225.6000 • F:877.894.6918 / 952.894.6918
04/12