1
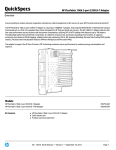
Table of Contents
1. P r o d u c t D e s c r i p t i o n … … … … 1
1.1 U n p a c k i n g … … … … … … … … 1
1.2 M a i n F e a t u r e s … … … … … … 1
1.3 S p e c i f i c a t i o n s … … … … … … … 2
1.4 N e t w o r k I n t e r f a c e a n d L E D
Indicators…………………………2
2. H a r d w a r e I n s t a l l a t i o n … … … … 4
3. Software Installation ………… …4
1
Product Description
Thank you for purchasing TENDA
TEL9939D/TEL9939DI 10/100Mbps LAN
adapter. TEL9939D/TEL9939DI is fully
compliant with PCI2.2, supports ACPI
Power management, Auto-Negotiation.
And also supports data transfer rate of
10Mbps and 100Mbps, auto-detect the
data transfer rate and duplex mode of the
devices
connected.
Besides,
TEL9939D/TEL9939DI
also
supports
RPL/PXE. TEL9939D/TEL9939DI supports
driver under the operating systems of
Windows 98, Windows ME, Windows 2000,
Windows NT, Windows XP, Windows NT,
Linux and Novell etc.
1.1 Unpacking
Please unpack the package and you
find:
TEL9939D or TEL9939DI LAN
Adapter
CD Driver
User’s Manual
Quality-passed Certificate Card
could
1 pc
1 pc
1
copy
1 pc
1.2 Main Features
z Compliant with IEEE802.3 Ethernet
standard
and
IEEE802.3u
fast
Ethernet standard
z Supports data transfer rate of 10Mbps,
100MBps, 10Mbps/100Mbps under
full/half duplex mode
z Support NWAY Auto-Negotiation,
auto detect data transfer rate, duplex
1
z
z
z
z
z
z
z
mode, and select optimal network
connecting mode, avoid complex
configuration, Plug-and-Play
Compliant with PCI 2.1, PCI 2.2
standard, support high efficient
32bit/33MHZ
PCI,
low
CPU
consumption.
Supports ACPI power management,
extremely low consumption
MAX 200Mbps network throughput
Integrated First In First Out (FIFO)
buffering area, enhance the data
transfer capability of network
Adopting High Integration, High
performance single chipset solution
Supports
BootROM,
insert
the
appointed BootROM and able to
realize RPL/PXE (For TEL9939D only)
Supports abundant driving software,
including almost all the common used
operating system.
1.3 Specifications
Main Features
IEEE802.3
Standard
IEEE802.3u
BUS Type
32bit/33MHZ PCI BUS
Network
RJ45
Interface
I/O Address, System auto assigned
Disconnected
System auto assigned
(IRO)
-10Mbps
half/full
duplex
mode:
Data Transfer
10/20Mbps
Rate
-100M half/full duplex
mode:100/200Mbps
2
Operating
Temperature
0 ℃ ~45 ℃ (32 F
~112 F)
10%-90%
(non
Humidity
condensing)
Power input from the
PCI
slot
of
the
Consumption
main-board, MAX 1.5
watts consumption
Compliances FCC Class B, CE
1.4 Network Interface and LED Indicators
TEL9939D/TEL9939DI supports one
RJ45 network Interface port, enables you
to connect it to the network through Cat. 5
or Cat. 5 enhanced twisted pair cable.
TEL9939D/TEL9939DI supports one
green Link/Act LED indicator. When there
is no network connecting signal, the
Link/Act
is
OFF;
When
TEL9939D/TEL9939DI is connected to the
network successfully under the data
transfer rate of 10Mbps or 100Mbps, the
LED
Indicator
is
ON;
When
TEL9939D/TEL9939DI is transferring or
receiving data, the LED Indicator is
blinking.
Location of the LED is as follows:
2 Hardware Installation
Please install the LAN Adapter
according to the steps as follows:
1. Shut down your computer, unplug its
power cord and remove the chassis
cover.
2. Insert the contact edge of the
DGE-530T card into the connector of
3
3.
4.
any available PCI Bus Master
expansion slot. Press the card firmly
into the connector such that the card’
s contacts are fully seated in the
connector.
Install the bracket screw that secures
the card to the computer chassis and
replace the computer’s chassis cover.
Connect TEL9901G to the network
through Cat. 5 or Cat. 5 enhanced
twisted pair cable.
3 Software Installation
Please install the driving software as
follows:
1. Start PC, and insert the CD
attached in the packing. The
computer would run the CD
automatically and display
TendaSetup on the screen. (If the
computer is not running the CD
automatically, please double click
the CD and run
“TendaSetup.exe” ), please click
the icon of “Driver” to install the
driving software.
2. For TEL9939D, please click
“TEL9939D”, and for TEL9939DI
please click “TEL9939DI”, then
please select “the language of
driver” and then click “Confirm”
to start installation.
3. Please select the directory for
installation and click “Next”
4. Please click “Finish” and you now
install the driver successfully.
4