1
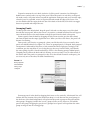
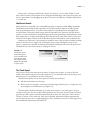
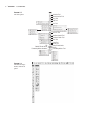
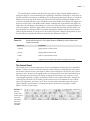
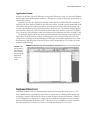
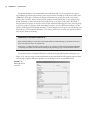
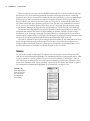
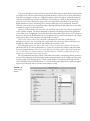
Chapter 1 AL Customizing GH TE D MA TE RI “Creative efficiency.” If you read the refreshingly short introduction a few pages previous, you know that I believe the phrase “creative efficiency” to be among the most important ideals of our profession of designing for, or placing, ink on paper. To realize your creative potential, to enable the creatives working under you to realize their creative potential, you must minimize the impact of your tools on the process of creating. Accomplishing that requires modifying tools like InDesign, making them emulate how you work as much as possible. Software—computers in general—is far from the point where it will truly work the way humans work, the way humans think. We are still forced to conform our methodologies and thinking processes to fit within the narrow boxes sitting under our desks—to a point. Whenever possible—and, with InDesign CS5, much is possible—customize the software to fit your work and the Preferences as closely as you can. While the idea of rearranging panels or modifying menus may seem superfluous compared with other topics in this book, I’ve placed this chapter first because, ultimately, how you customize InDesign directly affects how efficiently you use the page layout application to learn and use anything else you might read in this volume. Customizing InDesign shifts that dividing line between the software working for you and you working for the software further toward the former. RI In this chapter, you will learn to PY •u Organize panels and use the panel docks •u Customize keyboard shortcuts CO •u Remove parts of InDesign to create lean, workflow-specific installations •u Change the default font, colors, and more •u Carry your personalized InDesign work environment in your pocket or on your iPod Panels Since April 2005, when Adobe and Macromedia announced their intent to merge, users of InDesign or any of either company’s products have speculated about the user interface that would result from combining two of the most acclaimed user interface design teams in the business. Creative Suite 3 was that result—the Adobe UI—which Creative Suite 5 continues to improve upon and refine. 2 | Chapter 1 Customizing The Adobe UI is growing ever more efficient in its use of screen real estate and ever more user customizable to facilitate your personal productivity within InDesign and the other Creative Suite applications. Panels can be free-floating, tabbed, stacked, grouped together into vertical panel bars à la the old Macromedia applications, and condensed into narrow icon and title tiles. Given the fact that InDesign CS5 has an unprecedented 56 panels, you’ll likely employ several panel arrangement forms concurrently. Hands down, the most efficient way to organize the InDesign workspace is across dual (or triple) monitors—preferably monitors of the same size and resolution. Although the vast majority of users don’t need all 56 panels opened at once, many panels—such as Layers, Pages, Swatches, Index, Hyperlinks, Scripts, Links, and the five styles panels—tend to grow in utility and convenience according to their heights. The more space you give such panels, the less scrolling you’ll have to do, which means the faster you can access the layer, page, swatch, style, or whatever it is you need. Using Multiple Monitors On my primary production computer, I use six monitors, with the first containing the InDesign application itself and the Control and Tools panels, the second completely filled with my mostoften-used 28 panels, and several other panels, those I use once in a while, taking up about half of the third monitor in their collapsed button states. The remaining two and a half monitors I use for whatever other application I need open concurrently with a particular InDesign project. Often that’s InCopy, but just as often it’s a digital asset manager like Bridge or ThumbsPlus, and sometimes Illustrator, Photoshop, or multiple windows of Microsoft Word or Acrobat. Another interesting multiple-monitor InDesign scenario I’ve seen is two 32-inch Apple Cinema displays stacked vertically, rather than the more common setup of side-by-side monitors. The stacked monitors are used by a newspaper workflow for which I consulted in InCopy and InDesign. With the monitors stacked, the layout editor can proof two complete spreads (four pages) of the paper—one spread per monitor—simultaneously while keeping them large enough on screen to actually read most text. Ultimately, like RAM, designers can never have too much screen real estate when dealing with panel-based creative pro applications. The point is, Adobe knows that InDesign is a forest of panels. The vast majority of the application’s functions are contained on panels, which is a far more efficient way of doing it than in dialog boxes. Dialog boxes, while open, prohibit accessing the document; to do something to two objects individually via a dialog box requires more steps than doing it through panels, which are always onscreen. The downside to panels is, of course, that they’re always onscreen, always taking up space. Next, we’ll go through the various methods Adobe has built into InDesign to enable you to organize panels. I’ll also offer some advice on which ones you can safely keep off your screen. | Panels 3 The Panel Dock The dock is InDesign’s attempt to organize panels on single-monitor systems—or anywhere— where space is at a premium. Dragging panels to the side of the application window causes them to become labeled icons in the panel dock, a top-to-bottom reserved area of the application window (see Figure 1.1). In some programs, such as Photoshop and Illustrator, the icons initially appear unlabeled, resulting in a much slimmer dock (and consequently a wider document working area). Figure 1.1 The InDesign panel dock InDesign can have icon-only docks too; they just don’t appear that way in the default workspace. To slim down an InDesign dock to icon-only mode and reclaim most of the horizontal space for the working area, drag one edge of any collapsed panel in the dock toward the opposite screen edge (refer back to Figure 1.1). When you get to within 18 or so pixels of the edge, the dock will snap into icon-only mode. Conversely, dragging outward from the screen edge will widen the dock, first making labels appear, perhaps truncated, and then increasing the space for them. Adobe branded nearly all its applications and technologies with color-coded, two-letter signifiers strongly reminiscent of elements on the periodic table. The kaleidoscope of icons makes for a brighter desktop, Start Menu, or OS X Dock, while, as a counterpoint, the workspaces of Adobe applications themselves become a cool cornucopia of grayscale icons—every panel now has its own associated icon displayed within the application dock. For easy reference, Table 1.1 pairs all the panels with their associated icons. Astute observers will note that the table includes only 53 icons. The Tool and Control panels cannot be collapsed fully, so they have no icons. Nor does the Cross-References panel, which is permanently fused to the bottom of the Hyperlinks panel despite having a separate Show/Hide command under Window Type & Tables. To use a panel in the dock, click its collapsed icon or icon and title. It will expand out to the side, revealing the entire panel. Collapse it back into the panel either by clicking the double arrows pointed toward the dock, by clicking on the title tab of the panel, or by clicking its icon (or icon and title) again. Only one panel per dock may be extended at once, and by default, the last-used panel will remain extended until you collapse it. If you’d prefer that panels immediately collapse back to their icon or tile state as soon as you finish with them, right-click the dark gray dock title or an empty area of the dock itself and choose Auto-Collapse Icon Panels (you’ll also find the same choice in the Preferences on the Interface pane). 4 | Chapter 1 Customizing Table 1.1: Icon InDesign panels and their icons Panel Icon Panel Icon Panel Access CS Live Flattener Preview Preflight Align Glyphs Preview Animation Hyperlinks Script Label Assignments Index Scripts Attributes Info Separations Preview Background Tasks Kuler Story Bookmarks Layers Stroke Buttons Links Swatches Cell Styles Media Table Character Mini Bridge Table Styles Character Styles Notes Tags Color Object States Text Wrap Conditional Text Object Styles Timing CS News and Resources Pages Tool Hints CS Review Page Transitions Track Changes Data Merge Paragraph Transform Gradient Paragraph Styles Trap Presets Effects Pathfinder | Panels 5 Expand or contract the entire dock, inclusive of all the panels it contains, by clicking the double-arrow symbol at the very top of the panel. When the panel is in icon-only or collapsed tile mode, arrows will point inward, toward the application workspace and away from the edge; when the panel is expanded, arrows will point outward toward the edge of the screen. You can also double-click the empty, dark title bar of the dock or Cmd+click/Ctrl+click it to toggle between expanded and collapsed states. Arranging Panels To add a panel to the default dock, drag the panel’s title tab over the empty area of the dock beneath the lowest panel. When your cursor is in position, a colored horizontal line will appear across the dock. Release the mouse button to drop the panel into the dock at that point. Remove panels from the dock by dragging the title or icon (not the gray bar above them) out from the dock into the empty application area. When you release the mouse, the panel will become free floating. Some panels, you’ll notice, are grouped—when you click the title of one to extend it, other panels are tabbed behind it (see Figure 1.2). These are grouped panels. Collapsed, their grouped arrangement is indicated by their icons or tiles contained within a light gray rectangle, with a common gray bar atop them. If you do drag the gray bar away from the dock, you’ll detach the entire group of panels. Once detached, they will be a free-floating group of tabbed panels. Grouped panels, both on the dock and free floating, are one-at-a-time views. In other words, if the Stroke and Color panels are grouped (as they are in the default Essentials workspace), you can view only one or the other, not both simultaneously. Figure 1.2 Grouped panels extended with other groups collapsed Rearrange panels in the dock by dragging their icons or tiles vertically. A horizontal line will indicate the new location of the panel should you drop it. A rule between the panel groups, in the dark area of the dock background, will reposition the panel or group to that point outside other groups. Dropping it within the area of a group of icons or tiles, however, will add the panel to the group. Dragging the gray bar of a grouped set of panels will reposition the entire group or merge it into an existing group. 6 | Chapter 1 Customizing InDesign can actually contain docks on both sides of the application window and can have multiple columns of panels arranged side by side in the dock. Just as with adding panels to the default right-side dock, creating and managing side-by-side docks is done by dragging. Begin by creating the first dock, and then drag another panel (or panel group) to the screen edge. Bypass the horizontal line indicating that the new panel will appear below the one already there, and keep going to the screen edge, whereupon a vertical line will appear. When you let go, the previous dock area will be pushed inward, with the new panel forming a column on the outside. Similarly, you’ll see a vertical line at the inner edge of an existing dock as well, enabling you to add a dock inward rather than outward of existing docks. You can keep going, adding columns as you like, but only within the application window. If the dock expands so far that it reaches the other side of the window, panels will begin to automatically collapse into their labeled icon tiles. The width of each dock can be set independently, enabling you to have a wide, labeled tile panel dock beside a narrow, icon-only dock. Stacked Panels Detached or free-floating panels have similar arrangement options. Drag the tab of one panel atop another free-floating panel or group of panels to group them into tabs. When your cursor is in position, a bold outline will appear all the way around the target panel. If you drag too close to the bottom of another panel, you’ll see a horizontal line appear only there, indicating that the panels will stack rather than group (see Figure 1.3). Stacked panels work similarly to docked panels but with several distinct advantages. You can see and work with multiple panels at once just as you would free-floating panels, and they aren’t limited to positioning at the screen edge. Like docked panels, stacked panels can be expanded or contracted into just their icons or icon and title tiles selectively, or an entire stack can be expanded or contracted with a single click of the mouse. At the top of a stack is a double-arrow collapse/expand button. Clicking it—or double-clicking an empty area of the bar containing the collapse/expand double arrow—collapses all panels in the stack into their low-profile, docked form or expands them all. A single close button also hides the entire stack of panels. When you move a stack by dragging the top bar, all the panels move with it. Figure 1.3 Stacked panels | Panels 7 Many panels—the Pages and Swatches panels, for instance—are resizable. Within a stack, they can be resized by hovering the cursor along their bottom edge, at the point where they join the next panel down, and dragging up or down. The cursor will become a double-headed arrow as a visual cue. Multistate Panels Many panels have expanded views with additional options, controls, or fields hidden by default. Switch between the compact and expanded views by choosing Show Options or Hide Options from the panel flyout menus. As we deal with each panel’s expanded controls throughout the rest of the book, I’ll usually remind you to show the expanded view. However, since this book is written as a focused manual for using InDesign in professional print design and production workflows rather than as a soup-to-nuts InDesign CS5 reference book, some panels won’t even be mentioned in later chapters. Always check for the Show Options command on a panel’s flyout menu. Another way to discern if a given panel has multiple states is the presence of double (stacked) arrows in the title tab (see Figure 1.4). Clicking the arrows cycles through the states of any palette—condensed, expanded, and minimized. Double-clicking the title tab of the panel itself accomplishes the same state cycling as clicking the arrows. Figure 1.4 A multistate panel, the Gradient panel, shows a double arrow in its title tab. (Left) The condensed state. (Right) The expanded or options state. The Tools Panel You’ll use the Tools panel more than any other. All your tools are there, as are basic fill and stroke color controls and preview modes. In Figure 1.5, I’ve identified each of the tool icons and different parts in an exploded view of the Tools panel. Customization options for the Tools panel are limited to two choices: •u Whether it’s docked or free floating •u How its tools are arranged—in the now-standard single-column array, as a single row, or in the nostalgic two-column format (see Figure 1.6) The first option, docked or floating, is set in the same manner as any other panel—drag it toward or away from the screen edge. When docked, it uses the entire screen’s worth of vertical space because other panels cannot be docked beneath or above the Tools panel. That’s the con. The pro, of course, is that, when the Tools panel is docked, document windows automatically resize around it, never over- or underlapping it as they would do in versions of InDesign prior to the introduction of docking in InDesign CS3. 8 | Chapter 1 Customizing Figure 1.5 Selection Tool Direct Selection Tool Page Tool Gap Tool The Tools panel Line Tool Scissors Tool Gradient Swatch Tool Gradient Feather Tool Note Tool Fill Default Fill and Stroke Formatting Affects Container Figure 1.6 The three arrangements of the Tools panel Hand Tool Zoom Tool Swap Fill and Stroke Stroke Formatting Affects Text | Panels 9 The second option, whether to display the Tools panel in single-column, double-column, or single-row mode, is set in the Interface pane of InDesign’s Preferences (InDesign Preferences on the Mac and Edit Preferences on Windows). Easier than going that route, however, is to click the double arrows at the top of the Tools panel. When the Tools panel is floating, the double arrows will cycle it through the three states. If docked, however, the double-arrow button will toggle only between vertical single- and double-column modes. Although the single-column and single-row modes have the advantage of consuming less screen real estate, they have a seeming drawback as well: fewer options. The three apply buttons near the bottom don’t fit in the slimmer modes, nor does the Normal view button at the very bottom. Fortunately, Adobe made up for their absence with keyboard shortcuts. If you opt to use one of the Tools panel’s slimmer arrangements (or just like the efficiency of keyboard shortcuts), memorize the shortcuts in Table 1.2. Table 1.2: Keyboard shortcuts for Tools panel features hidden by single-column and single-row modes Shortcut Function , (comma) Apply solid color to fill or stroke. . (period) Apply gradient to fill or stroke. / (slash) Remove color from fill or stroke. W Toggle between normal mode and the selected preview mode. The Control Panel The Control panel, a favorite among users since its introduction in InDesign CS (1) PageMaker Edition, is context sensitive to the tool and task at hand, offering a compact quick access point for the most common features and options. While you’re editing text, for instance, the Control panel goes into Character or Paragraph mode, two transposable sets of fields and controls that offer, among many other things, the ability to change the font family, style, and size as well as paragraph alignments, spacing, and indents. When you’re working with tables, though, the Control panel transforms to offer table-specific controls such as the number of rows and columns, cell alignments, and insets. In all, there are four modes dependent upon what you’re actually doing in the document—working with objects, characters, paragraphs, or tables. Figure 1.7 shows all four modes. Figure 1.7 The four modes of the Control panel: (top to bottom) Object, Character, Paragraph, and Table 10 | Chapter 1 Customizing The very last object on the Control panel’s right end, a button that looks like three horizontal lines, is the Control panel’s flyout menu. Like the face of the Control panel, the commands on the flyout menu are context variable. At the bottom of the list, the Customize command is constant and opens the Customize Control Panel dialog box (see Figure 1.8). Here, by unchecking the show box in the expanding lists, you can selectively disable groups of controls or an entire mode. Maybe, while working with general objects, you’d rather not see the new Corner Shape controls section on the Control panel. To hide the Corner Shape controls, expand the Other section of the Customize Control Panel dialog box and uncheck Corner Shape. The same goes for anything else you’d rather not see on the Control panel. Also on the Control panel flyout menu are commands to dock the panel to the top of the application window, its default location, dock it to the bottom, or float it free à la PageMaker’s Control palette and QuarkXPress’s Measurements palette. Once free floating, the Control panel can be positioned anywhere you like onscreen but always horizontal. In addition to using the menu commands, dragging the vertical double bar of dotted lines on the left edge of the panel moves the panel around as well, attaching it to, or detaching it from, the top or bottom edge of the application. When you drag a floating Control panel close enough to either the top or bottom edge, a thick horizontal line, similar to the one you see when docking other panels, will appear above or below the panel; release the mouse button and the panel will snap into its docked position. If you’re running a monitor with a horizontal resolution greater than 1024 pixels, you should take advantage of dynamic controls in the Control panel. All the primary controls of each mode are contained within the first 1024 pixels. After the primary controls have been rendered, several modes of the Control panel will present additional controls for your convenience. In Character mode, for example, more paragraph-centric fields and options will fill the extra space after all character-centric fields. In Paragraph mode, more of the character-centric controls slip in there. The idea, of course, is that if you have the space to use, InDesign will use it to save you a few times toggling between Character and Paragraph modes. Figure 1.8 Customizing the Control panel Panels You Don’t Need So upgraded is the Control panel, in fact, that it negates the need to use some other panels almost entirely. Conversely, you can elect to hide the Control panel, saving yourself some vertical screen real estate. The main advantage to using the Control panel is its context-sensitive nature; | Bars 11 depending on the task at hand, it contains the majority of controls, options, fields, and buttons from the Transform, Align, Character, Paragraph, and Table panels, as well as some from the Stroke, Text Wrap, Effects, Character Styles, Paragraph Styles, Object Styles, and other panels. All these controls share the same space onscreen, which is far less real estate than the respective panels consume individually—even with panel docking and other space-saving options. Although the options on the Control panel are not comprehensive replicas of all the dedicated panels mentioned in the previous paragraph, you may need more only on rare occasions. Consider your unique workflow and examine what is and isn’t available on the Control panel to be sure, but you can probably safely hide the following stand-alone panels and reclaim the space they would occupy for other panels not duplicated on the Control panel: •u Character •u Paragraph •u Table •u Transform •u Align On the other hand, if you prefer using the individual panels (personally, I prefer using the Character, Paragraph, and Table panels rather than the Control panel most of the time), drop the Control panel and reclaim that space. With such a panel-laden application, where docking, grouping, and stacking panels and multiple monitors merely mitigate screen overcrowding and a claustrophobic document workspace rather than solve it, repossess any pixels you can. Bars With 56 default panels, Adobe could market InDesign under the tagline “There’s a panel for that!” Of course, that would infringe on Apple’s “There’s an app for that!” trademark, but in the ongoing feud between Apple and Adobe, one more tiff would hardly be noticed. By the same token, InDesign could also infringe on the trademark of Apple partner AT&T with “Fewer bars in more places.” That’s right, folks; InDesign has toolbars, though it has fewer bars than your average cell phone. Command Bar, R.I.P. If you’re upgrading directly from InDesign CS3 to CS5, as are many of your peers and this book’s readers, you may notice that Adobe did away with the Command Bar. Or, you might not notice; hardly anyone used it, which is why it disappeared as of version CS4. Activated from Window Object & Layout Command Bar in CS3, this horizontal toolbar included buttons for common functions like Save, Open, Print, and Check Spelling; buttons to toggle bullets, numbering, and left and right indents on or off; and quick-launch buttons for Photoshop, Illustrator, and Acrobat. If you’re among the proud few who used the Command Bar, I have the sad duty to inform you that it is no longer a part of InDesign. With the exception of the quick launch buttons, all its functions are now exclusively part of the Control panel or menus… …Or a new toolbar, called the Application bar, that has a half-finished look and an in-some-futurerelease-I’ll-be-a-better-Command-bar vibe. 12 | Chapter 1 Customizing Application Bar In an ongoing effort to get people to use the entry-level digital asset manager Adobe Bridge (and through it buy stock photography and subscribe to Adobe RSS newsfeeds), Adobe has, since the initial release of Bridge in Creative Suite (1), been integrating (some say infiltrating) all the major applications like InDesign with commands and buttons to launch Bridge. InDesign CS3 brought us a Control panel button named Go to Bridge, which also doubled as a menu to access the short-lived Adobe Stock Photos. As a part of the Control panel, that Go to Bridge button/menu could be easily hidden via the Customize Control Panel dialog box, which may be part of the reason Adobe Stock Photos never succeeded and was killed by the time CS4 debuted. Adobe Stock Photos- and Adobe RSS newsfeeds-free Bridge CS4 found its way into InDesign CS4 not as a Control panel section that a user could hide but instead as a Browse in Bridge command on the File menu (which is obliterable via menu customizations) and as a nonremovable Go to Bridge button on the new Application bar. It remains in both places in InDesign CS5; CS5 also includes the Mini Bridge panel, but that’s a topic for a different chapter. On the Mac, the Application bar can be toggled on or off with a command at the bottom of the Windows menu. Within the Application bar you’ll find the application icon (the stylized ID for InDesign); a Go to Bridge button; and alternate, menu-driven means of accessing document zoom level, common show/hide commands from the View menu, preview modes, and workspaces. In addition, exclusive to the Application bar and available nowhere else in InDesign, the Arrange Documents menu enables you to arrange multiple open documents’ windows in a dizzying variety of stacks, tiles, and flotillas (see Figure 1.9). You’ll also find a search field to help you find topics in the InDesign help as well as a button to access the new CS Live online features of Creative Suite 5. Figure 1.9 The Application bar on the Mac (top) and Windows (bottom) Showing the Application bar on the Mac will cause the document zoom percentage display to disappear from the status bar; hiding the Application bar puts the zoom percentage display back in the status bar. The Application bar is very different on Windows. It contains all the same features as the Mac version. A bigger difference, though, is that the Application bar can’t be hidden on Windows. Whether you want them or not, Go to Bridge and the other menus and buttons are a permanent fixture in your copy of InDesign CS4 or CS5. There is a silver lining, though: Unlike on a Mac, the Windows version of the Application bar is (usually) low profile. It’s unified with the application menus and minimize, maximize, and exit buttons to form a concatenated single Application bar that takes up very little extra vertical space than that required by the menus. Even the screen-wasting title bar is omitted! Note that in some default workspaces on Windows, the Application bar appears as its own toolbar independent of the menu bar and thus takes more vertical screen space. Despite the obvious ability of the InDesign engineers to reposition the Application bar, there remains no user interface for you and me to move or hide it. | Keyboard Shortcuts 13 Application Frame Exclusive to the Mac version of InDesign, owing to the differences in the way Mac and Windows handle application and document windows, is the option to attach all the panels and toolbars to a document window. Normally on a Mac, the Application bar and Control panel are docked directly beneath the menu bar; the Tools panel is docked to one side of the screen; and other panels are docked to the other side of the screen. Document windows are their own constructs that can be moved and resized without affecting the positioning on these other elements. To facilitate multiple-application workflows, however, you can invert the behavior that treats toolbars and panels as application—or screen—affixed objects and make them part of the document window (see Figure 1.10). Choosing the Application Frame command at the bottom of the Window menu sticks panels and toolbars to the document window, enabling you to resize and reposition your work area, which makes switching back and forth between InDesign and another application easier. Note that Illustrator and Photoshop CS4 and CS5 have similar commands to ease all sides of a backand-forth with InDesign. Figure 1.10 Panels and toolbars affixed to the document window via the Application Frame command Keyboard Shortcuts Somebody far back in time invented computer keyboard shortcuts, the ability to press a few keys simultaneously to produce the same effect as, and in lieu of, reaching for the mouse and navigating a menu. I don’t know who came up with the idea of keyboard shortcuts—I think it was Cro-Magnon man, but there’s a strong case being built that it might have been the newly discovered Ardipithecus Ramidus (“Ardi”). Whomever it was should have a statue erected in his honor. Maybe there already is; I haven’t visited the Smithsonian in a few years. 14 | Chapter 1 Customizing Keyboard shortcuts save tremendous time and effort and are, in my opinion, the greatest productivity-enhancing invention since instant coffee (created by Saint Juan Valdez circa 35,000 bce). InDesign is loaded with keyboard shortcuts to speed your work. And, at this point in the narrative, many software book authors would launch into several pages of keyboard shortcuts or direct you to the back of the book, to an index of the same. Me? Well, I have precious few pages in which to cram all the advanced InDesign info I can. I’m not going to waste 3 to 10 or so of those with something I can give you in a different medium (see the sidebar “InDesign CS5 Keyboard Shortcuts”). More important, I can give you something even better than a list of keyboard shortcuts: I can show you how to set your own keyboard shortcuts for just about everything. InDesign CS5 Keyboard Shortcuts Even with the ability to customize every keyboard shortcut in InDesign, sometimes it’s nice to have a list in front of you. So, I made one. Visit http://iampariah.com/projects/other-projects to download a free and printable PDF containing every keyboard shortcut for InDesign CS5 and InCopy CS5 on both Windows and Mac. If you choose Edit Keyboard Shortcuts to launch the Keyboard Shortcuts dialog box (see Figure 1.11), you can assign a keyboard shortcut to any command in InDesign, change the shortcuts already assigned, and create portable sets of shortcuts (more on portability later). Figure 1.11 Editing keyboard shortcuts | Keyboard Shortcuts 15 From the Product Area dropdown menu select Edit Menu, which lets you view and customize commands on the application’s Edit menu. Click Cut in the Commands list. Its shortcut—Cmd+X/Ctrl+X—will appear in the Current Shortcuts field beneath the list. Don’t like that shortcut? Click Default: Cmd+X or Default: Ctrl+X to highlight it, and then click the Remove button. InDesign will promptly notify you that you cannot modify the Default set of keyboard shortcuts and ask whether to create a new set for your customizations. InDesign can contain multiple keyboard shortcut sets. In fact, if you look toward the very top of the dialog box, you’ll see that it already had three—Default, Shortcuts for PageMaker 7.0, and Shortcuts for QuarkXPress 4.0. If you’re migrating to InDesign from PageMaker or QuarkXPress, using one of those sets can ease your transition. In the QuarkXPress set, for instance, object-arrange commands such as Bring Forward, Bring to Front, Send Backward, and Send to Back use XPress’s familiar F5 shortcuts instead of InDesign’s shortcuts, which use the left and right brackets ([ ]). Of course, InDesign isn’t PageMaker or QuarkXPress, so not every command or keyboard shortcut from one has a place in the other; the shortcut sets are not total conversions but helping hands. To create your own set, click the New Set button and name the set, or begin a change and answer Yes when prompted. Go ahead and create a new set now, just to practice while you go through the rest of this section. While working in your set, remember to save it from time to time with the button at the top. If, after working through this chapter, you elect to eject the shortcut set, simply choose it in the Set drop-down list and click the Delete Set button. Returning to modifying the Edit Cut command, let’s say that, instead of removing the default shortcut, you’d like to add a second shortcut. You’d like both Cmd+X/Ctrl+X and Cmd+Shift+X/Ctrl+ Shift+X to effect a cut. In that case, to add a shortcut, position your cursor within the New Shortcut field at the bottom of the dialog box and press the new shortcut. (Note to Windows users: You cannot use the Windows key as a modifier within the application.) Beneath the field you should see a warning that Cmd+Shift+X/Ctrl+ Shift+X is already assigned to the Normal Horizontal Text Scale command. If you click the Assign button, you’ll strip Normal Horizontal Text Scale from the shortcut and assign it to Cut. To the right of the New Shortcut field is Context. Every keyboard shortcut can be targeted to certain types of tasks. You could, for example, bind Cmd+Shift+X/Ctrl+Shift+X to Edit Cut only when working with tables. While working with text, with XML selections, within alert and dialog boxes, in the new Presentation mode, and in all other circumstances, it will not invoke the Cut command. In fact, if you set the Context field to Table now, you’ll see that the Currently Assigned To notice no longer says Normal Horizontal Text Scale. That’s because the shortcut is bound to that command only in the context of working with text. The horizontal scale of text is irrelevant to XML code, dialog boxes, and the structure of tables, and that command and shortcut combination has been assigned to function only where it is relevant—when working directly with text. If you left Context set to Table and assigned Cmd+Shift+X/Ctrl+Shift+X to the Cut command, that would apply only when working with tables. The same shortcut would still invoke Normal Horizontal Text Scale when working with text. In other words, the same keyboard shortcut can be used six times over for different commands in different contexts. 16 | Chapter 1 Customizing There are only so many keys on the QWERTY keyboard, only so many modifiers and combinations of keys, so customizing keyboard shortcuts in InDesign often entails sacrificing keyboard access to one command for another. By the same token, just as you can add multiple shortcuts to Cut, other commands already have multiple shortcuts. Do they need two (or three)? Probably not, which means their extras are fair game for commands that don’t have any. Other commands have shortcuts you’ll never use; put those key combinations to better use. If you use the Gradient Feather effect often, give it a keyboard shortcut (it doesn’t have one by default, although the Drop Shadow command does—Cmd+Shift+M/Ctrl+Shift+M). The Product Area drop-down list mirrors the structure of menus but includes a lot more, even commands not found on the menu bar. Object Editing, for instance, includes all sorts of align, distribution, scale, and nudge commands that simply don’t have counterparts on any menu and would normally require mouse work. Explore the dialog box, changing and testing shortcuts, until you have all your most-used commands shortcutted and InDesign works your way. The folks at Adobe did a great job in setting keyboard shortcuts on the commands most used by the average InDesign user, but they had to leave it up to you to tailor the program to your unique workflow. Keyboard shortcuts, various panel arrangements and customizations, even customizable menus are available to tailor the program to you. Use them. Menus Yes, you read me right: In InDesign CS3 and later you can customize menus. Photoshop CS2 (and its now-retired protégé ImageReady CS2) introduced the idea of customizable menus. Odd as it may sound, it’s a pretty cool idea. Do me a favor: Select Window Workspace New in CS5. You’ll likely be prompted to save your current workspace; answer in the affirmative. Now, return to the Window menu. Notice anything? Check out the File menu. You should see quite a few commands and submenus highlighted in a pleasing blue (see Figure 1.12). Figure 1.12 Menu highlighting in use to show off new commands and upgraded areas of CS5 | Menus 17 Now, go to the Menus command at the bottom of the Edit menu to open Menu Customization (see Figure 1.13). Similar to customizing keyboard shortcuts, you have sets to create and choose from and two categories of menus—Application Menus, those that appear within the menu bar at the top of the InDesign window, and Context & Panel Menus, which are the flyout menus on panels as well as those menus that appear when you right-click (Control-click for you singlebutton Mac mouse users) something. Every menu in InDesign can be customized. Pick one. Click the arrow to the left to expand the menu, showing commands and submenus in the order in which they appear on the menu itself. If there’s a command that you never use, one you’d like out of your way, click its eyeball icon in the Visibility column. The menu command or submenu will disappear from the application as if it didn’t exist. To highlight a menu like those that turned blue in the New in CS5 workspace, change the color in the third column. Sorry, no custom colors, just the basic rainbow red, orange, yellow, green, blue, violet, and gray (for rain clouds, I assume). Why would I want to remove some commands? you might ask. Well, the vast majority of InDesign users never use everything in the application. Do you do any XML work? If not, you can hide the XML-centric commands and unclutter the interface a little. Next, I’d expect you to ask, Why would I want to color-code my menu commands? As you saw Adobe do with its set, color-coding menus is a great way to learn new features and commands. It can also help in memory: Where do I set the options for an inline graphic so that it has vertical spacing? Oh, duh! Here it is: Anchored Objects on the Objects menu. I colored it red last time I used it six months ago so I’d remember where to find it again. For you production managers, editors, and other team leaders, customizing menus presents a new level of production control through customized workstation installs without messing with installer scripts or disabling plug-ins. Check out the sidebar “Customizing InDesign to Easily Create Workflow-Focused Workstations” to see how I helped the editor of one small newspaper keep her staff focused and her layouts clean and press ready. Figure 1.13 Customizing menus 18 | Chapter 1 Customizing Customizing InDesign to Easily Create Workflow-Focused Workstations I was asked to improve the workflow of a high school newspaper. The request came from Pam, the editor-in-chief and a teacher at the school. Pam was exasperated with her paper’s workflow. She had good reporters and editors, but none of them had had graphic design training despite the fact that they laid out their own copy and photos and worked up advertisements for the paper’s local sponsors. Her teenage staff probably knew more about technology than either Pam or me, but they were prone to—let’s say—experimenting with imagery and effects. They had a tendency to try to reproduce in their articles and ads anything that caught their eye in any medium—other newspapers, magazines, printed advertisements, broadcast media, the Web, and, most often, MySpace. com. All of this despite the fact that the paper was one color (with thrice-annual special editions going to two or three colors). Before putting the paper to bed every week, Pam lost a night of sleep fixing the staff’s experiments and converting too-similar color pairings like RGB deep purple and dark red to colors that would contrast in 85 LPI black on newsprint. When the school board delivered InDesign with its object effects, attribute-level transparency, and other features, Pam foresaw her one night of cleanup and fix stretching into a night and a day. The students’ designs, she said, will only get wilder. Because Pam had classes to teach, and because students’ class schedules varied, staffers often worked in the paper’s office without supervision. The teenagers, who by their own admission know far more than we experienced old fogies, simply couldn’t resist engaging in…experimental…design that we old folks “just don’t get.” Some features of InDesign would improve the productivity and creativity of the staff, but other features would make more work for Pam. This was the problem. The solution was to customize the menus. Armed with the character of the publication—B&W, 85 LPI, newspaper—the list-style presentation of commands in the Menu Customization dialog made it easy to compile a list of what commands and panels staffers needed and what they didn’t. Then, it was just a matter of turning off what they didn’t need. Because the publication is printed only in black ink, we disabled Window Color and removed the corresponding shortcut, preventing the Color panel from being accessed. The Swatches panel, preloaded with tint swatches of process black and all other colors removed, we left available to the students, but we disabled the Swatches panel menu commands for New Color Swatch, New Mixed Ink Swatch, and any other command that would have enabled the creation or loading of colors other than those added to the default palette by Pam. (We couldn’t do anything about the New Swatch button at the bottom of the panel, though, so we disabled the Color Picker.apln and other plug-ins.) For those thrice-annual two- or three-color special issues, Pam will create new InDesign INDT templates containing the same black tint swatches and matching tint swatches for the chosen spot color(s). We turned off access to object effects, transparency, HTML and XML export, and quite a few other commands and panels that the students didn’t need in order to write and lay out their newspaper—disabling in both the main application menu and in panel and context-sensitive menus. At the same time, we colored menu commands that were new to CS5 or had moved since CS3 to help the students learn the new version. To prevent the technology-savvy teenagers from undoing everything, we assigned custom (and difficult-to-guess) keyboard shortcuts to open the keyboard shortcut and menus customization dialog boxes and to revert to the default workspace (thus restoring access to the Window Workspace menu and everything else so that Pam could later change the customizations if needed). We changed the default shortcut for InDesign’s Preferences and then hid them all from appearing on the Edit and InDesign (Mac) menus. | Plug-In Customization 19 As a last step, after making all the menu and keyboard shortcut changes and showing and arranging all the required panels, we saved all the presets individually and created a new workspace that unified these settings. The result was a lean InDesign installation completely customized to the needs of the school newspaper and bereft of anything that didn’t have a place in the workflow. The final step was to copy the shortcut set, menu set, and workspace from the build machine to the staff’s workstations and load the preset workspace that mirrored the workstations to the build machine. Pam tells her students that the customized InDesign is the long-rumored Adobe InDesign Elements, a new product built specifically for black-and-white newsletter publishing that Adobe is test marketing among several schools and newspapers. Of course, these changes couldn’t prevent a student from drawing something completely inappropriate in Illustrator or Photoshop and then placing it in InDesign. Both of those applications have similar customization features, and we limited some of their functionality on the workstations, but by necessity, it couldn’t be as thorough a streamlining as within InDesign. Still, last I heard, Pam’s per-issue cleanup had dropped from a full night of work to less than two hours because of the limited InDesign installations. Plug-In Customization Another level of application customization available to you is via the removal of plug-ins. (Individual users, feel free to skip this section.) InDesign, you see, is not so much an application in the traditional sense of computer programming. It isn’t hundreds of thousands or millions of lines of code compiled into a single executable like most other applications. InDesign.exe (Windows) and InDesign.app (Mac) is actually a plug-in wrapper. All of InDesign’s functionality is added through plug-ins that are no different from third-party plug-ins you may buy to give InDesign functionality Adobe didn’t give it. Don’t believe me? Go look in your InDesign installation folder (Applications/Adobe/Adobe InDesign CS5 on the Mac, Program Files\Adobe\Adobe InDesign CS5 or Program Files (x86)\Adobe\ Adobe InDesign CS5 on Windows). The InDesign application itself is but a few megabytes. Look inside the Plug-Ins folder on the Mac to find numerous .InDesignPlugin files arranged in subfolders. On Windows, you’ll see the same subfolders beneath the Plug-Ins folder. On either platform, you’ll see mostly plain-English names for all your favorite InDesign panels and features. The Eyedropper tool, for instance, is added to InDesign Windows by the inclusion of the Eyedropper Tool.apln plug-in; the Print dialog box is PrintUI. InDesignPlugin on the Mac. The InDesign executable mostly acts as activator to run those plug-ins and glue to allow them to work together. There’s also an extra layer of organization on Windows that isn’t on the Mac. Windows users will note the Program Files\Adobe\ Adobe InDesign CS5\Required (or Program Files (x86)\Adobe\Adobe InDesign CS5\ Required) folder, which contains IDRC plug-in files. As the name implies, everything in the Required folder is required for InDesign to fulfill its base purpose. In the Plug-Ins folder are all the optional plug-ins, the ones InDesign can function without. Most you wouldn’t want it to run without, though. For example, you could pull out Page Setup Dialog.apln, but then you wouldn’t be able to alter page sizes. On the Mac, plug-ins aren’t so easily differentiated because required and nonrequired plug-ins all share the .InDesignPlugin extension. 20 | Chapter 1 Customizing InDesign can function, to one degree or another, absent any of the nonrequired plug-ins. Therefore, if some or all of the people in your workgroup have no need of something like, say, hyperlinks and the Hyperlinks panel or type on a path, you can save (a little) system overhead and tidy up the InDesign interface a bit by disabling the plug-ins that add those functions. In past versions, plug-ins were managed from the Configure Plug-Ins dialog box. As of CS5, however, Adobe has unified the management of plug-ins and extensions across all Creative Suite applications into the Adobe Extension Manager, an app that ships with the Suite and constituent products (see Figure 1.14). You can launch Adobe Extension Manager from its application icon or from within InDesign via Help Manage Extensions (Windows) or InDesign Manage Extensions (Mac). In Adobe Extension Manager, select InDesign CS5 from the Products list to view a list of plug-ins and extensions installed in your copy of InDesign. Plug-ins and extensions are listed with their versions and authors, if known, and may be selectively disabled by unchecking the box in the Enabled column. Already disabled plug-ins show an empty box in the Enabled column and can be toggled back on with a click in that box. Required plug-ins, those that cannot be disabled without destabilizing InDesign and triggering a planet-wide seismic catastrophe even John Cusack couldn’t escape, appear with a padlock icon to the left of their names, and their Enabled column checkboxes are unalterable. To delete, not merely disable, a noncritical plug-in, select it and click the Remove button that appears to the right of the plug-in author’s name. Figure 1.14 Configuring InDesign plug-ins via Adobe Extension Manager CS5 Disable any plug-ins neither you nor InDesign need to do your job; you’ll have a leaner InDesign with less demand on your system RAM. If you’re not entirely sure what a plug-in does, highlight it; at the bottom of Adobe Extension Manager you can view a description and advanced information about any selected plug-in. Although the resulting description isn’t guaranteed to be illuminating, it might offer some clues. Unfortunately, Adobe Extension Manager typically offers much less information about plug-ins and their dependencies than the much more verbose Configure Plug-Ins utility it replaced. Ah, progress! When in doubt about what a plug-in does and whether you need it, try disabling it and look for the absence of what you think it does. Why would I want to disable some plug-ins? For many of the | Workspaces 21 same reasons you’d want to disable some menus—a cleaner display, the aforementioned smaller RAM footprint, and to limit workstation installs to only what is required of the user’s workflow. If your team works in a strictly print workflow, for instance, and never exports to HTML or Flash, you can remove commands, panels, and everything else to do with hyperlinks, rollover buttons, sound and video, HTML export, and so on. I can tell you from personal experience that using Extensions Manager to disable things like the Tools panel (Tool Box.apln) on someone else’s computer is also an amusing practical joke. Just be kind enough to let the victim in on the joke before too long (or leave this book nearby opened to this page and I’ll take the blame). Workspaces Now that you have InDesign customized to your personal work habits, with this panel stacked over here, another dozen panels collapsed to icons in a dock, three more stacked, and several panels hidden, menus color-coded and customized, and keyboard shortcuts totally customized, it’s time to scare you: Everything you just did will evaporate the first time InDesign’s preferences get corrupted. They get corrupted often—no more so than other applications’, but that’s too often. All your customizations are saved into the application preferences, a flimsy little ASCII text file with all the resiliency and tensile strength of wet newsprint. Sneezing too hard in the general direction of your computer could tear and corrupt the preferences. Then where would you be? That’s right, trying to remember all the original keyboard shortcuts while stumbling all but blind through the original configuration of panels. Of course, there’s a solution to prevent the loss of your customizations. And, I’ll explain that solution in detail in the sequel to this book, Mastering InDesign CS5 for Print Design and Production Rebooted, due out from Sybex next year. Don’t let your preferences get corrupted before then. Just kidding. I was doing an impression of a typical local news anchor—Tune into our six o’clock broadcast to find out what’s killing area children and could be killing your child right now! (Yup, tune in at least three hours after your child has been presumably slain to learn that children are being given two desserts in the school cafeteria on Fridays.) InDesign has, for several versions now, had the ability to save panel (previously palette, lest we forget the tragedies of yesterday) arrangements as workspaces. Workspaces are so much more, though: They save menu customizations, keyboard shortcuts, and panel arrangements. It’s the last part that’s the most important because, while you can save and restore sets of keyboard shortcuts and menus, workspaces are the only way to record panel arrangements. When we looked at menu color-coding a few pages ago, the New in CS5 option you chose from Window Workspaces was a workspace. You may have noticed that loading it also rearranged your panels. If you missed that, load up New in CS5 again from Window Workspaces. Note the dock on the right wherein several panels have been hidden and replaced by others not shown after first installing InDesign. The Essential workspace will return everything—shortcuts, menus, panels—to out-of-the-box InDesign. Anytime you customize InDesign, save your workspace by choosing Window Workspaces Save Workspace. Supply a name, and your workspace will be added to the Workspaces menu ready for instant restoration in the event of a Preferences corruption and subsequent reset or if you change things around to fit a particular project. That brings me to another key point: You can have many, many workspaces. Sometimes you need these five panels showing, some projects require those six others, and yet other types of projects require a dozen or more, all with options showing. Make workspaces for each of your typical types of projects. Strictly print projects, for instance, aren’t likely to need the Hyperlinks panel, 22 | Chapter 1 Customizing whereas creating a publication that will be distributed only on the client’s website as a PDF does need Hyperlinks and probably doesn’t need the Separations Preview and Trap Presets panels. By employing multiple, project-specific workspaces, you can further reduce panel clutter by limiting the application to only what the one type of project needs, without the chore of having to manually open, close, and arrange panels every time you switch to a different task or project. InDesign in Your Pocket Or, InDesign on a Stick—a USB stick/thumbnail drive/flash drive. Although you can fit InDesign and all its component plug-ins on most portable USB flash drives, it won’t run from there. (Well, I’m sure somebody could get it to run, but I think that would violate the EULA.) What I mean by the title of this section is taking your InDesign in your pocket, your unique configuration and work habits, and sitting down at any workstation and, in 30 seconds or less, making any copy of InDesign CS5 work exactly like InDesign on your main computer—complete with panel arrangements, keyboard shortcuts, menus, and even your own autocorrect settings and Find/ Change queries. It’s exceedingly simple, really. First, make sure you’ve created a new keyboard shortcut set, a new set of menus, and a new workspace. Create and save them in their respective manners. Nothing here is permanent, so please don’t feel pressured to create the perfect workspace or customize everything right now. Just do something simple for each, save the set, and close InDesign. Now, open a Finder or Explorer window and navigate to the following InDesign folder. Note that, if you can’t get to the folder, if it’s marked as protected or hidden, or you just can’t see it, check out the sidebar “Are Your Files Hidden?” Mac: [your user name]/Library/Preferences/Adobe InDesign/Version 7.0/en_US/ Windows 7/Vista: Users\[your user name]\AppData\Roaming\Adobe\InDesign\InDesign CS5\Version 7.0\en_US\ Windows XP/2000: Documents and Settings\[your user name]\Application Data\ Adobe\Adobe InDesign CS5\Version 7.0\en_US\ Are Your Files Hidden or Restricted? By default, Windows (all recent versions) hide certain folders and files to protect them. Unless you (or your IT department) have specifically told the operating system to show those files to you, you may not be able to interact with them. First, you’ll need to unprotect and/or unhide these files. Here’s how. 1. On the Start menu, select Control Panel, which will either open a new Explorer window showing your Control Panel folder or list the contents of the Control Panel folder directly in a submenu on the Start menu. In either case, choose Folder Options, which opens the Folder Options dialog box. . Go to the View tab. 2 3. In the Advanced Settings section, select the Show Hidden Files and Folders radio button under Hidden Files and Folders. To also see file extensions, deselect the check box beside Hide Extensions for Known File Types. Click OK. You may need to restart Windows for the changes to take effect. | Customizing Application Defaults 23 Within those folders, you should see a subfolder for Workspaces. Open that, and you’ll find an XML file of the workspace you just created. Go back up to the Menu Sets folder to find your recently created menu set. At the same level as both of those folders, you’ll find others, called InDesign Shortcut Sets, Autocorrect, Find-Change Queries, Glyph Sets, Print Presets, Preflight Presets, and more. Note that you may not see all of those folders; they’re created the first time you save a customization in that respective area of InDesign. If you’ve not yet created Autocorrect replace pairs, saved Find/Change queries, or created a custom Glyph set, you won’t have folders for them. All of these folders store personal, per-user settings that are machine and even platform independent. You can pick up these files by copying the entire Version 7.0 folder, carry them to any other installation of InDesign CS5 on the same platform (Windows or Mac), copy them to the same locations on the new machine, and have access to them at that workstation just as you would your own. When you launch InDesign, your copied workspace will be on the Window Workspaces menu, your keyboard and menu sets in the Keyboard Shortcuts and Customize Menu dialog boxes’ Sets drop-down lists, and your Autocorrect, Find/Change, and Glyphs sets where they belong (I cover each later in this book). In fact, if you’re handy with scripting, you could probably write an AppleScript or VBScript or BAT file that, upon execution on a target workstation, copies the Version 7.0 folder from the USB drive to the hard drive. You can even store your portable InDesign settings on your iPod, which, if you didn’t realize it, can hold any type of data, not just music and videos. That would sell a few copies of this book! I can see the cover line now: Run InDesign from Your iPod! I’ll have to talk to my publisher’s marketing team. Customizing Application Defaults Is there a way to change the default font/swatches/hyphenation options/whatever? Collectively, it’s probably the most common question I’m asked. Answer: Yes. If you can change the font family and style in the Character panel, you can change the default font. Likewise with creating new default swatches and removing the swatches with which InDesign ships. In fact, if you can do almost anything, you can make it the new default. Just do it with all documents closed. Open InDesign without a document and look at the panels. If an option is grayed out, you can’t change its default. If it isn’t grayed out, well…there you are. Do you want hyphenation turned off by default instead of on? Uncheck the Hyphenate box on the Paragraph panel (choose Show Options from the panel flyout menu if you don’t see it). To remove swatches you rarely use, open the Swatches panel and delete them. Add new swatches you use regularly—like corporate colors—by adding them to the panel with all documents closed. Every new document from that point forward will use only the swatches you see there, or will leave hyphenate unchecked, or whatever change you want to make. To change the default font, open the Character panel and change the font. Done. Well, not entirely. You see, InDesign has a default paragraph style. When you change type options on the Character or Paragraph panel, you are indeed setting new defaults. However, you aren’t changing the default styles, which can lead to problems later on if you reapply the default styles to text. If you’re sure of your new font (or other type styling defaults), make the changes in the Character and/or Paragraph panels, and then open the Paragraph Styles panel. Highlight the Basic Paragraph style, choose Style Options from the panel flyout menu, and then repeat your changes there, making sure to save the style. Now your changes will survive a reapplication of the style. Experiment with different controls and options. You can set new defaults for a great many things when no documents are opened. 24 | Chapter 1 Customizing Here I should note three important points: •u After setting your new defaults, you should close and restart InDesign to commit those changes to the InDesign preferences saved on your hard drive; if InDesign crashes before you’ve closed it, you’ll lose those changes. •u Similarly, unlike workspaces and keyboard shortcut sets, your newly set defaults are part of the application preferences and can’t be saved out to external files. Thus, if your preferences become corrupted and you have to reset them by holding Cmd+Opt+Ctrl+Shift/ Ctrl+Alt+Shift while launching InDesign, your typeface, hyphenation, and any other new defaults will be reset to the factory defaults. •u You should also realize that setting new defaults makes them the defaults only for new documents—existing documents will use the defaults set at the time of their creation. Sharing Customizations Many of the customizations we’ve covered in this chapter can be easily shared with others in your workgroup. Things like workspaces, keyboard shortcuts, autocorrect pairs, find/change queries, and more can be shared and standardized across your team. In Chapter 14, “Collaboration,” you’ll learn how; you’ll also learn about the more powerful means of document and page collaboration available with InDesign CS5. The Bottom Line Organize Panels and Use the Panel Docks Docks and other options make organizing panels in the workspace easier than ever before. Master It Beginning with the default workspace, open all the panels you expect to use in most projects and close those you won’t. Now, using grouping, stacking, docking, or just free-floating panels, arrange the panels to fit your work style, and leave yourself as much room to work on documents as possible. Customize Keyboard Shortcuts Adobe couldn’t assign a keyboard shortcut to everything—there just aren’t enough keys—so it did its best. Many of your favorite commands may not have shortcuts or may have shortcuts you dislike. You can add or change keyboard shortcuts for any command in InDesign. Master It Just for fun, create keyboard shortcuts for each of the object effects—Basic Feather, Bevel and Emboss, and so on. Remove Parts of InDesign to Create Lean, Workflow-Specific Installations By customizing menus and disabling plug-ins, you can easily remove features and functions of InDesign not required by your workflow. Doing so streamlines the interface, reduces errors, and ultimately increases productivity among workflows that do not require the entirety of InDesign. Master It To test your hand at removing features from InDesign, find all the features that are new or improved in CS5 and hide their menu commands. Then, color green the first 10 still-enabled menu commands about which you’d like to learn more. Finally, disable the plug-ins that show panels you or your team members aren’t likely to need. | The Bottom Line 25 Change the Default Font, Colors, and More Out of the box, InDesign CS5 uses Minion Pro 12/14.4 pt as the default text style and includes swatches for process magenta, cyan, and yellow and RGB red, green, and blue. These defaults are fine if your average document uses 12/14.4 Minion Pro and only solid process or RGB colors. But, if the average document you create requires another typeface, size, leading, other colors, or virtually any other option different from the defaults, change the defaults and save yourself some time. Master It Think about the documents you create most often. What is the type style— font family, font style, size, leading, and other formatting attributes—you use more than any other? Make those your new defaults. Do the same with your swatches, eliminating any colors you rarely use while adding those you use frequently. Carry Your Personalized InDesign Work Environment in Your Pocket or on Your iPod From freelancers brought into agency offices to assist with crunch time to students working in school labs, from round-the-clock production teams where different shifts use the same equipment to those dedicated enough to bring work home, seldom do creatives work solely on a single machine anymore. Creative and production personnel who switch computers waste a significant portion of their time customizing the InDesign environment of each computer on which they work even for a few minutes. To save time, nearly everything customizable about the InDesign CS5 working environment is portable. Customize one copy of InDesign, and carry your unique environment with you, making you instantly productive at any workstation. Master It After arranging your panels and customizing your keyboard shortcuts and menus, it’s time to take your InDesign workspace with you. If you have a USB flash drive, an iPod, a smart phone, or even just a floppy disk handy, copy the files containing your customized environment to the storage device. Now, if a second computer is available with InDesign CS5 installed, install those files to that computer and set up InDesign CS5 your way.


![Model PH450G [Style: S2] pH and ORP Converter](http://vs1.manualzilla.com/store/data/006013412_1-cd77700eed276036ffccc744cbf6fbb4-150x150.png)