1
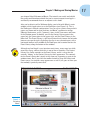
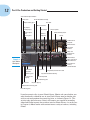
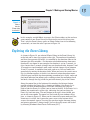
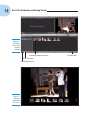
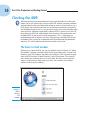
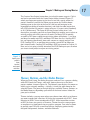
1
In This Chapter
▶ Introducing iMovie
MA
▶ Finding your way around the iMovie interface
TE
RI
AL
Making and Sharing Movies
▶ Planning your movie
▶ Finding what’s where in iDVD
TE
D
▶ Implementing your plan
i
PY
RI
GH
Movie and iDVD, parts of the iLife ’09 suite (which includes iTunes, iPhoto,
iMovie, iDVD, GarageBand, and iWeb), form the digital video spoke of
Apple’s so-called “Digital Hub.” iLife is bundled with new Macintosh computers and available separately for a $79 list price. iDVD is unchanged from the
very mature version shipped in iLife ’08 (other than a couple of minor
updates). iMovie, on the other hand, has dozens of new features, a few of which are the new Precision Editor; chapter,
comment, and beat markers; and themes.
CO
This chapter details the steps along the way that
brought iMovie and iDVD to their current incarnations. You also get a brief tour of the iMovie and
iDVD Workspaces. Additionally, we cover topics
you should keep in mind when planning and creating your movies so that you can achieve the best
end result.
Getting to iLife ‘09
©
iSt
oc
kp
hot
o/Kiy
In 1999, Apple introduced the iMac DV (Digital Video), the
o shi T
akahase
first consumer computer to come with a FireWire port as
standard equipment. To demonstrate FireWire’s speed and capability,
the iMac DV included a new application named iMovie. iMovie was a
groundbreaking introduction of home video editing to the masses (or, as
Apple prefers to say, “the rest of us”), geared to use the early generation of
8
Part I: Pre-Production and Getting Started
MiniDV-tape based camcorders from companies like Sony, Canon, and JVC.
All of these companies agreed on FireWire as the standard protocol for transferring video (although it was sometimes called something else, like iLink
or IEEE-1394). And iMovie was easy to use, far more so than professional
packages like Apple’s Final Cut or Adobe’s Premiere.
Apple improved and enhanced iMovie through six versions, the last two of
which included HD (for High Definition) as part of their name. However,
although it was still easier to use than the competition, iMovie gained complexity along with its new capabilities and was still based on code that
was originally written for pre-OS X Macs. Then, in late 2007, with the release
of iLife ’08, a new version of iMovie was introduced. Old-timers like us
recognized that the new iMovie made getting started a lot easier and that it
fit into the OS X mold more comfortably than its predecessors, but we also
noticed that a lot of functionality was either missing or, in a few cases,
relocated to GarageBand, the audio editing application in the iLife’09 suite.
Apple recognized that many of their existing users would be dissatisfied with
the new iMovie, just as new users would be enthused by how easy it was to
use, so Apple made iMovieHD available to iLife ’08 owners as a free download. The iMovie in iLife ’09 is a vast improvement on the previous release
and an alternative is no longer necessary nor provided.
Similarly, Apple introduced iDVD at the January 2001 Macworld Expo,
providing a tool that enabled purchasers of Macs with the new SuperDrives —
the first DVD burners priced for the consumer market (from Pioneer) — to
produce their own DVDs. The iDVD in iLife ’09 is, to all intents and purposes,
the same iDVD that shipped as part of iLife ’08. The only changes are
compatibility updates for the other applications in iLife ’09.
Henceforth in this book, we refer to the current software as iLife, iMovie,
iDVD, GarageBand, iPhoto, and so on, and include a version number only if
we find it necessary to discuss an earlier software iteration.
Knowing What Goes into Making a Movie
Just about any movie that anyone would be willing to watch requires some
planning, organization, and editing. Assuming that the content is coming
from a camcorder, planning includes being sure to start filming a few seconds
before the desired scene to avoid missing the first frame and letting the
camera run a few seconds after the end of scene so as not to prematurely end
the scene. One of the great things about digital editing in iMovie is how easy
it is to trim the footage so that you can start and end each scene with exactly
the frames you want.
Chapter 1: Making and Sharing Movies
Of formats and frame rates
Historically there have been, basically, two
broadcast standards: NTSC and PAL. Minor
variations existed, but NTSC and PAL have been
the name of the game outside of France, which
still employs a standard called SECAM that was
common in Eastern Europe before the fall of the
Iron Curtain, when the formerly Communist
nations switched to PAL. NTSC is the standard
in North and Central America, most South
American countries, Japan, the Philippines, and
a number of Asian and Pacific Island countries,
whereas some variety of PAL is the standard
almost everywhere else (except, as mentioned,
France). The two major differences between the
NTSC and PAL formats are the frame rate —
how many frames of video make up a second of
footage — and frame size — the number of
video scan lines in a frame. NTSC uses 30 fps
(frames per second) — really 29.97, but most of
the literature rounds this off — and PAL uses 25
fps. Similarly, NTSC has 525 scan lines and PAL
has 625, some of which are unused. If you’re
curious about the nitty-gritty details, the math,
and the exceptions, we recommend that you
start by searching the Web for more info on
NTSC and PAL. While you’re Googling, check
out some info on ATSC (the format for digital
television that supports HDTV) to see how the
“digital transition” has simplified many items
while introducing its own new technical details
to confuse the typical TV viewer.
Organization includes having your camera and microphone, if you have an
external microphone, positioned to catch the scene to the best advantage. In
other words, your scene needs to be properly lit with the audio pickup where
you’ll catch and immortalize any dialogue. (We could show you a wedding
video where the camcorder was behind the groom by about 15 feet and his
vows didn’t come through.) In fact, when you can arrange to do so, have
multiple cameras recording from different angles. iMovie makes it easy to
splice in both audio and video, and having multiple sources not only means
that you’re far less likely to miss something, but that you can use the best
audio while cutting from one camera angle to another to best present your
scene. That’s why professional videographers use multiple cameras, too.
Other organizational items include making sure that you have adequate
batteries or available power, sufficient media (be it tape, flash memory,
MiniDVDs, or available hard drive space), and satisfactory lighting. And, if
your movie is scripted, you need to make sure that everyone knows what
they’re supposed to do and say as well as where they’re supposed to be
while giving their performance.
The editing, well, that’s just what we’re going to cover in subsequent chapters, mostly in Chapters 5 and 6. iMovie lets you do easily almost anything
that a professional editor does, without all of the hard work and training.
9
10
Part I: Pre-Production and Getting Started
Understanding the Movie-Making Process
Oversimplifying the subject tremendously, movies fall into one of two categories: documentaries or scripted. Documentaries include not just the polished
product of collecting and narrating historic footage, but efforts as unpolished
as the traditional home movie, where you just throw the camera up and
grab footage of some unplanned event, such as baby’s first steps, animals
frolicking, or the first time your child succeeds in riding his two-wheeler.
Scripted movies range from recording planned scenes such as class lectures
to elaborately scripted vehicles that include not only prepared dialogue but
elaborate stage direction.
Television tends to blur traditional categorization, referring to the current
plethora of “reality” shows as unscripted; however, they fall more into the
scripted category than not, with prepared venues and planned activities.
The shows lack only the precise details of a traditional scripted show, just as
a variety show or a talk show leaves a lot of room for improvisation although
it’s still a planned show. The stunts or routines in a show like Survivor or
Dancing with the Stars are planned and scripted, but how well they’re executed varies, just as the host of a talk show has a prepared list of questions
(or script), but doesn’t always know how the guest is going to respond.
Just because most home movies are basically documentary, immortalizing
events and activities, doesn’t mean you can’t put a little structure into
the process. iMovie (and its companion, iPhoto) help you by grouping
footage and images into events — content organized initially by time, but
customizable by you. We discuss events in more detail in Chapter 3.
Entire books are dedicated to the art and science of film-making. If you’re
interested, a good starting point is Filmmaking For Dummies (Bryan Michael
Stoller, Wiley Publishing).
Figuring Out What’s Where in iMovie
The first time you launch iMovie (by clicking its icon in the Dock — a fivepointed star with a circled video camera in the center, as shown in the
margin), you encounter a screen that looks like Figure 1-1. Some minor details
in the menu bar and Dock may differ depending on your screen size and what
software you have installed, but the iMovie window and the Welcome to
iMovie dialog will be the same.
Apple realizes that you probably won’t want to see the Welcome dialog every
time you launch iMovie, so they include a check box in the lower-left corner
that you can deselect after you’ve taken advantage of the information it offers
(or decide that you don’t want to investigate). You won’t see it again unless
Chapter 1: Making and Sharing Movies
you choose Help➪Welcome to iMovie. The tutorials are useful and exhibit
the quality and attention to detail that we’ve come to expect from Apple —
we heartily recommend them as an adjunct to this book.
After you’ve dismissed the Welcome dialog, you’re left with iMovie’s main
window, which Apple refers to as the Workspace (see Figure 1-2). This is
the Workspace’s default configuration. You can, up to a point, change which
panes are shown and in what positions via iMovie’s preference settings
(iMovie➪Preferences, or Ô+, (comma)), items in the View menu, and items
in the Window menu. By default, you see the Project Library pane in the
upper left, the Viewer pane in the upper right, and the Event Library in the
lower half. The Event Library is split into a hierarchical view on the left and a
browser view on the right, displaying the clips in any selected event, with a
horizontal toolbar in the middle of the Workspace and a control bar for the
Event Library along the bottom of the window.
Although we laud Apple’s user interface consistency, every once in a while,
even they slip up, and we think this is one of those situations. The Project
Library has similar controls to the Event Library, and it is clear that the
controls “belong” to the Project Library by their appearance. The controls
for the Event Library don’t match in the same way, appearing as part of the
window frame. But, if you click the toolbar button to swap the Project and
Events areas, the controls swap appearance as well. It just goes to show you
that nobody’s perfectly consistent.
Figure 1-1:
Presenting
iMovie.
11
12
Part I: Pre-Production and Getting Started
Show Camera Import window
Arrow tool (Advanced only)
Full Screen
Narration
Project Library pane
Mark as Favorite
Play Project
from beginging
New Project
Swap Projects
and
Events panes
Show Inspector
Audio Skimming On/Off
Mark as
Rejected
Viewer
Audio Level at
playhead
Photo Browser
Transitions
Browser
Maps and
Backgrounds
Browser
Titles Browser
Figure 1-2:
Your iMovie
Workspace.
Music and Sound
Effects Browser
Event Browser
Frames/
Thumbnail slider
Hide/Show
Keyword
Filtering pane
Unmark
Crop, Rotate, and Ken Burns tool
Keyword tool (Advanced only)
Play Event from
Begining
Add to Project tool
Keyword Filtering pane
Full Screen
Clip Filter pop-up
Hide/Show Event Library pane
Event Library pane
If you have movie clips in your iPhoto Library, iMovie asks you whether you
want thumbnails created for use in your Event Library now or whether you
wish to wait and perform the processing later, as shown in Figure 1-3. This
activity takes place because a lot of still cameras are capable of recording
video and iPhoto imports those videos into the iPhoto Library. As we discuss
in Chapter 2, iMovie works with content from a variety of sources, including
iPhoto.
Chapter 1: Making and Sharing Movies
Figure 1-3:
Now or
later for
iPhoto video
thumbnails?
In this example, we told iMovie to process the iPhoto videos so that we have
some content in our Event Library to illustrate the rest of this discussion.
That’s why the Event Library sports an iPhoto Videos item in the following
screenshots, an item that wasn’t present in Figure 1-2.
Exploring the Event Library
As shown in Figure 1-4, we selected iPhoto Videos in the Event Library list
on the left and its four clips appear to the right. The number of thumbnails,
and thus the apparent clip length, is controlled by the duration slider at the
bottom-right of the window — the duration selected determines how many
thumbnails are shown. In our example, the duration is set for 5 seconds, so
clips shorter than 5 seconds in length are one thumbnail wide, between 5 and
10 seconds are two thumbnails wide, and if we had a longer clip of between
10 and 15 seconds, it would be three wide, and so on. You can modify this
granularity by moving the duration slider. When you hover the cursor over a
clip, its duration appears at the left, just above an action drop-down menu
(the little gear icon with the down-pointing arrowhead to its right), and a red
positional indicator line follows your scrubbing action (the movement, back
and forth, through the clip) while the particular frames play in the Viewer.
Along the control bar at the bottom of the window, the left-most button
controls whether the Events list is showing or hidden: if the Events list is
present, the little arrowhead points to the left, indicating that you can
click to hide the Events list (slide it out of view to the left). If the Events list is
hidden, the arrowhead is on the right, indicating that you can bring the
Events list back into view. The next button to the right, when clicked, puts
you in full-screen mode. The menu bar, Dock, and all your windows disappear, as shown in Figure 1-5. When you first enter full-screen mode, only the
viewer area is visible, but if you move your cursor to the bottom of the
screen, the controls appear. Pressing the spacebar toggles between playing
and pausing whatever is being viewed. You can also play events full-screen
by choosing Window➪Show Events Full-Screen (Ô+7).
13
14
Part I: Pre-Production and Getting Started
Figure 1-4:
The Events
Library with
an event
selected.
Action drop-down menu button
Fullscreen mode
Show/Hide Events list
Figure 1-5:
View your
event video
full-screen.
Duration slider
Chapter 1: Making and Sharing Movies
If you have the controls showing in full-screen mode, you can scrub across
the thumbnails to determine what’s visible in the viewer. Clicking the circled
X at the bottom left of the screen exits full-screen mode, but if you don’t
want to have to show the controls, you can also exit full-screen mode by
pressing Esc.
The Show pop-up menu (refer to Figure 1-4) lets you control which clips are
shown in the Event pane: Favorites only, Favorites and Unmarked (Ô+L), All
Clips, or Rejected Clips. We cover rejecting clips and marking favorites in
Chapter 4.
Deciding on a Distribution Plan
Modern technology has significantly expanded how and where we can share
our video products. It wasn’t all that long ago that camcorders were bulky
things that recorded on VHS, Beta, or VHS-C video cassettes, and distribution
was pretty much limited to duplicating tapes and handing or sending out
copies. Besides the enormous inconvenience, copying tape was a lossy
proposition (meaning quality was lost), both from duplicating analog data
and the fact that tape was flexible, stretched with repeated use, and was
magnetic, making it susceptible to electromagnetic interference.
DVDs and their predecessors, VideoCDs (VCD) and Super VideoCDs (SVCD),
eliminated the generational degradation inherent in the analog copying
process by moving to digital technology.
That quality loss is avoided only when you’re creating a duplicate, not when
you’re re-encoding to a different format, a process known as transcoding. All
standard distribution formats, such as MPEG-1, MPEG-2, MPEG-4, and DivX
(or Xvid) employ lossy data compression to keep the size of your video
manageable, just as JPEG compresses images and MP3 and AAC compress
audio in a manner that throws away some (hopefully) unimportant bits.
In addition to DVDs, we now have iPods, iPhones, Web pages, YouTube, and
a myriad of other distribution venues for our content. iMovie, with the help
of QuickTime, lets you choose which output format or formats you desire.
You can create a movie optimized for iPod viewing, create a copy targeted to
Apple TV, and then instruct iMovie to send the content off to iDVD. It’s up
to you to decide how you want your movies distributed, and we give you a
helping hand with the details in Chapter 12 and give extensive coverage to
iDVD in Part IV.
15
16
Part I: Pre-Production and Getting Started
Checking Out iDVD
Although we now have many different venues and methods for sharing our
videos, we’re still particularly partial to the DVD. Almost everyone we know,
and certainly everyone we know with whom we want to share content, has a
DVD player. Not everyone we know has an Internet connection, particularly
the broadband variety that is a virtual necessity for accessing viewable video
over the ether. Although Apple didn’t enhance iDVD’s feature set in iLife ’09,
they did revise iDVD for compatibility with the other iLife applications and
included iDVD as one of the six iLife components. This is apparently an
acknowledgement on Apple’s part that, although they consider DVD an old
technology that is going to be made obsolete by online and high-definition
offerings, it is still a dominant distribution venue at this time.
The Select a Task window
When you first launch iDVD, you see the window shown in Figure 1-6. Along
the window’s bottom, you find a Help button (question mark), a button that
launches your Web browser and takes you to Apple’s Web site and the page
with the iDVD tutorials (Video Tutorials), and a Quit button. The tutorials
don’t teach you anything that isn’t in this book, but they are presented as
video, so if watching a video helps you learn, the tutorials are a helpful
adjunct to what you’re holding.
Figure 1-6:
iDVD’s
Select a
Task
window.
Chapter 1: Making and Sharing Movies
The Create a New Project button does just what the name suggests. Click it
and you’re presented with the Create Project dialog shown in Figure 1-7,
where you name your project in the Save As text box, specify where the
project should be saved in the Where pop-up menu (or click the downpointing arrow to the right of the Save As text box and navigate in the
expanded Save dialog to another location), and click the radio button that
tells iDVD whether the project is going to have a 4:3 aspect ratio (Standard)
or 16:9 (Widescreen). The Open an Existing Project button also is selfdescriptive, presenting you with an Open dialog that enables you to select an
existing project with which you wish to work. Use Magic DVD to quickly
assemble a DVD from a collection of existing videos and photos — just drag
and drop the media into iDVD, and Magic DVD does the rest. OneStep DVD
lets you import video directly from your camera or a movie and put it on
DVD. OneStep DVD is an excellent way to make a quick DVD of video you
don’t intend to edit. OneStep DVD and Magic DVD are covered in Chapter 13.
Now, we’re just going to briefly introduce the iDVD Workspace you see when
you create a new project or open an existing project.
Figure 1-7:
Specify your
project’s
name,
location,
and aspect
ratio here.
Themes, Buttons, and the Media Browser
When you click Create, the dialog disappears and you’ll see a progress dialog
while iDVD loads the Themes, and so on, before you arrive at the main
project window, shown in Figure 1-8. The leftmost pane displays the menu on
which you’re currently working — initially, it shows the main menu for the
selected Theme. The pane to the right displays available Themes, Buttons, or
the Media Browser, depending upon which of the three buttons below the
pane you’ve clicked.
Themes includes a pop-up menu where you choose from which set of themes
you want to make your selection: All, those that appeared with iDVD 7, those
debuting in iDVD 6, those introduced in iDVD 5, those from older versions
of iDVD, or those you specify as Favorites. Themes have the same purpose
as templates in a word-processing or graphics program. You select a theme
to provide your DVD with a consistent design, employing professionally
designed backgrounds, buttons, and other elements.
17
18
Part I: Pre-Production and Getting Started
Figure 1-8:
Introducing
the iDVD
project
window.
Clicking Buttons enables you to specify how you want your menu buttons to
appear. Unlike the computer-based menus to which you’re accustomed, a
DVD menu is a screen with buttons or labels on it. Menu buttons are the
visual elements that you navigate and select with your DVD remote control,
selecting such things as what to play, whether subtitles are on or off, or
whether to play a narration track. Although they’re called buttons, as you’ll
see in the following list, they don’t have to look like computer (or physical)
buttons at all. Your choices are
✓ Text: Simple text, although you can designate an underlining style that
appears when the button is selected
✓ Bullets: Small icons that show up when the button is selected
✓ Shapes: Graphic elements that appear behind the button when selected
✓ Frames: Framing rectangles
✓ Artistic: Fancy borders for your button
✓ Rectangle: Various boxes that surround your button
✓ Rounded: Curved boxes that surround your button
With any of the last four button types, selecting the slashed circle icon from
the styles that appear in that category applies a default border to your
button, but selecting any other style includes a graphic thumbnail displaying
a preview of your content (the default is a 30-second video loop).
Chapter 1: Making and Sharing Movies
Selecting Media allows you to specify content for use on your DVD, either as
part of the menu structure or the actual content. You see the Media Browser
a lot in this book — it’s the interface between the different iLife applications.
For example, in iDVD, you would use the Media Browser to select movies
created in iMovie, audio created in GarageBand or stored in your iTunes
Library, and photos from your iPhoto Library.
19
20
Part I: Pre-Production and Getting Started