1
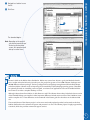
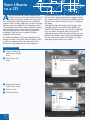
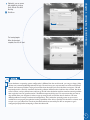
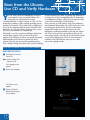
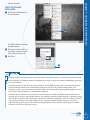
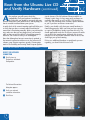
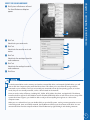
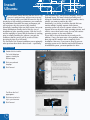
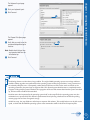
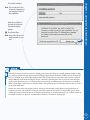
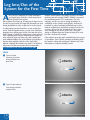
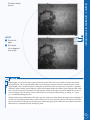
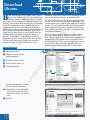
Download
Ubuntu
2
1
2
Open Internet Explorer.
3
4
5
Click Please Select a Location.
AL
RI
There are also two primary variants of Ubuntu 8.10. The
first is the Ubuntu Desktop, which is the focus of this
book. The other is the Server edition, and it is primarily for
handling tasks within a data center or a network. Server
provides mail servers, file servers, and application servers.
In general, it is all the back-office plumbing that your
typical corporate desktop would connect to for services.
Control Panel
D
Navigate to www.ubuntu.com/
getubuntu/download.
The most current release of the Ubuntu operating system
is 8.10. This version is also known as Intrepid Ibex. The
version number comes from the year 2008 and the month
October. The code name convention uses African animals
for the informal version names. For more on the history
of the naming convention, visit https://wiki.ubuntu.com/
DevelopmentCodeNames.
TE
Download Ubuntu
alternative, if you know someone who is running Ubuntu,
you can ask them to make you an installation disc.
MA
B
efore you can begin using Ubuntu Linux, you will
have to first obtain a copy. There are currently four
different methods of obtaining Ubuntu. One option
is to request a CD from Canonical. Although this CD is free
of charge, it does tend to take some time; there is a backlog
for the CDs because there is more demand than can be
readily provided for free. If you really want to have the
official release on CD, you may want to order an Ubuntu CD
online directly from Canonical or Amazon. This incurs a
charge, but it is faster. If you do not need a CD, there are
two other options. By far the most popular way to get
Ubuntu is to download it. Downloading the installer is
cheap and easy, but be aware that the files are very large.
The faster your connection, the better your experience
because the image is roughly 700MB in size. As an
TE
4
GH
Click the location nearest you.
3
5
CO
PY
RI
Click Begin Download.
The download page appears, and the
File Download dialog box opens.
Note: Depending on your security settings,
you may have to click in the top of
the browser to allow the download to
start.
6
Click Save.
2
6
8
Navigate to a location to save
the file.
Control Panel
Click Save.
7
8
The download begins.
Note: Depending on the speed of
your Internet connection and
the load on the download
servers, this operation could
take up to several hours.
Chapter 1: Getting Started with Ubuntu
7
Ubuntu is built on the Debian Linux distribution. Debian was started over 10 years ago by Ian Murdock when he
was a student at Purdue University. Over the years, the project has grown to over 1,000 volunteer developers and
20,000 different software packages. The base package format and package-management utilities behind Ubuntu
come from Debian. Ubuntu works on improving the consumability of the underlying operating system. That effort
has primarily focused on assembling a more targeted, consistent set of applications that can be bundled with the
base Linux OS to make a complete desktop or server.
Although Ubuntu draws from Debian, it adds features as well. The Ubuntu release always includes the latest version
of the GNOME desktop user interface. Other important differences include newer versions of the X Window Server
and the compiler GCC. These differences are documented in the feature goals for the release on the Ubuntu Web
site.
The essential thrust of the Ubuntu project is to be more consistently updated, patched, and recent than the base
Debian distribution and to enhance the system and promote it to users. The Ubuntu project is largely supported by
Canonical, which also provides commercial support services.
3
Burn Ubuntu
to a CD
A
fter you download the Ubuntu installation file
from the Internet, you need to write the file to CD
in order to generate a bootable CD. You will use
the resulting CD to install Ubuntu on your destination
computer. This is a fairly simple task, yet there are many
different ways to accomplish it. The instructions in this
section detail how to burn the CD on a machine running
any Microsoft Windows version from 95 up through
Vista. Note that you must have a CD drive capable of
recording CDs and at least one writable CD that is
compatible with that drive.
The Ubuntu installation file that you downloaded was
actually an archive of the data. When this data is stored
to a CD, the computer will use the data on the CD to
install the new operating system on the computer’s
internal hard disk drive. The installation files create a CD
that has all the right bootstrap data to support running
the computer from the CD during the installation process.
This process is called creating an .iso file, or burning a
disc image.
Although burning a disc image sounds simple, many
operating systems do not include this capability by
default. To perform this task, you will use a third-party
piece of software to burn the image file to the CD.
Although you may already have such software on your
machine, this software varies widely with manufacturer.
The one used in this section is Nero Express. It ships
with many systems built by PC vendors.
Burn Ubuntu to a CD
1
Launch the CD-burning
application that you plan
to use.
2
Choose to burn a CD
image.
3
Navigate to the location
of your Ubuntu .iso file.
4
5
Click the .iso file.
Click Add (or Open).
2
3
4
5
4
6
Optionally, you can ensure
data integrity by clicking
Verify Data on Disc After
Burning.
Click Burn.
6
The burning begins.
When the burning is
complete, the disc will eject.
Chapter 1: Getting Started with Ubuntu
•
If your hardware or operating system configuration is different from the one discussed, you can go to https://help.
ubuntu.com/community/BurningIsoHowto for help. The main issues you may encounter are media and hardware
related. One common problem is trying to burn faster than the media you have in the drive can support. This will
frequently result in a bad CD. Sometimes the burning software will detect that a bad burn has occurred, but other
times it will not, and you will not know until you try the CD in the destination machine. Another common problem
that can be the source of great frustration is insufficient temporary disk space. This error means that you have to
clear off files from your computer in order to open up enough room to hold the data for the burn. The most
difficult problem to remedy is hardware misconfiguration. This is where the operating system on your source
machine does not properly recognize the burning capabilities of the drive or possibly even the drive’s existence at all.
In such a case, you will need to consult any documentation that came with your drive or computer to get it
configured properly before attempting to burn the Ubuntu CD.
5
Boot from the Ubuntu
Live CD and Verify Hardware
Y
ou can easily check the compatibility of most of
your hardware before you install Ubuntu. The
image that you download in the section
“Download Ubuntu” is what is known as a live CD. This
means that it contains a fully working operating system
and the CD is bootable. This enables you to simply insert
the CD in the computer and boot from it instead of your
hard drive. You can take Ubuntu for a test drive, or you
can check your hardware for compatibility.
Historically, one of the consistent challenges with Linux
was hardware support. This was due to the lack of
support by the hardware vendors, who would not provide
documentation of their drivers or would use driver
software that only ran on a specific operating system.
This is mainly a thing of the past, but if you are installing
on any extremely old, exotic, or cutting-edge hardware, it
is always best to check compatibility prior to performing
an installation of Ubuntu; otherwise, you may lose some
or all of the functionality of that hardware.
After you boot, you will want to verify your computer’s
basic hardware functionality. The video card is one of the
first things you should check. The Screen Resolution
program will enable you to verify that you have the
appropriate resolutions available to you that you want to
use. If the video card does not function at all, you will
know pretty quickly. You will end up with a black console
screen with a login prompt. There are several options
available at the boot that you can try to use a more
conservative graphics mode.
Boot from the Ubuntu Live CD and Verify Hardware
BOOT FROM THE LIVE CD
1
Start Ubuntu Linux from
the live CD.
Note: See the section “Burn
Ubuntu to a CD.”
The Language screen
appears.
2
2
Choose your language.
The Ubuntu screen
appears.
3
Choose Try Ubuntu
Without Any Change to
Your Computer.
3
6
Chapter 1: Getting Started with Ubuntu
Ubuntu Linux loads.
VERIFY THE AVAILABLE
RESOLUTIONS
1
Control Panel
Click System ➔ Preferences ➔
Screen Resolution.
1
The Monitor Resolution Settings
dialog box appears.
2
Click here and verify that the list
of available resolutions includes
the one that you want to use.
3
Click Close.
2
3
Ubuntu provides many language and accessibility options. Accessibility support is provided directly from the initial
screen of the live CD, enabling selection of everything from a high-contrast screen theme to full Braille support and
even screen reading.
The Modes selection on the first boot screen enables you to pick different major modes of operation for the boot
process itself. The Normal mode is the default bootup for the CD. The Safe Graphics mode provides a lowresolution, yet safe, way to boot Ubuntu on older hardware or hardware with an unrecognizable graphics card. You
can also use a driver update CD or a manufacturer installation.
The Other Options selection on the initial boot screen allows you to enable and disable certain features that are
normally, but not always, supported by hardware. This can help if you have problems booting or experience strange
behaviors due to hardware not conforming to the standard. Advanced Configuration and Power Interface (ACPI) is
a feature that sometimes has hardware support issues. It replaced an older standard and may or may not be
supported fully by your hardware. The Advanced Programmable Interrupt Controller (APIC) support is another
common source of issues for similar reasons.
continued
➔
7
Boot from the Ubuntu Live CD
and Verify Hardware (continued)
A
fter you boot, you will want to check the
compatibility of all your hardware. In addition to
the video card, you should be concerned with your
network connections, your sound devices, and anything else
that is essential or unusual about your system.
via the Internet. The full software library available to
Ubuntu is quite large. In fact, many more packages are
available than can fit on a CD or DVD. This being the
case, you will find many more software options available
to you if you have an Internet connection.
A quick check of the network monitor applet will allow you
to verify that you have a network address and that the
connection is functioning normally. Before you perform this
step, make sure that you are plugged in to your network
cable or that your wireless device is functioning properly;
otherwise, the results are likely to be meaningless.
Finally, you should verify that your sound hardware is
functioning properly. Make sure that you have speakers
or a pair of headphones handy to perform this test. The
Sound application under the Preferences menu will enable
you to check the sound system. Although this is not a
complete list of all possible hardware items to check, this
should get you up and running.
Note that although an Internet connection is optional, a
fast network connection with access to the Internet will
enhance your Ubuntu experience greatly. Ubuntu gains
much of its flexibility and security from frequent updates
If there are additional hardware or peripherals you use
regularly, you should check them as well.
Boot from the Ubuntu Live CD and Verify Hardware (continued)
VERIFY THE NETWORK
CONNECTION
1
Control Panel
Click System ➔
Preferences ➔ Network
Configuration.
1
The Network Connections
dialog box appears.
2
Verify your network
connection information.
3
Click Close.
2
3
8
1
Click System ➔ Preferences ➔ Sound.
Control Panel
The Sound Preferences dialog box
appears.
1
2
3
Click Test.
Ubuntu tests your sound events.
2
Click Test.
3
4
5
Ubuntu tests the sound for music and
movies.
4
Click Test.
Chapter 1: Getting Started with Ubuntu
VERIFY THE SOUND HARDWARE
Ubuntu tests the receiving of sound for
audio conferences.
5
Click Test.
Ubuntu tests the sending of sound for
audio conferences.
6
6
Click Close.
To check external drives such as memory card readers, external disk drives, and external CD/DVD drives, you will
want to click the Computer option under the Places menu. This allows you to see all the file storage volumes
connected to your machine, even if you are currently not connected to them by the operating system, or in other
words, they are not currently mounted, such as a drive located on the network.
Linux can read a variety of formats, including FAT, FAT32, NTFS, Minix, Ext2, Ext3, and Apple HFS. The Ubuntu
kernel has built-in support for all USB drives and for FireWire (IEEE1394) drives as well. Due to the vast array of file
systems that Linux supports, you should be able to read just about anything that registers as a drive on the
computer screen.
When you see a volume listed, you can double-click it to open the file system, causing a mount operation to occur
in the background. Once successfully mounted, the File Browser will show you the contents of the drive. You can
unmount the drive from the computer window of the File Browser by right-clicking it and selecting Unmount.
9
Install
Ubuntu
Y
ou can install Ubuntu directly from the live CD. The
process is quick and easy, and you can even surf
the Internet while you install. Because the live CD
already has a fully working environment, you actually do
the installation from within the same environment you
will experience after the system is fully installed.
Historically, installing Linux was fairly arcane, but recent
Linux distributions actually rival or beat the ease of
installation of other operating systems. With the live CD
and the capability to ensure that the hardware is working
prior to actually installing the software, you gain the
confidence that the process will be a success before
investing the time for a full install.
The first half of the Ubuntu installation process primarily
asks questions about locale-driven items — specifically,
your local time zone, your preferred language, and your
keyboard layout. The most technical question posed
during the installation relates to disk preparation, that is,
whether you want to partition the drive.
Partitioning is a scheme in which a physical disk can
contain multiple, logically separate areas that an
operating system can view as separate volumes. These
separate areas can also host other operating systems, and
with the correct boot loader setup, you can boot various
operating systems on the same machine.
If you want to keep the data that is presently on the
machine, if any, you must create a new partition, rather
than wipe out the machine with a completely fresh
installation. Moreover, if you want to keep the present
operating system on the machine and install Ubuntu as
an additional system, you must partition the drive.
Install Ubuntu
1
Double-click the installer.
1
The Install dialog box
appears, showing the
Welcome page.
2
Click your preferred
language.
3
Click Forward.
2
3
The Where Are You?
page appears.
4
Click here and select a
city in your time zone.
5
Click Forward.
4
5
10
6
7
Control Panel
Click your keyboard layout.
Click Forward.
6
7
The Prepare Disk Space page
appears.
8
Verify that you want to use the
recommended partitioning for
the drive.
8
Chapter 1: Getting Started with Ubuntu
The Keyboard Layout page
appears.
Note: Double-check that you have
any important data from the
drive backed up.
9
Click Forward.
9
Partitioning schemes on Linux have a long tradition. The original UNIX operating systems ran on large multiuser
machines. When upgrades were performed on the operating system of these large machines, it was paramount to
not adversely affect the users. Consequently, rather than have all the users’ files on the same set of disks as the
operating system files, they were kept on separate disks. This allowed system administrators to completely rewrite
programs or the principle system if needed. The segregation of the user files meant that when the system came back
up, all the user files would be left untouched.
Partitions were also important for the operating system itself, as the swap file for the operating system was also
maintained on a separate disk. This allowed a performance boost by having a dedicated set of disks for pushing
memory pages into and out of magnetic storage.
Aside from swap, the /tmp folder was often kept on separate disk volumes. This usually had more to do with access
speed, as UNIX and all UNIX-like operating systems create tremendous traffic in the form of temporary files.
continued
➔
11
Install
Ubuntu (continued)
I
nstalling Ubuntu involves not only getting the software
on to your computer, but also setting up your account
to use the software. Controlling user access and
privileges is one of the keys to keeping your Ubuntu
system safe.
The proliferation of viruses and malware has been
accelerated by the use of unsecured administrative
privileges on machines connected to the Internet. A
common scenario for malware is to trick users into
running a malicious piece of software on their computers
that, because they have administrative privileges, allows
this program to set up backdoors into the system that can
be used remotely by the person or persons who authored
the program. This kind of attack is called a Trojan.
Similar, though more sophisticated, is the virus attack.
This relies on a vulnerability in either software or access
Install Ubuntu (continued)
The Who Are You? page
appears.
0
!
Type in your full name.
@
#
Choose a password.
$
Type in the name for your
machine.
%
Click Forward.
To avoid these problems, it is paramount to have strong
and not easily guessed passwords for user accounts and
to protect them vigorously. Never share your password
with another user and never run any program if you are
unsure of its authenticity. Ubuntu subscribes to a leastprivilege approach, meaning that your user account has
the minimum privileges necessary to accomplish your
day-to-day tasks. Whenever you request to perform an
operation that requires additional privileges, a dialog box
will be presented to ask you for your password. This is a
warning sign. Whenever you are asked for your password
by the system, be certain of the actions that you are
performing.
Control Panel
0
Type in the login name
that you want to use.
Retype the password,
making sure that it
matches the first one.
mechanisms to gain access to a system. If the account
breached has sufficient privileges, the virus can propagate
to other accounts on the system or even propagate out to
other systems.
!
@
#
$
%
The Ready to Install page
appears.
^
Click Install.
12
^
Note: This can take from 10 to
40 minutes, depending on
your machine’s CPU and
disk capabilities.
Control Panel
When the installation is
finished, the Installation
Complete dialog box
appears.
&
Click Restart Now.
Note: Remove the CD from the
machine before the next
boot.
&
Chapter 1: Getting Started with Ubuntu
The installation begins.
Choosing a strong password is essential to keeping your system safe. There are a couple general principles to help
you avoid your password being compromised. The longer the password, the harder it will be to crack it with brute
force. For example, if you have a three-digit password that is only made up of numbers, then it can be cracked in
under 1,000 tries. If the number of digits is longer, obviously, it will take more tries to crack. The same principle
applies to the characters you use. To make your password strong, use different types of characters. Use numbers,
letters of both upper- and lowercase, and punctuation. This greatly increases the number of tries it takes to crack a
password by brute force.
Hackers are aware of these strategies, however, and try to skew the odds in their favor by using dictionaries of
common passwords and variations on them to reduce the number of tries needed. To thwart this type of attack,
avoid proper nouns and words that can be found in the dictionary. A common technique is to use the first letter of
each word of a phrase to allow for a combination of letters not common in any language.
13
Log Into/Out of the
System for the First Time
A
fter you have completed the initial installation,
you should get in and take a look around your
fresh Ubuntu Linux system.
When Ubuntu first boots up, it brings up the login screen.
You will need to provide the login and password you used
during installation in order to gain access to the system.
A couple options present themselves to you on this first
screen. From the Options menu, you can select a different
language to use during your session. You may also select
from a variety of options for starting your session. Most of
these explicitly say to only use them if you are unable for
some reason to log in any other way, and a couple have
some additional utility. One of the options is the ability to
log into other machines with the secure shell (SSH)
protocol. Although this sounds very useful, it is limited to
only users who have an account on the local machine.
Log Into/Out of the System for the First Time
Another useful option is the ability to connect to remote
machines that are running XDMCP. XDMCP is a protocol
for establishing remote X11 connections. The host
computer, not the one you are using, broadcasts its
availability on the network, and typically, dedicated X
terminals see these broadcasts and allow you to select
from an available host and initiate a login. Then the X11
session is directed to this X terminal as if the session
were running on the console of the host. Using this
option on Ubuntu allows an Ubuntu desktop to be used
just like a dedicated X terminal.
Other options are pretty much standard login screen types
of operations. These include restarting or shutting down
the machine, along with sending the machine into either
hibernation or suspend (standby) modes.
LOG IN
1
Type in the login
username you created
during installation and
press Enter.
1
2
Type in the password you
chose during installation
and press Enter.
2
14
LOG OUT
1
1
Click the Quit
applet.
2
2
Click Log Out.
Chapter 1: Getting Started with Ubuntu
The Ubuntu desktop
launches.
You are logged out
of the system.
When logging out, notice the other options presented. Ubuntu allows for you to switch to another user without
having to log out. This is especially handy when you are sharing a computer. The most important option on the
logout display is the Lock Screen option. Locking the screen when you are away from your computer is a good line
of defense against hacking. Most hacking in corporations happens within the confines of the company itself, rather
than a person or persons on the Internet. Good computer security starts right at your desk. Whenever you are not
at your computer, lock the screen. Then you will not have to worry about others looking at, editing, or — worse
yet — accidentally deleting your files.
Another useful option is hibernation. This choice puts the computer to sleep without shutting it down completely. If
you have never used hibernation before, consider it because it is a great way to be able to shut down your machine
and conserve either AC line power or battery power without losing your place within your work. When a machine is
hibernated, it is completely shut off, drawing no power.
15