1
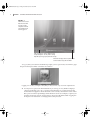
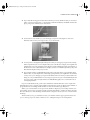
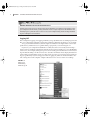
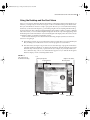
46147book.book Page 1 Friday, December 29, 2006 10:54 PM
1
AL
Part
PY
R
IG
HT
ED
Chapter 1: Getting Started with Windows Vista
Chapter 2: Connecting to the Internet and Surfing the Web
Chapter 3: Customizing Your Desktop
Chapter 4: Installing, Removing, and Running Programs
Chapter 5: Managing Your Files and Folders
Chapter 6: Making the Most of the Bundled Programs
Chapter 7: Finding Help to Solve Your Windows Problems
CO
◆
◆
◆
◆
◆
◆
◆
MA
TE
RI
Up and Running with
Windows Vista
46147book.book Page 2 Friday, December 29, 2006 10:54 PM
46147book.book Page 3 Friday, December 29, 2006 10:54 PM
Chapter 1
Getting Started with Windows Vista
◆ Understanding the differences among Administrator, Standard, and Guest users
◆ Logging on and logging off
◆ Using the Desktop and the Start menu
◆ Switching to another user without closing your programs
◆ Locking the computer
◆ Checking which user is currently active
◆ Seeing who else is logged on to the computer
◆ Seeing which programs the other users are running
◆ Logging off another user
◆ Sending a message to another user
◆ Using the Windows Key
◆ Putting your computer to sleep
◆ Shutting down Windows
This chapter shows you how to get started with Windows Vista. You’ll learn how to log on and log
off, how to troubleshoot logon problems, how to switch from one user session to another without
closing all your programs, how to use the Desktop and the Start menu, and how to exit Windows.
The chapter also shows you how to find out who else is logged on to the computer when you’re
working at it, how to get an idea of which programs the other users are running, and how to log off
another user (or all other users) to reclaim the resources they’re using.
If you share your computer with other people, you’ll probably log on and off, or switch users,
several times a day. Logging on and off and switching users are easy, but having two or more
people logged on at the same time, and possibly using the same programs and documents, can
cause some complications.
This chapter assumes that you’ve already installed Windows Vista (or someone else has
installed it for you). If not, see Appendix B.
46147book.book Page 4 Friday, December 29, 2006 10:54 PM
4
CHAPTER 1
GETTING STARTED WITH WINDOWS VISTA
Understanding Administrator, Standard, and Guest Users
For security and administration purposes, Windows Vista Home uses three different types of
user accounts:
Administrator User An Administrator user has full power to configure the computer. When
you first set up Windows Vista, the first user account you create is an Administrator account. An
Administrator user can create further user accounts as needed.
Standard User A Standard user can run programs freely and can customize most aspects of
Windows that affect their own user account. To configure aspects of Windows that affect other
user accounts, a Standard user must supply an Administrator user’s password.
Guest User The Guest user (there’s only one) can run most programs but can perform almost
no configuration or customization.
Microsoft recommends that you log on with a Standard user account except for when you
need to perform computer-wide administrative tasks. In practice, though, you may well normally log on using an Administrator account. This chapter gives instructions for both types of
accounts. Chapter 8 discusses how to create and manage user accounts and how to set a password on the main Administrator account for your computer
Logging On and Logging Off
To use Windows, you need to log on to your user account (a Windows identity), usually using a
password. Once you’ve logged on, you can run programs, customize Windows, and generally get
things done. When you’ve finished using Windows, you can log off so that someone else can log on
(using their own user account).
When you log off, Windows closes any programs you were running. Instead of logging off, you
can switch user, leaving your programs running in the background so that you can return to them
later. When you switch user, Windows displays the Welcome screen so that another user can log
on. After that user has logged off or switched user, you can log straight back into your session and
pick up where you left off.
Only one user can be active—actually using the computer—at any time. A user who is logged on
but not active is said to be disconnected.
This means that, for example, Jane and Jack can keep their programs open while Ross is using
the computer. When Ross disconnects and ambles off for a cup of coffee, Jane logs back on. Windows resumes Jane’s session from where she left off, displaying the programs she had running and
the files she had open. Windows reestablishes any of Jane’s persistent network connections, including any Internet connection that’s set to connect automatically.
Being able to leave multiple users up and running is great—up to a point. But it has serious
implications for performance. The sidebar “You May Want to Avoid Using Fast User Switching to
Improve Performance” discusses these considerations briefly.
Logging On
To start using Windows, log on from the Welcome screen. Figure 1.1 shows an example of the Welcome screen, which displays a list of the users who have accounts set up on the computer. If a user
is logged on, the Welcome screen displays Logged on beneath the name.
46147book.book Page 5 Friday, December 29, 2006 10:54 PM
LOGGING ON AND LOGGING OFF
How Logging On and Off Worked in Windows 95, 98, Me, and Windows 2000
Logging on and off in Windows Vista works in much the same way as in Windows XP. But in versions of
Windows before Windows XP, only one user at a time could be logged on to a computer running Windows. For a second user to log on, the first user needed to log off. Logging off involved closing all the open
programs and files: Either the user could close the programs and files manually before logging off, or
Windows would close them automatically when the user issued the Log Off command and confirmed
that they wanted to log off.
Once all the programs and files were closed, and all network and Internet connections were closed as
well, Windows displayed the Log On to Windows dialog box or the Enter Network Password dialog box,
depending on whether the computer was attached to a network. Another user could then log on to Windows, run programs, open files, establish network and Internet connections, and so on.
You May Want to Avoid Using Fast User Switching to Improve Performance
Having multiple users logged on to Windows at the same time affects performance because each user
who’s logged on takes up some of the computer’s memory. Having a user logged on itself takes up a fair
amount of memory, and each program that the user has running, and each file that they have open, adds
to the amount being used.
Windows Vista needs a minimum of 512MB of RAM to run at all and runs much better with 1GB
(1,024MB) or more. For each light user, figure in another 128MB of RAM; for each moderate user,
256MB; and for each heavy user, 512MB. If your computer has 1GB of RAM or more, you should be able
to have two or three users logged on and running several programs each without running short of
memory.
Another issue is what the programs in a disconnected session are actually doing. A program that’s running but waiting for user input consumes very few processor cycles, but one that’s actively engaged in
a task consumes many—sometimes as many as Windows can give it. For example, if you leave
Microsoft Word open with a document that you’re composing displayed, Word waits for user input, and
if you disconnect your session, it just sits there waiting until you come back. But if you’re performing a
processor-intensive task such as video rendering in a disconnected session, performance in the active
session is poor.
Some programs pretty much suspend themselves when Windows disconnects their session and so do
not affect the performance of the active session. Experiment with the programs you and the people with
whom you share your computer use and establish which programs you can’t reasonably leave running
in a disconnected session.
If your computer has only 512MB RAM, avoid using Fast User Switching to reduce the amount of memory needed. Instead of switching user, close your programs and log off.
5
46147book.book Page 6 Friday, December 29, 2006 10:54 PM
6
CHAPTER 1
GETTING STARTED WITH WINDOWS VISTA
Figure 1.1
The Welcome screen
lists the users with
accounts on this
computer and indicates whether each
user is logged on.
If this icon appears, click it to display a menu
of keyboard layouts. You may need to change
keyboard layout to type your password correctly.
Click here to display a menu of power-related
actions: Restart, Sleep, and Shut Down
To log on, click your username. If Windows prompts you for a password (as shown here), type
the password and press Enter or click the arrow button.
Logging on is usually as simple as that, but you may run into any of several complications:
◆
You may have to press Ctrl+Alt+Delete before you can log on. If so, Windows displays
a message instructing you to do so. Pressing Ctrl+Alt+Delete is a security measure that
ensures that what appears to be the Welcome screen actually is the Welcome screen rather
than a piece of malware pretending to be the Welcome screen (for example, to capture your
username and password). See “Forcing Users to Press Ctrl+Alt+Delete When Logging On”
in Chapter 8 for instructions on setting up this security measure.
46147book.book Page 7 Friday, December 29, 2006 10:54 PM
LOGGING ON AND LOGGING OFF
◆
If you enter the wrong password for the username you chose, Windows tells you “The user
name or password is incorrect,” as shown here. Click the OK button, and Windows then displays your password hint (if you created one).
◆
Passwords are case sensitive, so you must type your password using the correct case.
Windows Vista warns you if Caps Lock is on, as shown here.
◆
You may have to change the keyboard layout so that you can type your password correctly.
If the computer has two or more keyboard layouts available (for example, U.S. English and
United States – Dvorak), Windows Vista displays a keyboard button in the lower-left part of
the Welcome screen. Click the button to display a menu of available keyboard layouts, and
then click the keyboard layout you want.
◆
If your keyboard has an embedded keypad (using some letter keys to type numbers when
Num Lock is on, as the keyboards on most laptop computers do), having Num Lock switched
on may cause you to mistype your password. Windows doesn’t warn you about Num Lock
being on. So if you find Windows won’t accept your password, you’ve checked the keyboard
layout is correct, and your keyboard has an embedded keypad, look to see if Num Lock is
causing the problem.
If you’ve used Windows XP, you’ll notice a difference with the Welcome screen. Apart from
indicating that a user is logged on, the Windows XP Welcome screen also displays the number of
programs the user is running and the number of unread e-mail messages they have.
When you’ve entered the correct password, Windows displays your Desktop with its current settings. (The section “Using the Desktop and the Start Menu” a little later in this chapter
discusses the basics of the Desktop and Start menu. Chapter 3 discusses how to customize the
Desktop.)
The first time you log on, Windows creates your folders and sets up program shortcuts for
you—so the logon process takes a minute or two. Subsequent logons are much quicker.
7
46147book.book Page 8 Friday, December 29, 2006 10:54 PM
8
CHAPTER 1
GETTING STARTED WITH WINDOWS VISTA
Making Windows Log You On Automatically
Usually, forcing each user to log on before they can use Windows is a good idea, because it helps to keep
your computer secure. However, you may sometimes need to set up a computer so that Windows automatically logs in a particular user account. See the section “Implementing and Preventing Automatic
Logons” in Chapter 8 for instructions.
Logging Off
The counterpart to logging on is logging off. When you log off, Windows closes all the programs and
files you’ve been using. If the files contain unsaved changes, Windows prompts you to save them.
To log off, click the Start button, click the right-arrow button to the right of the Lock icon (the
padlock icon), and then choose Log Off from the pop-up menu, as shown in Figure 1.2.
If you leave your computer unattended for a while, the screen saver usually starts running—
unless you have something open that prevents the screen saver from starting (or you’ve disabled the
screen saver). For example, a dialog box open on screen usually prevents the screen saver from starting. The default setting is for the screen saver to start after 10 minutes and to display the Welcome
screen when you interrupt the screen saver. The screen saver gives you some protection against prying eyes (particularly if you’re using passwords for logging on), but it also makes it harder to see
who’s doing what on the computer. Chapter 3 discusses how to choose screen saver settings.
Figure 1.2
When you’ve
finished using
Windows, log off.
46147book.book Page 9 Friday, December 29, 2006 10:54 PM
USING THE DESKTOP AND THE START MENU
Using the Desktop and the Start Menu
Once you’ve logged on, Windows displays the Desktop—the background area that Windows provides for you to spread your work across. Figure 1.3 shows what the Desktop looks like the first
time you start Windows and start a couple of programs. Because you can customize the Desktop
extensively (as discussed in Chapter 3), your Desktop might not look anything like the Desktop
shown in the figure: The wallpaper might be different, the Taskbar could be located at a different
side of the screen, or various toolbars might be displayed. About the only unchanging thing about
the Desktop is the Start menu button—but even this might not be displayed if someone has chosen
to hide the Taskbar (of which the Start button is part).
You’ll meet the Desktop in more detail in the forthcoming chapters, but these are the basic
actions for navigating it:
◆
The Desktop contains one or more shortcuts to items. Usually, there’s an icon for the Recycle
Bin, if nothing else. Double-click an icon to run the program associated with it.
◆
The Start menu (see Figure 1.4) provides access to the full range of programs and features
currently installed on Windows. To display the Start menu, click the Start button, press the
Windows key on the keyboard, or press Ctrl+Esc (for example, if your keyboard doesn’t
have a Windows key). Choose one of the items that appears on it, or click the All Programs
button to display a menu containing further items.
Figure 1.3
The components of
the Windows Desktop
Icon
Desktop Background
Program Windows
Taskbar Buttons
Start Button
Gadgets in the sidebar
Windows Sidebar
Taskbar
Notification Area
9
46147book.book Page 10 Friday, December 29, 2006 10:54 PM
10
CHAPTER 1
GETTING STARTED WITH WINDOWS VISTA
Figure 1.4
Click the Start button
to display the Start
menu, then click the
item you want on
the Start menu itself,
on the All Programs
menu, or on one of
the folders it contains.
Click a folder to
expand its contents;
click again to collapse
the contents again.
Click the Back link to
hide the All Programs
menu again.
◆
The Taskbar gives you quick access to each program that’s currently running. The Taskbar
displays a button for each active program window until it runs out of space for reasonablesized buttons, at which point it groups related windows onto a single button (which expands
to show the individual window titles when you click it). To display that window in front of
all other windows, click its button. To minimize a program (removing its display from your
Desktop, so that only the Taskbar button is left), click its Taskbar button again.
◆
The notification area contains items that are useful to have displayed all the time (such as
the clock, which is displayed by default), together with information and alerts (which are
displayed at appropriate times). Because the notification area tends to get overstuffed with
icons, Windows automatically hides those that are inactive. You can choose which icons to
display and which to hide.
◆
The Desktop background is a graphic that you can change at will. From here on, this book
uses a white Desktop background, usually without any icons, so that you can see the individual windows more easily.
◆
The Windows Sidebar contains gadgets, small programs that display information for you.
Instead of using the Taskbar to switch from one program to another, you can “Windows Flip”
by pressing the Alt+Tab key combination. Doing so displays a panel of icons for the program windows currently open (see Figure 1.5). Hold down the Alt key and press the Tab key to move the
selection to the program window you want, and then release the Alt key to display that program
window. Hold down Alt+Shift and press the Tab key to move backward through the list.
Windows Flip is handy and has been a feature of Windows for many versions now (although
it used to be called “coolswitching” or simply “Alt-Tabbing”). Along with the new name, Windows Vista introduces a new version of switching: Press Windows Key+Tab to display the open
46147book.book Page 11 Friday, December 29, 2006 10:54 PM
USING THE DESKTOP AND THE START MENU
windows as a rotating stack (see Figure 1.6), and then press Tab repeatedly to bring the window
you want to the front. When the window is at the front, release the Windows Key. Press Windows
Key+Shift+Tab to move backward through the stack of windows. As with the Alt+Tab version of
Windows Flip, the Desktop appears in the stack of windows, so you can use Windows Key+Tab
to display the Desktop.
You Can Now Switch to the Desktop via Windows Flip
In a handy improvement over switching programs in earlier versions of Windows, Windows Vista
includes an entry for the Desktop in the Windows Flip list. Selecting this item hides all programs, allowing you to see everything on the Desktop. (In earlier versions of Windows, to get the same effect, you
would right-click the notification area or open space in the Taskbar and choose Show the Desktop.)
Figure 1.5
Press Alt+Tab to
“Windows Flip”
(switch) from one
open program to
another. Select the
Desktop item (the
rightmost icon shown
here) to display the
Desktop, hiding all
programs.
Figure 1.6
Press Windows
Key+Tab to display the
open windows and the
Desktop as a rotating
stack. You can also
select a window in
the stack by clicking
it with the mouse.
This version of Windows Flip works only
with the Vista Aero
user interface.
11
46147book.book Page 12 Friday, December 29, 2006 10:54 PM
12
CHAPTER 1
GETTING STARTED WITH WINDOWS VISTA
Switching to Another User
Instead of logging off (and closing all the programs you’ve been using) so that someone else can use
the computer, you can switch user, leaving your programs running but letting someone else log on.
To switch user, click the Start button, click the right-arrow button to the right of the Lock icon, and
then choose Switch User from the pop-up menu, as shown here. Windows then displays the Welcome screen. Your username has the words “Logged on” underneath it to indicate that you’re still
logged on, even though you’ve just disconnected.
To log back on, click your username, type your password, and press Enter or click the arrow
button. Windows displays your session again, with all the programs and windows as you left them.
Locking the Computer
Instead of switching user, you can “lock” your computer. Locking is almost the same as switching
user, as it leaves your open programs running, but instead of displaying the Welcome screen with
all the user accounts listed, it shows only your user account, together with the information that
you’re logged on and the computer is locked. You can then log on by clicking your icon and entering your password, or switch user by clicking the Switch User button, clicking the Switch User button again on the resulting screen, and then using the Welcome screen to log on as usual. Figure 1.7
shows an example of Windows in its “locked” state.
46147book.book Page 13 Friday, December 29, 2006 10:54 PM
LOCKING THE COMPUTER
Figure 1.7
When you’ve “locked”
your computer,
Windows displays
only your user
account, together
with the word
“Locked” to indicate
its status. Click your
icon to log on, or
click the Switch User
button if you need
to switch to another
user account.
To lock Windows, press Windows Key+L. Alternatively, click the Start button, and then click the
Lock button, as shown here. You can also click the right-arrow button to the right of the Lock icon
and choose Lock from the pop-up menu, but clicking the Lock icon itself is easier.
13
46147book.book Page 14 Friday, December 29, 2006 10:54 PM
14
CHAPTER 1
GETTING STARTED WITH WINDOWS VISTA
Checking Which User Is Currently Active
Normally, when you log on as yourself, you’ll know that you’re using your own user account. But
if you’re switching among user accounts for administration or testing, you may lose track of which
account you’re using, or you may return to the computer and need to find out whose session is currently connected.
To see which user is currently active, display the Start menu (by clicking the Start button or
pressing either the Windows Key or Ctrl+Esc) and check the username displayed at the top, under
the picture.
Seeing Who Else Is Logged On to the Computer
You can see who else is logged on to the computer in either of two ways:
◆
Switch user so that Windows displays the Welcome screen, and then look to see which users
(apart from you) are marked as being “logged on.” The problem with this approach is that
you then need to log back on.
◆
Right-click the Taskbar, and then choose Task Manager from the shortcut menu to open
Task Manager. Click the Users tab to display the Users page. You can then see the users and
their status. Figure 1.8 shows an example.
Figure 1.8
The Users page of Task
Manager shows you
which other users
are logged on to
the computer. You
can send them
messages or log
them off forcibly.
Seeing Which Programs the Other Users Are Running
It’s not easy to see exactly which programs the other users of the computer are running unless you
know the names of the executable files for the programs, but you can get an idea by using the Processes page of Task Manager. This page also shows you how much memory each program is using,
which can help you establish whether—or why—your computer is running short of memory.
46147book.book Page 15 Friday, December 29, 2006 10:54 PM
SEEING WHICH PROGRAMS THE OTHER USERS ARE RUNNING
To start Task Manager and display the Processes page, follow these steps:
1. Right-click the Taskbar, and then choose Task Manager from the shortcut menu. Windows
displays Task Manager.
2. Click the Processes tab. Windows displays the Processes page, which lists the processes
you’re running.
3. Click the Show Processes from All Users button, and then authenticate yourself to User
Account Control. Task Manager replaces the Show Processes from All Users button with the
Show Processes from All Users check box, which it selects, and adds to the list all the processes that the other users are running as well.
Figure 1.9 shows an example of the Processes page. You can sort the list of processes by any column by clicking the column heading; click once to sort in ascending order, and click again to sort
in descending order. In the figure, the processes are sorted by the User Name column so that it’s
easy to see which process belongs to which user.
The figure shows only part of the list, but you can see the users Lily and Mick are both running, and 57 percent of the physical memory is in use. The Mem Usage column lets you see which
programs are using more memory than others. See the sidebar called “Finding Out Which Process Belongs to Which Program” for details on how to find out which programs these processes
represent.
In the figure, you’ll see that Windows also has a number of processes open on its own account:
The LOCAL SERVICE account and the NETWORK SERVICE account are each running several
instances of the SVCHOST.EXE (service host) process each, together with various other processes. Not
shown in the figure is the SYSTEM account, which also various processes, including SVCHOST.EXE
and a process called System Idle Process, which indicates what percentage of the available processes
are free. (Having a high percentage for System Idle Process indicates that your computer is handling
its current workload easily.)
Finding Out Which Process Belongs to Which Program
The Processes page of Task Manager is helpful, but only up to a point. The problem you’ll usually face
when looking at the list of processes in Task Manager is that you need to identify which program a particular process represents—for example, so that you can decide whether to stop the process (as described
later in this chapter).
Some of the other names are readily identifiable. For example, EXPLORER.EXE is the executable for
Windows Explorer, and SIDEBAR.EXE is the executable for the Windows Sidebar. You don’t need to
memorize the mapping of each executable filename to its program, but if you look at Task Manager
now and then, you’ll learn to scan the list of processes and see which is running. This will help you
decide whether you should go ahead and log another user off Windows (as described in the next section) or whether doing so will lose valuable data.
15
46147book.book Page 16 Friday, December 29, 2006 10:54 PM
16
CHAPTER 1
GETTING STARTED WITH WINDOWS VISTA
To start finding out which program corresponds to each executable file, click the Applications tab to
display Task Manager’s Applications page. Right-click a program and choose Go to Process from the
shortcut menu. Task Manager displays the Processes page and selects the process for that program.
That’s easy enough—but you’ll find that there are many more processes running than programs. Try
closing all the programs listed on the Applications page of Task Manager, and you’ll see that many
processes are still running. Turn your attention to the notification area and close as many of the
items shown there as you can: Right-click each icon in turn and choose any Close, Quit, or Exit command that appears on the shortcut menu. Try stopping any obvious services that you can temporarily dispense with and see if an associated process disappears. For instance, try closing your
Internet connection or stopping your PC Cards. Did either of those actions lose you a process? Then
you have an idea of what that process does.
Even after you’ve done this, you’ll find that the Processes page lists many other processes. To find
out about these, click the Services tab in Task Manager to view a list of the services that Windows is
running. (A service is a system process that runs automatically—for example, to provide printing
features or network connectivity.) You can right-click a service and choose Go to Process from the
context menu to make Task Manager select the process that belongs to the service. (Some services
don’t allow you to do this.)
If you still can’t identify processes, try searching on the Web. At this writing, one of the best lists is at
http://www.processid.com/processes.html. Failing that, put the process name and “Windows
Vista” into your favorite search engine, and you should turn up plenty of hits.
46147book.book Page 17 Friday, December 29, 2006 10:54 PM
LOGGING OFF ANOTHER USER
Figure 1.9
Use the Processes
page of Task Manager
to see which programs
the other users are
running.
Logging Off Another User
If necessary, any Administrator user can log another user off the computer.
Logging someone else off is something you should do only in a pinch, because while you can use
Task Manager to see which processes they’re running (as described in the previous section), you
can’t see whether they have any unsaved work in them. If you don’t use passwords to log on to
Windows, it’s much better to switch to the other user’s account, close the programs and documents
manually, and then switch back to your own account. If you do use passwords, you’ll need to know
the other user’s password to log on to their account, which largely defeats the point of having passwords in the first place.
Even so, you may need to log off another user if they are running enough programs to affect the
computer’s performance or if they have open a program that can be used only by a single person
at a time or a document that you need to use.
To log off another user, take the following steps:
1. Right-click the Taskbar and choose Task Manager from the shortcut menu to display Task
Manager.
2. Click the Users tab. Windows displays the Users page (shown in Figure 1.8, earlier in the
chapter).
17
46147book.book Page 18 Friday, December 29, 2006 10:54 PM
18
CHAPTER 1
GETTING STARTED WITH WINDOWS VISTA
3. Select the user, and then click the Logoff button. (Alternatively, right-click the user and
choose Log Off from the shortcut menu.) Windows displays a confirmation dialog box,
as shown here.
4. Click the Log Off User button. The other user’s session is ended, and they lose any data that
they hadn’t saved.
Sending a Message to Another User
Windows provides a feature for sending a message to another user logged on to this computer.
Because the other user can’t be using the computer at the same time as you, this feature is no use
for real-time communication, but it can be useful for making sure a family member or a colleague
gets a message the next time they use the computer. (For example, you might ask them not to shut
down the computer because you’re still using it.) It’s also useful for notifying another user that
you’ve had to terminate a program that they were using.
To send a message to another user, take the following steps:
1. Right-click the Taskbar and choose Task Manager from the shortcut menu to display
Windows Task Manager.
2. Click the Users tab. Windows displays the Users page.
3. Right-click the user and choose Send Message from the shortcut menu. Windows displays
the Send Message dialog box (shown here).
4. Change the message title in the Message Title text box (Windows enters default text that
includes the computer’s name, your username, and the date and time), and then type the
message in the Message text box.
◆
To start a new line, press Ctrl+Enter. (Pressing the Enter key on its own “clicks” the OK
button, sending the message.)
◆
To type a tab, press Ctrl+Tab. (Pressing the Tab key on its own moves the focus to the
next control.)
46147book.book Page 19 Friday, December 29, 2006 10:54 PM
USING THE WINDOWS KEY
5. Click the OK button to send the message.
The next time the user logs on to Windows, they receive the message as a screen pop, as shown here.
You can send more than one message to the same user, if necessary. When the user logs on, they
receive the messages in the order you sent them. Sending multiple messages can be helpful if you
need to change or contradict the information you sent it before, but such messages run the risk of
being ignored, as the recipient blindly clicks through each pop-up message box in turn in the hope
of reaching their Desktop and getting some work done.
Using the Windows Key
Windows provides several keyboard combinations for the Windows Key, the key (or keys) with
the Windows logo on the keyboard. If you’re comfortable leaving your hands on the keyboard,
these combinations are doubly convenient, because not only can you avoid reaching for the
mouse but you can also display with a single keystroke a number of windows and dialog boxes
that lie several commands deep in the Windows interface.
Table 1.1 lists the Windows Key combinations.
Table 1.1:
Windows Key Combinations
Windows Key Combination
What It Does
Windows Key
Toggles the display of the Start menu
Windows Key+Break
Displays the System screen in Control Panel
Windows Key+Tab
Switches (Windows Flip) through the stack of open windows and
the Desktop
Windows Key+Shift+Tab
Switches (Windows Flip) backward through the stack of open
windows and the Desktop
Windows Key+B
Moves the focus to the notification area
Windows Key+D
Displays the Desktop, hiding all open applications
Windows Key+E
Opens an Explorer window showing Computer
Windows Key+F
Opens a Search window.
Windows Key+Ctrl+F
Opens a Find Computer window
Windows Key+F1
Opens a Windows Help and Support window
19
46147book.book Page 20 Friday, December 29, 2006 10:54 PM
20
CHAPTER 1
GETTING STARTED WITH WINDOWS VISTA
Table 1.1:
Windows Key Combinations (continued)
Windows Key Combination
What It Does
Windows Key+M
Issues a Minimize All Windows command
Windows Key+Shift+M
Issues an Undo Minimize All command
Windows Key+R
Displays the Run dialog box
Windows Key+U
Displays Ease of Access Center; formerly Utility Manager—hence the
shortcut letter
Windows Key+L
Locks the computer
Putting Your Computer to Sleep
When you’re not using your computer, you can either put it to sleep (as described here) or shut
it down completely (as described in the next section). Putting your computer to sleep lets you
keep your programs and documents open so that you can resume work (or play) when you
reawaken your computer.
Before you put your computer to sleep, it’s a good idea to save all open documents, just in case
your computer suffers a problem while asleep or restarting. (For example, the power might go out.)
To put your computer to sleep, click the Start button, and then click the Power button on the
Start menu, as shown here.
46147book.book Page 21 Friday, December 29, 2006 10:54 PM
SHUTTING DOWN WINDOWS
To wake your computer up again, press its power button. Depending on the computer and its configuration, you may also be able to wake it by moving the mouse or pressing a key on the keyboard.
When Windows resumes, it displays the Locked screen. Type your password and press Enter
(or click the arrow button) to log on.
Shutting Down Windows
When you don’t need to use your computer for a while—for example, overnight or over the weekend—you can turn it off completely. Rather than just turning off the power, shut down Windows,
which will normally turn off the power for you.
When you’re logged on, the easiest way to shut down Windows is to click the Start button, click
the right-arrow button to the right of the Lock icon, and then choose Shut Down from the menu, as
shown here.
Another way of shutting down Windows when you’re logged on is to click the Desktop, press
Alt+F4 to display the Shut Down Windows dialog box (shown here), choose Shut Down in the
What Do You Want the Computer to Do? drop-down list, and then click the OK button. There’s no
advantage to shutting down Windows this way unless you happen to enjoy it.
21
46147book.book Page 22 Friday, December 29, 2006 10:54 PM
22
CHAPTER 1
GETTING STARTED WITH WINDOWS VISTA
You can also shut Windows down from the Welcome screen by clicking the Power button. If
any user (including yourself) is logged on, Windows warns you of the problem, as shown here.
Usually, you’ll want to click the No button so that you can either log off the other users or have
them log themselves off, but you may sometimes need to click the Yes button and shut down their
user sessions without saving data.
After you issue the Shut Down command in one of these ways, Windows closes any open files,
shuts itself down, and then powers off the computer. If your computer has an unorthodox power
setup, you may need to power it off manually.
The Bottom Line
Understanding the differences among Administrator, Standard, and Guest users An Administrator user can customize Windows freely; a Standard user can customize their own user account;
and the Guest user can perform almost no customization.
Logging on and logging off To use Windows at all, log on using your user account. Click
your username on the Welcome screen and then, if you have a password, type it and press Enter.
At the end of your Windows session, log off by clicking the Start button, clicking the right-arrow
button to the right of the Lock icon, and then choosing Log Off from the pop-up menu.
Using the Desktop and the Start menu The Desktop contains icons that you can doubleclick to open Windows items (such as the Recycle Bin), programs, or documents. The Start
menu contains links to almost all the programs and features you’ve installed. Click the Start
button or press the Windows Key on the keyboard to display the Start menu. Choose one of
the items that appears on the Start menu, or click the All Programs button to display a menu
containing further items.
Switching to another user without closing your programs To stop using Windows so that
someone else can log on, but leave your programs running and your documents open, switch
user rather than logging off. Click the Start button, click the right-arrow button to the right of the
Lock icon, and then choose Switch User from the pop-up menu. Windows then displays the
Welcome screen.
Locking the computer To “lock” your computer, leaving your open programs running, press
Windows Key+L or click the Start button, and then click the Lock button. Windows displays a
version of the Welcome screen that shows your username, the word “Locked,” and a Switch
User button for switching to another user.
Checking which user is currently active To see which user account is active, press the Windows Key or click the Start button, and look at the username at the top of the Start menu, under
the picture.
46147book.book Page 23 Friday, December 29, 2006 10:54 PM
THE BOTTOM LINE
Seeing who else is logged on to the computer To see who else is logged on to the computer,
switch user to the Welcome screen and look to see which accounts are marked as “Logged on.”
Alternatively, open Task Manager, click the Users tab, and then see which users are listed on the
Users page.
Seeing which programs the other users are running To see which programs the other users
are running, open Task Manager, click the Show Processes from All Users button on the Processes page, authenticate yourself to User Account Control, and then see which processes are
listed. Some process names are easily identifiable, but you may need to look up others on the
Web to identify the programs they represent.
Logging off another user When necessary, you can log off another user. To do so, open Task
Manager, and then click the Users tab. Click the user you want to log off, click the Logoff button,
and then click the Log Off User button in the confirmation dialog box that Windows displays.
Sending a message to another user You can send a message to another user who is currently
logged on but disconnected. The user sees this message the next time they log on. Open Task
Manager, and then click the Users tab. Right-click the user, choose Send Message from the shortcut menu, type the message in the resulting dialog box, and then click the OK button.
Using the Windows Key Windows Vista offers various shortcuts using the Windows Key.
For example, press Windows Key+D to display the Desktop or press Windows Key+L to lock
Windows.
Putting your computer to sleep To put your computer to sleep, so that you can resume your
Windows session later without having to reopen programs and documents, click the Start button, and then click the Power button on the Start menu. Press the power button on your computer to wake Windows again.
Shutting down Windows To shut down Windows and your computer, click the Start button, click the right-arrow button to the right of the Lock icon, and then choose Shut Down from
the menu.
23
46147book.book Page 24 Friday, December 29, 2006 10:54 PM