1
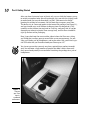
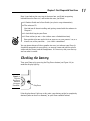
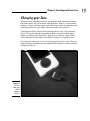
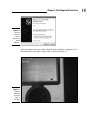
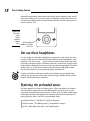
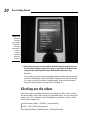
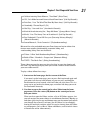
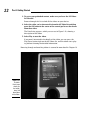
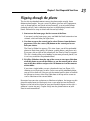
Chapter 1
AL
First Steps with Your Zune
In This Chapter
RI
䊳 Listening to, watching, and sharing your Zune
䊳 Opening the box and charging up your new Zune
MA
䊳 Exploring the preloaded content
TE
䊳 Scoring a Zune
I
GH
TE
D
f you’re reading this book, then you either recently purchased a Zune or
are seriously considering getting one. Either way, it’s time to find out what
a Zune can do! In this chapter, you can take a look at what you gain when
you get your hands on a Zune — or figure out how to get ahold of one if you
haven’t picked one up yet.
RI
Entertainment on the Go
CO
PY
So, the big question you’re asking yourself is this: What is this Zune thing and
what can it do for me? The first thing to realize is that a Zune is so much
more than just a music player; it’s a full-blown entertainment unit that has
30GB of memory and just happens to fit in your pocket. Any one of the Zune
devices — they come in three different colors but are otherwise the same —
is capable of doing a ton of great things right out of the box. What kinds of
great things? Well, check out this list:
⻬ Take all your music, photos, and videos with you everywhere you go,
which means you can
• Store 500 hours (at standard settings) of music so that you can
listen on the go.
• Tune into FM radio stations, set your station presets, and even
receive station information (station call letters or music format,
for example) on the fly.
8
Part I: Getting Started
• Store thousands of photos in full color so you can browse through
them any time you want. (You can even start up your slideshow
and flip through your photos automatically.)
• Store anywhere from 30 to 100 hours (depending on your settings)
worth of movies, TV shows, and other video content . . . and watch
it all on a bright display.
⻬ Hook up to Marketplace and never buy another CD again . . . or buy CDs
and rip them to your Zune. It’s up to you! You can use any or all of these
options:
• Getting bored with your own music but don’t want to buy more
CDs? You can subscribe to Zune Marketplace and listen to new
music whenever you want for a set monthly price.
• Buy songs and albums from Zune Marketplace one at a time, often
for less than you’d pay for the CD in the store.
• Copy your existing music, or music from new CDs you buy, right
onto your Zune, and add new music whenever you get it.
⻬ Share your Zune experience with your friends and family:
• Use the built-in wireless features to find and connect to other
nearby Zunes and share music and photos.
• Fire up your Web browser and go online to check out the everexpanding roster of Zune chat forums out there.
• Hook your Zune up to a stereo system (with a mini-plug-to-RCA
cable or something similar) or a set of speakers to listen to your
music with your friends, or hook it up to your TV (which requires
an audio/video cable) to share photos and videos.
Getting Your Hands on a Zune
If you haven’t already purchased your Zune, you need to make only a couple
of decisions: What color should I get, and where should I buy it?
The big decision: Black, white, or brown?
There is currently only one Zune model, but it does come in three different
colors: black, white, and brown. When you see a Zune up close and personal,
though, you’ll realize that the colors are more complex than just a single
tone. The outside of each Zune is actually made up of multiple layers of material. The outer layer is semitranslucent and has a slightly different color than
the rest of the unit. This interesting design produces a color that changes
slightly depending on the light and the angle at which you hold your Zune, an
effect that many people are calling doubleshot.
Chapter 1: First Steps with Your Zune
So, technically, each and every Zune has more than one color, but you still
have to decide if you’re (overall) a white, black, or brown type. Other than
the color, there’s no difference in the three styles of device, so pick
whichever color suits you best. Brown is a relatively unusual color for an
electronic device, but perhaps that will make your Zune stand out a bit more
from the other music players out there. A lot of rumors are flying around
about new colors, especially pink. At the time we wrote this book, nothing
had been confirmed, but check out www.zune.net (click on Meet Zune) to
see if any new colors are available.
Where to buy your Zune?
Just like with color, where to buy your Zune isn’t a technical decision. There’s
no difference between the Zunes being sold by different stores, so your decision should depend on the price and the level of after-sale support that you
can expect to receive. Many people avoid buying larger ticket items online,
but for something in the range of a Zune, there are few worries.
Personally, though, we prefer using a local chain store, such as Best Buy or
Circuit City, for two main reasons:
⻬ First, if something is wrong with the unit right when you open the box,
you can be confident that they’ll take care of the problem without any
need to call Microsoft support (and possibly having to mail the unit in to
be replaced or fixed).
⻬ Second, we just really like to get our purchases right into our hands
when we’re buying something that we’re this excited about. (Okay, so
we’re into instant gratification!)
Regardless of your personal preferences about online shopping, we suggest
you check out www.pricegrabber.com before you buy. On this site, you
can compare the prices (including shipping and taxes) across hundreds of
different online retailers. Find the best price (from a store with a high star
rating and a large number of positive reviews, to be sure), and the savings
might be enough to get you over any fear of online purchasing.
Opening the box
So you’ve bought yourself a Zune (or better yet, you’ve been given one as a
gift), and you’ve ripped the shrink wrap off the funky brown box with the distinctive orange bottom. Now what? Well, first, go ahead and open this thing
up and take a look at what you get!
9
10
Part I: Getting Started
After you have that outer layer of plastic off, you can slide the brown case up
to reveal yet another funky piece of packaging, this one with the slightly hardto-understand (but easy-to-remember) tag line, “Welcome to the Social.”
Ignoring the writing for a moment, lift that front flap to expose your Zune.
The device sits in a recessed pocket in the front of the package (see Figure 1-1),
and you should see a small ribbon sticking out from the bottom of it. Pull
carefully on that ribbon (not too hard or it will rip, and you’ll feel all sad for
damaging an otherwise perfect Zune storage box), and the Zune should lift
right up and out of the packaging.
Now, if you check out the area to either side of where the Zune was sitting,
you’ll find that two flaps open to reveal little secret compartments. On one
side, you’ll find a pair of headphones, and on the other side, you’ll find a special USB cable that you’ll need to hook your Zune up to a PC.
You (smart person that you are) may have spotted those pockets immediately, but we know a large number of people who didn’t notice them until
they were already totally frustrated from searching the package for a pair of
headphones.
Figure 1-1:
Liberate
your Zune
from its
cardboard
confinement.
Chapter 1: First Steps with Your Zune
Now, if you look on the very top of the inner box, you’ll find an opening
behind where the Zune sits, and inside that area, you’ll find
⻬ A Product Guide and a Start Guide (very basic usage information)
⻬ The software CD
You find out all about installing and getting started with the software in
Chapter 2.
⻬ A sleek little bag for your Zune
⻬ A Zune sticker (or not — the stickers were a limited-time item)
Run outside right now and stick it on your car, or your parents’ car, or a
friend’s car, or on your bike . . . just stick it somewhere!
You can ignore almost all these goodies for now; just take out your Zune (it
should be wrapped in its own plastic, so unwrap it now and peel the plastic
sticker off the screen) and the headphones. It’s time to try out your new toy
and see what it can do.
Checking the battery
Turn your Zune on by pressing the Play/Pause button (see Figure 1-2) to
make the display light up.
Figure 1-2:
Push the
Play/Pause
button to
bring your
Zune to life.
Play/Pause
If the display doesn’t light up at this point, your battery might be completely
drained (more on that in a moment), or your Zune could be locked.
11
12
Part I: Getting Started
If the Hold switch at the top of your Zune is in the Locked position, as shown
in Figure 1-3, slide it gently to the left to unlock it and then try the Play/Pause
button again.
Lock/Unlock
Headphone Jack
(also used for TV-Out)
Figure 1-3:
Unlock your
Zune before
taking it for
a drive.
If your Zune display does light up, check out the lower-right corner to see the
current battery status. (See Figure 1-4.)
Figure 1-4:
Checking
out the
Zune juice.
If half or less of this bar is filled in, your battery is low. If you have more than
half, you can go ahead and start using your Zune now; otherwise, it’s probably a good idea to charge it for a couple of hours before going any further.
To find out how to take care of this (very basic) chore, check out the following section.
Chapter 1: First Steps with Your Zune
Charging your Zune
When you were unpacking the Zune, you probably were amazed to discover
that there wasn’t any sort of power cord anywhere. There’s a simple reason
for that — there is no Zune power cord. You charge a Zune by using the same
USB cable (called the sync cable) you use to hook it up to your PC.
To charge your Zune, plug the wide connector on the sync cable, shown in
Figure 1-5, into the bottom of your device. Make sure that the Zune logo is
facing up and that your Zune itself is lying face-up, with the screen visible.
(The connectors fit right only if everything’s facing in the right direction.)
Don’t force the connector in; just push gently until you hear a click. Then go
ahead and plug the other end (the standard USB connector) into an available
USB port on your PC.
Figure 1-5:
The sync
cable plugs
into the
bottom of
the Zune.
13
14
Part I: Getting Started
You may want to use a USB port on the back of your PC because the front
ports may be underpowered and could cause you problems in charging and
syncing your Zune.
If your PC is running and you’re logged in at this point, you’ll likely receive a
prompt like the one in Figure 1-6, asking if you want to try to find a driver for
your Zune device. Just click the Cancel button at the bottom; we show you
how to set up your Zune drivers and software in Chapter 2.
What if my Zune won’t charge?
If you’re unlucky enough that the battery doesn’t
appear to be charging, the USB port you’re
using may not have enough power. If your Zune
battery won’t charge, try these fixes to figure
out how to get your Zune to charge properly:
⻬ If you’re plugged into a USB hub, try plugging directly into a port on your PC.
⻬ If you’re already plugged into a front panel
port on your PC, try switching to a rearpanel port.
⻬ If you have a powered USB hub available
(one that uses an AC adapter in addition to
a connection to your PC), try hooking up to
a port on that hub.
⻬ Try unplugging any other USB devices from
your PC or hub. One of those other devices
might be interfering with your Zune’s ability
to charge.
⻬ Try a port on another system . . . such as
your Xbox 360. (A running Xbox 360 provides
enough power on its USB ports to charge
the Zune; we cover other ways your Zune
and your Xbox 360 can work together in
Chapter 13.)
If none of the preceding fix attempts work,
and you can’t get your Zune to charge via
any USB port you have, then you have two
options:
⻬ If the Zune never started up at all, you
should take it back to the store where you
purchased it. Why take chances? Even if
some voodoo charm gets it charged up in
some way, you shouldn’t have to wander
around trying to figure out how to get it
working.
⻬ If the Zune did start up and was working for
a while, but is now low on battery and you
can’t find a USB port that will charge it, you
could get a docking station, such as the
Microsoft dock or one of several others that
are available (see Chapter 17 for more information on accessories for the Zune), or you
could get a USB charger, such as Zip LinQ’s
model (shown in the following figure),
which is currently available for less than ten
dollars.
Chapter 1: First Steps with Your Zune
Figure 1-6:
Don’t try
to install
drivers
until you set
up the
software.
After you connect the sync cable, check to see if your Zune is charging. If it is,
the little battery icon does a shape shift, as shown in Figure 1-7.
Figure 1-7:
The dots
show you
that your
Zune is
charging.
15
16
Part I: Getting Started
Putting Your Zune through Its Paces
Okay, we’re going to assume you have your Zune up and running. Time to fill
you in on the basic navigation and usage instructions for the Zune — while
taking you on a tour of the preloaded music, photos, and videos.
Starting your Zune is as easy as pressing any button (unless it’s locked, of
course), but what about turning it off? Turns out you don’t ever have to shut
it completely off. If you just leave it inactive (not playing music, video, or a
photo slideshow) for more than 30 seconds, it goes into a low-power state,
and shortly after that, it goes into a suspended sleep state. From either of
these states, pressing any key brings it back to full power instantly. After
approximately a day in the sleep mode, the device goes into a deep sleep to
conserve battery life even more. There’s little difference between the sleep
and deep sleep modes, except that the device starts up a bit more slowly
from a deep sleep and has forgotten what you were doing when you last used
it. (When your Zune’s in either the low-power state or sleep mode, it starts up
right at the song, video, or picture you were on when it powered down.)
When it’s turned on after being in deep sleep mode, it goes to the startup
screen with the Zune logo.
If you want, you can put your Zune to sleep immediately by pressing and
holding the Play/Pause button for about three seconds. Here are some other
handy tips about stopping and starting your Zune:
⻬ In normal usage, tap any key on the Zune to wake it up and light up the
display. If it’s been left idle for a long time, tap the Play/Pause key to
wake it up.
⻬ Leave the Zune alone for more than a few seconds, and the screen dims
down to save battery power. (You can tweak how long it’ll take before
this dimming down takes place — we show you how in Chapter 3.)
⻬ The Zune won’t dim if it’s playing video, which is nice because that
would be really annoying.
⻬ Keep in mind that, after being inactive and paused for more than a
minute, the Zune will go to sleep (which is still not powered down completely, but it’s very close), and that after about a day, the Zune goes
into a deep sleep (or sooner if it’s very low on battery power).
⻬ Left asleep, a fully charged Zune should retain battery power for a week
(possibly two).
The key to making your way through the Zune’s menus and through your
content is the control pad below the screen on your Zune. This control pad
(see Figure 1-8) is a circle, but you can press it only on the four distinct sides
(or on the center OK button). It doesn’t turn, and sliding your finger around it
won’t do anything; it’s not a wheel.
Chapter 1: First Steps with Your Zune
music
videos
pictures
radio
community
settings
Figure 1-8: Control Pad
You move (arrows added)
around on
your Zune
by using the
control pad.
OK button
When you’re viewing menus, you press up and down on the control pad to
move up and down on the list of options. Press left or right on the control
pad to move between types of lists, such as between viewing your music by
Album, Genre, or Song. After you find a menu item that you want to select,
just press the OK button to select it.
When you’re listening to music or watching a video, press up and down
on the control pad to adjust the volume. As you can see in the “Checking out
the videos” section later in this chapter, you need to rotate the Zune 90
degrees to the left when you watch video or view photos; the control pad
adjusts its behavior depending on what you’re doing. Volume control is
always up and down relative to how the screen is supposed to be rotated
(see Figure 1-9).
Figure 1-9:
Left/right
and up/down
functionality
depends on
the mode
you’re in.
Volume +/−
Volume +/−
17
18
Part I: Getting Started
Although we definitely spend more time talking about rebooting later, we do
want you to know that if you ever need to completely reboot your Zune, you
can do so by holding down the Back button and Down on the control pad, as
shown in Figure 1-10.
Figure 1-10:
The supersecret
button
combo to
reboot a
Back and Down
Zune. together will reboot
your Zune
Get out those headphones
It’s time to dig out the funky headphones, plug them in, and check out some
content. While you have them out, did you notice that the headphones were
magnetic? Yep, that’s right . . . those pesky ear buds will be staying nice and
close due to magnetic backs. Whenever you aren’t using them, let their backs
click together, making them easier to wrap up and keep untangled. The headphones also act as the antenna when you’re listening to FM radio stations,
and the Zune doesn’t get very good reception without them.
If you’re at all like us and aren’t really into the kinds of prepackaged headphones you get right out of any box, you’ll be happy to know that any headphones should work fine as antennas.
Exploring the preloaded music
For many people, the Zune is all about music. When you add in the wireless
sharing features along with the Zune Marketplace, you’ll see that it’s also
very much about discovering new music. In that spirit, the folks at Microsoft
preloaded your Zune with quite a few off-the-beaten-track tunes for your listening pleasure. Here’s the full list of preloaded songs:
⻬ Band of Horses, “Wicked Gil” (Sub Pop Records)
⻬ Bitter:Sweet, “The Mating Game” (Quango Music Group)
⻬ CSS, “Alala (Microsoft edit)” (Sub Pop Records)
Chapter 1: First Steps with Your Zune
⻬ Darkel, “At The End of The Sky (edit)” (Astralwerks)
⻬ Every Move a Picture, “Signs of Life” (V2)
⻬ Small Sins, “Stay” (Astralwerks)
⻬ The Adored, “Tell Me Tell Me” (V2)
⻬ The Rakes, “Open Book” (V2)
⻬ The Thermals, “A Pillar of Salt” (Sub Pop Records)
Those in the know will immediately recognize most of these bands as indie
faves — that is, bands that generally record for independent record labels.
This is a great selection of music for anyone who’s tired of what he or she
hears on the radio and is on the lookout for some new favorite bands. Each
track has a different vibe, but the set works well, as a whole, as a great mix of
pop and rock songs from a variety of new artists.
To dig into these tracks yourself, use the control pad below the screen. Just
follow these steps:
1. Start out on the home page, the first screen of the Zune.
If you aren’t on the home page, you can press Back again and again until
you make it all the way back home, or you can press and hold the Back
button for a few seconds, which will take you right there. This is a great
way to get back to the home page, no matter how deep you are in the
Zune menu hierarchy.
2. Use down or up on the control pad to select Music from the home
page menu. Press the center button of the control pad (the OK button)
to confirm your choice.
What you see — a list of albums, artists, playlists, genres, or songs —
depends on what you viewed the last time you were in this section.
(If you’ve never clicked the Music item before, you most likely see a list
of albums.)
Whatever list you’re viewing, you can now navigate the menu choices
in two different directions. Moving up and down (pressing the top and
bottom areas on the control pad) moves you through the current list of
items (albums, for example); moving left and right switches what list
you’re viewing (from albums to artists, genres to songs, and so on).
Figure 1-11 shows how this works in the music section.
3. To get to your preloaded content, click the right side of the navigation
area until you have the Songs list selected.
Because there’s only one song by each band and from each album on the
Zune, viewing by album or artist just makes you go through an extra
step to get to your music.
19
20
Part I: Getting Started
Figure 1-11:
Switching
views by
pressing left
or right lets
you move
from albums
to artists
without
having to
go back a
step first.
4. Select the song you’re interested in from the Song list and then press
the Play/Pause button to play that song, or press the OK button in the
center of the control pad for more information about the song.
Rock on!
If you want to play all of your preloaded content without having to select
each one individually, select the Shuffle All option at the top of the Song
list. Doing so plays the tracks in random order. (You can find out more
about the music features of your Zune in Chapter 4.)
Checking out the videos
Your Zune comes preloaded with quite a few different videos, most of which
are music videos in the same style as the preloaded music. (In fact, one of the
videos is by CSS, a band that’s also highlighted in the Music section.) Check
out the music videos first:
⻬ 30 Seconds to Mars, “The Kill” (Virgin Records)
⻬ BT, “1.618” (DTS Entertainment)
⻬ Chad VanGaalen, “Red Hot Drops” (Sub Pop Records)
Chapter 1: First Steps with Your Zune
⻬ Coldcut featuring Roots Manuva, “True Skool” (Ninja Tune)
⻬ CSS, “Let’s Make Love and Listen to Death From Above” (Sub Pop Records)
⻬ Fruit Bats, “Live: The Wind That Blew My Heart Away” (Sub Pop Records)
⻬ Grandaddy, “Elevate Myself” (V2)
⻬ Hot Chip, “Over and Over” (Astralwerks Records)
⻬ Kraak & Smaak featuring Dez, “Keep Me Home” (Quango Music Group)
⻬ Kinski, “Live: The Snowy Parts of Scandinavia” (Sub Pop Records)
⻬ Paul Oakenfold, “Faster Kill Pussycat (Featuring Brittany Murphy)”
(Maverick Records)
⻬ Serena-Maneesh, “Drain Cosmetics” (Playlouderecordings)
Microsoft has also preloaded onto your Zune three cool action videos that
feature some extreme skateboarding, mountain biking, and
snowboarding/skiing. Here are the details:
⻬ 5 Boro: “A New York Skateboarding Minute” (Skateboarding)
⻬ Radical Films: “Kranked — Progression” (Mountain Biking)
⻬ TGRTV: “The North Face” (Skiing/Snowboarding)
These videos may not be your cup of tea, but they’re great for showing off
the Zune’s big and bright display until you’ve had a chance to load some of
your own videos onto it!
To play a video, follow these steps:
1. Start out on the home page, the first screen of the Zune.
If you aren’t on the home page, you can press Back again and again until
you make it all the way back to home, or you can press and hold the
Back button for a few seconds, which will take you right there. This is a
great way to get back to the home page, no matter how deep you are in
the Zune menu hierarchy.
2. Use down or up on the control pad to select Video from the home
page menu. Press the center (OK) button on the control pad to confirm your choice.
When you first open the Videos section, a list of All Videos appears, but
you can navigate the menu choices in two different directions. Moving up
and down (pressing the top and bottom areas on the control pad) moves
you through the current list of items (the All Videos list, for example);
moving left and right switches which list you’re viewing (from All Videos
to subcategories such as Music Videos and Movies, each of which shows
a filtered view of the video content).
21
22
Part I: Getting Started
3. To get to your preloaded content, make sure you have the All Videos
list selected.
Browse through this list to find all the videos on your device.
4. Select the video you’re interested in from the All Video list and then
press the OK button in the center of the control pad to see the details
about that video.
The Detail view appears, which you can see in Figure 1-12, showing a
description of the video.
5. Select Play to start the video.
If you aren’t interested in the details of the video, you can press the
Play/Pause button right on the All Videos list, and the video starts playing without showing the detailed information.
Browsing through and watching videos is covered in more detail in Chapter 12.
Figure 1-12:
A video’s
Detail page
shows you
the length,
date, and
description
of the video.
Chapter 1: First Steps with Your Zune
Flipping through the photos
The last bit of preloaded content covers the photo angle actually, three
different photo angles. You get a set of DJ photos (pictures of DJ equipment,
such as record players and stacks of vinyl records), a set of graffiti photos
(colorful wall art), and a collection of poster art highlighting various rock
bands. Follow these steps to check out the cool eye candy:
1. Start out on the home page, the first screen of the Zune.
If you aren’t on the home page, press and hold the Back button for a few
seconds, which will take you right there.
2. Use down or up on the control pad to select Pictures from the home
page menu. Press the center (OK) button on the control pad to confirm your choice.
The View by Folder list appears. This view shows you all the preloaded
photos in their three groups (DJ photos, graffiti photos, and poster art).
If you press left or right on the control pad, the View by Date list appears.
This list is handy when you’re looking at your own personal photos, but
it isn’t very useful for the preloaded ones.
3. Pick Play Slideshow from the top of the screen to start up a slideshow
of all the photos across all the folders, or use the control pad to select
one of the three folders and press the OK button to view the contents
of that folder.
If you view a single folder, you get a thumbnail view (see Figure 1-13)
showing up to 30 pictures at once. (In the case of the preloaded photos,
you get to see them all.) You can use the control pad to select an individual picture to view or select Play Slideshow at the top of the screen to
start a slideshow of the current folder.
No matter how you view a photo or a slideshow of photos, the images are displayed in widescreen (or landscape) view, so you need to turn the Zune 90
degrees to the left to view them (or turn your head 90 degrees to the right —
whatever’s easier for you). Chapter 6 digs into the photo features of your
Zune in much more detail.
23
24
Part I: Getting Started
Figure 1-13:
The photo
folder view
shows you
up to 30
pictures
at a time.
Tuning in the radio
It isn’t really preloaded content, but the other way you can use your Zune
right out of the box is to tune into some local radio stations. Pick the Radio
option from the home page to switch to a cool Tuner view (see Figure 1-14).
Remember that the headphones of the Zune are also its antenna, so if you’re
going to use the radio feature, make sure they’re hooked up.
Press left or right on the control pad to seek between stations. When your
Zune finds a station, you may get some extra info above and below the
tuning band. Not every station transmits this extra data, which usually
includes the station’s call letters and sometimes the currently playing song,
but many do! We chat more about that info, and the rest of the radio features,
in Chapter 4.
Chapter 1: First Steps with Your Zune
Figure 1-14:
The hottestlooking
tuning dial
I’ve ever
seen.
What’s Next?
You can rely on your Zune’s preloaded content for only so long — did you really
plan on getting by with just nine pieces of preloaded music, for example? —
so Chapter 2 shows you how to install the Zune software and hook your
device up to your PC so you can load some content of your own. If we were
you, we’d go to Chapter 2 right now.
25
26
Part I: Getting Started