1
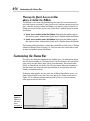
Chapter 1: Customizing
an Office Program
Changing around the Quick Access toolbar
RI
Choosing what appears on the status bar
AL
In This Chapter
Choosing a new color scheme
TE
Changing the keyboard shortcuts in Word
MA
Deciding what to do about Smart Tags
T
TE
D
his short chapter describes a handful of things you can do to customize
Office 2007 programs. Don’t be afraid to make like a software developer
and change a program to your liking. Many people are wary of retooling
Office programs, but you can always reverse the changes you make if you
don’t like them, as I explain throughout this chapter.
PY
RI
GH
This chapter shows how to put your favorite button commands on the
Quick Access toolbar. Instead of fishing around for your favorite commands,
you can assemble them on the Quick Access toolbar and locate them right
away. You also discover how to change around the status bar, dress up an
Office program in a new set of clothes, designate your own keyboard shortcuts in Word, and handle Smart Tags, the data snippets that sometimes get
mysteriously underlined in Office files.
CO
Customizing the Quick Access Toolbar
No matter where you go in Word, Access, Excel, or PowerPoint, you see the
Quick Access toolbar in the upper-left corner of the screen. This toolbar
offers the Save, Undo, and Repeat buttons (and sometimes other buttons
as well). However, which buttons appear on the Quick Access toolbar is
entirely up to you. You can put your favorite buttons on the toolbar and
keep them within reach. And if the Quick Access toolbar gets too big, you
can move it below the Ribbon, as shown in Figure 1-1. Adding buttons to and
removing buttons from the Quick Access toolbar is, I’m happy to report, a
piece of cake. And moving the toolbar below the Ribbon is as easy as pie.
654
Customizing the Quick Access Toolbar
Right-click a button to add it to the toolbar.
Figure 1-1:
Merely
by rightclicking, you
can add a
button to the
Quick
Access
toolbar.
The Quick Access toolbar below the Ribbon.
Adding buttons to the Quick Access toolbar
Use one of these techniques to add buttons to the Quick Access toolbar:
✦ Right-click a button you want to see on the toolbar and choose Add to
Quick Access Toolbar on the shortcut menu (see Figure 1-1).
✦ Click the Customize Quick Access Toolbar button and choose a button
on the drop-down list. The list offers buttons deemed most likely to be
placed on the Quick Access toolbar by the makers of Office.
✦ Click the Customize Quick Access Toolbar button and choose More
Commands (or right-click any button or tab and choose Customize
Quick Access Toolbar on the shortcut menu). You see the Customize
category of the Options dialog box, as shown in Figure 1-2. On the
Choose Commands From drop-down list, choose the name of the tab
with the button you want to add to the Quick Access toolbar. Then
select the button’s name and click the Add button.
Select a tab.
Figure 1-2:
Use this
dialog box
to add,
remove, and
reorder
buttons.
Select a button and click Add.
Customizing the Quick Access Toolbar
655
To restore the Quick Access toolbar to its original buttons, click the Reset
button in the Options dialog box (see Figure 1-2).
Unless you declare otherwise, changes you make to the Quick Access toolbar apply to all the files you work on. You can, however, construct a toolbar
for one file only. To alter the Quick Access toolbar for one file, go to the
Customize category of the Options dialog box (see Figure 1-2), open the
Customize Quick Access Toolbar drop-down list, choose the name of your
file, and then start altering the toolbar.
Changing the order of buttons
on the Quick Access toolbar
Follow these steps to change the order of buttons on the Quick Access
toolbar:
1. Click the Customize Quick Access Toolbar button and choose More
Commands on the drop-down list.
The Customize category of the Options dialog box appears (see Figure 1-2).
You can also open this dialog box by right-clicking any button or tab and
choosing Customize Quick Access Toolbar.
2. Select the name of a button on the right side of the dialog box and
click the Move Up or Move Down button.
3. Repeat Step 2 until the buttons are in the right order.
4. Click OK.
Removing buttons from the Quick Access toolbar
Use one of these techniques to remove buttons from the Quick Access
toolbar:
✦ Right-click a button and choose Remove from Quick Access Toolbar on
the shortcut menu.
You can click the Reset button in the Options dialog box (refer to Figure 1-2)
to remove all the buttons you placed on the Quick Access toolbar.
Customizing an
Office Program
✦ Right-click any button or tab and choose Customize Quick Access
Toolbar. You see the Customize category of the Options dialog box (refer
to Figure 1-2). Select the button you want to remove on the right side of
the dialog box and click the Remove button.
Book VIII
Chapter 1
656
Customizing the Status Bar
Placing the Quick Access toolbar
above or below the Ribbon
The Ribbon is the stretch of ground along the top of the screen where the
tabs and buttons are found. If your Quick Access toolbar contains many buttons, consider placing it below the Ribbon, not above it (refer to Figure 1-1).
Follow these instructions to place the Quick Access toolbar above or below
the Ribbon:
✦ Quick Access toolbar below the Ribbon: Right-click the toolbar, and on
the shortcut menu, choose Show Quick Access Toolbar below the Ribbon.
✦ Quick Access toolbar above the Ribbon: Right-click the toolbar, and on
the shortcut menu, choose Show Quick Access Toolbar above the Ribbon.
The Options dialog box offers a check box called Place Quick Access Toolbar
below the Ribbon (refer to Figure 1-2). You can select this check box as well
to move the toolbar above the Ribbon.
Customizing the Status Bar
The status bar along the bottom of the window gives you information about
the file you’re working on. The Word status bar, for example, tells you which
page you’re on, how many pages are in your document, and several other
things. In PowerPoint, the status bar tells you which slide you’re looking at
and the theme you chose for your presentation. It also presents the view
buttons and zoom controls.
To choose what appears on the status bar in Word, PowerPoint, Access, or
Excel, right-click the status bar. You see a pop-up list similar to the one in
Figure 1-3. By selecting and deselecting items in this list, you can decide
what appears on the status bar.
Figure 1-3:
Right-click
the status
bar to
customize it.
Customizing Keyboard Shortcuts in Word
657
Changing Color Schemes
Figure 1-5 shows three color schemes with which you can dress up Excel,
Outlook, Access, Word, and PowerPoint: Blue, Silver, and Black. Which do
you prefer? Follow these steps to choose a color scheme for PowerPoint:
Figure 1-4:
Take your
choice of
these color
schemes:
Blue (top),
Silver
(middle), or
Black
(bottom).
1. Click the Office button and choose Options.
You see the Options dialog box.
2. Click the Popular category.
3. Open the Color Scheme drop-down list and choose Blue, Silver, or
Black.
4. Click OK.
How do you like your new get-up? The color scheme you choose applies
to all the Office programs except Publisher.
In Microsoft Word, you can change the keyboard shortcuts. A keyboard shortcut is a combination of keys that you press to give a command. For example,
pressing Ctrl+P opens the Print dialog box; pressing Ctrl+S gives the Save
command. If you don’t like a keyboard shortcut in Word, you can change it
Customizing an
Office Program
Customizing Keyboard Shortcuts in Word
Book VIII
Chapter 1
658
Customizing Keyboard Shortcuts in Word
and invent a keyboard shortcut of your own. You can also assign keyboard
shortcuts to symbols, macros, fonts, AutoText entries, and styles.
Follow these steps to choose keyboard shortcuts of your own in Microsoft
Word:
1. Click the Office button and choose Word Options.
You see the Word Options dialog box.
2. Select the Customize category.
3. Click the Customize button.
You see the Customize Keyboard dialog box, as shown in Figure 1-5.
Figure 1-5:
Assigning
keyboard
shortcuts to
commands.
Enter the shortcut.
Select a command.
4. In the Categories list, choose the category with the command to which
you want to assign the keyboard shortcut.
At the bottom of the list are the Macros, Fonts, AutoText, Styles, and
Common Symbols categories.
5. Choose the command name, macro, font, AutoText entry, style, or
symbol name in the Commands list.
6. In the Press New Shortcut Key box, type the keyboard shortcut.
Press the actual keys. For example, if the shortcut is Ctrl+8, press the
Ctrl key and the 8 key — don’t type out C-t-r-l-+8.
Smart Tags, Smart Alecks
659
If you try to assign a shortcut that’s already assigned, the words “Currently
assigned to” and a command name appear below the Current Keys box.
You can override the preassigned keyboard assignment by entering a
keyboard assignment of your own.
7. If you want the keyboard shortcut changes you make to apply to the
document you’re working on, not to all documents created with the
template you’re working with, open the Save Changes In drop-down
list and choose your document’s name.
8. Click the Assign button.
9. When you’re done, close the Customize Keyboard dialog box.
To delete a keyboard shortcut, display it in the Current Keys box, select it,
and click the Remove button.
You can always get the old keyboard shortcuts back by clicking the Reset All
button in the Customize Keyboard dialog box.
Smart Tags, Smart Alecks
A Smart Tag is a snippet of data that Office programs recognize as a date, an
address, a company ticker name, a place, a telephone number, or a person to
whom you recently sent e-mail. If the program recognizes one of these entities, it places a purple dotted line underneath the data. Move the pointer
over the purple dotted line and you see the Smart Tag icon. Click this icon
and you see a shortcut menu with tasks, as shown in Figure 1-6.
Figure 1-6:
A Smart Tag
in action.
Book VIII
Chapter 1
1. Click the Office button.
2. Choose Options on the drop-down list.
3. Select the Proofing category of the Options dialog box, and click the
AutoCorrect Options button.
Customizing an
Office Program
Not everyone likes Smart Tags, however. Follow these steps to turn them off
or otherwise tell Office which ones to recognize:
660
Smart Tags, Smart Alecks
You see the AutoCorrect dialog box.
4. Click the Smart Tags tab.
5. Deselect the Label Text with Smart Tags check box.
Rather than ditch Smart Tags altogether, you can select check boxes to
tell Office which data types you want to “smart tag.”
6. Click OK.