1
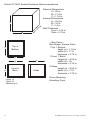
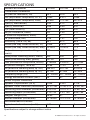
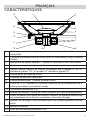
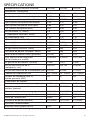
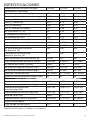
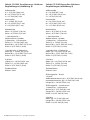
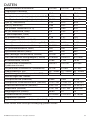
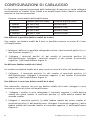
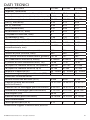
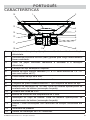
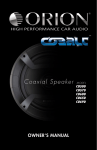
Su b w o of e r
OWNER'S MANUAL
MODEL
CO104S
CO124S
CO154S
TABLE OF CONTENTS
English . . . . . . . . . . . . . . . . . . . . . . . . . . . . . . . . . . . . . . . . . . . . . . . . . . . . . . . . . . . . . . . 1
Français . . . . . . . . . . . . . . . . . . . . . . . . . . . . . . . . . . . . . . . . . . . . . . . . . . . . . . . . . . . . . 17
Español. . . . . . . . . . . . . . . . . . . . . . . . . . . . . . . . . . . . . . . . . . . . . . . . . . . . . . . . . . . . . . 25
Deutsch . . . . . . . . . . . . . . . . . . . . . . . . . . . . . . . . . . . . . . . . . . . . . . . . . . . . . . . . . . . . . 33
Italiano. . . . . . . . . . . . . . . . . . . . . . . . . . . . . . . . . . . . . . . . . . . . . . . . . . . . . . . . . . . . . . 41
Português . . . . . . . . . . . . . . . . . . . . . . . . . . . . . . . . . . . . . . . . . . . . . . . . . . . . . . . . . . . 49
Introduction . . . . . . . . . . . . . . . . . . . . . . . . . . . . . . . . . . . . . . . . . . . . . . . . . . . . . . . 1
Practice Safe Sound™ . . . . . . . . . . . . . . . . . . . . . . . . . . . . . . . . . . . . . . . . . . . . . . . . 1
What's in the box . .. . . . . . . . . . . . . . . . . . . . . . . . . . . . . . . . . . . . . . . . . . . . . . . . . . .2
Installation . . . . . . . . . . . . . . . . . . . . . . . . . . . . . . . . . . . . . . . . . . . . . . . . . . . . . . . . . 2
Tools of the Trade . . . . . . . . . . . . . . . . . . . . . . . . . . . . . . . . . . . . . . . . . . . . . . . . . . . 2
Finding Speaker Mounting Locations . . . . . . . . . . . . . . . . .. . . . . . . . . . . . . . . . . . . . 2
Features . . . . . . . . . . . . . . . . . . . . . . . . . . . . . . . . . . . . . . . . . . . . . . . . . . . . . . . . . . 3
Wiring Configurations . . . . . . . . . . . . . . . . . . . . . . . . . . . . . . . . . . . . . . . . . . . . . . . . .4
Enclosure Recommendations . . . . . . . . . . . . . . . . . . . . . . . . . . . . . . . . . . . . . . . . . . . 8
Specifications . . . . . . . . . . . . . . . . . . . . . . . . . . . . . . . . . . . . . . . . . . . . . . . . . . . . . . 14
Warranty . . . . . . . . . . . . . . . . . . . . . . . . . . . . . . . . . . . . . . . . . . . . . . . . . . Back cover
INTRODUCTION
Thank you for your purchase of the Orion Cobalt Subwoofers. These woofers
represent a combination of incredible performance and value. We at Orion strive to
give you the latest up to date information about this product. What we can’t give you
with the manual is personal installation or technical experience. If you have questions
concerning the use or application of this product please refer to the nearest ORION
dealer for assistance, visit www.orioncaraudio.com, or call the technical support hotline at 1-800-876-0800. As we are always finding new ways to improve our product,
the features and specifications are subject to change without notice.
PRACTICE SAFE SOUND™
Continuous exposure to sound pressure levels over 100dB may cause permanent
hearing loss. High powered automotive sound systems can generate sound pressure
levels in excess of 130dB. When playing your system at high levels, please use hearing
protection and prevent long term exposure.
Model Number:
_______________
Serial Number:
_______________
Date of Purchase: _______________
© 2008 directed electronics—all rights reserved
1
WHAT’S IN THE BOX
Included in this box are all the necessary mounting hardware and cables for your basic
installation. Listed below is a detailed list of the components included in this system
package.
Quantity
Description
1
Installation and Operation Manual
1
Orion™ Cobalt woofer
1
Mounting template
Mounting screws
INSTALLATION
The performance of these Cobalt subwoofers is directly proportional to the quality
of the installation. Care taken with the installation process will be rewarded by years
of satisfying performance. If you are unsure of your installation abilities, please
refer to your local authorized Orion dealer for assistance. Orion dealers are trained
professionals dedicated to extracting the maximum performance out of your Orion
system. If you decide to install this speaker system yourself, please read the entire
section on sealed and vented enclosures before starting the installation. .
TOOLS OF THE TRADE
Listed are the majority of the tools required to perform the installation. Having the
proper tools will make the installation much easier. It is very difficult when you get
half way through the installation and discover that you require a specific tool to
get yourself through a particular part of the installation. Some of these tools are
necessities. Some make the job much easier.
•
•
•
•
•
Marking Pen
Phillips Screwdriver
Allen Wrenches
Table Saw
Wire Cutters
•
•
•
•
•
Electric Drill and assorted Bits
Wire Strippers
Volt/Ohm Meter (Optional)
Jig Saw
Wire Crimpers
FINDING SPEAKER MOUNTING LOCATIONS
Choosing the correct speaker locations will have the greatest effect on the
sound quality of the system. Different considerations are needed when choosing
the locations that best suit your needs. The locations must be large enough for
the speakers to fit. Care is needed to ensure that the location you have chosen
will not affect any of the mechanical or electrical operations of the vehicle.
Determining the best location for the speakers will depend on your cosmetic needs
and your vehicle's interior. If minimal intrusion in your vehicle is desired, factory
speaker locations may be the ticket for you. These woofers are too large to fit most
factory locations and typically need enclosures to perform correctly.
2
© 2008 directed electronics—all rights reserved
FEATURES
15
1
2
13
3
14
4
12
5
6
7
11
10
9
8
1
Polypropylene dust cap - moisture and UV resistant.
2
Oversized NBR (Nitrile-butadiene Rubber) surround for linear
controlled long excursion.
3
Vented paper cone - moisture and UV resistant.
4
Custom stamped steel frame.
5
Vented Kapton voice coil former (10” & 12" uses 1.5" voice coil
former, 15” use a 2" voice coil former).
6
8mm steel front plate.
7
Large 2 stack ceramic magnets.
8
8mm steel back plate/pole piece T yoke assembly.
9
.75" vent. Part of the enhanced voice coil cooling system (forced
convection).
10
PVC magnet protector.
11
High temperature Copper 4 ohm voice coil.
12
Venting in voice coil former. Part of the enhanced voice coil cooling
system (forced convection).
13
Interlaced Conex spider with stitched and looped tinsel leads
attached.
14
Push Terminals.
15
Reversible PVC mounting gasket.
© 2008 directed electronics—all rights reserved
3
WIRING CONFIGURATIONS
The following illustrations provide guidelines on properly connecting your
Orion Cobalt woofer to an Orion Cobalt amplifier for maximum performance.
Recommended Amplifier Power
Continuous Power (RMS)
Peak Power (Watts)
1 woofer
100 to 300
200 to 600
2 woofers
200 to 600
400 to 1200
3 woofers
300 to 900
600 to 1800
4 woofers
400 to 1200
800 to 2400
Parallel—Two Speakers ( 4 ohm voice coils)
Two 4 ohm voice coil woofers with the two woofers in parallel results in a 2 ohm load
to the amplifier..
_
_
4 ohm
4 ohm
+
+
Figure 2
Figura 2
Abbildung 2
+
_
1. Connect the speaker in parallel by connecting the two positive (+) terminals
together and the two negative (-) terminals together.
2. Wire the positive (+) terminals of the woofers to the positive (+) terminal on
the amplifier. Wire the negative (-) terminals of the woofers to the negative (-)
terminal on the amplifier.
4
© 2008 directed electronics—all rights reserved
One Speaker (4 ohm voice coil)
One 4 ohm voice coil woofer results in a 4 ohm load to the amplifier.
_
4 ohm
+
Figure 3
Figura 3
Abbildung 3
+
_
1. Connect the speaker by connecting the positive (+) terminal of the woofer to
the positive (+) terminal on the amplifier. Wire the negative (-) terminal of the
woofer to the negative (-) terminal on the amplifier.
© 2008 directed electronics—all rights reserved
5
Series—Two Speakers (Single 4 ohm voice coils)
Two single 4 ohm voice coil subwoofers with the voice coils connected in series to
result in an 8 ohm load to the amplifier.
_
_
4 ohm
4 ohm
+
+
Figure 4
Figura 4
Abbildung 4
+
_
1. Connect the woofers in series by connecting the negative (-) terminal of the first
woofer voice coil to the positive (+) terminal of the second woofer voice coil.
2. Wire the positive (+) terminal of the first woofer voice coil to the positive (+)
terminal on the amplifier. Wire the negative (-) terminal of the second woofer
voice coil to the negative (-) terminal on the amplifier.
6
© 2008 directed electronics—all rights reserved
Series/Parallel - 4 Speakers (Single 4 Ohm Coils)
4 single 4 ohm voice coil subwoofers with the voice coils of each pair of speaker wired
in series and then all 4 speakers wired in parallel to result in a 4 ohm load on the
amplifier.
_
4 ohm
1
_
_
4 ohm
2
_
4 ohm
3
+
4 ohm
4
+
+
+
Figure 5
Figura 5
Abbildung 5
+
_
1. Connect the negative (-) terminal from speaker 1 to the negative terminal on
speaker 3 and then hook that wire to the negative (-) terminal on the amplifier.
2. Connect the positive (+) terminal from speaker 1 to the negative (-) terminal on
speaker 2.
3. Connect the positive (+) terminal from speaker 3 to the negative (-) terminal on
speaker 4.
4. Connect the positive (+) terminal from speaker 2 to the positive (+) terminal on
speaker 4 and then hook that wire to the positive (+) terminal on the amplifer.
© 2008 directed electronics—all rights reserved
7
ENCLOSURE RECOMMENDATIONS
Enclosure Details
1. External dimensions calculated for 3/4” building material
2. Includes speaker displacement
3. Volumes given are net tuning volume
4. Enclosures include a minimal amount of damping material. Just enough material
to line the inside of the enclosure is required.
Cobalt CO104S Sealed Enclosure Recommendations
A
C
B
Top &
Bottom
c
b
a
d
c
Front &
Back
Sides
Figure 6
Figura 6
Abbildung 6
8
External Dimensions
A = 14 in
B = 12.5 in
C = 11.5 in
Internal Dimensions
A = 12.5 in
B = 11 in
C = 10 in
Wall Thickness
Front = 0.75 in
Side = 0.75 in
—Box Parts—
Box Shape: Square Prism
1 Top, 1 Bottom:
depth (c) = 11.5 in
width (b) = 12.5,
thickness = 0.75 in
1 Front, 1 Back:
height (a) = 12.5 in
width (d) = 11,
thickness = 0.75 in
2 Sides: height (a) = 12.5 in
depth (c) = 11.5,
thickness = 0.75 in
—Driver Mounting—
Front
© 2008 directed electronics—all rights reserved
Cobalt CO104S Vented Enclosure Recommendations
Figure 7
Figura 7
Abbildung 7
A
C
B
Top &
Bottom
c
b
a
d
c
Front &
Back
Sides
—Box Parts—
Box Shape: Square Prism
1 Top, 1 Bottom:
depth (c) = 12 in
width (b) = 14.25,
thickness = 0.75 in
1 Front, 1 Back:
height (a) = 14.25 in
width (d) = 12.75,
thickness = 0.75 in
2 Sides:
height (a) = 14.25 in
depth (c) = 12,
thickness = 0.75 in
—Driver Mounting—
Front
VENT Round
h
e
External Dimensions
A = 15.75 in
B = 14.25 in
C = 12 in
Internal Dimensions
A = 14.25 in
B = 12.75 in
C = 10.5 in
Wall Thickness
Front = 0.75 in
Side = 0.75 in
g
- OR VENT Square
e
h
h
g
© 2008 directed electronics—all rights reserved
Vent Parts --- Round
1 Duct: outside diameter (e) = 3.2
inside diameter (g) = 3 in
length (h) = 9.5 in
Vent Parts --- Square
1 Top, 1 Bottom:
width (e) = 3,
length (h) = 10 in
thickness = 0.125 in
2 Sides:
height (g) = 2.75,
length (h) = 10 in
thickness = 0.125 in
9
Cobalt CO124S Sealed Enclosure Recommendations
A
C
B
Top &
Bottom
c
b
a
d
c
Front &
Back
Sides
Figure 8
Figura 8
Abbildung 8
10
External Dimensions
A = 15.5 in
B = 14.75 in
C = 12 in
Internal Dimensions
A = 14 in
B = 13.25 in
C = 10.5 in
Wall Thickness
Front = 0.75 in
Side = 0.75 in
—Box Parts—
Box Shape: Square Prism
1 Top, 1 Bottom:
depth (c) = 12 in
width (b) = 14.75,
thickness = 0.75 in
1 Front, 1 Back:
height (a) = 14 in
width (d) = 13.25,
thickness = 0.75 in
2 Sides:
height (a) = 14 in
depth (c) = 12,
thickness = 0.75 in
Driver Mounting
Mounting: Front
© 2008 directed electronics—all rights reserved
Cobalt CO124S Vented Enclosure Recommendations
Figure 9
Figura 9
Abbildung 9
A
C
B
Top &
Bottom
c
b
a
d
c
Front &
Back
Sides
—Box Parts—
Box Shape: Square Prism
1 Top, 1 Bottom:
depth (c) = 13 in
width (b) = 16.75,
thickness = 0.75 in
1 Front, 1 Back:
height (a) = 16.5 in
width (d) = 15.25,
thickness = 0.75 in
2 Sides:
height (a) = 16.5 in
depth (c) = 13,
thickness = 0.75 in
Driver Mounting
Mounting: Front
VENT Round
h
e
External Dimensions
A = 18 in
B = 16.75 in
C = 13 in
Internal Dimensions
A = 16.5 in
B = 15.25 in
C = 11.5 in
Wall Thickness
Front = 0.75 in
Side = 0.75 in
g
- OR VENT Square
Vent Parts --- Round
1 Duct:
outside diameter (e) = 4.25
inside diameter (g) = 4 in
length (h) = 10 in
e
h
h
g
© 2008 directed electronics—all rights reserved
Vent Parts --- Square
1 Top, 1 Bottom:
width (e) = 3.75,
length (h) = 10 in
thickness = 0.125 in
2 Sides:
height (g) = 3.5,
length (h) = 10 in
thickness = 0.125 in
11
Cobalt CO154S Sealed Enclosure Recommendations
A
C
B
Top &
Bottom
c
b
a
d
c
Front &
Back
Sides
Figure 10
Figura 10
Abbildung 10
12
External Dimensions
A = 25 in
B = 17.5 in
C = 11.5 in
Internal Dimensions
A = 23.5 in
B = 16 in
C = 10 in
Wall Thickness
Front = 0.75 in
Side = 0.75 in
—Box Parts—
Box Shape: Square Prism
1 Top, 1 Bottom:
depth (c) = 11.5 in
width (b) = 17.5,
thickness = 0.75 in
1 Front, 1 Back:
height (a) = 23.5 in
width (d) = 16,
thickness = 0.75 in
2 Sides:
height (a) = 23.5 in
depth (c) = 11.5,
thickness = 0.75 in
Driver Mounting
Mounting: Front
© 2008 directed electronics—all rights reserved
Cobalt CO154S Vented Enclosure Recommendations
Figure 11
Figura 11
Abbildung 11
A
C
B
Top &
Bottom
c
b
a
d
c
Front &
Back
Sides
g
- OR VENT Square
e
h
h
g
© 2008 directed electronics—all rights reserved
—Box Parts—
Box Shape: Square Prism
1 Top, 1 Bottom:
depth (c) = 13 in
width (b) = 17.5,
thickness = 0.75 in
1 Front, 1 Back:
height (a) = 23.5 in
width (d) = 16,
thickness = 0.75 in
2 Sides:
height (a) = 23.5 in
depth (c) = 13,
thickness = 0.75 in
Driver Mounting
Mounting: Front
VENT Round
h
e
External Dimensions
A = 25 in
B = 17.5 in
C = 13 in
Internal Dimensions
A = 23.5 in
B = 16 in
C = 11.5 in
Wall Thickness
Front = 0.75 in
Side = 0.75 in
Vent Parts --- Round
1 Duct: outside diameter (e)
inside diameter (g) = 4 in
length (h) = 7 in
Vent Parts --- Square
1 Top, 1 Bottom:
width (e) = 4.25,
length (h) = 7 in
thickness = 0.125 in
2 Sides:
height (g) = 4,
length (h) = 7 in
thickness = 0.125 in
13
SPECIFICATIONS
Model/Part Number
CO104S
CO124S
CO154S
Fs (free-air resonance, Hz)
39.2
25.6
25.2
Vas (equivalent compliance, cu. ft.)
1.080
4.017
7.098
Vas (equivalent compliance, liters)
30.600
113.790
201.070
Qms (Q, mechanical)
3.53
4.72
6.08
Qes (Q, electrical)
0.68
0.55
0.51
Qts (total driver Q)
0.57
0.49
0.47
Re (DC resistance, ohms)
3.6
3.55
3.77
Z (nominal impedance, ohms)
4
4
4
Le (inductance, mh)
1.38
1.37
1.61
Efficiency (1W @ 1M, dB)
86.1
87.2
89.9
Xmax (one way linear excursion, in.)
0.406
0.410
0.453
Xmax (one way linear excursion, mm) 10.2925
10.4075
11.5
Pe (continuous power handling,
watts)
200
200
250
Peak power handling (music, watts)
400
500
600
Mms (total moving mass, grams)
101.00
127
195
Cms (mechanical compliance, mm/N)
0.180564
0.294721
0.211994
Bl (motor strength, Tesla-M)
10.88
11.61
14.82
Sd (effective radiating area, sq. cm.)
346.361
522.792
819.398
Sd (effective radiating area, sq. in.)
53.706
81.064
127.055
Frequency range (Hz)
39 - 250Hz
25 - 250Hz
25 - 250Hz
Energy Bandwidth Product (EBP)
58
47
49
Speaker Displacement (cu ft)
0.048
0.061
0.116
Speaker Outer Diameter (inches/mm)
10.31/ 262
12.40/ 315
15.40/ 391
Mounting hole diameter (inches/mm) 9.23/ 232
10.91/ 277
13.82/ 351
Mounting depth (inches/mm)
5.12/ 130
5.51/ 140
6.46/ 164
Magnet Weight (Oz)
38.60
41
70
Basket diameter (inches/mm)
10.16/258
12.21/310
15.16/385
0.75
1
2
Thiele/Small Parameters
Driver Physical Dimension
Recommended Enclosures
Typical sealed enclosure (cu. ft.)
Specifications subject to change without notice
14
© 2008 directed electronics—all rights reserved
A
B
C
D
E
Figure 12
Figura 12
Abbildung 12
CO104S
CO124S
CO154S
Dimensions inches/mm, Dimensions po/mm, Dimensiones
plg./mm, Abmessungen Zoll/mm, Dimensioni
pollici/millimetri, Dimensões polegadas/mm
A
5.12/130
5.51/140
6.46/164
B
1.97/50
1.97/50
2.01/51
C
4.96/126
5.00/127
5.71/145
D
9.13/232
10.91/277
13.82/351
E
10.16/258
12.20/310
15.16/385
© 2008 directed electronics—all rights reserved
15
FRANÇAIS
CARACTÉRISTIQUES
15
1
2
13
3
14
4
12
5
6
7
11
10
9
8
1
Cache-poussière en polypropylène — résiste à l'humidité et aux
ultraviolets
2
Panneau surdimensionné en nitrile pour un mouvement long à contrôle
linéaire
3
Membrane de papier ventilée — résiste à l'humidité et aux ultra-violets
4
Cadre sur mesure en acier matricé
5
Gabarit ventilé Kapton de bobine acoustique (les modèles 10” et 12"
utilisent le gabarit 1,5", le modèle 15” utilisent le gabarit 2")
6
Platine avant en acier de 8 mm
7
2 grands aimants en céramique
8
Platine arrière/collier T polaire en acier 8 mm
9
Évent de 0,75". Élément du système amélioré de refroidissement de la
bobine acoustique (convection forcée)
10
Protecteur d'aimant en PVC
11
Bobine acoustique 4 ohms en cuivre résistant aux hautes températures
12
Évent du gabarit de bobine acoustique. Élément du système amélioré de
refroidissement de la bobine acoustique (convection forcée)
13
Anneau de centrage Conex entrelacé avec fils rosettes piqués et bouclés
joints
14
Bornes-poussoirs
15
Joint de montage réversible en PVC
© 2008 directed electronics—all rights reserved
17
CONFIGURATIONS DE CÂBLAGE
Les illustrations suivantes fournissent des indications sur le câblage correct de votre
haut-parleur Orion Cobalt à un amplificateur Orion Cobalt pour un rendement optimal.
Puissance d'amplificateur recommandée
Puissance continue (RMS)
Puissance de crête (watts)
1 haut-parleur
100 à 300
200 à 600
2 haut-parleurs
200 à 600
400 à 1200
3 haut-parleurs
300 à 900
600 à 1800
4 haut-parleurs
400 à 1200
800 à 2400
Parallèle — Deux haut-parleurs (bobines acoustiques 4 ohms)
Deux haut-parleurs à bobine acoustique de 4 ohms en parallèle résultent en une
charge de 2 ohms pour l'amplificateur.
1. Raccordez le haut-parleur en parallèle en raccordant les deux bornes positives (+)
d'une part et les deux bornes négatives (-) d'autre part.
2. Raccordez les bornes positives (+) des haut-parleurs à la borne positive (+) de
l'amplificateur. Raccordez les bornes négatives (-) des haut-parleurs à la borne
négative (-) de l'amplificateur (figure 2).
Un haut-parleur (bobine acoustique 4 ohms)
Un haut-parleur à bobine acoustique de 4 ohms résulte en une charge de 4 ohms pour
l'amplificateur.
1. Raccordez le haut-parleur en raccordant la borne positive (+) du haut-parleur à
la borne positive (+) de l'amplificateur. Raccordez la borne négative (-) du hautparleur à la borne négative (-) de l'amplificateur (figure 3).
Série — Deux haut-parleurs (bobines acoustiques simples 4 ohms)
Deux haut-parleurs à bobine acoustique simple de 4 ohms en série résultent en une
charge de 8 ohms pour l'amplificateur.
1. Raccordez le haut-parleur en série en raccordant la borne négative (-) d'une
bobine à la borne positive (+) de l'autre bobine.
2. Raccordez la borne positive (+) de la première bobine à la borne positive (+) de
l'amplificateur. Raccordez la borne négative (-) de la seconde bobine à la borne
négative (-) de l'amplificateur (figure 4).
18
© 2008 directed electronics—all rights reserved
Série/parallèle — 4 haut-parleurs (bobines 4 ohms simples)
Quatre caissons de basses à bobines acoustiques simples de 4 ohms, les bobines
acoustiques de chaque paire de haut-parleurs raccordées en série et les quatre
haut-parleurs raccordés en parallèle, résultent en une charge de 4 ohms pour
l'amplificateur.
1. Raccordez la borne négative (-) du haut-parleur #1 à la borne négative du hautparleur #3, puis raccordez ce câble à la borne négative (-) de l'amplificateur.
2. Raccordez la borne positive (+) du haut-parleur #1 à la borne négative du hautparleur #2.
3. Raccordez la borne positive (+) du haut-parleur #3 à la borne négative du hautparleur #4.
4. Raccordez la borne positive (+) du haut-parleur #2 à la borne positive (+) du
haut-parleur #4, puis raccordez ce câble à la borne positive (+) de l'amplificateur
(figure 5).
NOTE: Diagramme de référence aux pages 4 - 7
RECOMMANDATIONS SUR LES ENCEINTES
Détails des enceintes
1. Dimensions externes calculées pour des matériaux de 3/4”
2. Inclut le volume d'encombrement des haut-parleurs
3. Les volumes indiqués sont le volume d'accord net
4. Les enceintes contiennent une quantité minimale de matériaux d'amortissement. Il
suffit de prévoir assez de tissu pour le revêtement intérieur de l'enceinte.
© 2008 directed electronics—all rights reserved
19
Recommandations pour l'enceinte
close Cobalt CO104S (Figure 6)
Recommandations pour l'enceinte
ventilée Cobalt CO104S (Figure 7)
Dimensions externes
A = 14"
B = 12,5"
C = 11,5"
Dimensions internes
A = 12,5"
B = 11"
C = 10"
Épaisseur de la cloison
Avant = 0,75"
Côté = 0,75"
Dimensions externes
A = 15,75"
B = 14,25"
C = 12"
Dimensions internes
A = 14,25"
B = 12,75"
C = 10,5"
Épaisseur de la cloison
Avant = 0,75"
Côté = 0,75"
— Parties du boîtier —
Forme: prisme carré
1 haut, 1 bas
Profondeur (c) = 11,5"
Largeur (b) = 12,5"
Épaisseur = 0,75"
1 avant, 1 arrière
Hauteur (a) = 12,5"
Profondeur (d) = 11"
Épaisseur = 0,75"
2 côtés: Hauteur (a) = 12,5"
Profondeur (c) = 11,5"
Épaisseur = 0,75"
— Parties du boîtier —
Forme: prisme carré
1 haut, 1 bas:
Profondeur (c) = 12"
Largeur (b) = 14,25"
Épaisseur = 0,75"
1 avant, 1 arrière:
Hauteur (a) = 14,25"
Profondeur (d) = 12,75"
Épaisseur = 0,75"
2 côtés:
Hauteur (a) = 14,25"
Profondeur (c) = 12"
Épaisseur = 0,75"
— Montage moteur —
Avant
— Montage moteur —
Avant
Pièces d'évent — rond
1 conduit: diamètre extérieur (e) = 3,25"
Diamètre intérieur (g) = 3"
Longueur (h) = 9,5"
Pièces d'évent — carré
1 haut, 1 bas:
Largeur (e) = 3"
Longueur (h) = 10"
Épaisseur = 0,125"
2 côtés:
Hauteur (g) = 2,75"
Longueur (h) = 10"
Épaisseur = 0,125"
NOTE: Diagramme de référence aux pages 8 - 13
20
© 2008 directed electronics—all rights reserved
Recommandations pour l'enceinte
close Cobalt CO124S (Figure 8)
Recommandations pour l'enceinte
ventilée Cobalt CO124S (Figure 9)
Dimensions externes
A = 15,5"
B = 14,75"
C = 12"
Dimensions internes
A = 14"
B = 13,25"
C = 10,5"
Épaisseur de la cloison
Avant = 0,75"
Côté = 0,75"
Dimensions externes
A = 18"
B = 16,75"
C = 13"
Dimensions internes
A = 16,5"
B = 15,25"
C = 11,5"
Épaisseur de la cloison
Avant = 0,75"
Côté = 0,75"
— Parties du boîtier —
Forme: prisme carré
1 haut, 1 bas:
Profondeur (c) = 12"
Largeur (b) = 14,75"
Épaisseur = 0,75"
1 avant, 1 arrière:
Hauteur (a) = 14"
Profondeur (d) = 13,25"
Épaisseur = 0,75"
2 côtés:
Hauteur (a) = 14"
Profondeur (c) = 12"
Épaisseur = 0,75"
— Parties du boîtier —
Forme: prisme carré
1 haut, 1 bas:
Profondeur (c) = 13"
Largeur (b) = 16,75"
Épaisseur = 0,75"
1 avant, 1 arrière:
Hauteur (a) = 16,5"
Profondeur (d) = 15,25"
Épaisseur = 0,75"
2 côtés:
Hauteur (a) = 16,5"
Profondeur (c) = 13"
Épaisseur = 0,75"
— Montage moteur —
Avant
— Montage moteur —
Avant
Pièces d'évent — rond
1 conduit: Diamètre extérieur (e) = 4,25"
Diamètre intérieur (g) = 4"
Longueur (h) = 10"
Pièces d'évent — carré
1 haut, 1 bas:
Largeur (e) = 3,75"
Longueur (h) = 10"
Épaisseur = 0,125"
2 côtés:
Hauteur (g) = 3,5"
Longueur (h) = 10"
Épaisseur = 0,125"
© 2008 directed electronics—all rights reserved
21
Recommandations pour l'enceinte
close Cobalt CO154S (Figure 10)
Recommandations pour l'enceinte
ventilée Cobalt CO154S (Figure 11)
Dimensions externes
A = 25"
B = 17,5"
C = 11,5"
Dimensions internes
A = 23,5"
B = 16"
C = 10"
Épaisseur de la cloison
Avant = 0,75"
Côté = 0,75"
Dimensions externes
A = 25"
B = 17,5"
C = 13"
Dimensions internes
A = 23,5"
B = 16"
C = 11,5"
Épaisseur de la cloison
Avant = 0,75"
Côté = 0,75"
— Parties du boîtier —
Forme: prisme carré
1 haut, 1 bas:
Profondeur (c) = 11,5"
Largeur (b) = 17,5"
Épaisseur = 0,75"
1 avant, 1 arrière:
Hauteur (a) = 23,5"
Profondeur (d) = 16"
Épaisseur = 0,75"
2 côtés:
Hauteur (a) = 23,5"
Profondeur (c) = 11,5"
Épaisseur = 0,75"
— Parties du boîtier —
Forme: prisme carré
1 haut, 1 bas:
Profondeur (c) = 13"
Largeur (b) = 17,5"
Épaisseur = 0,75"
1 avant, 1 arrière:
Hauteur (a) = 23,5"
Profondeur (d) = 16"
Épaisseur = 0,75"
2 côtés:
Hauteur (a) = 23,5"
Profondeur (c) = 13"
Épaisseur = 0,75"
— Montage moteur —
Avant
— Montage moteur —
Avant
Pièces d'évent — rond
1 conduit: diamètre extérieur (e) = 4,25"
Diamètre intérieur (g) = 4"
Longueur (h) = 7"
Pièces d'évent — carré
1 haut, 1 bas:
Largeur (e) = 4,25"
Longueur (h) = 7"
Épaisseur = 0,125"
2 côtés:
Hauteur (g) = 4"
Longueur (h) = 7"
Épaisseur = 0,125"
22
© 2008 directed electronics—all rights reserved
SPÉCIFICATIONS
Modèle/Numéro de pièce Directed
CO104S
CO124S
CO154S
Fs (résonance air libre, Hz)
39.2
25.6
25.2
Vas (volume d'air équivalent, pi cu)
1.080
4.017
7.098
Vas (volume d'air équivalent, litres)
30.600
113.790
201.070
Qms (facteur de qualité mécanique)
3.53
4.72
6.08
Qes (facteur de qualité électrique)
0.68
0.55
0.51
Qts (facteur de qualité total)
0.57
0.49
0.47
Re (résistance CC, ohms)
3.6
3.55
3.77
Z (impédance nominale, ohms)
4
4
4
Le (inductance, mh)
1.38
1.37
1.61
Efficacité (1W @ 1M, dB)
86.1
87.2
89.9
Xmax (déplacement de la bobine, po)
0.406
0.410
0.453
Xmax (déplacement de la bobine, mm)
10.2925
10.4075
11.5
Pe (puissance continue, watts)
200
200
250
Puissance de pointe (musique, watts)
400
500
600
Mms (masse mobile totale, grammes)
101.00
127
195
Cms (élasticité de suspension
de la membrane, mm/N)
0.180564
0.294721
0.211994
Bl (puissance du moteur, Tesla-M)
10.88
11.61
14.82
Sd (surface émissive de la
membrane, cm²)
346.361
522.792
819.398
Sd (surface émissive de la membrane, po²) 53.706
81.064
127.055
Gamme de fréquences (Hz)
39 - 250Hz
25 - 250Hz
25 - 250Hz
Produit du rendement par la
bande passante (EBP)
58
47
49
Paramètres Thiele/Small
Dimensions du moteur
Encombrement du haut-parleur (pi cu)
0.048
0.061
0.116
Diamètre extérieur du hautparleur (po/mm)
10.31/ 262
12.40/ 315
15.40/ 391
Diamètre du trou de montage (po/mm)
9.23/ 232
10.91/ 277
13.82/ 351
Profondeur de montage (po/mm)
5.12/ 130
5.51/ 140
6.46/ 164
Poids de l'aimant (oz)
38.60
41
70
Diamètre du panier (po/mm)
10.16/258
12.21/310
15.16/385
0.75
1
2
Enceintes recommandées
Enceinte close typique (pi cu)
Spécifications sujettes à changement sans préavis
© 2008 directed electronics—all rights reserved
23
ESPAÑOL
CARACTERÍSTICAS
15
1
2
13
3
14
4
12
5
6
7
11
10
9
8
1
Tapa de polipropileno contra el polvo; resistente a la humedad y a los
rayos ultravioleta.
2
Envolvente grande de Goma de Butadieno de Nitrilo (Nitrile Butadiene
Rubber, NBR) para grandes desplazamientos lineales controlados.
3
Cono de papel ventilado; resistente a la humedad y a los rayos
ultravioleta.
4
Armazón de acero troquelado a la medida.
5
Formador de bobina de voz Kapton ventilado (1.5 plg. para altavoces de
10 y 12 plg., 2 plg. para altavoces de 15 plg.)
6
Plancha delantera de acero de 8 mm.
7
Imanes grandes de cerámica de dos pilas.
8
Unidad de yugo en T de pieza polar y plancha trasera de acero de 8
mm.
9
Respiradero de 0.75 plg.; parte del sistema de enfriamiento de bobina de
voz mejorado (convección forzada).
10
Protector de imán de PVC.
11
Bobina de voz de 4Ω de cobre de alta temperatura.
12
Respiradero en el formador de la bobina de voz; parte del sistema de
enfriamiento de bobina de voz mejorado (convección forzada).
13
Araña Conex entrelazada con conductores de oropel bordado y
enlazado.
14
Terminales a presión.
15
Junta de montaje de PVC reversible.
© 2008 directed electronics—all rights reserved
25
CONFIGURACIONES DE CABLEADO
Las siguientes ilustraciones contienen las pautas para conectar correctamente el woofer
Orion Cobalt a un amplificador Orion Cobalt a fin de lograr el rendimiento máximo..
Potencia de amplificador recomendada
Potencia continua (RMS)
Potencia máxima (W)
1 woofer
100 a 300
200 a 600
2 woofers
200 a 600
400 a 1200
3 woofers
300 a 900
600 a 1800
4 woofers
400 a 1200
800 a 2400
En paralelo. Dos altavoces (una bobina de voz de 4 Ω cada uno)
Dos woofers, con una bobina de voz de 4 Ω cada uno y las bobinas de voz en paralelo
producen una carga de 2 Ω en el amplificador..
1. Conecte el altavoz en paralelo conectando las dos terminales positivas (+) entre sí
y las dos terminales negativas (-) entre sí.
2. Conecte las terminales positivas (+) de los woofers a la terminal positiva (+) del
amplificador. Conecte las terminales negativas (-) de los woofers a la terminal
negativa (-) del amplificador (figura 2).
Un altavoz (una bobina de voz de 4 Ω)
Un woofer con bobina de voz de 4 Ω produce una carga de 4 Ω en el amplificador.
1. Conecte el altavoz conectando la terminal positiva (+) del woofer a la terminal
positiva (+) del amplificador. Conecte la terminal negativa (-) del woofer a la
terminal negativa (-) del amplificador (figura 3).
En serie. Dos altavoces (una bobina de voz de 4 Ω cada uno)
Dos subwoofers, con una bobina de voz de 4 Ω cada uno y las bobinas de voz en serie
producen una carga de 8 Ω en el amplificador.
1. Conecte el woofer en serie conectando la terminal negativa (-) de una de las
bobinas a la terminal positiva (+) de la otra bobina.
2. Conecte la terminal positiva (+) de la primera bobina a la terminal positiva (+) del
amplificador. Conecte la terminal negativa (-) de la segunda bobina a la terminal
negativa (-) del amplificador (figura 4).
26
© 2008 directed electronics—all rights reserved
En serie / en paralelo. 4 altavoces (una bobina de voz de 4 Ω cada uno)
Cuatro subwoofers, con una bobina de voz de 4 Ω cada uno, las bobinas de voz
de cada par en serie y los 4 altavoces en paralelo producen una carga de 4 Ω en el
amplificador.
1. Conecte la terminal negativa (-) del altavoz 1 a la terminal negativa (-) del altavoz
3 y luego conecte esa terminal a la terminal negativa (-) del amplificador.
2. Conecte la terminal positiva (+) del altavoz 1 a la terminal negativa (-) del altavoz
2
3. Conecte la terminal positiva (+) del altavoz 3 a la terminal negativa (-) del altavoz
4
4. Conecte la terminal positiva (+) del altavoz 2 a la terminal positiva (+) del altavoz
4 y luego conecte esa terminal a la terminal positiva (+) del amplificador. (figura
5)
Consulte el diagrama de las páginas 4 - 7
RECOMENDACIONES PARA LA CAJA
Detalles de la caja
1. Las dimensiones externas se han calculado para un material de construcción de ¾
plg. de grosor
2. Incluye el desplazamiento del altavoz
3. Los volúmenes que se dan son volúmenes de sintonización neta
4. Las cajas contienen una cantidad mínima de material amortiguador. Se necesita
sólo material suficiente para recubrir la superficie interna de la caja.
© 2008 directed electronics—all rights reserved
27
Recomendaciones para la caja
sellada Cobalt CO104S (figura 6)
Recomendaciones para la caja
ventilada Cobalt CO104S (figura 7)
Dimensiones externas
A = 14 plg.
B = 12.5 plg.
C = 11.5 plg.
Dimensiones externas
A = 15.75 plg.
B = 14.25 plg.
C = 12 plg.
Dimensiones internas
A = 12.5 plg.
B = 11 plg.
C = 10 plg.
Dimensiones internas
A = 14.25 plg.
B = 12.75 plg.
C = 10.5 plg.
Grosor de la pared
Delantera = 0.75 plg.
Lateral = 0.75 plg.
Grosor de la pared
Delantera = 0.75 plg.
Lateral = 0.75 plg.
— Piezas de la caja —
Forma de la caja: prisma cuadrado
1 arriba, 1 abajo:
fondo (c) = 11.5 plg.
ancho (b) = 12.5 plg.
grosor = 0.75 plg.
— Piezas de la caja —
Forma de la caja: prisma cuadrado
1 arriba, 1 abajo:
fondo (c) = 12 plg.
ancho (b) = 14.25 plg.
grosor = 0.75 plg.
1 adelante, 1 atrás:
altura (a) = 12.5 plg.
ancho (d) = 11 plg.
grosor = 0.75 plg.
1 adelante, 1 atrás:
altura (a) = 14.25 plg.
ancho (d) = 12.75 plg.
grosor = 0.75 plg.
1 a cada lado:
altura (a) = 12.5 plg.
fondo (c) = 11.5 plg.
grosor = 0.75 plg.
— Montaje del excitador —
Adelante
1 a cada lado:
altura (a) = 14.25 plg.
fondo (c) = 12 plg.
grosor = 0.75 plg.
— Montaje del excitador —
Adelante
Piezas del respiradero --- redondo
1 conducto: diámetro externo (e) = 3.25 plg.
diámetro interno (g) = 3 plg.
longitud (h) = 9.5 plg.
Piezas del respiradero --- cuadrado
1 arriba, 1 abajo:
ancho (e) = 3 plg.
longitud (h) = 10 plg.
grosor = 0.125 plg.
1 a cada lado:
altura (g) = 2.75 plg.
longitud (h) = 10 plg.
grosor = 0.125 plg.
Consulte el diagrama de las páginas 8 - 13
28
© 2008 directed electronics—all rights reserved
Recomendaciones para la caja
sellada Cobalt CO124S (figura 8)
Recomendaciones para la caja
ventilada Cobalt CO124S (figura 9)
Dimensiones externas
A = 15.5 plg.
B = 14.75 plg.
C = 12 plg.
Dimensiones externas
A = 18 plg.
B = 16.75 plg.
C = 13 plg.
Dimensiones internas
A = 14 plg.
B = 13.25 plg.
C = 10.5 plg.
Dimensiones internas
A = 16.5 plg.
B = 15.25 plg.
C = 11.5 plg.
Grosor de la pared
Delantera = 0.75 plg.
Lateral = 0.75 plg.
Grosor de la pared
Delantera = 0.75 plg.
Lateral = 0.75 plg.
— Piezas de la caja —
Forma de la caja: prisma cuadrado
1 arriba, 1 abajo:
fondo (c) = 12 plg.
ancho (b) = 14.75 plg.
grosor = 0.75 plg.
— Piezas de la caja —
Forma de la caja: prisma cuadrado
1 arriba, 1 abajo:
fondo (c) = 13 plg.
ancho (b) = 16.75 plg.
grosor = 0.75 plg.
1 adelante, 1 atrás:
altura (a) = 14 plg.
ancho (d) = 13.25 plg.
grosor = 0.75 plg.
1 adelante, 1 atrás:
altura (a) = 16.5 plg.
ancho (d) = 15.25 plg.
grosor = 0.75 plg.
1 a cada lado:
altura (a) = 14 plg.
fondo (c) = 12 plg.
grosor = 0.75
1 a cada lado:
altura (a) = 16.5 plg.
fondo (c) = 13 plg.
grosor = 0.75 plg.
Montaje del excitador
Montaje: adelante
Montaje del excitador
Montaje: adelante
Piezas del respiradero --- redondo
1 conducto: diámetro externo (e) = 4.25 plg.
diámetro interno (g) = 4 plg.
longitud (h) = 10 plg.
Piezas del respiradero --- cuadrado
1 arriba, 1 abajo:
ancho (e) = 3.75 plg.
longitud (h) = 10 plg.
grosor = 0.125 plg.
1 a cada lado:
altura (g) = 3.5 plg.
longitud (h) = 10 plg.
grosor = 0.125 plg.
© 2008 directed electronics—all rights reserved
29
Recomendaciones para la caja
sellada Cobalt CO154S (figura 10)
Recomendaciones para la caja
sellada Cobalt CO154S (figura 11)
Dimensiones externas
A = 25 plg.
B = 17.5 plg.
C = 11.5 plg.
Dimensiones externas
A = 25 plg.
B = 17.5 plg.
C = 13 plg.
Dimensiones internas
A = 23.5 plg.
B = 16 plg.
C = 10 plg.
Dimensiones internas
A = 23.5 plg.
B = 16 plg.
C = 11.5 plg.
Grosor de la pared
Delantera = 0.75 plg.
Lateral = 0.75 plg.
Grosor de la pared
Delantera = 0.75 plg.
Lateral = 0.75 plg.
— Piezas de la caja —
Forma de la caja: prisma cuadrado
1 arriba, 1 abajo:
fondo (c) = 11.5 plg.
ancho (b) = 17.5 plg.
grosor = 0.75 plg.
— Piezas de la caja —
Forma de la caja: prisma cuadrado
1 arriba, 1 abajo:
fondo (c) = 13 plg.
ancho (b) = 17.5 plg.
grosor = 0.75 plg.
1 adelante, 1 atrás:
altura (a) = 23.5 plg.
ancho (d) = 16 plg.
grosor = 0.75 plg.
1 adelante, 1 atrás:
altura (a) = 23.5 plg.
ancho (d) = 16 plg.
grosor = 0.75 plg.
1 a cada lado:
altura (a) = 23.5 plg.
fondo (c) = 11.5 plg.
grosor = 0.75 plg.
1 a cada lado:
altura (a) = 23.5 plg.
fondo (c) = 13 plg.
grosor = 0.75 plg.
Montaje del excitador
Montaje: adelante
Montaje del excitador
Montaje: adelante
Piezas del respiradero --- redondo
1 conducto: diámetro externo (e) = 4.25 plg.
diámetro interno (g) = 4 plg.
longitud (h) = 7 plg.
Piezas del respiradero --- cuadrado
1 arriba, 1 abajo:
ancho (e) = 4.25 plg.
longitud (h) = 7 plg.
grosor = 0.125 plg.
1 a cada lado:
altura (g) = 4 plg.
longitud (h) = 7 plg.
grosor = 0.125 plg.
30
© 2008 directed electronics—all rights reserved
ESPECIFICACIONES
Modelo/Número de pieza dirigido
CO104S
CO124S
CO154S
39.2
Parámetros Thiele/Small
Fs (resonancia al aire libre, Hz)
25.6
25.2
Vas (cumplimiento de equivalencia, pies3) 1.080
4.017
7.098
Vas (cumplimiento de equivalencia, litros) 30.600
113.790
201.070
Qms (Q, mecánico)
3.53
4.72
6.08
Qes (Q, eléctrico)
0.68
0.55
0.51
Qts (Q total del excitador)
0.57
0.49
0.47
Re (resistencia CC, Ω)
3.6
3.55
3.77
Z (impedancia nominal, Ω)
4
4
4
Le (inductancia, mH)
1.38
1.37
1.61
Eficiencia (1 W a 1 m, dB)
86.1
87.2
89.9
Xmax (desplazamiento lineal de ida plg.)
0.406
0.410
0.453
Xmax (desplazamiento lineal de ida, mm) 10.2925
10.4075
11.5
Pe (procesamiento continuo
de potencia, W)
200
200
250
Procesamiento máximo de
potencia (música, W)
400
500
600
Mms (masa total en movimiento, g)
101.00
127
195
Cms (cumplimiento mecánico, mm/N)
0.180564
0.294721
0.211994
Bl (fuerza del motor, Tesla-m)
10.88
11.61
14.82
Sd (área de radiación efectiva, cm²)
346.361
522.792
819.398
Sd (área de radiación efectiva plg.²)
53.706
81.064
127.055
Gama de frecuencias (Hz)
39 - 250Hz
25 - 250Hz
25 - 250Hz
Producto ancho de banda energía (EBP)
58
47
49
0.048
0.061
0.116
Dimensiones físicas del excitador
Desplazamiento del altavoz (pies³)
Diámetro externo del altavoz (plg./mm)
10.31/ 262
12.40/ 315
15.40/ 391
Diámetro del agujero de
montaje (plg./mm)
9.23/ 232
10.91/ 277
13.82/ 351
Profundidad de montaje (plg./mm)
5.12/ 130
5.51/ 140
6.46/ 164
Peso del imán (oz.)
38.60
41
70
Diámetro de la canasta (plg./mm)
10.16/258
12.21/310
15.16/385
0.75
1
2
Cajas recomendadas
Caja sellada normal (pies³)
Especificaciones sujetas a cambio sin aviso previo
© 2008 directed electronics—all rights reserved
31
DEUTSCH
HÖHEPUNKTE
15
1
2
13
3
14
4
12
5
6
7
11
10
8
9
1
Feuchtigkeits- und UV-beständige Polypropylen-Abdeckung
2
Extra große Sicke aus NBR (Nitrilgummi) für linear kontrollierten
Langhub
3
Belüftete feuchtigkeits- und UV-beständige Papiermembran
4
Spezieller Stahlblechrahmen
5
Belüfteter Kapton-Schwingspulenträger (10- und 12-Zoll-Modell
verwendet 1,5-Zoll-Schwingspulenträger, 15-Zoll-Modell einen 2-ZollSchwingspulenträger)
6
8-mm dickes vorderes Abdeckblech
7
Große Double-Stack-Keramikmagneten
8
8-mm dickes hinteres Abdeckblech/Polplatten-T-Stück
9
0,75-Zoll-Öffnung. Teil des verbesserten Schwingspulen-Kühlsystems
(Zwangs-Konvektion)
10
PVC-Magnetschutz
11
Hochtemperatur-Kupferschwingspule (4 Ohm)
12
Belüftung des Schwingspulenträgers. Teil des
Schwingspulen-Kühlsystems (Zwangs-Konvektion)
13
Verknüpfte Conex-Zentriermembran mit gehefteten und geschleiften
Zuleitungslitzen
14
Druck-Terminals
15
Umkehrbare PVC-Befestigungsdichtung
© 2008 directed electronics—all rights reserved
verbesserten
33
SCHALTKONFIGURATIONEN
Die folgenden Abbildungen zeigen, wie Sie Ihren Orion Cobalt-Tieftöner richtig an
einen Orion Cobalt-Verstärker anschließen, um die maximale Leistung herauszuholen.
Empfohlene Verstärkerleistung
RMS-Dauerleistung
Spitzenleistung (Watt)
1 Tieftöner
100 bis 300
200 bis 600
2 Tieftöner
200 bis 600
400 bis 1200
3 Tieftöner
300 bis 900
600 bis 1800
4 Tieftöner
400 bis 1200
800 bis 2400
Parallel — Zwei Lautsprecher (4-Ohm-Schwingspulen)
Zwei parallel geschaltete Tieftöner mit 4-Ohm-Schwingspulen: Lastwiderstand von 2
Ohm am Verstärker
1. Schließen Sie den Lautsprecher parallel an, indem Sie jeweils die beiden positiven
(+) Terminals und die beiden negativen (-) Terminals miteinander verbinden.
2. Verbinden Sie die positiven (+) Terminals der Tieftöner mit dem positiven (+)
Terminal am Verstärker. Verbinden Sie die negativen (+) Terminals der Tieftöner
mit dem negativen (+) Terminal am Verstärker (abbildung 2).
Ein Lautsprecher (4-Ohm-Schwingspule)
Ein Tieftöner mit 4-Ohm-Schwingspule: Lastwiderstand von 4 Ohm am Verstärker.
1. Schließen Sie den Lautsprecher an, indem Sie das positive (+) Terminal des
Tieftöners mit dem positiven (+) Terminal am Verstärker verbinden. Verbinden
Sie das negative (-) Terminal des Tieftöners mit dem negativen (+) Terminal am
Verstärker (abbildung 3).
Reihe — Zwei Lautsprecher (Einzelne 4-Ohm-Schwingspulen)
Zwei einzelne in Reihe geschaltete Subwoofer mit 4-Ohm-Schwingspulen:
Lastwiderstand von 8 Ohm am Verstärker.
1. Schließen Sie die Tieftöner in Reihe an, indem Sie das negative (-) Terminal der
ersten Tieftöner-Schwingspule mit dem positiven (+) Terminal der zweiten Spule
verbinden.
2. Verbinden Sie das positive (+) Terminal der ersten Tieftöner-Schwingspule mit dem
positiven (+) Terminal am Verstärker. Verbinden Sie das negative (-) Terminal der
zweiten Tieftöner-Schwingspule mit dem negativen (-) Terminal am Verstärker
(abbildung 4).
34
© 2008 directed electronics—all rights reserved
Reihe/Parallel - 4 Lautsprecher (Einzelne 4-Ohm-Schwingspulen)
4 einzelne Subwoofer mit 4-Ohm-Schwingspulen, bei denen die Schwingspulen jedes
Lautsprecherpaars in Reihe geschaltet und dann alle 4 Lautsprecher parallel geschaltet
sind: Lastwiderstand von 4 Ohm am Verstärker
1. Schließen Sie das negative (-) Terminal an Lautsprecher 1 an das negative Terminal
an Lautsprecher 3 an und verbinden Sie diesen Draht mit dem negativen (-)
Terminal am Verstärker.
2. Verbinden Sie das positive (+) Terminal am Lautsprecher 1 mit dem negativen (-)
Terminal am Lautsprecher 2.
3. Verbinden Sie das positive (+) Terminal am Lautsprecher 3 mit dem negativen (-)
Terminal am Lautsprecher 4.
4. Schließen Sie das positive (+) Terminal an Lautsprecher 2 an das positive (+)
Terminal an Lautsprecher 4 an und verbinden Sie diesen Draht mit dem positiven
(+) Terminal am Verstärker (abbildung 5).
Siehe Diagramm auf Seite 4 - 7
GEHÄUSEEMPFEHLUNGEN
Gehäusedetails
1.
2.
3.
4.
Für Baumaterial mit ¾ Zoll (1,9 cm) Dicke berechnete Außenmaße
Einschließlich Lautsprecherhub
Angegebene Volumen sind Netto-Tuningvolumen
Gehäuse besitzen ein Minimum an Dämpfungsmaterial. Es ist gerade genug
Material zur Auskleidung der Innenseite des Gehäuses nötig.
© 2008 directed electronics—all rights reserved
35
Cobalt CO104S Geschlossenes Gehäuse:
Empfehlungen (abbildung 6)
Cobalt CO104S Bassreflex-Gehäuse:
Empfehlungen (abbildung 7)
Außenmaße
A = 14 Zoll (35,6 cm)
B = 12,5 Zoll (31,8 cm)
C = 11,5 Zoll (29,2 cm)
Außenmaße
A = 15,75 Zoll (40 cm)
B = 14,25 Zoll (36,2 cm)
C = 12 Zoll (30,5 cm)
Innenmaße
A = 12,5 Zoll (31,8 cm)
B = 11 Zoll (27,9 cm)
C = 10 Zoll (25,4 cm)
Innenmaße
A = 14,25 Zoll (36,2 cm)
B = 12,75 Zoll (32,4 cm)
C = 10,5 Zoll (26,7 cm)
Wandstärke
Vorn = 0,75 Zoll (1,9 cm)
Seite = 0,75 Zoll (1,9 cm)
Wandstärke
Vorn = 0,75 Zoll (1,9 cm)
Seite = 0,75 Zoll (1,9 cm)
— Gehäuseteile —
Gehäuseform: Quader
1 Oberseite, 1 Unterseite:
Tiefe (c) = 11,5 Zoll (29,2 cm)
Breite (b) = 12,5 Zoll (31,8 cm)
Dicke = 0,75 Zoll (1,9 cm)
— Gehäuseteile —
Gehäuseform: Quader
1 Oberseite, 1 Unterseite:
Tiefe (c) = 12 Zoll (30,5 cm)
Breite (b) = 14,25 Zoll (36,2 cm)
Dicke = 0,75 Zoll (1,9 cm)
1 Vorderseite, 1 Rückseite:
Höhe (a) = 12,5 Zoll (31,8 cm)
Breite (d) = 11 Zoll (27,9 cm)
Dicke = 0,75 Zoll (1,9 cm)
1 Vorderseite, 1 Rückseite:
Höhe (a) = 14,25 Zoll (36,2 cm)
Breite (d) = 12,75 Zoll (32,4 cm)
Dicke = 0,75 Zoll (1,9 cm)
2 Seiten:
Höhe (a) = 12,5 Zoll (31,8 cm)
Tiefe (c) = 11,5 Zoll (29,2 cm)
Dicke = 0,75 Zoll (1,9 cm)
2 Seiten:
Höhe (a) = 14,25 Zoll (36,2 cm)
Tiefe (c) = 12 Zoll (30,5 cm)
Dicke = 0,75 Zoll (1,9 cm)
— Treibereinbau —
Vorn
— Treibereinbau —
Vorn
Öffnungsteile - Rund
1 Kanal: Außendurchmesser (e) = 3,25 Zoll
(8,3 cm)
Innendurchmesser (g) = 3 Zoll (7,6 cm)
Länge (h) = 9,5 Zoll (24,1 cm)
Öffnungsteile - Quadratisch
1 Oberseite, 1 Unterseite:
Breite (e) = 3 Zoll (7,6 cm)
Länge (h) = 10 Zoll (25,4 cm)
Dicke = 0,125 Zoll (0,3 cm)
2 Seiten:
Höhe (g) = 2,75 Zoll (7 cm)
Länge (h) = 10 Zoll (25,4 cm)
Dicke = 0,125 Zoll (0,3 cm)
Siehe Diagramm auf Seite 8 - 13
36
© 2008 directed electronics—all rights reserved
Cobalt CO124S Geschlossenes Gehäuse:
Empfehlungen (abbildung 8)
Cobalt CO124S Bassreflex-Gehäuse:
Empfehlungen (abbildung 9)
Außenmaße
A = 15,5 Zoll (39,4 cm)
B = 14,75 Zoll (37,5 cm)
C = 12 Zoll (30,5 cm)
Außenmaße
A = 18 Zoll (45,7 cm)
B = 16,75 Zoll (42,5 cm)
C = 13 Zoll (33 cm)
Innenmaße
A = 14 Zoll (35,6 cm)
B = 13,25 Zoll (33,7 cm)
C = 10,5 Zoll (26,7 cm)
Innenmaße
A = 16,5 Zoll (41,9 cm)
B = 15,25 Zoll (38,7 cm)
C = 11,5 Zoll (29,2 cm)
Wandstärke
Vorn = 0,75 Zoll (1,9 cm)
Seite = 0,75 Zoll (1,9 cm)
Wandstärke
Vorn = 0,75 Zoll (1,9 cm)
Seite = 0,75 Zoll (1,9 cm)
— Gehäuseteile —
Gehäuseform: Quader
1 Oberseite, 1 Unterseite:
Tiefe (c) = 12 Zoll (30,5 cm)
Breite (b) = 14,75 Zoll (37,5 cm)
Dicke = 0,75 Zoll (1,9 cm)
— Gehäuseteile —
Gehäuseform: Quader
1 Oberseite, 1 Unterseite:
Tiefe (c) = 13 Zoll (33 cm)
Breite (b) = 16,75 Zoll (42,5 cm)
Dicke = 0,75 Zoll (1,9 cm)
1 Vorderseite, 1 Rückseite:
Höhe (a) = 14 Zoll (35,6 cm)
Breite (d) = 13,25 Zoll (33,7 cm)
Dicke = 0,75 Zoll (1,9 cm)
1 Vorderseite, 1 Rückseite:
Höhe (a) = 16,5 Zoll (41,9 cm)
Breite (d) = 15,25 Zoll (38,7 cm)
Dicke = 0,75 Zoll (1,9 cm)
2 Seiten:
Höhe (a) = 14 Zoll (35,6 cm)
Tiefe (c) = 12 Zoll (30,5 cm)
Dicke = 0,75 Zoll (1,9 cm)
2 Seiten:
Höhe (a) = 16,5 Zoll (41,9 cm)
Tiefe (c) = 13 Zoll (33 cm)
Dicke = 0,75 Zoll (1,9 cm)
Treibereinbau
Einbau: Vorn
Treibereinbau
Einbau: Vorn
Öffnungsteile - Rund
1 Kanal:
Außendurchmesser (e) = 4,25 Zoll (10,8 cm)
Innendurchmesser (g) = 4 Zoll (10,2 cm)
Länge (h) = 10 Zoll (25,4 cm)
Öffnungsteile - Quadratisch
1 Oberseite, 1 Unterseite:
Breite (e) = 3,75 Zoll (9,5 cm)
Länge (h) = 10 Zoll (25,4 cm)
Dicke = 0,125 Zoll (0,3 cm)
2 Seiten:
Höhe (g) = 3,5 Zoll (8,9 cm)
Länge (h) = 10 Zoll (25,4 cm)
Dicke = 0,125 Zoll (0,3 cm)
© 2008 directed electronics—all rights reserved
37
Cobalt CO154S Geschlossenes Gehäuse:
Empfehlungen (abbildung 10)
Cobalt CO154S Bassreflex-Gehäuse:
Empfehlungen (abbildung 11)
Außenmaße
A = 25 Zoll (63,5 cm)
B = 17,5 Zoll (44,5 cm)
C = 11,5 Zoll (29,2 cm)
Außenmaße
A = 25 Zoll (63,5 cm)
B = 17,5 Zoll (44,5 cm)
C = 13 Zoll (33 cm)
Innenmaße
A = 23,5 Zoll (59,7 cm)
B = 16 Zoll (40,6 cm)
C = 10 Zoll (25,4 cm)
Innenmaße
A = 23,5 Zoll (59,7 cm)
B = 16 Zoll (40,6 cm)
C = 11,5 Zoll (29,2 cm)
Wandstärke
Vorn = 0,75 Zoll (1,9 cm)
Seite = 0,75 Zoll (1,9 cm)
Wandstärke
Vorn = 0,75 Zoll (1,9 cm)
Seite = 0,75 Zoll (1,9 cm)
— Gehäuseteile —
Gehäuseform: Quader
1 Oberseite, 1 Unterseite:
Tiefe (c) = 11,5 Zoll (29,2 cm)
Breite (b) = 17,5 Zoll (44,5 cm)
Dicke = 0,75 Zoll (1,9 cm)
— Gehäuseteile —
Gehäuseform: Quader
1 Oberseite, 1 Unterseite:
Tiefe (c) = 13 Zoll (33 cm)
Breite (b) = 17,5 Zoll (44,5 cm)
Dicke = 0,75 Zoll (1,9 cm)
1 Vorderseite, 1 Rückseite:
Höhe (a) = 23,5 Zoll (59,7 cm)
Breite (d) = 16 Zoll (40,6 cm)
Dicke = 0,75 Zoll (1,9 cm)
1 Vorderseite, 1 Rückseite:
Höhe (a) = 23,5 Zoll (59,7 cm)
Breite (d) = 16 Zoll (40,6 cm)
Dicke = 0,75 Zoll (1,9 cm)
2 Seiten:
Höhe (a) = 23,5 Zoll (59,7 cm)
Tiefe (c) = 11,5 Zoll (29,2 cm)
Dicke = 0,75 Zoll (1,9 cm)
2 Seiten:
Höhe (a) = 23,5 Zoll (59,7 cm)
Tiefe (c) = 13 Zoll (33 cm)
Dicke = 0,75 Zoll (1,9 cm)
Treibereinbau
Einbau: Vorn
Treibereinbau
Einbau: Vorn
Öffnungsteile - Rund
1 Kanal: Außendurchmesser (e) = 4,25 Zoll
(10,8 cm)
Innendurchmesser (g) = 4 Zoll (10,2 cm)
Länge (h) = 7 Zoll (17,8 cm)
Öffnungsteile – Quadratisch 1 Oberseite, 1
Unterseite:
Breite (e) = 4,25 Zoll (10,8 cm)
Länge (h) = 7 Zoll (17,8 cm)
Dicke = 0,125 Zoll (0,3 cm)
2 Seiten:
Höhe (g) = 4 Zoll (10,2 cm)
Länge (h) = 7 Zoll (17,8 cm)
Dicke = 0,125 Zoll (0,3 cm)
38
© 2008 directed electronics—all rights reserved
DATEN
Modell/Directed-Teilenummer
CO104S
CO124S
CO154S
Fs (Freiluftresonanz, Hz)
39.2
25.6
25.2
Vas (Äquivalente Nachgiebigkeit, Kubikfuß)
1.080
4.017
7.098
Vas (Äquivalente Nachgiebigkeit, Liter)
30.600
113.790
201.070
Thiele/Small-Parameter
Qms (Q, mechanisch)
3.53
4.72
6.08
Qes (Q, elektrisch)
0.68
0.55
0.51
Qts (totaler Treiberwert für Q)
0.57
0.49
0.47
Re (GS-Widerstand, Ohm)
3.6
3.55
3.77
Z (Nennimpedanz, Ohm)
4
4
4
Le (Induktivität, mh)
1.38
1.37
1.61
Wirkungsgrad (1 W bei 1 M, dB)
86.1
87.2
89.9
Xmax (linearer Hub in eine Richtung, Zoll)
0.406
0.410
0.453
Xmax (linearer Hub in eine Richtung, mm)
10.2925
10.4075
11.5
Pe (Dauerbelastbarkeit, Watt)
200
200
250
Spitzenbelastbarkeit (Watt)
400
500
600
Mms (Bewegte Gesamtmasse, Gramm)
101.00
127
195
Cms (mechanische Nachgiebigkeit, mm/N)
0.180564
0.294721
0.211994
Bl (Motorstärke, Tesla-M)
10.88
11.61
14.82
Sd (effektiver Strahlbereich,
Quadratzentimeter)
346.361
522.792
819.398
Sd (effektiver Strahlbereich, Quadratzoll)
53.706
81.064
127.055
Frequenzbereich (Hz)
39 - 250Hz 25 - 250Hz
25 - 250Hz
Verstärkungs-Bandbreitenprodukt (EBP)
58
47
49
Lautsprecherhub (Kubikfuß)
0.048
0.061
0.116
Lautsprecher-Außendurchmesser (Zoll/mm)
10.31/ 262
12.40/ 315
15.40/ 391
Einbaulochdurchmesser (Zoll/mm)
9.23/ 232
10.91/ 277
13.82/ 351
Einbautiefe (Zoll/mm)
5.12/ 130
5.51/ 140
6.46/ 164
Magnetgewicht (Unzen)
38.60
41
70
Korbdurchmesser (Zoll/mm)
10.16/258
12.21/310
15.16/385
1
2
Abmessungen des Treibers
Empfohlene Gehäuse
Typisches geschlossenen Gehäuse (Kubikfuß) 0.75
Daten können ohne vorherige Ankündigung geändert werden
© 2008 directed electronics—all rights reserved
39
ITALIANO
CARATTERISTICHE
15
1
2
13
3
14
4
12
5
6
7
11
10
9
8
1
Protezione parapolvere in polipropilene - resistente all'umidità e ai
raggi ultravioletti.
2
Surround maggiorato in NBR (gomma nitrile butadiene) per lunga
escursione lineare controllata.
3
Cono aperto in carta - resistente all'umidità e ai raggi ultravioletti.
4
Telaio in acciaio stampato su misura.
5
Supporto aperto della bobina mobile in Kapton (i diffusori da 10” e 12"
usano un supporto da 1,5", quelli da 15” usano un supporto da 2").
6
Piastra anteriore in acciaio da 8 mm.
7
2 grandi magneti ceramici in cascata.
8
Piastra posteriore in acciaio da 8 mm/staffa a T per i poli.
9
Apertura da 19 mm (0,75"). Parte del sistema migliorato di raffreddamento
della bobina mobile (a convezione forzata).
10
Protezione del magnete in PVC.
11
Bobina mobile da 4 ohm in rame ad alta temperatura.
12
Aperture di ventilazione del supporto della bobina mobile. Parte del
sistema migliorato di raffreddamento della bobina mobile (a convezione
forzata).
13
Centratore in Conex intrecciato con fili conduttori applicati e avvolti.
14
Terminali a pressione.
15
Guarnizione di montaggio in PVC rovesciabile.
© 2008 directed electronics—all rights reserved
41
CONFIGURAZIONI DI CABLAGGIO
Le illustrazioni seguenti presentano delle indicazioni di massima su come collegare
correttamente un woofer Orion Cobalt a un amplificatore Orion Cobalt in modo da
ottenere le massime prestazioni.
Potenza raccomandata dell'amplificatore
Potenza continua (RMS)
Potenza di picco (watt)
1 woofer
da 100 a 300
da 200 a 600
2 woofers
da 200 a 600
da 400 a 1200
3 woofers
da 300 a 900
da 600 a 1800
4 woofers
da 400 a 1200
da 800 a 2400
Due diffusori in parallelo (bobine mobili da 4 ohm)
Due woofer con bobine mobili da 4 ohm in parallelo causano un carico di 2 ohm
sull'amplificatore.
1. Collegare i diffusori in parallelo collegando tra loro i due terminali positivi (+) e i
due terminali negativi (-).
2. Collegare i terminali positivi (+) dei woofer al terminale positivo (+)
dell'amplificatore. Collegare i terminali negativi (-) dei woofer al terminale
negativo (-) dell'amplificatore (figura 2).
Un diffusore (bobina mobile da 4 ohm)
Un woofer con bobina mobile da 4 ohm causa un carico di 4 ohm sull'amplificatore.
1. Collegare il terminale positivo (+) del woofer al terminale positivo (+)
dell'amplificatore. Collegare il terminale negativo (-) del woofer al terminale
negativo (-) dell'amplificatore (figura 3).
Due diffusori in serie (con bobine mobili da 4 ohm)
Due subwoofer, ciascuno con una con bobina mobile da 4 ohm, collegati in serie
causano un carico di 8 ohm sull'amplificatore.
1. Collegare i woofer in serie collegando il terminale negativo (-) della bobina
mobile del primo woofer al terminale positivo (+) della bobina mobile del
secondo woofer.
2. Collegare il terminale positivo (+) della bobina mobile del primo woofer al
terminale positivo (+) dell'amplificatore. Collegare il terminale negativo (-) della
bobina mobile del secondo woofer al terminale negativo (-) dell'amplificatore
(figura 4).
42
© 2008 directed electronics—all rights reserved
4 diffusori collegati in serie-parallelo (con bobine mobili da 4 ohm)
4 subwoofer con una con bobina mobile da 4 ohm ciascuno, e con le bobine mobili
di ogni coppia di diffusori collegate in serie e tutti i 4 diffusori collegati tra loro in
parallelo, causano un carico di 4 ohm sull'amplificatore.
1. Collegare il terminale negativo (-) del diffusore 1 al terminale negativo (-) del
diffusore 3 e quindi collegare il filo al terminale negativo (-) dell'amplificatore.
2. Collegare il terminale positivo (+) del diffusore 1 al terminale negativo (-) del
diffusore 2.
3. Collegare il terminale positivo (+) del diffusore 3 al terminale negativo (-) del
diffusore 4.
4. Collegare il terminale positivo (+) del diffusore 2 al terminale positivo (+) del
diffusore 4 e quindi collegare il filo al terminale positivo (+) dell'amplificatore
(figura 5).
Vedere lo schema a pagina 4 - 7
RACCOMANDAZIONI PER LA CASSA
Dettagli della cassa
1. Le misure esterne sono calcolate in base a un materiale da costruzione spesso 19
mm (0,75 in).
2. Comprendono il volume interno del diffusore.
3. I volumi indicati sono netti.
4. La cassa comprende una quantità minima di materiale di riempimento. Occorre
solo il materiale stret¬tamente sufficiente per allineare l'interno della cassa.
© 2008 directed electronics—all rights reserved
43
Raccomandazioni per la cassa
sigillata Cobalt CO104S (figura 6)
Raccomandazioni per la cassa
aperta Cobalt CO104S (figura 7)
Dimensioni esterne
A = 35,5 cm (14 in)
B = 31,7 cm (12,5 in)
C = 29,2 cm (11,5 in)
DDimensioni esterne
A = 31,7 cm (15,75 in)
B = 28 cm (14,25 in)
C = 25,4 cm (12 in)
Dimensioni interne
A = 31,7 cm (12,5 in)
B = 28 cm (11 in)
C = 25,4 cm (10 in)
Dimensioni interne
A = 31,7 cm (14,25 in)
B = 28 cm (12,75 in)
C = 25,4 cm (10,5 in)
Spessore delle pareti
Anteriore = 1,9 cm (0,75 in)
Laterale = 1,9 cm (0,75 in)
Spessore delle pareti
Anteriore = 1,9 cm (0,75 in)
Laterale = 1,9 cm (0,75 in)
— Parti della cassa —
Forma della cassa: prisma quadrato
1 superiore, 1 inferiore:
profondità (c) = 29,2 cm (11,5 in)
larghezza (b) = 31,7 cm (12,5 in)
spessore = 1,9 cm (0,75 in)
— Parti della cassa —
Forma della cassa: prisma quadrato
1 superiore, 1 inferiore:
profondità (c) = 29,2 cm (12 in)
larghezza (b) = 31,7 cm (14,25 in) = 14,25
spessore = 1,9 cm (0,75 in)
1 anteriore, 1 posteriore
altezza (a) = 31,7 cm (12,5 in)
larghezza (d) = 28 cm (11 in)
spessore = 1,9 cm (0,75 in)
1 anteriore, 1 posteriore
altezza (a) = 31,7 cm (14,25 in)
larghezza (d) = 28 cm (12,75 in) = 12,75
spessore = 1,9 cm (0,75 in)
2 laterali:
altezza (a) = 31,7 cm (12,5 in)
profondità (c) = 29,2 cm (11,5 in)
spessore = 1,9 cm (0,75 in)
2 laterali:
altezza (a) = 31,7 cm (14,25 in)
profondità (c) = 29,2 cm (12 in) = 12
spessore = 1,9 cm (0,75 in)
— Montaggio driver —
Anteriore
— Montaggio driver —
Anteriore
Parti apertura --- Tonda
1 tubo: diametro esterno (e) = 8,2 cm (3,25
in)
diametro interno (g) = 7,6 cm (3 in)
lunghezza (h) = 24 cm (9,5 in)
Parti apertura --- Quadra
1 superiore, 1 inferiore:
larghezza (e) = 7,6 cm (3 in)
lunghezza (h) = 24 cm (10 in)
spessore = 1,9 cm (0,125 in)
2 laterali:
altezza (g) = 7 cm (2,75 in)
lunghezza (h) = 24 cm (10 in)
spessore = 1,9 cm (0,125 in)
Vedere lo schema a pagina 8 - 13
44
© 2008 directed electronics—all rights reserved
Raccomandazioni per la cassa
sigillata Cobalt CO124S (figura 8)
Dimensioni esterne
A = 31,7 cm (15,5 in)
B = 28 cm (14,75 in)
C = 25,4 cm (12 in)
Dimensioni interne
A = 31,7 cm (14 in)
B = 28 cm (13,25 in)
C = 25,4 cm (10,5 in)
Spessore delle pareti
Anteriore = 1,9 cm (0,75 in)
Laterale = 1,9 cm (0,75 in)
— Parti della cassa —
Forma della cassa: prisma quadrato
1 superiore, 1 inferiore:
profondità (c) = 29,2 cm (12 in)
larghezza (b) = 31,7 cm (14,75 in) = 14,75
spessore = 1,9 cm (0,75 in)
1 anteriore, 1 posteriore
altezza (a) = 31,7 cm (14 in)
larghezza (d) = 28 cm (13,25 in) = 13,25
spessore = 1,9 cm (0,75 in)
2 laterali:
altezza (a) = 31,7 cm (14 in)
profondità (c) = 29,2 cm (12 in) = 12
spessore = 1,9 cm (0,75 in)
Montaggio driver
Montaggio: anteriore
Raccomandazioni per la cassa
aperta Cobalt CO124S (figura 9)
Dimensioni esterne
A = 31,7 cm (18 in)
B = 28 cm (16,75 in)
C = 25,4 cm (13 in)
Dimensioni interne
A = 31,7 cm (16,5 in)
B = 28 cm (15,25 in)
C = 25,4 cm (11,5 in)
Spessore delle pareti
Anteriore = 1,9 cm (0,75 in)
Laterale = 1,9 cm (0,75 in)
— Parti della cassa —
Forma della cassa: prisma quadrato
1 superiore, 1 inferiore:
profondità (c) = 29,2 cm (13 in)
larghezza (b) = 31,7 cm (16,75 in) = 16,75
spessore = 1,9 cm (0,75 in)
1 anteriore, 1 posteriore
altezza (a) = 31,7 cm (16,5 in)
larghezza (d) = 28 cm (15,25 in) = 15,25
spessore = 1,9 cm (0,75 in)
2 laterali:
altezza (a) = 31,7 cm (16,5 in)
profondità (c) = 29,2 cm (13 in) = 13
spessore = 1,9 cm (0,75 in)
Montaggio driver
Montaggio: anteriore
Parti apertura --- Tonda
1 tubo:
diametro esterno (e) = 8,2 cm (4,25 in)
diametro interno (g) = 7,6 cm (4 in)
lunghezza (h) = 24 cm (10 in)
Parti apertura --- Quadra
1 superiore, 1 inferiore:
larghezza (e) = 7,6 cm (3,75 in) = 3,75
lunghezza (h) = 24 cm (10 in)
spessore = 1,9 cm (0,125 in)
2 laterali:
altezza (g) = 7 cm (3,5 in) = 3,5
lunghezza (h) = 24 cm (10 in)
spessore = 1,9 cm (0,125 in)
© 2008 directed electronics—all rights reserved
45
Raccomandazioni per la cassa
sigillata Cobalt CO154S (figura 10)
Dimensioni esterne
A = 31,7 cm (25 in)
B = 28 cm (17,5 in)
C = 25,4 cm (11,5 in)
Dimensioni interne
A = 31,7 cm (23,5 in)
B = 28 cm (16 in)
C = 25,4 cm (10 in)
Spessore delle pareti
Anteriore = 1,9 cm (0,75 in)
Laterale = 1,9 cm (0,75 in)
—Parti della cassa—
Forma della cassa: prisma quadrato
1 superiore, 1 inferiore:
profondità (c) = 29,2 cm (11,5 in)
larghezza (b) = 31,7 cm (17,5 in) = 17,5
spessore = 1,9 cm (0,75 in)
1 anteriore, 1 posteriore
altezza (a) = 31,7 cm (23,5 in)
larghezza (d) = 28 cm (16 in) = 16
spessore = 1,9 cm (0,75 in)
2 laterali:
altezza (a) = 31,7 cm (23,5 in)
profondità (c) = 29,2 cm (11,5 in) = 11,5
spessore = 1,9 cm (0,75 in)
Montaggio driver
Montaggio: anteriore
Raccomandazioni per la cassa
sigillata Cobalt CO154S (figura 11)
Dimensioni esterne
A = 31,7 cm (25 in)
B = 28 cm (17,5 in)
C = 25,4 cm (13 in)
Dimensioni interne
A = 31,7 cm (23,5 in)
B = 28 cm (16 in)
C = 25,4 cm (11,5 in)
Spessore delle pareti
Anteriore = 1,9 cm (0,75 in)
Laterale = 1,9 cm (0,75 in)
—Parti della cassa—
Forma della cassa: prisma quadrato
1 superiore, 1 inferiore:
profondità (c) = 29,2 cm (13 in)
larghezza (b) = 31,7 cm (17,5 in) = 17,5
spessore = 1,9 cm (0,75 in) 1
anteriore, 1 posteriore
altezza (a) = 31,7 cm (23,5 in)
larghezza (d) = 28 cm (16 in) = 16
spessore = 1,9 cm (0,75 in)
2 laterali:
altezza (a) = 31,7 cm (23,5 in)
profondità (c) = 29,2 cm (13 in) = 13
spessore = 1,9 cm (0,75 in)
Montaggio driver
Montaggio: anteriore
Parti apertura --- Tonda
1 tubo: diametro esterno (e) = 8,2 cm (4,25
in)
diametro interno (g) = 7,6 cm (4 in)
lunghezza (h) = 24 cm (7 in)
Parti apertura --- Quadra 1 superiore, 1
inferiore:
larghezza (e) = 7,6 cm (4,25 in) = 4,25
lunghezza (h) = 24 cm (7 in)
spessore = 1,9 cm (0,125 in)
2 laterali:
altezza (g) = 7 cm (4 in) = 4,
lunghezza (h) = 24 cm (7 in)
spessore = 1,9 cm (0,125 in)
46
© 2008 directed electronics—all rights reserved
DATI TECNICI
Modello/Codici parti
CO104S
CO124S
CO154S
39.2
Parametri Thiele/Small
Fs (freq. di risonanza in aria libera, Hz)
25.6
25.2
Vas (volume equivalente di cedevolezza, cu ft) 1.080
4.017
7.098
Vas (volume equivalente di cedevolezza, litri)
30.600
113.790
201.070
Qms (Q, meccanico)
3.53
4.72
6.08
Qes (Q, elettrico)
0.68
0.55
0.51
Qts (Q totale driver)
0.57
0.49
0.47
Re (resistenza in c.c., ohm)
3.6
3.55
3.77
Z (impedenza nominale, ohm)
4
4
4
Le (induttanza, mH)
1.38
1.37
1.61
Efficienza (1 W a 1 M, dB)
86.1
87.2
89.9
Xmax (escursione lineare monodirezionale, in) 0.406
0.410
0.453
Xmax (escursione lineare
monodirezionale, mm)
10.4075
11.5
10.2925
Pe (potenza elettrica continua, watt)
200
200
250
Potenza di picco (acustica, watt)
400
500
600
Mms (massa meccanica mobile totale, grammi) 101.00
127
195
Cms (cedevolezza meccanica, mm/N)
0.180564
0.294721
0.211994
Bl (fattore di forza elettromeccanico, Tm)
10.88
11.61
14.82
Sd (superficie radiante effettiva, cm quadrati)
346.361
522.792
819.398
Sd (superficie radiante effettiva, sq in)
53.706
81.064
127.055
Gamma di frequenza (Hz)
39 - 250Hz 25 - 250Hz 25 - 250Hz
Prodotto energia - larghezza di banda (EBP)
58
47
49
Volume interno del diffusore (cu ft)
0.048
0.061
0.116
Diametro esterno del diffusore
(pollici/millimetri)
10.31/ 262
12.40/ 315
15.40/ 391
Diametro fori di montaggio (pollici/millimetri)
9.23/ 232
10.91/ 277
13.82/ 351
Profondità di montaggio (pollici/millimetri)
5.12/ 130
5.51/ 140
6.46/ 164
Peso magneti (Oz)
38.60
41
70
Diametro telaio (pollici/millimetri)
10.16/258
12.21/310
15.16/385
0.75
1
2
Dimensioni fisiche del driver
Casse raccomandate
Cassa sigillata tipica (cu ft)
Caratteristiche soggette a modifica senza preavviso
© 2008 directed electronics—all rights reserved
47
PORTUGUÊS
CARACTERÍSTICAS
15
1
2
13
3
14
4
12
5
6
7
11
10
9
8
1
Cobertura contra pó de polipropileno resistente à umidade e radiação
ultravioleta.
2
Surround de borracha nitrílica (NBR) grande para longo deslocamento
linear controlado.
3
Cone de papel ventilado resistente à umidade e à radiação
ultravioleta.
4
Carcaça de aço estampado especial.
5
Bobina de copo Kapton ventilado (10” e 12” usam bobina de 1,5”; 15”
usa uma bobina de 2”).
6
Placa frontal de aço de 8 mm.
7
Ímãs cerâmicos grandes de duas camadas.
8
Conjunto de placa traseira/haste em T tipo forquilha de 8mm de aço
9
Abertura de ventilação de 190 mm. Parte do sistema aperfeiçoado de
arrefecimento da bobina (convecção forçada).
10
Protetor dos ímãs de PVC.
11
Bobina de cobre de alta temperatura de 4 ohm.
12
Ventilação no copo da bobina. Parte do sistema aperfeiçoado de
arrefecimento da bobina (convecção forçada).
13
Aranha Conex entrelaçada com terminais de ouropel costurados em
loop.
14
Terminais de pressão.
15
Gaxeta de instalação de PVC reversível.
© 2008 directed electronics—all rights reserved
49
CONFIGURAÇÕES DE CONEXÃO
As próximas ilustrações fornecem diretrizes sobre como conectar o woofer Orion
Cobalt a um amplificador Orion Cobalt para obter o máximo desempenho.
Potência recomendada do amplificador
Potência contínua (RMS)
Pico de potência (Watts)
1 woofer
100 a 300
200 a 600
2 woofers
200 a 600
400 a 1200
3 woofers
300 a 900
600 a 1800
4 woofers
400 a 1200
800 a 2400
Paralela – Dois alto-falantes (bobinas de 4 ohm)
Dois woofers com bobinas de 4 ohm com dois woofers em paralelo resultam em uma
carga de 2 ohm ao amplificador.
1. Conecte o alto-falante em paralelo conectando os dois terminais positivos (+)
juntos e os dois terminais negativos (-) juntos.
2. Conecte os terminais positivos (+) dos woofers ao terminal positivo (+) do
amplificador. Conecte os terminais negativos (-) dos woofers ao terminal negativo
(-) do amplificador (figura 2).
Um alto-falante (bobina de 4 ohm)
Um woofer com bobina de 4 ohm resulta em uma carga de 4 ohm ao amplificador.
1. Conecte o alto-falante unindo o terminal positivo (+) do woofer ao terminal
positivo (+) do amplificador. Conecte o terminal negativo (-) do woofer ao
terminal negativo (-) do amplificador (figura 3).
Em série – Dois alto-falantes (bobinas simples de 4 ohm)
Dois subwoofers com bobinas simples de 4 ohm conectadas em série resultam em uma
carga de 8 ohm ao amplificador.
1. Conecte os woofers em série conectando o terminal negativo (-) da bobina do
primeiro woofer ao terminal positivo (+) da bobina do segundo woofer.
2. Conecte o terminal positivo (+) da bobina do primeiro woofer ao terminal positivo
(+) do amplificador. Conecte o terminal negativo (-) da bobina do segundo
woofer ao terminal negativo (-) do amplificador (figura 4).
50
© 2008 directed electronics—all rights reserved
Em série/paralela - 4 alto-falantes (bobinas de 4 ohm simples)
Quatro subwoofers com bobinas de 4 ohm simples, com as bobinas de cada par de
alto-falantes conectadas em série e todos os quatro alto-falantes conectados em
paralelo para resultar em uma carga de 4 ohm ao amplificador.
1. Conecte o terminal negativo (-) do alto-falante 1 ao terminal negativo (-) do
alto-falante 3 e, em seguida, conecte este cabo ao terminal negativo (-) do
amplificador.
2. Conecte o terminal positivo (+) do alto-falante 1 ao terminal negativo (-) do altofalante 2.
3. Conecte o terminal positivo (+) do alto-falante 3 ao terminal negativo (-) do altofalante 4.
4. Conecte o terminal positivo (+) do alto-falante 2 ao terminal positivo (+) do
alto-falante 4 e, em seguida, conecte este cabo ao terminal positivo (+) do
amplificador (figura 5).
Consulte o diagrama nas páginas 4 - 7
RECOMENDAÇÕES PARA CAIXAS
Detalhes da caixa
1. Dimensões externas calculadas para material de construção de 190 mm (3/4”) de
espessura.
2. Inclui o deslocamento do alto-falante.
3. Os volumes fornecidos são volumes de sintonização sem acréscimo
4. As caixas possuem uma quantidade mínima de material abafador. É necessário ter
material suficiente para revestir a parte interna da caixa.
© 2008 directed electronics—all rights reserved
51
Recomendações para caixa selada
para Cobalt CO104S (figura 6)
Recomendações para caixa ventilada
para Cobalt CO104S (figura 7)
Dimensões externas
A = 35,6 cm (14 pol.)
B = 31,8 cm (12,5 pol.)
C = 29,2 cm (11,5 pol.)
Dimensões externas
A = 40,0 cm (15,75 pol.)
B = 36,2 cm (14,25 pol.)
C = 30,5 cm (12 pol.)
Dimensões internas
A = 31,8 cm (12,5 pol.)
B = 27,9 cm (11 pol.)
C = 25,4 cm (10 pol.)
Dimensões internas
A = 36,2 cm (14,25 pol.)
B = 32,4 cm (12,75 pol.)
C = 26,7 cm (10,5 pol.)
Espessura da parede
Frente = 1,9 cm (0,75 pol.)
Lateral = 1,9 cm (0,75 pol.)
Espessura da parede
Frente = 1,9 cm (0,75 pol.)
Lateral = 1,9 cm (0,75 pol.)
— Partes da caixa —
Formato da caixa: prisma quadrado
1 topo, 1 parte inferior:
comprimento (c) = 29,2 cm (11,5 pol.)
largura (b) = 31,8 cm (12,5 pol.)
espessura = 1,9 cm (0,75 pol.)
— Partes da caixa —
Formato da caixa: prisma quadrado
1 topo, 1 parte inferior:
comprimento (c) = 30,5 cm (12 pol.)
largura (b) = 31,8 cm (14,25 pol.)
espessura = 1,9 cm (0,75 pol.)
1 frente, 1 parte posterior
altura (a) = 31,8 cm (12,5 pol.)
largura (d) = 27,9 cm (11 pol.)
espessura = 1,9 cm (0,75 pol.)
1 frente, 1 parte posterior
altura (a) = 36,2 cm (14,25 pol.)
largura (d) = 27,9 cm (12,75 pol.)
espessura = 1,9 cm (0,75 pol.)
2 laterais:
altura (a) = 31,8 cm (12,5 pol.)
comprimento (c) = 29,2 cm (11,5 pol.)
espessura = 1,9 cm (0,75 pol.)
2 laterais:
altura (a) = 36,2 cm (14,25 pol.)
comprimento (c) = 29,2 cm (12 pol.)
espessura = 1,9 cm (0,75 pol.)
— Montagem do alto-falante —
Frente
— Montagem do alto-falante —
Frente
Partes da ventilação --- Redonda
1 duto: diâmetro externo (e) = 8,3 cm (3,25
pol.)
diâmetro interno (g) = 7,6 cm (3 pol.)
comprimento (h) = 24,1 cm (9,5 pol.)
Partes da ventilação --- Quadrada
1 topo, 1 parte inferior:
largura (e) = 7,6 cm (3 pol.)
comprimento (h) = 25,4 cm (10 pol.)
espessura = 3,2 mm (0,125 pol.)
2 laterais:
altura (g) = 7 cm (2,75 pol.)
comprimento (h) = 25,4 cm (10 pol.)
espessura = 3,2 mm (0,125 pol.).
Consulte o diagrama nas páginas 8 - 13
52
© 2008 directed electronics—all rights reserved
Recomendações para caixa selada
para Cobalt CO124S (figura 8)
Recomendações para caixa ventilada
para Cobalt CO124S (figura 9)
Dimensões externas
A = 39,4 cm (15,5 pol.)
B = 37,5 cm (14,75 pol.)
C = 30,5 cm (12 pol.)
Dimensões externas
A = 45,7 cm (18 pol.)
B = 42,6 cm (16,75 pol.)
C = 33,0 cm (13 pol.)
Dimensões internas
A = 35,6 cm (14 pol.)
B = 33,7 cm (13,25 pol.)
C = 26,7 cm (10,5 pol.)
Dimensões internas
A = 41,9 cm (16,5 pol.)
B = 38,7 cm (15,25 pol.)
C = 29,2 cm (11,5 pol.)
Espessura da parede
Frente = 1,9 cm (0,75 pol.)
Lateral = 1,9 cm (0,75 pol.)
Espessura da parede
Frente = 1,9 cm (0,75 pol.)
Lateral = 1,9 cm (0,75 pol.)
— Partes da caixa —
Formato da caixa: prisma quadrado
1 topo, 1 parte inferior:
comprimento (c) = 30,5 cm (12 pol.)
largura (b) = 31,8 cm (14,75 pol.)
espessura = 1,9 cm (0,75 pol.)
— Partes da caixa —
Formato da caixa: prisma quadrado
1 topo, 1 parte inferior:
comprimento (c) = 33,0 cm (13 pol.)
largura (b) = 31,8 cm (16,75 pol.)
espessura = 1,9 cm (0,75 pol.)
1 frente, 1 parte posterior
altura (a) = 35,6 cm (14 pol.)
largura (d) = 27,9 cm (13,25 pol.)
espessura = 1,9 cm (0,75 pol.)
1 frente, 1 parte posterior
altura (a) = 41,9 cm (16,5 pol.)
largura (d) = 27,9 cm (15,25 pol.)
espessura = 1,9 cm (0,75 pol.)
2 laterais:
altura (a) = 35,6 cm (14 pol.)
comprimento (c) = 29,2 cm (12 pol.)
espessura = 1,9 cm (0,75 pol.)
2 laterais:
altura (a) = 41,9 cm (16,5 pol.)
comprimento (c) = 29,2 cm (13 pol.)
espessura = 1,9 cm (0,75 pol.)
Montagem do alto-falante
Montagem: Frente
Montagem do alto-falante
Montagem: Frente
Partes da ventilação --- Redonda
1 duto:
diâmetro externo (e) = 10,8 cm (4,25 pol.)
diâmetro interno (g) = 10,2 cm (4 pol.)
comprimento (h) = 25,4 cm (10 pol.)
Partes da ventilação --- Quadrada
1 topo, 1 parte inferior:
largura (e) = 7,6 cm (3,75 pol.)
comprimento (h) = 25,4 cm (10 pol.)
espessura = 3,2 mm (0,125 pol.)
2 laterais:
altura (g) = 7 cm (3,5 pol.)
comprimento (h) = 25,4 cm (10 pol.)
espessura = 3,2 mm (0,125 pol.)
© 2008 directed electronics—all rights reserved
53
Recomendações para caixa selada
para Cobalt CO154S (figura 10)
Recomendações para caixa ventilada
para Cobalt CO154S (figura 11)
Dimensões externas
A = 63,5 cm (25 pol.)
B = 44,5 cm (17,5 pol.)
C = 29,2 cm (11,5 pol.)
Dimensões externas
A = 63,5 cm (25 pol.)
B = 44,5 cm (17,5 pol.)
C = 33,0 cm (13 pol.)
Dimensões internas
A = 59,7 cm (23,5 pol.)
B = 40,6 cm (16 pol.)
C = 25,4 cm (10 pol.)
Dimensões internas
A = 59,7 cm (23,5 pol.)
B = 40,6 cm (16 pol.)
C = 29,2 cm (11,5 pol.)
Espessura da parede
Frente = 1,9 cm (0,75 pol.)
Lateral = 1,9 cm (0,75 pol.)
Espessura da parede
Frente = 1,9 cm (0,75 pol.)
Lateral = 1,9 cm (0,75 pol.)
— Partes da caixa —
Formato da caixa: prisma quadrado
1 topo, 1 parte inferior:
comprimento (c) = 29,2 cm (11,5 pol.)
largura (b) = 31,8 cm (17,5 pol.)
espessura = 1,9 cm (0,75 pol.)
— Partes da caixa —
Formato da caixa: prisma quadrado
1 topo, 1 parte inferior:
comprimento (c) = 33 cm (13 pol.)
largura (b) = 31,8 cm (17,5 pol.)
espessura = 1,9 cm (0,75 pol.)
1 frente, 1 parte posterior
altura (a) = 59,7 cm (23,5 pol.)
largura (d) = 27,9 cm (16 pol.)
espessura = 1,9 cm (0,75 pol.)
1 frente, 1 parte posterior
altura (a) = 59,7 cm (23,5 pol.)
largura (d) = 27,9 cm (16 pol.)
espessura = 1,9 cm (0,75 pol.)
2 laterais:
altura (a) = 59,7 cm (23,5 pol.)
comprimento (c) = 29,2 cm (11,5 pol.)
espessura = 1,9 cm (0,75 pol.)
2 laterais:
altura (a) = 59,7 cm (23,5 pol.)
comprimento (c) = 29,2 cm (13 pol.)
espessura = 1,9 cm (0,75 pol.)
Montagem do alto-falante
Montagem: Frente
Montagem do alto-falante
Montagem: Frente
Partes da ventilação --- Redonda
1 duto: diâmetro externo (e) = 10,8 cm (4,25
pol.)
diâmetro interno (g) = 10,2 cm (4 pol.)
comprimento (h) = 17,8 cm (7 pol.)
Partes da ventilação --- Quadrada
1 topo, 1 parte inferior:
largura (e) = 7,6 cm (4,25 pol.)
comprimento (h) = 17,8 cm (7 pol.)
espessura = 3,2 mm (0,125 pol.)
2 laterais:
altura (g) = 7 cm (4 pol.)
comprimento (h) = 17,8 cm (7 pol.)
espessura = 3,2 mm (0,125 pol.)
54
© 2008 directed electronics—all rights reserved
ESPECIFICAÇÕES
Modelo/Número do produto
CO104S
CO124S
CO154S
Fs (ressonância ao ar livre, Hz)
39.2
25.6
25.2
Vas (conformidade equivalente, pés cúbicos)
1.080
4.017
7.098
Vas (conformidade equivalente, litros)
30.600
113.790
201.070
Qms (Q, mecânica)
3.53
4.72
6.08
Qes (Q, elétrica)
0.68
0.55
0.51
Qts (Q total do alto-falante)
0.57
0.49
0.47
Re (resistência à CC, ohms)
3.6
3.55
3.77
Z (impedância nominal, ohms)
4
4
4
Le (indutância, mh)
1.38
1.37
1.61
Eficiência (1 W a 1 M, dB)
86.1
87.2
89.9
Xmax (excursão linear unidirecional, pol.)
0.406
0.410
0.453
Xmax (excursão linear unidirecional, mm)
10.2925
10.4075
11.5
Pe (potência máxima permissível
contínua, watts)
200
200
250
Capacidade de processamento de
pico de potência (música, watts)
400
500
600
Mms (massa total móvel, gramas)
101.00
127
195
Cms (conformidade mecânica, mm/N)
0.180564
0.294721
0.211994
B1 (força do motor, Tesla-M)
10.88
11.61
14.82
Sd (área de radiação efetiva, cm²)
346.361
522.792
819.398
Sd (área de radiação efetiva, in²)
53.706
81.064
127.055
Faixa de freqüência (Hz)
39 - 250Hz 25 - 250Hz 25 - 250Hz
Produto de eficiência da
largura de banda (EBP)
58
Parâmetros Thiele/Small
47
49
Dimensão física do alto-falante
Deslocamento do alto-falante (pés cúbicos)
0.048
0.061
0.116
Diâmetro externo do alto-falante (pol./mm)
10.31/ 262
12.40/ 315
15.40/ 391
Diâmetro do orifício de montagem
do alto-falante (pol./mm)
9.23/ 232
10.91/ 277
13.82/ 351
Profundidade de instalação (pol./mm)
5.12/ 130
5.51/ 140
6.46/ 164
Peso do ímã (Oz)
38.60
41
70
Diâmetro do cone (pol./mm)
10.16/258
12.21/310
15.16/385
0.75
1
2
Caixas recomendadas
Caixa selada típica (pés cúbicos)
As especificações estão sujeitas a alteração sem aviso prévio.
© 2008 directed electronics—all rights reserved
55
™
WARRANTY
LIMITED ONE-YEAR CONSUMER WARRANTY/*LIMITED TWO-YEAR CONSUMER WARRANTY FOR AUTHORIZED
DIRECTED DEALER PURCHASE & INSTALLATION
Directed Electronics (herein “Directed”) promises to the original purchaser of the subwoofer or amplifier, as
applicable (herein “Unit” or “Product”), to repair or replace with a new or refurbished Unit (at Directed’s
sole and absolute discretion) should the Unit prove to be defective in workmanship or material under normal
use, for a period of *two-years from the date of purchase from the authorized Directed dealer PROVIDED
the Unit was purchased and installed by an authorized Directed dealer. During this *two-year period, there
will be no charge for the repair or replacement PROVIDED the Unit is returned to Directed (DO NOT RETURN
THE ENTIRE ENCLOSURE. PLEASE RETURN THE WARRANTIED UNIT ONLY.), shipping prepaid, along with the
required proof of installation, the bill of sale or other dated proof of purchase, and the consumer’s contact
information. If the Unit is installed by anyone other than an authorized Directed dealer, the warranty period
will be one-year from the date of purchase. This warranty is non-transferable and does not apply to any Unit
that has been modified or used in a manner contrary to its intended purpose, and does not cover damage to
the Unit caused by installation or removal of the Unit. During this one-year period, there will be no charge
for the repair or replacement PROVIDED the Unit is returned to Directed, shipping pre-paid, along with
the bill of sale or other dated proof of purchase and the consumer’s contact information. This warranty is
void if the product has been damaged by accident or unreasonable use, neglect, improper service or other
causes not arising out of defects in materials or construction. This warranty does not cover the elimination
of externally generated static or noise, or the correction of antenna problems or weak reception, damage to
speakers, accessories, electrical systems, cosmetic damage or damage due to negligence, misuse, failure to
follow operating instructions, accidental spills or customer applied cleaners, damage due to environmental
causes such as floods, airborne fallout, chemicals, salt, hail, lightning or extreme temperatures, damage due
to accidents, road hazards, fire, theft, loss or vandalism, damage due to improper connection to equipment
of another manufacturer, modification of existing equipment, or Product which has been opened or tampered for any reason. Units which are found to be damaged by abuse resulting in thermally damaged voice
coils are not covered by this warranty but may be replaced at the absolute and sole discretion of Directed.
Unit must be returned to Directed (DO NOT RETURN THE ENTIRE ENCLOSURE. THE UNIT ENCLOSURE IS COVERED BY A SEPARATE 90-DAY LIMITED CONSUMER WARRANTY. PLEASE ONLY RETURN THE WARRANTIED
UNIT UNLESS A WARRANTY CLAIM IS BEING MADE FOR THE ENCLOSURE.), postage pre-paid, with bill of sale
or other dated proof of purchase bearing the following information: consumer’s name, telephone number,
and address, authorized dealer’s name and address, and product description. Unit must be returned to the
following address: ATTN: WARRANTY DEPARTMENT, Directed Electronics , 1 Viper Way, Vista, CA 92081. Note:
This warranty does not cover labor costs for the removal and/or reinstallation of the Unit. IN ORDER FOR
THE TWO-YEAR WARRANTY TO BE VALID, YOUR UNIT MUST BE SHIPPED WITH PROOF OF INSTALLATION BY
AN AUTHORIZED DIRECTED DEALER. ALL UNITS RECEIVED BY DIRECTED FOR WARRANTY REPAIR WITHOUT
PROOF OF DIRECTED DEALER INSTALLATION AND PURCHASE WILL BE COVERED BY THE LIMITED 1 YEAR
WARRANTY.
BY PURCHASING THIS PRODUCT, ALL WARRANTIES INCLUDING BUT NOT LIMITED TO EXPRESS WARRANTY,
IMPLIED WARRANTY, WARRANTY OF MERCHANTABILITY, FITNESS FOR PARTICULAR PURPOSE, AND WARRANTY OF NON-INFRINGEMENT OF INTELLECTUAL PROPERTY ARE EXPRESSLY EXCLUDED TO THE MAXIMUM
EXTENT ALLOWED BY LAW, AND DIRECTED NEITHER ASSUMES NOR AUTHORIZES ANY PERSON TO ASSUME
FOR IT ANY LIABILITY IN CONNECTION WITH THE SALE OF THE PRODUCT. DIRECTED HAS ABSOLUTELY NO
LIABILITY FOR ANY AND ALL ACTS OF THIRD PARTIES INCLUDING ITS AUTHORIZED DEALERS OR INSTALLERS.
IN NO EVENT WILL DIRECTED BE LIABLE FOR ANY INCIDENTAL, SPECIAL OR CONSEQUENTIAL DAMAGES (INCLUDING LOSS OF PROFITS). BY PURCHASING THIS PRODUCT, THE CONSUMER AGREES AND CONSENTS THAT
ALL DISPUTES BETWEEN THE CONSUMER AND DIRECTED SHALL BE RESOLVED IN ACCORDANCE WITH CALIFORNIA LAWS IN SAN DIEGO COUNTY, CALIFORNIA. This warranty is only valid for sale of Product within the
United States of America. Product sold outside of the United States of America is sold “AS-IS,” and shall have
NO WARRANTY, express or implied. Some states do not allow limitation on how long an implied warranty
lasts. In such states, the limitation or exclusions of this Limited Warranty may not apply. Some states do not
allow the exclusion or limitation of incidental or consequential damages. In such states, the exclusion or limitation of this Limited Warranty may not apply to you. This Limited Warranty gives you specific legal rights,
and you may have other rights which vary from state to state.
920-0033 04-07
For more information on Orion products please visit www.orioncaraudio.com
Directed Electronics is an
ISO 9001 registered company.
Directed Electronics is committed to delivering
world class quality products and services
that excite and delight our customers.
© 2008 Directed Electronics. All rights reserved.
Vista, CA 92081
w w w. d i r e c t e d . c o m
GCO104S 2008-10