1
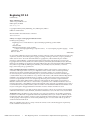
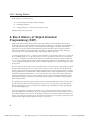
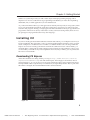
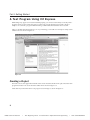
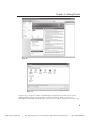
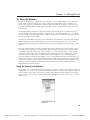
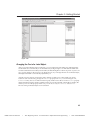
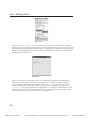
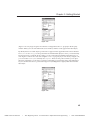
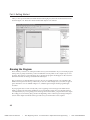
Beginning
C# 3.0
Jack Purdum
ISBN: 978-0470-26129-3
Chapter 1:
Getting Started
SKU: 9785CH0009874
ISBN: 978-0-470-26129-3
I
Title: Beginning C# 3.0 : An Introduction to Object Oriented Programming
I
SKU: 9785CH0009874
Beginning C# 3.0
Published by
Wiley Publishing, Inc.
10475 Crosspoint Boulevard
Indianapolis, IN 46256
www.wiley.com
Copyright © 2007 by Wiley Publishing, Inc., Indianapolis, Indiana
ISBN: 978-0-470-26129-3
Manufactured in the United States of America
10 9 8 7 6 5 4 3 2 1
Library of Congress Cataloging-in-Publication Data:
Purdum, Jack J. (Jack Jay)
Beginning C# 3.0 : an introduction to object oriented programming / Jack Purdum.
p. cm.
Includes index.
ISBN 978-0-470-26129-3 (paper/website)
1. Object-oriented programming (Computer science) 2. C# (Computer program language) I. Title.
QA76.64.P88 2008
005.13'3—dc22
2008011056
No part of this publication may be reproduced, stored in a retrieval system or transmitted in any form or by
any means, electronic, mechanical, photocopying, recording, scanning or otherwise, except as permitted
under Sections 107 or 108 of the 1976 United States Copyright Act, without either the prior written
permission of the Publisher, or authorization through payment of the appropriate per-copy fee to the
Copyright Clearance Center, 222 Rosewood Drive, Danvers, MA 01923, (978) 750-8400, fax (978) 646-8600.
Requests to the Publisher for permission should be addressed to the Legal Department, Wiley Publishing,
Inc., 10475 Crosspoint Blvd., Indianapolis, IN 46256, (317) 572-3447, fax (317) 572-4355, or online at
http://www.wiley.com/go/permissions.
Limit of Liability/Disclaimer of Warranty: The publisher and the author make no representations or
warranties with respect to the accuracy or completeness of the contents of this work and specifically
disclaim all warranties, including without limitation warranties of fitness for a particular purpose.
No warranty may be created or extended by sales or promotional materials. The advice and strategies
contained herein may not be suitable for every situation. This work is sold with the understanding that the
publisher is not engaged in rendering legal, accounting, or other professional services. If professional
assistance is required, the services of a competent professional person should be sought. Neither the
publisher nor the author shall be liable for damages arising herefrom. The fact that an organization or
Website is referred to in this work as a citation and/or a potential source of further information does not
mean that the author or the publisher endorses the information the organization or Website may provide or
recommendations it may make. Further, readers should be aware that Internet Websites listed in this work
may have changed or disappeared between when this work was written and when it is read.
For general information on our other products and services please contact our Customer Care Department
within the United States at (800) 762-2974, outside the United States at (317) 572-3993 or fax (317) 572-4002.
Trademarks: Wiley, the Wiley logo, Wrox, the Wrox logo, Wrox Programmer to Programmer, and related
trade dress are trademarks or registered trademarks of John Wiley & Sons, Inc. and/or its affiliates, in the
United States and other countries, and may not be used without written permission. All other trademarks
are the property of their respective owners. Wiley Publishing, Inc. is not associated with any product or
vendor mentioned in this book.
Wiley also publishes its books in a variety of electronic formats. Some content that appears in print may
not be available in electronic books.
ISBN: 978-0-470-26129-3
I
Title: Beginning C# 3.0 : An Introduction to Object Oriented Programming
I
SKU: 9785CH0009874
1
Getting Star ted
Welcome to the world of object-oriented programming and C#! The primary goal of this book is
to use the C# programming language from Microsoft to teach you object-oriented programming,
or OOP. This book assumes that you have no prior programming experience in any language and
that you know nothing about OOP.
If you do have programming experience and some familiarity with OOP, that’s fine. Having that
experience makes things easier for you. However, I still encourage you to read the book from
start to finish for a number of reasons. First, this book represents the distillation of 25 years of
programming and teaching experience. I have a good idea of what works and what doesn’t work
when it comes to explaining complex topics so that they’re easy to understand. Reading each
chapter gives you the tools to understand the next chapter. Second, I may introduce topics in one
chapter and then rely heavily on those topics in a much later chapter. In other words, the process
used to learn OOP and C# is one that introduces new topics based upon ones that were introduced
earlier. Obviously, it’s important to master the earlier content before tackling the later content.
Finally, the programming examples I use also build on concepts presented in earlier program
examples. It will be easier for you to understand the later program examples if you’ve
experimented with those programs introduced earlier in the book.
One more thing: You cannot learn programming by just reading about it. You have to dig in and
start programming yourself. For that reason, there are exercises at the end of each chapter designed
to help you hone your programming skills. The learning process is even more interesting if you
try to create your own programs based upon some real problems you’d like to solve. Don’t
worry if things don’t fall together instantly on the first try. You should plan to make a ton of
“flat-forehead” mistakes . . . you know, the kind of mistake where, upon discovering it, you pound
the heel of your hand into your forehead and say: “How could I make such a stupid mistake!” Not
to worry . . . we’ve all been there. Such mistakes are just part of the process of becoming a
programmer and you should expect to make your fair share. However, stick with it, read the
book, and you’ll be surprised at how fast things will come together. Indeed, I think you’ll find
programming to be a truly enjoyable pastime.
ISBN: 978-0-470-26129-3
I
Title: Beginning C# 3.0 : An Introduction to Object Oriented Programming
I
SKU: 9785CH0009874
Part I: Getting Started
In this chapter, you will learn about
❑
Downloading Visual Studio .NET’s C# Express
❑
Installing C# Express
❑
Testing C# Express to ensure it was installed correctly
With that in mind, let’s get started.
A Shor t Histor y of Object - Oriented
Programming (OOP)
Many people believe that OOP is a product of the 1980s and the work done by Bjarne Stroustrup in
moving the C language into the object-oriented world by creating the C++ language. Actually, SIMULA 1
(1962) and Simula 67 (1967) are the two earliest object-oriented languages. The work on the Simula
languages was done by Ole-John Dahl and Kristen Nygaard at the Norwegian Computing Center in
Oslo, Norway. While most of the advantages of OOP were available in the earlier Simula languages,
it wasn’t until C++ became entrenched in the 1990s that OOP began to flourish.
C was the parent language of C++ and it was often said that C was powerful enough to shoot yourself in
the foot multiple times. C++, on the other hand, not only was powerful enough to shoot yourself in the
foot, but you could blow your entire leg off without too much difficulty. Most programmers admit that
C++ is a very powerful language and it is still in widespread use today. However, with that power comes
a lot of complexity. Language developers wanted a simpler and perhaps less complex language for OOP
development.
The next step in the development of OOP started in January of 1991 when James Gosling, Bill Joy, Patrick
Naughton, Mike Sheradin, and several others met in Aspen, Colorado, to discuss ideas for the Stealth
Project. The group wanted to develop intelligent electronic devices capable of being centrally controlled
and programmed from a handheld device. They decided that OOP was the right direction to go with the
development language, but felt that C++ was not up to the job. The result was the Oak programming
language (named after an oak tree outside Gosling’s window), which eventually morphed into the Java
programming language. (Oak had to be renamed because the team discovered that a language by that
name already existed.)
Java quickly grew in popularity, spurred by the growth of the World Wide Web. In both cases this rapid
growth was in part due to the fact that the “guts” necessary to run Java programs on the Web quickly
became an integral part of various web browsers. With the improved Web functionality augmented by
Java, the Web hit light speed.
To many programmers, C# is Microsoft’s answer to Java. Some would even say that C# is the result of
Microsoft’s stubbornness in refusing to promote a language it did not develop. That sentiment is a bit too
harsh. Microsoft had good reasons for developing C#, not the least of which was that it wanted what are
known as type-safe programs that run in a managed environment. You’re not ready to appreciate exactly
what that means right now, but it will become clear as you learn C#.
4
ISBN: 978-0-470-26129-3
I
Title: Beginning C# 3.0 : An Introduction to Object Oriented Programming
I
SKU: 9785CH0009874
Chapter 1: Getting Started
Suffice it to say that C# provides you with a robust object-oriented programming language and an
impressive set of tools to tackle almost any programming task. Whether you wish to develop desktop,
distributed, web, or mobile applications, C# can handle the task.
As you become familiar with C#, you will appreciate its relatively few keywords, its crisp syntax, and its
easy-to-use development environment. You’ll discover that pieces of programs you write in C# can be
reused in other programs. Finally, you might appreciate the fact that there are many job opportunities for
programmers who know C#. (In fact, in the writer ’s locality as this text is being written, there are more
job openings for C# programmers than in any other language.)
Installing C#
If you have already purchased and installed Visual Studio 2008 and C#, you can skip this section. If you
haven’t installed C#, this section tells you how to download and install the C# Express version of Visual
Studio. C# Express is a modified version of C# that is available from Microsoft at no charge. While the
Express version of C# is missing some features found in the commercial version of Visual Studio, you
should be able to compile and run all the sample programs in this book using C# Express. Once you are
convinced that you should do all your development work in C# (and you will be), you can purchase the
full version of Visual Studio.
Downloading C# Express
At the time that this book is being written, you can go to: http://msdn2.microsoft.com/en-us/
express/future/bb421473.aspx to download C# Express. The web page looks similar to what is
shown in Figure 1-1. As you can see if you look closely at the figure, the book was written using Visual
C# Express Edition Beta 2. (By the time you read this book, it is quite likely that the “Beta 2” part of the
title will have changed.) Now click the IMG file link to download the file.
Figure 1-1
5
ISBN: 978-0-470-26129-3
I
Title: Beginning C# 3.0 : An Introduction to Object Oriented Programming
I
SKU: 9785CH0009874
Part I: Getting Started
Depending upon the speed of your Internet connection, the file should be saved on your system within a
few minutes.
Installing C# Express
After the download completes, click the executable file that was supplied (the file was named
vcssetup.exe when I installed it, but it could change). You should see a screen similar to that shown in
Figure 1-2, the C# Express Edition installation screen.
Figure 1-2
Selecting the Installation Options
Click the Next button to proceed to the next phase of the installation. In short order you will see a screen
similar to the one in Figure 1-3, showing Visual C# Expression Edition installation options. This screen
presents a number of installation options from which to pick. Unless you have some disk space
limitations, I suggest that you install all the components in the list. Note that the file sizes mentioned are
compressed file sizes. When those files are expanded, their disk space footprint is substantially larger.
(Figure 1-3 suggests that a little over 76MB is the download file size. However, just before you press the
Install button you can see the actual download file size compared to the expanded file size. When I
installed C# Express, I was informed that the download file size was 135MB and the expanded disk
storage requirement was 1.2GB.)
6
ISBN: 978-0-470-26129-3
I
Title: Beginning C# 3.0 : An Introduction to Object Oriented Programming
I
SKU: 9785CH0009874
Chapter 1: Getting Started
Figure 1-3
Microsoft SQL Server and its associated tools are also useful, especially if you plan to do any web
development in the future. Unless you have some severe disk space constraints, you should install all the
components. You can always uninstall components later if you need to.
Once you’ve decided on which components you wish to install, click the Next button and go fix yourself
a sandwich . . . it’s going to take a while for things to get installed.
While I was working through the installation process, the install software sensed
that some of the Windows software on my system was outdated. I was asked if
I wanted to install the updates and patches that had come out since I last updated
my system. Because the list also included several patches to Visual Studio, I said yes.
It took almost two hours to download and update my software. However, when the
updates were finished, the C# Express installer picked up right where it had left off
and the installation continued without a hitch. While it does take some time, you
should update your software if the installer offers you that option.
Eventually, the installation process ends . . . honest! If you updated your system software as part of the
installation process, the installer will ask you at some point if you wish to restart your computer. Answer
yes if you are asked. After the system restarts and the software has been installed, you should see a
new icon on your desktop labeled Microsoft Visual C# 2008 Express Edition. You should be able to
double-click the new icon and launch C# Express.
7
ISBN: 978-0-470-26129-3
I
Title: Beginning C# 3.0 : An Introduction to Object Oriented Programming
I
SKU: 9785CH0009874
Part I: Getting Started
A Test Program Using C# Express
While things may appear to have been installed properly, you can’t be certain until you actually write a
program and try to run it. That’s the purpose of this section of the chapter. The program is about as
simple as we can make a program while remaining confident that the installation was successful.
After you double-click the C# Express icon on your desktop, you should see a C# Express startup screen
similar to the one shown in Figure 1-4.
Figure 1-4
Creating a Project
Move the cursor to the upper left-hand side of the screen and select the File menu option from the main
program menu bar. Your screen should look like what is shown in Figure 1-5.
Select New Project from the menu. Your program screen changes as shown in Figure 1-6.
8
ISBN: 978-0-470-26129-3
I
Title: Beginning C# 3.0 : An Introduction to Object Oriented Programming
I
SKU: 9785CH0009874
Chapter 1: Getting Started
Figure 1-5
Figure 1-6
In Figure 1-6 you are given a number of predefined project templates from which to choose. These
templates define the types of programs that you can develop with C#. When you select one of
the templates, Visual Studio creates that type of project for you as well as writing some stub code for you.
9
ISBN: 978-0-470-26129-3
I
Title: Beginning C# 3.0 : An Introduction to Object Oriented Programming
I
SKU: 9785CH0009874
Part I: Getting Started
Stub codes are predefined pieces of code that Visual Studio writes for you as a background process.
From the templates shown in Figure 1-6, select the Windows Application template. You should also type
in the name you wish the program to have. I have typed in TestProgram for our example. Click OK
after you’ve entered the program name you wish to use.
The C# Integrated Development Environment
You should now see something like Figure 1-7 on your screen. Figure 1-7 shows you where you’ll be
spending a lot of your programming time as you read this book. It’s called the Integrated Development
Environment, or IDE, because virtually every programming tool you need to write C# programs is
available to you there.
Run Icon
Source Window
Solution Explorer Window
Properties Window
Toolbar Window
Figure 1-7
Back in the Dark Ages of programming, you had to load and run a programming editor to write the
program’s source code. Next, you had to close the editor and load the language compiler program to
check the program’s statements for errors. Then you had to load an assembler program to convert the
source code to assembly language. Finally, you had to load and run a linker program to combine all
the elements of your program into an executable program. The Visual Studio IDE provides all of these
functions within a single program. This makes it much easier to write and test the programs you create.
10
ISBN: 978-0-470-26129-3
I
Title: Beginning C# 3.0 : An Introduction to Object Oriented Programming
I
SKU: 9785CH0009874
Chapter 1: Getting Started
The Major IDE Windows
The IDE shown in Figure 1-7 divides the screen into three windows. The left window shows the Visual
Studio Toolbox, which, by default, shows some of the objects Visual Studio makes available to you.
If you look closely you can see that the Toolbox presents a smorgasbord of objects you can use in your
programs, including textboxes, labels, buttons, and other controls you will find useful as you develop
your programs.
The middle window is referred to as the Source window and currently shows an unadorned Visual
Studio form object. As presented in Figure 1-7, the form has no other objects placed on it . . . yet. That is,
you haven’t added any other objects (such as textboxes or buttons) from the Toolbox onto the form. You
will change this later in this chapter.
The right side of the IDE currently shows two subwindows. The subwindow on top shows the Solution
Explorer. Simply stated, the Solution Explorer shows the current development state of your project.
It shows the forms the program has and its references, plus other information that we’ll discuss in later
chapters.
Below the Solution Explorer window is the Properties window. The purpose of the Properties window
is to show you the properties associated with the object currently in focus in the Source window. If you
look closely at the form in the Source window in Figure 1-7, you’ll notice that it has a couple of small
white boxes along its edge. These are called sizing boxes and their purpose is to enable you to alter the
size of the objects to which they are attached. However, the sizing boxes also show which object in
the Source window currently has the attention, or focus, of Visual Studio. Whatever object has the focus
in the Source window is also the object that the Properties window displays. In Figure 1-7 the properties
shown in the Properties window apply to the form shown in the Source window. Visual Studio always
maintains this relationship between the object in focus in the Source window and the information
displayed in the Properties window.
Using the Source Code Window
If you click Form1.cs in the Solution Explorer window, you can move to the Solution Explorer menu bar
and click the source code icon to view the code that Visual Studio has written for you thus far. Figure 1-8
shows you the location of the source code icon in the Solution Explorer window. (When you hover the
cursor over the source code icon a small textbox opens and displays the words “View Code,” as shown
in Figure 1-8.)
Figure 1-8
11
ISBN: 978-0-470-26129-3
I
Title: Beginning C# 3.0 : An Introduction to Object Oriented Programming
I
SKU: 9785CH0009874
Part I: Getting Started
The code associated with clicking the source code icon shown in Figure 1-8 is shown in Figure 1-9.
When you click the source code icon, notice that another tab is added at the top of the Source window.
One tab has form1.cs (Design) on it, while the other tab has form1.cs. The first tab is for the view of the
form in the design mode. (The design mode is shown in Figure 1-7.) The second tab is the source code
mode and shows you the code for the program under development. Even though you haven’t written
any code yourself, Visual Studio has already written some for you behind your back! You can see the
TestProgram C# source code in Figure 1-9.
Figure 1-9
It’s not necessary that you understand the code shown in Figure 1-9 at this time. All you’re trying to do
at this point is write a very short program to see if the installation was done correctly. However, you will
be spending a lot of time in the source code window as you write your own programs.
Adding an Object to a Windows Form
A form with nothing on it isn’t terribly interesting. Let’s change the form so that, when the program
runs, it displays the message, “My first program.” You need to add a label to the form object shown in
the Source window in Figure 1-7 to hold your program message. There are two ways to add a label
object to a form. First, as shown in Figure 1-10, you can click the label object in the Toolbox and, while
holding the left mouse button down, drag the label over to the form and release the mouse button.
Second, you can simply double-click the label object in the Toolbox. The mouse double-click causes
Visual Studio to place a label object near the upper left-hand corner of the form shown in the Source
window.
You can click the label in the Source window while holding the left mouse button down and drag the
label to wherever you want it to appear on the form object. When you have positioned the label object
where you want it on the form, simply release the mouse button.
12
ISBN: 978-0-470-26129-3
I
Title: Beginning C# 3.0 : An Introduction to Object Oriented Programming
I
SKU: 9785CH0009874
Chapter 1: Getting Started
Figure 1-10
Changing the Text of a Label Object
After you position the label object on the form, you can set the text for the label. One of the things that
Visual Studio does automatically is size the label to be just big enough to accommodate the label’s text.
Given the default font size used by Visual Studio, the default height for a label is 13 pixels. (A pixel is one
dot, or point of light, on the screen of your display device.) If you change the font size of the label object,
the height of the label is automatically adjusted for you.
Actually, I am not a big fan of automatic sizing of labels. For that reason, I turn off the auto-sizing
feature. To turn off auto-sizing, change the AutoSize property from True, as shown in Figure 1-11,
to False. You may have to scroll down in the Property window to be able to see the AutoSize property
displayed in the Properties window. Click the down arrow at the right end of the textbox to display the
choices you have for the property. In this case you can choose only True or False. Select False.
The auto-sizing of the label object is now turned off.
13
ISBN: 978-0-470-26129-3
I
Title: Beginning C# 3.0 : An Introduction to Object Oriented Programming
I
SKU: 9785CH0009874
Part I: Getting Started
Figure 1-11
After you set AutoSize to False, you can resize the label object in the Source window by clicking the
white sizing boxes that appear on the ends and corners of the label object. In Figure 1-12, I have increased
the width of the label by clicking the middle sizing box on the right edge of the label object and dragging
the edge to the right until I got the desired size. I then released the left mouse button to end up with the
label object shown in Figure 1-12.
Figure 1-12
After you have set the size of the label object, you can change the text property of the label object to
whatever you want to appear in the label. In your example, you want the text “My first program.”
At the present time, the text property of the label object is label1 . . . not what you want. Scroll the
contents of the Property window down to the Text property for the label object and change it to
My first program and press the Enter key. Changing the Text property for the label object is shown
in Figure 1-13. Notice how the first line below the Property window’s title bar shows the name of the
object currently in focus in the Source window (label1 in Figure 1-13).
14
ISBN: 978-0-470-26129-3
I
Title: Beginning C# 3.0 : An Introduction to Object Oriented Programming
I
SKU: 9785CH0009874
Chapter 1: Getting Started
Figure 1-13
(Figure 1-13 is only large enough to show the last word typed into the Text property in the Property
window. When you look at the label in the Source window, all three words appear in the label object.)
By default, the text of a label object is positioned so it appears in the upper left-hand corner of the label.
If AutoSize is set to True, you can’t position the text with the label object; it’s set for you automatically.
However, because you turned off auto-sizing, you can position the text within the label wherever you
wish. Figure 1-14 shows how to do this using the TextAlign property. If you look closely at Figure 1-14,
you can see that TextAlign is currently set to TopLeft. There are nine positions where you can place
the text in a label that you can resize. You want to right-justify your text in the center of the label object.
If you look where the cursor is positioned in Figure 1-14, clicking that box right-justifies the text in the
label object.
Figure 1-14
15
ISBN: 978-0-470-26129-3
I
Title: Beginning C# 3.0 : An Introduction to Object Oriented Programming
I
SKU: 9785CH0009874
Part I: Getting Started
After you have positioned the text within the label at the right place, the form should look like what is
shown in Figure 1-15. Notice how the text in the label object is now centered.
Figure 1-15
Running the Program
This is all that you want to do at the present time to test your C# installation. If you can run the program
at this point, it’s pretty certain that you have installed C# correctly. There are two simple ways to run a
program. The easiest is to press the F5 key. If you do that, the program should appear on the screen in a
few moments with our message centered in the label object.
The second way is to click the Run Program icon. If you look carefully at Figure 1-15, right below the
Window menu option near the top of the form you can see a small triangle. (On your screen, it appears
green. The Run icon is also labeled in Figure 1-7.) Click that green triangle and the program begins
execution.
If your program does not run correctly and you’re not getting an error message from within Visual
Studio, go back to the start of the installation process and check to make sure you followed each step
correctly. Likewise, if you are getting an error message from Visual Studio, you performed some step in
the coding process incorrectly. Just go back to the beginning of the “A Test Program Using C# Express”
section of this chapter and check each step to make sure you followed the correct sequence.
16
ISBN: 978-0-470-26129-3
I
Title: Beginning C# 3.0 : An Introduction to Object Oriented Programming
I
SKU: 9785CH0009874
Chapter 1: Getting Started
Summar y
In this chapter you learned how object-oriented programming got its start over four decades ago.
This chapter also showed you how to download and install Visual Studio’s C# Express Edition. Finally,
you wrote a simple program to test the installation to make sure it was done correctly. So, now what?
You could immediately proceed to the next chapter and start reading. Not a good idea. Now that you
have a simple program up and running, this is the perfect time to experiment a little. For example,
your program doesn’t have any text in the program’s title bar. Surely C# provides a property that
enables you to change the title bar. (Hint: It does provide such a property!) Play around with some of the
other properties and see what they do. For example, change the foreground property and see what
happens. Each chapter in this book has a set of exercises at the end of the chapter that you should do
before reading the next chapter. I realize that you’re anxious to move on to the next chapter, but resist the
temptation and do the exercises. They’ll help crystallize what you’ve learned in the current chapter and
better prepare you for the content of the next chapter. You can find the solutions in Appendix A.
Programming should be fun, and some of that fun comes from discovering what happens if you
change this to that. If you see smoke coming out of your computer, don’t make that change again.
(Just kidding . . . you can’t hurt your computer if you make an incorrect change to a property.)
Experiment and have fun!
17
ISBN: 978-0-470-26129-3
I
Title: Beginning C# 3.0 : An Introduction to Object Oriented Programming
I
SKU: 9785CH0009874
ISBN: 978-0-470-26129-3
I
Title: Beginning C# 3.0 : An Introduction to Object Oriented Programming
I
SKU: 9785CH0009874
Ready for more?
CHECK OUT THIS BOOK IN ITS ENTIRETY.
ENTIRETY
Whet
Whether
Whet
you want to develop desktop, distributed, web, or mobile applications, C# can handle almost
any programming
p
task. This book walks you through this robust object-oriented (OOP) programming
language
langu
lan
gu
so you can quickly get started. Written by a veteran programming instructor, it provides
you w
with the perfect mix of tutorial and hands-on coding. The author even addresses the common
stumbling blocks you’ll likely face when writing code for an application so that you can avoid them.
stum
The bbook begins with a non-programming language introduction to OOP and explores how objects are
viewed in C#. New programming concepts are then slowly introduced along with the set of tools that
viewe
C# hhas to offer. With the help of common, easily understood exercises included in each chapter, you’ll
dig in and start applying the concepts. After completing this book, you’ll be writing complex OOP
programs of your own design.
prog
What you will learn from this book
Wh
• All about the C# syntax and concepts of OOP
• Ho
How to design and write C# programs that follow safe programming practices
• Tip
Tips for utilizing statement repetition and program loops
• Tec
Techniques for building and implementing your own classes
• Trie
Tried-and-true tricks of the trade that cover everything from design basics to debugging aids
• Wa
Ways to store data using disk data files and databases
Who
W
Wh
h this book is for
This book is for anyone who wants a thorough, yet easy-to-understand, introduction to C# and Object
Oriented Programming. No prior programming experience is necessary. All projects and exercises can
Orien
completed using Microsoft’s free Visual C# 2008 Express or other tools.
be co
978-0-470-26129-3, Paper, 552 pages
Wrox Beginning guides are crafted to make learning programming languages and technologies easier
than you think, providing a structured, tutorial format that will guide you through all the techniques
involved.
invol
Visit us at wrox.com
Contents:
Part I. Getting Started.
Chapter 7. Statement Repetition Using Loops.
Part IV. Storing Data.
Chapter 1. Getting Started.
Chapter 8. Arrays.
Chapter 13. Using Disk Data Files.
Chapter 2. Understanding Objects.
Part III. Writing Your Own Classes
Chapter 14. Using Databases.
Part II. Understanding C# Syntax.
Chapter 9. Designing Your Own Classes.
Chapter 15. Using Inheritance and Polymorphism.
Chapter 3. Understanding Data Types.
Chapter 10. Implementing Your Class Design.
Chapter 4. Understanding C# Statements.
Chapter 5. Understanding Reference Data Types.
Chapter 11. Exception Handling and Program
Debugging.
Chapter 6. Making Decisions in Code.
Chapter 12. Generics.
ISBN: 978-0-470-26129-3
I
Title: Beginning C# 3.0 : An Introduction to Object Oriented Programming
I
SKU: 9785CH0009874