1
AL
MA
TE
RI
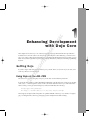
Enhancing Development
with Dojo Core
IG
Getting Dojo
HT
ED
This chapter shows the Dojo core of basic JavaScript language enhancements that provides the
foundation for all of the other tools and systems offered by the toolkit. But first, you learn how to
get a copy of Dojo, either from current releases or leading-edge development versions. Then, you are
taken on a tour through the basic packaging, markup declaration, and object-oriented programming
features.
PY
R
It’s time to dig in and start playing with Dojo for yourself. There are several ways to do this, and
each way offers its own advantages.
Using Dojo via the AOL CDN
CO
The easiest way to start using Dojo is by way of the AOL Content Delivery Network.
In short, the AOL CDN is a widely distributed and highly available network of web servers hosting
static assets — and among these assets are the code and collateral for the Dojo toolkit. What this
means is that you can get started using Dojo with an include like the following:
<script type="text/javascript"
src="http://o.aolcdn.com/dojo/1.1.1/dojo/dojo.xd.js"></script>
This single JavaScript include will pull in an optimized build of the Dojo core, which is enough to
get you rolling thanks to the Dojo packaging system and dynamic module loading.
Chapter 1: Enhancing Development with Dojo Core
Downloading the Latest Dojo Release
If relying on someone else’s servers for a JS framework isn’t quite your style — even if (or because)
they are as big as AOL — you can download the complete Dojo framework to host your own
way.
Find the latest Dojo release here:
http://dojotoolkit.org/downloads
From that page, you can find a distribution package of everything Dojo — as well as a few other
support tools such as Dojo ShrinkSafe, handy for use later in building your own compressed version
of the bits of Dojo you end up using.
Once you’ve downloaded the distribution archive, you’ll need to unpack it somewhere convenient
on your web server. Make a note of the URL at which you’ve made it available, for use throughout
the rest of this part of the book.
Trying Dojo Under Development
If you’re really feeling adventurous, you can skip the release version and head straight for a cut
of the current code under development. The easiest way to do this is to check out a nightly build,
available here:
http://archive.dojotoolkit.org/nightly/
But, if you’d like to track Dojo development even more closely, you can check out code directly
from the project’s Subversion repository. As of this writing, find details on this repository here:
http://dojotoolkit.org/book/dojo-book-0-9/part-4-meta-dojo/get-code-subversion
If you have a command-line Subversion client, the following as of this writing will assemble and
check everything out for you from all the subprojects:
svn co http://svn.dojotoolkit.org/src/view/anon/all/trunk dojodev
After this command, you should have a dojodev/ directory organized in the same way as a release
package. The rest of the examples here will refer to this dojodev/ directory in using Dojo locally,
but keep the following in mind: Grabbing a copy of Dojo this close to the bleeding-edge might not
quite be what you want to deal with on a regular basis.
Sampling Dojo
If you grabbed a local copy of Dojo, whether from a release download or checked out from the development repository, you should notice that there are several directories in the root of the package directory,
including the following:
❑
2
dojo/ — Here lives the core of Dojo, including basic JS extensions, dynamic module loading,
DOM and AJAX utilities, and a host of other useful bits.
Chapter 1: Enhancing Development with Dojo Core
❑
dijit/ — Residing in this directory is Dijit, the Dojo widget system.
❑
dojox/ — Under this path, you’ll find optional yet powerful extensions to Dojo that provide
charting facilities, cryptographic routines, offline application support, and more.
Getting to Hello World
Possibly the best way to get a flavor for the Dojo way is to jump right into a quick example page that
loads up the toolkit and tries a few things out:
<html>
<head>
<title>Hello Dojo</title>
<style type="text/css">
@import "../dojodev/dojo/resources/dojo.css";
@import "../dojodev/dijit/themes/tundra/tundra.css";
</style>
<style type="text/css">
.accord { margin: 1em; height: 300px;}
</style>
<script type="text/javascript" src="../dojodev/dojo/dojo.js"
djConfig="isDebug: true, parseOnLoad: true"></script>
Note that the CSS and JavaScript paths in the preceding code assume that this page resides in a folder
devoted to this chapter — ex-dojo-core/ for example — in the same directory as the dojodev/ folder.
The code itself is fairly mundane stuff so far — the page opens with a title and the inclusion of a couple
of Dojo style sheets. What’s worth noting, though, is that Dojo does include a baseline ‘‘reset’’ CSS like
the one offered by YUI and others, though not nearly as ambitious.
The second CSS import is somewhat more interesting: tundra.css defines a complete theme for Dijit
widgets, and can be swapped out for another. For example, soria/soria.css is one you might try. You
read more on this feature later on in Chapter 6.
The final bit of CSS is just a little tweak to an element that will appear further along in the page.
After the CSS, take a look at the first JavaScript import of the page. This loads up the core of Dojo. Notice
that there’s a custom djConfig attribute on the <script> tag — this is your first hint that there’s something different going on here. The djConfig attribute may contain flags and settings used globally to
configure the Dojo toolkit. In this case, the isDebug flag enables debug logging and messages, and the
parseOnLoad flag tells Dojo to scan the DOM for setup cues once the page has finished loading.
Continuing on, here’s markup to finish off the <head> element:
<script type="text/javascript">
dojo.require("dojo.parser");
dojo.require("dijit.form.TextBox");
dojo.require("dijit.form.CheckBox");
3
Chapter 1: Enhancing Development with Dojo Core
dojo.require("dijit.form.DateTextBox");
dojo.require("dijit.form.NumberSpinner");
dojo.require("dijit.form.Slider");
dojo.require("dijit.layout.AccordionContainer");
</script>
</head>
The dojo.require() calls you see in this <script> block use the Dojo module system. For each of these,
if the named module has not already been loaded, the Dojo core attempts to locate and load it dynamically to satisfy each dependency. If any of these modules declares further requirements — and these, in
particular, do — Dojo will scoop them up as well.
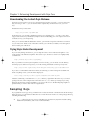
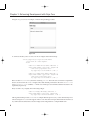
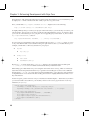
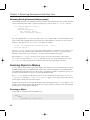
In fact, if you happen to use Firefox as your browser, and have the Firebug extension installed, you
can take a look at the network activity tab and monitor all the requests generated by the requirements
specified. Check out Figure 1-1 for an example of what you might see. There’s quite a lot going on here,
but keep in mind that there are tools for optimizing this later on.
Figure 1-1
4
Chapter 1: Enhancing Development with Dojo Core
Using Firebug
In case you’ve never been introduced to it, Firebug is an invaluable Firefox extension
for web developers.
Firebug is useful in every aspect of the job — you can inspect elements in the page,
view and manipulate live CSS, access a JavaScript shell for trying out small snippets, as
well as view a log of debugging messages from your code. Check it out here:
http://getfirebug.com
It’s also worth noting that Dojo, at least in development, comes with a copy of Firebug
Lite for non-Firefox browsers. It can be activated by the Dojo config setting isDebug.
Read more about Firebug Lite here:
http://getfirebug.com/lite.html
Next begins the <body> of the page:
<body class="tundra">
<h1>Hello Dojo</h1>
Note that the <body> tag has a class = "tundra" attribute. This corresponds to the theme loaded in CSS
earlier. Now we’re starting to get into some meaty bits:
<div class="accord"
dojoType="dijit.layout.AccordionContainer"
duration="200">
<div dojoType="dijit.layout.AccordionPane" selected="true"
title="Intro" class="apane">
<p>Hello world - welcome to Dojo!</p>
</div>
There hasn’t been much JavaScript in this page yet, but the preceding HTML will cause quite a bit to
happen. Thanks to the requirements loaded in the <head> — as well as djConfig = "parseOnLoad:
true" appearing on the <script> tag loading Dojo — the markup here is interpreted on page load as
declarative cues for object initialization.
In particular, this markup declares that an accordion-style layout widget be constructed. Although there
are some caveats, this widget can be styled like any bit of HTML on the page, as seen with the .accord
selector appearing in CSS earlier, back in the <head> element.
Notice that each of the <div> elements comes with a custom dojoType attribute that defines
what Dijit class should be instantiated and wrapped around each. The parent <div> becomes an
AccordionContainer, and the first child <div> becomes an AccordionPane. Additionally, each of these
comes with configuration for the widgets in the form of custom attributes. For instance, the animation
speed with which the accordion panes open and close is specified by duration = "200", and the title of
a pane is specified with title = "Intro".
5
Chapter 1: Enhancing Development with Dojo Core
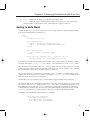
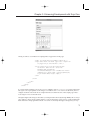
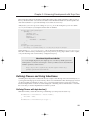
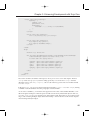
In Figure 1-2, you can see an example of what all the preceding produces.
Figure 1-2
To reinforce the ideas, take a look at a few more widgets declared in markup:
<div dojoType="dijit.layout.AccordionPane"
title="Form #1" class="apane">
<form>
<label for="fname">First Name</label><br />
<input name="fname" type="text" length="10"
trim="true" propercase="true"
dojoType="dijit.form.TextBox" /><br />
<label for="lname">Last Name</label><br />
<input name="lname" type="text" length="10"
trim="true" propercase="true"
dojoType="dijit.form.TextBox" /><br />
Here’s another AccordionPane, this time containing a <form>. The form starts off with two input fields
that are also declared to be TextBox widgets. These both include parameters in the form of trim = "true"
and propercase = "true" attributes — which cause whitespace to be trimmed and the first letter to be
capitalized, respectively.
Next, it’s time to try a slightly more interesting widget:
<label for="bday">Birthday</label><br />
<input name="bday" type="text" length="10"
dojoType="dijit.form.DateTextBox" /><br />
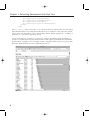
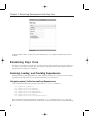
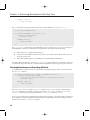
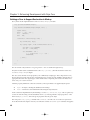
Although the markup for this DateTextBox is simpler than the previous two, it does dramatically more.
Check out Figure 1-3 to see what happens when a user clicks this new input field. Without much fuss at
all, a full-featured calendar date selection widget can be integrated into a simple HTML form.
6
Chapter 1: Enhancing Development with Dojo Core
Figure 1-3
Finally, it’s time to see a little bit of scripting make an appearance in the page:
<label for="fnum">Favorite Number</label><br />
<input name="fnum" id="fnum" type="text" length="15"
dojoType="dijit.form.TextBox" /><br />
<div dojoType="dijit.form.HorizontalSlider"
id="horiz1" name="horiz1" value="10"
maximum="100" minimum="0"
intermediateChanges="true" showButtons="false"
onChange="dojo.byId(‘fnum’).value=arguments[0]"
style="width:10em; height: 20px;">
</div>
</form>
</div>
</div>
</body>
</html>
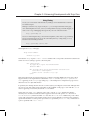
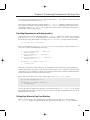
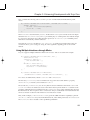
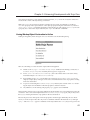
If you missed the scripting, look for the onChange attribute of the HorizontalSlider widget. That small
bit of glue code copies updates of the widget as a number to the TextBox before it. Otherwise, the two
widgets used here aren’t much more complex than those found in the rest of the sample page. Take a
look at Figure 1-4 to see the end result.
Though it might seem strange to introduce a JavaScript framework mostly through HTML, this is a major
part of the Dojo magic. In the coming chapters, you’ll see that many aspects of Dojo can be used through
both declarative and programmatic means. You can do it all strictly through JavaScript, but you may
7
Chapter 1: Enhancing Development with Dojo Core
Figure 1-4
eventually find it useful to tie into this system and build your own widgets and declaratively driven
modules.
Examining Dojo Core
Now that you’ve gotten a foot in the Dojo, it’s time to back up a little and take a closer look at what Dojo
core offers to a JavaScript developer. The other aspects touched upon in the initial sample will return
throughout the rest of this part of the book.
Declaring, Loading, and Providing Dependencies
Defining modules, declaring dependencies, and dynamically loading code is a key facet of Dojo. What’s
especially nice, though, is that you can use these facilities in your own projects.
Using dojo.require() to Declare and Load Dependencies
You’ve already seen part of this system in action with dojo.require(), used like so:
dojo.require("dojo.parser");
dojo.require("dijit.form.TextBox");
dojo.require("dijit.form.CheckBox");
dojo.require("dijit.form.DateTextBox");
dojo.require("dijit.form.NumberSpinner");
dojo.require("dijit.form.Slider");
dojo.require("dijit.layout.AccordionContainer");
These statements resulted in dynamically constructed <script> inserted into the <head> of the page.
There’s a bit more to it than that, but this is the basic idea. To derive the URL for the include, the following
8
Chapter 1: Enhancing Development with Dojo Core
was done: Dots in the module names were replaced with slashes, a .js was added, and a base URL prefix
was constructed from the location of dojo.js.
Most of these modules themselves include further dojo.require() statements, which in turn result in
more includes. The thing is, though, many of these dojo.require() statements end up asking for the
same things. Luckily, dojo.require() has enough smarts to know when something has already been
loaded and won’t try loading it again.
Providing Dependencies with dojo.provide()
Actually, the smarts don’t lie completely within dojo.require(). Rather, they depend upon convention
in the use of dojo.provide(). Each module in Dojo starts with a call to dojo.provide(), which registers
that module as having been loaded. For example, dijit/form/TextBox.js begins with the following:
dojo.provide("dijit.form.TextBox");
There’s another benefit to using dojo.provide() in your own code, though. Consider whether you’ve
ever seen or written something like the following:
if (typeof window.decafbad == ‘undefined’)
window.decafbad = {};
if (typeof decafbad.util == ‘undefined’)
decafbad.util = {};
if (typeof decafbad.util.foo == ‘undefined’)
decafbad.util.foo = {};
decafbad.util.foo.aMethod = function() {
// method body
}
This is the convention by which namespaces are established in many modern JavaScript applications,
ensuring the existence of each part of the namespace before trying to use it. Sometimes only the last part
of the namespace is created because all the parent namespaces have been created in other dependencies
loaded earlier, but this is the general form of the dance.
This can be replaced with a more concise and descriptive call to dojo.provide(), like so:
dojo.provide("decafbad.util.foo")
decafbad.util.foo.aMethod = function() {
// method body
}
Not only does this call register the namespace as loaded with respect to dojo.require(), it also ensures
that the full namespace itself is created as necessary. This provides both an implementation and a readability benefit for your code.
Telling Dojo Where to Find Your Modules
There’s one more piece to the dependencies story: How does Dojo find your code? By default,
dojo.require() attempts to load all modules from the parent URL where dojo.js was found. This
9
Chapter 1: Enhancing Development with Dojo Core
means that Dojo will orient itself with respect to relative paths from wherever you’ve installed Dojo and
its subprojects — which could mean the AOL CDN, if you chose to go that route.
Thus, consider that a dojo.require("decafbad.util.foo") might resolve to the following:
http://o.aolcdn.com/dojo/1.1.1/decafbad/foo/bar.xd.js
It’s highly unlikely that you can host your project on the AOL CDN, so you’ll want Dojo to look for your
code elsewhere. And, even if you’re using a locally downloaded installation of Dojo, it’s cleaner to keep
your code out of that directory in case you plan on ever upgrading Dojo in the future. So, here’s where
dojo.registerModulePath() comes in:
dojo.registerModulePath(‘decafbad’, ‘../../ex-dojo-core/decafbad’);
If you’re using a local installation of Dojo, this statement will cause any dojo.require() call for decafbad
or any of its child modules to be loaded from the given path relative to the dojo module directory. For
example, consider this as a directory structure for your project:
❑
dojodev
❑
❑
dojo/dojo.js
ex-dojo-core/
❑
hello.html
❑
decafbad/foo/bar.js
Because dojo.js resides under the dojodev/dojo/ directory, the registered relative module path
../../ex-dojo-core/decafbad would be found outside the Dojo installation itself.
Where things get a little trickier is if you’re using the AOL CDN version of Dojo, which is an XDomain
build. That means this particular build of Dojo is geared toward loading its resources from a different
domain (that is, o.aolcdn.com) versus where it’s been included (that is, yours). Because of the particulars
of implementation of cross-domain module loading, the situation is slightly different than what a local
Dojo install allows.
For the most part, you don’t need to worry too much about what this implies — but in this case, it means
you need to include a base URL for your modules, relative to the current page instead of a local Dojo
installation, in djConfig:
<script type="text/javascript"
src="http://o.aolcdn.com/dojo/1.1.1/dojo/dojo.xd.js"
djConfig="isDebug: true, parseOnLoad: true, baseUrl: ‘./’"></script>
<script type="text/javascript">
dojo.registerModulePath(‘decafbad’, ‘./decafbad’);
dojo.require("dojo.parser");
dojo.require("dijit.layout.AccordionContainer");
dojo.require("decafbad.foo.bar");
</script>
10
Chapter 1: Enhancing Development with Dojo Core
This sets the base URL for all modules loaded with relative paths, which exclude those that are part of
the Dojo XDomain build — because those modules in the XDomain build all have absolute paths to the
AOL CDN ‘‘burned in’’ as part of the build process for that version of Dojo.
And, because you’re now up to two settings in djConfig, it’s worth noting that you can also define
djConfig more fully in a JavaScript block rather than an attribute:
<script type="text/javascript">
djConfig = {
isDebug: true,
parseOnLoad: true,
baseUrl: ‘./’,
modulePaths: {
"decafbad": "./decafbad",
},
};
</script>
<script type="text/javascript"
src="http://o.aolcdn.com/dojo/1.1.1/dojo/dojo.xd.js"></script>
Notice that the dojo.registerModulePath() call can be replaced by defining modulePaths in djConfig.
This offers a bit more clarity and efficiency up front if you know you’re going to define a series of paths,
or if you’ll be doing a bit of advanced Dojo configuration anyway.
More About Dojo XDomain Builds
To avoid a lengthy digression, this chapter glosses over the Dojo build system. The
build system is covered in a later chapter — but if you’d like to know about XDomain
builds in particular, read more here:
http://dojotoolkit.org/book/dojo-book-0-9/part-4-meta-dojo/
package-system-and-custom-builds
Defining Classes and Using Inheritance
Something that’s important to understand about JavaScript is that although it does deal with objects, it’s
a prototype-based language. It doesn’t natively offer classes and inheritance like other languages focused
on object-oriented programming. In many ways, a prototype-based language can be more expressive
because multiple forms of code re-use can be employed — including classes and inheritance — but with
the caveat that you need to implement those facilities yourself.
Defining Classes with dojo.declare()
With that in mind, consider the following code defining a JavaScript class the usual way:
decafbad.school.PersonClassic = function(name) {
this.name = name;
};
decafbad.school.PersonClassic.prototype = {
11
Chapter 1: Enhancing Development with Dojo Core
getName: function() {
return this.name;
}
};
Now, consider this functionally similar code from a module defined in decafbad/school.js:
dojo.provide("decafbad.school")
dojo.declare("decafbad.school.Person", null, {
constructor: function(name) {
this.name = name;
},
getName: function() {
return this.name;
}
});
The dojo.declare() method does all the behind-the-scenes work necessary to create a JavaScript class
with inheritable constructors and methods. The arguments to the method are the following:
❑
Name of the class, complete with namespace.
❑
Parent class from which to inherit, if any. In this case, it’s null, which indicates there are no parent classes for this class.
❑
Object literal defining the class, including all of its data members and methods.
Among the methods defined in a Dojo class, constructor is called whenever a new instance of the class
is created. This plays the same roll as the initial function definition in native JS prototype-based classes.
Declaring Subclasses and Overriding Methods
Considering further what Dojo does beyond standard JavaScript prototypes, take a look at this declaration of a Person subclass:
dojo.declare("decafbad.school.Student", decafbad.school.Person, {
constructor: function(name, grade) {
// Note that the inherited constructor is automatically called.
this.grade = grade;
},
getGrade: function() {
return this.grade;
}
});
The new Student class is a subclass of Person — thanks to Dojo, Student inherits all the methods
of Person, including the constructor. When a new instance of Student is created, the Person class
constructor method is automatically called before constructor is called for Student.
This is sort of class-based programming supported by other languages — though it requires a little extra
work within JavaScript’s prototype-based environment to support inheritance and other typical OOP
facilities. This is what dojo.declare() provides.
12
Chapter 1: Enhancing Development with Dojo Core
Now, consider the following code to see how you can override methods inherited from parent
classes:
dojo.declare("decafbad.school.MaleStudent", decafbad.school.Student, {
getName: function() {
var name = this.inherited(arguments);
return "Mr. " + name;
}
});
This MaleStudent class inherits the getName() method from Student, but overrides it. The new implementation uses this.inherited(arguments) provided by Dojo to call the parent class method and put
its own spin on the return value. Other than the special case of constructor, no overridden parent
methods are automatically called in subclasses.
Note that the arguments parameter to this.inherited() is a built-in JavaScript feature. This call
convention allows you to easily pass along all of the arguments originally given to the current
method.
Using Multiple Inheritance through Mixins
Dojo also supports multiple inheritance in the form of mixins. Take a look at this new example:
dojo.declare("decafbad.school.DoorUnlocker", null, {
canUnlockDoors: true,
constructor: function() {
this.doorsUnlocked = [];
},
unlockDoor: function(door) {
this.doorsUnlocked.push(door);
return door + " now unlocked";
}
});
dojo.declare("decafbad.school.DormAssistant",
[ decafbad.school.Student, decafbad.school.DoorUnlocker ], {});
Two classes are defined here, named DoorUnlocker and DormAssistant.
The first class, DoorUnlocker, does not inherit from any parent classes but defines a property
canUnlockDoors, a constructor, and a method unlockDoor.
The second class, DormAssistant, uses an array literal to declare inheritance from both Student and
DoorUnlocker. These are called mixin classes. This means that Dojo mixes them in — it adds all of the
properties and methods from each mixin into the DormAssistant class, in the order that they appear in
the inheritance list. The exception to this is constructors: They’re accumulated in an internal list for the
new class and each is called in order whenever a new instance is created.
Thus, in this example, DormAssistant is a Student given the additional add-on capability to perform
unlockDoor(). The Student class, first in the inheritance list, is the official parent class of DormAssistant.
The DoorUnlocker class is treated as extra capabilities sprinkled in.
13
Chapter 1: Enhancing Development with Dojo Core
Extending Existing Classes with dojo.extend()
Using multiple inheritance in declaring new classes with mix-and-match functionality is handy, but what
can be even handier is the ability to augment existing classes. This is where dojo.extend() comes in:
dojo.extend(decafbad.school.Person, {
_studying: null,
study: function(subject) {
this._studying = subject;
return "Now studying "+subject;
}
});
This code augments the Person base class with a new study() method and a new data member to keep
track of what’s being studied. What’s particularly nice is that additions to the base class carry down to
subclasses. Take this creation of a DormAssistant object, for example:
var bar = new decafbad.school.DormAssistant(‘kim’, ‘senior’);
bar.study(‘physics’);
Using dojo.extend() allows you to layer in custom functionality in a powerful way atop existing widgets and classes. This post-declaration augmentation of existing classes offers a way to package up
alterations and tweaks to your own classes — as well as those belonging to Dojo itself.
The preceding dojo.extend() call doesn’t even need to be in the same module as the original
Person class. You can include dojo.extend() statements as part of an external package for use with
dojo.require(), with no pre-planned coordination with other existing packages and classes.
Declaring Objects in Markup
As you’ve already seen in the first part of this chapter, part of the mojo of Dojo is the declaration of objects
in HTML markup. This is most immediately useful in the context of widgets that wrap DOM elements
with additional functionality. However, this feature is not limited to widgets: Using the Dojo parser, you
can declare the instantiation of any Dojo class through HTML markup.
The dojo.parser module provides the Dojo parser. You can enable it by ensuring that parseOnLoad is
true in djConfig, and that dojo.require("dojo.parser") appears in your page scripts. This is all true
for the sample offered at the start of the chapter.
On page load, the parser scans though the DOM looking for elements bearing a dojoType attribute — the
existence of the attribute signifies that the element is an object declaration, and the value of the attribute
specifies the class of the object to instantiate.
Declaring an Object
Diving right in, consider the following HTML code:
<html>
<head>
<title>Hello Dojo Parser</title>
14
Chapter 1: Enhancing Development with Dojo Core
<script type="text/javascript">
djConfig = {
isDebug: true,
parseOnLoad: true,
modulePaths: {
"decafbad": "../../ex-dojo-core/decafbad",
},
};
</script>
<script type="text/javascript"
src="../dojodev/dojo/dojo.js"></script>
<script type="text/javascript">
dojo.require("dojo.parser");
dojo.require("decafbad.things");
</script>
</head>
<body>
<h1>Hello Dojo Parser</h1>
<div dojoType="decafbad.things.thingA" jsId="decafbad.stuff.someThingA"
class="someThingA" alpha="true" beta="three, four"
foo="bar" baz="123" xyzzy="hello">
<p>Alpha:
<p>Beta:
<p>Foo:
<p>Baz:
<p>Xyzzy:
<span
<span
<span
<span
<span
class="alpha">default</span></p>
class="beta">default</span></p>
class="foo">default</span></p>
class="baz">default</span></p>
class="xyzzy">default</span></p>
</div>
</body>
</html>
Most of this should look familiar with respect to what you’ve seen so far in this chapter: The first
<script> block sets up djConfig before loading up the Dojo core in the next <script> element.
After that comes a pair of dojo.require() calls to load in the Dojo parser and a new module named
decafbad.thingA.
In the page <body>, you can see an object instance declared with dojoType = "decafbad.thingA", bearing
a number of custom attributes and some paragraphs contained within.
As one of those attributes, jsId makes its first appearance: The value of this attribute identifies a variable in the global namespace where the parser should store the newly instantiated object. In this case,
decafbad.stuff.someThingA is where the new object will be found. This feature is very useful for referring to and connecting multiple objects declared in markup — there’ll be more of this in later chapters
when working with Dijit widgets.
15
Chapter 1: Enhancing Development with Dojo Core
Defining a Class to Support Declaration in Markup
Now, check out this implementation for the decafbad/thingA.js module:
dojo.provide("decafbad.things");
dojo.declare("decafbad.things.thingA", null, {
alpha:
beta:
foo:
baz:
false,
[ ‘one’, ‘two’ ],
‘default’,
456,
constructor: function(args, node) {
dojo.mixin(this, args);
dojo.query(‘span’, node).forEach(function(ele) {
var name = ele.className;
var val = this[name];
ele.innerHTML = val ?
‘[’ + (typeof val) + "] " + val :
‘undefined’;
}, this);
}
});
This isn’t much code, but there’s a lot going on here — this is a theme throughout Dojo.
First, the module itself is established with a call to dojo.provide(), then the declaration of the class
decafbad.things.thingA is begun.
The class starts off with several properties, each a different JavaScript type. This is important to note,
because the parser peeks into the class and performs type conversions from attribute character data as
appropriate based on the original types of the default values. Hopefully, this feature will make more
sense once you’ve seen it in action.
After the property definitions comes the constructor, whose parameters are supplied by the parser:
❑
args — An object collecting the attributes from markup
❑
node — A reference to the DOM element declaring the object instance
In the constructor implementation, the first thing is a call to dojo.mixin(this, args). This is a quick way
to take all of the incoming converted attributes from args and assign them to object properties — like
mixin classes, dojo.mixin() mixes the given properties into the given object.
The next part is a dojo.query() chained with a forEach() call. This sort of construct is explored in
more detail in the next chapter. In short, it searches the contents of node for <span> elements and applies
16
Chapter 1: Enhancing Development with Dojo Core
an anonymous function to each of them. The final parameter, this, causes the anonymous function to
execute in the context of the object being constructed.
With each <span>, the anonymous function examines the class name and attempts to update its
innerHTML property with a representation of the object property bearing the same name. So, if there’s a
<span class = "alpha">, it should be changed to represent the type and contents of this.alpha if such
a property has a value in the object. Otherwise, the <span> should read ‘‘undefined.’’
Seeing Markup Object Declaration in Action
Putting it all together, check out Figure 1-5 to see what this code should end up doing.
Figure 1-5
Here are some things to notice about the output and what happened:
❑
Thanks to the dojoType = "decafbad.things.thingA" attribute in the markup, an instance of
decafbad.things.thingA was created by the Dojo parser on page load.
❑
Due to jsId = "decafbad.stuff.someThingA", other code will be able to refer to this newly
instantiated object as decafbad.stuff.someThingA.
❑
Each attribute on the <div> was handed to the constructor for decafbad.things.thingA in a
single JavaScript object, with type conversions to match the default values of properties existing
in the class declaration.
❑
As part of constructing the decafbad.things.thingA instance, the contents of the <div> declaring the object were modified to reflect the properties of the new instance.
❑
Oh, and there’s one more thing: The property xyzzy appears to be undefined.
That last item is true because not all of the attributes from the markup were converted and passed to the
constructor. Take a look at the implementation for decafbad.things.thingA again, and you may notice
that xyzzy is missing from the list of properties in the class declaration.
Because the parser does introspection into the properties and their types defined by the class declaration, it converts and provides data only for those attributes named in the declaration. So, although
xyxxy — and even class — appear as attributes on the object declaration <div>, they’re not given to the
17
Chapter 1: Enhancing Development with Dojo Core
constructor because they’re not part of the class declaration. In other words, if the class didn’t ask for it,
the parser won’t provide it.
Designing Classes for both Declarative and Programmatic Use
It’s perfectly fine to bypass the parser and programmatically create a new instance of a class designed for
declaration in markup. For example, you could write something like this:
var new_thing = new decafbad.things.thingA(
{ alpha: true} ,
dojo.byId(‘someDiv’)
);
This is basically what dojo.parser does, after all. However, there are cases where it would be nice
to have a simpler constructor for use in code and still support declaration in markup. This is where a
special ‘‘static’’ class method named markupFactory comes in:
dojo.declare("decafbad.things.thingB", null, {
alpha:
beta:
foo:
baz:
false,
[ ‘one’, ‘two’ ],
‘default’,
456,
constructor: function(alpha, beta, foo, baz) {
this.alpha = alpha;
this.beta = beta;
this.foo
= foo;
this.baz
= baz;
},
markupFactory: function(args, node, thisClass) {
var instance = new thisClass(
args.alpha, args.beta, args.foo, args.baz
);
return instance;
}
});
In this new decafbad.things.thingB class, you can see that there’s both a constructor and a
markupFactory method. The Dojo parser will instantiate objects using the constructor, unless it finds
a markupFactory method to use instead.
The markupFactory method works like a ‘‘static’’ class method in other languages in that it is not called
on individual object instances of a class, but is instead called on the class prototype itself. The parameters
for this method, which are similar to the signature for constructor seen earlier, include:
18
❑
args — The set of parameters collected from markup attributes
❑
node — A reference to the DOM node declaring the object instance
❑
thisClass — A reference to the class for which an instance should be created
Chapter 1: Enhancing Development with Dojo Core
When called, this method is responsible for creating and returning a new instance of thisClass, and is
free to do whatever it needs to do in between. This lets you maintain two separate means for creating an
instance of a class based on whether the context is programmatic or whether it’s declared in markup.
Considering mixin classes and dojo.mixin(), the availability of markupFactory also affords the possibility to augment existing classes that were not previously designed for use in markup by way of a newly
mixed-in implementation for markupFactory.
Declaring Objects in Markup versus Validating HTML
There’s an elephant in the room with regard to this whole section explaining Dojo’s parser and declaring
objects in markup: If you’re using all these custom attributes, how will your pages ever pass the test of
HTML validation?
The short answer is that your pages won’t validate, but it might be okay.
The longer answer is that you need to choose between the convenience of the Dojo parser and
non-validating custom attributes versus programmatic creation of objects and validating markup.
Custom attributes work in browsers, practically speaking, and the current implementation of the Dojo
parser is a considered trade-off between convenience and performance. Introducing XML namespaces or
using some CSS class naming convention — both of which seem to be common suggestions — fall on the
non-performant side of the equation, and so the Dojo team has drawn this pragmatic line in the sand and
punted on satisfying everyone in what’s a very noisy religious debate.
So, if you’re willing to give up strict HTML validity, you may find the benefits of declaring networks of
objects and widgets in markup worth your while.
On the other hand, if you really do adhere to the discipline of validating all of your markup, then
dojo.parser is not for you. This is one more reason why the constructor / markupFactory arrangement is useful, because any object that can be declared in markup can also be instantiated in plain old JS
code. Alternatively, you can look into the option of extending or replacing the dojo.parser module to
work within your own acceptable constraints.
If you’re interested, you can read some of the background surrounding this issue here:
http://www.dojotoolkit.org/book/dojo-porting-guide-0-4-x-0-9/widgets/general
Summar y
In this chapter, you were given a quick tour of core Dojo — including how to get Dojo working in your
own pages, how to manage modules and dependencies, and how Dojo’s class system and page parser
build on top of JavaScript’s prototype-based system. This is the foundation upon which just about everything else in the Dojo framework builds — but this foundation is available for you to do the same with
your own code.
Coming up in the next chapter, you’ll be able to get down to business with Dojo’s DOM manipulation
facilities.
19