1
AL
MA
TE
RI
Introduction to ASP.NET 2.0
GH
TE
D
With the release of ASP.NET 1.0, Microsoft revolutionized web application development by providing a rich set of features aimed at increasing the productivity of developers. Now with
ASP.NET 2.0, Microsoft has raised the bar to a much higher level by providing excellent out-of-thebox features that are not only geared toward increasing the productivity of developers but also
toward simplifying the administration and management of ASP.NET 2.0 applications. These new
features, combined with the increased speed and performance of ASP.NET 2.0, arm developers
with a powerful platform that can make a significant impact on the way web applications are
developed, deployed, and maintained.
PY
RI
This chapter takes a quick tour of the new ASP.NET 2.0 features. Specifically, this chapter will discuss the features of this new, improved platform that will help you in designing, developing, and
deploying enterprise-class web applications.
ASP.NET 2.0 Features
CO
If you have worked with ASP.NET 1.x versions, you will undoubtedly agree that it was a great product that provided huge improvements in the way web applications were designed and deployed. If
ASP.NET 1.x was a great product, then what’s wrong with it? Well, nothing, actually, but when developing software, there is always a trade-off between how much can be done, how many resources you
have, and how much time you have to do it. There is an almost never-ending supply of features you
can add, but at some stage you have to ship the product. You cannot doubt that ASP.NET 1.0 shipped
with an impressive array of features, but the ASP.NET team members are ambitious, and they not only
had plans of their own but also listened to their users. ASP.NET 2.0 addresses the areas that both the
development team and users wanted to improve. The aims of the new version are:
❑
Reduce the number of lines of code required by 70%: The declarative programming
model freed developers from having to write reams of code, but there are still many scenarios where this cannot be avoided. Data access is a great example, where the same
Connection, DataAdapter/DataSet, and Command/DataReader code is used regularly.
Part I: Introduction
❑
Increase developer productivity: This partly relates to reducing the amount of code required,
but is also affected by more server controls encompassing complex functionality, as well as providing better solutions for common web site scenarios (such as portals and personalized sites).
❑
Provide the fastest web server platform: Although ASP.NET 1.x offered a fast server platform,
ASP.NET 2.0 will improve areas such as application start-up times and provide better application tracing and performance data. Innovative caching features will enhance application performance, especially when SQL Server is used.
❑
Support for mobile development: In ASP.NET 1.0, the Microsoft Mobile Internet Toolkit (MMIT
in version 1.0 and ASP.NET Mobile Controls in version 1.1) provided this support, including
separate controls for building web pages suitable for small screen browsers. In ASP.NET 2.0, the
MMIT is no longer required because mobile support is built into all controls. This reduces the
amount of code required, as well as the need for specialist knowledge about mobile platforms.
❑
Provide the best hosting solution: With the large number of Internet applications being hosted,
it’s important to provide better solutions for hosters. For example, better management features
to identify and stop rogue applications will give hosters more control over their current environment. More control can also be given to hosted companies by use of the new web-based
administration tool, allowing users to easily control the configuration of applications remotely.
❑
Provide easier and more sophisticated management features: Administration of ASP.NET applications under version 1.x required manual editing of the XML configuration file, which is not a
great solution for administrators. Version 2.0 brings a graphical user interface–based administration tool that is integrated with the Internet Information Services (IIS) administration tool.
❑
Easy implementation of entire scenarios: The better management features are built on top of a
management application programming interface (API), allowing custom administration programs to be created. Along with application packaging, this will provide support for easily
deployable applications, with or without source.
Even from this broad set of aims, you can see that ASP.NET 2.0 is a great advance from 1.x for both
developers and administrators. For the purposes of this chapter, the features of ASP.NET 2.0 based on
the following three core themes are examined:
❑
Developer productivity
❑
Administration and management
❑
Speed and performance
Note that this chapter isn’t an in-depth look at any specific feature — instead it gives you a taste of
what’s to come so that you can see how much easier web development is going to be.
Developer Productivity
One of the goals of ASP.NET 2.0 is to enable developers to easily and quickly build feature-rich web
applications. To accomplish this, Microsoft looked at the existing ASP.NET 1.x applications to identify
the common features, patterns, and code that developers build over and over today. Once they identified
those features, they componentized those features and included them as built-in functionality of
ASP.NET. With ASP.NET 2.0, the ASP.NET team has a goal of reducing the number of lines of code
required for an application by a whopping 70%. To this end, Microsoft has introduced a collective arsenal of new features that are now available to developers in ASP.NET 2.0.
4
Chapter 1: Introduction to ASP.NET 2.0
Using these features, you can spend your time building richer, more fully featured applications by leveraging the new controls and infrastructure services built into the core platform, as opposed to writing a
lot of infrastructure code as is the case with ASP.NET 1.x. For example, ASP.NET 2.0 now includes builtin support for membership (username/password credential storage) and role management services out
of the box. The new personalization service provides for quick storage/retrieval of user settings and
preferences, enabling rich customization with minimal code. With ASP.NET 2.0, Microsoft has introduced a new concept known as master pages that now enable flexible page user interface (UI) inheritance across sites. The new site navigation system enables developers to quickly build link structures
consistently across a site. Site counters enable rich logging and instrumentation of client browser access
patterns. Themes enable flexible UI skinning of controls and pages. And the new ASP.NET Web Part
Framework enables rich portal-style layout and end user customization features that would require tens
of thousands of lines of code to write today. Along with all these features, ASP.NET 2.0 also brings with
it 45 new server controls that enable powerful declarative support for data access, login security, wizard
navigation, image generation, menus, treeviews, portals, and more. The next few sections will provide
you with a glimpse of these features.
Master Pages
ASP.NET 2.0 introduces a new concept known as master pages, in which a common base master file contains the common look and feel and standard behavior for all the pages in your application. Once the
common content is placed in the master page, the content pages (child pages) can inherit content from
the master pages apart from adding their content to the final output. To allow the content page to add its
own content, you add placeholders (known as ContentPlaceHolder control) in the master page that
will be utilized by the content pages to add their custom content. When users request the content pages,
the output of the content pages are merged with the output of the master page, resulting in an output
that combines the layout of the master page with the output of the content page.
In ASP.NET 1.x, you could achieve similar effects by creating user controls that
abstract the common look and behavior of all the pages in the application and then
declaring the user control in each and every page. Even though this approach was
useful, it required a lot of cutting and pasting of code across all the pages in a web
application. Master pages take this approach of reusable user controls to the next
level by providing a much cleaner approach to reusing a common look and feel
across all the pages.
Master pages are saved with the file extension .master. Apart from containing all the contents that are
required for defining the standard look and feel of the application, the master pages also contain all the
top-level HTML elements for a page, such as <html>, <head>, and <form>. As mentioned previously,
the master pages also contain one or more content placeholders that are used to define regions that will
be rendered through the content pages.
Now that you have had a general understanding of master pages, take a look at an example. First, create
a master page named CommonPage.master and add the code shown in Listing 1-1.
Listing 1-1: A Master Page Example
<%@ master language=”C#” %>
<html>
<head runat=”server”>
(continued)
5
Part I: Introduction
Listing 1-1: (continued)
<title>Master Page</title>
</head>
<body>
<form runat=”server”>
Master Page Content
<br/>
<b>
<asp:ContentPlaceHolder id=”MiddleContent” runat=”server”>
</asp:ContentPlaceHolder>
</b>
</form>
</body>
</html>
Apart from looking at the file extension, you can also identify a master file by looking at the new page
directive named master at the top of the page. This declarative is used to identify that the current page
is a master page and prevents users from requesting the page from a browser. Inside the code, the code
contains an element named asp:ContentPlaceHolder, which will be used by all the content pages to
render appropriate content that is specific to their pages. That’s all there is to creating the master page.
To create a content page, add a new ASP.NET page named ContentPage.aspx and modify the code as
follows:
<%@ page language=”c#” MasterPageFile=”~/CommonPage.master” %>
<asp:Content id=”Content1” ContentPlaceHolderID=”MiddleContent”
runat=”server”>
Child Page Content
</asp:Content>
The code required for the content page is very simple and straightforward. As part of the page directive,
specify a new attribute named MasterPageFile that is used to identify the name of the master page
that you want to utilize. This example uses the master page created in Listing 1-1. Next, you have a new
element named asp:Content that is used to associate the asp:ContentPlaceHolder element in the
master page with the content page. This is done through the use of the ContentPlaceHolderID
attribute. That’s all that is there to creating a master page and using the master page from a content
page. Now, if you request the content page from a browser, you will get the output that is produced by
merging the master page with the content page.
New Code-Behind Model in ASP.NET 2.0
ASP.NET 1.x supports two coding models: the inline model, in which markup and code coexist in the
same ASPX file, and the code-behind model, which places markup in ASPX files and code in source code
files. ASP.NET 2.0 introduces a third model: a new form of code-behind that relies on the new partial
classes support in the Visual C# and Visual Basic compilers. Code-behind in ASP.NET 2.0 fixes a nagging
problem with version 1.x: the requirement that code-behind classes contain protected fields whose types
and names map to controls declared in the ASPX file.
The following code listing shows the .aspx file named HelloWorld.aspx:
<%@ Page Language=”C#” CodeFile=”HelloWorld.aspx.cs” Inherits=”HelloWorld” %>
<html>
<body>
6
Chapter 1: Introduction to ASP.NET 2.0
<form id=”form1” runat=”server”>
<asp:TextBox ID=”TextBox1” runat=”server”></asp:TextBox>
<asp:Button ID=”Button1” runat=”server” OnClick=”Button1_Click” Text=”Button”/>
<asp:Label ID=”Label1” runat=”server”></asp:Label>
</form>
</body>
</html>
The code-behind file referenced by HelloWorld.aspx file is HelloWorld.aspx.cs, which is defined as
follows:
using System;
using System.Web.UI;
using System.Web.UI.WebControls;
public partial class HelloWorld : System.Web.UI.Page
{
protected void Button1_Click(object sender, EventArgs e)
{
Label1.Text = TextBox1.Text;
}
}
As you can see, HelloWorld.aspx contains the markup and HelloWorld.aspx.cs contains the code.
The Inherits attribute in the @Page directive identifies the code-behind class, while the CodeFile
attribute identifies the file containing the class. Note the absence of any fields in the HelloWorld class
providing mappings to controls in the ASPX file. Old-style code-behind is still supported, but this new
model is now the preferred one. Not surprisingly, Visual Studio 2005 supports the new model natively.
Creating and Sharing Reusable Components in ASP.NET 2.0
Prior to ASP.NET 2.0, if you were to reference a reusable component from your ASP.NET application,
you had to compile the assembly and place it in the bin folder (or place it in the GAC) of the web application. But now with ASP.NET 2.0, creating a reusable component is very simple and straightforward.
All you need to do is create the component in a predefined subdirectory called App_Code. Any component placed in this directory will be automatically compiled at runtime into a single assembly. This
assembly is automatically referenced and will be available to all the pages in the site. Note that you
should only put components in the App_Code subdirectory.
New ASP.NET 2.0 Controls
ASP.NET 2.0 introduces several new controls that help create data-driven web applications. These controls perform actions, such as connecting to a database, executing commands against the database, and
so on, without you even having to write a single line of code. ASP.NET 2.0 introduces more than 40 new
control types to help you build rich web UIs while insulating you from the vagaries of HTML, client-side
script, and browser DOMs. The following table lists the new control types.
Control Category
Controls
Data source controls
SqlDataSource, ObjectDataSource, XmlDataSource, AccessDataSource, SiteMapDataSource
Data-bound controls
GridView, DetailsView, FormView, TreeView, Menu
Table continued on following page
7
Part I: Introduction
Control Category
Controls
Login controls
Login, LoginName, LoginStatus, LoginView, CreateUser
Wizard, ChangePassword, PasswordRecovery
Navigation controls
Menu, TreeView, SiteMapPath
Web Parts controls
WebPartManager, WebPartZone, CatalogZone, EditorZone,
ConnectionsZone, DeclarativeCatalogPart, PageCatalogPart, ImportCatalogPart, AppearanceEditorPart, Behavior
EditorPart, LayoutEditorPart, PropertyGridEditorPart
Other controls
BulletedList, FileUpload, HiddenField, ImageMap, Wizard,
WizardStep, MultiView, View, Substitution, Content,
ContentPlaceHolder
To start with, the next section will explore the new data source controls supplied with ASP.NET 2.0.
Data Controls
As mentioned previously, one of the important goals of ASP.NET 2.0 is 70% code reduction. The data
controls supplied with ASP.NET 2.0 play an important role in making this ambitious goal a reality. Data
source controls provide a consistent and extensible method for declaratively accessing data from web
pages. Data source controls supplied with ASP.NET 2.0 are as follows:
❑
<asp:SqlDataSource>: This data source control is designed to work with SQL Server, OLE
DB, Open DataBase Connectivity (ODBC), and Oracle databases. Using this control, you can
also select, update, delete, and insert data using SQL commands.
❑
<asp:ObjectDataSource>: N-tier methodology allows you to create web applications that are
not only scalable but also easier to maintain. N-tier principle also enables clean separation,
thereby allowing you to easily add new functionalities. In an n-tier application, the middle-tier
objects may return complex objects that you have to process in your ASP.NET presentation
layer. Keeping this requirement in mind, Microsoft has created this new control that allows you
to seamlessly integrate the data returned from the middle-layer objects with the ASP.NET presentation layer.
❑
<asp:AccessDataSource>: This is very similar to the SqlDataSource control, except for the
difference that it is designed to work with Access databases.
❑
<asp:XmlDataSource>: Allows you to bind to XML data, which can come from a variety of
sources, such as an external XML file, a DataSet object, and so on. Once the XML data is bound
to the XmlDataSource control, this control can then act as a source of data for data-bound controls such as TreeView and Menu.
❑
<asp:SiteMapDataSource>: Provides a site navigation framework that makes the creation of
a site navigation system a breezy experience. Accomplishing this requires the use of a new XML
file named web.sitemap that lays out the pages of the site in a hierarchical XML structure.
Once you have the site hierarchy in the web.sitemap file, you can then data-bind the SiteMap
DataSource control with the web.sitemap file. Then the contents of the SiteMapDataSource
control can be bound to data-aware controls such as TreeView, Menu, and so on.
8
Chapter 1: Introduction to ASP.NET 2.0
Now that you have had a look at the data source controls supplied with ASP.NET 2.0, this section will
examine the data-bound controls that you will normally use to display data that is contained in the data
source controls. These data-bound controls bind data automatically.
One of the neat things about data-bound controls is that the development environment automatically
guides developers through the process of binding a data control to a data source. Developers are
prompted to select the particular data source to use for selecting, inserting, updating, and deleting data.
The feature that walks the developers through this process is called Smart Tasks. This is explained in
detail in the “Visual Studio 2005 Improvements” section later in this chapter.
The DataGrid is one of the most popular data-bound controls in ASP.NET, but in some ways it is a victim of its own success: It is so rich in functionality that it leaves ASP.NET developers wanting even more.
The DataGrid control does not change much in ASP.NET 2.0, but the new GridView control offers features commonly requested in DataGrid and adds a few surprises of its own. In addition, new controls
named DetailsView and FormView simplify the building of master-detail views and web-editable user
interfaces. The new data-bound controls introduced in ASP .NET 2.0 are:
❑
<asp:GridView>: This control is the successor to the DataGrid control that was part of
ASP.NET 1.x, and is used to display multiple records in a web page. However, the GridView
also enables you to add, update, and delete a record in a database without writing a single line
of code. Similarly to the DataGrid control, in a GridView control each column represents a
field, while each row represents a record. As you would expect, you can bind a GridView control to a SqlDataSource control, as well as to any data source control as long as that control
implements the System.Collections.IEnumerable interface.
❑
<asp:DetailsView>: Can be used in conjunction with the GridView control to display a spe-
cific record in the data source.
❑
<asp:FormView>: Provides a user interface to display and modify the data stored in a
database. The FormView control provides different templates, such as ItemTemplate and
EditItemTemplate, that you can use to view and modify the database records.
❑
<asp:TreeView>: Provides a seamless way to consume information from hierarchical data
sources, such as an XML file, and then display that information. You can use the TreeView control to display information from a wide variety of data sources, such as an XML file, a sitemap
file, a string, or a database.
❑
<asp:Menu>: Like the TreeView control, the Menu control can be used to display hierarchical
data. You can use the Menu control to display static data, sitemap data, and database data. The
main difference between the two controls is their appearance.
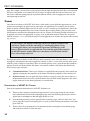
Listing 1-2 shows you an example of how to use the combination of SqlDataSource and GridView controls to retrieve and display data from the ProductCategory table in the AdventureWorks database without even having a single line of code.
Listing 1-2: Using the SqlDataSource Control to Retrieve Categories Information
<%@ page language=”C#” %>
<html>
<head id=”Head1” runat=”server”>
<title>Data Binding using SqlDataSource control</title>
</head>
(continued)
9
Part I: Introduction
Listing 1-2: (continued)
<body>
<form id=”Form1” runat=”server”>
<asp:SqlDataSource id=”categorySource” runat=”server”
ConnectionString=”server=localhost;database=AdventureWorks;uid=user;pwd=word”
SelectCommand=”SELECT * From Production.ProductCategory”>
</asp:SqlDataSource>
<asp:GridView DataSourceID=”categorySource” runat=”server” id=”gridCategories”>
</asp:GridView>
</form>
</body>
</html>
The code declares a SqlDataSource control and a GridView control. The SqlDataSource control declaration also specifies the connection string and the SQL statement to be executed as attributes. The
DataSourceID attribute in the GridView is the one that links the SqlDataSource control to the
GridView control. That’s all there is to retrieving the data from the database and displaying it in a web
page. Figure 1-1 shows the output produced by the page when requested from the browser.
Figure 1-1
Security Controls
With the large amount of business being done on the web, security is vitally important for protecting not
only confidential information such as credit card numbers, but also users’ personal details and preferences.
Thus, most of the web applications require the capability to authenticate users on their web sites. Although
this was easy to do in ASP.NET 1.x, you still had to write code. With ASP.NET 2.0, things have changed for
the better. For security-related functionalities, ASP.NET 2.0 introduces a wide range of new controls:
10
❑
<asp:Login>: Provides a standard login capability that allows the users to enter their credentials
❑
<asp:LoginName>: Allows you to display the name of the logged-in user
❑
<asp:LoginStatus>: Displays whether the user is authenticated or not
Chapter 1: Introduction to ASP.NET 2.0
❑
❑
<asp:LoginView>: Provides various login views depending on the selected template
<asp:PasswordRecovery>: Provides the web site administrators with the capability to email
the users their lost password
The login controls described here abstract most of the common tasks for which developers have to manually write code for a secured web site. Although this could be achieved in ASP.NET 1.x, you still had to
add controls manually and write code. Apart from providing the user interface, ASP.NET 2.0 also provides the capability to retrieve and validate user information using Membership functionality. To this
end, ASP.NET ships with a new Membership API, the aim of which is to abstract the required membership functionality from the storage of the member information.
Other New Controls
In addition to the new controls, ASP.NET 2.0 also provides numerous enhancements to existing controls
that make these controls more versatile than ever before in building component-based web pages. For
example, the Panel control now has a DefaultButton property that specifies which button should be
clicked if the user presses the Enter key while the panel has the focus.
There is also a new Wizard control, which simplifies the task of building web UIs that step users
through sequential operations. Individual steps are defined by WizardStep controls. The Wizard control serves as a container for WizardStep and provides a default interface for stepping backward and
forward. It is also capable of displaying a list of steps, enabling users to randomly navigate between
them, and it fires events that can be used to programmatically control step ordering. A simple Wizard
control declaration is:
<asp:Wizard ID=”Wizard1” runat=”server”>
<WizardSteps>
<asp:WizardStep ID=”WizardStep1” runat=”server” Title=”Step 1”>
Wizard Step 1
</asp:WizardStep>
<asp:WizardStep ID=”WizardStep2” runat=”server” Title=”Step 2”
StepType=”Complete”>
Wizard Step 2
</asp:WizardStep>
</WizardSteps>
</asp:Wizard>
Another interesting and potentially very useful control debuting in ASP.NET 2.0 is the MultiView control. Paired with View controls, MultiView controls can be used to create pages containing multiple logical views. Only one view (the one whose index is assigned to the MultiView control’s ActiveViewIndex
property) is displayed at a time, but you can switch views by changing the active view index.
Validation Groups
In ASP.NET 1.x, you would assign validation controls to input controls such as text boxes, password
fields, radio buttons, and check boxes, and the validation controls would automatically validate the data
entered by an end user to input controls. With ASP.NET 2.0, Microsoft introduces a new feature known
as validation groups, which enables you to create different groups of validation controls and assign
them to input controls, such as text boxes. You can assign a validation group to a collection of input controls if you want to validate the collection of input controls on the same criteria. For example, you can
assign the button control to a group of input controls and validate the data entered to each group of
input controls on a criterion. This feature is very handy when you have multiple forms on a single web
11
Part I: Introduction
page. For example, you can create a web page that contains login and password text boxes for registered
end users, and another set of controls for new end users to register with the web site. In this case, you
can use the validation group property to perform different actions, such as logging on to the web site
and registering an end user.
Themes
One of the neat features of ASP.NET 2.0 is themes, which enable you to define the appearance of a set of
controls once and apply the appearance to your entire web application. For example, you can utilize
themes to define a common appearance for all of the CheckBox controls in your application, such as the
background and foreground color, in one central location. By leveraging themes, you can easily create
and maintain a consistent look throughout your web site. Themes are extremely flexible in that they can
be applied to an entire web application, to a page, or to an individual control. Theme files are stored
with the extension .skin, and all the themes for a web application are stored in the special folder named
App_Themes.
As you read this, you might be wondering if themes are another variation of CSS
stylesheets. Themes are not the same thing as Cascading Style Sheets. Using
Cascading Style Sheets, you can control the appearance of HTML tags on the
browser. Whereas themes are applied on the server and they apply to the properties
of ASP.NET controls. Another difference is that themes can also include external
files, such as images and so on.
The implementation of themes in ASP.NET 2.0 is built around two areas: skins and themes. A skin is a set
of properties and templates that can be applied to controls. A theme is a set of skins and any other associated files (such as images or stylesheets). Skins are control-specific, so for a given theme there could be a
separate skin for each control within that theme. Any controls without a skin inherit the default look.
There are two types of themes:
❑
Customization themes: These types of themes are applied after the properties of the control are
applied, meaning that the properties of the themes override the properties of the control itself.
❑
Stylesheet themes: You can apply this type of theme to a page in exactly the same manner as a
customization theme. However, stylesheet themes don’t override control properties, thus allowing the control to use the theme properties or override them.
Characteristics of ASP.NET 2.0 Themes
Some of the important characteristics of ASP.NET 2.0 themes are:
12
❑
Themes make it simple to customize the appearance of a site or page using the same design
tools and methods used when developing the page itself, thus obviating the need to learn any
special tools or techniques to add and apply themes to a site.
❑
As mentioned previously, you can apply themes to controls, pages, and even entire sites. You
can leverage this feature to customize parts of a web site while retaining the identity of the other
parts of the site.
❑
Themes allow all visual properties to be customized, thus ensuring that when themed, pages
and controls can achieve a consistent style.
Chapter 1: Introduction to ASP.NET 2.0
❑
Customization themes override control definitions, thus changing the look and feel of controls.
Customization themes are applied with the Theme attribute of the Page directive.
❑
Stylesheet themes don’t override control definitions, thus allowing the control to use the theme
properties or override them. Stylesheet themes are applied with the StylesheetTheme
attribute of the Page directive.
Now that you have an understanding of the concepts behind themes, the next section provides you with
a quick example of creating a theme and utilizing it from an ASP.NET page.
Creating a Simple Theme
To create a theme and apply it to a specific page, go through the following steps:
1.
2.
Create a folder called ControlThemes under the App_Themes folder.
Create a file with the extension .skin and add all the controls (that you want to use in a page) and
their style properties. Or you can also create individual skin files for each and every control. When
you are defining skin files, remember to remove the ID attribute from all of the controls’ declarations. For example, you can use the following code to define the theme for a Button control:
<asp:Button runat=”server” BackColor=”Black” ForeColor=”White”
Font-Name=”Arial” Font-Size=”10px” />
3.
Name the skin file Button.skin and place it under the ControlThemes folder. Once you have
created the .skin file, you can then apply that theme to all the pages in your application by
using appropriate settings in the Web.config file. To apply the theme to a specific page, all you
need to do is to add the Theme attribute to the Page directive as shown below:
<%@Page Theme=”ControlThemes” %>
That’s all there is to creating a theme and utilizing it in an ASP.NET page. It is also possible for you to
programmatically access the theme associated with a specific page using the Page.Theme property.
Similarly, you can also set the SkinID property of any of the controls to specify the skin. If the theme
does not contain a SkinID value for the control type, then no error is thrown and the control simply
defaults to its own properties. For dynamic controls, it is possible to set the SkinID property after they
are created.
Web Parts Framework
There are many times when you would want to allow the users of your web site to be able to customize
the content by selecting, removing, and rearranging the contents in the web page. Traditionally, implementing this capability required a lot of custom code, or you had to depend on third-party products to
accomplish this. To address this shortcoming, ASP.NET 2.0 ships with a Web Parts Framework that provides the infrastructure and the building blocks required for creating modular web pages that can be
easily customized by the users. You can use Web Parts to create portal pages that aggregate different
types of content, such as static text, links, and content that can change at runtime. It is also possible for
the users to change the layout of the Web Parts by dragging and dropping them from one place to
another, providing a rich user experience.
Web Parts are reusable pieces of code that allow you to logically group related functionality together into one unit. Once the Web Parts are added to an ASP.NET page,
they can then be shown, hidden, moved around, and redesigned, all by the user.
13
Part I: Introduction
By taking advantage of Web Parts, you, as a developer, can empower your users with the ability to
perform the following operations.
❑
Users can personalize page content.
❑
Users can personalize the page layout by allowing the users to drag Web Parts from one zone to
another zone, or change its appearance, look and feel, and so on.
❑
Users can also export and import Web Part controls so the Web Parts can be effectively shared
among other sites.
❑
Users can create connections between two Web Parts by establishing communication between
Web Part controls.
As a developer, you will typically work with Web Parts in one of the three ways: creating pages that use
Web Parts controls, creating individual Web Parts controls, or creating complete personalizable web portals. You can create two kinds of Web Parts in ASP.NET 2.0:
❑
Custom Web Part: Those Web Part controls that derive from the System.Web.UI
.WebControls.WebParts.WebPart class.
❑
Generic Web Part: A custom control that does not inherit from the WebPart class and is still
used as a Web Part is called GenericWebPart. For example, if you place a TextBox control
inside a WebPartZone control (a zone on the page that hosts the Web Parts control), the
TextBox control will be wrapped to a GenericWebPart class.
This section provides you with a simple generic Web Part creation example followed by a code examination. Listing 1-3 shows the code required to implement the Web Part.
Listing 1-3: Creating a Simple Generic Web Part
<%@ Page Language=”C#” %>
<html xmlns=”http://www.w3.org/1999/xhtml” >
<head runat=”server”>
<title>Example of a GenericWebPart</title>
</head>
<body>
<form id=”form1” runat=”server”>
<asp:WebPartManager id=”WebPartManager1” runat=”Server”>
</asp:WebPartManager>
<table cellspacing=”0” cellpadding=”0” border=”0”>
<tr>
<td valign=”top”>
<asp:WebPartZone id=”MainZone” runat=”server”
headertext=”Main”>
<ZoneTemplate>
<asp:Label id=”contentPart” runat=”server”
title=”GenericWebPart”>
<h4>GenericWebPart that uses a label control
to generate the contents of the Web Part
</h4>
</asp:Label>
</ZoneTemplate>
</asp:WebPartZone>
</td>
14
Chapter 1: Introduction to ASP.NET 2.0
</tr>
</table>
</form>
</body>
</html>
To start with, you declare a WebPartManager control. The WebPartManager control is a must for any
ASP.NET page that utilizes Web Parts. This control must be the first element in an ASP.NET web form,
above all other Web Parts, zones, or any other custom or specialized Web Part controls. The
WebPartManager has no visual element associated with it; however, it is crucial because of the required
plumbing it provides for managing the interactions between Web Parts. Then the code declares a
WebPartZone control, which in turn includes a Label control that consists of all the HTML elements
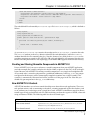
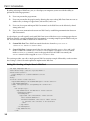
that make up the display of the Web Part. The WebPartZone control is the one that provides overall layout for the Web Part controls that compose the main UI of a page. Before navigating to the page using
the browser, enable Windows Authentication for the web site through IIS Manager and ensure that SQL
Server 2005 Express is installed with Windows authentication enabled. Now run the page, and you will
see the output shown in Figure 1-2.
Figure 1-2
In Figure 1-2, you can choose to minimize or close the Web Part by clicking on the corresponding links.
Personalization Framework
There are times when you want to store and present information that is unique to a specific user. For
instance, when a user visits your site, you can collect information from the user about his preferences,
such as color scheme, styles, and so forth. Once you have that information, you can use it to present the
user with a personalized version of your web application. To implement this with ASP.NET 1.x, you had
to go through the following steps.
1.
Store user information with a unique user identifier, used to identify the user when he visits
again.
2.
3.
Fetch the user information as needed.
Finally, present the user with the personalized content.
15
Part I: Introduction
Now with the introduction of ASP.NET 2.0 personalization, all of the above complexities are handled by
the personalization framework itself. In ASP.NET personalization, information about a specific user is
stored in a persistent format. Also, ASP.NET personalization allows you to easily manage user information without requiring you to create and maintain your own database. In addition, the personalization
system makes the user information available using a consistent, easy-to-use, strongly typed API that you
can access from anywhere in your application. You can also store objects of any type in the personalization system, including user information, user preferences, or business information. The personalization
system uses a generic storage system for storing the data and makes that data available to the users in a
type-safe manner. By default, ASP.NET 2.0 uses SQL Server as the storage mechanism.
Visual Studio 2005 Improvements
Visual Studio 2005 is the best development tool for building data-driven web applications. As part of the
Visual Studio 2005 suite of tools, Microsoft is introducing a new tool called Visual Web Developer
(VWD) that is designed to work with the current and next generation of ASP.NET. VWD provides powerful new features for the web developer. VWD is also tuned to the specific needs of the web developer
through a new web profile that exposes a menu and window layout optimized for web development.
The environment includes a best-of-breed HTML source editor, an improved visual page designer, better
IntelliSense support, a new project system, better support for working with data, and full XHTML standards support. Collectively, these features enable you to develop data-driven web applications faster
than ever before. The next few sections will explore some of the important web development improvements coming with VWD.
Better Source Code Editing
VWD provides an improved HTML source editor that enables you to write and modify your pages
faster. The source editor provides full IntelliSense throughout your files and has new features for navigating and validating your markup.
If you are not aware what IntelliSense is, it is the pop-up code hints that automatically appear when you type in the development environment.
Although Visual Studio.NET provides excellent IntelliSense support, it gets even better with Visual
Studio 2005. In Visual Studio 2005, IntelliSense pops up everywhere. For example, you can take full
advantage of IntelliSense within the script blocks, Page directives, inline CSS style attributes, and
Web.config, as well as in any generic XML file that contains a DTD or XML Schema reference.
HTML Source Preservation
Visual Studio 2005 preserves the formatting of your HTML markup, including all white space, casing,
indention, carriage returns, and word wrapping. The formatting is preserved exactly, even when switching back and forth between the Design View and Source View of the page. This is one of the important
features that developers have been clamoring for in the previous versions of Visual Studio.
16
Chapter 1: Introduction to ASP.NET 2.0
Tag Navigator
Visual Studio 2005 comes with a new Tag Navigator feature that enables developers to easily track their
location in a HTML document, thereby providing excellent navigation support. The Tag Navigator displays the current path within the source of an HTML page by displaying a list of all the HTML tags that
contain the tag where your cursor is currently located. Clicking on any of the nodes enables developers
to optionally change the source level selection, and quickly move up and down a deep HTML hierarchy.
This feature can be very handy, especially when you are editing multiple nested HTML elements. For
example, when you are editing multiple nested HTML tables, it is very easy to get lost, and you can
leverage Tag Navigator to easily identify the current path within the hierarchy of table elements.
Targeting Specific Browsers and HTML Validation
Using Visual Studio 2005, you can easily target a specific HTML standard or browser when writing your
HTML pages. For example, you can target your HTML pages to work with a particular browser, such as
Internet Explorer 5.0 or Netscape Navigator 4.0. Alternatively, you can target a particular HTML standard, such as XHTML 1.0 Strict or XHTML 1.0 Transitional. As you type your HTML in the source editor,
it will be automatically validated in real time. Invalid HTML will automatically be underlined with a red
squiggly line, and all the validation errors are also summarized in real time within the Task List window.
Code Refactoring
Code Refactoring allows you to change the code structure without changing or affecting what the code
itself actually does. For example, changing a variable name or packaging a few lines of code into a
method are part of Code Refactoring. The main difference between Code Refactoring and a mere edit or
find-and-replace is that you can harness the intelligence of the compiler to distinguish between code and
comments, and so on. Code Refactoring is supported everywhere that you can write code, including
both code-behind and single-file ASP.NET pages.
Smart Tasks
Smart tasks are a new feature that displays a pop-up list of common tasks that you can perform on an
ASP.NET control. For example, when you add a GridView control to a page, a common task list appears,
which allows you to quickly enable sorting, paging, or editing for the GridView. Visual Studio 2005
enables you to perform many of the most common programming tasks directly from the designer surface. When you drag new controls onto the designer surface, a pop-up list of common tasks automatically appears. You can use the common tasks list to quickly configure a control’s properties, as well as
walk through common operations you might perform with it. Smart tasks can go a long way in increasing the productivity of the developers, allowing developers to create feature-rich, database-driven web
applications without writing a single line of code.
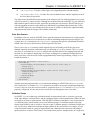
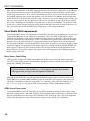
Creating Web Projects
With Visual Studio 2005, you have more flexibility and features for managing the files in your web projects. When you bring up the New Web Site dialog box and click on the Browse button, you will see the
dialog box shown in Figure 1-3.
17
Part I: Introduction
Figure 1-3
As you can see from Figure 1-3, you have the following options when creating web projects:
❑
File System Support: With Visual Studio 2005, you now have the option of creating a new web
application within any folder on your computer. Note that neither IIS nor Front Page Server
Extensions is required to be installed on your computer. You can simply point the web application to a specific folder and start building web pages. This is made possible through the new
built-in ASP.NET enabled web server that ships with Visual Studio 2005. Using this new web
server, you can develop and debug web applications without requiring Administrator access.
Note that the built-in web server cannot be accessed remotely, and it automatically shuts down
when you close the Visual Studio 2005 development environment.
❑
Local IIS Support: In addition to file system projects, Visual Studio 2005 now enables you to
more easily manage projects that are hosted on an IIS web server. When you create a new IIS
project, you can now view all of the web sites and applications configured on your machine.
You can even create new IIS web applications or virtual directories directly from the New Web
Site dialog box. Figure 1-3 shows an example of this in action. FrontPage Server Extensions
(FPSE) is no longer required for locally developed IIS web applications.
❑
FTP Support: Visual Studio 2005 now has out-of-the-box support for editing and updating
remote web projects using the standard File Transfer Protocol (FTP). The New Web Site and
Open Web Site dialog boxes allow you to quickly connect to a remote web site using FTP.
Administration and Management
One of the key goals of ASP.NET 2.0 is to ease the effort required to deploy, manage, and operate
ASP.NET web sites. To this end, ASP.NET 2.0 features a new Configuration Management API that
18
Chapter 1: Introduction to ASP.NET 2.0
enables users to programmatically build programs or scripts that create, read, and update configuration
files such as Web.config and machine.config. In addition, there is a new comprehensive admin tool
that plugs into the existing IIS Administration MMC, enabling an administrator to graphically read or
change any setting within the configuration files. ASP.NET 2.0 also provides new health-monitoring support to enable administrators to be automatically notified when an application on a server starts to experience problems. New tracing features will enable administrators to capture runtime and request data
from a production server to better diagnose issues.
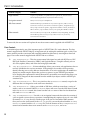
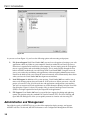
Visual Studio 2005 also ships with a new web-based tool that provides a very easy way to administer an
ASP.NET web site. You can access this by clicking Website ➪ ASP.NET Configuration in Visual Studio
2005. This web-based tool wraps much of the Management API, thereby providing an easy and effective
way to remotely administer a site. Figure 1-4 shows the ASP.NET Web Application Administration tool
in action.
Figure 1-4
As you can see from Figure 1-4, it provides a simple web interface that allows configuration of all aspects
of a site. The interface is designed to be customized, so corporations and hosts can give it a company look.
Precompilation
One of the significant improvements in ASP.NET 2.0 is the capability to request a web form (.aspx file)
from a browser without having to compile the code even once. When the page is first requested,
ASP.NET compiles the page on the fly, dynamically generating the assembly. This makes it possible for
you to resort to the “Just Hit Save” programming model (similar to ASP), wherein you just develop and
test the page without having to compile it. After the initial compilation, the compiled page is cached,
which is used to satisfy the subsequent requests for the same page. Although this approach is flexible, it
does result in a performance hit, especially when the page is requested for the first time, since ASP.NET
requires a bit of extra time to compile the code. You can avoid this overhead by leveraging a new feature
19
Part I: Introduction
known as precompilation, using which you can compile an ASP.NET web site before making the web site
available to users. Precompilation also allows you to catch all the compilation errors before deploying
the application onto the production servers. ASP.NET 2.0 provides the following two options for precompiling a site:
❑
In-place precompilation: When you perform in-place precompilation, all ASP.NET files are
compiled and stored in a special folder. The precompilation process follows the same logic that
ASP.NET uses for dynamic compilation, also taking into consideration the dependencies
between files. During precompilation, the compiler creates assemblies for all executable output
and places them in a special folder. After the compiled output is created, ASP.NET fulfills
requests for pages using the assemblies contained in this folder. One of the important advantages of precompilation is the ability to check the web site for compilation errors. For example,
to precompile a web site named Chapter1, enter the following command at the .NET
Framework 2.0 SDK command prompt:
aspnet_compiler –v /myprojects/wrox/chapter1
The above command will precompile the web site and display the compilation errors in the
browser, if there are any.
❑
Precompiling a site for deployment: Using this option, you can create a special deployable output of your web application that can be deployed to production servers. Once the output is created, you can deploy the output, using various mechanisms such as XCOPY, FTP, or Windows
installers, onto the production servers. To precompile a web site for deployment, use the same
aspnet_compiler utility and specify the target path as an additional argument:
aspnet_compiler –v /myprojects/wrox/chapter1 C:\Chapter1\Output
This type of precompilation enables applications to be deployed without any source being
stored on the server (even the content of .aspx files is removed as part of the precompilation),
further protecting your intellectual property. This capability can be very useful in web site hosting scenarios.
Speed and Performance
Although ASP.NET 1.x is the one of the world’s fastest web application servers, Microsoft aims to make
it even faster by bundling the performance improvements in ASP.NET 2.0. It is now 64-bit-enabled,
meaning it can take advantage of the full memory address space of new 64-bit processors and servers.
Developers can simply copy existing 32-bit ASP.NET applications onto a 64-bit ASP.NET 2.0 server, and
the web applications will be automatically JIT compiled and executed as native 64-bit applications. As
part of the performance improvements, ASP.NET 2.0 also enhances the caching feature set by providing
new functionalities. The next section provides you with a quick overview of the caching improvements
in ASP.NET 2.0.
Caching Feature
Caching is defined as temporary storage of data for faster retrieval on subsequent requests. In ASP .NET
2.0, the caching support is integrated with the DataSource controls to cache data in a web page. ASP.NET
2.0 also now includes automatic database server cache invalidation. This powerful and easy-to-use feature
20
Chapter 1: Introduction to ASP.NET 2.0
allows developers to aggressively output cache database-driven page and partial page content within a
site, and have ASP.NET automatically invalidate these cache entries and refresh the content whenever the
back-end database changes. ASP .NET 2.0 also introduces the Substitution control, which allows you to
link dynamic and cached content in a web page.
Caching with the DataSource Controls
The DataSource controls enable you to cache database data while connecting a .NET application to a
database. The DataSource control provides various properties, such as EnableCaching, which you can
use to automatically cache the data represented by a DataSource control. The syntax to cache a
database table in a memory for 120 seconds is:
<asp:SqlDataSource ID=”SqlDataSource1” EnableCaching=”True” CacheDuration=”120”
ConnectionString=”Server=localhost;database=AdventureWorks;uid=user;pwd=word;”
SelectCommand=”SELECT * FROM Production.ProductCategory” Runat=”server”/>
The above syntax caches a database table, ProductCategory, by setting the EnableCaching property
of the DataSource control to True. The CacheDuration property of the DataSource control specifies
the time, in seconds, for caching the data before it is updated in a database containing the
ProductCategory table. The value of the Time parameter is set to 120 to cache data for two minutes.
Using SQL Cache Invalidation
The Cache API introduced with ASP.NET 1.x was a powerful feature that can be immensely useful in
increasing the performance of a web application. The Cache API also allows you to invalidate items in
the cache based on some predefined conditions, such as change in an XML file, change in another cache
item, and so on. Using this feature, you can remove or invalidate an item from the cache when the data
or another cached item changes. However, the Cache API in ASP.NET 1.x versions did not provide a
mechanism to invalidate an item in the cache when data in a SQL Server database changed. This is a
very common capability that many web applications require. Now with ASP.NET 2.0, Microsoft has
introduced a new cache invalidation mechanism that works with SQL Server as well. Using this new
capability, you can invalidate an item in the Cache object whenever the data in a SQL Server database
changes. This built-in cache invalidation mechanism works with SQL Server 7.0 and above. However,
with SQL Server 7.0 and 2000, only table-level cache invalidation mechanism is supported. The next
release of SQL Server (named SQL Server 2005) will also feature a row-level cache invalidation mechanism, providing a finer level of accuracy over the cached data. To enable the SQL Server–based cache
invalidation mechanism, you need to do the following:
1.
Add a <caching> element to the Web.config file, and specify the polling time and the connection string information.
2.
Enable SQL cache invalidation at the database and table levels by using either the
aspnet_regsql utility or the SqlCacheDependencyAdmin class. This is not required
if you are using SQL Server 2005 as your database.
3.
Specify the SqlCacheDependency attribute in the SqlDataSource control.
That’s all you need to do to leverage SQL Server cache invalidation from your ASP.NET pages.
21
Part I: Introduction
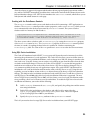
Using the Substitution Control
ASP.NET 2.0 provides a new control called the Substitution control, which enables you to insert
dynamic content into a cached web page. For example, you can display the name of an end user, which
is dynamically generated in a cached web page containing some text or images. The Substitution control provides a property called MethodName, which represents the method called to return the dynamic
content. Listing 1-4 shows an example of the Substitution control in action.
Listing 1-4: Partial Page Caching Using Substitution Control
<%@ Page Language=”C#” %>
<%@ OutputCache Duration=”6000” VaryByParam=”none” %>
<script runat=”server”>
static string GetRandomNumber(HttpContext context)
{
int randomNumber;
randomNumber = new System.Random().Next(1, 10000);
return randomNumber.ToString();
}
</script>
<html>
<head>
<title>Use of Substitution control to implement Partial Caching</title>
</head>
<body>
<form id=”form1” runat=”server”>
The random number generated is:
<asp:Substitution ID=”Substitution1” MethodName=”GetRandomNumber”
Runat=”Server” />
<p>
The current time is <%= DateTime.Now.ToString(“t”) %>.
It never changes since the page is cached.
</p>
</form>
</body>
</html>
At the top of the page, the OutputCache directive is used to cache the contents of the page in memory.
The Duration attribute of the OutputCache directive is set to 6000 milliseconds. The VaryByParam
attribute indicates whether or not ASP.NET should consider the parameters passed to the page when
caching. When VaryByParam is set to none, no parameters will be considered; all users will receive the
same page no matter what additional parameters are supplied. The MethodName attribute of the
Substitution control is set to a method named GetRandomNumber, which simply returns a random
number between 1 and 10,000. Note that the return value of the GetRandomNumber method is a string,
because the HttpResponseSubstitutionCallback delegate always requires a return type of string.
When you make a request for the page through the browser, you will find that the displayed current
time always remains the same, whereas the portion of the page that is generated by the substitution control keeps changing every time. In this case, it displays a random number between 1 and 10,000 every
time someone requests the page.
22
Chapter 1: Introduction to ASP.NET 2.0
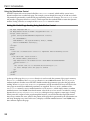
Summar y
This chapter has provided you with a quick tour of the features of ASP.NET 2.0. Specifically, this chapter
discussed the number of new productivity enhancements of ASP.NET 2.0 that are exciting for the developers. In addition, this chapter has also discussed the configuration and management of ASP.NET web
applications, as well as the performance improvement features. Apart from the features discussed so far,
ASP.NET 2.0 also provides the following features:
❑
ASP.NET 2.0 is 64-bit enabled.
❑
ASP.NET 2.0 is almost completely backward compatible with ASP.NET 1.0 and ASP.NET 1.1.
❑
You can also define a single class in multiple files, and at runtime they will be compiled together
to create a single assembly.
Now that you have had a quick tour of ASP.NET 2.0, the next chapter focuses on the features of
ADO.NET 2.0.
23