1
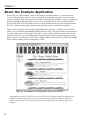
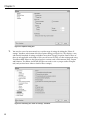
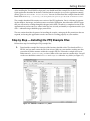
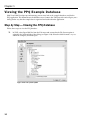
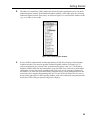
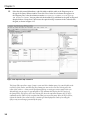
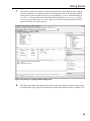
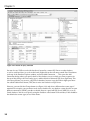
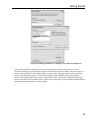
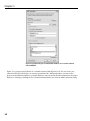
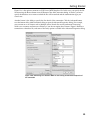
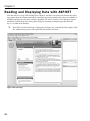
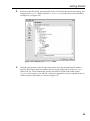
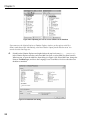
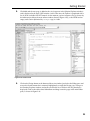
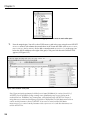
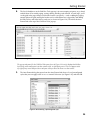
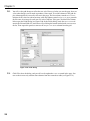
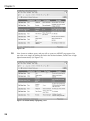
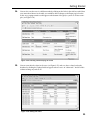
1
TE
RI
AL
Getting Star ted
MA
Developing sites and applications for the Web finally comes of age with the release of Microsoft
Visual Web Developer (VWD 2005 Express Edition) and version 2.0 of the .NET Framework. VWD
is one of the “Express” products that Microsoft provides as an expansion of the Visual Studio
product line. These are lightweight, easy-to-use, and easy-to-learn tools aimed at hobbyists,
students, and novice developers.
In this chapter, you will:
GH
TE
D
VWD is a lightweight tool for building dynamic Web sites and Web services. While there have
been other tools and technologies around for a long time, the great new features in VWD and
.NET 2.0 make it even easier to build, test, deploy, manage, and extend your Web sites and Web
applications. This chapter starts the process of demonstrating the capabilities of VWD, and
showing you how easy it is to build attractive, high-performance Web sites with ASP.NET 2.0.
See the completed example application
❑
Install and set up Visual Web Developer 2005 and SQL Server 2005 Express Editions
❑
Install the example application files for this book
❑
View the example database and execute a test query
❑
Generate a simple page that uses the example database
CO
PY
RI
❑
The last two items in this list perform two tasks. They confirm that the database is properly
installed and accessible, thus avoiding any problems that may arise later on. They also let you see
just how powerful (and yet easy to use) VWD and ASP.NET 2.0 actually are. You will be amazed at
how quickly and easily you can create a page that includes many features that previously would
have required a great deal of code and development work.
Chapter 1
About the Example Application
In this book, you will be building a Web site that displays and sells products — a common scenario
for many Web developers today. It is not a complicated site in comparison to many “out there” but is
extensive enough to demonstrate most of the features of ASP.NET 2.0 and VWD, as well as showing you
the prime techniques and approaches that are used as the foundations for almost all Web sites built
using version 2.0 of .NET. The product you will see in the demonstration site is not complicated either.
The site is a fictional online pizza parlor that sells and delivers pizzas and drinks to customers.
Figure 1-1 shows the page in the example application that lists the items available from “Pizza Pretty
Quick,” or as you will see it described throughout the book, “PPQ.” The page header and the menu you
see at the left are part of a master page. This makes is easy to achieve a consistent look and feel for the
whole site, and saves a lot of work both when creating new pages and when updating the site design.
Data for the list of available items comes from a database table stored in a local copy of SQL Server 2005
Express Edition running on the same machine as VWD.
Figure 1-1: The completed site, showing the list of items you can order
The installation routine for VWD allows you to install SQL Server Express as part of the main program
installation. Alternatively, if required, you can access data stored in SQL Server 2000 or SQL Server
2005 on another machine. The set of examples you can download for this book contains the SQL Server
database.
2
Getting Started
Installing Visual Web Developer
Visual Web Developer 2005 Express Edition is available along with SQL Server 2005 Express Edition on
the CD-ROM included with this book. Both are also available for download (along with other “Express”
products) from Microsoft at http://msdn.microsoft.com/express. You can install it on Windows 98,
Windows 2000 Professional or Server, Windows XP with Service Pack 2, or Windows Server 2003. In this
book, you will see it running on both Windows XP and Windows Server 2003. Installation is easy, as you
will see in the following step-by-step guide, and there is no other configuration required after installation.
Step by Step — Using the Setup Wizard
Follow these steps to use the Setup Wizard:
1.
If you are installing from the book’s CD-ROM and the installer doesn’t automatically begin
when you insert the CD, double click on setup.exe to start the Setup Wizard. If you downloaded
the software, double-click on the downloaded program file to start the Setup Wizard. In the
Setup Wizard, step through the screens that concern providing feedback and accepting the
license agreement. You may also have to install other updates, such as XP Service Pack 2 or the
latest Windows Installer, during this process, and these may require a reboot during the
installation.
2.
Continue to click Next until you reach the Installation Options page that shows the list of products for installation (Figure 1-2). Make sure that SQL Server 2005 Express Edition is included,
and it is also a good idea to install the MSDN Express Library as well. You will see references to
help topics in these pages in various places within this book.
Figure 1-2: Installation Options page
If you would like to read more about the installation and any issues it may have, then you can click the
Readme link on the installation options screen (Figure 1-2).
3
Chapter 1
3.
Click Next. In the Destination Folder page (see Figure 1-3), confirm the path where VWD will be
installed. It is recommended that you leave it set to the default. This page shows a summary of
the products for installation, and the disk space requirements.
Figure 1-3: Destination Folder page
4
4.
Click Install to start the installation. After it completes, you will find entries in the Programs
section of your Start menu for Visual Web Developer and SQL Server. The SQL Server section
includes a tool that you can use to set the configuration options for SQL Server if you want to
change the services or protocols it uses. This may be necessary if you want to be able to access
SQL Server from another machine, but no changes are required when accessing it from the local
machine (as you will see in this book).
5.
Start up VWD to confirm that it has been successfully installed. You will see the Start Page and
some empty docked windows, as shown in Figure 1-4.
Getting Started
Figure 1-4: Start Page
6.
VWD is extremely configurable, so you can change many features to suit your preferences.
Click Options on the Tools menu to open the Options dialog (see Figure 1-5). Here you see a
simplified view of the options you can set. These include general options, the fonts and colors
used in the various windows within the IDE, the formatting options for the text and code you
type, and the target browser or HyperText Markup Language (HTML) standard that you want
to be used for validating your page content.
5
Chapter 1
Figure 1-5: Options dialog box
7.
You can also exert a lot more control over a wider range of settings by ticking the “Show all
settings” checkbox at the bottom left of the Options dialog (see Figure 1-6). This displays a tree
with literally hundreds of settings available in more than 75 pages of options. Some of these of
these are not applicable to the kinds of files you will create in VWD, or when writing code using
Visual Basic 2005. However, the General pages in sections such as Environment, Help, Projects
and Solutions, Text Editor, and HTML Designer are worth a visit as you get used to using the
tool (and you now know where to look for these settings!).
Figure 1-6: Selecting the “Show all settings” checkbox
6
Getting Started
After installing the Visual Web Developer tool, you should install the example files for the Pizza Pretty
Quick application described in the book. To download the examples (or to see the application running
online), go to www.daveandal.net/books/8079. You can also download the examples from the Wrox
Books Web site at http://eu.wiley.com/WileyCDA/WileyTitle/productCd-0764588079.html.
The examples download file contains two versions of the PPQ application. One is a skeleton site containing the database, the images, and other resources used in the application, but without the ASP.NET pages
that you will create by working through the chapters in this book. The other is a completed version of the
application that you can run to see what it looks like, how it works, and modify or experiment with as you
wish — without having to build the pages yourself first.
The next section describes the process for installing the samples, setting up the file permissions that are
required, and testing the application to make sure that it is working properly on your machine.
Step by Step — Installing the PPQ Example Files
Follow these steps for installing the PPQ example files:
1.
Download the example files from one of the locations detailed earlier. The download file is a
ZIP file, and you must extract the files from it into a folder on your machine, making sure that
you retain the folder structure within the examples ZIP file. Extract the examples into a new
folder named C:/Websites/PPQ/, or into a folder of the same name on another drive. You will
see the two subfolders named skeleton and complete within the PPQ folder (see Figure 1-7).
Figure 1-7: Subfolders inside the PPQ folder
7
Chapter 1
2.
If you are running Windows XP and you have Internet Information Services (IIS) installed,
you must now grant the accounts named ASPNET and NETWORK SERVICE (under which
ASP.NET executes, depending on whether you installed SP2) the required permissions to access
the database provided with the example files. (This and the remaining steps are not required
in Windows Server 2003, or if you do not have IIS installed.) In Windows Explorer, right-click
on the subfolder named App_Data within the skeleton folder and select Properties. In the
App_Data Properties dialog, select the Security tab and click the Add button to open the “Select
Users or Groups” dialog, as shown in Figure 1-8. Click the Locations button, and select the
name of your machine (not the domain it is part of) and click OK; then enter the account name
ASPNET in the text box and click the Check Names button. The full account name, including
the machine name, is underlined to indicate that is was located.
Figure 1-8: Select Users or Groups dialog
3.
8
Click OK to return to the Select Users or Groups dialog, ensure the new entry ASPNET is selected
in the upper list, and select the Write option in the lower list box (see Figure 1-9); then click OK.
Getting Started
Figure 1-9: Selecting the Write option
If you cannot see a Security tab in the App_Data Properties dialog, you have Simple File Sharing
enabled. Select Folder Options from the Tools menu, and select the View tab. At the bottom of the list,
uncheck the option named Use Simple File Sharing. This option does not appear in Windows Server
2003 because this operating system does not support simple file sharing.
However, the Use Simple File Sharing option does not appear in Windows XP Home Edition either,
because this operating system uses only simple file sharing. In this case, you must restart your machine
and hold down the F8 key as it starts, and then select Safe Mode. Log in as Administrator after Windows
starts up in safe mode, and navigate to the C:\WebSites\PPQ folder in Windows Explorer. When you
right-click on the App_Data folder and select Properties, you will see that the Security tab has now
appeared.
4.
Now, repeat the process from step 2 to give Write permission to the NETWORK SERVICE
account for the App_Data folder within the skeleton folder of the examples.
If you have not yet installed Service Pack 2 for Windows XP, you will not have an account named
NETWORK SERVICE, and so you can skip step 3.
5.
Repeat the process again from step 2 to give Write permission to the ASPNET and NETWORK
SERVICE accounts for the App_Data folder within the completed folder of the examples.
The application, including the database, is now installed and ready to use.
9
Chapter 1
Viewing the PPQ Example Database
With Visual Web Developer up and running, you can now look at the example database used for the
PPQ application. This demonstrates the database access features that VWD provides and will give you a
feeling for the way that the sample data is organized and used within the application.
Step by Step — Viewing the PPQ Database
Follow these steps to view the PPQ database:
1.
In VWD, select Open Web Site from the File menu and ensure that the File System option is
selected in the left-hand side of the dialog (see Figure 1-10). Select the folder named complete
within the examples, and click Open.
Figure 1-10: File System option
10
Getting Started
2.
The Web site is loaded into VWD, and the files that make up the application can be seen in the
Solution Explorer window. (If the Solution Explorer window is not visible, open it by selecting
Solution Explorer from the View menu.) As shown in Figure 1-11, notice that the database in the
App_Data folder is also visible.
Figure 1-11: Solution Explorer window
3.
In fact, VWD has automatically attached the database to SQL Server Express. Select Database
Explorer from the View menu to open the Database Explorer window (see Figure 1-12). If
you are prompted to give yourself “dbo” permission at his point, select “yes.” The Database
Explorer window shows the data connections set up for VWD to use. You will see the database
shown there as well, and you can expand the tree-view list to see the categories of objects for
the database. (If, when you select the Database Diagrams entry, you are prompted to create the
items necessary to support diagramming click Yes.) As you select each item in the list, you see
details of this item appear in the Properties window, such as the connection string and provider
details that VWD is using to connect to SQL Server Express.
11
Chapter 1
Figure 1-12: Database Explorer window
The Solution Explorer and Database Explorer windows dock at the right-hand side of the main VWD
window by default, but you can drag any of the windows to a docked or floating position using their
title bars. As you drag, small arrow indicators become visible allowing you drop the window into
another one, or dock it at the side of the main VWD window. Use the drop-down menu (the “downarrow” icon) in the title bar or the Auto-Hide feature (the pin-shaped icon) to set up the window
positions you require. If you cannot reorganize windows in the way you want to, you can go back to
the original window layout using the Reset Window Layout command on the main Window menu.
4.
12
Now that the database is available in VWD, you can test that it is working properly, and see the
kinds of data it contains. Right-click on the data connection name and select New Query from
the pop-up menu that appears (see Figure 1-13).
Getting Started
Figure 1-13: Selecting New Query
5.
This opens the Query Editor in the main central section of the VWD window. (You can close or
auto-hide the Toolbar window to make more room as shown in the screenshot.) The Add Table
dialog also appears automatically, showing a list of tables in the database that you can use in your
new query, as shown Figure 1-14.
Figure 1-14: Add Table dialog
13
Chapter 1
6.
Select the table named MenuItems, and click Add to add this table to the Diagram pane at
the top of the Query Editor window. Then click Close. In the list of columns that appears in
the Diagram pane, select the columns named MenuItemType, ItemName, PizzaToppings,
and GraphicFileName. You can either tick the checkboxes to add them to the grid, or drag and
drop them there. Notice how VWD creates the equivalent SQL statement in the section below
the grid, as shown in Figure 1-15.
Figure 1-15: Equivalent SQL statement
The Query Editor provides a range of ways to create and edit a database query. You can add tables to the
top section of the window, and then drag the columns you want to show into the Criteria grid in the
center of the window — where you also specify any filtering or sorting you want to apply to the rows.
Alternatively, you can, type (or copy and paste) a SQL statement directly into the lower section of
the Query Editor. This section, below the Criteria grid, shows the equivalent Transact-SQL (T-SQL)
commands used by VWD to fetch or update data when you execute the query. Below the SQL window,
right at the bottom of the central window, is another grid that displays the results of executing the
query or any error messages generated by the query.
14
Getting Started
7.
The Criteria grid section specifies not only the columns for the query, but also any sorting or
filtering you require. As a simple example, use the drop-down lists in the Sort Type column
of the grid to set the sort order for the rows as Ascending by ItemName, then Descending by
ItemPrice, as shown in Figure 1-16. Select the columns named MenuItemType, ItemName,
PizzaToppings, and GraphicFileName. Again, you will see the equivalent SQL statement
appear in the SQL pane below the grid.
Figure 1-16: Sorting by ascending and descending order
8.
Click the Execute button (the button in the toolbar with a red exclamation mark) and the results
of executing this query appear in the bottom pane of the Query Editor window (see Figure 1-17).
15
Chapter 1
Figure 1-17: Results of query execution
You can also use VWD to work with data that is located in a remote SQL Server or other database,
as well as with local data (as we do in this book). Right-click on the root entry named Data Connections
at the top of the Database Explorer window, and select Add Connection. . . . This opens the Add
Connection dialog where you specify details of the database server to which you want to connect. At
the top of this dialog is the Data source (type), and the default is Microsoft SQL Sever (SqlClient). This
is the most efficient way to access a SQL Server database, because it uses the built-in high-speed interface called Tabular Data Stream (TDS) that is native and exclusive to SQL Server.
However, you can click the Change button (see Figure 1-18) and select a different data source type if
required. For example, you can connect to an Access database file, any database system that has an open
database connectivity (ODBC) provider available, direct to a persisted SQL Server (MDF) file, or to an
Oracle database. You can even specify, using the checkbox at the bottom of the window, if this should be
the default data source (type) to use in the future.
16
Getting Started
Figure 1-18: Adding a connection to a database server other than SQL Server
After specifying the data source type, you can use the drop-down Server name list to see all the
databases of the type you selected that advertise their presence and are available. You can also type an
instance name directly. For the default instance, you just need to enter the machine name, or you can
access a named instance (such as a remote Microsoft Data Engine (MSDE) or SQL Server Express
instance) by appending the instance name to the machine name separated by a backslash. Figure 1-19
shows a connection to the default instance of SQL Server running on a remote machine named DELBOY,
and to the Northwind database on that machine.
17
Chapter 1
Figure 1-19: Connecting to the Northwind database on a remote machine
named DELBOY
Figure 1-19, you must specify details of a suitable account within SQL Server. If, for any reason, you
cannot install SQL Server Express or want to experiment with a different database, you can use the
process just described to connect to a suitable database. You can confirm that the connection to the target
database is working by clicking the Test Connection button before you close the Add Connection dialog.
18
Getting Started
Figure 1-19 is the option to connect to a SQL Server (MDF) database file. In this case, you specify the file
location using the Browse button near the bottom of the Add Connection dialog. As before, you must
specify the database server name to which the file will be attached and the authentication type you
want to use.
Another feature is the ability to specify the fine details of the connection. Click the Advanced button
near the bottom of the Add Connection dialog to open the Advanced Properties dialog. For example,
you can turn on or off features such as Multiple Active Results Sets and Asynchronous Processing,
which saves resources and increases efficiency, if you do not require these features. Figure 1-20 shows a
connection to a database file, and some of the many options available in the Advanced Properties dialog.
Figure 1-20: Connecting to a database MDF file and setting the Advanced Properties of
the connection
19
Chapter 1
Reading and Displaying Data with ASP.NET
Now that you have set up VWD and SQL Server Express, and have seen some of the features that allow
you to access data, this chapter concludes by showing you just how quickly and easily you can build an
ASP.NET page that uses the values stored in a database. The task is to create a list of the types of pizza
and drinks available from Pizza Pretty Quick (PPQ), by extracting and displaying values from the
MenuItems table in the database.
1.
Start VWD so that the Start Page is displayed (see Figure 1-21), and click the link to Open a Web
Site. Alternatively, you can select Open Web Site from the File menu.
Figure 1-21: Start Page
20
Getting Started
2.
In the Open Web Site dialog, ensure that File System is selected in the top left of the dialog, and
navigate to the skeleton folder within the C:\Websites\PPQ folder where you installed the
example files (see Figure 1-22).
Figure 1-22: Navigating to the skeleton folder
3.
Click OK, and you then see the files that make up the site in the Solution Explorer window.
Switch to the Database Explorer window, and you see the database that is in the App_Data
folder of the site. VWD automatically attaches any MDF file it finds in the folder named
App_Data when it opens a site, and this is what has happened here. You can expand the tree to
see the contents of the database, as shown in Figure 1-23.
21
Chapter 1
Figure 1-23: Expanding the tree to see the contents of the database
If you cannot see the Solution Explorer or Database Explorer windows, use the options on the View
menu to make them visible. Alternatively, select Reset Window Layout from the Window menu. You
can also close the Start Page now.
4.
Switch back to Solution Explorer and right-click on the top-level entry (C:\...\skeleton\)
in the Solution Explorer window and select Add New Item, or select Add New Item from the
Website menu, to open the Add New Item dialog (see Figure 1-24). Select Web Form, change the
Name to TestMenu.aspx, and leave the Language set to Visual Basic. Also leave the other two
checkboxes unticked.
Figure 1-24: Add New Item dialog
22
Getting Started
5.
Click Add and the new page is added to the site (it appears in the Solution Explorer window)
and is displayed in the main VWD window. At the same time, the Toolbox is populated with a
list of all the available ASP.NET controls. At the moment, you are in Source view (as shown by
the indicator just below the main editor window shown in Figure 1-25), so the HTML and an
empty code section (delimited by <script> tags) is visible.
Figure 1-25: Source view
6.
Click on the Design button at the bottom of the main window (just below the Editor pane and
next to the Source button that is currently highlighted) to switch the Design view. Then go to
the Database Explorer window, and make sure that the list of Tables in the PPQ database is
displayed. Click on the table named MenuItems and drag it onto the page in the main Editor
pane, as shown in Figure 1-26.
23
Chapter 1
Figure 1-26: Dragging MenuItems onto the main editor pane
7.
Now the magic begins. You will see that VWD creates a grid in the page using the new ASP.NET
GridView control, with columns that match those in the source data table (such as MenuItemID,
MenuItemType, and ItemName). It also adds a control named SqlDataSource to the page, just
below the grid. In addition, to the right of the grid, a Task pane with the title GridView Tasks
appears (see Figure 1-27).
Figure 1-27: GridView Tasks pane
Note: If you previously experimented with the free tool named WebMatrix for versions 1.0 and 1.1 of
ASP.NET, you will probably be feeling a strange sense of familiarity creep over you looking at the
results shown here. WebMatrix was, in many ways, a test platform for the ASP.NET 2.0 concept of
using data source controls and intelligent grid controls to display data. The Web Matrix MXDataGrid
control was the forerunner to the new ASP.NET 2.0 GridView control, and the Web Matrix
MXSqlDataSource control was the forerunner to the SqlDataSource (and other data source) controls in ASP.NET 2.0.
24
Getting Started
8.
The list of checkboxes on the GridView Tasks pop-up is just too tempting to ignore, so go ahead
and tick them all to enable paging, sorting, editing, deleting, and selection. At each stage, you’ll
see the grid in the page change to reflect the features you specify — such as adding the paging
controls below the grid, turning the header text for each column into a hyperlink, and adding
the Edit, Delete, and Select links to each row (as shown in Figure 1-28). Then click the Auto
Format link at the top of the GridView Tasks pop-up.
Figure 1-28: Adding links
The pop-up task panes like the GridView Tasks pane shown in Figure 1-28 can be displayed and hidden
by clicking on the small square icon that contains a left- or right-facing arrow. This icon appears at the
top right of any control that provides a task pane when you move the mouse over that control.
9.
The Auto Format dialog that opens from the Auto Format link shows a list of preconfigured
styles that you can apply to the GridView control. Select one (see Figure 1-29), and click OK.
Figure 1-29: Selecting a preconfigured style
25
Chapter 1
10.
You will see the grid change to reflect the new style. However, before you run the page, there are
a few other changes you can make to produce a nicer result. Two of the columns in the grid display information that is not really relevant in this page. The first column, named MenuItemID,
contains the ID value for each menu item, while the column named GraphicFileName contains
the file name of an image for each item. So, in the GridView Tasks pane, click the Edit Columns
link to open the Fields dialog (see Figure 1-30). In the Fields dialog, locate the MenuItemID column in the Selected fields list, and remove it by clicking the button marked with a cross next to
the list. Then repeat this process to remove the GraphicFileName column from the grid.
Figure 1-30: Fields dialog
11.
26
Click OK to close the dialog, and you will see the updated GridView control in the page. You
can see that it now only contains four columns from the source data table (see Figure 1-31).
Getting Started
Figure 1-31: Updated GridView
12.
Now you can run the page to see the results. Click the Start Debugging button in the Toolbar
above the main editing window, or just press the F5 key. Alternatively, you can select Start
Debugging from the Debug menu. At this point, the Debugging Not Enabled dialog appears
(see Figure 1-32) because there is no web.config file in the application folders. VWD needs a
web.config to be able to “turn on” debugging (by setting a value in this file). The best course
of action is to select the first option, whereupon VWD will create a default web.config file and
set the appropriate values. This also means that you will not see this dialog every time you run
a page, and VWD will be able to provide more information on any errors that it encounters.
Figure 1-32: Debugging Not Enabled dialog
27
Chapter 1
Figure 1-32
13.
Now a browser window opens, and you will see your new ASP.NET page appear. You
can select a row simply by clicking the link in the left-hand column, and that row is highlighted automatically (see Figure 1-33).
Figure 1-33: Automatically highlighting a row
28
Getting Started
14.
You can also sort the rows in a different order by clicking on the links in the title bar, and if there
were more than 10 rows in the table you would be able to change to a different page of results.
In this case, paging controls would appear at the bottom of the grid, as you’ll see in later examples (see Figure 1-34).
Figure 1-34: Selecting a different page of results
15.
You can even edit the values in the rows (see Figure 1-35), and save these values back to the
database by clicking the Update link that appears when a row is in “edit mode.” And all of this
without writing any code at all!
Figure 1-35: Editing row values
29
Chapter 1
Notice that the URL in the address bar, and the icon for VWD’s built-in Web server that appears in the
notification area of the Windows taskbar, indicate that the page is running on your local machine
(localhost), but using a nonstandard port number (usually port 80 is used for a Web server). You will
see a different port number because VWD chooses one at run time. This means that you can run VWD
on a machine without a Web server installed to develop your site. And you can also run it on a machine
that does have a Web server such as Internet Information Server (IIS) installed without interfering with
the operation of that Web server.
Summar y
In this first chapter, you have seen how easy Visual Web Developer (VWD) 2005 Express Edition is to
install, configure, and use to create powerful and attractive Web pages — quickly and with very little
effort. Because the standard installation also includes SQL Server 2005 Express Edition, you don’t even
have to have a database server available to be able to build data-driven pages (although, as you saw, you
can use any database server or file-based database such as Microsoft Access if you prefer).
VWD is a remarkable tool for building a whole range of Web sites, Web applications, and Web Services,
as you will discover throughout the remainder of this book. You will also see and learn about the
amazing new features and capabilities of ASP.NET version 2.0, which make building high-performance
Web applications and Web sites so much quicker and easier than ever before.
In this chapter, you installed VWD and used it to access a database through SQL Server Express. You
also saw some of the features of the VWD interface and its capabilities. The discussion skipped over
much of the detailed working of these features so that you could quickly get a feel for how it works and
what it can do. You will, of course, see a lot more detail in later chapters of this book.
In summary, this chapter covered:
❑
A preview of the completed example application
❑
Installation and set up of Visual Web Developer 2005 and SQL Server 2005 Express Editions
❑
Installation of the example application files for this book
❑
Viewing the example database and executing a test query
❑
Generating a simple page that uses the example database
In Chapter 2, you will begin a more detailed journey through the features of VWD and ASP.NET 2.0 by
looking at the design of the PPQ Web site, how master pages can make things so much easier, and how
you can plan and implement navigation between the pages of your site.
30