1
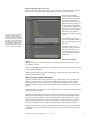
36 pt.
Adobe CS5 Production Premium Panasonic AVCCAM Workflow Guide
Adobe® Creative Suite 5 Production Premium
End-to-end editing workflows with Panasonic AVCCAM cameras
Adobe CS5 Production Premium provides tight support for AVCHD footage acquired with
Panasonic AVCCAM cameras. Edit your AVCHD footage quickly and efficiently in its native
format, taking advantage of the fast editing performance with the native 64-bit, GPUaccelerated Mercury Playback Engine, and the tight integration between applications.
More than just video editing, Adobe CS5 Production Premium is a tightly-integrated suite of applications
intended to cover every aspect of video and content creation, from acquisition in the field, to editing and
effects, to audio, through to export and delivery.
Adobe Creative Suite 5 Production
Premium combines:
•Adobe After Effects CS5
•Adobe Premiere Pro CS5
•Adobe Photoshop CS5 Extended
•Adobe Illustrator CS5
•Adobe Flash CS5 Professional
•Adobe Soundbooth CS5
•Adobe Encore CS5
•Adobe OnLocation CS5
• Adobe Flash® Catalyst™ CS5
Additional components:
• Adobe Dynamic Link
• Adobe Bridge CS5
• Adobe Device Central
Integrates with new Adobe CS Live
online services*, which are
complimentary for a limited time.
Three applications in the Creative Suite are principally involved in the AVCHD workflow – Adobe Premiere
Pro, After Effects, and Adobe Encore. Adobe Premiere Pro provides complete, native timeline support for
all AVCHD recording formats. Adobe Premiere Pro supports all frame sizes and frame rates of AVCHD.
Many of the techniques described in this paper are applicable to CS4 programs, but with CS5, the level
of performance in the AVCHD environment has been greatly enhanced. Most work with AVCHD content
will be done in Adobe Premiere Pro, and it will be through Adobe Premiere Pro that most of the other CS5
applications will usually be accessed in the AVCHD workflow.
Working with tapeless media in Adobe Premiere Pro gives you several advantages. The ability to edit
HD and higher resolution footage in real time without having to first render it or lower its resolution by
transcoding or rewrapping it with an intermediate codec is a post-production dream come true. Adobe
Premiere Pro CS5 brings that dream to the desktop with the revolutionary Mercury Playback Engine.
The native 64-bit, CPU- and GPU-accelerated Mercury Playback Engine provides rock-solid performance
and stability so you can edit complex, high resolution projects fluidly. Open projects faster, scrub through
HD and higher-resolution footage more fluidly, and play back complex long-format and effects-heavy
projects more reliably. With the Mercury Playback Engine, you can put 2-hour, multi-thousand clip projects
together as easily as a high-impact trailer:
• Work in real time on complex timelines and long-form projects with thousands of clips - whether
your project is SD, HD, 2K, 4K, or beyond
• Open projects faster
• Multi-thousand clip projects load and play fluidly
• Mix and match formats such as XDCAM, RED, P2, AVCHD, AVC-Intra, and DSLR cameras freely in
the timeline without rendering
• Experiment fluidly in real-time with multiple color corrections and effects and see results in real
time even on complex timelines
• Use real-time keying on multiple clips at all resolutions using the new Ultra keyer
Another significant advantage of editing with Adobe Premiere Pro is that there is no transcoding or
rewrapping; all footage is natively supported as recorded by the AVCHD camera. You can begin editing
the exact files recorded by the cameras immediately after shooting, straight from the SD card, or even
straight from the camera -- there is no waiting. You can share media between users and other NLE
systems in its native format. You also maintain the full quality of the footage throughout the entire
production process. In addition, Adobe Premiere Pro provides a full array of export options. Most
common formats can be accessed from the timeline and through Adobe Media Encoder.
Top benefits
•Edit AVCHD in its native format -- no
waiting for transcoding; you can edit
seconds after shooting (Page 1)
•End-to-end production metadata
with XMP (Page 6)
•Take advantage of fast timeline
playback and rendering with the
Mercury Playback Engine (Page 1, 8)
•T ight integration between Adobe
Premiere Pro, Adobe Encore, and
After Effects lets you fly through
your workflow (Page 8)
•Enjoy a wide range of High
Definition output choices (Page 11)
The industry-standard compositing and visual effects program, After Effects, also supports all frame
sizes and frame rates of AVCHD material in its native format. After Effects can import AVCHD
material directly; it can import Adobe Premiere Pro AVCHD project files and sequences, or it can
create composites with AVCHD material inside an Adobe Premiere Pro sequence using Adobe
Dynamic Link.
As of CS5, a 64-bit operating system is required for Adobe Premiere Pro and After Effects.
Adobe Encore CS5 software is a rich set of creative tools for DVD and Blu-ray Disc authoring as well
as web versions of DVD projects (SWF file export to the web).
AVCHD footage may be imported into Adobe OnLocation, where it can be analyzed, mated with
XMP metadata, and included in the script-to-screen workflow starting with Adobe Story (available
separately).
With CS5, all applications are nearly identical between the Windows and Mac versions. Most
application project files (Adobe Encore excepted) work in either platform, so crossing between
platforms is as simple as accessing the media files and the project files with either system, either
over a network, or with external hard drives. It is therefore possible, for example, to work in the field
with a low-cost Windows laptop and then transfer all work to a Mac desktop station, or to work with
both Windows and Mac stations on the same network.
This paper will cover:
Part 1: Acquiring And Archiving Footage To Be Edited. Ways of acquiring AVCHD footage through
shooting, from NLEs, from sharing files, or from content generated by Panasonic AVCHD software
and equipment, methods for archiving the footage before use in CS5, AVCHD file structure, and
accessing footage on your computer.
Part 2: Working In Adobe Premiere Pro. Project setup, importing footage, working with the
footage, and exporting to a variety of formats. We will explore integration with Adobe Encore and
After Effects through Dynamic Link.
Part 3: Working With AVCHD In After Effects. Importing footage, creating composites, working
with the footage, and exporting through the render queue. Integration with Adobe Premiere Pro
through Dynamic Link.
Part 4: Adobe CS5 Production Premium HD Delivery Options. Adobe Creative Suite 5 Production
Premium offers a wide array of HD delivery options, including content for the Web, Blu-ray Disc
authoring, Panasonic P2 format, and even export to HD tape for broadcast.
Part 1: Acquiring And Archiving Footage To Be Edited
Acquiring AVCHD Footage
AVCCAM is Panasonic’s brand name for its professional cameras which use the AVCHD codec. The
most common method for acquiring AVCHD footage is to shoot with any of Panasonic’s AVCCAM
cameras, including the AG-HMC40, AG-HMC70, and AG-HMC150 camcorders, and the AG-HCK10
camera head coupled with the AG-HMR10 handheld AVCHD recorder.
Footage already shot may also be delivered on storage media such as hard disk drives, digital tape,
optical media such as CD, DVD, or Blu-ray, or by any other file storage system. As long as the AVCHD
file structure is maintained, these files are identical to the files recorded on an SD card.
AVCHD is recorded to SD and SDHC flash memory cards. It is recorded within a file system common
to all AVCHD equipment. The topmost folder is called PRIVATE. Inside it is a folder called AVCHD,
which contains two folders called AVCHDTN and BDMV. Inside the BDMV folder are three folders
which contain the data for the footage recorded by the camera – CLIPINF, PLAYLIST, and STREAM.
The STREAM folder contains the MTS files, which are the footage. It is recommended to keep this
file structure intact.
Panasonic AVCHD Software
No special drivers are needed, as the SD card format is common to and supported by all major
computer operating systems and most computer manufacturers. Cards can be read natively by any
computer with an SD card slot, or through external readers, including the AVCHD camcorder itself.
Adobe CS5 Production Premium Panasonic AVCCAM
2
Available Panasonic support software includes AVCCAM Viewer, which can be used to view, transfer,
and organize footage, as well as edit the AVCHD metadata, and also AVCHD Transcoder (Windows
only), a tool which transcodes AVCHD footage to P2/MXF/DVCPRO HD format. Footage transcoded
is stored in a virtual P2 card, and the workflow is then identical to any other P2HD footage. (See the
workflow guide Adobe CS5 Production Premium: Panasonic P2.)
Panasonic AVCCAM/AVCHD software is available from the Panasonic AVCCAM home page located
at http://www.panasonic.com/business/provideo/avchd-home.asp.
Archiving Footage
It is highly recommended that AVCHD data be archived before working with it. The data on AVCHD
cards is properly thought of as computer data, and not “video” data, and it should be archived
accordingly, instead of to a form of video tape or to video DVD or video Blu-ray disc. There are
numerous archiving options.
1. Hard Disk Drives -- transfer the AVCHD data just as you would any other data; this can be
to an internal drive, but an external drive – whether over USB 2.0 or IEEE-1394 400/800
(FireWire) – would be most useful for long-term storage.
2. Optical Media -- the most useful variety will be Blu-ray Discs, because they are the
highest-capacity and can store multiple cards on a single disc, but standard DVD+/-R DVDs
and dual-layer DVDs can be used to store single, smaller cards.
3. DLT Or LTO tape -- not video tape; DTO or LTO tapes are designed to store computer data
instead of video footage, and can store hundreds of gigabytes per tape.
4. Flash Media.
Hard Disk Drives
To transfer to hard disk drive, the best option is to use AVCCAM Viewer. This will allow you to
create “virtual cards” with the correct file structure and all necessary files and folders intact, as well
as mixing and matching clips from multiple cards as you see fit. This will allow you the greatest
flexibility and control over your archiving process. (Note: AVCCAM viewer will change the video file
extension from MTS to M2T.)
Or, you can simply copy over the existing PRIVATE folder from the SD card, making sure to keep all
subfolders intact.
To maintain functionality between Windows and Mac systems, a hard disk drive can be formatted as
FAT32, which is compatible with both systems. However, footage may also be stored on hard disk
drives using the Windows NTFS or Mac HFS+ file systems. For cross-platform access, Windows users
can use software such as MediaFour’s MacDrive to read and write to Mac-format drives. Mac users
can read NTFS drives natively, but for read-write capability, additional software such as Paragon
Software’s Paragon NTFS is required.
Optical Media
To archive onto optical media, you will need an appropriate DVD burner and burning software (such
as Nero) to create data (not video) DVDs. Again, you would maintain the PRIVATE file structure. You
can burn to DVD+/-R, dual-layer DVD, or to Blu-ray DVD.
Archiving to DVD can also be done through Adobe Encore. To do this, choose File>Select DVD ROM
Folder, and then navigate to an SD card or AVCHD folder; choose the PRIVATE folder. Then go to
File>Build and pick “Disc” from the submenu. In the Build panel, you may choose the DVD size from
3.95 GB, 4.7 GB or 8.54 GB Dual Layer. Under Output, choose “DVD Disc.” When you click “Build,”
choose “Ignore and Continue” when the box pops up warning there is a problem which may cause
the disc not to play; it is unnecessary to make a playable video DVD. After you click, the process will
continue automatically with instructions.
Digital Tape
For archiving to digital data tape, Quantum offers DLT and LTO tapes and drives. LTO-3 tapes are
high-capacity and can store several hundred gigabytes of data.
Flash Media/Drives
Footage can also be stored on flash drives or memory cards. Footage stored on such drives should
be transferred to hard disk before being used. The process for transferring to a flash drive or
memory card is the same as for storing to hard disk drive.
Adobe CS5 Production Premium Panasonic AVCCAM
3
Accessing AVCHD Footage On Your Computer
There are a number of ways to access AVCHD data with a computer.
Reading AVCHD On SD Cards Directly
The quickest path to working with AVCHD footage would be to read the data directly from the SD
card – this can allow you to edit your footage literally seconds after shooting, with no waiting for
capture or transcoding. The footage is ready to edit as soon as it is recorded.
As the SD card is a mass storage device, it can be read directly by either Windows or the Mac OS.
Various options exist to connect an SD card directly to a system. Many computers have internal SD
card readers or may accept external readers via USB or 1394. The AVCCAM camcorder itself can be
used as a card reader when connected to the computer. Likewise, the AG-HMR10 handheld recorder
can be used as a card reader.
Note: for optimal performance, it is
recommended to store the AVCHD
data on hard drives in a striped
RAID, allowing for increased transfer
speeds, very useful for better
playback performance of multiple
streams and clips with added effects.
Using any of these methods, Adobe Premiere Pro CS5 can read, import, and edit the footage on the
cards exactly as if it were stored on a hard disk drive.
Offloading Cards To Hard Disk
AVCHD footage may also be offloaded to hard disk drive and accessed by by Production Premium
applications as any other files.
Files may be transferred directly from the card to an internal or external hard drive using any of the
methods above to connect the card to a computer, and then using the computer’s operating system
to transfer the files. You may transfer the footage simply by copying the PRIVATE folder to your
desired location.
Direct access of AVCHD data is the same whether you read from the SD card or from a hard disk
or other storage device – you use Windows Explorer or Mac Finder to navigate to the drive, and
then to the specific volume, where you can access any of the data in the AVCHD PRIVATE folder or
subfolders. You are now ready to import the AVCHD data into a CS5 application.
Part 2: Working In Adobe Premiere Pro
Adobe Premiere Pro Project Setup
When opening Adobe Premiere Pro, you will be asked to create a new project, or open an existing
project. If you create a new project, you will then be asked to create a sequence.
It is not necessary to create a sequence before entering Adobe Premiere Pro. It is, however,
necessary to create a sequence before you can begin work, so it is recommended that you create a
sequence at this time.
You may create multiple sequences with any settings and group them together into a single
sequence of any settings. So, you may work in one sequence with settings for 720p and in another
with settings for 1080i -- even at different frame rates -- but you may nest either sequence into the
other, or you may nest them both into a third sequence of even different settings. How close to realtime playback you are able to achieve will depend upon your system hardware.
If you do not create a sequence when opening the project, you can create one by pressing
Control+N (Windows) or Command+N (Mac), or by right-clicking, or Control+clicking (Mac), in
the Project panel and choosing “New Item>sequence.” You will then be given options for project
presets; groups of presets will appear in the “Available Presets” box of the “New sequence” panel,
represented as file folders.
Sequence Settings
For AVCHD material, there are a number of preset options found in the AVCHD folder. Your best
option is to choose a sequence setting which fits most, if not all, of the footage you will be using in
the project.
1080i/p -- for any footage, the project preset should be chosen according to the frame rate of the
footage, including whether the footage is progressive or interlaced. In the AVCHD folder, there are
subfolders labeled “1080i” and 1080p” containing the 1080 presets. AVCCAM cameras offer several
Adobe CS5 Production Premium Panasonic AVCCAM
4
frame rates in 1080 mode, including 60i and 50i, as well as 24p, 25p, and 30p, depending on the
model and region.
AVCCAM cameras record AVCHD at various quality levels; the highest record 1080 footage as fullraster 1920x1080. Lower-quality settings record the footage as 1440x1080 with a pixel aspect ratio
of 1.333, also called “anamorphic”.
If you recorded footage at the lower quality HE, HN, or HF modes, select the Anamorphic preset. If
you recorded in HG, HA, or PH modes, do not select the Anamorphic preset.
•
For 1080/60i footage (HE, HN, or HF), choose AVCHD 1080i30 (60i) Anamorphic.
•
For 1080/60i footage (HG, HA, or PH), choose AVCHD 1080i30 (60i).
•
For 1080/50i footage (HE, HN, or HF), choose AVCHD 1080i25 (50i) Anamorphic.
•
For 1080/50i footage (HG, HA, or PH), choose AVCHD 1080i25 (50i).
24p, 25p, and 30p footage may only be recorded in full-raster PH mode, so do not select an
Anamorphic preset.
•
For 1080/24p footage, choose AVCHD 1080p24.
•
For 1080/25p footage, choose AVCHD 1080p25.
•
For 1080/30p footage, choose AVCHD 1080p30.
720p -- the sequence presets for 720p footage are contained in a single folder (see Fig. 1 above).
As with 1080 footage, choose the preset which best matches your footage. All recording modes are
full-raster, non-anamorphic.
•
For 720/60p footage, choose AVCHD 720p60.
•
For 720/50p footage, choose AVCHD 720p50.
•
For 720/30p footage, choose AVCHD 720p30.
•
For 720/25p footage, choose AVCHD 720p25.
•
For 720/24p footage, choose AVCHD 720p24.
Importing Footage Into Adobe Premiere Pro
There are three ways to import AVCHD data into Adobe Premiere Pro CS5. (You may import footage
before creating a sequence. However, it is recommended to create a sequence first.)
The Media Browser
The best method for importing AVCHD files is using the Media Browser panel. You will see a list
of your storage devices; clicking on the
arrow next to each letter will reveal the
folders on that drive. Navigate by clicking
the disclosure triangles to a drive or folder
containing a AVCHD PRIVATE folder
(“twirling to a folder”) – or to an SD card
itself if mounted on the system – and in
the sub-panel immediately to the right,
thumbnails of your clips will appear.
The video contents will appear when you
reach the PRIVATE folder level; navigating
further into the PRIVATE folder is not
necessary.
Adobe CS5 Production Premium Panasonic AVCCAM
5
To the right of the clip Name, you will see numerous
columns of metadata. You can select which columns
are displayed, and in what order, by clicking on the
flyout menu icon in upper right of the Media Browser
panel, and choosing “Edit Columns.”
You can sort the clips by any of the metadata
columns, so if you wish to group your clips by Name,
or any other of the applicable columns, you may do
so before importing.
If you have shot a variety of formats or frame rates,
a good way to sort footage is to activate the Frame
Rate and Frame Size columns and move them
up near the Name column. You can then easily determine which footage is which format and/or
frame rate. Note that the footage
frame rate will include interlaced or
progressive information, and that
1080i60 material will read as 59.94i,
while 1080p30 material will read as
29.97p, making it easy to tell which
is which.
Adobe has created a Workspace
configuration called “Metalogging”
which is useful when browsing
and importing footage
using the media browser.
(Panel>Workspace>Metalogging,
or Alt+Shift+5 (Windows) or
Option+Shift+5 (Mac))
To import a clip from the Media
Browser into Adobe Premiere Pro
directly, you can drag it to the Project
panel, or you can right-click and
choose “Import.”
If you wish to review clips before
deciding to import them, a clip in the
Media Browser can be opened in the Source panel only – without importing into the project -- by
double-clicking. There, you can set In/Out points and then send the selection only to the timeline.
You can drag/drop the selection by cursor, or, you can send the clip to the Current Time Indicator on
the timeline by pressing the comma key for an Insert edit, or the period key for an Overlay edit. You
can also click the corresponding edit buttons under the Source panel. The selection will appear in
the timeline, and the full clip will automatically be imported into the project.
File>Import
You may also use the Import selection under the File Menu (or Ctrl+I in Windows or Command+I on
the Mac). In the Import dialogue box, you would then navigate to the STREAM folder and select the
MTS files for import.
Drag And Drop
You may also use Windows Explorer or Finder to navigate to the STREAM folder of an AVCHD SD
card. Then, you may simply drag the video files to the Project panel in Adobe Premiere Pro.
Working With the Footage In Adobe Premiere Pro
Working With Metadata
Adobe Premiere Pro CS5 has powerful tools for media management by working with metadata
stored with each clip.
Under the Window menu, the Metadata panel can be activated. The panel is divided into three
sections – Clip, File, and Speech Analysis. The Speech Analysis section will display the text transcript
of the spoken words in the audio if the clip has been analyzed with the Analyze Content tool under
the Clip menu.
Note:
The metadata discussed in this
section is XMP metadata created
and used by Adobe CS5 Production
Premium applications. This is not
the Panasonic metadata stored by
the camera.
Many metadata fields in the Clip and File sections may be edited. The data will be saved and
viewable as an XMPTM file created to be associated with the clip. This XMP data is viewable in other
applications which support XMP, including all the other applications in the Creative Suite. Thus, the
changes made are viewable, and the metadata is editable, in other CS5 applications such as After
Effects and Adobe Encore. The XMP files are saved in the STREAM folder of the AVCHD card.
Adobe CS5 Production Premium Panasonic AVCCAM
6
Working with Media In The Project Panel
All project media files appear in the Project panel. The media files can be listed entirely as separate
items, or they can be organized into a file/bin structure for ease of media management.
Media items are listed with
numerous columns of metadata.
The default set of columns is the
legacy display of information
common to previous versions of
Adobe Premiere Pro, but they can
be deselected, or more/different
columns added, by clicking on the
flyout menu icon in upper right of
the Project panel, and choosing
“Metadata display.” Column
order can be changed by dragging
columns.
In order to edit and save the XMP
metadata, including making a
speech transcript, it is important
to make sure any write protection
is disabled. In Windows, uncheck
“Read Only” in the Contents folder
Properties, and make sure it applies
to all subfolders and files. In the
Mac OS, make sure the Contents
folder’s Ownership & Permissions
is set to “You Can Read & Write.”
In the Metadata Display panel,
you can choose which columns to
display by checking or unchecking
their boxes.
The project can be sorted on
any of the columns. Some of the
metadata in the columns can
be edited directly in the Project
panel; changes will be saved to
the XMP file.
Automatic 2:2 Pulldown
Removal
AVCCAM cameras do not record 24p footage as over-60, only as native 23.976p, so there is never
any pulldown to remove.
However, in both 1080 and 720 PH modes, 25p and 30p footage is recorded, respectively, as over-50
and over-60 with 2:2 pulldown.
Adobe Premiere Pro will recognize 25p and 30p footage and work with the footage in their native
frame rates instead of 50i/p or 60i/p.
Editing Footage In Adobe Premiere Pro
Footage can be edited either directly from the SD cards, as noted before, or from a hard disk drive.
With a fast, modern processor and at least 4 GB of RAM, Adobe Premiere Pro can edit multiple
streams of footage at real time, and is helped especially with the new Mercury Playback Engine,
which provides GPU acceleration (see Previewing below) multicore optimizations, and native 64-bit
support.
Editing from DVD or optical media is not recommended; the data transfer speeds from the drive will
be too slow for effective editing.
Generally, any type of supported media may be dropped into a timeline of any sequence settings
without any sort of transcoding or rendering. A red bar may appear above footage which does not
conform to the sequence settings; this means that the footage must be rendered for final output,
but (pre)rendering isn’t necessary for playback on the timeline. Timeline playback may not be fullquality or without dropped frames, however. (If you wish to render for full-frame rate playback,
press Enter, and Adobe Premiere Pro will create a rendered file and replace the footage with it.)
A yellow bar indicates that a clip does not match the settings of the sequence, but can generally still
be played back in real-time without rendering. A green bar indicates that all necessary rendering is
completed.
Adobe CS5 Production Premium Panasonic AVCCAM
7
Previewing To An External Monitor
Previewing a project is not limited to the preview panel in Adobe Premiere Pro. There are several
options for an external preview. This offers numerous advantages. The entire video frame can
be seen at full size, allowing for more detailed work; the project can be sent to the type of screen
which will be the intended primary viewing source, such as an NTSC or PAL monitor or an ATSC
High-Definition monitor, allowing an accurate representation of the picture for purposes of image
manipulation, particularly color correction. It can be easier for display of a work-in-progress to a
client or a group of people, etc. In general, it allows you to see your work as closely as possible to
how your audience will see it.
All preview options are found by clicking the Output button under the preview panel, then choosing
“Playback Settings . . .”
From there, you will be given a dialogue panel; external preview options are found in the “External
Device” drop-down menu in the “Realtime Playback” box.
For most projects, the preview can be sent as DV via 1394 through a DV camera or deck to a
monitor, through composite or S-Video cables/inputs. This is ideal if working in a DV or standarddefinition project, but it is not ideal if working in HD.
HD material in either version can be previewed using an HD preview card, such as AJA’s Kona (Mac)
or Xena (Windows) cards, or Blackmagic Design’s DeckLink or Intensity Pro cards.
The Mercury Playback Engine works
hand-in-hand with NVIDIA® CUDA™
technology and the following
graphics cards are now available:
•
•
•
•
•
Quadro CX (Windows)
Quadro FX 3800 (Windows)
Quadro FX 4800 (Windows
and Mac)
Quadro FX 5800 (Windows)
GeForce GTX 285 (Windows
and Mac)
Please see www.nvidia.com
for system requirements and
compatibility.
Adobe is planning on supporting
additional cards as they become
available, including some of the
new NVIDIA solutions based on the
upcoming Fermi parallel computing
architecture. For an up-to-date list
of supported cards, please see www.
adobe.com/go/64bitsupport.
Preview is accelerated using a Mercury Playback Engine supported NVIDIA graphics card (GPU). The
GPU can accelerate video playback with heavy effects to real-time if the card is powerful enough,
depending on the footage type and level of effects. This can be very useful when working with highdefinition footage like AVCHD. Playback is also enhanced by OpenGL support with some effects.
The Windows version of Adobe Premiere Pro can also use the graphics card to preview on an
external HD monitor if the card has a native HDMI output port, or through a DVI output using a
DVI-to-HDMI adapter. For this, you must use the GPU’s driver software to set up the output as a
Windows display. Then, you should see that display as an option in the External Device drop-down.
Exporting Footage From Adobe Premiere Pro
Exporting a sequence can be done in several ways.
Direct Export
In CS5, sequences or selections can be exported to any format directly. Choose File>Export>Media,
then select the desired format and preset. Make adjustments to settings as desired. Press “Export.”
The video will then be exported to the location you choose.
Export Via Adobe Media Encoder
To export a completed movie file, go to File>Export>Media, and then choose the desired format
in the Export Settings box. Click “Queue,” and then Adobe Media Encoder will open, and the
project will appear as a selection in the Source panel. From here, the output format settings may be
changed, or multiple format settings may be added.
When encoding is started by pressing “Start Queue,” a movie file in the desired format will be
created; multiple files will be created if multiple settings selections are made.
Exporting To After Effects and Adobe Encore Via Dynamic Link
Save time during the authoring workflow by sending sequences directly from Adobe Premiere Pro to
Adobe Encore, where they open immediately without intermediate rendering, using Adobe Dynamic
Link. From within Encore, open Adobe Premiere Pro sequences and then use the Edit Original
command to make a change to the sequence. Any changes you make in Adobe Premiere Pro are
automatically reflected in Encore. Encore also reads chapter markers in the sequence. (The Edit
Original command is also useful when modifying a media file in Photoshop CS5 Extended.)
An Adobe Premiere Pro project may be sent to Adobe Encore or opened as a new composition in
After Effects by going to File>Adobe Dynamic Link and choosing the appropriate selection. The
chosen application will then launch and the Adobe Premiere project will appear in the Project panel
of the application. Dynamic Link between Adobe Premiere Pro and After Effects is only supported in
the CS5 Production Premium or Master Collection; it is not available with the stand-alone versions
of Adobe Premiere Pro CS5 or After Effects CS5.
Adobe CS5 Production Premium Panasonic AVCCAM
8
Edits, transitions, and clip effects will be preserved when opened in the other applications. Any
changes to the sequence made in Adobe Premiere Pro will be immediately reflected in the other
applications.
Opening Adobe Premiere Pro Project Files In Other CS5 Applications
After Effects and Adobe Encore have the ability to open Adobe Premiere Pro .prproj files, including
AVCHD projects. A .prproj file can be opened directly in After Effects by going to File>Import>Adobe
Premiere Pro Project and navigating to a .prproj file. An Adobe Premiere Pro sequence can be
opened at File>Adobe Dynamic Link>Import Adobe Premiere Pro Sequence and navigating to a
.prproj file. All the sequences in the Adobe Premiere Pro project will then be displayed and can be
chosen from.
A .prproj file can be opened in Adobe Encore through File>Adobe Dynamic Link>Import Adobe
Premiere Pro Sequence and again navigating to the file. As with After Effects, the sequences
associated with the Adobe Premiere Pro project will then appear and can be chosen from.
Part 3: Working With AVCHD Footage In After Effects
After Effects, the industry-standard compositing, visual effects, and motion graphics program,
supports AVCHD material natively. It supports all AVCHD formats and frame rates. After Effects can
accept the AVCHD files directly in a stand-alone composition, or it may accept Adobe Premiere Pro
AVCHD projects or sequences via Dynamic Link, or by opening sequences directly from the .prproj
file.
Importing Footage Into After Effects
AVCHD material can be imported by going to File>Import and then navigating to the STREAM folder,
or by dragging/dropping the MTS files from the folder into the Project panel.
After Effects Project Setup
The equivalent to a sequence in After Effects is a composition. If you have imported your footage
into the project before creating a composition, you can simply drag a footage asset to the Create
a New composition square at the bottom of the Project panel. This will automatically create a
composition which matches the properties of the footage.
To create a composition manually, go to Composition>New Composition. A dialogue box will
appear in which you can define the attributes of the composition, including frame size, frame rate,
etc.
There are numerous presets available. As with Adobe Premiere Pro, choose the preset which best
fits your footage, or define your own composition settings manually. If your footage is shot in the
1080 HG or HE modes, it is best to start with an HDV preset, as it will match the frame size and pixel
aspect ratio. Change the frame rate if necessary. For 1080 HA or PH footage, start with an HDTV
1080 preset and change the frame rate if necessary. For all 720 footage, start with an HDV/HDTV
720 preset and, again, change the frame rate if necessary.
Working With AVCHD Footage In After Effects
Working With Pulldown
As with Adobe Premiere Pro, there is no need to remove pulldown in 24p footage, because it is
recorded at its native frame rate. However, as 1080/25p and 1080/30p footage is recorded in 50i or
60i streams, respectively, After Effects will read the footage as interlaced. To have After Effects read
the footage as true (progressive) 25p or 30p, it is necessary to use Interpret Footage. Right-click on a
footage item and select Interpret Footage>Main.
The Interpret Footage box will appear. From there, in the “Fields and Pulldown” box, you can choose
to turn “Separate Fields” off. After Effects will then recognize 720/30p footage as 29.97p.
Integration With Adobe Premiere Pro
After Effects can be integrated with Adobe Premiere Pro in a number of ways.
Importing Adobe Premiere Pro Sequences -- As noted above, After Effects can open Adobe
Premiere Pro .prproj files directly. When opened, all of the Adobe Premiere Pro project media and
sequences will appear in the Project panel of After Effects.
Adobe CS5 Production Premium Panasonic AVCCAM
9
Dragging an Adobe Premiere Pro sequence to a composition timeline will open that sequence on
the timeline. All media will appear in the same arrangement as it does in the Adobe Premiere Pro
sequence, and will preserve some effects and transitions applied in Adobe Premiere Pro.
(Opening an Adobe Premiere Pro project in After Effects is the same as copying/pasting between
Adobe Premiere Pro and After Effects; see Copy Between After Effects and Adobe Premiere Pro in
Adobe After Effects Help for a list of preservations and conversions.)
Using Adobe Dynamic Link -- in Adobe Premiere Pro, an option exists under File>Adobe Dynamic
Link to “Create New After Effects Composition.”
When this option is selected, After Effects will launch, and a composition will be created. That
composition will be linked to the Adobe Premiere Pro project as a composition which appears in the
Project panel. That composition may be dropped into an Adobe Premiere Pro sequence as a selfcontained clip. Any changes made in the composition in After Effects will automatically be reflected
on the timeline in Adobe Premiere Pro.
Likewise, in the After Effects File menu, a choice under Adobe Dynamic Link is “New Adobe
Premiere Pro Sequence.” Here, a sequence will be created in Adobe Premiere Pro and appear as
“Linked Sequence” in the After Effects Project panel. Any changes made to the sequence in Adobe
Premiere Pro will be automatically reflected in the composition in After Effects.
Also available is the ability to open selected clips in the Adobe Premiere Pro timeline in After Effects
and replace them automatically with an After Effects composition. In Adobe Premiere Pro, select
the desired clips, then right-click or Control-click one of them and select “Replace With After Effects
Composition.” After Effects will then launch and a new composition will automatically be created
with the selected clips already on the composition timeline.
In Adobe Premiere Pro, the selected clips will then
show as a single clip. Changes made to the clips in the
composition will be reflected on the Adobe Premiere Pro
timeline each time you return to Adobe Premiere Pro.
Navigating to and selecting STREAM folder MTS
files in Import dialog box.
Import option under File menu in After Effects.
Rendering And Exporting Footage From After Effects
As a Movie File
To export a movie from After Effects, use the render queue. You can access the render queue by
going to Composition>Add to Render Queue. Here, you can select from many formats and format
settings, or add multiple formats and settings to create multiple movie files of multiple formats.
As an Adobe Premiere Pro Project
A choice in the File>Export menu is “Adobe Premiere Pro Project.” This will allow you to export an
After Effects project in Adobe Premiere Pro format. The resulting .prproj file can then be opened
in Adobe Premiere Pro; a folder will appear in the Project panel containing all of the media in the
project, and each composition will appear as a separate clip. Compositions can then be added to a
sequence timeline as a self-contained clip.
Adobe CS5 Production Premium Panasonic AVCCAM
10
Part 4: Overview Of Adobe CS5 Production Premium HD Delivery
Options
There are several common methods for delivering HD content. These include exporting for web
content, for Blu-ray Disc delivery, and to tape for broadcast. Adobe Media Encoder is a separate,
64-bit software application that saves you time by automating the process of creating multiple
encoded versions of your source files and Adobe Premiere Pro sequences. Adobe Media Encoder
is part of Adobe Premiere Pro, and features an intuitive user interface that provides visual feedback
on your encoding process. You can set up multiple items for batch encoding, manage priorities, and
control advanced settings for each item individually. Batch encoding lets you use any combination
of sequences and clips as sources and encode to a wide variety of video formats, including FLV, F4V,
Windows Media, QuickTime, and other popular codecs such as MPEG-2, MPEG-4, H.264, AVC-Intra,
and DPX.
Web Content
A very common method of delivering HD content is via the World Wide Web. The most common
formats for delivery are Flash, QuickTime, Windows Media, and AVC/MP4. Flash is also often used
for delivering high-resolution video content on CD or DVD. Web formats are created as data files
and most formats are exported from Adobe Premiere Pro through Adobe Media Encoder.
Flash video
Standard .f4v and .flv files can be created from Adobe Premiere Pro via Adobe Media Encoder, a
separate included software application that automates the process of creating multiple encoded
versions of your source files and sequences. Save time with Batch encoding in the background in
Adobe Media Encoder, manage priorities, and control advanced settings for individual files.
A project can also be sent via Dynamic Link to Adobe Encore, which can encode in .flv or .swf format
for direct delivery to the Web. This creates a web version of a DVD or Blu-ray Disc project.
Other Formats
The other Web formats can be encoded from Adobe Premiere Pro or After Effects using Adobe
Media Encoder. The available common Web formats available include, H.264, MPEG-4, Windows
Media, and QuickTime.
Most formats have a wide variety of presets available, and each can be customized. These options
range from small frame all the way up to HD content.
HD Tape For Broadcast
As with archiving, printing to HD tape for broadcast will require the installation of a High Definition
hardware card, such as those from AJA or Blackmagic Design, and a deck which records in the
desired format. To print to tape, choose File>Export to Tape, and then the appropriate deck option
through the hardware card.
Blu-ray Disc
Adobe Encore CS5 software is a versatile, interactive authoring tool for video distribution that allows
you to deliver your high-definition work complete with advanced functions such as pop-up menus,
subtitles, and more to clients or consumers on standard-definition DVDs and high-definition Blu-ray
Discs. Adobe Encore can be used to make a Blu-ray Disc image, or with a Blu-ray burner, burn a Bluray Disc.
An Adobe Premiere Pro or After Effects project can be sent by Dynamic Link to Adobe Encore, which
can then author the project for Blu-ray delivery. A selection of Blu-ray format options is available.
Encore simplifies production and preserves control over interactivity and output. Instead of doing
manual scripting, visually drag and drop assets to create your DVD and Blu-ray Disc navigation
with the visual flowchart. Design full-featured interfaces by using robust text tools, high-definition
royalty-free menu templates and art, and automated menu generation.
P2 Format
Adobe Media Encoder can also be used independently to create virtual P2 cards from stand-alone
media files. For example, a card can be made from a single MTS video file by choosing “Add . . .” and
Adobe CS5 Production Premium Panasonic AVCCAM
11
then navigating to the STREAM folder and choosing the file. A new P2 card can be made, containing
only that video file.
Any video file can be transcoded to a P2 format using Adobe Media Encoder, simply by choosing
“P2 Movie” as the Format, and then choosing one of the options in the Preset drop-down. It is
generally best to choose a DVCPRO HD or AVC-Intra setting most closely matching the original
footage. The presets may also be edited, but straying from the existing presets may create a file
incompatible with P2 formats and equipment.
Summary
Through native, comprehensive, and flexible support for AVCHD files, Adobe Premiere Pro
provides fast import of AVCCAM content without file transcoding or rewrapping, preserves image
quality, and allows users to adjust playback resolution to meet the performance and image-quality
needs of every post-production task. Native format support together with powerful real-time
editing tools make Adobe Premiere Pro the hub of comprehensive, efficient, and flexible Panasonic
workflows.
System requirements
Please visit:
www.adobe.com/products/
premiere/systemreqs
For more information
Product details:
Adobe Production Premium:
www.adobe.com/products/
creativesuite/production
Adobe Premiere Pro:
www.adobe.com/products/
premiere
Written by David Jimerson, co-owner of Wrightsville Beach Studios, Ltd. David Jimerson is a producer and the editor of
series of instructional DVDs for Panasonic cameras and workflows and general video production available at http://www.
wrightsvillebeachstudios.com.
Adobe Systems Incorporated
345 Park Avenue
San Jose, CA 95110-2704
USA
www.adobe.com
Adobe, the Adobe logo, and Adobe Premiere are either registered trademarks or trademarks of Adobe Systems Incorporated in the United States and/
or other countries. Mac and Macintosh are trademarks of Apple Computer, Inc., registered in the United States and other countries. QuickTime and the
QuickTime logo are trademarks used under license. Intel and Pentium are trademarks or registered trademarks of Intel Corporation or its subsidiaries in the
United States and other countries. Microsoft and Windows are either registered trademarks or trademarks of Microsoft Corporation in the United States and/
or other countries. Panasonic is a registestered trademark of Panasonic Corporation. AVCHD is a registered trademark of Matsushita Electric Industrial Co.,
Ltd., and Sony Corporation. All other trademarks are the property of their respective owners.
© 2010 Adobe Systems Incorporated. All rights reserved. Printed in the USA.
90000000 3/10