1
KVM SWITCH
USER'S MANUAL
The USB KVM Switch offers the possibility of sharing keyboard,
mouse and monitor between two ~ four computers, true USB
interface to support its driver-free and plug-n-play features, which
allow users to easily install and use the KVM Switch.
Dual monitor VGA / DVI display connections are supported.
The DVI interface technology is tailored to modem digital Flat
Panel Display, it implements genuinely digital signal transmission
over the cable to reduce undesired distortion from conventional
analog/digital conversion.
Robust and reliable with metal casing, suitable for use in
environments pervasive with electromagnetic interference and
wherever a sturdy protective metal case is needed.
e Dual display monitor/TFT-LCD connection - VGA/DVI.
® USB mouse & keyboard interface supported.
e Supports stereo audio sound.
e Direct channel selection, operation and keyboard hotkeys.
e Supports Windows 98SE/ME/2000/XP/Vista, Linux, Mac OS.
e Hot Plug - add or remove connected PCs for maintenance
without powering down the KVM switch or PCs.
e No software required.
® Auto Scan function for monitoring PC operation,
e LED display for monitoring port status.
e Buzzer sound for swilching port confirmation while use
Keyboard hotkeys
e Heavy metal casing for best shielding and protection.
a
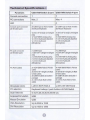
Functions | USB KVM Switch 2-port | USB KVM Switch 4-port
Console connection | 1 1
PC conneclions Max. 2 Max. 4
LED | 2 4
Console port connector | 2x USB A-type on front of switch | 2x USB A-type on front of switch
(all female type) (for Mouse Keyboard } | (for Mouse [Keyboard |}
1x DVI (18+1) Single Link (Digital | 1x DVI (18+1) Single Link (Digital
only) | ony)
1x VGA HDB15 (Analog only) 1x VGA HDB15 (Analog only)
1x 3.5 mm Audio jack (Speaker) | 1x 3.5 mm Audio jack (Speaker)
1x 3.5 mm Audio jack 1x 3.5 mm Audio jack
(Microphone) | (Microphone)
PC port connector 2 x USB B-type 4 x USB B-type
(all female type) 2x DVI (18+1) Single link (Digital | 4 x DVI (18+1) Single link (Digital |
only) only) |
2 x VGAHDB 16 {Analog only) | 4 x VGAHDB 15 (Analog only)
2 x 3.5mm Audio jack (Speaker) | 4 x 3.5mm Audio jack (Speaker)
2 x 3.5mm Audio jack 4 x 3.5mm Audio jack
(Microphone) (Microphone)
PC Port Cables 2x VGA HOB15 Male to Female — | 4x VGA HDB15 Male to Female
cables cables
2х DVI-D 18+1 Single Link Male — | 4x DVI-D 18+1 Single Link Male
lo Male cables to Male cables
2x USB À-B cables (included in | 4x USB A-B cables (included in
package) package)
2x 3.5mm Audio Male to Male 4x 3.5mm Audio Male to Male
cables cables
Dimension (mm) L:201.3 W:75 H:43.2 L:331.3 W:135 H:43.2
| PC selection Keyboard hotkeys / push buttons of KVM Switch
| Scan Intervals 5,10,15,20,25,30,35,40,60 sec.
| Keyboard Emulation [USB —
Mouse Emulation — | USB >
VGA Resolution Up to 2048 x 1536
DVI Resolution Up to 1920 x 1200
©
Daisy Chain and Levels | No
On Screen Display No
Power Type Bus-powered or DC 5V
Housing Heavy metal casing
Operating Temperature | 0 to 40°C
Storage Temperature | -20 lo 60°C
Humidity 0 to 90% RH, non-condensing
USB KVM Switch 2-port USB KVM Switch 4-port
USB KVM Switch 1pc | USB KVM Switch 1pc
USB1.1v A-B Cable 2 pcs |USB1.1v A-B Cable 4 pcs
User's manual 1 pc | User's manual |1 pc i
— Functions USB KVM Switch 2-port | USB KVM Switch 4-port
Console side 1x USB Keyboard | 1x USB Keyboard
1x USB Mouse | 1x USB mouse
ix VGA. 1 x DVI Monitor 1x VGA, 1 х DVI Monitor
1x Microphone w3.5mm jack | 1x Microphone 3.5mm jack
1x Speaker 2.0 sot wid 5mm jack | 1x Speaker 2.0 set wid.Smm jack
3
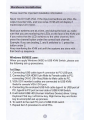
2-port USB KVM Switch :
4-port USB KVM Switch :
y 000
| - 0 D B
J 3000 EE
© © «> ‘о SEG o «ED o o CD» io 0 ED!
|e 5 ни [Е) «ан»! [Е] «ан»: [Е] «но»
2 TL ga hr oH AE Re TL
PC-1 1.
Hardware Installation
Please read this important installation information:
Never mix DVI with VGA. If the input connections are VGA, the
output must be VGA, and vice versa. KVM will not display if
inputs/output are mixed.
Boot your systems one at a time, and during the boot up, make
sure that you are monitoring the LEDs on the face of the KVM unit.
If you notice that the LED switches to the other channel, then
press the channel button under the correct boot channel.
Example: If you are booting 2, and it switches to 1, press the
button under 2.
Keep monitoring the KVM unit until the systems are done with
their boot up sequence.
Windows 98/98SE user:
When you apply Windows 98SE to USB KVM Switch, please use
the following set up procedures:
1st Step:
1. Connecting USB cable type-A connector to PC USB port.
2. Connecting VGA HDB15 pin Male to Female cable to PC:
connecting DVI-D (18+1key) Male to Male cable to PC.
3. VGA / DVI monitor's cables are connected to USB KVM
Switchs console VGA / DVI port,
4. Connecting the enclosed USB A-B cable type-A to USB port of
PC, type-B to PC port on rear side of USB KVM Switch.
5. It will install USB HID (Human Interface Device) driver. Using
Keyboard Tab key, Left Arrow key, Right Arrow key and Enter
Key to accomplish set up process.
. To switch to the next PC port of USB KVM switch
. Repeat item 5 procedure to all of PCs.
| ©)
@
2nd Step:
1. Connecting USB keyboard and USB mouse to USB KVM
Switch's console USB port (on front of switch.)
Windows ME/XP/NT/2000 user:
When you apply Windows ME/XP/NT/2000 to the USB KVM
Switch, please use the following set up procedure:
1. Connecting the enclosed USB A-B cable type-A to USB port of
PC, type-B to PC port on rear side of USB KVM Switch
2. Connecting VGA HDB15 pin Male to Female cable to PC;
connecting DVI-D (18+1key) Male to Male cable to PC.
3. VGA / DVI monitor cables are connected to VGA / DVI port of
USB KVM Switch.
4. Connecting USB keyboard to USB KVM Switch's USB port (on
front panel).
5. Connecting USB mouse to USB KVM Switch's USB port (on
front panel)
Hot Key Definition :
To send commands to the USB KVM Switch, the NumLock Key
must be pressed twice within 2 seconds. If you have not pressed
any key in hot key mode within 2 seconds, the keyboard will back
to under Operating System control state. Note : ++ " means
press key within 2 seconds.
EEE Secs
№ (A | = switch to Previous Channel
EE EEN EE EEE EE ET EE EE OE Em mye we ie A A A A A EES. EE EE EE. EEE CEA тн
Select PC port:
Num Num = д
© | r Lack | + 1,2,3 ог 4@ = Toselect PC1~PCA
Beeper On/Off :
E | + + 3 = Beeper OvOIf (Audible feedback when beeper
| is On and keep the device in sient mode when
beeper is Off, factory default is On.) (only
beeper sound when use keyboard hotkeys to
switch port, no beeper sound when use push
buttons on switch).
== E aE ae E EE EE A EE EE ET EE OE cee Ee i i eG AA A A a ME N N O CC"
Auto Scan Mode :
—
+ er S | = Auto Scan every 10 seconds, (ESC” swilches to
regular key code), (Note: Auto Scan mode only
works with at least two PCs powered on
simultaneously)
EE EET OEE EE EE OEE OE CEE TEE EE CEE Emm сти mem SS Ee ef mm fA ER. EER ERD A A CA EER A A ESL Em Emm mm
Set Auto Scan Rate :
ps 5 =
| + | - | - A = Sel auto scan rale("ESC”
= | cs switch to regular key code),
(each represents 5 seconds’
interval latency lo 60 seconds
correspondingly.
Digital Number 1: 5secs 2: 10secs 3:15 secs 4: 20 secs 5:25 secs |
6: 30 secs 7: 35 secs 8: 40 secs 9: 60 secs
Usage
Normally, there is one LED is always lit (ie. the switch is
connected to this PC port) for one PC port and the other PC ports
LED is off, when you power on KVM switch,
When you select one of two PCs, one LED will shut down and the
selected port LED is flashing.
roubleshooting
Ba ii ©
Ensure that all cables are well seated. Label all of cables with the
number for each respective computer to avoid confusion.
1. The USB KVM Switch draws the power from USB port of
computers. If the computers such as desktop computer, laptop
computer or the other computers can not support enough power
to the USB KVM switch, please add a DC5V, 1Amp to the power
jack (on rear side of USB KVM switch).
2. Don't press any keys on the keyboard while the selected
computer is booting up. Otherwise, it might cause the keyboard
error or keyboard is not detected at PC side.
3. If the computer boots up fine and keyboard doesn't work, then
make sure the keyboard works when directly plugged into the
computer.
4. The mouse is not detected during PC boot up.
Make sure the mouse works when directly plug into the
computer, and make sure the mouse is a true USB mouse. A
combo (USB+PS/2) mouse will work just as long as it is set for
USB mouse with the correct adapter. If not, please try another
pure USB mouse.
5. Avoiding moving the mouse or pressing the mouse buttons
when switching the port.
6. Some of DVI cards may be unable to support Hot-swappable.
For instance, if you like to connect DVI display with the USB
KVM switch to prevent errors and shut down, please follow the
steps below.
® Before power on the DVI -PC, please firstly connect the DVI -
PC to the USB KVM Switch (i.e. PC 1).
e Push the button of selected DVI-PC (i.e. PC 1) on the front
panel of USB KVM switch.
e Connect other devices such like speaker, microphone to the
USB KVM Switch
® Power on the DVI-PC and wait until the DVI display is well
appeared,
e After all, may change to another channel (i.e. PC 2~PC4) if
needed.
7. When the console PC is power-off, the USB KVM switch will
detect the power-on PC approx. 20 seconds.
10,