1
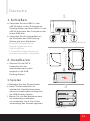
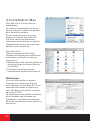
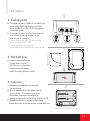
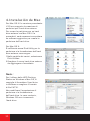
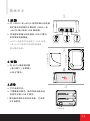
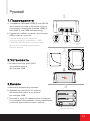
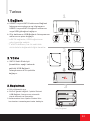
P/N:ST0015
HDD Docking Station
Contents
English
02
1.Connect
2.Install
2.安裝
3.Play
3.啟動
4.Mac Installation
4.Mac 安裝設定
Deutsche
04
1.Schliesen
简体中文
2.Installieren
2.安装
3.Spielen
3.启动
4.Mac Installation
4.Mac 安装设置
Francais
06
日本語
2.Installation
2.インストール
3.開始する
4.Installation Mac
4.Mac のインストール
08
1.Conectar
Русский
2.Instale
2.Установить
3.Начало
4.Instalacion de Mac
4.Установка Mac
Italiano
16
18
1.Подсоедините
3.Jugar
1.Collegare
14
1.接続
3.Jouer
Espanol
12
1.连接
1.Connect
01
繁體中文
1.連接
10
Turkce
1.Bağlantı
2.Installare
2.Yükle
3.Giocare
3.Başlatmak
4.Instalacion de Mac
4.Mac Kurulum
20
English
1
1.Connect
a. Connect USB2.0 or eSATA cable to
the back of Docking Station and
computer's USB2.0 or eSATA port
or USB hub.
b. Connect the power cable to the
back of USB Docking Station and
power outlet.
* eSATA connection has the priority
over USB connection.
* 1 eSATA cable controls both hard
drives connectivity.
USB 2.0
DC Jack
3.5” HDD
2
2.5” HDD
2.Install
eSATA
c. Insert SATA Hard Drive
(with connectors facing
down) into USB Docking
Station firmly.
3.Play
d. Turn on the power switch.
e. No driver is needed. OS should find
and installed the USB Docking
Station automatically.
f. Wait until OS completes all
installations before usage.
3
Power Button
02
4.Mac Installation
For Mac OS 9.2 & earlier version:
OS does not support partition creation
for external hard drive.
In order to create partition for external
hard drive with Mac OS 9.2 & earlier,
user will need to purchase additional
3rd party software to create hard drive
partition.
For Mac OS X:
Simply use the Disk Utility to Partition
and Format external hard drive as
follows:
1.Select Disk Utilities in the utilities
folder.
2.Choose newly added external drive
and format it.
Note:
If you want to operate HDD Docking
Station on both Windows and Mac OS,
it is recommended to format the hard
drive in Windows and choose FAT32
file format.
Do not change set partition or format
hard drive.
Otherwise, Windows OS will not be
able to recognize the hard drive.
03
Deutsche
1
1.Schließen
c. Stecken Sie die SATAFestplatte (mit den
Anschlussen nach unten
zeigend) in die USBDocking-Station.
eSATA
USB 2.0 Gleichstromanschluss
2
3.5” Festplatte
2.Installieren
2.5” Festplatte
a. Verbinden Sie das USB2.0- bzw.
eSATA-Kabel mit der Ruckseite der
Docking-Station und dem USB 2.0- bzw.
eSATA-Anschluss des Computers oder
einem USB-Hub.
b. Verbinden Sie das Stromkabel mit
der Ruckseite der USB-DockingStation und einer Steckdose.
* Der eSATA-Anschluss hat
Priorität gegenüber dem
USB-Anschluss.
* 1 Das eSATA-Kabel steuert die
Konnektivität beider Festplatten.
3.Spielen
d. Betatigen Sie den Stromschalter.
e. Keine Treiberinstallation ist
erforderlich. Das Betriebssystem
erkennt normalerweise automatisch
die USB-Docking-Station.
f. Warten Sie, bis das Betriebssystem
die notwendige Installation
vervollstandigt, bevor Sie mit der
Verwendung des Gerates beginnen.
3
Power Taste
04
4.Mac Installation
Für Mac OS 9.2 & frühere Versionen:
Das OS hat keine Unterstützung für
die Erstellung von Partitionen auf
externen Festplatten.
Um eine Partition auf einer externen
Festplatte mit dem Mac OS 9.2 &
früher zu erstellen, muss der Anwender
zusätzliche Software zum Erstellen von
Festplatten-Partitionen von einem
Fremdhersteller erwerben.
Für Mac OS X:
Benutzen Sie einfach das Disk-Utility,
um die externe Festplatte zu
partitionieren und zu formatieren:
1.Wählen Sie Disk Utilities im
Verzeichnis Utilities.
2.Wählen Sie das neu hinzugefügte
externe Laufwerk und formatieren
Sie es.
Anmerkung:
Anmerkung: Wenn Sie die HDD
Docking-Station mit Windows und
Mac OS betreiben wollen, empfehlen
wir, die Festplatte in Windows zu
formatieren und dort das FAT32Dateiformat auszuwählen.
Verändern Sie den Partitionensatz
oder das Format der Festplatte nicht.
Andernfalls kann Windows die
Festplatte nicht erkennen.
05
Francais
1
1.Connect
c. Inserez fermement le lecteur
de disque dur SATA (avec les
connecteurs orientes vers le
bas) dans le Socle de
synchronisation USB.
eSATA
USB 2.0
Prise CC
2
Disques durs 3,5po
2.Installation
Disques durs 2,5po
a. Branchez le cable USB2.0 ou eSATA au
dos du Socle de synchronisation et dans
le port USB2.0 ou eSATA de l'ordinateur
ou dans le repeteur multiport USB.
b. Branchez le cable d'alimentation au dos
du Socle de synchronisation USB et
dans la prise de courant.
* La connexion eSATA est prioritaire par
rapport à la connexion USB.
* 1 câble eSATA contrôle la connectivité
des deux disques durs.
3.Jouer
d. Appuyez sur l'interrupteur de courant.
e. L'utilisation d'un pilote n'est pas requise.
Le systeme d'exploitation devrait trouver
et installer automatiquement le Socle de
synchronisation USB.
f. Patientez jusqu'a ce que le systeme
d'exploitation ait acheve toutes les
installations avant de commencer l'utilisation.
3
Le bouton d'alimentation
06
4.Installation Mac
Pour Mac OS 9.2 & les versions
précédentes :
Le système d'exploitation ne prend
pas en charge la création de partition
pour disque dur externe.
Afin de créer des partitions pour
disque dur externe avec Mac OS
9.2 & les versions précédentes,
l'utilisateur devra acheter un logiciel
supplémentaire tiers pour créer des
partitions pour disque dur.
Pour Mac OS X :
Utilisez simplement Disk Utility
(Utilitaire de disque) pour partitionner
et formater un disque dur externe
comme suit :
1.Sélectionnez Disk Utilities (Utilitaires
de disque) dans le dossier Utilities
(Utilitaires).
2.Choisissez le disque externe
nouvellement ajouté et formatez-le.
Remarque :
Si vous voulez utiliser la station
d'accueil pour disque dur à la fois
sous Windows et sous Mac OS, il est
conseillé de formater le disque dur
sous Windows et de choisir le format
de fichier FAT32.
Ne modifiez pas les partitions définies
et ne formatez pas le disque dur.
Autrement, le système d'exploitation
Windows ne pourra pas reconnaître le
disque dur.
07
Espanol
1
1.Conectar
a. Conecte el cable USB2.0 o eSATA a la parte
posterior de la Estacion de Acoplamiento
y el puerto USB2.0 o eSATA del ordenador
o al concentrador USB.
b. Conecte el cable de alimentacion a la
parte posterior de la Estacion de
Acoplamiento USB y la salida de
alimentacion.
* La conexión eSATA tiene prioridad
eSATA
sobre la conexión USB.
USB 2.0
Toma CC
* El cable 1 eSATA controla la
c. Inserte el Disco Duro SATA
(con los conectores hacia
abajo) firmemente en la
Estacion de Acoplamiento
USB.
2
Disco duro 3,5po
2.Instale
Disco duro 2,5po
conectividad de ambos discos duros.
3.Jugar
d. Encienda el interruptor de encendido.
e. No es necesario ningun controlador.
El SO deberia encontrar e instalar
automaticamente la Estacion de
Acoplamiento.
f. Espere hasta que el SO complete todas
las instalaciones antes de usarlo.
3
Botón de encendido
08
4.Instalación de Mac
Para sistemas operativos Mac 9.2
y versiones anteriores:
El sistema operativo no permite
realizar particiones en unidades
de disco externas.
Para poder crear una partición en
unidades de disco externas con
Mac 9.2 y sus versiones anteriores,
el usuario deberá comprar un
software adicional de terceros.
Para sistemas operativos Mac X:
Simplemente utilice la Función de
Disco para realizar la partición y
formatear la unidad de disco externa
siguiendo los siguientes pasos:
1.Selecciones Funciones de Disco en
la carpeta de utilidades.
2.Seleccione la unidad externa
añadida recientemente y formatéela.
Nota :
Si desea que la estación de conexión
de discos duros funcione tanto en
sistemas operativos Windows y como
Mac, es recomendable que formatee
el disco duro en Windows y el
seleccione el formato de archivo
FAT32.
No modifique la partición establecida
o formatee la unidad de disco. De lo
contrario, Windows no podrá reconocer
el disco duro.
09
Italiano
1
1.Collegare
a. Collegare il cavo USB2.0 o eSATA sul
retro della Docking Station ed alla
porta USB2.0 o eSATA del computer
o dell'hub USB.
b. Collegare il cavo d'alimentazione sul
retro della Docking Station e ad
una presa di corrente.
* La connessione eSATA ha priorità
sulla connessione USB.
* 1 cavo eSATA controlla la
connettività di entrambi gli hard drive.
Disco rigido 3,5
c. Inserire con fermezza
l'unita disco rigido
SATA (con i connettori
rivolti verso il basso)
nella Docking Station USB.
USB 2.0 Connettore CC
2
Disco rigido 2,5
2.Installare
eSATA
3.Giocare
d. Attivare l'alimentazione usando
l'interruttore.
e. Non e necessaria l'installazione di
alcun driver. Il sistema operativo
dovrebbe rilevare ed installare
automaticamente la Docking Station USB.
f. Attendere finche il sistema operativo
completa tutte le installazioni prima dell'uso.
3
Pulsante di alimentazione
10
4.Instalación de Mac
Per Mac OS 9.2 e versione precedente:
L’SO non supporta la creazione di
partizioni per l'hard drive esterno.
Per creare la partizione per un hard
drive esterno con Mac OS 9.2 e
precedenti, sarà necessario acquistare
un software aggiuntivo per creare la
partizione dell’hard drive.
Per Mac OS X:
È sufficiente usare Disk Utility per la
partizione e la formattazione dell'hard
drive esterno come segue:
1.Nella cartella dei servizi, selezionare
Disk Utilities.
2.Scegliere il nuovo hard drive esterno
da aggiungere e formattarlo.
Nota :
Per l’utilizzo della HDD Docking
Station su Windows e Mac OS, si
consiglia di formattare l’hard drive
in Windows e scegliere il formato
di file FAT32.
Non modificare l’impostazione di
partizione o la formattazione
dell’hard drive. In caso contrario,
Windows OS non riconoscerà
l’hard drive.
11
繁體中文
1
1.連接
a. 將 USB2.0 或 eSATA 線分別接至
銜接站背面與電腦 USB2.0 或 eSATA
連接埠或 USB 集線器上。
b. 將電源線分別接至 USB 銜接站背面與
電源插座上。
* eSATA 連接的優先順序高於 USB 連接。
eSATA
* 1 條 eSATA 連接線控制兩部硬碟機
的連接。
3.5” 硬碟
c. 將 SATA 硬碟確實插入
DC 插座
2
2.5” 硬碟
2.安裝
USB 2.0
USB 銜接站 (接頭朝下)。
3.啟動
d. 開啟電源開關。
3
e. 無須安裝驅動程式。作業系統會自動
搜尋並安裝 USB 銜接站。
f. 待作業系統完成所有安裝,即可使用
本產品。
電源按鈕
12
4.Mac 安裝設定
Mac OS 9.2 及更舊版本
作業系統不支援建立外部硬碟機的
磁碟分割。
為了用 Mac OS 9.2 及更舊版本的
作業系統建立外部磁碟機的磁碟分
割,使用者必須購買額外的第三方
軟體才能建立硬碟機的磁碟分割。
使用 Mac OS X:
如下所示,使用磁碟公用程式建立
磁碟分割與格式化外部硬碟機:
1.選擇公用程式資料夾中的磁碟公
用程式。
2.選擇新增加的外部磁碟機並將它
格式化。
註 :
如果您要在 Windows 和 Mac 作業
系統上操作硬碟機基座,建立您在
Windows 中格式化硬碟並選擇
FAT32 檔案格式。
不要變更設定好的磁碟分割或格式
化硬碟機。否則,Windows 作業
系統將無法識別硬碟機。
13
简体中文
1
1.连接
a. 将 USB2.0 或 eSATA 线的两端分别连接
到扩展坞的背面和计算机的 USB2.0 或
eSATA 端口或者 USB 集线器。
b. 将电源线两端分别连接到 USB 扩展坞
的背面和电源插座。
* eSATA 连接的优先级高于 USB 连接。
eSATA
USB 2.0
直流插孔
* 1 条 eSATA 缆线可控制两部硬盘
驱动器的连接。
3.5” 硬盘驱动器
c. 将 SATA 硬盘驱动器
2.5” 硬盘驱动器
2.安装
2
(接口朝下)牢固插入
USB 扩展坞。
3.启动
d. 打开电源开关。
3
e. 不需要驱动程序。操作系统应能自动
找到并安装 USB 扩展坞。
f. 等待操作系统完成所有安装,之后即
可开始使用。
电源按钮
14
4.Mac 安装设置
关于 Mac OS 9.2 及早期版本:
操作系统不支持创建外部硬盘驱动器
的磁盘分区。
为了使用 Mac OS 9.2 及早期版本的
操作系统,创建外部硬盘驱动器的磁
盘分区,用户必须额外购买第三方软
件以创建硬盘驱动器的磁盘分区。
关于 Mac OS X:
如下所示,使用磁盘实用工具创建磁
盘分区与格式化外部硬盘驱动器:
1.选择实用工具文件夹中的磁盘实用
工具。
2.选择新添加的外部驱动器,然后对
其格式化。
注意 :
若要在 Windows 和 Mac 操作系统
上运行硬盘座,建议您在 Windows
中先行格式化硬盘驱动器,然后选择
FAT32 文件格式。
请勿更改已设定的磁盘分区或格式化
硬盘驱动器。 否则,Windows 操作
系统将无法识别硬盘驱动器。
15
日本語
1
1.接続
a. USB2.0またはeSATAケーブルをドッキングステ
ーションの背部に接続し、コンピュータのUSB2.0
またはeSATAポートをUSBハブに接続します。
b .電源ケーブルをUSBドッキングステーションの
背部に接続し、コンセントに差し込みます。
* eSATA接続はUSB接続に優先します。
* eSATAケーブルは1本で、両方のハードドラ
eSATA
USB 2.0
DCジャック
イブ接続を制御します。
c. SATAハードドライブ(コネクタを
3.5” HDD
2.インストール
2.5” HDD
2
下にして)をUSBドッキングステー
ションにしっかりと差し込みます。
3.開始する
d. 電源スイッチを入れます。
3
e. ドライバは必要ありません。 OSが自動でUSB
ドッキングステーションを検知し、インストー
ルします。
f. Osがインストールを完了してから使用を開始
して下さい。
電源ボタン
16
4.Mac のインストール
Mac OS 9.2 &以前のバージョンの場合:
OSは外付けハードドライブ用のパーテ
ィション作成をサポートしていません。
Mac OS 9.2以前のバージョンで外付け
ハードドライブ用パーティションを作成
するには、サードパーティ製ソフトウェア
を追加で購入しハードドライブのパーテ
ィションを作成する必要があります。
Mac OS Xの場合:
ディスクユーティリティを使って、次の
ように外付けハードドライブのパーテ
ィションを作成し、フォーマットします:
1.ユーティリティフォルダでディスクユー
ティリティを選択する。
2.新たに追加された外付けドライブを選択し、
フォーマットする。
注 :
WindowsとMac OSの両方でHDDドッキング
ステーションを操作する場合、Windowsで
ハードドライブをフォーマットしFAT32
ファイル形式を選択するようにお勧めします。
セットパーティションを変更したり、
ハードドライブをフォーマットしないで
ください。 Windows OSがハードドライブを
認識できなくなる原因となります。
17
Русский
1
1.Подсоедините
a. Соедините кабелем USB2.0 или eSATA
c. Вставьте жесткий диск SATA
(разъемами вниз) в
док-станцию USB.
3.Начало
d. Включите выключатель питания.
eSATA
USB 2.0
Разъем
постоянного
тока
2
3.5” жесткий диск
2.Установить
2.5” жесткий диск
док-станцию (разъем с обратной стороны
устройства) и компьютер (разъем USB2.0,
или eSATA, или USB-концентратор).
b . Подключите кабель питания к док-станции
USB (сзади) и к розетке.
* Подключение eSATA является
приоритетным по сравнению с USB.
* 1 Кабель eSATA можно использовать
для обоих способов подключения
жестких дисков.
3
e . Драйвер не требуется. ОС должна
автоматически найти и установить
док-станцию USB.
f. Подождите, пока ОС завершит все процедуры
по установке оборудования. После завершения
установки док-станция готова к работе.
Кнопка питания
18
4.Установка Mac
Для пользователей Mac OS 9.2 и более
ранних версий
Эта операционная система не
поддерживает создание раздела для
внешнего жесткого диска.
Чтобы создать раздел для внешнего
жесткого диска в операционной системе
Mac OS 9.2 или более ранней версии,
пользователю необходимо приобрести
дополнительное программное
обеспечение сторонних разработчиков
для создания разделов жестких дисков.
Для пользователей Mac OS X
Для создания раздела внешнего
жесткого диска и его форматирования
используйте утилиту Disk Utility
указанным ниже образом.
1.Выберите Disk Utilities в папке утилит.
2.Выберите только что добавленный
внешний диск и отформатируйте его.
Примечание:
Если необходимо использовать
док-станцию для жестких дисков на
компьютерах, работающих под
управлением как ОС Windows,
так и Mac OS, рекомендуется
отформатировать жесткий диск в
ОС Windows и выбрать файловую
систему FAT32.
Не изменяйте установленный раздел
и не форматируйте жесткий диск.
В противном случае ОС Windows не
сможет распознать жесткий диск.
19
Turkce
1
1.Bağlantı
c. SATA Sabit Sürücüyü
eSATA
USB 2.0
DC Jak ı
2
3.5” HDD
2.Yükle
2.5” HDD
a. USB2.0 veya eSATA kablosunu Bağlantı
İstasyonunun arkasına ve bilgisayarın
USB2.0 veya eSATA bağlantı noktasına
veya USB göbeğine bağlayın.
b. Güç kablosunu USB Bağlantı İstasyonunun
arkasına ve prize bağlayn.
* eSATA bağlantısı, USB bağlantısına
göre önceliğe sahiptir.
* 1 eSATA kablosu, her iki sabit disk
sürücüsünün bağlanabilirliğini denetler.
(konektörler aşağı bakacak
şekilde) USB Bağlantı
İstasyonuna sıkı bir şekilde
bağlayın.
3.Başlatmak
d. Güç düğmesini açın.
e. Sürücü gerekli değildir. İşletim Sistemi
USB Bağlantı İstasyonunu otomatik
olarak bulacak ve kuracaktır.
f. Kullanmadan önce İşletim Sistemi tüm
kurulumları tamamlayana kadar bekleyin.
3
Güç Düğmesi
20
4.Mac Kurulum
Mac OS 9.2 ve önceki sürümler için:
İşletim sistemi, dış sabit disk sürücüsü
için bölüm oluşturulmasını desteklemez.
Kullanıcının, Mac OS 9.2 ve önceki
sürümleriyle dış sabit disk sürücüsüne
bölüm oluşturması için ek 3. taraf yazılımı
satın alması gerekir.
Mac OS X için:
Dış sabit disk sürücüsünü Bölümlemek
ve Biçimlendirmek için Disk Yardımcı
Programı’nın aşağıdaki gibi kullanılması
yeterlidir:
1.Yardımcı programlar klasöründeki Disk
Yardımcı Programları’nı seçin.
2.Yeni eklenen dış sürücüyü seçip
biçimlendirin.
Not:
HDD Takma Aygıtı’nı hem Windows
hem de Mac OS üzerinde çalıştırmak
isterseniz, sabit disk sürücüsünü
Windows işletim sisteminde
biçimlendirmeniz ve FAT32 dosya
biçimini seçmeniz önerilir.
Ayarlanan bölümü değiştirmeyin veya
sabit disk sürücüsünü biçimlendirmeyin.
Aksi takdirde, Windows işletim sistemi
sabit disk sürücüsünü tanıyamaz.
21
22
© 2009 Thermaltake Technology Co., Ltd. All Rights Reserved.
www.thermaltake.com