1
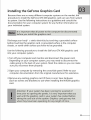
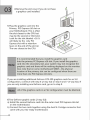
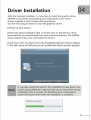
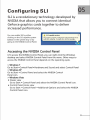
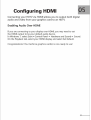
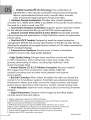
с
a
= a
= Ls
oye
a
a
vas . La
a Г
Pee
|
GeForce GTX 40
GRAPHICS CARD
User Manual
Introduction … 0
About this Guide
Minimum System Requirements
Unpacking
Equipment
Hardware Installation ee
Safety Instructions
Before You Begin
Installing the GeForce Graphics Card
Driver Installation snus.
Configuring SLI
Accessing the NVIDIA Control Panel
Enabling SLI
Configuring HDMI —————————————
Features and Benefits --
01-02
03-04
10-11
12-13
14
15-17
Introduction
Thank you for choosing the NVIDIA®GeForce® GTX
400 graphics card.
Built from the ground up for DirectX 11tessellation,
the GeForce GTX 400 delivers revolutionary geometry
performance for the ultimate next generation DX11
gaming experience.
With full support for NVIDIA 3D Vision the
GeForce GTX 400 provides the graphics
horsepower and video bandwidth needed to
experience games and high definition Blu-ray
movies in eye-popping stereoscopic 3D.
About This Guide
This installation guide discusses the installation and operation of
the NVIDIA GeForce GTX 400 graphic solution.
01
Minimum System Requirements
> Motherboard
PCI Express® or PCI Express 2.0-compliant motherboard with one dual-width
x16 graphics slot. For a 2way SLI confi guration, you need an SLI-ready
motherboard with one dual-width x16 graphics slot for each graphics card.
> System Power Supply
» GeForce GTX 480: Minimum 600W (42A on 12V rail) power supply with one 8-
pin and one 6-pin PCI Express supplementary power connector for each
graphics card.
» GeForce GTX 470/465: Minimum 550W (38A on 12V rail) power supply with
two 6-pin PCI Express supplementary power connector for each graphics card.
* GeForce GTX 460: Minimum 450W or greater system power supply (with a
minimum 12V current rating of 24A) with two 6-pin PCI Express
supplementary power Connector for each graphics card.
For power supply recommendations for SLI configurations, visit
www.slizone.com and check the Certified Products section.
> Operating System
e Microsoft Windows 7, 32-bit or 64-bit
* Microsoft Windows Vista, 32-bit or 64-bit
e Microsoft Windows XP, 32-bit or 64-bit
® Linux, 32-bit or 64-bit
® FreeBSD x86
> System Memory
2 GB system memory (4 GB recommended)
> CD-ROM/DVD-ROM drive or internet connection for driver installation
> 200 MB of available hard disk space
02
Unpacking
Prior to unpacking your new NVIDIA GeForce GTX 400 graphics card, it is
important to make sure you meet all the system requirements listed on
page 2 for a smooth installation.
Be sure to inspect each piece of equipment shipped in the packing box. If
anything is missing or damaged, contact your reseller.
Equipment
The following equipment and documentation are included in the
GeForce GTX400 graphics card box.
NVIDIA Driver Installation Disk
Contains:
« Windows 7, XP and Vista (32/64-bit) drivers for the GeForce
graphics card. For other operating systems and to keep your
drivers current, visit www.nvidia.com/drivers and download
the latest drivers
Quick Installation Guide
Fast and easy steps to install the GeForce
graphics card(s).
User Manual
More detailed instructions to install the GeForce
graphics card(s).
DVI-to-VGA Adapter (Optional)
Use to connect a VGA monitor to the DVI
connector or a DVI monitor to the VGA connector.
03
Mini-HDMI-to-HDMI Adapter (Optional)
Use to connect the mini-HDMI connector on the
card to a regular size HDMI connector.
GeForce 480/470/465/460 Graphics Card
Power connectors
SLI connector
er 470; ge
Mini-HDMI ©
connector Е
UD
e
—fíA
DVI
connector
DVI
connector
dut,
a
a — À
“a. | Je
pt
a
03 Hardware Installations
Installing the NVIDIA GeForce GTX 400 graphics card hardware involves
opening up your computer. Follow all of the safety instructions provided
here to ensure that there is no damage to you, your computer, or the
graphics board.
Safety Instructions
To reduce the risk of fire, electric shock, or injury, always follow basic safety
precautions.
All hardware must be installed prior to installation of
the drivers.
> Remove power from your computer by disconnecting the AC main
source before installation.
> Do not operate this product near water or when your hands or body are
wet.
> Do not place this product on soft surfaces that could block the ventilation
slots and cause overheating.
> Do not place this product near a heating register or radiator.
> Place this product securely on a stable surface. Serious damage to this
product may result if it falls.
> Do not allow anything to rest on the power cord. Do not place this
product where a person can step or trip on the power cord.
Before You Begin
The GeForce GTX 400 graphics card is a PCI Express 2.0 x16 graphics card.
Your computer may already have a graphics card installed in the PCI Express
slot. If so, you will need to remove that graphics card and replace it with the
GeForce GTX 400 graphics card.
If you do not have a graphics card, this means that your motherboard
has on-board graphics (there is a graphics chip installed on your
motherboard or integrated in the motherboard chipset). If this is the case,
there is no action that needs to be taken before installing your new graphics
card.
05
Installing the GeForce Graphics Card
Because there are so many different computer systems on the market, the
procedure to install the GeForce GTX 400 graphics card can vary from system
to system. Use the following instructions as a guideline and consult the
documentation for your computer system for any further information on
your individual system.
It is important that all power to the computer be disconnected
before you install the graphics card.
Discharge your body’ s static electricity by touching a grounded surface
before touching the graphics card. A grounded surface is the computer
chassis, or some other surface you know to be grounded.
Use the following procedure to install the GeForce GTX 400 graphics card
into your computer system.
1 Turn off your computer and monitor and disconnect the power cord.
Depending on your computer system, you may need to disconnect the
cable going to the back of your system. Mark the cables so you can make
sure you reconnect them properly.
2 Open your computer by removing the cover/side panel. Refer to your
computer documentation from the original manufacturer for assistance.
3 Remove any existing graphics card (if there is one). Save hardware
(Such as screws and brackets) to use when installing the NVIDIA graphics
card.
Attention: If your system has been running for a period of
time prior to opening the panels, it is very important that you
walt until the graphics card in your system has cooled before
taking the card out of the system. Graphics card get very hot
when they have been operating for any length of time.
DE
4 Remove the slot cover if you do not have
a graphics card installed.
5 Plug the graphics card into the
Primary PCI Express x16 slot on
your Motherboard. This is often
the slot closest to the CPU but
may be the second or third slot.
Look for the slot labeled x16. It
will likely be the only PCI
Express slot with a retention
lever on the end of the slot (or
The one closest to the CPU.
It is recommended that you install the graphics card
Into the primary PCI Express x16 slot. If you install the graphics
card into the secondary slot, your system may not recognize the
graphics card and there will be nothing displayed on the monitor.
Also note that on some motherboard SBIOS , the physical
location of the primary slot can be configured when there are
more than one PCI Express x16 slots.
If you are installing additional GeForce GTX 400 graphics cards for an SLI
configuration, continue with step 6 (2-way SLI) or step 6 and 7 (3-way SLI). If
you are only installing one GeForce card, go on to step 8.
Note: All of the graphics cards in an SLI configuration must be Identical.
6 Two GeForce graphic cards (2-way SLI):
a) Install the second GeForce card into the outer most PCI Express x16 slot
on the motherboard.
b) Connect the two cards together using the dual SL I bridge connector that
came with your SLI-ready motherboard.
07
7 Connect two 6-pin PCI Express auxiliary power connectors coming
from the computer power supply to the connectors on the top edge of on
the top edge of the GeForce GTX 400 graphics card.
8 Reinstall the cover on your computer and reconnect any cables that you
removed earlier in the installation.
9 Connect your computer monitor(s) to the GeForce graphics card
using the mini-HDMI and DVI connectors. The GeForce GTX graphics
Card can be connected to PC monitors that support DVI, VGA, and
08
DVI connector for digital displays.
Using the DVI-to-HDMI adapter,
you can connect to HDTV. Using a
DVI-to-VGA adapter, you can
conected a second VGA display.
Mini-HDMI (High-Definition Multimedia
Interface) Connector supports output of both
video and audio from the PC to a highdefinition
television. Mini-HDMI is a smaller footprint
version of the standard HDMI connector. A cable
or adapter is needed to connect from the mini-
HDMI connector to a display with a standard
HDMI Plug.
A single GeForce GTX 400 graphics card can support up to two
displays per card in a multi-monitor confi guration.
10 Reconnect your power cord to the PC.
09
Driver Installation
With the hardware installed, it is now time to install the graphics driver.
NVIDIA recommends downloading and installing the most recent
drivers available at http://www.nvidia.com/drivers.
Use the following procedure to load the graphics drivers.
1 Power up your system.
2 Insert the driver installation disk or double click on the GeForce driver
executable file you downloaded from www.nvidia.com/drivers. The NVIDIA
Setup program takes over and installs the drivers.
3 Click Next when the Welcome to the InstallShield Wizard window displays.
I Click Next when the Welcome to the InstallShield Wizard window displays.
It may take several minutes for the installation to take place. Your
screen may go blank for a few seconds one or more times during
installation. This is normal. The Installing driver components...
screen will let you know when the installation is complete.
Installing driver components...
10
4 Select Yes, I want to restart my computer now.
5 Click Finish to complete the installation and restart your system.
Configuring SLI
SLI is a revolutionary technology developed by
NVIDIA that allows you to connect identical
GeForce graphics cards together to deliver
Increased performance.
You can enable SLI by either Y SU capable system X |
clicking on the SLI capable system This system is properly configured to take advantage of SLI
balloon in the system tray or by multi-GPU rendering, To enable SLI, click this message,
going to the NVIDIA Control Panel.
Accessing the NVIDIA Control Panel
1 To access the NVIDIA Control Panel, you can right-click the Windows
desktop and select NVIDIA Control Panel from the menu. Other ways to
access the NVIDIA Control Panel depends on the operating syste.
> Windows 7
Go to Start=Control Panel » Hardware and Sound and select Control Panel
> Windows XP
Go to Start = Control Panel and select the NVIDIA Control
Panel icon.
> Windows Vista
e Classic view
Go to Start = Control Panel and select the NVIDIA Control Panel icon.
e Control Panel Home view
Go to Start =Control Panel = Additional Options and select the NVIDIA
Control Panel icon.
12
Enabling SLI
2 Once you have the NVIDIA Control Panel open, click on
Set SLI and PhysX configuration in the left task pane.
Fde Een = View 3D setting: Неа
e E
NVIDIAS SUE technology alcws you la use huó o more GPU: for sgrdicant mprovements in rendenng peromaence and image quality. NVIDIA
Prys¥® 5 e powedd physics engíe fhai cen ufilzs GPU scosterston lo provide amádng raldime physics eltecís.
L. Set Piryaii GPU accrlerabion:
cin color settrea o nde
о r
Marge custom resciubons + Erubled
Dei up Aue diera yt
E Nebworkrg
= Performance 2_ Select an S11 configuration:
Dynamic СЕ scores “iban
Enable Quad SLI (recommended)
Viejo Myitacs mdormason =
Profile polices
= System Update
Lpdaté your Sister: BIOS
Lipdate your Sistem Drivers
Adjust "des color settings ESS 8
Adjust vidas mage settings
Descrioson:
Tour AVICTA GPUs will work fogether 10 ства fre rendering performance of your D applicadons. Grapéécs
ard physics processing vell ocodr on the same GPU IF Phys) is enabled ard here i= aot an additional graphics
card to serve as the Phys processor. Some display settings may be sered such &s rotabon, résolution, snd
fat pane] scabng.
Турне! иле scenarine:
Para №! game
» Lisng any application that renders hardware-scoslerated Drect3D or OpenGL content
3 Select from the following multi-GPU configurations:
> Do not use SLI
Select this mode when you want to drive displays on each GPU.
> Enable SLI (recommended)
Select this mode when you want your graphics cards to work together
To increase your rendering performance and image quality.
4 Click Apply, then Yes on the Applications Shutdown Required window.
13
Configuring HDMI
Connecting your HDTV via HDMI allows you to output both digital
audio and video from your graphics card to an HDTV.
Enabling Audio Over HDMI
If you are connecting to your display over HDMI, you may need to set
the HDMI output to be your default audio device.
In Windows 7, select Start + Control Panel + Hardware and Sound = Sound.
On the Playback tab, select your HDMI display and select Set Default.
Congratulations! Your GeForce graphics card(s) is now ready to use!
14
Features
> Microsoft" DirectX 11 GPU Support: DirectX 11 GPU with Shader Model
5.0 support designed for ultra high performance in the new API s key
graphics feature, GPU-accelerated tessellation.
> NVIDIA CUDA™ Technology: CUDA technology unlocks the power
of the GPU’ s processor cores to accelerate the most demanding tasks such
as video transcoding, physics simulation, ray tracing, and more, delivering
incredible performance improvements over traditional CPUs.
> 3-way NVIDIA su Technology: Industry leading 3-way NVIDIA SLI
technology offers amazing performance scaling by implementing 3-way AFR
(Alternate Frame Rendering) for the world' s premier gaming solution under
Windows 7 with solid, state-ofthe- art drivers.
> NVIDIA PhysX” Technology: GeForce GPU support for NVIDIA PhysX
technology, enabling a totally new class of physical gaming interaction for a
more dynamic and realistic experience with GeForce.
> NVIDIA” 3D Vision" Ready: GeForce GPU support for NVIDIA 3D Vision,
bringing a fully immersive stereoscopic 3D experience to the PC. A
combination of high-tech wireless glasses and advanced software, 3D Vision
transforms hundreds of PC games into full stereoscopic 3D. In addition, you
can watch 3D movies and 3D digital photographs in eye popping, in crystal-
clear quality.
> NVIDIA 3D Vision“ Surround Ready: Expand your games across three
displays in full stereoscopic 3D for the ultimate “inside the game”
experience with the power of NVIDIA 3D Vision and SLI technologies.
NVIDIA Surround™ also supports triple screen gaming with non-stereo
displays.
> GigaThread™ Technology: Massively multi-threaded architecture
supports thousands of independent, simultaneous threads, pro
15
> Microsoft Windows 7 Support: Windows 7 is the next generation
operating system that will mark a dramatic improvement in the way the
OS takes advantage of the graphics processing unit (GPU) to provide a
more compelling user experience. By taking advantage of the GPU for
both graphics and computing, Windows 7 will not only make today’s
PCs more visual and more interactive but also ensure that they have
the speed and responsiveness customers want.
> DirectCompute Support: Full support for DirectCompute,
Microsoft” s GPU computing API.
> OpenCL Support: Full support for OpenCL GPU computing API.
> 32x Anti-aliasing Technology: Lightning fast, high-quality antialiasing
at up to 32x sample rates obliterates jagged edges.
> NVIDIA“ GeForce” Unified Driver Architecture (UDA): Delivers a proven
record of compatibility, reliability, and stability with the widest range of
games and applications. NVIDIA deliver continuous performance and
feature updates over the life of NVIDIA GeForce” GPUs.
> PCI Express 2.0 Support : Designed for the new PCI Express 2.0 bus
architecture offering the highest data transfer speeds for the most
bandwidth-hungry games and 3D applications, while maintaining backwards
compatibility with existing PCI Express motherboards for the broadest
support.
> Dual-link DVI Support: Able to drive industry’ s largest and highest
resolution flat-panel displays up to 2560x1600 and with support for High-
bandwidth Digital Content Protection (HDCP).
> Fully integrated support for HDMI 1.4a including GPU accelerated
Blu-ray 3D* support, xvYCC, deep color, and 7.1 digital surround sound,
Dolby TrueHD and DTS-HD. Upgrade your GPU to full 3D capability
with NVIDIA 3DTV Play software, enabling 3D gaming, picture viewing
and 3D web video streaming. See www.nvidia.com/3dtv for more
details.
*Blu-ray 3D playback requires the purchase of a compatible software
player from CyberLink, ArcSoft, Corel, or Sonic.
16
> NVIDIA PureVideoG) HD Technology: The combination of
CU highdefinition video decode acceleration and post-processing that
— delivers unprecedented picture clarity, smooth video, accurate
color, and precise image scaling for movies and video.
* Hardware Decode Acceleration: Provides ultra-smooth playback
of H.264, VC-1, WMV, DivX, MPEG-2 and MPEG-4 HD and SD movies without
the need for a dual or quad-core CPU.
e Dual-stream Hardware Acceleration: Supports picture-inpicture content
for the ultimate interactive Blu-ray and HD DVD movie experience.
« Dynamic Contrast Enhancement & Color Stretch: Dynamically provides
post-processing and optimization of High Definition movies for spectacular
picture clarity.
* Dual-link HDCP Capable: Designed to meet the output protection
management (HDCP) and security specifications of the Blu-ray Disc format,
allowing the playback of encrypted movie content on PCs when connected to
HDCP-compliant displays.
* Enhanced Error Resilience: Correct errors or losses in broadcast
content to ensure crisp, high quality playback.
* High-Quality Scaling: Enlarges lower resolution movies and videos
to HDTV resolutions, while maintaining a clear, clean image. Also
provides downscaling of videos, including high-definition, while
preserving image detail.
* Inverse Telecine (3:2 & 2:2 Pulldown Correction): Recovers original
film images from films-converted-to-video (DVDs, 1080i HD
content), providing more accurate movie playback and superior
picture quality.
* Bad Edit Correction: When videos are edited, the edits can disrupt the
normal 3:2 or 2:2 pulldown cadence. PureVideo uses advanced processing
techniques to detect poor edits, recover the original content, and display
perfect picture detail frame after frame for smooth, natural looking video.
* Noise Reduction: Improves movie image quality by removing unwanted
Artifacts.
e Edge Enhancement: Sharpens movie images by providing higher
contrast around lines and objects.
1. Requires application support for CUDA technology.
2. NVIDIA PhysX drivers are required to experience in-game GPU PhysX acceleration.
Refer to www.nvidia.com/PhysX for more information.
3. NVIDIA 3D Vision Surround requires NVIDIA release 256 driver, two or more
graphics cards in NVIDIA SLI confi guration, 3D Vision glasses and three matching 3D
Vision-Ready displays. See www.nvidia.com/surround for more information.
4. Feature requires supported video software. Features may vary by product.
5. Requires other HDCP-compatible components
17 555100-0247
www.kfa2.com