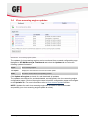
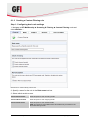
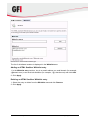
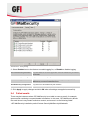
1
GFI MailSecurity 2011 for Exchange/SMTP Administration & Configuration Manual http://www.gfi.com [email protected] The information and content in this document is provided for informational purposes only and is provided "as is" with no warranty of any kind, either express or implied, including but not limited to the implied warranties of merchantability, fitness for a particular purpose, and non-infringement. GFI Software is not liable for any damages, including any consequential damages, of any kind that may result from the use of this document. The information is obtained from publicly available sources. Though reasonable effort has been made to ensure the accuracy of the data provided, GFI makes no claim, promise or guarantee about the completeness, accuracy, recency or adequacy of information and is not responsible for misprints, out-of-date information, or errors. GFI makes no warranty, express or implied, and assumes no legal liability or responsibility for the accuracy or completeness of any information contained in this document. If you believe there are any factual errors in this document, please contact us and we will review your concerns as soon as practical. All product and company names herein may be trademarks of their respective owners. GFI MailSecurity is copyright of GFI SOFTWARE Ltd. - 1999-2011 GFI Software Ltd. All rights reserved. Document Version: MSEC-UM-EN-1.01.001 Last updated: April 11, 2011 Contents 1 Introduction ............................................................................................................... 1 1.1 1.2 2 About GFI MailSecurity ............................................................................................. 3 2.1 2.2 2.3 3 Introduction ....................................................................................................... 7 Status and statistical information ...................................................................... 8 Email processing logs ..................................................................................... 11 Virus scanning engine updates ....................................................................... 13 General settings ...................................................................................................... 15 4.1 4.2 4.3 4.4 4.5 4.6 5 GFI MailSecurity components ........................................................................... 3 How GFI MailSecurity works ............................................................................. 3 2.2.1 Incoming email ..................................................................................... 3 2.2.2 Outgoing email ..................................................................................... 4 2.2.3 Other features ...................................................................................... 5 Licensing........................................................................................................... 5 Monitoring the GFI MailSecurity status ................................................................... 7 3.1 3.2 3.3 3.4 4 Introduction to GFI MailSecurity ........................................................................ 1 Using this manual ............................................................................................. 1 1.2.1 Manual structure .................................................................................. 1 1.2.2 Terms and conventions used in this manual ........................................ 2 Introduction ..................................................................................................... 15 Configuring the administrator‟s email address ................................................ 15 Configuring proxy server settings for automatic updates ................................ 16 Adding Local Domains .................................................................................... 17 SMTP server bindings..................................................................................... 18 Managing local users ...................................................................................... 19 4.6.1 GFI MailSecurity installed in Active Directory mode ........................... 19 4.6.2 GFI MailSecurity installed in SMTP mode .......................................... 19 Configuring Virus Scanning Engines .................................................................... 21 5.1 5.2 5.3 Introduction ..................................................................................................... 21 AVG configuration ........................................................................................... 22 5.2.1 AVG LinkScanner............................................................................... 23 Kaspersky configuration.................................................................................. 25 5.4 5.5 5.6 5.7 5.8 5.9 5.10 5.11 6 BitDefender configuration ............................................................................... 27 McAfee configuration ...................................................................................... 29 Norman configuration...................................................................................... 31 Virus scanner actions...................................................................................... 33 Virus scanner updates .................................................................................... 35 Setting the Virus Scanning Engines scan sequence ....................................... 36 Configuring Virus Scanning optimizations....................................................... 37 Configuring Information Store Scanning ......................................................... 37 5.11.1 Information Store Scanning ................................................................ 37 5.11.2 VSAPI settings ................................................................................... 38 Configuring other mail filters ................................................................................. 41 6.1 6.2 6.3 6.4 6.5 6.6 Content Filtering ............................................................................................. 41 6.1.1 Introduction ........................................................................................ 41 6.1.2 Creating a Content Filtering rule ........................................................ 42 6.1.3 Enabling/disabling rules ..................................................................... 48 6.1.4 Removing content filtering rules ......................................................... 48 6.1.5 Modifying an existing rule ................................................................... 49 6.1.6 Changing rule priority ......................................................................... 49 Attachment Filtering ........................................................................................ 49 6.2.1 Introduction ........................................................................................ 49 6.2.2 Creating an Attachment Filtering rule ................................................. 51 6.2.3 Enabling/disabling rules ..................................................................... 55 6.2.4 Removing attachment rules................................................................ 56 6.2.5 Modifying an existing rule ................................................................... 56 6.2.6 Changing the rule priority ................................................................... 57 Decompression engine ................................................................................... 57 6.3.1 Introduction ........................................................................................ 57 6.3.2 Configuring the decompression engine filters .................................... 58 6.3.3 Enable/disable decompression filters ................................................. 65 The Trojan & Executable Scanner .................................................................. 65 6.4.1 Introduction ........................................................................................ 65 6.4.2 Configuring the Trojan & Executable Scanner ................................... 66 The Email Exploit Engine ................................................................................ 69 6.5.1 Introduction ........................................................................................ 69 6.5.2 Configuring the Email Exploit Engine ................................................. 69 6.5.3 Enabling/Disabling email exploits ....................................................... 73 The HTML Sanitizer ........................................................................................ 74 6.6.1 Introduction ........................................................................................ 74 6.6.2 Configuring the HTML Sanitizer ......................................................... 75 6.6.3 HTML Sanitizer Whitelist .................................................................... 75 7 Quarantine ............................................................................................................... 77 7.1 7.2 7.3 7.4 7.5 8 Reporting ................................................................................................................. 97 8.1 8.2 8.3 9 Introduction ..................................................................................................... 77 The Quarantine Store ..................................................................................... 77 7.2.1 Searching for quarantined emails....................................................... 77 7.2.2 Search Folders ................................................................................... 79 7.2.3 Approving quarantined emails ............................................................ 83 7.2.4 Permanently deleting quarantined emails .......................................... 84 7.2.5 Rescanning quarantined emails ......................................................... 85 7.2.6 Viewing the full security threat report of an email ............................... 86 7.2.7 Downloading quarantined email ......................................................... 87 Quarantine Action Forms ................................................................................ 87 7.3.1 Enabling Quarantine Action Forms .................................................... 87 7.3.2 Reviewing quarantined emails ........................................................... 88 7.3.3 Logging quarantine actions ................................................................ 90 Quarantine RSS feeds .................................................................................... 90 7.4.1 Enabling Quarantine RSS Feeds ....................................................... 91 7.4.2 Subscribing to Quarantine RSS feeds ................................................ 92 7.4.3 Securing access to the GFI MailSecurity Quarantine RSS feeds ....... 93 Directory Harvesting ....................................................................................... 94 7.5.1 Configuring Directory Harvesting ....................................................... 94 Introduction ..................................................................................................... 97 Enabling reporting ........................................................................................... 97 Configuring the database ................................................................................ 97 8.3.1 Configuring a Microsoft SQL Server database backend .................... 98 Miscellaneous ........................................................................................................ 101 9.1 9.2 9.3 9.4 9.5 9.6 Patch Checking ............................................................................................. 101 Version Information ....................................................................................... 102 Tracing .......................................................................................................... 102 Failed emails................................................................................................. 103 9.4.1 Reprocessing legitimate emails that fail ........................................... 104 9.4.2 Failed emails notifications ................................................................ 104 Notification templates.................................................................................... 105 9.5.1 Customizing notification templates ................................................... 106 Monitoring Virus Scanning API ..................................................................... 107 9.6.1 Performance counter in Windows 2003 Server ................................ 107 9.6.2 Performance counter in Windows 2008 Server ................................ 108 9.6.3 Performance monitor counters ......................................................... 110 10 Troubleshooting .................................................................................................... 113 10.1 10.2 10.3 10.4 10.5 10.6 11 Introduction ................................................................................................... 113 Knowledge Base ........................................................................................... 113 Web Forum ................................................................................................... 113 Common issues ............................................................................................ 113 Request technical support ............................................................................ 114 Build notifications .......................................................................................... 114 Glossary ................................................................................................................. 115 Index ............................................................................................................................... 117 1 1.1 Introduction Introduction to GFI MailSecurity Email is frequently used as a means for distributing harmful content (for example, through email attachments). GFI MailSecurity acts as an email firewall to protect an email system against malicious email attacks. The software uses various methods to block malicious emails, such as multiple virus scanning engines and link scanning technology. Using the GFI MailSecurity web-based interface, you can easily configure and optimize the software for your requirements. Blocked emails can then be reviewed and the appropriate action taken accordingly. 1.2 Using this manual This user manual is a comprehensive guide that aims to assist systems administrators in configuring and using GFI MailSecurity in the best way possible. It builds up on the instructions provided in the GFI MailSecurity „Getting Start Guide‟ and describes the configuration settings that systems administrators must do to achieve the best possible results out of the software. The GFI MailSecurity Getting Start Guide can be accessed from: http://www.gfi.com/mailsecurity/manual/ 1.2.1 Manual structure This manual contains the following chapters: Chapter 1 Introduction Introduces this manual. Chapter 2 About GFI MailSecurity Provides basic information about GFI MailSecurity. Chapter 3 Monitoring email processing status Describes how to use the GFI MailSecurity Dashboard to monitor the status of the software, including monitoring email processing activity. Chapter 4 General settings Provides instructions on how to configure basic settings of GFI MailSecurity. Chapter 5 Configuring Virus Scanning Engines Describes how to configure and optimize anti-virus scanning engines. Chapter 6 Configuring other mail filters Describes how to configure the other mail scanning features included with GFI MailSecurity. Chapter 7 Quarantine Provides instructions how to use and customize the GFI MailSecurity Quarantine. Introduction GFI MailSecurity 2011 1 Chapter 8 Reporting Describes how to configure the reporting database to generate reports using the GFI MailSecurity ReportPack. Chapter 9 Miscellaneous Provides information how to use and configure other features of the product. Chapter 10 Troubleshooting Contains information on how to deal with any problems encountered while using GFI MailSecurity. Also provides extensive support information. Chapter 11 Glossary Defines technical terms used within GFI MailSecurity. 1.2.2 Terms and conventions used in this manual The following terms and conventions are used in the documentation of this manual: NOTE: Additional information and references essential for correct operation. Important notifications and cautions regarding potential issues that are commonly encountered. ► Step by step navigational instructions to access a specific task. Bold Names of items to select such as nodes, menu options or command buttons. <Italics> Parameters and values that you must replace with the applicable value, such as custom paths and filenames. For any technical terms and their definitions as used in this manual, refer to the Glossary chapter. 2 GFI MailSecurity 2011 Introduction 2 About GFI MailSecurity 2.1 GFI MailSecurity components GFI MailSecurity scan engine The GFI MailSecurity scan engine analyzes the con tent of all inbound and outbound email. If you install GFI MailSecurity on the Microsoft Exchange Server, it will also scan the Microsoft Exchange Information Store and internal emails. When GFI MailSecurity quarantines an email, it informs the appropriate supervisor/administrator via Email or RSS feed, depending on the options configured. GFI MailSecurity web interface Through the GFI MailSecurity web interface, you can: Monitor email scanning activity Manage scanning and filtering engines Configure GFI MailSecurity settings Review quarantined emails GFI MailSecurity Switchboard Use the GFI MailSecurity Switchboard to configure: The GFI MailSecurity launch mode Website and Virtual Directory names for the web interface and quarantine Tracing options to create log files for debugging purposes. 2.2 How GFI MailSecurity works This section provides a high-level overview on how GFI MailSecurity works. 2.2.1 Incoming email Screenshot 1 -Incoming email About GFI MailSecurity GFI MailSecurity 2011 3 Incoming email is relayed to the GFI MailSecurity machine. Email is scanned by GFI MailSecurity using the email scanning engines and filters configured to scan inbound emails. EMAIL SCANNING ENGINE DESCRIPTION Virus Scanning Engines Scan emails for viruses and malicious code. Some engines also include other features, such as macro checking, link scanning and Sandbox technology. Content and attachment filtering Block emails that match any rules containing pre-configured conditions within the email body or attachments. Decompression engine Analyzes compressed attachments for potentially malicious content. Trojan & executable scanner Analyzes the function of executable files for malicious code. Email exploit engine Checks if attachments contain any exploits. HTML Sanitizer Scans and removes html code with email body and attachments. GFI MailSecurity applies the appropriate action depending on the scan results. SCAN RESULT ACTION Accepted If the email is safe, delivery to the user‟s mailbox is allowed. Blocked When a compromised email is detected, the appropriate action is taken by GFI MailSecurity depending on which action is configured (for example, the email is quarantined). 2.2.2 Outgoing email Screenshot 2 -Outgoing email Outgoing email is relayed to the GFI MailSecurity machine. Email is scanned by GFI MailSecurity using the email scanning engines and filters configured to scan outbound emails. EMAIL SCANNING DESCRIPTION ENGINE 4 GFI MailSecurity 2011 About GFI MailSecurity Virus Scanning Engines Scan emails for viruses and malicious code. Some engines also include other features, such as macro checking, link scanning and Sandbox technology. Content and attachment filtering Block emails that match any rules containing pre-configured conditions within the email body or attachments. Trojan & executable scanner Analyzes the function of executable files for malicious code. Email exploit engine Checks if attachments contain any exploits. HTML Sanitizer Scans and removes html code with email body and attachments. GFI MailSecurity applies the appropriate action depending on the scan results. SCAN RESULT ACTION Accepted If the email is safe, delivery to the user‟s mailbox is allowed. Blocked When a compromised email is detected, the appropriate action is taken by GFI MailSecurity depending on which action is configured (for example, the email is quarantined). 2.2.3 Other features Apart from scanning incoming and outgoing emails, GFI MailSecurity also includes the features listed below. FEATURE DESCRIPTION Internal emails scanning Attachment Filtering and Content Filtering can be configured to scan internal emails when GFI MailSecurity is installed on the Microsoft Exchange server. Information Store Protection Scans the Microsoft Exchange Information Store using the Virus Scanning Engines. Directory Harvesting Deletes emails addressed to nonexistent users from the Quarantine Store. Quarantine Store A central repository within GFI MailSecurity where all blocked emails are retained until review. 2.3 Licensing For information on licensing, refer to: http://www.gfi.com/products/gfi-mailsecurity/pricing/licensing. About GFI MailSecurity GFI MailSecurity 2011 5 3 Monitoring the GFI MailSecurity status 3.1 Introduction The GFI MailSecurity Dashboard node provides important information in real time that enables you to monitor the functionality of GFI MailSecurity. This includes: Important statistical information about blocked emails Status of GFI MailSecurity services Graphical presentation of email activity List of emails processed Status of virus scanning engines updates NOTE: Configure the refresh settings from the top side of the page. Select Auto-refresh dashboard & logs to automatically refresh the page at a particular interval. To change the time interval, key in a custom value in the Refresh time interval in seconds box and click Set Interval. You can also click Refresh to refresh the page manually. Monitoring the GFI MailSecurity status GFI MailSecurity 2011 7 3.2 Status and statistical information Screenshot 3 - The GFI MailSecurity Dashboard Navigate to GFI MailSecurity ► Dashboard to open the Dashboard page. This page displays GFI MailSecurity statistics, status of services and a graphical presentation of email activity. More details on these sections are provided below. 8 GFI MailSecurity 2011 Monitoring the GFI MailSecurity status Services Screenshot 4 - The GFI MailSecurity Services The Services area displays the status of the GFI MailSecurity services. Indicates that the service is started. Indicates that the service is stopped. NOTE: Start or stop services from the Microsoft Windows Services console. To launch the Services console, navigate to Start ► Run, key in services.msc and click OK. Quarantine Statistics Screenshot 5 - The GFI MailSecurity Quarantine Statistics The Quarantine Statistics area displays the following statistical information: Emails in Quarantine Store The number of emails stored in the Quarantine Store. Quarantine Store size The size on disk of the Quarantine Store database. Free disk space The free space on the disk where the Quarantine Store is saved. Monitoring the GFI MailSecurity status GFI MailSecurity 2011 9 Email Statistics Screenshot 6 - The GFI MailSecurity Charts The Charts area displays graphical information about emails processed by GFI MailSecurity. Select the time period from the drop-down list to display information for that period in the charts. Total emails processed/ Total quarantined emails/ Shows various global statistics, including total number of emails scanned and quarantined by GFI MailSecurity since installation, and unprocessed emails in the last 24 hours. Unprocessed emails in the last 24 hours View charts for this period Enables you to select a period for which to view charts. Available options are: Last 6 hours Last 24 hours Last 48 hours Last 7 days NOTE: Options displayed depend on how long GFI MailSecurity has been installed. For example, if GFI MailSecurity was installed 24 hours ago, Last 48 hours and Last 7 days options are not available. Email scanning timeline (time graph) Shows a time graph in intervals for the time period selected. The graph shows the number of safe, quarantined and failed emails. Scan statistics (pie chart) A graphical distribution of the total number of safe, quarantined and failed emails for the time period selected. Safe emails in this period/ Shows the number of safe, quarantined and unprocessed emails in the selected period. Quarantined emails in this period/ 10 GFI MailSecurity 2011 Monitoring the GFI MailSecurity status Unprocessed emails in this period 3.3 Email processing logs Screenshot 7 - Email processing logs From GFI MailSecurity, you can monitor all processed emails in real time. Navigate to GFI MailSecurity ► Dashboard and select the Logs tab to display the list of processed emails. The following details are displayed for each email processed: Date/Time Sender Recipient(s) Subject Scan Result The Scan Result column shows the action taken on the email. OK Email is not blocked by GFI MailSecurity, and is delivered to its intended recipients. Quarantined Email is blocked by an engine or filter that has the action set to Quarantine. Click Quarantine to review the email. Monitoring the GFI MailSecurity status GFI MailSecurity 2011 11 NOTE: The email cannot be previewed in quarantine if it was manually deleted or it was blocked by a rule configured to save emails to a folder on disk. Deleted Email is blocked by an engine or filter with the action set to delete detected emails. Failed Email could not be scanned by GFI MailSecurity. Email is moved to the following folder: <GFI MailSecurity installation path>\GFI\Content Security\MailSecurity\FailedMails For more information about failed emails refer to http://kbase.gfi.com/showarticle.asp?id=KBID003263. Filtering the email processing logs Screenshot 8 - Email processing logs filter Filtering the email processing logs simplifies the reviewing process by providing the possibility to find particular emails. From the Filter area, specify any of the following criteria: Sender Specify the full or part of an email address to display only the emails sent by matching senders. Recipient Specify the full or part of an email address to display only the emails sent to matching recipients. Subject Specify the full or part of an email subject to display only the emails with a matching subject. Scan result From the drop-down list, select whether to display only emails with a particular scan result (for example, quarantined emails only) From & To Specify a date and time range to display emails processed during that particular period. NOTE: Click Clear Filters to remove specified filters and to show all email logs. 12 GFI MailSecurity 2011 Monitoring the GFI MailSecurity status 3.4 Virus scanning engine updates Screenshot 9 - Virus scanning engines updates The updates of virus scanning engines can be monitored from a central configuration page. Navigate to GFI MailSecurity ► Dashboard and select the Updates tab to review the following update information: Engine Virus scanning engines Last Update Displays the date and time of the last successful update. Status Shows the current status of the updating process. Click Update all engines to check for, and download, all updates. The updates are checked for, and downloaded, as configured in the virus scanning engine configuration pages. Click on the engine name to load the configuration pages and navigate to the Updates tab. For more information refer to Virus scanner updates section. NOTE: Updates for each virus scanning engine are checked for and downloaded sequentially (one virus scanning engine update at a time). Monitoring the GFI MailSecurity status GFI MailSecurity 2011 13 4 General settings 4.1 Introduction The Settings node enables you to configure a number of options. Administrator‟s email address Proxy settings for automatic updates The list of Local Domains. SMTP server bindings The list of local users 4.2 Configuring the administrator’s email address GFI MailSecurity sends important notifications to the administrator via email. To set up the administrator‟s email address: 1. From the GFI MailSecurity Configuration navigate to GFI MailSecurity ► General ► Settings and select the General tab. Screenshot 10 - Specifying the administrator’s email address 2. Key in the administrator‟s email address in the Administrator email area. 3. Click Apply. General settings GFI MailSecurity 2011 15 4.3 Configuring proxy server settings for automatic updates GFI MailSecurity automatically searches for and downloads updates (for example, virus definitions updates and Trojan & Executable Scanner definitions) from the GFI update servers. If the server on which GFI MailSecurity is installed, connects to the internet through a proxy server, configure the proxy server settings as follows: 1. From the GFI MailSecurity Configuration navigate to GFI MailSecurity ► General ► Settings and select Updates tab. Screenshot 11 - Updates server proxy settings 2. Select the Enable proxy server checkbox. 3. In the Proxy server field key in the Machine Name or IP address of the proxy server. 4. In the Port field, key in the port to connect on (default value is 8080). 5. If the proxy server requires authentication, select the Enable proxy authentication check box and key in the user name and password in the Username and Password fields respectively. 16 GFI MailSecurity 2011 General settings 6. Click Apply. 4.4 Adding Local Domains Screenshot 12 - Local Domains list GFI MailSecurity requires the list of local domains to enable it to distinguish between inbound, outbound or internal emails. During installation, GFI MailSecurity automatically imports local domains from the IIS SMTP service. If, however, you wish to add or remove local domains after installation, follow these steps: 1. From the GFI MailSecurity Configuration navigate to GFI MailSecurity ► General ► Settings and select Local Domains tab. 2. Key in the name of the domain to add in the Domain text box. 3. Click Add to include the stated domain in the Local domains list. NOTE: To remove a listed domain, select it from the list and click Remove. 4. Click Apply. General settings GFI MailSecurity 2011 17 4.5 SMTP server bindings NOTE: The SMTP Server bindings tab is not available when GFI MailSecurity is installed on a Microsoft Exchange Server 2007/2010 machine. Screenshot 13 - Binding GFI MailSecurity to a different SMTP Server GFI MailSecurity relies on the IIS SMTP service to send and receive emails. By default, it binds to your default SMTP virtual server. If however, you have multiple SMTP virtual servers installed on your machine, select to which one you want to bind GFI MailSecurity. You can select your virtual SMTP server both during the installation stage as well as from the Bindings tab after the installation. To change the current SMTP Virtual Server: 1. From the GFI MailSecurity Configuration navigate to GFI MailSecurity ► General ► Settings and select Bindings tab. 2. Select the required SMTP Virtual Server from the detected list of servers present in your domain. 3. Click Apply. 18 GFI MailSecurity 2011 General settings 4.6 Managing local users GFI MailSecurity uses 3 ways to retrieve users depending on the installation environment. NOTE: The number of users retrieved is also used for licensing purposes. 4.6.1 GFI MailSecurity installed in Active Directory mode When GFI MailSecurity is not installed on the same machine as your mail server and Active Directory is present, then GFI MailSecurity retrieves mail-enabled users from the Active Directory domain of which the GFI MailSecurity machine forms part. GFI MailSecurity installed on the Microsoft Exchange machine When GFI MailSecurity is installed on the same machine as Microsoft Exchange, GFI MailSecurity retrieves the users that have a mailbox on the same Microsoft Exchange Server. 4.6.2 GFI MailSecurity installed in SMTP mode When you choose to install GFI MailSecurity in SMTP mode, the list of local users is stored in a database managed by GFI MailSecurity. To populate and manage the user list when GFI MailSecurity is installed in SMTP mode, navigate to GFI MailSecurity ► General ► Settings ► User Manager tab. Screenshot 14 - User Manager The User Manager tab displays the list of local users, and allows you to add or remove local users. The list of local users is used when configuring user-based rules, such as Attachment Filtering rules and Content Filtering rules. General settings GFI MailSecurity 2011 19 NOTE: GFI MailSecurity automatically populates the list of local users using the sender‟s email address in outbound emails. To add a new local user: 1. Enter the email address in the Email address box. 2. Click Add. 3. Repeat to add more local users and click Apply. To remove a local user: 1. Select the local user you want to remove from the Local Users list and click Remove. 2. Repeat to remove more local users and click Apply. 20 GFI MailSecurity 2011 General settings 5 Configuring Virus Scanning Engines 5.1 Introduction GFI MailSecurity uses multiple Virus Scanning Engines to scan all emails for the presence of viruses. As part of its standard package, GFI MailSecurity ships with Norman and BitDefender Virus Scanning Engines. You can also acquire a license for the following antivirus engines: AVG Kaspersky McAfee This chapter describes how to configure Virus Scanning Engines, updates, actions and the scanning sequence. Configuring Virus Scanning Engines GFI MailSecurity 2011 21 5.2 AVG configuration Screenshot 15 - Anti-virus Scanning Engines: AVG configuration page (General Tab) 1. Navigate to GFI MailSecurity ► Virus Scanning Engines ► AVG Anti-Virus. NOTE: In this page, you can also review the anti-virus engine licensing and version information. 2. Select Enable Gateway Scanning (SMTP) check box, to scan SMTP traffic using this Virus Scanning Engine. 3. Select whether to scan inbound and/or outbound emails using this Virus Scanning Engine. Scan inbound SMTP email Select this option to scan incoming emails Scan outbound SMTP email Select this option to scan outgoing emails 22 GFI MailSecurity 2011 Configuring Virus Scanning Engines 4. If you installed GFI MailSecurity on the Microsoft Exchange machine, you will also have the option to scan the Information Store using this Virus Scanning Engine. To scan the Information Store select the Enable Information Store Virus Scanning (VSAPI) check box. NOTE: To be able to use the Information Store Virus Scanning feature, you must enable the option from Information Store Protection node. For more information about Information Store Protection, refer to Configuring Information Store Scanning section in this chapter. 5. Select Actions tab to configure the actions to take when this anti-virus engine finds malicious emails. Refer to the Virus scanner actions section in this chapter. 6. Select Updates tab to configure the update options for this anti-virus engine. Refer to the Virus scanner updates section in this chapter. 7. Click Apply to save changes. AVG web site For more information about AVG anti-virus engine, visit the AVG website at http://www.avg.com. 5.2.1 AVG LinkScanner When using the AVG Anti-Virus engine, it is also possible to use the AVG LinkScanner to block emails that contain links to known malicious web pages. The AVG LinkScanner checks each link in an email against a list of URLs that are known sources of exploits and other malicious content. AVG LinkScanner can also be configured to scan the content of links‟ destination pages for exploits. Configuring Virus Scanning Engines GFI MailSecurity 2011 23 Screenshot 16 - AVG LinkScanner options 1. Navigate to GFI MailSecurity ► Virus Scanning Engines ► AVG Anti-Virus ► AVG LinkScanner. 2. Select Scan inbound SMTP emails to scan incoming emails using AVG LinkScanner. 3. Select Scan links destination pages for exploits to check the content of links‟ destination pages for exploits. This feature requires HTTP access. Click Test http access to verify that AVG LinkScanner can access the links‟ destination pages. NOTE: If test fails, ensure that the GFI MailSecurity machine has internet connectivity. If the machine connects to the internet using a proxy server, configure proxy settings as described in section Configuring proxy server settings for automatic updates in this manual. 4. Select Actions tab to configure the actions to take when this anti-virus engine finds malicious emails. Refer to the Virus scanner actions section in this chapter. 5. Select Updates tab to configure update options. Refer to the Virus scanner updates section in this chapter. 6. Click Apply to save changes. 24 GFI MailSecurity 2011 Configuring Virus Scanning Engines 5.3 Kaspersky configuration Screenshot 17 - Anti-virus Scanning Engines: Kaspersky configuration page (General Tab) 1. Navigate to GFI MailSecurity ► Virus Scanning Engines ► Kaspersky Anti-Virus. NOTE: In this page you can also review the anti-virus engine licensing and version information. 2. Select Enable Gateway Scanning (SMTP) check box, to scan SMTP traffic using this Virus Scanning Engine. 3. Select whether to scan inbound and/or outbound emails using this Virus Scanning Engine. Scan inbound SMTP email Select this option to scan incoming emails Scan outbound SMTP email Select this option to scan outgoing emails 4. If you installed GFI MailSecurity on the Microsoft Exchange machine, you will also have the option to scan the Information Store using this Virus Scanning Engine. To scan the Information Store select the Enable Information Store Virus Scanning (VSAPI) check box. Configuring Virus Scanning Engines GFI MailSecurity 2011 25 NOTE: To be able to use the Information Store Virus Scanning feature, you must enable the option from Information Store Protection node. For more information about Information Store Protection, refer to Configuring Information Store Scanning section in this chapter. 5. Select Actions tab to configure the actions to take when this anti-virus engine finds malicious emails. Refer to the Virus scanner actions section in this chapter. 6. Select Updates tab to configure the update options for this anti-virus engine. Refer to the Virus scanner updates section in this chapter. 7. Click Apply to save changes. Kaspersky web site For more information about Kaspersky anti-virus engine, visit the Kaspersky website at http://www.kaspersky.com. 26 GFI MailSecurity 2011 Configuring Virus Scanning Engines 5.4 BitDefender configuration Screenshot 18 - Virus Scanning Engines: BitDefender configuration page (General Tab) 1. Navigate to GFI MailSecurity ► Virus Scanning Engines ► BitDefender Anti-Virus. NOTE: In this page you can also review the anti-virus engine licensing and version information. 2. Select Enable Gateway Scanning (SMTP) check box, to scan SMTP traffic using this Virus Scanning Engine. 3. Select whether to scan inbound and/or outbound emails using this Virus Scanning Engine. Scan inbound SMTP email Configuring Virus Scanning Engines Select this option to scan incoming emails GFI MailSecurity 2011 27 Scan outbound SMTP email Select this option to scan outgoing emails 4. If you installed GFI MailSecurity on the Microsoft Exchange machine, you will also have the option to scan the Information Store using this Virus Scanning Engine. To scan the Information Store select the Enable Information Store Virus Scanning (VSAPI) check box. NOTE: To be able to use the Information Store Virus Scanning feature, you must enable the option from Information Store Protection node. For more information about Information Store Protection, refer to Configuring Information Store Scanning section in this chapter. 5. BitDefender can also be used to block emails with attachments that contain macros. Enable this feature from the Macro Checking area by selecting Block all documents containing macros. 6. Select Actions tab to configure the actions to take when this anti-virus engine finds malicious emails. Refer to the Virus scanner actions section in this chapter. 7. Select Updates tab to configure the update options for this anti-virus engine. Refer to the Virus scanner updates section in this chapter. 8. Click Apply to save changes. BitDefender website For more information about BitDefender anti-virus engine, visit the BitDefender website at http://www.bitdefender.com 28 GFI MailSecurity 2011 Configuring Virus Scanning Engines 5.5 McAfee configuration Screenshot 19 - Virus Scanning Engines: McAfee configuration page (General Tab) 1. Navigate to GFI MailSecurity ► Virus Scanning Engines ► McAfee Anti-Virus. NOTE: In this page you can also review the anti-virus engine licensing and version information. 2. Select Enable Gateway Scanning (SMTP) check box, to scan SMTP traffic using this Virus Scanning Engine. 3. Select whether to scan inbound and/or outbound emails using this Virus Scanning Engine. Scan inbound SMTP email Select this option to scan incoming emails Scan outbound SMTP email Select this option to scan outgoing emails Configuring Virus Scanning Engines GFI MailSecurity 2011 29 4. If you installed GFI MailSecurity on the Microsoft Exchange machine, you will also have the option to scan the Information Store using this Virus Scanning Engine. To scan the Information Store select the Enable Information Store Virus Scanning (VSAPI) check box. NOTE: To be able to use the Information Store Virus Scanning feature, you must enable the option from Information Store Protection node. For more information about Information Store Protection, refer to Configuring Information Store Scanning section in this chapter. 5. McAfee can also be used to block emails with attachments that contain macros. Enable this feature from the Macro Checking area by selecting Block all documents containing macros. 6. Select Actions tab to configure the actions to take when this anti-virus engine finds malicious emails. Refer to the Virus scanner actions section in this chapter. 7. Select Updates tab to configure the update options for this anti-virus engine. Refer to the Virus scanner updates section in this chapter. 8. Click Apply to save changes. McAfee website For more information about McAfee anti-virus engine, visit the McAfee website at http://www.mcafee.com 30 GFI MailSecurity 2011 Configuring Virus Scanning Engines 5.6 Norman configuration Screenshot 20 - Virus Scanning Engines: Norman configuration page 1. Navigate to GFI MailSecurity ► Virus Scanning Engines ► Norman Anti-Virus. NOTE: In this page you can also review the anti-virus engine licensing and version information. 2. Select Enable Gateway Scanning (SMTP) check box, to scan SMTP traffic using this Virus Scanning Engine. 3. Select whether to scan inbound and/or outbound emails using this Virus Scanning Engine. Configuring Virus Scanning Engines GFI MailSecurity 2011 31 Scan inbound SMTP email Select this option to scan incoming emails Scan outbound SMTP email Select this option to scan outgoing emails 4. Select Enable Sandbox to use the Norman Anti-Virus Sandbox feature. This executes email attachments in a virtual environment and monitors all actions and effects on a system. If an attachment exhibits viral behavior, email is marked as malicious and all appropriate actions are taken. NOTE: Since this check is executed in a virtual environment, it does not pose any threats to the machine or network where GFI MailSecurity is installed. 5. If you installed GFI MailSecurity on the Microsoft Exchange machine, you will also have the option to scan the Information Store using this Virus Scanning Engine. To scan the Information Store select the Enable Information Store Virus Scanning (VSAPI) check box. NOTE: To be able to use the Information Store Virus Scanning feature, you must enable the option from Information Store Protection node. For more information about Information Store Protection, refer to Configuring Information Store Scanning section in this chapter. 6. Norman can also be used to block emails with attachments that contain macros. Enable this feature from the Macro Checking area by selecting Block all documents containing macros. 7. Select Actions tab to configure the actions to take when this anti-virus engine finds malicious emails. Refer to the Virus scanner actions section in this chapter. 8. Select Updates tab to configure the update options for this anti-virus engine. Refer to the Virus scanner updates section in this chapter. 9. Click Apply to save changes. Norman website For more information about Norman Virus Control (NVC) anti-virus engine, visit the NVC website at http://www.norman.com 32 GFI MailSecurity 2011 Configuring Virus Scanning Engines 5.7 Virus scanner actions Screenshot 21 - Virus Scanning Engine: Configuration page (Actions Tab) In GFI MailSecurity, you can configure what each of the installed Virus Scanning Engines should do whenever an infected email is detected. NOTE: When GFI MailSecurity is installed on same machine as Microsoft Exchange 2003, GFI MailSecurity may not be able to block outbound emails, but instead replaces the blocked content (e.g. the attachment) with a threat report. 1. Select the virus scanner that you want to configure actions for and select the Actions tab. 2. Choose the action to take when an email is blocked: Quarantine item Stores all infected emails detected by the selected Virus Scanning Engine in the Quarantine Store. You can subsequently review (approve/delete) all the quarantined emails. For more information about Quarantine refer to the Quarantine chapter in this manual. Delete item Deletes infected emails. 3. Select Send a sanitized copy of the original email to recipient(s) to choose whether to forward a copy of the blocked email to the recipients but with the malicious content removed. Configuring Virus Scanning Engines GFI MailSecurity 2011 33 NOTE: This feature is not applicable to emails scanned using the Information Store Virus Scanning feature. 4. GFI MailSecurity can send email notifications whenever an infected inbound email is detected. To enable this feature, select any of the following options: Notify administrator Notify the administrator whenever the virus scanner detects an infected email. To configure the administrator‟s email address refer to chapter Configuring the administrator‟s email address. Notify local user Notify the email local recipients about the blocked malicious email. 5. To log the virus scanning activity to a log file select Log occurrence to this file. In the text box specify: Path and file name to a custom location on disk where to store the log file or The file name only. The log file will be stored in the following default location: <GFI MailSecurity installation path>\ContentSecurity\MailSecurity\Logs\<filename.txt> 34 GFI MailSecurity 2011 Configuring Virus Scanning Engines 5.8 Virus scanner updates Screenshot 22 - Virus Scanning Engines: Configuration page (Updates Tab) You can configure GFI MailSecurity to download virus scanner updates automatically or to notify the administrator whenever new updates are available. 1. Select the virus scanner to configure and select the Updates tab. 2. Select the Automatically check for updates check box to enable anti-virus engine autoupdate. 3. From the Downloading option list, select one of the following options: Only check for updates Configuring Virus Scanning Engines Select this option if you want GFI MailSecurity to just check for and notify the administrator when updates are available for the virus scanner. This option will NOT download the available updates automatically. GFI MailSecurity 2011 35 Check for updates and download Select this option if you want GFI MailSecurity to check for and automatically download any updates available for the virus scanner. 4. Specify how often you want GFI MailSecurity to check/download updates for this Virus Scanning Engine, by specifying an interval value in hours. 5. In the Update options area, select Enable email notifications upon successful updates to send an email notification to the administrator whenever the virus scanning engine updates successfully. NOTE: An email notification is always sent when an update fails. 6. To check for and download updates immediately, click Download updates. 7. Click Apply to save changes. Downloading anti-virus updates manually To check for and download updates for a Virus Scanning Engine, click Download updates from the Updates tab of the Virus Scanning Engine page. 5.9 Setting the Virus Scanning Engines scan sequence GFI MailSecurity scans each email through each licensed anti-virus scanning engine. The order of priority and sequence how GFI MailSecurity executes scanning can be configured from the Virus Scanning Engines page. NOTE: The engine with priority 0 has the top priority and is the first engine to scan inbound/outbound emails. To configure the execution order of the Virus Scanning Engines, follow these steps: 1. Navigate to the GFI MailSecurity ► Virus Scanning Engines node. Screenshot 23 - Virus Scanning Engines: scan priority list 2. In the right pane, the Virus Scanning Engines are listed in descending order of priority. 3. To change the virus scanning execution priority, click the (up) or (down) respectively increase or decrease the priority of the virus scanner. 36 GFI MailSecurity 2011 arrows to Configuring Virus Scanning Engines 5.10 Configuring Virus Scanning optimizations From the GFI MailSecurity ► Virus Scanning Engines node you can instruct GFI MailSecurity to stop scanning an item if a particular number of virus scanning engines detect a virus in that item. Screenshot 24 - Configure virus scanning optimizations To enable this option, select the Stop virus scanning the current item, if viruses are detected by check box, and specify the number of virus scanners that need to detect a virus to stop virus scanning, in the box. Click Apply. You can also instruct GFI MailSecurity to stop further scanning by all other modules, such as the Email Exploit Engine. To enable this feature select Stop scanning even for non-virus related threats check box and click Apply. 5.11 Configuring Information Store Scanning When GFI MailSecurity is installed on the Microsoft Exchange server machine, you can utilize GFI MailSecurity to scan the Microsoft Exchange Information Store for viruses. NOTE: When GFI MailSecurity is installed on a Microsoft Exchange Server 2007/2010 machine, Information Store Protection is available only when both the Mailbox Server Role and Hub Transport Server Role are installed. This section will show you how to enable Information Store Scanning and select the scan method used by VSAPI (Virus Scanning API). 5.11.1 Information Store Scanning 1. Click the GFI MailSecurity ► Virus Scanning Engines ► Information Store Protection node. Configuring Virus Scanning Engines GFI MailSecurity 2011 37 Screenshot 25 - Information Store Protection node 2. In the Information Store Virus Scanning tab, check Enable Information Store Virus Scanning and click Apply. The status of the Virus Scanning Engines used to scan the Information Store is displayed in the table. You can also disable a particular anti-virus engine from Information Store Scanning. To do this, navigate to the Virus Scanning Engines page, select the anti-virus engine and disable Enable Information Store Virus Scanning (VSAPI). 5.11.2 VSAPI settings The method used by GFI MailSecurity to access emails and attachments in the Microsoft Exchange Information Store is VSAPI (Virus Scanning Application Programming Interface). GFI MailSecurity allows you to specify the method to use when scanning the Information Store. 1. Click the GFI MailSecurity ► Virus Scanning Engines ► Information Store Protection node. 38 GFI MailSecurity 2011 Configuring Virus Scanning Engines Screenshot 26 - VSAPI scan settings 2. Select the VSAPI Settings tab. 3. (Optional) Select Enable background scanning to run Information Store Scanning in the background. Background scanning causes all the contents of the Information Store to be scanned. This can result in a high processing load on the Microsoft Exchange server depending on the amount of items stored in the Information Store. It is recommended to enable this option only during periods of low server activity such as during the night. 4. Select a VSAPI scan method: On-access scanning New items in the Information Store are scanned as soon as they are accessed by the email client. This introduces a short delay before the email client displays the contents of a new message. Pro-active scanning New items added to the Information Store are added to a queue for scanning. Configuring Virus Scanning Engines GFI MailSecurity 2011 39 This is the default and recommended mode of operation, since in general the delay associated with on-access scanning is avoided. NOTE: In the event that an email client tries to access an item that is still in the queue, it will be allocated a higher scanning priority so that it is scanned immediately. 5. Click Apply. 40 GFI MailSecurity 2011 Configuring Virus Scanning Engines 6 Configuring other mail filters Apart from virus scanning engines, GFI MailSecurity also includes a number of other mail filtering mechanisms as described in this chapter. 6.1 Content Filtering 6.1.1 Introduction The Content Filtering feature allows you to set up rules to filter emails containing particular keywords or a combination of keywords in an email. A rule is composed of: Keywords to block in the email body, subject or attachment Actions to take when a keyword is found The users to which a rule applies. NOTE: Although this feature can be used as a filter against spam email, it is recommended to use dedicated software to block spam. For more information, refer to: http://kbase.gfi.com/showarticle.asp?id=KBID003342 Screenshot 27 - Content Filtering page To configure content rules, navigate to GFI MailSecurity ► Scanning & Filtering ► Content Filtering. This page allows you to view, create, enable, disable or delete rules. Configuring other mail filters GFI MailSecurity 2011 41 6.1.2 Creating a Content Filtering rule Step 1: Configuring basic rule settings 1. Navigate to GFI MailSecurity ► Scanning & Filtering ► Content Filtering node and click Add Rule…. Screenshot 28 - Content Filtering: General Tab 2. Specify a name for the rule in the Rule name text box. 3. Select which emails to scan. Check inbound emails Select this option to scan incoming emails Check outbound emails Select this option to scan outgoing emails Check internal emails Select this option to scan internal emails. NOTE: This option is only available when GFI MailSecurity is installed on the Microsoft Exchange server. 42 GFI MailSecurity 2011 Configuring other mail filters 4. To block emails encrypted using PGP technology, select Block PGP encrypted emails. NOTE: PGP encryption is a public-key cryptosystem often used to encrypt emails. Step 2: Configuring terms to block 1. Select the Body tab to specify the keywords in the email body to block. 2. Select Block emails if content is found matching these conditions checkbox to enable scanning of body for keywords. Screenshot 29 - Content Filtering: Body Tab- setting conditions 3. From the Condition entry area, key in keywords to block in the Edit condition box. You can also use conditions AND, OR, AND NOT and OR NOT to use a combinations of keywords. 4. To add the keyword or combination of keywords keyed in, click Add Condition. NOTE 1: To modify an entry in the Conditions list, select it and make the required changes in the Condition entry box. Click Update to apply changes. NOTE 2: To remove an entry from the Conditions list, select it and click Remove. Configuring other mail filters GFI MailSecurity 2011 43 Screenshot 30 - Content Filtering: Body Tab- configuring other options 5. From the Options area, configure other settings: Match whole words only Block emails when the keywords specified match whole words. Apply above conditions to attachments Select this option to apply this rule also to text in attachments. In the Attachment filtering area specify the attachments to apply or exclude from this rule. 6. Select the Subject tab to specify keywords to block in the email subject. 44 GFI MailSecurity 2011 Configuring other mail filters Screenshot 31 - Content Filtering: Subject Tab 7. Select Enable subject content filtering to enable scanning for keywords in the email subject. 8. In the Enter phrase text box, specify keywords to block, and click Add. NOTE: To remove an added keyword, select it from the Phrases box and click Remove Selected. 9. From the Options area, configure how keywords are matched. Select Match whole words only to block emails where the keywords specified match whole words in the subject. Step 3: Configuring the actions to take on detected emails 1. Click the Actions tab to configure what should be done when this rule is triggered. 2. To block an email that matches the rule conditions, select Block attachment and perform this action and select one of the following options: Configuring other mail filters GFI MailSecurity 2011 45 Quarantine email Stores emails containing the keyword(s) in the Quarantine Store. You can subsequently review (approve/delete) all the quarantined emails. For more information about Quarantine refer to the Quarantine chapter in this manual. Delete email Deletes emails containing the blocked keyword(s). Move to folder Moves the email to a folder on disk. Key in the full folder path where to store blocked emails. NOTE: When GFI MailSecurity is installed on same machine as Microsoft Exchange 2003, GFI MailSecurity may not be able to block outbound emails, but instead replaces the blocked content (e.g. the attachment) with a threat report. 3. Select Send a sanitized copy of the original email to recipient(s) to choose whether to forward a copy of blocked emails to the recipients but with the malicious content removed. 4. You can configure rule to send email notifications to the administrator and/or user whenever an email containing an attachment is blocked. To do this, from the Notification options area select: Notify administrator Notify the administrator whenever the rule is triggered. To configure the administrator‟s email address refer to chapter Configuring the administrator‟s email address. Notify local user Notify the email local recipients about the blocked email. 5. To log the activity of this rule to a log file, select Log rule occurrence to this file. In the text box specify: Path and file name to a custom location on disk where to store the log file, or The file name only. The log file will be stored in the following default location: <GFI MailSecurity installation path>\ContentSecurity\MailSecurity\Logs\<filename.txt> Step 4: Specifying the users to apply this rule to By default, the rule is applied to all email users. GFI MailSecurity, however, allows you to apply this rule to a custom list of email users. 1. To specify the users to apply this rule to, select Users/Folders tab 46 GFI MailSecurity 2011 Configuring other mail filters Screenshot 32 - Content Filtering: Users/Folders Tab 2. Specify the users to apply this rule to. Only this list Apply this rule to a custom list of email users, groups or public folders. All except this list Apply this rule to all email users except for the users, groups or public folders specified in the list. 3. To add email users, user groups and/or public folders to the list, click Add. Screenshot 33 - Add users to a Content Filtering rule 4. In the User Lookups window, specify the name of the email user/user group or public folder that you wish to add to the list and click Check Names. Matching users, groups or public folders are listed below. Configuring other mail filters GFI MailSecurity 2011 47 NOTE: You do not need to input the full name of the users, groups or public folder. It is enough to enter part of the name. GFI MailSecurity will list all the names that contain the specified characters. For example, if you input „sco‟, GFI MailSecurity will return names like „Scott Adams‟ and „Freeman Prescott„, if they are available. 5. Select the check box next to the name(s) that you want to add to the list and click OK. NOTE 1: To remove entries from the list, select the user/user group/public folder you want to remove and click Remove. NOTE 2: If no names are included in the list, GFI MailSecurity automatically applies this rule to all email users. 6. Repeat steps 3 to 5 to add all the required users to the list. 7. Click Apply to save the newly created rule. 6.1.3 Enabling/disabling rules To enable/disable content filtering rules: 1. Navigate to the GFI MailSecurity ► Scanning & Filtering ► Content Filtering node. 2. From the Content Filtering page, select the checkbox of the rule(s) to enable or disable. 3. Click Enable Selected or Disable Selected accordingly. 6.1.4 Removing content filtering rules Screenshot 34 - Selecting a Content Filtering rule for removal 48 GFI MailSecurity 2011 Configuring other mail filters Deleted rules are not recoverable. 1. Navigate to the GFI MailSecurity ► Scanning & Filtering ► Content Filtering node. 2. From the Content Filtering page, select the checkbox of the rule(s) that you want to remove. 3. Click Remove Selected. 6.1.5 Modifying an existing rule 1. Click the GFI MailSecurity ► Scanning & Filtering ► Content Filtering node. 2. From the Content Filtering page, click the name of the rule to modify. 3. Perform the required changes in the rule properties and click Apply to apply changes. 6.1.6 Changing rule priority Content Filtering rules are applied in the same order, from top to bottom as they are listed in the Content Filtering page (that is, rule with priority value 1 is checked first). To change the sequence/priority of rules: 1. Navigate to GFI MailSecurity ► Scanning & Filtering ► Content Filtering. 2. From the Content Filtering page, click the (up) increase or decrease the priority of the rule. or (down) arrows to respectively 3. Repeat step 2 until rules are placed in the desired sequence. 6.2 Attachment Filtering 6.2.1 Introduction The Attachment Filtering feature allows you to set up rules to filter what types of email attachments to allow and block on the mail server. A rule is composed of: Attachment types to block Actions to take when a matching attachment is found The users to which a rule applies. Configuring other mail filters GFI MailSecurity 2011 49 Screenshot 35 - Attachment Filtering page To configure attachment rules, navigate to GFI MailSecurity ► Scanning & Filtering ► Attachment Filtering. This page allows you to view, create, enable, disable or delete rules. 50 GFI MailSecurity 2011 Configuring other mail filters 6.2.2 Creating an Attachment Filtering rule 1. Navigate to GFI MailSecurity ► Scanning & Filtering ► Attachment Filtering node. 2. Click Add Rule…. Screenshot 36 - Attachment Filtering: General Tab 3. Specify a name for the rule in the Rule name text box. Configuring other mail filters GFI MailSecurity 2011 51 4. Select whether to scan inbound and/or outbound emails. Check inbound emails Select this option to scan incoming emails Check outbound emails Select this option to scan outgoing emails Check internal emails Select this option to scan internal emails. NOTE: This option is only available when GFI MailSecurity is installed on the Microsoft Exchange server 5. In the Attachment Blocking area, specify the types of attachments to block: Block all Block all email attachments of any type. Block this list Block a custom list of attachment types. Key in a filename and/or attachment type to block in the Enter filename with optional wildcards text box and click Add. Repeat this step for all filenames and/or attachment types to block. Do not block attachments which are smaller than the following size in Kb: Select this option to allow attachment types in the list that are smaller than a particular size. Specify the size in Kb in the text box provided. Block all except this list Block all attachments except the ones specified in the list. Key in a filename and/or attachment type to exclude in the Enter filename with optional wildcards text box and click Add. Repeat this step for all filenames and/or attachment types to exclude. NOTE 1: When specifying filenames and/or attachment types, you can use asterisk (*) wildcards. For example, specifying *orders*.mdb refers to all files of type mdb that contain the string 'orders' in the file name. Specifying *.jpg will block all images of type jpg. NOTE 2: To remove an entry from the list, select it and click Remove Selected. 6. You can also block attachments that have a size bigger than a particular size. To enable this option, from the Options area select Block all files greater than the following size in Kb and specify the maximum attachment size (in Kb). NOTE: This feature blocks all attachments with a file size bigger than the one specified irrespective if the attachment matches an entry in the Attachment blocking list. 52 GFI MailSecurity 2011 Configuring other mail filters Screenshot 37 - Attachment Filtering: Actions Tab 7. Click the Actions tab to configure what happens when this rule is triggered. 8. To block an email that matches the rule conditions from being delivered to recipients, select Block attachment and perform this action and select one of the following options: Quarantine email Stores emails containing blocked attachments in the Quarantine Store. You can subsequently review (approve/delete) all the quarantined emails. For more information about Quarantine refer to the Quarantine chapter in this manual. Delete email Deletes emails containing blocked attachments. Move to folder Moves the email to a folder on disk. Key in the full folder path where to store blocked emails. Actions always affect the whole email containing the blocked attachment, even if there are other attachments that do not trigger this rule. Configuring other mail filters GFI MailSecurity 2011 53 NOTE: When GFI MailSecurity is installed on same machine as Microsoft Exchange 2003, GFI MailSecurity may not be able to block outbound emails, but instead replaces the blocked content (e.g. the attachment) with a threat report. 9. Select Send a sanitized copy of the original email to recipient(s) to choose whether to forward a copy of the blocked email to the recipients but with the malicious content removed. 10. You can configure rule to send email notifications to the administrator and/or user whenever an email containing an attachment is blocked. To do this, from the Notification options area select: Notify administrator Notify the administrator whenever the rule is triggered. To configure the administrator‟s email address refer to chapter Configuring the administrator‟s email address. Notify local user Notify the email local recipients about the blocked email. 11. To log the activity of this rule to a log file, select Log rule occurrence to this file check box. In the text box specify: Path and file name (including .txt extension) to a custom location on disk where to store the log file, or The file name only (including .txt extension). The log file will be stored in the following default location: <GFI MailSecurity installation path>\ContentSecurity\MailSecurity\Logs\<filename>.txt 12. By default, the rule is applied to all email users. GFI MailSecurity, however, allows you to apply this rule to a custom list of email users. To specify the users to apply this rule to, select Users/Folders tab Screenshot 38 - Attachment Filtering: Users/Folders Tab 13. Specify the users to apply this rule to. Only this list Apply this rule to a custom list of email users, groups or public folders. All except this list Apply this rule to all email users except for the users, groups or public folders specified in the list. 54 GFI MailSecurity 2011 Configuring other mail filters 14. To add email users, user groups and/or public folders to the list, click Add. Screenshot 39 - Add users to an attachment Filtering rule 15. In the User Lookups window, specify the name of the email user/user group or public folder that you wish to add to the list and click Check Names. Matching users, groups or public folders are listed below. NOTE: You do not need to input the full name of the users, groups or public folder. It is enough to enter part of the name. GFI MailSecurity will list all the names that contain the specified characters. For example, if you input „sco‟, GFI MailSecurity will return names like „Scott Adams‟ and „Freeman Prescott„, if they are available. 16. Select the check box next to the name(s) that you want to add to the list and click OK. NOTE 1: To remove entries from the list, select the user/user group/public folder you want to remove and click Remove. NOTE 2: If no names are included in the list, GFI MailSecurity automatically applies this rule to all email users. 17. Repeat steps 14 to 16 to add all the required users to the list. 18. Click Apply. 6.2.3 Enabling/disabling rules To enable or disable attachment filtering rules: 1. Navigate to the GFI MailSecurity ► Scanning & Filtering ► Attachment Filtering node. 2. From the Attachment Filtering page, select the checkbox of the rule(s) to enable or disable. 3. Click Enable Selected or Disable Selected accordingly. Configuring other mail filters GFI MailSecurity 2011 55 6.2.4 Removing attachment rules Screenshot 40 - Selecting an attachment Filtering rule for removal Deleted rules are not recoverable. 1. Navigate to the GFI MailSecurity ► Scanning & Filtering ► Attachment Filtering node. 2. From the Attachment Filtering page, select the checkbox of the rule(s) that you want to remove. 3. Click Remove Selected to delete the selected rules. 6.2.5 Modifying an existing rule 1. Click the GFI MailSecurity ► Scanning & Filtering ► Attachment Filtering node. 2. From the Attachment Filtering page, click the name of the rule to modify. 3. Perform the required changes in the rule properties and click Apply to apply changes. 56 GFI MailSecurity 2011 Configuring other mail filters 6.2.6 Changing the rule priority Attachment Filtering rules are applied in the same order, from top to bottom as they are listed in the Attachment Filtering page (that is, rule with priority value 1 is checked first). To change the sequence/priority of rules: 1. Navigate to GFI MailSecurity ► Scanning & Filtering ► Attachment Filtering. 2. From the Attachment Filtering page, click the (up) increase or decrease the priority of the rule. or (down) arrows to respectively 3. Repeat step 2 until rules are placed in the desired sequence. 6.3 Decompression engine 6.3.1 Introduction The Decompression engine decompresses and analyzes archives attached to an email. Screenshot 41 - The decompression engine filters list The following is a list of checks performed by the decompression engine: Password protected archives Corrupted archives Recursive archives Size of decompressed files in archives Amount of files in archives Scan within archives Configuring other mail filters GFI MailSecurity 2011 57 6.3.2 Configuring the decompression engine filters To configure any decompression engine filter: 1. Navigate to GFI MailSecurity ► Scanning & Filtering ► Decompression. 2. Click the decompression filter to configure. Check password protected archives Screenshot 42 - Configuring password protected archives options This filter allows you to quarantine or delete emails that contain password-protected archives. To configure this filter: 1. Navigate to GFI MailSecurity ► Scanning & Filtering ► Decompression. 2. From the list of available filters, click Check password protected archives. 3. To enable this filter select the Check password protected archives checkbox. 4. Specify what to do when an email contains an archive that triggers this filter: Quarantine Quarantines blocked emails Automatically Delete Deletes blocked emails NOTE: When GFI MailSecurity is installed on same machine as Microsoft Exchange 2003, GFI MailSecurity may not be able to block outbound emails, but instead replaces the blocked content with a threat report. 5. Select Send a sanitized copy of the original email to recipient(s) to choose whether to forward a copy of the blocked email to the recipients but with the malicious content removed. 6. Click the Actions tab to configure further actions. 7. GFI MailSecurity can send email notifications whenever an email triggers this filter. To enable this feature, select any of the following options: 58 GFI MailSecurity 2011 Configuring other mail filters Notify administrator Notify the administrator whenever this engine blocks an email. To configure the administrator‟s email address refer to chapter Configuring the administrator‟s email address. Notify local user Notify the email local recipients about the blocked email. 8. To log the occurrence of this activity to a log file select the Log occurrence to this file check box. In the text box specify: Path and file name (including .txt extension) to a custom location on disk where to store the log file, or The file name only (including .txt extension). The log file will be stored in the following default location: <GFI MailSecurity installation path>\ContentSecurity\MailSecurity\Logs\<filename>.txt 9. Click Apply. Check corrupted archives This filter allows you to quarantine or delete emails that contain corrupted archives. To configure this filter: 1. Navigate to GFI MailSecurity ► Scanning & Filtering ► Decompression. 2. From the list of available filters, click Check corrupted archives. 3. To enable this filter select the Check corrupted archives checkbox. 4. Specify what to do when an email contains an archive that triggers this filter: Quarantine Quarantines blocked emails Automatically Delete Deletes blocked emails NOTE: When GFI MailSecurity is installed on same machine as Microsoft Exchange 2003, GFI MailSecurity may not be able to block outbound emails, but instead replaces the blocked content with a threat report. 5. Select Send a sanitized copy of the original email to recipient(s) to choose whether to forward a copy of the blocked email to the recipients but with the malicious content removed. 6. Click the Actions tab to configure further actions. 7. GFI MailSecurity can send email notifications whenever an email triggers this filter. To enable this feature, select any of the following options: Notify administrator Notify the administrator whenever this engine blocks an email. To configure the administrator‟s email address refer to chapter Configuring the administrator‟s email address. Notify local user Notify the email local recipients about the blocked email. 8. To log the occurrence of this activity to a log file select the Log occurrence to this file check box. In the text box specify: Path and file name (including .txt extension) to a custom location on disk where to store the log file, or Configuring other mail filters GFI MailSecurity 2011 59 The file name only (including .txt extension). The log file will be stored in the following default location: <GFI MailSecurity installation path>\ContentSecurity\MailSecurity\Logs\<filename>.txt 9. Click Apply. Check for recursive archives Screenshot 43 - Configuring recursive archives options This filter allows you to quarantine or delete emails that contain recursive archives. Recursive archives, also known as nested archives, are archives that contain other/multiple levels of sub-archives (that is, archives within archives). A high number of archive levels can indicate a malicious archive. Recursive archives can be used in a DoS (Denial of Service) attack, since most content scanning and anti-virus packages crash while attempting to scan nested archive levels. To configure this filter: 1. Navigate to GFI MailSecurity ► Scanning & Filtering ► Decompression. 2. From the list of available filters, click Check for recursive archives. 3. To enable this filter select the Check for recursive archives checkbox. 4. Specify the maximum number of recurring archives in the Maximum number of recurring archives text box. If an archive contains more recurring archives than the specified number, the email is triggered as malicious. 5. Specify what to do when an email contains an archive that triggers this filter: Quarantine Quarantines blocked emails Automatically Delete Deletes blocked emails 60 GFI MailSecurity 2011 Configuring other mail filters NOTE: When GFI MailSecurity is installed on same machine as Microsoft Exchange 2003, GFI MailSecurity may not be able to block outbound emails, but instead replaces the blocked content with a threat report. 3. Select Send a sanitized copy of the original email to recipient(s) to choose whether to forward a copy of the blocked email to the recipients but with the malicious content removed. 7. Click the Actions tab to configure further actions. 8. GFI MailSecurity can send email notifications whenever an email triggers this filter. To enable this feature, select any of the following options: Notify administrator Notify the administrator whenever this engine blocks an email. To configure the administrator‟s email address refer to chapter Configuring the administrator‟s email address. Notify local user Notify the email local recipients about the blocked email. 9. To log the occurrence of this activity to a log file select the Log occurrence to this file check box. In the text box specify: Path and file name (including .txt extension) to a custom location on disk where to store the log file, or The file name only (including .txt extension). The log file will be stored in the following default location: <GFI MailSecurity installation path>\ContentSecurity\MailSecurity\Logs\<filename>.txt 10. Click Apply. Check size of uncompressed files in archives Screenshot 44 - Configuring checks for the size of uncompressed files in archives Configuring other mail filters GFI MailSecurity 2011 61 This filter allows you to block or delete emails with archives that exceed the specified physical size when uncompressed. Hackers sometimes use this method in a DoS (Denial of Service) attack by sending an archive that can be uncompressed to a very large file that crashes content security or anti-virus software. To configure this filter: 1. Navigate to GFI MailSecurity ► Scanning & Filtering ► Decompression. 2. From the list of available filters, click Check size of uncompressed files in archives. 3. To enable this filter select the Check size of uncompressed files in archives checkbox. 4. Specify the maximum size of uncompressed archives in the Maximum size of uncompressed files in archive in Mb text box. If an uncompressed archive‟s size is bigger than the specified value, the email is triggered as malicious. 5. Specify what to do when an email contains an archive that triggers this filter: Quarantine Quarantines blocked emails Automatically Delete Deletes blocked emails NOTE: When GFI MailSecurity is installed on same machine as Microsoft Exchange 2003, GFI MailSecurity may not be able to block outbound emails, but instead replaces the blocked content with a threat report. 6. Select Send a sanitized copy of the original email to recipient(s) to choose whether to forward a copy of the blocked email to the recipients but with the malicious content removed. 7. Click the Actions tab to configure further actions. 8. GFI MailSecurity can send email notifications whenever an email triggers this filter. To enable this feature, select any of the following options: Notify administrator Notify the administrator whenever this engine blocks an email. To configure the administrator‟s email address refer to chapter Configuring the administrator‟s email address. Notify local user Notify the email local recipients about the blocked email. 9. To log the occurrence of this activity to a log file select the Log occurrence to this file check box. In the text box specify: Path and file name (including .txt extension) to a custom location on disk where to store the log file, or The file name only (including .txt extension). The log file will be stored in the following default location: <GFI MailSecurity installation path>\ContentSecurity\MailSecurity\Logs\<filename>.txt 10. Click Apply. Check for amount of files in archives 62 GFI MailSecurity 2011 Configuring other mail filters Screenshot 45 - Configuring the amount of files in archive check This filter allows you to quarantine or delete emails that contain an excessive amount of compressed files within an attached archive. You can specify the number of files allowed in archive attachments from the configuration options included in this filter. To configure this filter: 1. Navigate to GFI MailSecurity ► Scanning & Filtering ► Decompression. 2. From the list of available filters, click Check for amount of files in archives. 3. To enable this filter select the Check for amount of files in archives checkbox. 4. Specify the maximum number of files in archives in the If the number of files within archive exceeds text box. If the archive contains more files than the specified value, the email is triggered as malicious. 5. Specify what to do when an email contains an archive that triggers this filter: Quarantine Quarantines blocked emails Automatically Delete Deletes blocked emails NOTE: When GFI MailSecurity is installed on same machine as Microsoft Exchange 2003, GFI MailSecurity may not be able to block outbound emails, but instead replaces the blocked content with a threat report. 6. Select Send a sanitized copy of the original email to recipient(s) to choose whether to forward a copy of the blocked email to the recipients but with the malicious content removed. 7. Click the Actions tab to configure further actions. 8. GFI MailSecurity can send email notifications whenever an email triggers this filter. To enable this feature, select any of the following options: Notify administrator Notify the administrator whenever this engine blocks an email. To configure the administrator‟s email address refer to chapter Configuring the administrator‟s email Configuring other mail filters GFI MailSecurity 2011 63 address. Notify local user Notify the email local recipients about the blocked email. 9. To log the occurrence of this activity to a log file select the Log occurrence to this file check box. In the text box specify: Path and file name (including .txt extension) to a custom location on disk where to store the log file, or The file name only (including .txt extension). The log file will be stored in the following default location: <GFI MailSecurity installation path>\ContentSecurity\MailSecurity\Logs\<filename>.txt 10. Click Apply. Scan within archives (attachment checking) Through the Scan within archives option, you can apply Attachment Filtering and Content Filtering of files within archives. 1. Navigate to GFI MailSecurity ► Scanning & Filtering ► Decompression. 2. From the list of available filters, click Scan within archives. 3. To enable scanning within archives select the Apply Attachment and Content Filtering rules within archives checkbox. 4. Click Apply. For more information about Attachment Filtering and Content Filtering refer to Attachment Filtering and Content Filtering sections respectively in this manual. 64 GFI MailSecurity 2011 Configuring other mail filters 6.3.3 Enable/disable decompression filters Screenshot 46 -Disabling Decompression tool filters To enable or disable decompression filters: 1. Navigate to GFI MailSecurity ► Scanning & Filtering ► Decompression. 2. From the Decompression engine page, select the checkbox of the filters to enable or disable. 3. Click Enable Selected or Disable Selected accordingly. 6.4 The Trojan & Executable Scanner 6.4.1 Introduction GFI MailSecurity includes an advanced Trojan and Executable Scanner that analyzes and determines the function of an executable file. This scanner can subsequently quarantine any executables that perform suspicious activities (such as Trojans). What is a Trojan horse? In computer technology, a Trojan horse is a covert attack vector that compromises a victim‟s computer while remaining undetected. This enables the attacker access to the data stored on that computer. Subsequently, the attacker can compromise the data and can cause downtime and loss of data to the victim. Hackers typically hide Trojans in applications that appear to perform a legitimate function. How does the Trojan & Executable Scanner work? GFI MailSecurity rates the risk-level of an executable file by decompiling the executable, and detecting in real-time what the executable might do. Subsequently, it compares capabilities Configuring other mail filters GFI MailSecurity 2011 65 of the executable to a database of malicious actions and rates the risk level of the file. With the Trojan & Executable scanner, you can detect and block potentially dangerous, unknown or one-off Trojans before they compromise your network. 6.4.2 Configuring the Trojan & Executable Scanner This section describes how to customize the GFI MailSecurity Trojan & Executable Scanner. Screenshot 47 - Trojan and Executable Scanner: General Tab 1. Navigate to GFI MailSecurity ► Scanning & Filtering ► Trojan & Executable Scanner. 2. Select Enable Trojan & Executable Scanner to activate this filter. 3. In Email checking area, specify the emails to check for Trojans and other malicious executables by selecting: Check inbound emails 66 GFI MailSecurity 2011 Scan incoming emails for Trojans and malicious executable files. Configuring other mail filters Check outbound emails scan outgoing emails for Trojans and malicious executable files. 4. From the Security settings area, choose the required level of security: High Security Blocks all executables that contain any known malicious signatures Medium Security Blocks suspicious executables. Emails are blocked if an executable contains one highrisk signature or a combination of high-risk and low-risk signatures. Low Security Blocks only malicious executables. Emails are blocked if an executable contains at least one high-risk signature. Screenshot 48 - Trojan and Executables Scanner: Actions Tab 5. Click the Actions tab to configure the actions you want GFI MailSecurity to take on emails containing a malicious executable. NOTE 1: Emails blocked by the Trojan & Executable Scanner are always quarantined. NOTE 2: When GFI MailSecurity is installed on same machine as Microsoft Exchange 2003, GFI MailSecurity may not be able to block outbound emails, but instead replaces the blocked content (e.g. the attachment) with a threat report. 6. GFI MailSecurity can send email notifications whenever malicious executables are detected. To enable this feature, select any of the following options: Notify administrator Notify the administrator whenever this engine blocks an email. To configure the administrator‟s email address refer to chapter Configuring the administrator‟s email address. Notify local user Notify the email local recipients about the blocked email. 7. To log the occurrence of this activity to a log file select Log occurrence to this file checkbox. In the text box specify: Configuring other mail filters GFI MailSecurity 2011 67 Path and file name (including .txt extension) to a custom location on disk where to store the log file, or The file name only (including .txt extension). The log file will be stored in the following default location: <GFI MailSecurity installation path>\ContentSecurity\MailSecurity\Logs\<filename>.txt 8. Select Updates tab to configure GFI MailSecurity to download Trojan & Executable Scanner updates automatically or to notify the administrator whenever new updates are available. Screenshot 49 - Trojan and Executable Scanner: Updates tab 9. To enable the automatic updating of Trojan & Executable Scanner, select Automatically check for updates check box. 10. From the Downloading options list, select one of the following download options: Only check for updates Automatically check for updates and notify the administrator whenever updates are available. This option will NOT download the available updates automatically. Check for updates and download Automatically check for and download all available updates. 68 GFI MailSecurity 2011 Configuring other mail filters 11. In Download/check after the specified number of hours text box, specify how often you want GFI MailSecurity to check for updates, by typing an hourly interval. 12. In the Update options area, select Enable email notifications upon successful updates to send an email notification to the administrator whenever Trojan & Executable Scanner is updated successfully. NOTE: An email notification is always sent when an update fails. 13. To check for and download updates immediately, click Download updates. 14. Click Apply. 6.5 The Email Exploit Engine 6.5.1 Introduction What is an exploit? An exploit uses known vulnerabilities in applications or operating systems to compromise the security of a system. It "exploits" a feature of a program or the operating system for its own use. For example, execute a program or command, or install a backdoor. What is an e-mail exploit? An email exploit is an exploit launched via email. An email exploit is essentially an exploit that can be embedded in an email, and executed on the recipient‟s machine either when the user receives or opens the email. Difference between Anti-Virus software & Email Exploit Detection software Anti-virus software is designed to detect malicious code. It does not necessarily analyze the method used to execute the code, whereas the Email Exploit Detection Engine scans for methods that execute a program or command on the user‟s system. The Email Exploit Engine does not check whether the program is malicious or not. Rather, it assumes a security risk if an email is using an exploit in order to run a program or command, whether or not the actual program or command is malicious. 6.5.2 Configuring the Email Exploit Engine To configure the Email Exploit Engine properties: 1. Navigate to GFI MailSecurity ► Scanning & Filtering ► Email Exploit Engine. Configuring other mail filters GFI MailSecurity 2011 69 Screenshot 50 - Email Exploit Engine: General Tab 3. From the General tab, select whether to scan inbound and/or outbound emails. Check inbound emails Select this option to scan incoming emails Check outbound emails Select this option to scan outgoing emails 3. Click the Actions tab to configure what should be done when an email is blocked by the Email Exploit Engine. NOTE: When GFI MailSecurity is installed on same machine as Microsoft Exchange 2003, GFI MailSecurity may not be able to block outbound emails, but instead replaces the blocked content (e.g. the attachment) with a threat report. 70 GFI MailSecurity 2011 Configuring other mail filters Screenshot 51 - Email Exploit Engine: Actions Tab 4. In the Actions area select one of the following options: Quarantine email Stores blocked emails in the Quarantine Store. Delete email Deletes blocked emails NOTE: Actions always affect the whole email containing the blocked attachment, even if there are other attachments that do not contain exploits. 5. When an email exploit is detected, you can also inform the administrator and/or user by sending email notifications. To do this, from the Notification options area select: Notify administrator Notify the administrator whenever this engine blocks an email. To configure the administrator‟s email address refer to chapter Configuring the administrator‟s email address. Notify local user Notify the email local recipients about the blocked email. 6. To log the activity of the Email Exploit Engine to a log file, select Log rule occurrence to this file. In the text box specify: Path and file name (including .txt extension) to a custom location on disk where to store the log file, or The file name only (including .txt extension). The log file will be stored in the following default location: <GFI MailSecurity installation path>\ContentSecurity\MailSecurity\Logs\<filename>.txt Configuring other mail filters GFI MailSecurity 2011 71 7. You can configure GFI MailSecurity to download Email Exploit Engine updates automatically or to notify the administrator whenever new updates are available. To configure updates, click the Updates tab. Screenshot 52 - Email Exploit Engine: Updates Tab 8. To enable the automatic updating of Email Exploit Engine, select Automatically check for updates check box. 9. From the Downloading options list, select one of the following download options: Only check for updates Automatically check for updates and notify the administrator whenever updates are available. This option will NOT download the available updates automatically. Check for updates and download Automatically check for and download all available updates. 72 GFI MailSecurity 2011 Configuring other mail filters 10. In Download/check after the specified number of hours text box, specify how often you want GFI MailSecurity to check for updates by typing an hourly interval. 11. In the Update options area, select Enable email notifications upon successful updates to send an email notification to the administrator whenever Trojan & Executable Scanner is updated successfully. NOTE: An email notification is always sent when an update fails. 12. To check for and download updates immediately, click Download updates. 13. Click Apply. 6.5.3 Enabling/Disabling email exploits To enable/disable email exploits: 1. Navigate to GFI MailSecurity ► Scanning & Filtering ► Email Exploit Engine ► Exploit List. Configuring other mail filters GFI MailSecurity 2011 73 Screenshot 53 - Email Exploit list 2. Select the check box of the exploit(s) that you want to enable or disable. 3. Click Enable Selected or Disable Selected accordingly. 6.6 The HTML Sanitizer 6.6.1 Introduction The HTML Sanitizer scans and removes scripting code within: the email body of emails that have the MIME type set to “text/html” all attachments of type “.htm” or “.html”. 74 GFI MailSecurity 2011 Configuring other mail filters Why remove HTML scripts? The introduction of HTML email has allowed senders to include scripts in email that can be triggered automatically upon opening an email. HTML scripts are used both in a number of common viruses and in one-off attacks directed towards particular users/companies. In addition, HTML scripts are rarely used in legitimate emails. 6.6.2 Configuring the HTML Sanitizer 1. Navigate to GFI MailSecurity ► Scanning & Filtering ► HTML Sanitizer. Screenshot 54 - HTML Sanitizer configuration page 2. To enable the HTML Sanitizer, select Enable the HTML Sanitizer checkbox . 3. Select the emails to check for HTML scripts and clean, by selecting any of the following options: Check inbound emails Scan and sanitize HTML scripts from all incoming emails. Check outbound emails Scan and sanitize HTML scripts from all outgoing emails. 4. Click Apply. 6.6.3 HTML Sanitizer Whitelist The HTML Sanitizer Whitelist excludes emails received from specific senders from being processed by the HTML Sanitizer. To manage senders in the HTML Sanitizer Whitelist, select the Whitelist tab from the HTML Sanitizer node. Configuring other mail filters GFI MailSecurity 2011 75 Screenshot 55 - HTML Sanitizer Whitelist page The list of whitelisted senders is displayed in the Whitelist area. Adding an HTML Sanitizer Whitelist entry 1. In the Whitelist entry text box, key in an email address, an email domain (for example, *@domain.com) or an email sub-domains (for example, *@*.domain.com) and click Add. 2. Click Apply. Deleting an HTML Sanitizer Whitelist entry 1. Select the entry to delete from the Whitelist area and click Remove. 2. Click Apply. 76 GFI MailSecurity 2011 Configuring other mail filters 7 Quarantine 7.1 Introduction The GFI MailSecurity Quarantine is a central repository where all emails that fail any of the content policy or content security checks are stored. This ensures that users do not receive malicious email in their mailbox and that no email is lost. This chapter describes the three methods how administrators can manage quarantined emails: Via the GFI MailSecurity web interface - for more information refer to The Quarantine Store. Through an email (action form) sent to the administrator - for more information refer to Quarantine Action Forms. Using Quarantine RSS Feeds - for more information refer to Quarantine RSS feeds. These quarantine management methods allow administrators to review, approve or delete quarantined emails. If the administrator approves a quarantined email, GFI MailSecurity immediately releases the email from the Quarantine Store and delivers it to its recipients. 7.2 The Quarantine Store The Quarantine Store is accessible from the GFI MailSecurity web interface and the administrator can manage quarantined emails. To access the GFI MailSecurity Quarantine Store, navigate to GFI MailSecurity ► Quarantine. 7.2.1 Searching for quarantined emails The administrator has various options to search through quarantined emails: Quarantine GFI MailSecurity 2011 77 Screenshot 56 - Quarantine Store status page Content search From the Quick Search area of the Quarantine page, specify any of the following search criteria and click Search to display matching quarantined emails: SEARCH CRITERIA DESCRIPTION Search in sender/recipients Specify a name or email address of a sender or recipient to find quarantined emails sent from or addressed to that user. You can also specify part of the name or email address and GFI MailSecurity returns all matching senders/recipients. Search in subject Specify a keyword or phrase to find quarantined emails that contain that specific 78 GFI MailSecurity 2011 Quarantine text in the subject. Search in quarantine reason Specify a keyword or phrase to find quarantined emails that contain that specific text in the quarantine reason. Search by date From the Quarantined Items area of the Quarantine page select one of the preconfigured folders that return quarantined emails depending on the date when the email was quarantined. NOTE: These folders can also be accessed from the GFI MailSecurity tree as sub-nodes of the Quarantine node. The default search folders that filter quarantined emails by date are: Today Yesterday This week 7.2.2 Search Folders A Search Folder is a folder that has a custom search query associated to it and displays all quarantined emails that match the search query. Examples of search folders: A search folder that displays only outbound emails that were quarantined by the Virus Scanning Engines. A search folder that displays inbound emails that were quarantined in a particular date range and addressed to a particular user. To display emails in a particular search folder navigate to GFI MailSecurity ► Quarantine ► Search Folders and click a search folder displayed in the Quarantined Items area. Creating a new Search Folder 1. Navigate to GFI MailSecurity ► Quarantine ► Search Folders. 2. Click New search folder…. Screenshot 57 - New Search Folder - folder name 3. In the Search folder name text box, key in a name for the new search folder. Quarantine GFI MailSecurity 2011 79 Screenshot 58 - New Search Folder - selecting the source 4. If GFI MailSecurity is installed on the Microsoft Exchange Server machine, you can limit the emails in this search folder to those blocked from a particular source. From the Item source area, select one of the following sources: Information Store (VSAPI) Quarantined items forming part of the Information Store. Information Store (Transport) Quarantined items forming part of the Information Store that were scanned through the Hub Transport Agent. This option is only available when GFI MailSecurity is installed on a Microsoft Exchange Server 2007/2010 machine with the Hub Transport Server Role installed. Gateway (SMTP) Inbound or outbound quarantined emails, SMTP traffic, will be displayed. Any All quarantined items will be displayed irrespective of the source. Screenshot 59 - New Search Folder - auto-purge settings 5. You can also configure auto-purge settings for this search folder. If you configure auto purging on a search folder, GFI MailSecurity deletes any emails in that search folder that are older than the number of days specified. To enable auto-purging, select Enable Auto-purging and specify a value in the Automatically purge items older than box. Purged items are not recoverable. 80 GFI MailSecurity 2011 Quarantine Screenshot 60 - New Search Folder - searching by keywords 6. In the Keywords search area specify the search criteria that will determine the contents of this folder. You can select any of the following options: Quarantine reason Search for emails containing specific text in the quarantine reason. Item subject Search for emails containing specific text in the email subject. Sender Search for emails sent from a particular email address. Recipient Search for emails sent to a particular email address. Screenshot 61 - New Search Folder - search options 7. Specify other search criteria in the Search options area: Quarantined by Search for emails quarantined by a specific filter. Select a filter from the list next to this option (for example, Attachment Filtering). NOTE: Since an email can be blocked by multiple security threats or content policy infringements, you can choose to show only emails that were blocked by one specific filter. To do this, select only next to the filters dropdown list. Item direction Limits the items included in this search folder to either Inbound or Outbound emails. NOTE 1: Leave this option unselected if you want to include both Inbound and Outbound emails in this Search Folder. NOTE 2: This option is only available when GFI MailSecurity is not installed on a Microsoft Exchange machine, or when the Item source selected is Gateway. Quarantine GFI MailSecurity 2011 81 Screenshot 62 - New Search Folder - filtering by date 8. A search folder can also filter emails by date. From the Date filter area select the Date checkbox and specify: Specific date Filters emails by a specific date. Key in or select a date in the Day text box. You can also search by a specific email time. To do this, select the Time check box and input a time value. Date Range Filters emails by a range of dates. Specify a start date in the Day from box and an end date in the Day to box. You can also search by a time range. To do this, select the Time from and Time to checkboxes, and specify a time range. NOTE: To search for a time range in one particular day, select Date Range and input the same date in both Day from and Day to boxes. Specify the time range in the Time from and Time to boxes. 9. Click Save folder to create the search folder. Modifying a Search Folder 1. Navigate to GFI MailSecurity ► Quarantine ► Search Folders ► <search folder to modify>. Screenshot 63 - Search Folder options 82 GFI MailSecurity 2011 Quarantine 2. Click Edit search folder and make the required changes to the search folder properties. 3. Click Save folder to apply changes. Deleting Search Folders 1. Navigate to GFI MailSecurity ► Quarantine ► Search Folders ► <search folder to modify>. 2. Click Delete search folder. 3. Click OK to confirm deletion of the folder. NOTE: When deleting a search folder, no emails are deleted from the quarantine store. 7.2.3 Approving quarantined emails There might be instances where GFI MailSecurity incorrectly identifies as malicious (false positive), or the email contains an attachment that triggered a particular filter but you still want to deliver to its recipient (for example, a .jpg image that triggered Attachment Filtering). GFI MailSecurity allows the administrator to approve a quarantine email so that the email is released from the Quarantine Store and delivered to its intended recipients. To approve emails: 1. Use the search features described in the previous sections to return a list of quarantined emails. Quarantine GFI MailSecurity 2011 83 Screenshot 64 - List of Quarantined Emails in Search Folder 2. Select the checkbox next to the quarantined email(s) to approve and click Approve. NOTE: Alternatively, click Approve all to approve all emails in the list. Sanitize and Approve GFI MailSecurity also allows you to remove malicious html scripts in the email body or in html attachments before approving. NOTE: Emails quarantined by the Information Store (VSAPI) source cannot be sanitized. To sanitize and approve a quarantined email: 1. Use the search features described in the previous sections to return a list of quarantined emails. 2. Click on the email to view the email contents. 3. Click Sanitize and Approve. 7.2.4 Permanently deleting quarantined emails 1. Use the search features described in the previous sections to return a list of quarantined emails. 84 GFI MailSecurity 2011 Quarantine Screenshot 65 - List of Quarantined Emails in selected Search Folder 2. Select the checkbox next to the quarantined email(s) to approve and click Delete items. NOTE: Alternatively, click Delete all to approve all emails in the list. Delete and Notify You can also notify the intended recipients when you delete an email from quarantine. 1. Use the search features described in the previous sections to return a list of quarantined emails. 2. Click on the email to view the email contents. 3. Click Delete and Notify. 7.2.5 Rescanning quarantined emails The Quarantine Store allows you to rescan quarantined emails. For example, to re-check an email with updated anti-virus signatures. 1. Use the search features described in the previous sections to return a list of quarantined emails. 2. Select the checkbox next to the quarantined email(s) to rescan and click Rescan items. NOTE: Alternatively, click Rescan all to approve all emails in the list. Quarantine GFI MailSecurity 2011 85 7.2.6 Viewing the full security threat report of an email To view the full security threat report of a quarantined email: 1. Use the search features described in the previous sections to return a list of quarantined emails. 2. Click on the email to view the full security threat report. Screenshot 66 - Viewing the full security threat report of a quarantined email 3. Click Back to return to the list of quarantined emails. 86 GFI MailSecurity 2011 Quarantine 7.2.7 Downloading quarantined email Emails in Quarantine Store may contain malicious content. Use this feature with caution. 1. Use the search features described in the previous sections to return a list of quarantined emails. 2. Click on the email to download. 3. Click Download Item. 4. Click OK in the confirmation dialog. 5. Select to open or save the email in .eml format. 7.3 Quarantine Action Forms GFI MailSecurity can also be configured to notify the administrator or authorized users via email (Quarantine Action Form) whenever an email is quarantined. The Quarantine Action Form contains details related to the quarantined email including the reason why it was blocked and any attachments that were included in the email. The administrator can then action the quarantined email (for example, approve the email) directly from the email client. 7.3.1 Enabling Quarantine Action Forms 1. Navigate to GFI MailSecurity ► Quarantine ► Quarantine Options. Quarantine GFI MailSecurity 2011 87 Screenshot 67 - Quarantine Options configuration page 2. In the Quarantine mode page, select Send quarantine approval forms by email checkbox to enable the sending of Quarantine Action Forms. 3. From the Select recipient area, specify the recipient of the Quarantine Action Forms: Send to administrator Sends Quarantine Action Forms to the administrator. To configure the administrator‟s email address refer to chapter Configuring the administrator‟s email address. Send to the following email address Sends Quarantine Action Forms to another email address. Key in the recipient in the text box provided. 4. Click Apply. 7.3.2 Reviewing quarantined emails Recipients of the Quarantine Action Forms can carry out various actions on quarantined emails directly from the email client. 88 GFI MailSecurity 2011 Quarantine Screenshot 68 - The Quarantine Action Form When a Quarantine Action Form is received, review it and select one of the following actions directly from the Quarantine Action Form‟s body: More details Launches the Quarantine Store page containing further information about this email. Approve Release the email from the Quarantine Store and deliver it to its intended recipients. Sanitize and Approve Sanitize the email from malicious content, release it from the Quarantine Store and deliver it to its intended recipients. Delete Permanently deletes the email. Delete and Notify Permanently delete the email and send an email notification to the email‟s recipient. Quarantine GFI MailSecurity 2011 89 7.3.3 Logging quarantine actions GFI MailSecurity provides the option to store a log of actions taken on quarantined emails. Use this feature, for example, in environments where multiple administrators are assigned the task to review quarantined emails. Each quarantine action is displayed in the following format: Date, Time, User, Operation, Sender, Recipients, Subject For example: "2010-09-28", "9:25:05", "Administrator", "Approve", "[email protected]", "[email protected]", "EmailSubject" To enable this feature: 1. Navigate to GFI MailSecurity ► Quarantine ► Quarantine Options. Screenshot 69 - Quarantine Options configuration page 2. In the Audit options area, select Save quarantine audit to this file. 3. Specify where to store the audit file and the filename. Key in either: a file name in .LOG format - This option stores the audit file in <GFI MailSecurity installation path>\ContentSecurity\MailSecurity\Data\ A custom path and file name in .LOG format - This option stores the audit file in a custom location NOTE: The year is appended to the audit file name and hence a new audit file is automatically created each year. This prevents that the file becomes very large. 4. Click Apply. 7.4 Quarantine RSS feeds RSS (Really Simple Syndication) is a protocol used to distribute frequently updatable content or feeds (for example, news items) with its subscribers. An RSS Feed Reader is required by subscribers to view RSS feeds. RSS feeds usually include a summary of the content and a link to view the full article. To facilitate the monitoring of quarantined emails, RSS feeds can be used. The Quarantine RSS feed displays quarantined emails for management of these emails. NOTE: GFI MailSecurity Quarantine RSS feeds can be used on most RSS Feed Readers. For a list of freely available RSS Feed Readers that were tested with GFI MailSecurity Quarantine RSS feeds refer to: http://kbase.gfi.com/showarticle.asp?id=KBID002661. 90 GFI MailSecurity 2011 Quarantine 7.4.1 Enabling Quarantine RSS Feeds 1. Navigate to GFI MailSecurity ► Quarantine ► Quarantine RSS Feeds. Screenshot 70 - Quarantine RSS feeds 2. Select the Enable Quarantine RSS Feeds checkbox. 3. From the RSS Feeds area, click Edit to the right of the quarantine search folder for which to enable RSS feeds. Quarantine GFI MailSecurity 2011 91 Screenshot 71 - Quarantine folder RSS feed 4. Select Enable Quarantine RSS feeds on this folder checkbox. 5. Specify the refresh interval in minutes in the Refresh feed content every text box. The default value is 10 minutes. 6. Specify the maximum number of items you want the feed to include in the Feed should contain at most text box. The default value is 100 items. NOTE: You can change the URL of an RSS feed by clicking Reset Feed URL. To change the URL of all enabled RSS feeds, click Edit to the right of the OPML entry and click Reset all the URLs. When changing URLs, ensure to update all present subscriptions accordingly. 7. Click Apply. 7.4.2 Subscribing to Quarantine RSS feeds Subscribing to all enabled Quarantine RSS feeds 1. Navigate to GFI MailSecurity ► Quarantine ► Quarantine RSS Feeds. 2. In the RSS Feeds area, right-click on RSS feed URL. icon and click Copy Shortcut to copy the 3. Use the copied URL in your RSS Feed Reader application to create a new RSS feed subscription. 92 GFI MailSecurity 2011 Quarantine Subscribing to a search folder Quarantine RSS feed To subscribe to an RSS feed of a default or custom search folder: 1. Navigate to GFI MailSecurity ► Quarantine ► Quarantine RSS Feeds. 2. In the RSS Feeds area, right-click on icon next to the search folder to subscribe to and click Copy Shortcut to copy the RSS feed URL. 3. Use the copied URL in your RSS Feed Reader application to create a new RSS feed subscription. 7.4.3 Securing access to the GFI MailSecurity Quarantine RSS feeds You can configure GFI MailSecurity to create quarantine RSS feeds on specific quarantine folders. To configure who can subscribe to the quarantine RSS feeds: 1. Navigate to Start ► Programs ► GFI MailSecurity ► GFI MailSecurity SwitchBoard. Screenshot 72 - GFI MailSecurity SwitchBoard 2. In the GFI MailSecurity SwitchBoard dialog box, click RSS Security…. Quarantine GFI MailSecurity 2011 93 Screenshot 73 - Quarantine RSS feeds Access Control Lists 3. In the IIS mode access control list dialog box you can configure who can subscribe to the quarantine RSS feeds. Click Add or Remove buttons to add or remove users or groups from the list. For each entry, select Allow or Deny checkboxes to allow or deny access. 4. Click OK to finalize access permissions. 5. Click OK and wait while applying the new settings. 6. When the process completes, click OK. 7.5 Directory Harvesting Directory harvesting attacks occur when malicious mail senders send emails to randomly generated email addresses. While some of these email addresses match real users, the majority of addresses are invalid. The GFI MailSecurity Directory Harvesting feature scans emails for non-existing local email addresses before these are stored to the Quarantine Store. If an email is triggered as a Directory harvesting attack, it is permanently deleted. This reduces the number of emails for administrative reviewing. 7.5.1 Configuring Directory Harvesting The Directory Harvesting filter requires access to the list of local addresses. This is done either via Active Directory or if communication with Active Directory is not possible, via an LDAP server. 1. Navigate to GFI MailSecurity ► Quarantine ► Quarantine Options. 2. Click the Directory Harvesting tab. 94 GFI MailSecurity 2011 Quarantine Screenshot 74 - Directory Harvesting filter 3. Select Enable directory harvesting protection checkbox. 4. Select the user lookups method to use: Use native Active Directory lookups Select this option if GFI MailSecurity is installed in Active Directory mode and has access to ALL users on Active Directory. Skip to step 9. NOTE 1: When GFI MailSecurity is installed in Active Directory user mode on a DMZ, the AD of a DMZ usually does not include all the network users (email recipients). In this case configure directory harvesting to use LDAP lookups. Quarantine GFI MailSecurity 2011 95 NOTE 2: When GFI MailSecurity is behind a firewall, the Directory Harvesting feature might not be able to connect directly to the internal Active Directory because of Firewall settings. Use LDAP lookups to connect to the internal Active Directory of your network and ensure to enable default port 389 on your Firewall. Use LDAP lookups Select this option when GFI MailSecurity is installed in SMTP mode and/or when GFI MailSecurity does not have direct access to the full list of users. 5. Specify the LDAP server name or IP address in the Server text box. NOTE: In an Active Directory environment, the LDAP server is typically the Domain Controller. 6. Specify the port number, default 389, in the Port text box. If connection to the LDAP server is via SSL, select Use SSL and the default port changes to 636. NOTE: Ensure that the port is enabled from the Firewall. 7. Click Update DN list to populate the Base DN list and select the Base DN (that is, the top level in the Active Directory hierarchy). 8. If your LDAP server requires authentication specify the User and Password. Alternatively, if no authentication is required, select Anonymous bind. 9. Test your configuration settings by specifying a valid email address in the Email address box and click Test. If the email address is not found review the configuration settings. 10. To log Directory Harvesting activity to a log file, select Log occurrence to this file and specify: Path and file name (including .txt extension) to a custom location on disk where to store the log file, or The file name only (including .txt extension). The log file is stored in the following default location: <GFI MailSecurity installation path>\ContentSecurity\MailSecurity\Logs\<filename>.txt 11. Click Apply. 96 GFI MailSecurity 2011 Quarantine 8 8.1 Reporting Introduction Use the GFI MailSecurity Reporting option to configure logging of statistical data, such as the amount of emails being processed and quarantined, into a database. You can then install the GFI MailSecurity ReportPack add-on, to generate reports based on the data collected in the database. For more information about the GFI MailSecurity ReportPack navigate to GFI MailSecurity ► Reporting ► GFI MailSecurity ReportPack. NOTE: Reporting is enabled by default. 8.2 Enabling reporting 1. Navigate to GFI MailSecurity ► Reporting. Screenshot 75 - Reporting page 2. Select Enable Reporting check box. In the Current database settings area, the type and location of the database are displayed. 8.3 Configuring the database By default, GFI MailSecurity uses a Microsoft Access database reports.mdb located in: <GFI MailSecurity installation path>\ContentSecurity\MailSecurity\data\ You can also use a Microsoft SQL Server database for reports. Reporting GFI MailSecurity 2011 97 Configuring a Microsoft Access database backend Screenshot 76 - Configuring a Microsoft Access database backend 1. Navigate to GFI MailSecurity ► Reporting ► Configure Database. 2. Select MS Access. 3. Key in the complete path including filename (and .mdb extension) of the database file. If you only specify a filename, the database file is created in the following default path: <GFI MailSecurity installation path>\ContentSecurity\MailSecurity\data\ 4. Click Apply. 8.3.1 Configuring a Microsoft SQL Server database backend 1. Create a new database in Microsoft SQL Server. NOTE 1: It is recommended to create a dedicated user/login in Microsoft SQL Server for GFI MailSecurity and assign it the database owner role. 98 GFI MailSecurity 2011 Reporting NOTE 2: For information how to create a new database in Microsoft SQL Server refer to http://kbase.gfi.com/showarticle.asp?id=KBID003379. 2. Navigate to GFI MailSecurity ► Reporting ► Configure Database. Screenshot 77 - Configuring SQL Server Database backend 3. Select SQL Server. 4. Select Detected server and select the automatically detected SQL Server from the list. If the server is not detected, select Manually specified server and key in the IP address or server name of the Microsoft SQL Server. 5. Key in the credentials with permissions to read/write to the database. 6. Click Get Database List to extract the list of databases from the server. 7. From the Database list, select the database created for GFI MailSecurity Reporting. 8. Click Apply. Reporting GFI MailSecurity 2011 99 9 9.1 Miscellaneous Patch Checking The Patch Checking feature verifies if there are any software patches available for your version of GFI MailSecurity by directly connecting to the GFI Update Servers. NOTE: It is highly recommended to check for patches periodically to keep GFI MailSecurity running efficiently. 1. Navigate to GFI MailSecurity ► General ► Patch Checking. Screenshot 78 - List of available patches 2. Click Check for patches to connect to the GFI Update Server and check for available updates. 3. Click the Download link of patches to download. 4. On completion, install the downloaded updates. NOTE: Since the software patches vary in file format (for example, .dll, .exe etc...), read the relative patch information for installation instructions. To access the installation instructions and other information applicable to a patch, click the Information link provided in the list of available updates. An incorrect patch installation might cause the product to malfunction or degrade its performance. Miscellaneous GFI MailSecurity 2011 101 9.2 Version Information Screenshot 79 - Version Information page To view the GFI MailSecurity version information, navigate to GFI MailSecurity ► General ► Version Information. The version information page displays the GFI MailSecurity installation version number and the build information. To check whether you have the latest build of GFI MailSecurity installed on your machine, click Check if newer build exists. NOTE: Always quote your GFI product Version and Build information when contacting GFI support. 9.3 Tracing GFI MailSecurity provides the facility of creating log files for debugging purposes. When enabled, GFI MailSecurity stores a number of log files in the following folders: <GFI MailSecurity installation path>\GFI\ContentSecurity\DebugLogs\ <GFI MailSecurity installation path>\GFI\ContentSecurity\MailSecurity\DebugLogs\ <GFI MailSecurity installation path>\GFI\ContentSecurity\WwwConf\DebugLogs\ NOTE: Use tracing for troubleshooting purposes or when contacting GFI Support. It is recommended that tracing is disabled if there are performance issues with the GFI MailSecurity machine. To enable or disable Tracing: 1. Navigate to Start ► GFI MailSecurity ► GFI MailSecurity Switchboard and select Tracing tab. 102 GFI MailSecurity 2011 Miscellaneous Screenshot 80 - Tracing settings 2. Select Enabled next to the feature to enable logging for, or Disable to disable logging. GFI ContentSecurity Attendant Log files related to the viewer application when GFI MailSecurity is loaded in local mode. GFI MailSecurity Scan Engine Log files for the scanning engines and filters. GFI MailSecurity Attendant Log files for all the components (except scanning functions) of GFI MailSecurity such as the Quarantine Store. GFI MailSecurity Configuration Log files for the GFI MailSecurity web interface. GFI MailSecurity Switchboard Log files related to the operation and usage of the Switchboard. 3. Click Apply to apply changes and click OK when all settings are applied successfully. 9.4 Failed emails There may be instances where GFI MailSecurity is not able to scan an email, for example, spam emails containing corrupted header information. In this case, GFI MailSecurity blocks the email since it may contain malicious content, and moves it to the following folder: <GFI MailSecurity installation path>\Content Security\MailSecurity\failedmails Miscellaneous GFI MailSecurity 2011 103 9.4.1 Reprocessing legitimate emails that fail If a large number of legitimate emails are being moved to the failedmails folder, it is recommended to contact GFI Support to resolve the issue. When the issue is resolved, emails can be re-scanned by GFI MailSecurity as explained in the following sections, to determine if they are safe to be delivered. NOTE: Files with extension .PROP in the failedmails folder are used for troubleshooting purposes. When reprocessing failed emails, these files can be deleted. GFI MailSecurity installed on Microsoft Exchange Server 2007/2010 1. Change the extension of .TXT files in the failedmails folder to .EML. 2. Move renamed files to the following folder: <drive>\Program Files\Microsoft\Exchange Server\TransportRoles\Replay NOTE: To automatically change the extension of all .TXT files in the failedmails folder to .EML files, from command prompt change the directory to the failedmails folder and run the following command: ren *.txt *.eml GFI MailSecurity installed on Microsoft Exchange Server 2003 1. Move emails (in .txt format) to the following folder: <Microsoft Exchange installation path>\Exchsrvr\Mailroot\vsi 1\PickUp GFI MailSecurity installed on Gateway server 1. Move emails (in .txt format) to the following folder: <drive>\Inetpub\mailroot\Pickup 9.4.2 Failed emails notifications GFI MailSecurity can be configured to notify the administrator whenever an email fails processing. NOTE: To configure the administrator‟s email address refer to chapter Configuring the administrator‟s email address. 1. Navigate to Start ► Programs ► GFI MailSecurity ► GFI MailSecurity Switchboard. 104 GFI MailSecurity 2011 Miscellaneous Screenshot 81 - Failed emails notification 2. Select Other tab. 3. Select Send Notifications on Failed Mail. 4. Click Apply. 9.5 Notification templates Notifications GFI MailSecurity sends notification emails to the administrator/user whenever an event that needs attention occurs. There are two types of notifications: Administrative notifications GFI MailSecurity sends these notifications, for example, when a license is going to expire, when a new patch is available and when new anti-virus engine updates are available. End user notifications GFI MailSecurity sends these notifications to the sender/recipient of an email Miscellaneous GFI MailSecurity 2011 105 when an email gets quarantined or modified. Templates There are two types of templates: Tag-based templates Use tags (in the form "[TAGNAME]”) to indicate fields which need to be replaced with dynamic data. XSL-based templates An XSL style sheet, used in conjunction with dynamically created XML data to generate the notification message. Notification email messages are generated from templates stored in: <GFI MailSecurity installation path>\ContentSecurity\MailSecurity\Templates. The templates contain the text of notification messages, as well as field names that are replaced by dynamic values upon generation of the notification message. 9.5.1 Customizing notification templates NOTE 1: Always take a backup of templates before modification. NOTE 2: Before modifying XSL-based templates, make sure you are proficient in XML and XSL. Incorrect code can cause GFI MailSecurity to not send notification emails. NOTE 3: Template folder names and template file names are predefined and should not be changed. To customize a notification template: 1. Navigate to: <GFI MailSecurity installation path>\ContentSecurity\MailSecurity\Templates. 2. Open the folder containing the template to modify. Each folder can contain any of the following files: html.txt An HTML-type body template text.txt A plain text body template subject.txt Subject template 3. Take a backup of the template(s) to modify. 4. Open the template to modify in a text editor (for example, Notepad) and customize accordingly. 5. Save changes. NOTE: To check whether an XSL based template is well formed, save a copy of the template in .xml extension and load it in Microsoft Internet Explorer. If the template is well formed, the browser loads the code correctly. If it contains errors, the browser specifies the location/code where issues are located. Variables used in XSL-based notification templates Notify user and notify manager notifications (in notifyuser folder and notifymanager folder respectively). 106 GFI MailSecurity 2011 Miscellaneous VARIABLE DESCRIPTION “itemsenderemailaddress” The sender‟s email address. “itemsubject” The quarantined email subject. “itemdeliverytime” The date and time the message was delivered. “itemrecipients/recipient” The message recipients. Use xsl:for-each to enumerate. “action” Action taken on message by GFI MailSecurity. “shortdate” Date when email was processed. Short date format. “longdate” Date when email was processed. Long date format. “time24” Time when email was processed. 24 hour format. “time12” Time when email was processed. “infringedrules/rule” List of rules infringed. Use xsl:for-each to enumerate. “itemmessageid” The message ID of the email processed. “itemscandirection” 0 - Inbound : 1 - Outbound : 4 - Mixed “Itemsendername” The sender‟s name. “Itemscanresult” The scan result. 9.6 Monitoring Virus Scanning API When GFI MailSecurity is installed on the Microsoft Exchange machine, you can monitor Virus Scanning API performance using the Performance Monitor MMC. 9.6.1 Performance counter in Windows 2003 Server To add and view, the performance monitor counter in Windows 2003 Server, follow these steps: 1. Click on Start ► Control Panel. 2. In the Control Panel window, double-click Administrative Tools. 3. In the Administrative Tools window, double-click Performance, to start the Performance monitor MMC. 4. From the System Monitor viewing pane, click Add to load the Add Counters dialog. Miscellaneous GFI MailSecurity 2011 107 Screenshot 82 - Adding VSAPI performance monitor counters 5. From the Performance object dropdown list, select MSExchangeIS. 6. Click Select counters from list. 7. Select any Virus Scan counter you need to add, as listed in the Performance monitor counters section below. 8. Click Add. 9. Repeat step 7 and 8 to add all the performance counters needed. 10. Click Close. The counters of added processes are now displayed in the Performance Monitor. 9.6.2 Performance counter in Windows 2008 Server NOTE: In a Microsoft Exchange Server 2007/2010 environment, the VSAPI performance monitor counters are only available on machines with the Mailbox Server Role installed. To add and view, the performance monitor counter in Windows 2008 Server, follow these steps: 1. Navigate to Start ► Control Panel ► Administrative Tools ► Reliability and Performance Monitor. 2. In the monitor dialog, expand Monitoring Tools and select Performance Monitor. 3. From the viewing pane, click Add to load the Add Counters dialog. 108 GFI MailSecurity 2011 Miscellaneous Screenshot 83 - Adding VSAPI performance monitor counters in Windows 2008 Server 4. From the Select counters from computer dropdown list, select the computer to monitor. 5. From the list of available counters, expand MSExchangeIS. 6. Select any Virus Scan counter you need to add, as listed in the Performance monitor counters section below and click Add. 7. Repeat step 8 for each process to monitor. 8. Click Ok to apply changes. Miscellaneous GFI MailSecurity 2011 109 The counters of added processes are now displayed in the Performance Monitor. Screenshot 84 - Monitoring Virus Scan Files Scanned in Windows Server 2008 Performance Monitor 9.6.3 Performance monitor counters The following VSAPI Performance Monitor counters are available: Virus Scan Messages Processed This is a cumulative value of the total number of top-level messages that are processed by the virus scanner. Virus Scan Messages Processed/sec This counter represents the rate at which top-level messages are processed by the virus scanner. Virus Scan Messages Cleaned The total number of top-level messages that are cleaned by the virus scanner. Virus Scan Messages Cleaned/sec The rate at which top-level messages are cleaned by the virus scanner. Virus Scan Messages Quarantined The total number of top-level messages that are put into quarantine by the virus scanner. Virus Scan Messages Quarantined/sec The rate at which top-level messages are put into quarantine by the virus scanner. 110 GFI MailSecurity 2011 Miscellaneous Virus Scan Files Scanned The total number of separate files that are processed by the virus scanner. Virus Scan Files Scanned/sec The rate at which separate files are processed by the virus scanner. Virus Scan Files Cleaned The total number of separate files that are cleaned by the virus scanner. Virus Scan Files Cleaned/sec The rate at which separate files are cleaned by the virus scanner. Virus Scan Files Quarantined The total number of separate files that are put into quarantine by the virus scanner. Virus Scan Files Quarantined/sec The rate at which separate files are put into quarantine by the virus scanner. Virus Scan Bytes Scanned The total number of bytes in all of the files that are processed by the virus scanner. Virus Scan Queue Length The current number of outstanding requests that are queued for virus scanning. Virus Scan Folders Scanned in Background The total number of folders that are processed by background scanning. Virus Scan Messages Scanned in Background The total number of messages that are processed by background scanning. Miscellaneous GFI MailSecurity 2011 111 10 Troubleshooting 10.1 Introduction The troubleshooting chapter explains how you should go about resolving any issues that you might encounter. The main sources of information available to users are: The manual - most issues can be solved by reading this manual. GFI Knowledge Base articles Web forum Contacting GFI Technical Support 10.2 Knowledge Base GFI maintains a Knowledge Base, which includes answers to the most common problems. If you have a problem, consult the Knowledge Base first. The Knowledge Base always has the most upto-date listing of technical support questions and patches. To access the Knowledge Base, visit http://kbase.gfi.com/. 10.3 Web Forum User to user technical support is available via the web forum. The forum can be found at: http://forums.gfi.com/. 10.4 Common issues ISSUE ENCOUNTERED POSSIBLE CAUSE AND SOLUTION Error when receiving emails: This error occurs when emails are relayed from the IIS SMTP server to the Microsoft Exchange server. This happens because Microsoft Exchange Server versions 4.0, 5.0, and 5.5 are not able to handle 8-bit MIME messages. For instructions how to turn off 8BITMIME in Windows Server 2003 refer to: "Body type not supported by Remote Host" http://support.microsoft.com/default.aspx?scid=kb;en-us;Q262168. Legitimate emails are moved to the failedmails folder Cause When GFI MailSecurity is not able to scan incoming emails, these emails are not delivered to the recipient(s) since they may contain malicious content. GFI MailSecurity moves these emails to the following folder: <GFI MailSecurity installation path>\Content Security\MailSecurity\failedmails Solution If any legitimate emails are moved to the failedmails folder, these can be manually re-processed for delivery. For more information how to do this in various environments refer to: http://kbase.gfi.com/showarticle.asp?id=KBID003263 GFI MailSecurity returns the following error: “The file was blocked by the attachment filtering module at file type checking stage. The attachment claimed to be a <filetype 1> which is identified as being Troubleshooting Cause An attached file is detected as being a file with multiple file-types. Solution For information how to resolve this issue refer to: GFI MailSecurity 2011 113 an attachment in category <filetype 1>. The file was detected to belong to the category <filetype 2>.” http://kbase.gfi.com/showarticle.asp?id=KBID001922. NOTE: The solution to this issue requires changes in the Windows Registry. It is important to follow the steps described in the solution with attention as incorrect configuration can cause serious, system-wide problems. 10.5 Request technical support If you have referred to this manual and our Knowledge Base articles, and you still cannot solve issues with the software, contact the GFI Technical Support team by filling in an online support request form or by phone. Online: Fill out the support request form on: http://support.gfi.com/supportrequestform.asp. Follow the instructions on this page closely to submit your support request. Phone: To obtain the correct technical support phone number for your region visit: http://www.gfi.com/company/contact.htm. NOTE: Before you contact our Technical Support team, have your Customer ID available. Your Customer ID is the online account number that is assigned to you when you first register your license keys in our Customer Area from: http://customers.gfi.com. We will answer your query within 24 hours or less, depending on your time zone. 10.6 Build notifications We strongly suggest that you subscribe to our build notifications list. This way, you will be immediately notified about new product builds. To subscribe to our build notifications, visit: http://www.gfi.com/pages/productmailing.htm. 114 GFI MailSecurity 2011 Troubleshooting 11 Glossary Active Directory A technology that provides a variety of network services, including LDAP directory services. AD See Active Directory Anti-virus software Software that detects malware such as Trojan horses in emails, files and applications. Botnet A network of infected computers that run autonomously and are controlled by a hacker/cracker. Decompression engine A scanning module that decompresses and analyzes archives attached to an email. Demilitarized Zone An internet-facing section of a network that is not part of the internal network. Its purpose typically is to act as a gateway between internal networks and the internet. Directory harvesting Email attacks where known email addresses are used as a template to create other email addresses. Domain Name System A database used by TCP/IP networks that enables the translation of hostnames to IP addresses and provides other domain related information. DMZ See Demilitarized Zone DNS See Domain Name System DNS MX See Mail Exchange Email headers Information that precedes the email text (body) within an email message. This includes the sender, recipient, subject, sending and receiving time stamps, etc. Exploit An attack method that uses known vulnerabilities in applications or operating systems to compromise the security of a system. Gateway The computer (server) in a LAN that is directly connected to an external network. In GFI MailSecurity, gateway refers to the email servers within the company that first receive email from external domains. HTML Sanitizer A filtering module within GFI MailSecurity that scans and removes html scripting code from emails. HTTP Hypertext Transfer Protocol - A protocol used to transfer hypertext data between servers and internet browsers. IIS See Internet Information Services Internet Information Services A set of Internet-based services created by Microsoft Corporation for internet servers. LDAP See Lightweight Directory Access Protocol Lightweight Directory Access Protocol An application protocol used to query and modify directory services running over TCP/IP. Glossary GFI MailSecurity 2011 115 Mail Exchange The DNS record used to identify the IP addresses of the domain‟s mail servers. Malware All malicious types of software that are designed to compromise computer security and which usually spread through malicious methods. Microsoft Message Queuing Services A message queue implementation for Windows Server operating systems. MIME See Multipurpose Internet Mail Extensions MSMQ See Microsoft Message Queuing Services Multipurpose Internet Mail Extensions A standard that extends the format of e-mail to support text other than ASCII, non-text attachments, message bodies with multiple parts and header information in non-ASCII character sets. PGP encryption A public-key cryptosystem often used to encrypt emails. Public folder A common folder within Microsoft Exchange that allows users to share information. Quarantine Store A central repository within GFI MailSecurity where all blocked emails are retained until they are reviewed by an administrator. Recursive archives Archives that contain multiple levels of sub-archives (that is, archives within archives). Also known as nested archives. RSS feeds A protocol used by websites to distribute content (feeds) that frequently changes (for example news items) with its subscribers. Secure Sockets Layer A protocol to ensure an integral and secure communication between networks. Simple Mail Transport Protocol An internet standard used for email transmission across IP networks. SMTP See Simple Mail Transport Protocol SSL See Secure Sockets Layer Trojan horse Malicious software that compromises a computer by disguising itself as legitimate software. Virus scanning engine A virus detection technology implemented within antivirus software that is responsible for the actual detection of viruses. Zombie An infected computer that is made part of a Botnet through malware. 116 GFI MailSecurity 2011 Glossary Index A K Active Directory, 115 Kaspersky, 25, 26 anti-virus, 69, 105 AVG, 22, 23 B BitDefender, 27, 28, 30, 32 L Licensing, 5 M Mailbox, 108 D McAfee, 29, 30 Database, 19, 66, 97, 98, 99 Microsoft Exchange, 3, 37, 80, 107, 108 Decompression engine, 57 Microsoft Exchange Server, 113 DMZ, 115 MIME, 74 Domain, 17, 96 MSMQ, 116 DoS, 60 N E Norman, 32 email, 3, 15, 20, 33, 34, 39, 46, 47, 52, 54, 55, 57, 58, 59, 61, 62, 63, 69, 71, 72, 73, 74, 75, 78, 81, 86, 87, 88, 96, 105, 107, 115 P Exploit Engine, 69, 71, 72, 73 perimeter server, 115 G proxy, 16 gateway, 81 Q H Quarantine, 33, 46, 53, 58, 60, 77, 78, 79, 81, 82, 83, 84, 87, 88, 89, 90, 91, 92, 93, 94 Performance, 107, 108, 109, 110 Harvesting, 94, 95 HTML Sanitizer, 74, 75 R Hub Transport, 80 RSS Feeds, 91, 92, 93, 94 I S IIS, 17, 18 SMTP, 17, 18, 19, 22, 25, 27, 29, 31, 80 Internet, 106 SMTP Server, 113 IP, 96 SQL, 98, 99 T X Trojan, 16, 65, 66, 68, 69, 73 XSL, 106, 107