1
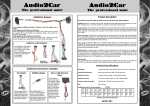
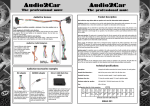
IGNI-BOX
IGNI-BOX
FOR THE PROFESSIONAL INSTALLER
FOR THE PROFESSIONAL INSTALLER
Technical Specifications
Product Description
69600 IGNIIGNI-BOX and IGNIIGNI-BOX adaptor
Voltage supply range :
Current usage :
10-16 VDC
<1 mA (passive)/2mA-3A (active)
Activation voltage
Active :
Passive :
> +10VDC
< +10VDC
Many new cars do not have an easy accessible switched ignition wire due to the use of Bus based vehicle control networks like CAN-bus. This has spawned the need for a fast
and versatile Ignition substitute.
Maximum current supplied by ignition:
1A. Active when High.
For this reason we have invented the IGNI-BOX. This small
microprocessor controlled unit makes an artificial switched
Ignition based on the noise levels on the constant 12v wire.
To make the needed calculations the IGNI-BOX makes up to
4000 measurements pr. second.
Measurements pr. Second:>3500
Size L x W x H:
75 x 20 x 14 mm
Connector configurations
Input connector
The IGNI-BOX makes the need for an ignition wire, when installing aftermarket car accessories, redundant.
Output connector
+12
NC
1
1
IGN
NC
+12
-
2
3
3
2
NC
-
Made in Denmark by
Kram Telecom A/S
See our complete Radio Mute program on our website www.kram.dk
The IGNI-BOX will switch on the ignition signal when the engine is turned on. On some car models it will even turn on
the ignition signal as soon as the key is inserted into the ignition barrel and that way being very similar to the normal ignition functionality in older cars.
A normal IGNI-BOX item number consists of two items. The
1st item is the IGNI-BOX and the 2nd item is the IGNI-BOX
adaptor. The IGNI-BOX adaptor makes the installation plug
and play when installing a Kram Telecom cable set. Some
IGNI-BOX adaptors even exists for OEM Carkit cablesets. But
all the IGNI-BOX really needs in order to make an artificial ignition signal is a connection to the constant 12v and the
ground wire. The installation is that simple.
EN950
IGNI-BOX
IGNI-BOX
FOR THE PROFESSIONAL INSTALLER
FOR THE PROFESSIONAL INSTALLER
69600 for 2.G Drive & Talk / Interface leads
Installation description
IGNI-BOX and IGNI-BOX adaptor.
C
Needed items:
A. IGNI-BOX.
B. IGNI-BOX adaptor.
C. Cable set.
D. Carkit-adaptor.
Installation:
Installation steps 1 to 7 must be followed as described to ensure correct function of
the IGNI-BOX.
1.
Prepare the installation of the IGNI-BOX. Install the cable set C, Refer to
the instruction delivered with the Cable set. If connected disconnect the
Carkit-adaptor D from the Cable set C. Connect the IGNI-BOX adaptor B to
the 8 pin connector on the IGNI-BOX A.
NOTE: Do NOT connect the IGNI-BOX to the cable set.
2.
Start the engine.
3.
Wait for warning lights to turn off and let engine run for approximately
10 sec.
4.
Stop the engine, remove the key and wait approximately 10 sec.
5.
Connect the IGNI-BOX. When the IGNI-BOX is connected the ignition goes
on (Ignition wire goes high) and the carkit should start-up.
6.
Please wait while the IGNI-BOX programs itself. When the programming
phase is complete, after approximately 30 sec, the ignition will go off
(Ignition wire goes low) and the carkit should shut down. NOTE: Please
avoid interfering with the cars wiring loom or electronics while the IGNIBOX is programming itself.
7.
Step 1.
Prepare the installation
of the IGNI-BOX. Do NOT
connect the IGNIBOX.
D
Please make a function check. The blue artificial ignition wire in the 8 pin
output connector should source 12v within 5-30 sec. after the engine is
started. And should source 0v 5-30 sec. after the engine is turned off. In
some car models the IGNI-BOX will also be able to source 12v if the key is in
the ignition but the engine is off. NOTE: If the IGNI-BOX does not work as
described please disconnect the IGNI-BOX and repeat installation from point
2.
Note: If the car is equipped with accessories like “Follow me home light” or other
systems that might be active when the car is parked. Please make sure
these systems are active when installing the IGNI-BOX.
A
B
Step 2.
Start the car.
Step 3.
Wait for warning lights
to turn off and let the
engine run for approximately 10 sec.
Step 4.
Turn of the car and pull
out the key and wait
approximately 10 sec.
C
A
B
D
Step 5.
Connect the IGNIIGNI-BOX
and wait approximately
30 sec.