1
m Model: QB-35RFE black
m Sl
— |
|
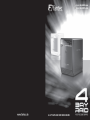
www.fantec.de 4x 3.5" SATA RAID HDD ENCLOSURE FANTEC QB-35RFE
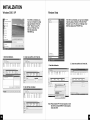
INHALT
UBERSICHT 1
LED anzeigen
SELBSTMONTAGE 4
Schnellstart
SETUP 6
RAID modus einstellungen / LED anzeigen
INITIALISIERUNG 15
Windows 2000 / Windows xp / Windows Vista / Macintosh 10.X 0.5
HINWEISE 18
English ИИ
CONTENT
OVERVIEW 21
LED indication
SELF-ASSEMBLY 24
Quick installation guide
SETUP 26
RAID mode setup / LED display status
INITIALIZATION 35
Windows 2000 / Windows xp / Windows Vista / Macintosh 10.X O.S
REFERENCES 38
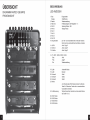
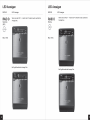
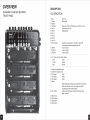
UBERSICHT BESCHREIBUNG
DIAGRAMM FANTEC QB-35RFE LED ANZEIGEN
FRONTANSICHT 1. Blau Eingeschaltet
Orange Schalfmodus
2. Rebuild Wiederherstellung
3. HDD error Fehleranzeige für die Festplatten 1 - 4
4. RAID 0 Spanning Modus / BIG
5. RAID O Striping Modus
6. RAID 1
7. RAID 3
8. RAID 5
9. RAID 10
10. Hauptschalter Zum Ein- und Ausschalten bitte 3 Sekunden drúcken.
Damit wird ein versehentliches Abschalten vermieden.
11. eSATA Aktiv / Zugriff
12. USB 2.0 Aktiv / Zugriff
13. FireWire Aktiv / Zugriff
14.17. HDD1 / HDD2 / HDD3 / HDD4
Blau Aktiv
Pink Zugriff
Rot Wiederherstellung
18. Lüfter Automatik Modus
19. Lüfter Manuell
20. Drehzahl Stufe 1
21. Drehzahl Stufe 2
22. Drehzahl Stufe 3
23. Modus
Zum Wechsel des RAID Modus drücken Sie bitte die
Taste für 3 Sekunden. Damit wird ein versehentliches
Umschalten vermieden.
24. Lüftersteuerung Wechselt zwischen Automatik und manuellem Modus
der Stufen 1 bis 3.
25. HDD1 Fehler
26. HDDZ2 Fehler
27. HDD3 Fehler
28. HDD4 Fehler
RUCKSEITE
BESCHREIBUNG
1. Lifter
2. RAID Level Bestátigung
3. HDD Anzahl Auswahl
4. FireWire 400 Port
5. eSATA Port
6. USB Port
SEITENANSICHT
HDD GRIFF
BESCHREIBUNG
1. Stromeingang
2. FireWire 800 Port
3. Stromstecker
FRONT ABDECKUNG METALL VERKLEIDUNG
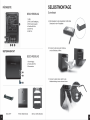
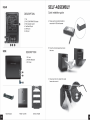
SELBSTMONTAGE
Schnellstart
A. Bitte befestigen Sie die mitgelieferten Griffe mittels
Schrauben an den 4 Festplatten.
B. Driicken Sie die kreisrunde Vertiefung,
um das Geháuse zu óffnen..
C. Drücken Sie beide Hebel, damit Sie die
Metallverkleidung heraus nehmen können.
D. Bitte entfernen Sie den
Transportsicherungskarton.
E. Schieben Sie bitte die 4 Festplatten in
das Gehause und versichern Sie sich,
daß diese korrekt in der Reihenfolge
von oben nach unten installiert sind.
F. Setzen Sie die Metallverkleidung, die in Schritt C. entfernt wurde,
wieder ein und achten Sie darauf, daß
diese auch einrastet. Danach
kann die Frontabeckung
geschlossen werden.
G. Verbinden Sie das FANTEC QB-35RFE mit dem Netzteil, stecken Sie
das USB, FireWire oder eSATA Kabel ein und schalten Sie das Gerät an.
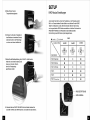
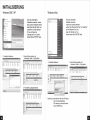
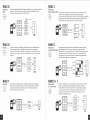
SETUP
RAID Modus Einstellungen
Zuerst stellen Sie bitte die Anzahl der Festplatten an der Rückseite gemäß
Bild-1 ein. Danach schalten Sie das Gerät ein und drücken Sie den MODE
Taster für 3 Sekunden, bis die LED blinkt. Drücken Sie den Taster erneut,
um den gewünschten RAID Modus auszuwählen und drücken Sie danach die
RAID BESTÄTIGUNG an der Rückseite bis das Gerät abschaltet.
Die Einrichtung des RAID Modus ist jetzt abgeschlossen.
Bild-1
@ :Unterstitzt (©) : Nicht Unterstützt
Anzahl der HDDs 2xHDD 3xHDD 4xHDD
о
—
—
—
va
lu
—
E
Cm
—
RAID MODUS
RAID 0 (Spanning) o O 9
RAID 0 (Striping) © O o
RAID 1 (Mirroring) e O O
RAID 3 O ® o
RAID 5 O e o
O O ©
RAID 10 (Mirroring+Stripina)
RAID BESTATIGUNG
HDD AUSWAHL
RAID O
Spanning Spanning verbindet mehrere Laufwerke zu einem großen virtuellen Laufwerk und umgeht
(BIG) damit die physische Begrenzung einzeln angeschlossener Festplatten. Die Daten werden
fortlaufend von HDD1 bis HDD4 geschrieben (siehe Grafik).
7
+ O SPN
A
5 DATA TRANSFER
SENS FT a
178 HDD 4
N +
aC D ит HDD 2
— v — +
wv +
Striping Striping verbindet mehrere Laufwerke zu einem groñen virtuellen Laufwerk als eine logische
Einheit. Die Daten werden parallel auf alle Festplatten geschrieben, was zu einer Steigerung
# O Be der Datentransferrate führt. Bei Ausfall einer Festplatte sind jedoch alle Daten verloren,
4
ae ee J
— HDD 2
и e alle
> = En Y - =| +
DATA TRANSFER [- [Hoos Jima | vos
+
| | irroring ist das automatische Spiegeln der Daten auf mehrere Festplatten. Dadurch wird eine
Mirroring Mirroring ist d ische Spiegeln der D f meh F I Dadurch wird ei
hohe Datensicherheit gewáhrleistet. Bei Ausfall einer Festplatte ist der Zugriff weiterhin
+ | möglich und nach Austausch der defekten Festplatte wird der Datenspiegel wieder hergestellt.
Der nutzbare Speicherplatz entspricht dem der kleinsten Festplatte.
HDD 1
| HDD2 | ve bat
-— 1
Les | MIRRORING mam | TF
LEER Em
HDD 2
JHA TREE
LEER
1TB
RAID 3
Striping mit
Paritát
+3
RAID 5
Striping mit
verteilter Parität
+5
Dieser Mechanismus ermöglicht die Aufteilung der Daten in einzelne Bytes und schreibt
diese abwechselnd auf die vorhandenen Festplatten. Es wird ein Prüf-Byte erstellt und
auf der »Parity-Disk« gespeichert. Mit einem Rechenalgorithmus (XOR-Verknüpfung)
ist es möglich, beim Ausfall einer Disk die fehlenden Daten zusammen mit der Prúfsumme
wieder herzustellen. Der Schreibvorgang ist deutlich langsamer als der Lesevorgang.
MO [J [we
- —
DATA TRANSFER +
HDD 3 HDD 3
1TE
BOR PARITAT 21B
Bei RAID 5 mit verteilter Paritát arbeiten die Laufwerke unabhángig voneinander und die
Paritätsblöcke werden über alle Platten verteilt gespeichert. Bei Ausfall einer Festplatte,
kônnen die Daten über die XOR-Verknüpfung der übrigen Blôcke mit dem Paritátsblock
wieder hergestellt werden. Vorteil sind beschleunigte verteilte Lesezugriffe, aber das
Schreiben ist langsamer als bei einer Einzelplatte, da der Schreibvorgang immer mit einer
Aktualisierung der Paritat verbunden ist.
+
HDD 3 HDD 3
+
BOR PARITAT 3TB
RAID 0 + 1
Striping und
Spiegelung
+10
RAID 0+1 ist Striping und Spiegelung gleichzeitig. (Dazu sind 4 Festplatten nótig). Vorteil
ist eine erhôhte Ausfallsicherheit und eine sehr gute Datentransferrate. Da 2 Festplatten
komplett gespiegelt werden, kónnen sogar ? Festplatten des gesamten RAID Verbunds
ohne Datenverlust ausfallen. (Auñer die Kombination HDD1+HDD3 oder HHD2+HDD4).
Bei allen anderen genannten RAID Modi darf maximal eine HDD ausfallen, um
Datenverlust zu vermeiden.
HDD 1
e +
= |HDD2
нее? ús = +
==
= | Hops a
DATA TRANSFER a evene | +
HDD 4
HDD 4 | ‚тв
2TB
LED Anzeigen
MODUS LED Anzeigen
RAI D O Wenn eine der HDD 1 - 4 durch den PC erkannt wurde, leuchtet die
Anzeige blau.
Spanning 9
(BIG)
Ñ
+ O SPN
A
Blau / Aktiv
LED Anzeigen
MODUS LED Anzeigen
Wenn eine der HDD 1 - 4 durch den PC erkannt wurde, leuchtet die
RAID O Anzeige blau.
Striping
+ O STR
>
Blau / Aktiv
лей
== =e TT
LED Anzeigen
MODUS
LED Anzeigen
RAID 1
Mirroring
0
Blau / Aktiv
Wenn eine der HDD 1 - 4 durch den PC erkannt wurde, leuchtet die
Anzeige blau.
Rot / Rebuild - Wiederherstellung
Während die Daten wieder hergestellt
werden, leuchtet die REBUILD LED
und die LED der betroffenen Festplatte
(HDD 1-4).
LED Anzeigen
MODUS LED Anzeigen
RAID 3 Wenn eine der HDD 1 - 4 durch den PC erkannt wurde, leuchtet die
Anzeige blau.
Striping mit a
Parität
3)
Blau / Aktiv
== ===
=
Rot / Rebuild - Wiederherstellung Während die Daten wieder hergestellt
i werden, leuchtet die REBUILD LED
und die LED der betroffenen Festplatte
(HDD 1-4).
LED Anzeigen
MODUS LED Anzeigen
Wenn eine der HDD 1 - 4 durch den PC erkannt wurde, leuchtet die
Anzeige blau.
RAID 5
Striping mit
verteilter Paritat
{5)
Blau / Aktiv
Während die Daten wieder hergestellt
werden, leuchtet die REBUILD LED
und die LED der betroffenen Festplatte
(HDD 1-4).
LED Anzeigen
MODUS LED Anzeigen
RAI D 0 + 1 Wenn eine der HDD 1 - 4 durch den PC erkannt wurde, leuchtet die
Anzeige blau.
Striping und
Spiegelung
0)
Blau / Aktiv
Während die Daten wieder hergestellt
werden, leuchtet die REBUILD LED
und die LED der betroffenen Festplatte
(HDD 1-4).
INITIALISIERUNG
Windows 2000 / XP Windows Vista
Wenn Sie unformatierte FF
Festplatten verwenden, mússen e
diese zunáchst initialisiert werden.
Dazu fúhren Sie bitte “Start” und
“Ausführen” an Ihrem Windows
PC aus und tippen Sie
> Program Updates
© Set Program Access and Defauks
Wenn Sie unformatierte
Festplatten verwenden,
müssen diese zunächst initialisiert
werden. Dazu führen Sie bitte “Start” und “Ausführen”
an Ihrem Windows PC aus und
tippen Sie "diskmgmt.msc”. ein.
ts windows Catalog
© Windows Update
q ==
ra) Programs +
: 7 | “diskmgmt.msc”. ein. Danach Danach driicken Sie die “ENTER” Taste.
El sae drücken Sie die “ENTER” Taste.
O miso ЧЕ) Поти пожать a ms ok stoner yo
= y Fun. Open: [ distant. mac +]
Е El Log of XP...
a Start E
D See all results
© Search the Internet
1. Festplatte initialisieren. 2. Neue Partition erstellen und quam и
formatieren: Weiter -> Fertig stellen. IRC
Pis Addon Faw Hap я
= WM FB DEE nia eos a
Wee Tons Tipe Tsu Town pay [ee aca [ios Be us 1. Festplatte initialisieren. 2. Neue Partition erstellen und
Ека (И) Fastition E MTFs TE ТЕТЕ HEE 4% = + BU а ев . В В
Swi Wal = Ep me am ems ea = == ee [ee Ter formatieren: Weiter -> Fertig stellen.
E Ры | 6 МТР5 Haar HUE 20008 a fa Des Don Rasy EE dE pe ES sa EE ma rr
vea Fi ela = MTS Haaltfe #254 GE mE 65% esr ET BEE
E (C1 Parton Ema Ч Haale (9... 341808 22.3168 8%
Sri Eston ar sr Hash 3.10 8 гв ся п Yes [ime TE [Pichon [Sess | "а [ей Тен | бен |
A : ma th I E E E O =
J Ram: Sm. EE. EE Eee amir. в =
meta [Ae [mbr Ed | '
red
HABE |на оне = rm ie
fo Чейн опия и го disks bo Inbal. к МОЙ Hilal aman] Me sae = или Crit
© кк: a
№ bar ra : mana ra
Ema O —— =
ol rrr Mh на ны:
| Oak 1
Ll dea diri ¡bar na dr has sch a
a ET EEE
"ELA Mah | ada. | dr. | e | Hes | win. | Se [he fection e Help Ш Мени Ре сей Е ее Г ride fete ri TE ESRI ERA POTTER
cs mien ER CET © |
Volare | Layout [pe CEE [Capacity | Eros Space | 5 Free | [om J Cou |
Partition, Sin Halt AAA OE 2000... EDO HE
EP (De) Partition Sami MES Halll) 11.84 08 E aa aL
SER] 2 Fee Ee AM O ae. Me Sam bh
SSE] Pa ONES HEN DE XD 6% Bemerkung: Bitte aktivieren Sie den GPT Modus,
wenn die Gesamtkapazitát
> | | 2TB übersteigt, andernfalls wählen
3 A NE нс чм Ка ry i В
dre rte e Sie den MBR Modus.
Pink | й й й
Ns
NOE в
Dép (5-1
Mo Medis
3. Formatierung abgeschlossen.
a NF KF Td UF éd Fi
TA ES CE Th Gl ATE ar
Cia
ша ва НН
Half Toler doles Few Finally Brass Paddeer |
| FT A E E
Macintosh OS 10.X
Gehen Sie in das Festplattendienstprogramm und partitionieren und formatieren
Sie die Festplatte.
External RAID Media
El 149.1 G6 WDC WD164 №
E 10.5.4.Leopard Ev
4 10.4.1) _ Tiger
El 10.3.x Panther
E 10.2.x Jaguar
310.1.
El 10.4
[3.6 TH External RAID №
Erase Disk
Erasing & disk ill destroy 30 information de the
volume of thi disk.
This disk has 1 volume
“Untitled”
Are vou Curt you wiih Eg Baie the digk "7
Come) (Erase )
tore |
pm, amd click Era.
& disk empry. Erasing a
je the disk unchanged.
loa balan clicking
race button.
ES Untitled
a vic=0.8.6d.amg
E | Disk Description: External RAID Media Total
—
Consecikon Bus: USE
Connection Type: External
O
5.
USE Serial Number | ABCDEFOLZ34567RD Partition a 10.1.x
Volume Format: | Mac O5 Extended (Journaled) =
Name:
DJ install Mac 05 9 Disk Driver
Select this option to ese this device on a
computer running Mac Of 9. This option
dera ml aM Classic.
prez:
«siz ol |
bak (ÓN Nerwork
@ 104.11 Tiger
| 10.3.x_ Panther
Sl 10.2.x Jaguar
ll 10.5.4_Leopard
EN Desktop
+ hobaay
A Appli cations
& Documents
My Movies
$ Music
Jl Pictures
|
/ Formatierung abgeschlossen.
[| Untitled
O items, 3.64 TH available
HINWEISE
. Der Wechsel des RAID Modus führt zu Datenverlust.
11.
12
13.
14.
. Um den RAID Modus zu ändern, folgen Sie bitte den Anweisungen, andernfalls wird
. Die Schnittstellen USB, eSATA oder FireWire können nicht gleichzeitig angeschlossen
. Im RAID Modus werden Festplatten der gleichen Marke, Modellnummer und Kapazität
. Die Erstellung mehrerer Partitonen wird im RAID Modus nicht empfohlen.
. Unter Windows Vista besteht die Möglichkeit den GPT Modus für Kapazitäten von
. Wenn Sie versehentlich den MBR Modus aktiviert haben, aber nur die Partitionstabelle
. Fir Mac OS Nutzer: Eine Gesamtkapazitát von mehr als 2TB ist erst ab dem
. Verbinden Sie das Gerät nicht mit dem SATA on Board Steckern, da der PC unter
die Anderung nicht úbernommen.
werden.
empfohlen.
mehr als 2TB zu verwenden. Bel älteren Betriebssystemen kann es jedoch Schwierigkeiten
mit der Kompatibilität geben. Für nähere Informationen über GPT, besuchen Sie die
Internetseite: http://www.microsoft.com/whdc/device/storage/GPT_FAQ.mspx
löschen wollten, müssen Sie zunächst einen anderen RAID Modus aktivieren und dannach
wieder in den gewünschten Modus zurück wechseln. Erst dann können Sie die Festplatten
im GPT Modus nutzen.
Betriebssystem MAC OS 10.4.11 Tiger oder höher möglich.
Umständen das Gerät oder die Festplatten nicht richtig erkennt. Wir empfehlen zusätzlich
PCI-Express oder PCI Controller Karten mit eSATA Anschluß.
Die Dauer des REBUILD ist abhängig von der Kapazität, 1TB dauert ca. 10-12 Stunden.
. Bitte installieren Sie die Festplatten von Oben nach Unten und stellen Sie die
verwendete Anzahl an der rückseitigen HDD Auswahl ein.
Wenn Sie das USB, eSATA oder FireWire Kabel entfernen, schaltet das
FANTEC QB-35RFE automatisch in den Schlaf-Modus.
Um die Festplatten aus dem Gehäuse zu entnehmen, drücken Sie den Griff leicht nach
unten und ziehen Sie die Festplatte vorsichtig heraus.
15. Es wird empfohlen das Power Management im BIOS auf S3 einzustellen.
(Für weitere Informationen lesen Sie bitte das Handbuch Ihres Mainboards).
16. Wenn die Initialisierung des FANTEC QB-35RFE zu lange dauert, prüfen Sie bitte, ob die
Festplatten korrekt eingelegt sind oder aktualisieren Sie die Treiber Ihres eSATA Controllers.
17. Wenn die Transferrate ungewöhnlich erscheint, prüfen Sie bitte, ob die SATA Jumper an der
Festplatte auf 1.5 oder 3.0Gbps eingestellt sind .
18. Wenn der Lüfter zu laut geworden ist, schalten Sie bitte das Gerät aus und öffnen Sie die
Verkleidung an der Rückseite. Jetzt können Sie den Lüfter reinigen.
Bild-2
(electrode)
19
20
21
22
23
. Wenn trotz Reinigung keine Verbesserung eingetreten ist, können Sie den Lüfter durch
einen baugleichen Typ mit den Abmessungen 80mm x 80mm x 20mm gemäß Abbildung
Bild-2 ersetzen.
. Wenn Sie vor dem Schließen der Frontabdeckung vergessen haben die Metallverkleidung
einzusetzen, drücken Sie einfach, wie im Bild gezeigt, den unteren Hebel. Dadurch öffnet
sich die Frontabdeckung langsam nach vorne. Bitte versuchen Sie nicht die
Frontabdeckung mit einem scharfen Gegenstand zu öffnen.
. Wenn der Lüfter ausgefallen ist, senden Sie das Gerät bitte zu Ihrem Händler zurück.
‚ Arbeitsumgebung: 0 - 60 °C
Luftfeuchtigkeit 0 = 90 9% r.F.
. Der Lifter wird durch einen Thermo-Sensor gesteuert und bietet neben 2 Varianten
(Auto / Manuell) auch 3 Drehzahleinstellungen:
unter 45 °C 1200 U/ min.
45 °С - 54 °С 1800 U/ min.
warmer als 55 °C 2500 U/ min.
Langsam :
Mittel:
Schnell:
Betriebssystem:
Windows 2000 / XP / Vista 32/64bit (mit MBR Modus maximale Kapazität bis zu 2TB )
Vista 32/64bit (mit GPT Modus werden mehr als 2TB unterstützt)
Mac OS 10.3.x oder hôher
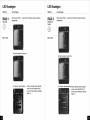
OVERVIEW
DIAGRAM of FANTEC QB-35RFE
FRONT PANEL
DESCRIPTION
LED INDICATION
1. Blue Power on
Orange Sleep mode
2. Rebuild
3. HDD error When any of HDD1~HDD4 has error, HDD error is on.
4. RAID 0 Spanning Mode / BIG
5. RAID 0 Striping Mode
6. RAID 1
7. RAID 3
8. RAID 5
9. RAID 10
10. Power button It needs to be pressed for 3 seconds to power off.
This design prevents accidental power off.
11. eSATA in use / access
12. USB 2.0 in use / access
13. FireWire in use / access
14.-17. HDD1 / HDD2 / HDD3 / HDD4
Blue active
Purple access
Red rebuild
18. Smart Fan automatic mode
19. Smart Fan manual mode
20. Fan speed level 1
21. Fan speed level 2
22. Fan speed level 3
23. Mode
RAID mode button needs to be pressed for 3 seconds to
switch the device's mode. This design will prevent
accidental execution of this function.
24. Fan button Controls auto & manual modes and fan speed from
level 1 to level 3.
25. HDD1 error
26. HDD2 error
27. HDD3 error
28. HDD4 error
REAR SELF-ASSEMBLY
DESCRIPTION Quick installation guide
1. Fan
2. RAID CONFIRMATION button A. Please use the provided handles to
3. HDD selection switch secure the 4 HDDs with screws.
4. FireWire 400 port
5. eSATA port
6. USB port
B. Press the circular deepening to open
the cover.
SIDE DESCRIPTION
1. DC Jack
2. FireWire 800 ports
3. DC Power
C. Press down the rib to detach the metal
frame and remove it.
HDD HANDLE FRONT COVER METAL FRAME
D. Take the transport paper
board out of the device.
E. Slide 4 HDDs into the chassis and
make sure they are securely
installed in order from up
to down.
F. Adjust the metal frame that was removed
in Step C. Please make sure the
bottom of the frame stays
inside the track before
closing the cover.
G. Connect the power supply to the device, plug in either USB / eSATA
or FireWire cable in the rear panel and power on the device.
SETUP
RAID mode setup
First select the amount of HDDs on the back panel referring to Figure-1, then
power on the device and press MODE button for 3 seconds until LED flashes.
Press it again to select the RAID mode you want to use and then press the
RAID CONFORMATION button on the back panel until the device shuts
down. Power on the device again and the RAID mode setup is completed.
Figure-1
@ Supported (O) :N/A
RAID MODE
RAID 0 (Spanning) o O o
RAID 0 (Striping) © O o
RAID 1 (Mirroring) a O O
RAID 3 O . e
RAID 5 0 e o
O O e
RAID 10 (Miroring-Stripina)
HDD SELECTION
RAID CONFORMATION
RAID O RAID 3
Spanning Spanning concatenates multiple hard drives as a single large volume; resulting in a seamless Striped set
expansion of virtual volumes beyond the physical limitations of separately connected е : :
(BIG) hard drives. Thze data are written frim HDD1 to HDD4. with dedicated parity This mechanism provides an improved performance and fault tolerance similar to
‚`` RAID 5 but with a dedicated parity disk rather than rotated parity stripes.
+ О SPN + 3 The single parity disk is a bottle-neck for writing since every write requires updating the
ne CR DATA TRANSFER parity data. One minor benefit is the dedicated parity disk allows the parity drive to
ST y= fail and operation will continue without parity or performance penalty.
178 HDD 4
== +
E aa [= [Je [es
— Y — + b +
me нооз EH ET
e в Ba) + [2 Jm [me
Try us HDD 4 DATA TRANSFER ors
E 4TB iTE
Bl XOR PARITY 2TB
Striping Striping is a method of concatenating multiple hard drives into one logical storage unit. Striped set Distributed parity requires all drives but one to be present to operate; drive failure
It is the automated process of writing data across multiple drives simultaneously. with distributed parity requires replacement, but the array is not destroyed by a single drive failure.
7 \ Striping is used to increase the performance of disk reads. The multiple hard drives will Upon drive failure, any subsequent reads can be calculated from the distributed parity
+ O STR write data in “column” effect. If one drive in a striped set fails, all of the data in the stripe + = such that the drive failure is masked from the end user. The array will have data
Ne set is lost. loss in the event of a second drive failure and is vulnerable until the data that was
on the failed drive is rebuilt onto a replacement drive.
— | |
т В » ==)» +
Ё T8 HDD 4 HDD 3 HDD 3
bi Нее DATA TRANSFER =
HOD 1 HDD 1
HDD 2
E
1
—
=
a
= Ш ГГ]. Le
HDD 4 1TB HDD 4
BM XOR PARITY 3TB
Mirroring Mirroring is the automated process of writing data to multiple drives simultaneously. Stri ped sets RAID 0+1 is striped sets in a mirrored set (minimum 4 disks; even number of disks),
Mirroring is used to provide redundancy. If one drive fails, the redundant drive(s) will in a mirrored set provides fault tolerance and improves performance but increases complexity.
+ | continue to store the data and provide access to it. The failed drive can then be The key difference from RAID 1+0 is that RAID 0+1 creates a second striped set
replaced and the drive set can be rebuild. to mirror a primary striped set. The array continues to operate with one or more
+ 10 drives failed in the same mirror set but if drives fail on both sides of the mirror,
the data on the RAID system is lost.
a eC ОСН
HOD 1
HDD 1 | 7 m
LL STRIPING +
; ‚ НОО 2 | 178 — = | HDD2
cl = ==
за B — + — С +
MIRRORING г )
oo } a HDD 2 DATA TRANSFER [ Hoos | 1TB ) я
N ls RF
DATA TRANSFER +
1TB РВ
A AC
2TB
LED Display Status
MODE LED Display
RAID Q When any of HDD1 ~ HDDA is recognized by the PC,
HDD1 ~ HDD4 blue / active is on.
Spanning
(BIG)
+ 0 SPN
A
Blau / Aktiv
Sa РО
Purple / Transferring Data
e
ЕЕ Зе
es =,
LED Display Status
MODE LED Display
RAID O When any of HDD1 - HDD4 is recognized by the PC,
в HDD1 ~ HDD4 blue / active is on.
Striping
7
+ O STR
A
Blau / Aktiv
LED Display Status
MODE
RAID 1
Mirroring
a)
Blau / Aktiv
LED Display
When any of HDD1 ~ HDD4 is recognized by the PC,
HDD1 - HDD4 blue / active is on.
Red / Rebuild
When the data is being rebuilt, LED
of rebuild, HDD error and HDD
(14, depends on which HDD
is being rebuilt) error will be on.
LED Display Status
MODE LED Display
RAID 3 When any of HDD1 - HDD4 is recognized by the PC,
HDD1 - HDD4 blue / active is on.
Striped set
with dedicated parity
3)
Blau / Aktiv
When the data is being rebuilt, LED
of rebuild, HDD error and HDD
(1-4, depends on which HDD
is being rebuilt) error will be on.
LED Display Status
MODE LED Display
RAI D 5 When any of HDD1 ~ HDD4 is recognized by the PC,
: HDD1 ~ HDD4 blue / active is on.
Striped set
with distributed parity
©
Blau / Aktiv
When the data is being rebuilt, LED
of rebuild, HDD error and HDD
(1-4, depends on which HDD
is being rebuilt) error will be on.
LED Display Status
MODE LED Display
RAID 0 + 1 When any of HDD1 - HDD4 is recognized by the PC,
HDD1 - HDD4 blue / active is on.
Striped sets
in a mirrored set
+10
Blau / Aktiv
When the data is being rebuilt, LED
of rebuild, HDD error and HDD
(1-4, depends on which HDD
is being rebuilt) error will be on.
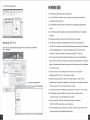
INITIALIZATION
Windows 2000 / XP Windows Vista
аа п mia
"E Se E E
If the HDD is uninitialized, you a
may have lo mnaialize it by doing if turer
steps as followed: Al first cick
“Star”, "Execute" at your PC
and key in “deskmgmt. msc”.
Afar that please press
"RETURN" key.
If the HDD is uninitialized, you may have bo initialize
it by doing steps as followed: At first click “Start”,
“Execute” at your PC and key in “diskmgmi. msc”.
Añor that please press "RETURN" key.
Fy ga dear a oi peep, em, Spee
=; En te Cem Ad me Te pee
CPE A
pe lo | |_ ен
"ma oll realy
om fn, pg bey ear
1. Stari disk initialization. 2. Greate new partition and formal disk. se
KEY Za + a ай 7 F
= < de dm BFE Bar
==. Ea pe A e os e I ; 2. Create new partition and format disk.
ds rar tm = PE, br: Gm hm mil HEHE Bam ar 1. Start desk initalzation:.
Mae a pe |
= ШВ Sh She EE
er = == ——
==
Е a
EE sa pes Bie as] a Em PE gr Pa RTE РОННИ
- = me a o Fl PU
— = wm с— E o E и—— же вене |) ще sume ma me mt
En ZÉRO 5H HR — at
| o
Ea "eat MBE mE [eam Nota: Plessa enable GPT If the total capacity la more
E = = than 2TB and enable MBR I the total capacity
— |= la less than 2TB.
3. Disk format completed.
Macintosh OS 10.X
Go to Disk Utility, create new partion and format the disk.
Das
Extérnal RAID Media rt ==
| (==, [Erase Disk En
SH 145.1 GB WDC WD16( Ev Erasing a disk will destroy all information on the
= i the disk,
tra volume of the dis sme, and click Erase.
74 10.4. 11 _Tiger
This disk mas 1 volume:
= € disk empty. Erasing a
a 10.3.x_ Panther ‘Untitled 36 the disk unchanged.
E 10.7. Jaguar Are you sure you wish to erase the disk “7 pe
El 10.1.x La
mac E =)
E Untitled
Volume Format: | Mac 05 Extended (Journaled) $ |
à vic-0.8.6d.dmg Forde
install Mac 05 9 Disk Driver
Select this option to use this device an a
computer running Mac O5 9, This aption
does not affect Classic.
Disk format completed.
Соса Options.) (Erase)
Ll untitled че
E Disk Description: External RAND Media Total (oh
Connection Bus : USE Wi NETVOrk
Connection Type: External SAMAR À 10.1.x
USE Serial Mamber | ABCDEFD123456789 Partition
|
@ E 04.7. |
@ 103x Panther ||
El 10.2.x Jaguar
a 10.5.4_ Leopard ||
y
EN Desktop
T ora
e Applications
4 Documents
JS Movies В
@ Music i
- |
(CI Pictures |
Id +
me D aterra, 3.64 TE avadalile
REFERENCES
10.
11
13.
. Changing the RAID mode will cause data lost.
. Please refer to the instructions when switching the RAID mode, otherwise the execution
might fail.
. Interface of USB / eSATA or FireWire can not be used at the same time.
. When using RAID function, HDDs with the same brand, model and capacity is
recommended.
. When using RAID function, more than one HDD partition is not recommended.
. Windows Vista users can enable GPT when initializing HDD with a total capacity
of more than 2TB.
Older OS may not recognize the device if you use a different operation system than
Windows Vista. For more detailed information about GTP, please visit:
http://www.microsoft.com/whdc/device/storage/GPT_FAQ.mspx
. If you enable MBR by mistake, in order to clean the partition table, you have to switch
another RAID mode and do the RAID mode switch all over again referring to Setup.
Then go back to the RAID mode you want, repeat the previous actions and enable
GPT when initializing HDD.
. For Macintosh users: the total capacity of more than 2TB could be recognized only for the
operation system is 10.4.11 Tiger or later.
. Do not connect the device to the SATA on board port of the motherboard. Either use
SATA to eSATA PCI-Express or SATA to eSATA PCI add-on card,
otherwise the PC may not recognize the device.
In RAID 1, HDD1 and HDD2 must be installed,
otherwise the PC can not recognize the device.
. Rebuild time is based on the capacity, e.g. it takes about 10-12 hours for 1TB.
12.
Please install the HDDs from up to down according to the amount you select
in HDD selection switch on the rear panel.
When the USB / eSATA / FireWire cable is plugged out, the device goes to sleeping mode
automatically.
14.
15.
16.
17.
18.
To take the HDD out from the device, slightly press down the handle of the tray
and pull it out.
Setting up motherboard's power management in S3 is recommended.
(For more details, please refer to the user guide of motherboard BIOS setting).
If the device takes too long to initialize, please check if the HDD is securely installed or
update the eSATA host driver version.
If the transfer rate is not normal, please check if the setting of SATA disk jumper is 1.5 or 3.0Gbps .
If there is noise with the fan, power off the device, unscrew the fan, take out the cover,
clean the fan and assemble it back.
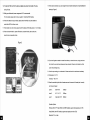
Figure-2
Positive
(electrode)
Negative
(electrode)
19. If the noise is still present, you can change the fan with another identical fan of size 80x80x20mm
referring to Figure-2.
20. If you have forgotten to attach the metal frame before you closed the cover, simply press down
the rib and the cover will slowly release and open outwards. Please do not attempt to pull the
cover with something sharp.
21. If the fan stops working, do not dismantle it. Please send back to the retail store immediately.
22. Temperature 0 ~ 60 °C
Humidity 0 ~ 90 % RH
23. Smart fan controlled by the built-in thermal sensor and it comes with 2 modes (auto / manual)
and 3 levels of speed:
Level 3: below 45 °C 1200rpm
Level 2: 45°C ~54 °C 1800rpm
Level 1: higher than 55 °C 2500rpm
Operation System:
Windows 2000 / XP / Vista 32/64bit ( with MBR enabled, supports total capacity up to 2TB )
Vista 32/64bit ( with GPT enabled, supports total capacity more than 2TB )
Macintosh 10.3.x or later