1
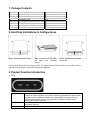
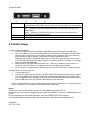
Thecus Y.E.S nano
N1050
External Hard Disk Drive Enclosure
& Mobile Photo Bank
Quick Installation
Guide
1. Package Contents
No.
1
2
3
4
5
6
7
Name
Thecus N1050
USB cable
AA Battery Case
Protective Pouch
USB-DC Power Supply Wire
User Manual
Mounting Screw
Quantity
1 pc
1 pc
1 pc
1 pc
1 pc
1 pc
A few
2. Hard Disk Installations & Configurations
Step 1: Remove screws & Cover
Step 2: Insert a 2.5” IDE HDD
and fasten with mounting
screws
Step 3: Replace cover & fasten
the screws
Connect the N1050 to a PC to format your HDD. You need at least one FAT32 partition on your HDD in order to
copy files from your digital cameras, MP3 players or USB disks.
4. Product Function Introduction
1) LEDs:
1. Power / Copy
2. ERR
3. Copy OK
Shows the power status (on/off), or the battery status. It is steady bright green if it is
powered on (either AA battery or bus power); blinking light indicates the status of data
transferring between different USB devices, or data transferring between PC and
N1050 as external hard disk. The copy procedure is finished if the light restores
stability, and ready for next action.
Error LED. Light on or flickering shows there are errors during transferring data, and
you need to check up.
Indicates the copy process has finished when the unit is in OTG mode.
2) Button & Switch:
1
1. COPY button
2. Mode Switch
3. USB port
4. Power socket
2
3
4
It is a copy/stop key when the device is used as a photo bank; press it to start copy
process and the COPY LED will be on; press it for a second time to stop copy process.
OFF : To turn the device off.
PC : The device is used as a external hard disk. The device will use USB bus as
power supply.
COPY : The device is used as a OTG device. The device will use battery pack or
external power supply as power source.
Connection to other USB devices or PC.
DC +5V power supply or AAA battery.
5. Product Usage
1) Using N1050 as Photo Bank
1.
Connect to Digital Cameras, Card Readers, Flash Memory Disks, MP3 players via USB cable.
2.
Plug in the battery case or external power supply, turn on the Power key and switch to COPY position.
After the Power / Copy LED is on, the N1050 is ready for action; and press COPY key to start copy,
and meanwhile the light is flickering. Photo Bank will create a subdirectory named
DSKXXXXX(XXXXX are each different digits), and it will retain the original directory structure. After
the COPY LED stops blinking, the copy procedure is finished and ready for next action, you may also
disconnect power and USB cable.
3.
When the COPY LED stops blinking and COPY OK LED is on, it means the copy procedure is
completed. If the ERR LED is on, it means the copy process might not have finished.
4.
When copying is in progress (COPY LED blinking), user can press COPY button to stop the process.
2) Using N1050 as a external hard disk
1.
Turn the switch to PC.
2.
Connect the N1050 to PC via USB cable. POWER / COPY LED will light and the hard disk is ready for
use. If the POWER/COPY LED starts to blink, this indicates data transferring status. Portable Hard
Disk icon appears on [My Computer] of PC (USB drive needs to be installed on Windows 98 system).
3.
Remove USB device from your PC before disconnection of the USB cable.
NOTE: If the hard disk does not spin up after connecting the external hard disk to PC, it is because the bus
power is insufficient. You need to plug in the USB-DC power supply wire.
Notice:
If the device is used as Photo Bank, at least one of the partitions should be FAT 32.
Do not use other external power adapter than the original one included, so as not to cause damage to your
N1050.
Do not cut off power or disconnect USB cable, when the POWER/COPY LED is blinking.
Use AA Ni-Mh battery or alkaline battery, and pay attention to the positive and negative polarity.
Certificates:
CE, FCC, C-Tick