1
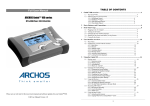
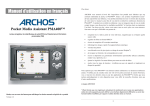
1
Gmini™ 402 CamCorder
CamCorder and Camera functions
User Manual
English
Please visit our website to download the most recent manual and software for this product.
v 1.0
English
2
1
Video – Recording a video with your GminiTM 402 Camcorder
1.1 Video Recording procedure
1. From the Main screen, select the CamCorder icon, then click on ENTER.
2. On this pre-recording screen, you can adjust the recording settings by pressing the F2 button (Settings). You
can also zoom in and out using the UP/DOWN button.
3. On the Settings screen, Use the directional buttons UP and DOWN to select a setting, and LEFT and RIGHT to
change it. To change the file name, select the Rename button and press enter. You will be taken to the Virtual
Keyboard (see the Using the Virtual Keyboard section in the Browser chapter of the complete Adobe® PDF
user manual on the Gmini™’s hard drive for more information.) Press one of the Function buttons (Back) or
ESC/STOP to go back the pre-recording screen.
4. Once you have adjusted the settings and returned to the Pre-recording screen, press the ENTER button. The
recording will start. It is possible to change certain settings, such as the Exposure and White balance, during
a recording. To stop and save your recording, press the ESC/STOP button. You can press the PLAY button to
pause and resume the recording.
2
3
4
The table below explains the different settings. The corresponding screen icons are also shown.
2
3
Video recording settings
Resolution
Options: VGA or Optimal. Optimal (448 x 336) will give the smoothest image quality,
with the smallest file size. VGA (640 x 480) will give sharper images, which are less
smooth during fast moving scenes. However, the file size is larger.
Bitrate
Options: Low, Medium or High. This setting determines the level of compression of
the recorded video file. A higher bitrate will result in a smoother-looking video, but will
also require more storage space. The default Medium will be appropriate for most
situations.
Exposure
Between Brighter +2, Normal and Darker -2. This permits you to adjust to bright or
dark conditions. Setting it in the negatives, will decrease the amount of picture exposure
and make your image darker. Setting it positive will increase the exposure and make
your image brighter. If your subject has a bright background, you may want to over
expose your image a little bit so that the person’s face is more visible, thus you would
set it to Brighter +1 or +2. If you are recording a video where there is a lot of snow or
the sun’s reflection on water, you may want to reduce the exposure, thus set it to Darker
-1 or -2.
White balance
Options: Auto, Daylight, Cloudy, Fluorescent or Tungsten. This parameter lets the
camera adjust to the ambient light source in order to record colors in the best way.
Source
Options: Microphone or Line-in. The default audio source for a video recording is
the built-in microphone. You can use a line level audio source for special recording
situations and enter the source audio through the multiconnect adaptor line-in jack.
Sampling
Options: 32 kHz or 48 kHz. The sampling rate refers to the audio track of your recording.
A higher sampling rate makes the audio sound better, but will result in a larger file size.
1.2 Where is the recording saved?
The default location for video recordings is the folder called Video. If you click on the Video icon in the main menu,
you will go to this folder. Notice that the right Function button in the Video Browser screen is labeled Record.
Each time you use this button to record a video instead of going through the VideoCorder icon on the main menu,
you set the recording default location to the current folder. For example, let’s say you have a folder called /Video/
Holiday. If you go to this folder and then make a recording using the right Function button Record, you will set
the default record location to this folder. Now, each time you use the VideoCorder icon to start a recording, your
3
4
English
recording will be saved in the folder /Video/Holiday.
When pressing the ESC/STOP button from the pre-recording screen, you will be taken to the current default
recording folder so you can directly view your recording.
4
5
2
PHOTO – Taking photos with your GminiTM 402 Camcorder
2.1
Taking a photo
1. From the Main screen, select the Camera icon, then click on ENTER.
2. On this Viewfinder screen, you can adjust the exposure settings by pressing the F2 button (Settings). You can
also zoom in and out using the up and down buttons. For more information on the F3 button (Fix), see the
section Controlling the image quality.
3. On the Settings screen, use the directional buttons UP and DOWN to select a setting, and LEFT and RIGHT to
change it. To change the file name, select the Rename button and press enter. You will be taken to the Virtual
Keyboard (see the Using the Virtual Keyboard section in the Browser chapter of the complete Adobe® PDF
user manual for more information.) Press one of the Function buttons (Back) or ESC/STOP to go back the
Viewfinder screen.
4. Once you have adjusted the settings, press the ENTER button to take a photo. You might notice that the HDD
indicator lights up as the device is saving the image on its hard drive. The name of the next image changes
and your Gmini™ is now ready to take the next picture.
2
3
4
The table below explains the different settings. The corresponding screen icons are also shown.
5
6
English
Photo settings
Resolution
Options: VGA or 1.2 Megapixels. 1.2 Megapixels (1280 x 960) will give the best image
quality, but the largest file size. VGA (640 x 480) will give the smallest file size, but the
images will not be as sharp.
Image quality
Basic, Normal, Fine. For the best possible image (although it will take up more disk
space) set this to Fine (fine dots icon).
Exposure
Between Brighter +2, Normal and Darker -2. This permits you to adjust to bright or
dark conditions. Setting it in the negatives, will decrease the amount of picture exposure
and make your image darker. Setting it positive will increase the exposure and make
your image brighter. If your subject has a bright background, you may want to over
expose your image a little bit so that the person’s face is more visible, thus you would set
it to Brighter +1 or +2. If you are taking a photo where there is a lot of snow or the sun’s
reflection on water, you may want to reduce the exposure, thus set it to Darker -1 or -2.
White balance
Options: Auto, Daylight, Cloudy, Fluorescent or Tungsten. This parameter lets the
camera adjust to the ambient light source in order to record colors in the best way.
Timer
Options: Off, 5 seconds or 10 seconds. The timer setting allows you to delay the moment
at which the photo is taken, for example if you want to include yourself in the picture.
Reset
Reset the values in this screen to the factory default settings.
2.2 Taking a photo using the timer
On the main screen, select the Camera icon and press enter. Press the F2 buttons (Settings) and highlight the
Timer setting. Select for example 10 seconds. Press a Function button (Back) to return to the Viewfinder screen.
The Timer icon appears on the top of the Viewfinder screen. Now press ENTER. A stopwatch symbol will appear
on the screen and counts down from 10 to 0. The Gmini™ 402 will now take a photo.
Note: The Timer function will stay active for successive pictures you take unless you return to the Main menu or
set the Timer Setting to OFF.
6
7
2.3 Where is the photo saved?
The default location for photos is the folder called Pictures. If you click on the Photo icon in the main menu, you
will go to this folder. Notice that the right Function button is labeled Record. Each time you use this button to go to
the Viewfinder screen instead of going through the Camera icon on the Main menu, you set the default location
to the current folder. For example, let’s say you have a folder called /Pictures/Holiday. If you go to this folder and
then take a photo using the right Function button Record, you will set the default location to this folder. Now, each
time you use the Camera icon to take a picture, it will be saved in the folder /Pictures/Holiday.
When pressing the ESC/STOP button from the Viewfinder screen, you will be taken to the current default folder.
2.3 Controlling the image quality
Blurred images
If you notice that your images are blurred, this could be due to the fact of using the zoom. When zooming in on
objects, you must have a very steady hand to hold the camera when pressing the ENTER button. Any shakiness
is magnified and often renders the picture blurry. Also, shooting in low light conditions requires more time so that
the camera can capture a sufficient amount of information. Thus, any camera movement or fast movement in the
camera’s sight, will be blurred. Trying to take pictures of objects closer than 1.5 m (60 inches) may also give out
of focus results.
Light/Exposure issues (Fix function)
When taking a photo against a bright light source (for example a window when you are inside or the sun when
you are in an open space), it can happen that the object or person appears too dark in the photo. This is because
the bright background makes the camera select an exposure which is not appropriate to capture the person or
object in the foreground. One way of correcting this it using the Exposure setting (see the table of parameters
for information). Another option is pointing the Gmini™ away from the bright light, towards an area where the light
conditions are similar to those around the person or object. Press the function button F3 (Fix). The exposure
settings become fixed and the Exposure-fixed icon will appear on top of the screen. If you now take a picture
against the bright light source, the exposure will stay fixed at the previous light adjustment. The image of the person
or object should no longer appear as dark as before.
In order to return to automatic exposure, press the function button F3 (now Auto) again.
7
English
8
3
Technical specification
Gmini™ 402 CamCorder
Resolution
Digital Still Camera: 1.2 mega pixels
CamCorder: 640x480 (300.000 pixels)
Sensor
CCD (Charge Coupled Device)
Camcorder file format MPEG-4 SP (VGA resolution)
Field of view
Focale 4.63mm (equivalent to 45mm for a 35mm camera)
Depth field
1.5 m to infinity
White balance
5 settings : Auto - Daylight - Cloudy -Fluorescent - Tungsten
Zoom
digital 2x
Battery life
Up to 2 hours1 of video recording with camcorder.
(1) Calculated with included battery, Battery life will vary with use and recording parameters.
All brands and product names are registered trademarks and the property of their respective owners. Specifications are subject to change without
notice. Errors or omissions excepted. Images and illustrations may not always match contents. COPYRIGHT ARCHOS © 2005. All rights reserved.
8