1
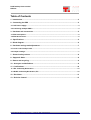
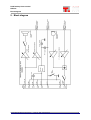
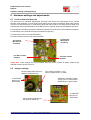
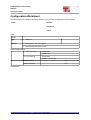
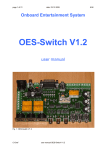
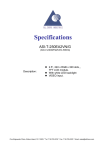
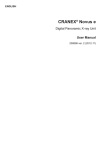
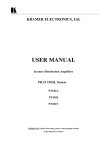
RoIP Desktop User terminal
RDU101
PRODUCT MANUAL
Revision: RDU101_MNL_EN100408
Im Tiegel 9
36367 Wartenberg
Telefon +49 (0) 66 41 – 979-0 Fax: -299
www.thiesen.com/pmr
[email protected]
RoIP Desktop User terminal
RDU101
Table of Contents
1. Introduction................................................................................................................................3
2. Connecting the RDU .................................................................................................................4
2.1 12V Power Supply.......................................................................................................................... 4
2.2 Combining multiple RDU's............................................................................................................ 4
3. Hardware and accessories.......................................................................................................5
3.1 RDU and options............................................................................................................................ 5
3.2 RDU Accessories........................................................................................................................... 5
4. Specifications ...........................................................................................................................5
5. Block diagram............................................................................................................................6
6. Hardware settings and adjustments........................................................................................7
6.1 Level control and pre-sets............................................................................................................. 7
6.2 Jumper settings............................................................................................................................. 7
7. General safety notices..............................................................................................................8
8. Support & Sales.........................................................................................................................9
9. Return and recycling.................................................................................................................9
10. Acronyms and definitions.......................................................................................................9
11. Certifications..........................................................................................................................10
11.1 EC Conformity Declaration ....................................................................................................... 10
11.2 RoHS Conformity Declaration, EC............................................................................................ 10
12. Disclaimer...............................................................................................................................11
13. Revision Control....................................................................................................................11
Product Manual RDU101 (08.04.2010)
RDU101_MNL_EN100408.odt
2
RoIP Desktop User terminal
RDU101
Introduction
1. Introduction
The RDU-101 was specifically designed for seamless interoperation with the RRC101-IP-B RoIP
adaptor. In combination with the RRC, the RDU provides excellent voice-quality and usability. The
RDU can also be connected directly to a radio transceiver via its rear-panel RJ45 connector.
The RDU provides individual volume control for speaker and headset. The internal speaker can be
switched off. A noise-compensated goose-neck microphone with wind-protection and a voiceoptimised speaker ensure excellent voice-quality. Three status LEDs indicate Power (yellow), Active
Receive (Red), PTT Active (green).
External PTT (e.g. for the FTM 2410 foot-switch), microphone and headset and radio control are
provided via the 3.5mm rear-panel connectors. The rear-panel RJ45 provides an 8-pin RRC or Radio
interconnect. Power-supply is via the rear-panel RJ45 from RRC or radio.
The unit is both physically and mechanically designed and manufactured to withstand continued use in
operations over a long life-span. Up to three RDU's can be used in parallel via the MAB 4 multiconnect box enabling simultaneous use of one radio by three users.
Headset/
Speaker
volume
To RRC /
Radio
Internal speaker
ON/OFF
PTT
Microphone
PTT
Status LEDs
Product Manual RDU101 (08.04.2010)
Headset
RDU101_MNL_EN100408.odt
3
RoIP Desktop User terminal
RDU101
Connecting the RDU
2. Connecting the RDU
Cat5
Audio
Figure 1 Connecting the RDU to an RRC101-IP-B/19 AUDIO
1 – Audio-IN (600Ω IN)
2 - Ground (600Ω IN)
3 - Tx/Rx IN (SQUELCH)
4 - Ground
5 - +12V IN
6 - Tx/Rx Control OUT(PTT)
7 – Ground (600Ω OUT)
8 - Audio-OUT (600Ω OUT)
Figure 2 PIN allocation for connecting the RDU directly to a radio
2.1 12V Power Supply
The RDU receives its +12Vpower supply either from the connected RRC or radio transceiver. Multiple
RDU's can receive their power-supply from the MAB 4 interconnect box. If required, a special option
external power-supply connector can be installed as a factory option.
2.2 Combining multiple RDU's
Up to 3 RDU's can be used in parallel with one radio
or RRC by using the Multi-Access Box 4. The MAB 4
provides 4 RJ45 connectors, one for the RRC or
radio interconnect and three for three separate
RDU's. The MAB 4 includes a power-supply to
provide both RDU's and RRC with the 12V required.
The RDU's work in true parallel fashion. To avoid
conflicting communications, each unit signals an
existing AUDIO connection with a steady PTT
indicator (green LED).
Product Manual RDU101 (08.04.2010)
RDU101_MNL_EN100408.odt
MAB4
4
RoIP Desktop User terminal
RDU101
Hardware and accessories
3. Hardware and accessories
3.1 RDU and options
Order Number
Description
RDU101
RoIP Desktop User terminal
Options
Requires RRC101-IP in appropriate HW/FW configuration
BOS (Germany)
RRC101-IP with Call 1+ 2, configured via RRC web browser interface
Channel-select
Allows to select 3 channels in conjunction with the RRC
Squelch On/Off
Allows to turn SQUELCH on and off
Thiesen can provide special options for your specific applications. Inquires are most welcome, please
contact us at [email protected]. Our product development team will gladly assist you.
3.2 RDU Accessories
Order Number
Description
MAB4
Multi-Access Box 4, allows parallel operation of up to three RDU's
SNT18
Switched power supply, 13.2 V/1.5 A (18 W), for RRC101-IP and RDU
FTM 2410
PTT-Foot switch for RDU101, 3.5mm TRS jack, 2.3m cable
4. Specifications
General
Voltage / Current
Status indicators
Dimensions RRC101-IP-B
2W Audio Amplifier
+12Vdc / 430mA via RRC101-IP or Radio interconnect
3 LEDS: Power (yellow), Active Receive (Red), PTT Active (green)
90mm (W) x 60mm (H) x 165mm (D) (w/o microphone)
Audio In
Input impedance / capacitance
Input voltage
Frequency response (flatness)
Signal-to-noise ratio (SNR)
2.5 kΩ / 24pF (Optional 600Ω)
40mV – 1.0V (variable), 400mV factory pre-set
Better than 60dB
Audio Out
Output impedance
Output voltage
100Ω, nominal 35Ω (Optional 600Ω)
80mV – 1V (variable), 400mV factory pre-set
External Audio/PTT
Microphone
Headset/Headphone
External PTT Control
3.5mm
3.5mm
3.5mm (e.g. foot-switch)
Direct Radio interconnect RJ45
Pin
1
2
3
Audio IN (600Ω Opt. IN)
Ground (600Ω Opt. IN)
Squelch IN
Product Manual RDU101 (08.04.2010)
4
5
6
Ground
+12V IN
PTT OUT
RDU101_MNL_EN100408.odt
7
8
Ground (600Ω Opt. OUT)
Audio OUT (600Ω Opt. OUT)
5
RoIP Desktop User terminal
RDU101
Block diagram
5. Block diagram
Product Manual RDU101 (08.04.2010)
RDU101_MNL_EN100408.odt
6
RoIP Desktop User terminal
RDU101
Hardware settings and adjustments
6. Hardware settings and adjustments
6.1 Level control and pre-sets
The RDU has four individual adjustments (trimmers) that control the base-levels for the internal
speaker, audio amplifiers. In most cases, these settings do not need to be altered. When using a direct
connect to a radio transceiver, it is advised to adjust the audio levels on the radio (400mV) rather than
adjusting the internal potentiometers on the RDU board. If required, levels can be adjusted as follows:
P3: Sensitivity of the RDU microphone, adjusts amplification for both internal and external microphone
P4: Sensitivity of the external microphone (headset microphone)
P5: Sets base-volume of the internal speaker
P5: Sets the base-volume of the external speaker
P4: External
Microphone
sensitivity
P3: Internal
Microphone
sensitivity
P5: Base-volume
Headset
P5: Base-volume
Speaker
Safety Note: These settings are only accessible within the device. Ensure all safety measures are
adhered to before opening the unit.
6.2 Jumper settings
Jumper breaks Audio-OUT line,
Test point for AUDIO OUT
PTT switches to GND or +12V
(factory default shown, to GND)
SQUELCH activated by GND
or High (+3V to +30V) (factory
default shown, High activate)
To GROUND
Remove for
600Ω option
Jumper breaks Audio-IN line,
Test point for AUDIO IN
Product Manual RDU101 (08.04.2010)
RDU101_MNL_EN100408.odt
To GROUND
Remove for
600Ω option
7
RoIP Desktop User terminal
RDU101
General safety notices
7. General safety notices
Please read all applicable instructions and user manuals prior to installing and operating the
device.
The installation, connection, maintenance and otherwise handling of mains power supply,
electrical wiring, telecommunications wiring and apparatus and general electronics and
electrics, radio transmitting and receiving devices and installations must be executed in
accordance with national and international rules and regulations and is only to be executed by
qualified personnel.
The following general safety notices must be adhered to:
• Always disconnect mains power supply and any external wiring prior to opening the device
• All installation, maintenance, repair and associated work is to be done by qualified
personnel only
• Ensure appropriate safety measures in regards to RF-radiation when executing maintenance
or repair in the vicinity of radio transmitters
• Ensure all covers and safety features are properly installed before connecting the unit to
power supply and mains and other wiring
• Regularly check leads and external wiring. Replace faulty wiring immediately by appropriately
qualified personnel
• Regulated and required checks and routine maintenance as specified by applicable national and
international regulations must be executed (e.g. VDE 0701, 0702 Germany).
• Specifically ensure that all potentially hazardous voltages are removed and/or discharged before
using tools in the vicinity of electrical or electronic components, wiring and/or circuit boards.
• Important Safety Note: Capacitors can hold a hazardous charge even after all external voltages
have been disconnected. Ensure that capacitors are discharged through safe and appropriate
means. DO NOT discharge the capacitor by short-circuiting!
• All specifications regarding voltages, currents, temperature and environment MUST BE adhered to
as exceeding the limits for even a short period can damage components beyond repair and may
even lead to injury
• The instruments, devices, assemblies, components and otherwise are to be used and operated
solely for the intended use as described in this manual.
• Should you have questions or concerns, please do contact Thiesen Hardware- & Software-Design
GmbH or the dealer you purchased this unit from
Product Manual RDU101 (08.04.2010)
RDU101_MNL_EN100408.odt
8
RoIP Desktop User terminal
RDU101
Support & Sales
8. Support & Sales
Factory & Headquarters Thiesen, Germany
International: +49 66 41 / 9 79-0
Within Germany: 0 66 41 / 9 79-0
[email protected]
9. Return and recycling
Please refer to applicable legislation for your area or contact your authorised dealer and/or distributor.
10. Acronyms and definitions
101
AC
BOS
DC
GPIO
I/O
IN
IP
ISDN
MAB
LF
OUT
PMR
PTT
Radio
RoIP
RRC
RDU
RxD
SCL
SDA
SSH
TETRA
TxD
Tx/Rx
VoIP
101
│ │ └─
Number of channels
│ └─── Software Revision (0 = Standard, X = customised)
└───── Unit/Device Revision (1 = default, first generation)
Alternating Current
Governmental Agencies and Organisations for Security and Safety (Germany)
Direct Current
General Purpose Input Output,
Input/Output
Input
Internet Protocol → Internet/Intranet
Integrated Services Digital Network → Digital Telecommunications standard
Multi-Access Box
Low Frequency (baseband)
Output
Private Mobile Radio also Professional Mobil Radio
Push To Talk (enables RF on transmitter)
Radio Transceiver
Radio over Internet Protocol
Remote Radio Control
Remote Desktop Unit
Receive data RS232
Clock I2C-Bus
Data I2C-Bus
Secure Shell
Terrestrial Trunked Radio
Transmit data RS232
Transmit/Receive
Voice over Internet Protocol
Product Manual RDU101 (08.04.2010)
RDU101_MNL_EN100408.odt
9
RoIP Desktop User terminal
RDU101
Certifications
11. Certifications
11.1 EC Conformity Declaration
The company:
Thiesen Hardware- & Software-Design GmbH
Im Tiegel 9
36367 Wartenberg
declares, that the devices Remote Radio Control over IP (RRC101-IP) and Remote Desktop Unit
(RDU101) comply with the following standards and regulations:
DIN / EN 55022
EN / IEC 61000
Radiated Emissions up to 1 GHz
Conducted Emissions
Conducted Susceptibility
BURST, SURGE, ESD
11.2 RoHS Conformity Declaration, EC
2002/95/EG/RoHS (Restrictions of Hazardous Substances)
The company:
Thiesen Hardware- & Software-Design GmbH
Im Tiegel 9
36367 Wartenberg
declares, that the devices Remote Radio Control over IP (RRC101-IP) and Remote Desktop Unit
(RDU101) is manufactures comply with the Directive 2002/95/EC (RoHS).
Important Note: Adaptation, alteration and improper installation and use of the devices that is
not specifically agreed to in writing by senior management of Thiesen Hardware- & SoftwareDesign GmbH voids the above declarations. Installation, operation and maintenance of products
and devices must be in accordance with applicable safety guidelines and regulations and the
information provided in the user manual and applicable documentation provided.
This declaration is given in responsible representation of the manufacturer Thiesen Hardware- &
Software-Design GmbH by:
Wartenberg, 10.06.2008
Product Manual RDU101 (08.04.2010)
Jürgen Thiesen, Managing Director
RDU101_MNL_EN100408.odt
10
RoIP Desktop User terminal
RDU101
Disclaimer
12. Disclaimer
The information in this document is subject to change without notice and does not represent a
commitment on the part of the vendor. Images and diagrams in the manual may resemble but not
exactly match the actual product and software. No warranty or representation, either expressed or
implied, is made with respect to the quality, accuracy or fitness for any particular purpose of this
document. The manufacturer reserves the right to make changes to the content of this document
and/or the products associated with it at any time without obligation to notify any person or
organisation of such changes. In no event will the manufacturer be liable for direct, indirect, special,
incidental or consequential damages arising out of the use or inability to use this product or
documentation, even if advised of the possibility of such damages.
This document contains materials protected by copyright. All rights are reserved. No part of this
manual may be reproduced or transmitted in any form, by any means or for any purpose without
expressed written consent of its authors. Product names appearing in this document are mentioned for
identification purchases only. All trademarks, product names or brand names appearing in this
document are registered property of their respective owner.
13. Revision Control
Revision
Author
Description
090916
RPB
Created English RDU Manual
Product Manual RDU101 (08.04.2010)
RDU101_MNL_EN100408.odt
11
RoIP Desktop User terminal
RDU101
Revision Control
Configuration Worksheet
The worksheet can be used to submit the details of your device(s) for support or other purposes.
Client
Contact
Telephone
e-mail
Unit
Ser.No.
Type
□
RDU101
Options
□
BOS Option, Call 1 and Call 2
□
600 Ω Audio Symmetric In/Out
HW Configuration
Tx / Rx Control Out
□ Active GND
□ Active +12 V
Tx / Rx Control In
□ Active GND
□ Active +1.5V to +30V
Audio Level IN
mV
Audio Level OUT
mV
Comments
Product Manual RDU101 (08.04.2010)
RDU101_MNL_EN100408.odt
12