1
English
Table of Contents
Section 1: Quick Start Guide .................................. 1
1. Please read these instructions ................................................2
2. Package contents ....................................................................2
3. Select and prepare the installation location .........................3
4. Connect the antenna cable ....................................................4
5. Connect the power cable .......................................................4
6. Adjust viewing angle ..............................................................5
7. Activate the remote control ...................................................5
8. Initialize your TV ...................................................................7
9. View the TV programs ..........................................................8
Care and cleaning information .................................................8
What’s next? ...............................................................................9
Section 2: User Manual ........................................... 11
Introduction ........................................................................... 12
Getting to know your TV ..........................................................12
Input options .............................................................................. 12
Analog TV source inputs ........................................................... 12
Video source inputs ................................................................... 12
Graphic source inputs ................................................................ 13
Front view ..................................................................................13
Control panel .............................................................................14
External AV devices (temporary) terminal panel ....................15
Rear view ....................................................................................16
Getting to know the remote control ..................................... 18
Using the remote control ...................................................... 21
Power on and standby ...............................................................21
Turning the TV on ..................................................................... 21
Putting the TV to standby ......................................................... 21
Switching inputs ........................................................................21
Adjusting sound settings ...........................................................21
Adjusting volume ....................................................................... 21
Mute setting ................................................................................ 21
Selecting a TV sound mode ....................................................... 22
Selecting a preset EQ mode ....................................................... 22
Changing programs ...................................................................22
Selecting a program directly ...................................................... 22
Changing programs sequentially ............................................... 22
Returning to the previous viewed program or input ............... 22
Using the freeze function ..........................................................22
Selecting a picture mode ...........................................................23
Table of Contents
i
English
Using the PIP (Picture-In-Picture) function ........................... 23
Using the sleep timer ................................................................. 24
Adjusting backlight .................................................................... 24
Using the Teletext function ....................................................... 24
Displaying information ............................................................. 25
Adjusting aspect ratio ................................................................ 25
Connecting audio and video inputs ..................................... 26
Connecting the SCART input ................................................... 26
Connecting the SCART output ................................................. 27
Connecting the Composite Video input .................................. 27
Connecting the S-Video input .................................................. 28
Connecting the Component Video input ............................... 28
Connecting the PC input ......................................................... 29
Connecting the HDMI input .................................................... 29
Connecting the DVI input ....................................................... 30
Connecting the stereo audio output ......................................... 30
On-Screen Display (OSD) menu .......................................... 31
OSD structure ............................................................................ 31
Navigating the OSD menu ........................................................ 32
Audio menu ............................................................................... 33
Setting up Personal EQ mode ................................................... 34
Picture menu .............................................................................. 35
Setting up Personal Picture mode ............................................. 36
Feature menu ............................................................................. 37
Window menu ........................................................................... 38
TV menu .................................................................................... 39
Performing manual installation ................................................ 39
Editing programs ........................................................................ 40
Child Lock .................................................................................. 41
Setup menu ................................................................................ 43
Reference ............................................................................... 44
Disclaimer .................................................................................. 44
Copyright ................................................................................... 44
Battery safety notice ................................................................... 44
Important safety instructions ................................................... 44
Dimensional drawings ............................................................... 47
Specifications ............................................................................. 49
Supported PC (D-Sub/DVI) input signal resolution .............. 50
Supported Component Video/HDMI input signal resolution 50
Troubleshooting ........................................................................ 51
ii
Table of Contents
English
VL3733/VL4233
LCD TV
Section 1: Quick Start Guide
Welcome
1. Please read these instructions
English
Congratulations. You have a state-of-the-art flat widescreen digital LCD TV
which should provide you with years of viewing pleasure. Please take a few
minutes to read these quick start instructions through before installing and
using the TV.
What’s in the Quick Start Guide?
Section 1 contains the Quick Start Guide which provides you with enough
information to setup the TV and start viewing TV station broadcasts as
quickly as possible. This is section 1.
What’s in the User Manual?
Section 2 contains the User Manual which details the features and functions
of the TV and the remote control, describes how to connect to other devices,
and provides product specifications and troubleshooting information for
your further assistance. The User Manual also describes how to customise the
TV settings so that you can gain the best viewing experience possible to suit
your preferences and viewing environment.
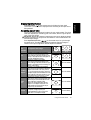
2. Package contents
Unpack the TV and check that all the following items are included:
TV (x1)
Power cable (x3)
Quick Start Guide and Service Information
User Manual (x1)
(x1)
Composite Video Remote control (x1)
cable (x1)
AAA battery
(x2)
If any item is missing or damaged, contact your place of purchase immediately
and notify them of the discrepancy. Please keep the product documentation in a
safe place for later reference.
Dispose of packaging wisely:
• The cardboard carton can be recycled.
• Do not leave plastic bags within reach of young children or babies.
• Consider storing the packaging (if possible) for future transport of the TV.
• Check that you haven’t left an accessory inside the packaging, before
discarding.
For the primary safety of yourself and others, this TV should be handled with care
to avoid damage to it or to persons which come into contact with it.
All LCD screens have a very thin protective layer of glass which is liable to
marking or scratching, and cracking if struck or pressured. The liquid crystal
substrate is also liable to damage under excessive force or extreme
temperatures. Please handle with care.
2
Section 1: Quick Start Guide
3. Select and prepare the installation location
Do NOT place the TV on an
uneven, sloping or unstable surface
where it may fall and cause damage
to itself or others.
If recessed into a wall opening, you
must leave appropriate free space
both top and bottom for
ventilation.
Do NOT place the TV near water,
like a spa or pool, or in a position
which will allow the splashing or
spraying of water onto the TV, like
in front of an open window where
rain water may enter.
If wall mounting, allow appropriate
space on top for attaching the TV
to the wall bracket.
Do NOT place the TV near or
above sources of heat, such as
radiators, heaters, fuel stoves and
other heat-generating items
(including audio amplifiers).
Do NOT cover or block the vents
and openings whilst the TV is
switched on.
Do NOT place the TV in direct sun
or where direct sun or spot lighting
will shine onto the TV, as the heat
may damage the TV and the bright
light will make viewing the TV
more difficult than necessary.
Do NOT place the TV in an
enclosed place without allowing for
ventilation.
If wall mounting, have a suitable
qualified and experienced
tradesperson mount it safely.
Ensure that the mounting bracket
(optional accessory) is securely
screw fixed to the wall structure,
and not just the wall render, lining
or cladding. Do not glue the
bracket to the wall. Use only a
recommended TV wall bracket for
this model TV. Ensure the bracket
is level horizontally. TV dimensions
are detailed in "Dimensional
drawings" on page 34
Observe all warnings and cautions
as labelled on the TV.
Once all considerations and precautions have been made, position the TV
where most suitable.
Section 1: Quick Start Guide
3
English
In order to prevent potential dangers and prolong the service life of the TV,
please observe the following points when installing, operating and cleaning
the TV.
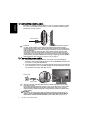
4. Connect the antenna cable
English
Connect a TV antenna cable fly-lead from your TV antenna system or Cable
TV (CATV) to the ATV input on the TV. Check to make sure that the cable
connection is firmly in place.
Antenna cable
• A poor quality TV signal will produce a poor picture and/or sound on your TV.
For high quality picture and sound, you will need a high quality TV signal.
Depending upon your location, for best TV signal reception, you should have a
properly aligned outdoor TV antenna system. If need be, consult a professional
antenna specialist.
• This TV has a built-in analog TV tuner, which requires the TV antenna cable
connection to an external TV antenna system. If you wish to make use of the
digital LCD screen to view digital TV, you should connect an external digital TV
tuner (decoder) set top box (STB) to the TV using a digital signal cable (HDMI or
DVI) connection. See "Getting to know your TV" on page 12.
5. Connect the power cable
1. Locate the power cable suitable for your region from the packaging,
unwrap it, and plug the appropriate end into the AC INLET socket on the
rear of the TV (as illustrated below).
2. Connect the other end into an appropriate wall power outlet, and switch it
on (if switched). The TV will enter standby mode and the power indicator
(on the front lower right) will light up red.
Power outlet
Power cable
• The type of power cable plug and socket illustrated may differ from the type
used in your region.
• Only use an appropriate power cable for your region. Never use a power cable
which appears damaged or frayed. Never change the plug type on a power
cable. Be aware of total loading when using extension cords or multiple outlet
power boards.
WARNING:
• This TV has been engineered and manufactured with the highest priority on
safety, however, IMPROPER HANDLING OR USE CAN RESULT IN POTENTIAL
ELECTRICAL SHOCK OR FIRE HAZARD. Please handle this TV with care. If
4
Section 1: Quick Start Guide
English
damaged, turn off the power and unplug the power cable from the TV. Transport
the TV to your nearest BenQ authorised service centre for repair.
• There are no user serviceable parts in this TV. Never unscrew or remove any
covers. There are dangerous voltages inside. Turn off the power and unplug the
power cable before moving the TV.
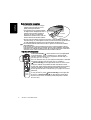
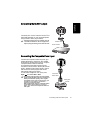
6. Adjust viewing angle
This TV is equipped with a swivable stand.
If necessary, turn the TV screen to an
appropriate angle for more comfortable
viewing.
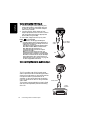
7. Activate the remote control
1. Locate the remote control and batteries from the packaging, and unwrap
them.
Be cautious when handling batteries. See "Battery safety notice" on page 44.
2. Turn the remote control end up to reveal its base,
and open the lid of the battery compartment by
using a small coin or similarly curved object to
rotate the slot 90° anticlockwise. The lid is spring
loaded and will popup and come loose from the
remote control body.
3. Insert the batteries (supplied) ensuring that the
positive and negative marked battery terminals
match the (+) and (-) marks in the battery
compartment.
Note that these batteries are provided for your
convenience so that you can operate the TV
straight away. You should replace them as soon as
possible.
4. Refit the lid of the battery compartment by
inserting the hinge into the recess at one edge and
levering the lid down into position with the
thumb of the hand holding the remote control
body.
5. Whilst holding the lid in place in this manner, use
your other hand and a small coin or similarly
shaped object to rotate the locking slot 90°
clockwise locking the lid in place.
Section 1: Quick Start Guide
5
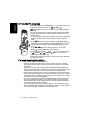
Remote control usage tips
English
• Point and aim the top front of the
remote control directly at the TV
when pressing the buttons.
• The remote control must be held at
an angle within 30 degrees of the TV's
remote control sensor window to
5 meters
function correctly. The distance
between the remote control and the
30 degrees
sensors should not exceed 5 meters.
• Do not cover the sensor window on the front of the TV (below the power
indicator lamp), or place objects in front of it which will block the direct lineof-sight between the remote control and the sensor window on TV.
• Do not let the remote control become wet, or place it in humid environments
(like bathrooms.)
• If the remote control sensor window on the TV is in direct sunlight or strong
light, the remote control may not operate properly. In this situation, change the
light source or readjust the angle of your TV, or operate the remote control from
a location closer to the remote control sensor window on the TV.
Test the remote control
Press Power/standby
on the remote control (as highlighted
in the illustration). The TV should turn on, and the power
indicator change to green. If so, progress to the next step ("8.
Initialize your TV" on page 7.
If the TV does not turn on, first check that the power is available
(the power indicator will be lit red). If so, try pressing
(Power/standby) on the right side of the TV. If the TV turns
on by this method, the problem lies with the remote control.
In that case, check that the remote control batteries are properly
installed. If need be, replace the batteries with new ones or
known good ones. See "Troubleshooting" on page 51 for further
assistance.
To turn off the TV, press
(Power/standby) on the right side
of the TV, or Power/standby on the remote control again,
and the TV will return to standby mode (the power indicator
will turn red.)
6
Section 1: Quick Start Guide
8. Initialize your TV
English
When first turned on (and until tuned), the First Turn On menu will display:
First Turn On
Language
Country
Standard
Auto Installation>
English
UK
I
Before you can use your TV to view TV programs, you need to let it search for
and tune TV station programs appropriate to your region. This process only
needs to be done when the TV is newly installed, or whenever you install it in
a new location. You also need to select your language for the on-screen display
(OSD) menu for convenience of operation.
1. Press or on the remote control to select Language, and then press
or to select your language.
2. When you select a Language, the Country and TV Standard items will
change automatically to suit. If your country is not displayed in the
Country item, you can press or
to select it and then press or to
select your country. If Others is selected as the Country, you will also need
to select the TV broadcast standard suitable for your region.
3. Press or to select Auto Installation and then press OK. The following
menu will display:
Auto Installation
Country
UK
Standard
I
Start
to select Start and then press OK. The TV will start searching
4. Press or
for available programs and tune and store them for you. This may take
several minutes, depending on the available TV programs in your local
reception area. Please allow the display to complete this tuning process.
5. When the tuning process is complete, the TV menu will display. Press
MENU on the remote control to close it.
You can alter the settings in the future using the OSD menu. See "On-Screen
Display (OSD) menu" on page 31 for more information.
Section 1: Quick Start Guide
7
9. View the TV programs
English
Press P (Program) or P (Program) on the remote control (as
highlighted in the illustration) or
(Program) or
(Program) on the TV to view the TV programs available in
your area.
You can also change to a program directly by selecting the station
number using the numeric program selection button(s) on the
remote control:
• To select a single-digit program number, press the corresponding
program selection button. For example, to select program 8,
press
.
,
• To select a two-digit program number, press Program entry
followed by the corresponding program selection buttons. For
and
example, to select program 28, press Program entry
then
,
.
• To return to the previous viewed program or input, press
Recall
(also highlighted in the illustration).
To alter the volume, press
+ or
- on the remote control,
(Volume) or
(Volume) on the TV. The volume
or
indicator will display on-screen.
Please refer to the User Manual for further information about the
TV and its operation.
Care and cleaning information
• Always turn off the TV before cleaning.
• Do NOT use cream, liquid, aerosol or spray cleaners. Use only a slightly
damp well wrung-out (drip-free) and lint-free, clean soft cloth and lightly
wipe the TV.
• If necessary, use a pH-neutral liquid dish-washing detergent diluted with
water on a separate clean lint-free cloth to remove oil or grease marks. Wipe
over again with a clean dry lint-free cloth to remove any smear marks.
• Under close examination and in certain circumstances, you may notice that a
few non-active pixels appear on the screen as a fixed point of colour. Please
note that this does not affect the performance of your product as it is usually
not visible at normal viewing distances.
• If the TV is not going to be used for an extended period of time (like when
you’re going away for holidays), it should be switched off and unplugged
from the wall outlet. You should also consider removing the batteries from
the remote control (as they may leak).
• To help prevent possible 'LCD Image Persistence', you should ensure that
static images are never displayed for extended periods of time (days) and that
you turn off the screen for several hours every day or so.
8
Section 1: Quick Start Guide
What’s next?
This LCD TV is a high resolution display device. To achieve the best possible
display results, it is recommended that you:
• connect it to a digital video source
• select an appropriate aspect ratio
When viewing traditional (analog) TV, it is recommended that you set the aspect
ratio to 4:3, Letter Box, or Cinema. See "Adjusting aspect ratio" on page 25.
Section 1: Quick Start Guide
9
English
You have reached the end of Section 1: Quick Start Guide. By now, you should
have a reasonable understanding of your new LCD TV and its controls, know
how to install, connect, turn on, tune, change the programs, and how to care
for and maintain it.
Should you wish to maximise your viewing experience pleasure, Section 2 of
this booklet contains the User Manual which describes how to customise the
TV settings to suit your preferences and viewing environment. It details the
features and functions of the TV and the remote control, describes how to
connect other devices, and provides product specifications and
troubleshooting information for your further assistance.
<Memo>
English
10
Section 1: Quick Start Guide
English
VL3733/VL4233
LCD TV
Section 2: User Manual
Welcome
English
Introduction
This booklet is divided into two sections: the Quick Start Guide; and the User
Manual. For details of the Quick Start Guide, see "1. Please read these
instructions" on page 2.
This is section 2, the User Manual which describes how to customise the
display settings so that you can gain the best viewing experience possible to
suit your preferences and viewing environment. This section details the
features and functions of the TV and the remote control, describes how to
connect to other devices, and provides product specifications and
troubleshooting information for your further assistance.
Getting to know your TV
This LCD TV is a state-of-the-art flat widescreen digital display device. It has a
built-in analog TV tuner which can be used to view standard definition analog
television (TV or ATV), cable television (CATV), or radio frequency (RF)
modulated video through its coaxial TV tuner input socket.
However, the high quality of a widescreen LCD TV isn’t realized through
analog TV. The highest possible quality display is only possible from high
definition digital video sources like High Definition TV (HDTV) and High
Definition DVD (HDVD).
Input options
This TV supports the simultaneous connection of several different types of
TV, Video and Graphic sources, and permits you to select whichever one of the
on the
available sources you wish to view at any time. You can press Input
remote control or INPUT on the TV to select an input source.
There are multiple sockets on the TV for analog TV, Video, and Graphic
inputs.
• Analog TV source input includes: 1 x Coaxial analog TV antenna.
• Video source inputs include: 2 x Composite Video, 2 x S-Video, 2 x SCART
and 1 x Component Video (Y CB/PB CR/PR).
• Graphic source inputs include: 1 x HDMI/DVI and 1 x PC VGA (D-Sub).
You should connect whichever TV, Video or Graphic sources you wish to view
on the TV. You need not connect more than one if that one is all you wish to
view.
Analog TV source inputs
You can connect an external VHF or UHF TV antenna (if available) to the TV
tuner input using an appropriate TV coaxial cable, and select the ATV input to
view analog TV broadcasts. If you have cable TV, you can connect your cable
TV decoder box to the TV tuner input using an appropriate TV coaxial cable,
and select the ATV input to view cable TV. See "4. Connect the antenna cable"
on page 4.
Video source inputs
You can connect an external analog video device (if available—VCR, VCD or
DVD) to either of the Composite Video (AV), S-Video or SCART inputs, and
select AV4 or AV5 (for Composite Video inputs), AV4-S or AV5-S (for S-Video
inputs) or AV1 or AV2 (for SCART inputs) as the input source respectively to
view analog video. See "Connecting the SCART input" on page 26,
12
Introduction
Graphic source inputs
You can connect a PC video card graphic source (if available) like a VGA
output or a digital DVI output. If your device supports HDMI output, you can
also use the HDMI input on the TV for connection. Select the PC, DVI or
HDMI input respectively to view the display. See "Connecting the PC input" on
page 29, "Connecting the DVI input" on page 30 and "Connecting the HDMI
input" on page 29.
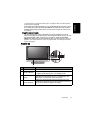
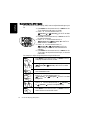
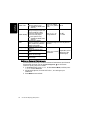
Front view
No. Name
1
Speakers
2
Power indicator
3
Ambient light
sensor
4
Remote control
sensor window
Description
Left and right speakers for reproducing stereo audio.
• Lights up green when the TV is powered on.
• Lights up red when the TV is in standby mode.
If activated, this sensor detects ambient lighting condition
and adjusts the brightness of the TV automatically. See
"Backlight" on page 43 for more information.
Receives command signals from the remote control. Do
not obstruct the sensor by placing any objects in front of it,
which will hinder the reception of signals.
Introduction
13
English
"Connecting the Composite Video input" on page 27 and "Connecting the SVideo input" on page 28.
If the video source device supports it, you could alternatively connect it using
the Component Video input and select AV3 as the input source for the best
possible analog Video picture. See "Connecting the Component Video input"
on page 28.
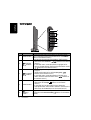
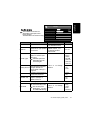
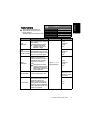
Control panel
English
No. Name
1
2
3
4
5
14
Description
Displays the OSD menu if not visible, or exits the current
MENU button menu if displayed. (Performs the same action as the MENU
button on the remote control.)
• Adjusts the volume level of the speakers. (Performs the
same action as the Volume
+/- buttons on the remote
(Volume)
control.)
/ buttons • In the OSD menu, moves the selection highlight left or
right or changes settings. (Performs the same action as the
/ buttons on the remote control.)
• Sequentially selects the previous or next tuned TV
program.
(Performs the same action as the P (Program) /
(Program)
buttons on the remote control.)
/ buttons • In the OSD menu, moves the selection highlight up or
down. (Performs the same action as the / buttons on
the remote control.)
• Cycles through possible input signal sources. (Performs the
button on the remote
same action as the Input
control.)
INPUT button
• In the OSD (On-Screen Display) menu, selects the
highlighted menu item to enter a submenu. (Performs the
same action as the OK button on the remote control.)
(Power/
standby)
button
Introduction
Toggles the TV between standby mode and on. (Performs the
same action as the Power/standby
button on the remote
control.)
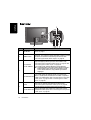
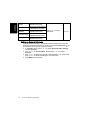
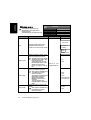
External AV devices (temporary) terminal panel
English
No. Name
AV5 VIDEO
AV5 S-VIDEO
1
2
3
4
Description
Connect to either the Composite Video (AV) or S-Video
output as appropriate for your AV source device. See
"Connecting the Composite Video input" on page 27 and
"Connecting the S-Video input" on page 28.
Connect your external AV device using either the
Composite Video or S-Video inputs. If both are
connected to an AV source at the same time, S-Video
input takes preference over Composite Video input. SVideo will provide a better quality image.
Connect to the audio output of either the Composite
Video or S-Video output as appropriate for your AV source
device. (These inputs are common for either Composite
AV5 AUDIO L/R
Video or S-Video audio.) See "Connecting the Composite
Video input" on page 27 and "Connecting the S-Video
input" on page 28.
This socket is an audio output for connecting an external
Headset socket headset. The TV speakers will be muted whenever the
headset socket is being used.
Connect to the VGA video (D-Sub) output of a PC. See
PC D-SUB
"Connecting the PC input" on page 29.
Connect to the audio output to match that of the VGA
PC AUDIO
video output on a PC. See "Connecting the PC input" on
page 29.
Connect to your antenna TV/CATV cable system. See "4.
ATV
Connect the antenna cable" on page 4.
Introduction
15
English
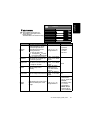
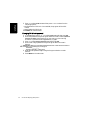
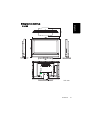
Rear view
No.
Name
1
AC-INLET
2
AUDIO OUT
AV4 VIDEO
AV4 S-VIDEO
3
4
16
Description
Connect to the AC power cable. See "5. Connect the power
cable" on page 4.
Connect to the audio input of an audio or sub-woofer
amplifier. This output is always available, however, its level
is fixed and cannot be controlled by the Volume. See
"Connecting the stereo audio output" on page 30.
Connect to either the Composite Video (AV) or S-Video
output as appropriate for your AV source device. See
"Connecting the Composite Video input" on page 27 and
"Connecting the S-Video input" on page 28.
Connect your external AV device using either the
Composite Video or S-Video inputs. S-Video provides a
better quality image. If both are connected to an AV
source at the same time, only S-Video input will be
displayed.
Connect to the audio output of either the Composite Video
or S-Video output as appropriate for your AV source
device. (These inputs are common for either Composite
AV4 AUDIO L/R
Video or S-Video audio.) See "Connecting the Composite
Video input" on page 27 and "Connecting the S-Video
input" on page 28.
Connect each to the component video (Y CB/PB CR/PR)
AV3 Y CB/PB
output of an appropriate video source device. See
CR/PR
"Connecting the Component Video input" on page 28.
Connect each to the component audio output of an
AV3 AUDIO L/R appropriate video source device to match that of each
component video input. See "Connecting the Component
Video input" on page 28.
Introduction
5
7
Introduction
17
English
6
Connect each to the SCART input/output of an
appropriate device. See "Connecting the SCART input" on
AV1
page 26 and "Connecting the SCART output" on page 27.
Connect to the DVI digital video or HDMI digital audio/
video output of your digital source device. See "Connecting
HDMI/DVI
the DVI input" on page 30 and "Connecting the HDMI
input" on page 29.
DVI-AUDIO L/R Connect to the DVI digital audio output of your digital
source device. See "Connecting the DVI input" on page 30.
AV2
English
Getting to know the remote control
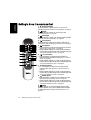
1.
Power/standby
Press this button to power the TV on or put it to
standby mode. See "Power on and standby" on page 21.
2.
Input
Press this button to select an input source. See
"Switching inputs" on page 21.
3.
Backlight
Press this button to select your desired screen backlight
level. See "Adjusting backlight" on page 24.
4.
Information
Press this button to display the screen image source
information. See "Displaying information" on page 25.
5.
Sleep/blue
• Press this button to set the automatic shut-off timer.
See "Using the sleep timer" on page 24.
• When Teletext displays on-screen, press this button
to select the corresponding colour Teletext page. See
"Using the Teletext function" on page 24.
6.
TV sound/red
• Press this button to toggle among available TV
sound reception modes. See "Selecting a TV sound
mode" on page 22.
• When Teletext displays on-screen, press this button
to select the corresponding colour Teletext page. See
"Using the Teletext function" on page 24.
7.
Preset/yellow
• Press this button to select from among 4 preset
picture modes. See "Selecting a picture mode" on
page 23.
• When Teletext displays on-screen, press this button
to select the corresponding colour Teletext page. See
"Using the Teletext function" on page 24.
8.
Audio/green
• Press this button to select from 5 preset EQ modes.
See "Selecting a preset EQ mode" on page 22
• When Teletext displays on-screen, press this button
to select the corresponding colour Teletext page. See
"Using the Teletext function" on page 24.
9.
Mode
Press this button to cycle the Teletext display mode
between Teletext only or with Teletext superimposed
on the display. See "Using the Teletext function" on
page 24.
18
Getting to know the remote control
Getting to know the remote control
19
English
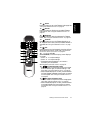
10.
Index
Press this button to go to the Teletext index page. See
"Using the Teletext function" on page 24.
11.
Reveal
Press this button to display any concealed Teletext
information. See "Using the Teletext function" on
page 24.
12.
Subpage
Press this button to enter the subpage of a Teletext
menu. See "Using the Teletext function" on page 24.
13.
Teletext
Press this button to turn the Teletext decoder on or
off. Page store won’t start until the Teletext decoder is
activated.See "Using the Teletext function" on page
24.
14.
PIP
Press this button to simultaneously view signals from
two different sources on-screen. See "Using the PIP
(Picture-In-Picture) function" on page 23.
15. / / / and OK
When the OSD (On-Screen Display) menu displays
on-screen:
• Press or to select settings.
• Press or to adjust settings.
• Press OK to execute selections, or to enter a
submenu you have selected.
See "Navigating the OSD menu" on page 32.
16.
/
Freeze/Teletext freeze
• Press this button to freeze the image on the screen.
Press the button again to resume viewing in real
time. See "Using the freeze function" on page 22.
• When Teletext displays on-screen, press this button
to freeze Teletext messages. Press it again to restore
normal update. See "Using the Teletext function"
on page 24.
17.
/
Aspect/Teletext size
• Press this button to adjust the screen image aspect
ratio. See "Adjusting aspect ratio" on page 25.
• When Teletext displays on-screen, press this button
to enlarge Teletext size. Press it again to resume
normal size. See "Using the Teletext function" on
page 24.
English
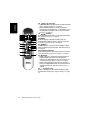
18.
/
Program
• Press these buttons to sequentially change programs.
See "Changing programs" on page 22.
• When Teletext displays on-screen, press these
buttons to go to the previous or next page, or go to
the subpage (if available). See "Using the Teletext
function" on page 24.
19.
+/- Volume
Press these buttons to raise or lower the volume level.
See "Adjusting volume" on page 21.
20. MENU
Press this button to display the OSD menu for
commands and settings. Press it again to close. See
"Navigating the OSD menu" on page 32.
21.
Mute
Press this button to mute the sound output. Press it
again to restore the sound output. See "Mute setting"
on page 21.
22. Program selection
Press these buttons to select the program you wish to
view. See "Selecting a program directly" on page 22
23.
Recall
• When viewing TV programs, press this button to
toggle between the current and the previous
program you were viewing. See "Returning to the
previous viewed program or input" on page 22.
• When viewing different input sources, press this
button to toggle between the current and previous
viewed input sources. See "Switching inputs" on
page 21.
24.
Program entry
Press this button prior to entering 2-digit program
numbers. See "Selecting a program directly" on page
22.
20
Getting to know the remote control
Power on and standby
Turning the TV on
After plugging the TV's power cable into a wall outlet and turning on the main
power switch, the TV will enter standby mode automatically. The power
indicator will light up red.
(Power/standby) on the TV, or Power/standby
on the remote
Press
control. The TV will turn on and the power indicator will change to green.
You can also turn the TV on and view ATV input by pressing P (Program)
,P
or any Program selection numeric button on the remote control.
(Program)
Putting the TV to standby
Press
(Power/standby) on the TV, or Power/standby
on the remote
control again, and the TV will return to standby mode. The power indicator
will turn red.
Switching inputs
1. Turn on all connected equipment or devices before selecting an input.
on the remote control to display the
2. Press INPUT on the TV, or Input
current selected input. Press the button repeatedly until your desired input
is displayed. The sequence is as follows:
ATV
AV 1
AV 2
AV 3
PC
HDMI (or DVI)
AV 5 (or AV5-S)
AV 4 (or AV4-S)
• DVI will appear only when DVI signal is connected to the HDMI input.
• AV4-S and AV5-S will appear only when S-Video signals are connected to the
AV4 and AV5 S-Video inputs.
• If both Composite Video (AV) and S-Video signals are connected to the AV4 or
AV5 inputs at the same time, only S-Video input will be displayed. If you wish to
view the Composite Video (AV) input in such case, remove the S-Video
connection temporarily.
• Be aware that HDMI input must be HDCP-compliant to be displayed.
Adjusting sound settings
Adjusting volume
• Press
(Volume) on the TV, or Volume
+ on the remote control to
increase volume. The volume indicator increases in length as volume rises.
(Volume) on the TV, or Volume
- on the remote control to
• Press
decrease volume. The volume indicator decreases in length as volume falls.
Mute setting
• Press Mute on the remote control to turn off the audio temporarily.
• Press Mute again, or press Volume
+ or Volume
- to restore the
sound level.
The sound level will also be restored if the TV is put to standby mode and
subsequently turned on.
Using the remote control
21
English
Using the remote control
Selecting a TV sound mode
English
Press TV sound/red
on the remote control to select Sound 1, Sound 2,
Sound 3, NICAM, Automatic, Stereo, or Mono systems (the items available
will depend on the TV and video sound system being received).
Selecting a preset EQ mode
Press Audio/green on the remote control to select a suitable EQ (Equalizer)
mode from Classic, POP, JAZZ, Rock and Personal. You can also customise
the Personal sound mode according to your preference. See "Setting up
Personal EQ mode" on page 34.
Changing programs
Selecting a program directly
• To select a single-digit program number, press the corresponding program
selection button. For example, to select program 8, press
.
• To select a double-digit program number, press Program entry
,
followed by the corresponding program selection buttons. For example, to
and then
,
.
select program 28, press Program entry
Changing programs sequentially
Press P (Program) or P (Program) on the remote control, or
(Program) or
(Program) on the TV to sequentially cycle through
your TV programs.
Returning to the previous viewed program or input
• When viewing ATV input, you can press Recall on the remote control to
quickly return to the previous viewed program. This button can be used to
toggle between the two most recently viewed programs without having to
entering the precise program number.
• If you have just switched from a different input source to the current one,
you can also press Recall on the remote control to toggle between the
current and previous viewed input sources.
Using the freeze function
Press Freeze /Teletext freeze / on the remote control to freeze the
image on the screen. Press it again to restore normal viewing.
This freeze function does not control the input source which will continue
normally, but not be displayed whilst the image remains frozen. When the image
freeze is stopped, normal play will resume in real time. That is, the displayed
image will jump to the current time and any interim video is not displayed.
Do not leave the screen displaying a static image for an extended period of time
(days) because you may temporarily or permanently damage the screen resulting
in image traces which could remain visible long after the original image has been
removed.
22
Using the remote control
Selecting a picture mode
Using the PIP (Picture-In-Picture) function
If the TV is connected to either a TV antenna or Video image source, and also
to an active Graphic image source at the same time, you can display both
images on the screen simultaneously by using PIP (Picture-In-Picture) mode.
• PC or DVI must be selected as one of the input sources in PIP mode.
• In PIP mode, Teletext will not display. Some of the remote control functions will
also be unavailable.
• See "Input options" on page 12 for definitions of Video and Graphic input
sources.
To display images in PIP mode:
1. Make sure that both Video and Graphic image sources are connected to the
TV.
on the remote control to select a Graphic image source (
2. Press Input
PC or DVI) as the input source.
on the remote control to switch display to PIP mode. Each
3. Press PIP
press cycles the display through the following display sequence:
Full screen
PIP mode
Full screen
on the
• To change the input source for the sub picture, press Input
remote control.
Component Video (AV3) input image cannot be displayed in PIP mode and cannot
be selected.
• To change the position of the sub picture on the screen, press , ,
or on the remote control.
• To select audio from the main or sub picture, see "PIP Audio" on page 38.
Using the remote control
23
English
To select a picture mode, press Preset/yellow
on the remote control. This
enables you to select from the following settings:
Picture mode Description
Suitable for viewing in brighter environments. The colour,
Dynamic
contrast, and brightness of the image is increased to suit the
brighter lighting condition.
Suitable for viewing in environments with normal lighting
condition. This most closely represents the broadcast
Standard
standard quality. No alteration to colour, contract or
brightness has been made.
Suitable for viewing movies in darker environments. The
Cinema
colour has been adjusted to more accurately represent
natural skin tones.
Your own customised picture mode. See "Setting up
Personal
Personal Picture mode" on page 36.
Using the sleep timer
English
The sleep timer is useful if you want the TV to automatically to go into
standby mode after a set period of time.
on the remote control to activate the sleep timer
1. Press Sleep/blue
function.
2. Press the button again to set the time interval. Time is set in increments of
30 minutes, from 0 to 180 minutes.
1 minute before the expiration of the set time, a message will display on-screen
as a reminder. You can press OK to reset the sleep timer and the TV will
remain on. At the expiration of this time, the TV will be turned off
automatically.
Adjusting backlight
To adjust the intensity of your TV's backlight system, press Backlight
on
the remote control to select between Bright, Normal, Dark or Auto.
When viewing the TV in dimly lit rooms it is recommended to set the
backlight to Dark which will reduce the image brightness and make the dark
areas of the image darker thus maintaining a high contrast image in a dark
environment. If Auto is selected, the ambient light sensor on the TV will be
activated and the TV’s backlight will be changed automatically according to
the ambient lighting condition.
Using the Teletext function
Press Teletext
it off.
on the remote control to display Teletext, and again to turn
Teletext is only available when ATV, Composite Video (via the AV1, AV2, AV4 and
AV5 inputs) or S-Video (via the AV4-S and AV5-S inputs) is selected as the input
source, and a signal which transmits Teletext is currently displayed. Not all TV
stations and video signals broadcast Teletext. If in doubt, please contact the TV
station or the video source provider.
When Teletext displays on-screen, you can:
to cycle between Teletext only and superimposed on the
• Press Mode
video image.
• Press Index
to go to the Teletext index page.
• Press Reveal
to display any concealed Teletext information if available.
• Press Subpage
to view the subpages when provided.
If subpages are available, the page number (at top left) will display a small red
"s": e.g. "100s".
• Press Aspect/Teletext size
/
to enlarge Teletext size. Press it again to
resume normal size.
to freeze Teletext messages. Press it
• Press Freeze /Teletext freeze /
again to restore normal update.
, Audio/green , Preset/yellow
or Sleep /
• Press TV sound/red
blue
to jump to the corresponding coloured pages as displayed across
the bottom of the Teletext screen.
• Press
or
to go to the previous or next Teletext page, or to move
between subpages when selected.
24
Using the remote control
Displaying information
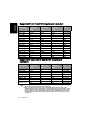
Adjusting aspect ratio
The TV can resize and reshape an image to suit your requirements. The visual
result will depend upon the setting your have chosen, and the original aspect
ratio of the input image.
IMPORTANT: Aspect ratio selection is designed to allow you to adjust the display
of images which are in 4:3 aspect ratio. This feature is not recommended for use
with 16:9 aspect images.
Press Aspect/Teletext size
/
on the remote control to cycle through
the aspect ratios. The table below shows the resultant displayed images in
relation to the input image when different aspects are selected:
Aspect
ratio
Description and usage
selection
Stretches a 4:3 image to 16:9 aspect
proportions. Recommended for use
16:9
when viewing video sources which are
already in 16:9 aspect such as digital TV
and most widescreen DVDs.
Resizes the image to 4:3 aspect
proportions. Recommended for use
4:3
when viewing video sources which are
already in 4:3 aspect such as analog TV
and PC video input.
Stretches a 4:3 image to 16:9 aspect
proportions and enlarges the resultant
16:9 Adj. image on the screen. You can press
or on the remote control to pan the
(Adjust) enlarged image. Recommended for use
when viewing video sources which are
in 4:3 aspect such as analog TV input.
Resizes a 4:3 image to 16:9 aspect
proportions, and trims off the top and
bottom strips. Recommended for use
Letter
when viewing 4:3 aspect video
presenting compressed 16:9 aspect
Box
images in a 4:3 aspect frame in a socalled letterbox format (black strips
along the top and bottom).
Stretches a 4:3 image to the width of a
16:9 aspect image proportions.
Cinema recommended for use in filling the
screen with a 4:3 aspect image.
4:3
16:9
(Do not select)
(Do not select)
(Do not select)
(Do not select)
Using the remote control
25
English
Press Information
on the remote control to display the input signal
information. The information displayed varies according to the input source
being selected.
English
Connecting audio and video inputs
• Before connecting any devices, please turn all equipment off.
• To obtain the most benefit from the digital LCD screen, you should select
the connection method which will provide you with the best possible signal.
See "Input options" on page 12.
• Do not pull cables out of sockets by grasping the cable itself, as you may
damage the cable. Only ever remove cables from sockets by grasping the
plug on the end of the cable.
• Once connected, please ensure that all plugs are fully inserted and firmly
seated. Be aware that if incorrect connections are made, picture quality may
be adversely affected.
Connecting the SCART input
Connect the AV 1 or AV 2 terminal on the TV to
the SCART terminal on your output equipment
using a SCART cable (not provided).
To view video image from these inputs, press
Input
and select AV 1 or AV 2.
The SCART 1 and SCART 2 terminals
support the input of the following types of
signals:
• Composite Video
• RGB
• S-Video
26
Connecting audio and video inputs
SCART cable
DVD player
Connecting the SCART output
English
Connect the AV 1 or AV 2 terminal on the TV to
the SCART terminal on your input equipment
using a SCART cable (not provided).
If the ATV antenna input is available, the AV
1 and AV 2 terminals on the TV support the
output (relay) of ATV signal to other devices.
SCART cable
DVD recorder
Connecting the Composite Video input
Connect the Composite Video output of your
output equipment to the AV4 or AV5 VIDEO
and AUDIO L/R terminals on the TV using the
Composite Video cable as illustrated.
A Composite Video cable consists of three
connectors: Yellow (video), White (left channel
audio), and Red (right channel audio). Ensure
that the colours of the plugs and terminals
match when making connection.
To view video image from this input, press
Input
and select AV4 or AV5.
Composite
Video cable
Composite Video provides the least optimal
image quality. Both S-Video and Component
Video provide better quality video signals.
If available on the video source device, you
should use one of those connections
instead of composite Video.
AV4 and AV5 both support composite Video
and S-Video signal inputs. If you use SVideo, you cannot use Composite Video for
that input.
Video game
console
Connecting audio and video inputs
27
Connecting the S-Video input
English
1. Connect the S-Video output of your output
equipment to the TV's AV4 or AV5 SVIDEO terminal using an S-Video cable
(not provided). Pay attention to the
alignment of the plugs on the S-Video cable
when inserting so as not to damage any
pins.
2. Connect the corresponding audio output of
the output equipment to the S-Video
AUDIO L/R input terminals using a suitable
audio cable (or use the Composite Video
cable. The yellow plug is not used).
To view video image from these inputs, press
Input
and select AV4-S or AV5-S.
You should not connect both a composite
Video and an S-Video from the same device;
just one or the other. If you have the choice,
use the S-Video instead of composite Video
as an S-video signal provides a higher
quality signal to that of composite Video.
AV4 and AV5 both support composite Video
and S-Video signal inputs. If you use SVideo, you cannot use Composite Video for
that input.
Audio cable
S-Video
cable
DVD
player
Connecting the Component Video input
1. Connect the Component Video output of
your output equipment to the TV's AV3 Y,
CB/PB and CR/PR terminals using a
Component Video cable (not provided). A
Component Video cable consists of three
plugs: Green (Y), Blue (CB/PB), and Red
(CR/PR). Ensure that the colours of the plugs
and terminals match when making
connection.
2. Connect the corresponding audio output of
your output equipment to the Component
Video AUDIO L/R input terminals on the
TV using an audio cable (not provided).
To view video image from these inputs, press
Input
and select AV3.
Of the analog video signal types,
Component Video offers the best quality.
See "Supported Component Video/HDMI
input signal resolution" on page 50 for
supported resolutions.
28
Connecting audio and video inputs
Audio cable
DVD
player
Component
Video cable
Connecting the PC input
English
1. Connect the VGA (D-Sub) output of your
PC to the PC D-SUB terminal on the TV
using a mini (15-pin) D-Sub cable (not
provided).
2. Connect the audio output of your PC to the
TV's PC AUDIO terminal using an
appropriate Mini-jack stereo audio cable
(not provided).
To view video image from this input, press
Input
and select PC.
Mini D-Sub
cable
Audio
cable
When you connect the TV to a PC, you
should adjust the resolution in the display
properties of the computer to closely match
the native resolution of the TV (for example,
1360 x 768 pixels). See "Supported PC (DSub/DVI) input signal resolution" on page 50
on other supported resolutions.
To view the best quality picture when using
the PC input, you will then need to instruct
the TV to calibrate itself to the PC signal
timing. To do so, select 'Auto' in the 'Picture'
menu. See "Picture menu" on page 35.
PC
Connecting the HDMI input
Connect the HDMI output of your output
equipment to the HDMI terminal on the TV
using an HDMI cable (not provided).
To view video image from this input, press
Input
and select HDMI.
HDMI (High-Definition Multimedia Interface)
is an uncompressed and all-digital audio/
video interface. HDMI provides an interface
between any audio/video source, such as a
set-top box, DVD player, or A/V receiver over
a single cable.
Be aware that HDMI input must be HDCPcompliant to be displayed.
See "Supported Component Video/HDMI
input signal resolution" on page 50 for
supported resolutions.
HDMI cable
DVD
player
Connecting audio and video inputs
29
Connecting the DVI input
English
1. Connect the digital video output of your
output equipment to the HDMI terminal
on the TV using a DVI to HDMI adaptor
cable (not provided).
2. Connect the DVI audio output of your
output equipment to the TV's DVI- AUDIO
L/R input terminals using an appropriate
audio cable (not provided).
To view video image from this input, press
Input
and select DVI.
Remember to set the type of DVI input
according to the device connected (a PC or
digital Set Top Box) in the Setup menu. See
"DVI Input" on page 43.
The DVI input only supports signals higher
than 480i and 576i. When connected to a
High Definition Set Top Box, it is
recommended that you set the output
resolution to 1080i.
When you connect the TV to a PC, you
should adjust the resolution in the display
properties of the computer to closely match
the native resolution of the TV (for example,
1360 x 768 pixels). See "Supported PC (DSub/DVI) input signal resolution" on page 50
on other supported resolutions.
Audio
cable
DVI to HDMI
adaptor cable
PC
Connecting the stereo audio output
This TV provides a set of (RCA type) stereo
audio output terminals for delivering the audio
signal to a sound system or other audio devices.
Connect the audio input terminals of an
amplifier or other audio device to the AUDIO
OUT L/R terminals on the TV using a suitable
audio cable.
This output is always available. Its level is fixed
and cannot be adjusted by the Volume setting
of the TV.
30
Connecting audio and video inputs
Audio cable
Audio
amplifier
English
On-Screen Display (OSD) menu
OSD structure
Input signal type
ATV
Audio
AV1, AV2,
AV4, AV4-S,
AV5, AV5-S
AV3
PC
• Picture
Mode
• Contrast
• Brightness
• Colour
• Sharpness
• Colour
TEMP.
• Contrast
• Brightness
• Colour
TEMP.
• Contrast
• Auto
• Brightness
• Frequency • Colour TEMP.
• Phase
• H. Position
• V. Position
• Black Extension
• ACE
Feature • Noise Reduction
• Aspect Ratio
• Auto Format
• Aspect Ratio
Window (Not available)
• PIP
• Main Input
• Sub Input
• PIP Audio
Setup
HDMI
• Volume
• Balance
• Sound Type
• Steady Sound
• Surround
• Speaker Out
• Advanced Audio Settings
• Picture Mode
• Contrast
• Brightness
Picture • Colour
• Sharpness
• Colour TEMP.
• NTSC Tint
• NTSC Setup
TV
DVI
DVI
(PC (Video
mode) mode)
• Picture
Mode
• Contrast
• Brightness
• Colour
• Sharpness
• Colour
TEMP.
(Not available)
• Auto
Installation
• Manual
Installation (Not available)
• Program
Edit
• Child Lock
• Language
• Backlight
• Sleep Timer
• ECO
• DVI Input
• Reset All Settings
• The available menu items are dependent on the input source being selected.
Unavailable items will be greyed out or not displayed.
• For details see:
"Audio menu" on page 33
"Picture menu" on page 35
"Feature menu" on page 37
"Window menu" on page 38
"TV menu" on page 39
"Setup menu" on page 43
On-Screen Display (OSD) menu
31
Navigating the OSD menu
English
You can use the On-Screen Display (OSD) menu to adjust the settings on your
TV.
1. Press MENU on the remote control, or MENU on the
TV to display the OSD menu on-screen.
2. Press or on the remote control, or
(Volume) or
(Volume) on the TV to select
an item in the menu.
3. Press OK on the remote control, or INPUT on the TV
to enter the submenu.
4. Press or on the remote control, or
(Program) or
(Program) on the TV to
select an item in the submenu.
5. Press or on the remote control, or
(Volume) or
(Volume) on the TV to
adjust settings. Press OK to enter the submenu if
available.
6. Press MENU on the remote control, or MENU on the
TV to return to the previous menu layer, or close the
OSD menu.
For example, to adjust image sharpness using the OSD menu:
1. Press MENU on the remote control, or MENU on the TV
to display the OSD menu on-screen.
2. Press
or
(Volume)
Picture.
on the remote control, or
or
(Volume) on the TV to select
3. Press OK on the remote control, or INPUT on the TV to
enter the Picture menu.
4. Press
or
on the remote control, or
or
(Program) on the TV to select
(Program)
Sharpness.
5. Press or on the remote control, or
(Volume)
or
(Volume) on the TV to adjust setting.
6. Press MENU on the remote control, or MENU on the TV
several times to close the OSD menu.
32
On-Screen Display (OSD) menu
English
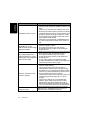
Audio
Audio menu
The available menu items are
dependent on the input source
being selected.
The illustration is for reference only.
Item
Volume
Balance
Sound Type
Stereo
Steady Sound
Off
Surround
Off
Speaker Out
Off
Advanced Audio Settings...
10
0
Function
Operation
Range
Press
to
increase
or
Volume
Adjusts volume level.
0 to 47
to decrease volume.
Press to increase right
Adjusts left or right speaker speaker volume, to
Balance
-12 to 12
volume level.
increase left speaker
volume level.
• Automatic
• Mono
Selects TV and AV input
• Stereo
audio type.
• NICAM
Sound Type
Available options are
• Sound 1
dependent upon the
received signal.
• Sound 2
• Sound 3
Automatically adjusts the
Press or to change
sound level to be constant selection.
• Off
Steady Sound amongst different TV
• Auto
stations when viewing TV
programs.
• Dolby
Activates or deactivates the
Surround
Surround sound effect.
• Off
Enables or disables sound
• On
Speaker Out output to the built-in
• Off
speakers of the TV.
Advanced Audio Settings - Press OK to enter.
• Classic
To restore a factory preset or
user customised EQ mode. Press or to change • POP
EQ Mode
• JAZZ
You can also press
selection.
• Rock
Audio/green
to jump
to an EQ mode directly.
• Personal
On-Screen Display (OSD) menu
33
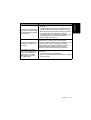
Adjusts treble tones for the
English
Treble
Personal preset mode.
Adjusts mid-treble tones for
the Personal preset mode.
Press or
Adjusts mid tones for the
Medium
Personal preset mode.
adjustment.
Adjusts mid-bass tones for
Medium Bass
the Personal preset mode.
Adjusts
bass tones for the
Bass
Personal preset mode.
Mid Treble
to make
-12 to 12
Setting up Personal EQ mode
You can adjust the settings in the Advanced Audio Settings menu and save
on
them as your Personal EQ mode. Once set, you can press Audio/green
the remote control to quickly jump to this mode.
1. In the Audio menu, press or to select Advanced Audio Settings,
and then press OK.
2. Press or to select EQ Mode, and the press or to select
Personal.
3. Press or to select the Treble, Mid Treble, Middle..., etc. options and
press or to adjust the settings to your satisfaction.
4. Press MENU to save and exit.
34
On-Screen Display (OSD) menu
English
Picture
Picture menu
The available menu items are
dependent on the input source
being selected.
The illustration is for reference only.
Item
Picture
Mode
Picture Mode
Contrast
Brightness
Colour
Sharpness
Colour TEMP.
NTSC Tint
NTSC Setup
Function
Provides complete preferred
setups adjusted for colour,
contrast, brightness and
sharpness to suit various
viewing situations.
You can also press
Preset/yellow
to jump
to a picture mode directly.
Contrast
Brightness
Colour
Sharpness
Colour
TEMP.
Standard
32
32
32
4
Normal
32
7.5 IRE
Operation
Range
Press or to
change selection.
•
•
•
•
Dynamic
Standard
Cinema
Personal
Adjusts image white level so
that whites do not wash out
surrounding colours.
Adjusts image black level, so
that detail in the dark areas of
an image can be seen.
Press for brighter
whites, for darker
whites.
Press for brighter
blacks, for darker
0 to 64
blacks.
Press for more
Adjusts image colour
intense colours,
intensity.
for less intense
colours.
Press for sharper
Adjusts image sharpness level. image, for softer 0 to 7
image.
• Cool: Biased
toward blue for PC input use
•
Normal:
Adjusts the colour tint of the
Standard video/
Press or to
black and white part of the
TV colour
change selection.
image.
temperature
• Warm: Biased
toward red for
movie standard.
On-Screen Display (OSD) menu
35
Adjusts colour tint
English
NTSC Tint
This option is only
available for NTSC video
sources.
Press for redder
tones, for greener 0 to 64
tones.
Sets up the NTSC video
display format to match that
of the input NTSC video
Press or to
NTSC Setup input from other devices
change selection.
(such as a DVD player).
• 0 IRE
• 7.5 IRE
This option is only
available for NTSC video
sources.
Auto
Frequency
Phase
H. Position
V. Position
Automatically adjusts
frequency, phase, H. position
and V. position to place the
image on the screen.
Adjusts the display clock
frequency.
Adjusts the display clock
phase.
Adjusts the horizontal
position of the image.
Adjusts the vertical position
of the image.
Press OK to begin the auto adjustment
function.
(Dependent on the
Press or to make
resolution of the
adjustment.
received signal)
Setting up Personal Picture mode
You can adjust the settings in the Picture menu and save them as your Personal
Picture mode. Once set, you can press Preset/yellow
on the remote
control to quickly jump to this mode.
1. In the Picture menu, press or to select Picture Mode, and then press
or to select Personal.
2. Adjust the Brightness, Contrast and Colour..., etc. settings to your
satisfaction.
3. Press MENU to save and exit.
36
On-Screen Display (OSD) menu
Black Extension
ACE
Noise Reduction
Aspect Ratio
Auto Format
Off
Off
Off
16:9
Off
Function
Operation
Enhances the contrast
among details when viewing
dark images.
Range
The available menu items are
dependent on the input source
being selected.
The illustration is for reference only.
Item
Black
Extension
English
Feature
Feature menu
This option will not be
available if the ACE
function is set to Low,
Medium or High.
Adjusts the auto contrast
ACE
enhancement function that
(Auto Contrast
Enhancement) optimizes the image contrast
ratio for interlaced inputs.
Adjusts the image noise
reduction function that
helps to remove noise in TV
images. Suitable in fringe
and poor TV reception
Noise
Press or to
areas.
Reduction
change selection.
This option will not be
available if the currently
displaying Component
Video input resolution is
higher than 576i.
•
•
•
•
Low
Medium
High
Off
•
•
•
•
Low
Medium
High
Off
•
•
•
•
Low
Medium
High
Off
Aspect Ratio
Adjusts image aspect ratio.
See "Adjusting
aspect ratio" on
page 25 for more
information.
Auto Format
If set to On, the TV will
automatically adjust screen
aspect ratio when the
SCART inputs are used, or
when a WSS (Wide Screen
Signaling) signal is detected
from Composite Video or SVideo input signals.
• On
• Off
On-Screen Display (OSD) menu
37
English
Window
Window menu
The available menu items are
dependent on the input source
being selected.
The illustration is for reference only.
Item
PIP
Main Input
Sub Input
PIP Audio
Function
Picture in Picture
PC
ATV
Main
Operation
Range
• Full Screen
Full screen
Display Video and Graphic
images simultaneously in
Picture-In-Picture (PIP) mode.
PIP
• Picture in
Picture
Video
image
Graphic image
Select the graphic signal input
source for the PIP function.
Main Input
The DVI input image will be
displayed only when a DVI
input in PC mode is
connected to the TV, and
the DVI Input option in the
Setup menu (see "DVI
Input" on page 43) is set to
PC.
• PC
• DVI
Press or to
change selection.
Select the video signal input
source for the PIP function.
Sub Input
PIP Audio
38
This option is available only
if the PIP item is set to
Picture in Picture.
The Component Video input
(AV3) image cannot be
displayed in the Sub
Window and cannot be
selected.
The sub window only
supports Video input up to
480p.
Select the audio source in PIP
mode.
This option is available only
if the PIP item is set to
Picture in Picture.
On-Screen Display (OSD) menu
•
•
•
•
•
ATV
AV1
AV2
AV4 (AV4-S)
AV5 (AV5-S)
• Main
• Sub
English
TV
TV menu
Auto Installation...
Manual Installation >
Program Edit >
Child Lock >
The available menu items are
dependent on the input source
being selected.
The illustration is for reference only.
Item
Auto Installation
Manual Installation
Program Edit
Child Lock
Function
Operation
See "8. Initialize your TV" on page 7.
See "Performing manual installation" below.
See "Editing programs" on page 40.
See "Child Lock" on page 41.
Range
Performing manual installation
The Manual Installation feature allows you to add programs to the sequential
programs list.
This option is not possible when the Child Lock is activated. See "Child Lock" on
page 41.
1. From the TV menu, press or to select Manual Installation and then
press OK. The following menu will display:
Manual Installation
Standard
BG
Frequency
___.__MHz
PR Name
Fine Tune
Decoder
Off
Text Code
Char. 1
Store on PR
02
to highlight Standard, and then press or
2. Press
to select a TV
standard according to your country.
3. Press to highlight Frequency and then press or to start the tuning
system. If the tuned program is incorrect, press or again until your
desired program is located. You can directly input the frequency using the
Program selection numeric buttons on the remote control if you wish.
4. Press to highlight Fine Tune and then press or to adjust the
reception of TV signal (only necessary where the image or sound reception
is poor).
5. If the SCART input is connected, press to highlight Decoder and then
press or to select from the following options:
• On: Select this option if an external decoder Set-Top-Box (STB) is being
used.
• Off: Select this option if no external decoder STB is being used.
6. Press to highlight Text Code and then press or to select a code
format for the Teletext function.
On-Screen Display (OSD) menu
39
English
7. Press to highlight Store on PR, and then press the Program selection
numeric buttons on the remote control to enter the number (location) for
this program. Press OK to confirm.
8. Press MENU to save the program and close the menu.
Editing programs
You can delete unwanted programs, add a program name and change the
program position number.
This option is not possible when the Child Lock is activated. See "Child Lock" on
page 41.
Naming a program
1. In the TV menu, press or to select Program Edit and then press OK.
The following menu will display:
Program Edit
Select PR
12
Edit Name
-----PR Swap
-PR Lock
Off
PR Delete
12
to select Select PR, and then press or
to select the program
2. Press
you wish to name. You can also press the Program selection numeric
buttons on the remote control to select the program directly. Two digit
entry is required. For example, press "0", "2" to select program 2.
3. Press to highlight Edit Name, and then press or to highlight the
character you want to edit, or to change it to your desired character.
4. Repeat step 3 to edit other characters.
5. Press OK to store the name.
6. Press MENU to close the menu.
Swapping programs
1. In the TV menu, press or to select Program Edit and then press OK.
2. Press to select Select PR, and then press or to select the program
you wish to relocate to a different position. You can also press the Program
selection numeric buttons on the remote control to select the program
directly. Two digit entry is required. For example, press "0", "2" to select
program 2.
3. Press to highlight PR Swap, and then press the Program selection
numeric buttons on the remote control to select the new location for the
program. Two digit entry is required. For example, press "0", "5" to select
program location 5.
4. Press OK and the current program is changed to the new location.
5. Press MENU to close the menu.
40
On-Screen Display (OSD) menu
Locking/unlocking a program for the Child Lock function
1. In the TV menu, press or to select Program Edit and then press OK.
2. Press to select Select PR, and then press or to select the program
you wish to lock. You can also press the Program selection numeric
buttons on the remote control to select the program directly. Two digit
entry is required. For example, press "0", "2" to select program 2.
3. Press to highlight PR Lock, and then press or to select from the
following options:
• On: Lock the selected program.
• Off: Unlock the selected program.
4. Press MENU to close the menu. All programs which are locked cannot be
viewed when the Child Lock function is enabled.
Deleting a program
1. In the TV menu, press or to select Program Edit and then press OK.
2. Press to select Select PR, and then press or to select the program
you wish to delete. You can also press the Program selection numeric
buttons on the remote control to select the program directly. Two digit
entry is required. For example, press "0", "2" to select program 2.
3. Press to highlight PR Delete and then press OK to delete the program.
4. Press the MENU button to close the menus.
Child Lock
The Child Lock function can be used to prevent access to certain programs.
For example, to prevent children from viewing inappropriate programs such
as adult-only programs. This Child Lock only affects the TV/CATV input (not
AV and Graphic inputs), and prohibits the selection or display of every
program which has had its PR Lock menu item set to On (see "Locking/
unlocking a program for the Child Lock function" above). The correct
password is required to unlock and view those programs once Child Lock is
enabled.
WARNING: You will be inconvenienced if you activate the password functionality
and subsequently forget the password. Write the password you use in this
manual, and keep it in a safe place for later recall.
Enabling/disabling Child Lock
1. In the TV menu, press or to select Child Lock, and then press OK.
The following menu will display:
Child Lock
Enter Password
---Change Password
Child Lock
Off
Enter Password by Using Keys 0 to 9.
2. Enter the password using the Program selection numeric buttons (default
password: 0000). When entering, you can press to clear a wrong
character. If you enter the wrong password, try again.
On-Screen Display (OSD) menu
41
English
See "Child Lock" below for information about the Child Lock function.
English
3. Press to select Child Lock and then press or to select from the
following options:
• On: Enables the Child Lock. Once enabled, the program will be childlocked.
• Off: Disables the Child Lock.
Press MENU to close the menu.
Changing Child Lock password
1. In the TV menu, press or to select Child Lock and then press OK.
2. Enter the password using the Program selection numeric buttons (default
password: 0000). When entering, you can press to clear a wrong
character. If you enter the wrong password, try again.
3. Press to select Change Password and then press OK.
4. Enter a new 4-digit password using the Program selection numeric
buttons.
IMPORTANT: Write your selected password down here in this manual so that it is
available to you should you ever forget it
Password: __ __ __ __.
Keep this manual in a safe place.
5. Enter the new password again using the Program selection numeric
buttons.
6. Press MENU to close the menu.
42
On-Screen Display (OSD) menu
English
Setup
Setup menu
The available menu items are
dependent on the input source
being selected.
The illustration is for reference only.
Language
Backlight
Sleep Timer
ECO
DVI Input
Reset All Settings
Item
Function
Language
Select your desired language for
the OSD menu.
Backlight
Adjust backlight intensity.
If Auto is selected, the ambient
light sensor will be activated and
the TV’s backlight will be
changed automatically according
to the ambient lighting
condition.
Sleep Timer
Set the Sleep timer to
automatically turn off the TV.
ECO
DVI Input
Reset All
Settings
Operation
English
Auto
0
On
Video
Range
• English
• Français
• Nederlands
• Deutsch
• Italiano
• Español
•
•
•
•
Dark
Normal
Bright
Auto
0, 30, 60, 90,
Press or to 120, 150, 180
change selection. minutes
Once set to On, the TV will
activate the Display Power
Management System (DPMS)
and enter power saving mode
• On
when no PC input signal is
• Off
detected for 5 seconds, or enter
standby mode automatically if
no TV or Video signal is
detected for 10 minutes.
Select the DVI input mode
according to the device
• PC
connected. Select PC if a PC is
connected. If a video device (for
• Video
example, a digital Set Top Box) is
connected, select Video.
Restore all settings to their
Press OK to activate the reset.
default values.
On-Screen Display (OSD) menu
43
English
Reference
Disclaimer
BenQ Corporation makes no representations or warranties, either expressed
or implied, with respect to the contents of this User Manual. BenQ
Corporation reserves the right to revise this publication and to make changes
from time to time in the contents thereof without obligation to notify any
person of such revision or changes.
Copyright
Copyright 2006 BenQ Corporation (www.BenQ.com). All rights reserved. No
part of this publication may be reproduced, transmitted, transcribed, stored in
a retrieval system or translated into any language or computer language, in any
form or by any means, electronic, mechanical, magnetic, optical, chemical,
manual or otherwise, without the prior written permission of BenQ
Corporation.
Dolby and the double-D symbol are registered trademarks of
Dolby Laboratories. Manufactured under license from Dolby
Laboratories.
Battery safety notice
The use of the wrong type of batteries may cause chemical leaks and/or
explosion. Please note the following:
• Always ensure that the batteries are inserted with the positive and negative
terminals in the correct direction as shown in the battery compartment.
• Different types of batteries have different characteristics. Do not mix
different types.
• Do not mix old and new batteries. Mixing old and new batteries will
shorten battery life and/or cause chemical leaks from the old batteries.
• When batteries fail to function, replace them immediately.
• Chemicals which leak from batteries may cause skin irritation. If any
chemical matter seeps out of the batteries, wipe it up immediately using a
dry cloth.
• Due to varying storage conditions, the battery life for the batteries included
with your TV may be shortened. Replace them within 3 months or as soon
as you can after initial use.
Important safety instructions
Electrical energy can perform many useful functions, but it can also cause
personal injury and property damage if improperly handled. This TV has been
engineered and manufactured with the highest priority on safety, however
IMPROPER USE CAN RESULT IN POTENTIAL ELECTRICAL SHOCK OR
FIRE HAZARD. In order to prevent potential danger, please observe the
following instructions when installing, operating and cleaning the TV. Proper
care will also prolong the service life of your TV. Just follow these simple
instructions before using your display
1. Read instructions - All operating instructions must be read and
understood before the TV is operated.
2. Retain instructions - These safety and operating instructions must be
kept in a safe place for future reference.
44
Reference
Reference
45
English
3. Observe warnings - All warnings on the TV and in the instructions must
be observed closely.
4. Follow instructions - All operating instructions must be followed.
5. Water and moisture - Do not use this TV near water - for example, near a
bathtub, washbowl, kitchen sink, or laundry tub, in a wet basement, or
near a swimming pool, and the like. Do not use immediately after moving
from a low temperature to a high temperature environment, as this causes
condensation, which may result in fire, electric shock, or other hazards.
6. Cleaning - Unplug this TV from the wall outlet before cleaning. Do not
use liquid cleaners or aerosol cleaners. Periodically clean the liquid crystal
panel of the display to ensure a clear screen and prolong the service life of
the panel. Use a clean, soft and cotton-free dry cloth to dip into the specific
cleaner for the liquid crystal panel. Quickly wipe over the whole panel and
use another cloth to clean the panel.
7. Ventilation - The vents and other openings in the cabinet are designed to
let hot air escape from the TV. Do not cover or block these vents and
openings since insufficient ventilation can cause overheating and/or
shorten the life of the TV. Do not place the TV on a bed, sofa, rug or other
similar surface, since they can block ventilation openings.
8. Heat sources - Keep the TV away from heat sources such as radiators,
heaters, stoves and other heat-generating products (including amplifiers).
9. Power cord protection - Power-supply cords should be routed so that
they are not likely to be walked on or bitten by small animals. Pay
particular attention to cords at doors, plugs, receptacles, and the point
where they exit from the TV.
10. Transporting the TV - When the TV is used on a trolley, care should be
taken to avoid quick stops, excessive force, and uneven surfaces that may
cause the TV and trolley to overturn, damaging equipment or causing
possible injury to the operator. Do not place this TV on an unstable trolley,
stand, pedestal, bracket, or table. The TV may fall, causing serious injury to
a child or adult and serious damage to the TV.
11. Servicing - Do not attempt to service the TV by yourself. Removing covers
can expose you to high voltage and other dangerous conditions. Request a
qualified service person to perform servicing.
12. Replacement parts - In case the TV needs replacement parts, make sure
that the service person uses replacement parts specified by BenQ, or those
with the same characteristics and performance as the original parts. Use of
unauthorized parts can result in fire, electric shock and/or other danger.
13. Overloading - Do not overload wall outlets, extension cords, or
convenience receptacles on other equipment as this can result in a risk of
fire or electric shock.
14. Entering of objects and liquids - Never poke an object into the TV
through vents or openings. High voltage flows in the TV, and inserting an
object can cause electric shock and/or short circuit internal parts. For the
same reason, do not spill water or liquid on the TV.
15. Damage requiring service - If any of the following conditions occurs,
unplug the power cord from the AC outlet, and request a qualified service
person to perform repairs.
• When the power cord or plug is damaged.
• When a liquid is spilled on the TV or when objects have fallen into the TV.
English
• When the TV has been exposed to rain or water.
• When the TV does not operate properly as described in the operating
instructions.
• If the TV has been dropped or the cabinet has been damaged in any way.
• When the TV displays an abnormal condition or exhibits a distinct change
in performance. Any noticeable abnormality in the TV indicates that the
TV needs servicing.
16. Controls - Do not touch the controls other than those described in this
manual. Improper adjustment of controls can cause damage, which often
requires extensive adjustment work by a qualified technician.
17. Safety checks - Upon completion of service or repair work, request the
service technician to perform safety checks to ensure that the TV is in
proper operating condition.
18. Wall mounting - When mounting the TV on a wall, be sure to install the
TV according to the method recommended by BenQ using only the
specified mounting hardware.
19. Installation of an external antenna - If an outside antenna is connected to
the TV, be sure the antenna system is grounded so as to provide some
protection against voltage surges and built-up static charges.
20. For added protection for this TV during a lightning storm, or when it is left
unattended and unused for long periods of time, unplug it from the wall
outlet and disconnect the antenna. This will prevent damage to the TV due
to lightning and power-line surges.
21. An outside antenna system should not be located in the vicinity of
overhead power lines or other electric light or power circuits, or where it
can collide with such power lines or circuits. When installing an outside
antenna system, extreme care should be taken to keep from touching such
power lines or circuits, as contact with them might be fatal.
46
Reference
Dimensional drawings
English
VL3733
Unit: mm
Reference
47
VL4233
English
Unit: mm
48
Reference
Specifications
VL3733
25Kg
968.3 x 746.3 x 295 mm
37 inches
16:9
1366 x 768
English
Model
Weight (Net)
Dimensions (W x H x D)
LCD panel size
Aspect ratio
Native resolution
LCD panel brightness
(typical)
LCD panel contrast ratio
(typical)
Viewing angle
Response time
Amplifier
TV
VL4233
35Kg
1080 x 811.2 x 295 mm
42 inches
500 cd/m2
1200:1
89º/89º/89º/89º (left/right/up/down)
8 ms grey to grey
10W x 2, 80Hz ~ 20KHz
Analog Pan-Euro TV tuner
• Composite Video x 2
• SCART (Cenelec) x 2
• S-Video x 2
Video
• Component Video (Y CB/PB CR/PR) x 1
Signal
• Composite Video/S-Video audio x 2
inputs
• Component Video audio x 1
• PC D-Sub x 1
• HDMI/DVI x 1
Graphic
• PC audio x 1
• DVI audio x 1
• Stereo audio x 1
Signal outputs
• Headset x 1
PC horizontal frequency 31.5 ~ 67.5 kHz
PC vertical frequency
60 ~ 75 Hz
Power supply
AC 100-240V, 50-60 Hz
Power consumption
210W
260W
Operating temperature 0°C ~ 40°C (at sea level)
Storage temperature
-20°C ~ 50°C(at sea level)
TV systems
PAL / SECAM
Video systems
PAL / SECAM
Design and specifications are subject to change without notice.
Reference
49
Supported PC (D-Sub/DVI) input signal resolution
English
Resolution
720 × 400
640 × 480
640 × 480
640 × 480
640 × 480
800 × 600
800 × 600
800 × 600
800 × 600
1024 × 768
1024 × 768
1024 × 768
1280 × 720
1280 × 1024
1360 × 768
1920 × 1080
Horizontal
Frequency
(KHz)
31.469
31.469
35
37.5
37.86
35.16
37.879
46.88
48.08
48.363
56.5
60
44.955
63.98
47.7
67.5
Vertical
Frequency
(Hz)
70.08
59.94
67
75
72.81
56.25
60.317
75
72.19
60
70
75
59.939
60.02
60
60
Dot Clock
Frequency
(MHz)
28.322
25.175
30.24
31.50
31.50
36
40
49.50
50
65
75
78.75
74.175
108
85.5
148.5
Note
DOS, VESA
DOS, VESA
Mac. (SOG)
VESA
VESA
VESA
VESA
VESA
VESA
VESA
VESA
VESA
VESA
VESA
VESA
VESA
Supported Component Video/HDMI input signal
resolution
Resolution
720 × 480i
720 × 480p
720 × 576i
720 × 576p
1280 × 720p
1280 × 720p
1920 × 1080i
1920 × 1080p
(HDMI only)
Horizontal
Frequency
(KHz)
15.735
31.25
15.625
31.25
45
37.5
28.13/33.75
56.25
67.5
Vertical
Frequency
(Hz)
60
60
50
50
60
50
50/60
50
60
Dot Clock
Frequency
(MHz)
12.27
27
13.5
27
74.25
74.25
148.5
148.5
148.5
Note
SDTV 480i
SDTV 480p
HDTV 576i
HDTV 576p
HDTV720p
HDTV720p
HDTV1080i
HDTV1080p
HDTV1080p
• PC (D-Sub/DVI) and Component Video/HDMI resolutions outside of these tables
are not recognised and will not be displayed.
• When you connect the TV to a PC, you should adjust the resolution in the
display properties of the computer to closely match the native resolution of the
TV (for example, 1360 x 768 pixels). To view the best quality picture when using
the PC input, you will then need to instruct the TV to calibrate itself to the PC
signal timing. To do so, select 'Auto' in the 'Picture' menu. See "Picture menu"
on page 35.
50
Reference
Troubleshooting
Symptoms
TV does not turn ON
There is no picture or
sound
"Not supported" appears
The image appears
distorted
Improper screen position
or size
Possible Causes
Ensure the TV power is ON (as shown by the green
Power indicator on the front of the TV). If so, check
that the remote control is working or not. Press the
Power/standby button on it.
If not:
• Check that the power plug is securely inserted into
both the AC-INLET socket on the TV and the wall
outlet, and that the wall outlet is switched on (if
switched).
• Check that power is available from the power outlet
by trying another known working appliance (e.g.
desk lamp) from that same power outlet.
• Try a different input source to confirm if the
symptom is still present or whether the source is at
fault.
• Check for mis-connection of cables for that input.
• Make sure the antenna cable is properly connected.
• Change programs to confirm if the symptom is still
present or whether the program station is at fault.
• Try a different picture mode to check that picture
settings haven’t been turned down.
• Adjust the volume control to check that isn't turned
down, or that the Mute button wasn't pressed.
• Make sure that the Speaker Out option in the
Audio menu is not set to Off.
• Check the audio input cables for disconnection.
The PC VGA output signal resolution is set too high.
1920 x 1080 @ 60Hz is the highest acceptable PC
timing.
• Ensure the TV's aspect ratio is correctly set to suit
the image source.
• Try a different input source to confirm if the
symptom is still present or whether the source is at
fault.
• Try selecting a different aspect ratio.
• Try a different input source to confirm if the
symptom is still present or whether the source is at
fault.
Reference
51
English
There are many external influences and circumstances beyond the control of
BenQ which may be causing problems with your TV. Some of the more
common and user fixable problems are listed below for your information.
Please check the following list before calling your nearest BenQ Customer
Service Center, and attempt the following steps to diagnose and fix the
problem yourself:
Symptoms
English
Possible Causes
• Try a different input source to confirm if the
symptom is still present or whether the source is at
fault.
• Check for mis-connection of cables for that input.
• Make sure the antenna cable is properly connected.
Degraded colours or hue • Change programs to confirm if the symptom is still
present or whether the program station is at fault.
• Try a different picture mode to check that picture
settings haven't been altered.
• Check the picture properties in the Picture menu.
• The source may be set to output NTSC. Alter it to
PAL.
• Reduce the brightness level until the black areas of
The image appears too
the picture appear as black.
'washed out', or the
•
The
input source device (e.g. DVD player)
darkest areas of the image
brightness level may be set too high. Reduce its
appear too bright
brightness level.
• Reduce the contrast level until the over brightness is
gone, and the bright area definition returns.
The image appears too
• The input source device (e.g. DVD player)
bright, and there is a loss
brightness level may be set too high. Reduce its
of definition in the brightest
brightness level.
areas of the image
• The AV video signal has not been terminated
properly somewhere in the external AV equipment.
Check the connection and try again.
• Check for incorrect battery orientation.
• Check for dead batteries
• Check your distance and angle from the TV.
• Check whether remote control is properly being
pointed at the TV's remote control sensor window.
• Check for any obstacle between the remote control
and the remote control sensor window.
Remote control does not
• Check that the remote control sensor window is not
function properly
under strong fluorescent lighting. or in direct
sunlight.
• Check for any devices (PC or personal digital
assistant, PDA) nearby that transmit infrared
signals which may cause interference to signal
transmission between the remote control and the
TV. Turn off the infrared function of these devices.
If PC is selected as the input signal source, use the
Picture is not clear when
Auto function in the Picture menu to let the TV
using PC input
adjust the picture settings automatically.
52
Reference
Symptoms
Reference
53
English
Possible Causes
• The reception may be weak. See next problem
solution.
• Change programs to confirm if the symptom is still
The picture is not sharp or
present or whether the program station is at fault.
the picture contains image
•
Make
sure the antenna cable is properly connected.
movement when using the
•
Try
redirecting
or relocating your antenna to
TV tuner input
improve the picture. If the antenna is exterior, have
a suitable qualified and experienced antenna
specialist adjust the antenna.
Your TV antenna signal may be effected by
interference. Try redirecting or relocating your
The picture is doubled or antenna to reduce the effects of the interference. If the
tripled when using the TV antenna is exterior, have a suitable qualified and
tuner input
experienced antenna specialist adjust the antenna.
Picture ghosting is caused by reflections from
buildings, large metal structures and mountains.
The background image,
The screen may be displaying 'LCD Image
icon or button persists on- Persistence'.
screen as a visible faint
• Turn off the screen for several days.
outline trace no matter
• Apply an all white screen size screensaver or image
what image is currently
for several days.
being displayed.
<Memo>
English
54
Reference