1
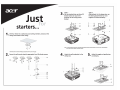
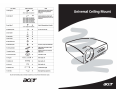
 Item / Typeit
Image (x Quantity)
Usage
1. screw Type A a: xa Attach ceiling rod to ceiling mount
base and the ceiling bracket to
-50mm length /8mm diameter ceiling rod
2. screw Type B == X18 Attach projector to ceiling mount
bracket-use appropriate size for your
-25mm length / Ámm diameter equipment
- 25mm length / 3mm diameter
-25mm length /2.6mm diameter
- 20mm length / 4Amm diameter
- 20mm length / 3mm diameter
- 20mm |langth / 2.6mm dlametar
3. screw Type C 7 ХЗ Attach sliding extension to bracket
- 12mm length / 6mm diameter
4. tightening screw xa For use with allen key
X3
5. small washer
X3
6. large washer X3
7. small fat cap X3
8. large cylinder cap X4
9. heat buffer piece X3 Allows for proper heat distribution
10. sliding extension ХЗ Adds support and range to larger
- projector size
; Supports projector and allows for
11. projector bracket X1 adjustments
12. ceiling mount base X1 Attached to ceiling
13. long rod X1 Basic length unit
14. medium rod x1 Basic length unit
15. short rod xi Basic length unit
16. extension rod X1 Increases basic length
17. allen key X1 Make tightening adjustments
Note: Acer recommends that you consult an electrician or carpenter if you are not comfortable with the installation process,
Universal Ceiling Mount
Y
Just
starters...
1 Drill four holes into a solid, structural ceiling member, and secure the
"ceiling mount base to the ceiling.
Note:These screws not included. Please get appropriate screws for your ceiling type.
2 Secure the ceiling rod using the appropiate four (4) cylinder screws
N
Type 1: Type 2:
For the standard size use three (3) Alternatively, for the larger size, use
bracket screws to mount the the sliding attachments for more
projector to the ceiling mount support and maneuverability. .
bracket
Note: It is recommended that you keep a reasonable space between the bracket and the projector to allow for prope heat distribution.
Use 2 washers for extra support, if deemed necessary.
Attach the ceiling bracket to the 5 Adjust the angle and positioning
ceiling rod. "as necessary.