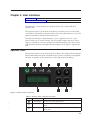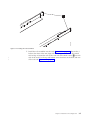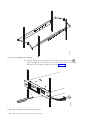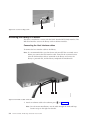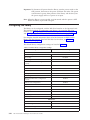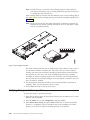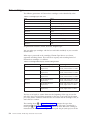
1
Dell PowerVault TL1000 Tape Autoloader
User's Guide
Dell PowerVault TL1000 Tape Autoloader
User's Guide
Information in this document is subject to change without notice.
© 2014 Dell Inc. All rights reserved.
Reproduction in any manner whatsoever without the written permission of Dell Inc. is strictly forbidden.
Trademarks used in this text: Dell, the DELL logo and PowerVault are trademarks of Dell Inc.
Other trademarks and trade names might be used in this document to refer to either the entities claiming the marks
and names or their products. Dell Inc. disclaims any proprietary interest in trademarks and trade names other than
its own.
|
Type: 3572 Model: S3H/S4H/S5H/S6H
Printed August 2014
Read this first
Contacting Dell
For customers in the United States, call 800-WWW-DELL (800-999-3355).
Note: If you do not have an active Internet connection, you can find contact
information about your purchase invoice, packing slip, bill, or Dell product
catalog.
Dell provides online and telephone-based support and service options. Service
availability varies by country and product, and some services might not be
available in your area. To contact Dell for sales, technical support, or customer
service issues follow the steps that are listed:
1. Visit http://dell.com/support.
2. Verify your country or region in the Choose A Country/Region menu at the
bottom of the page.
3. Click Contact Us on the left side of the page.
4. Select the appropriate service or support link that is based on your need.
5. Choose the method of contacting Dell that is convenient for you.
iii
iv
Dell PowerVault TL1000 Tape Autoloader User's Guide
Contents
Read this first . . . . . . . . . . . . iii
Chapter 4. Operations . . . . . . . . 4-1
Contacting Dell .
The Operator Panel . . .
Monitoring the library .
Managing the library . .
Configuring the library .
Servicing the library . .
The Web User Interface . .
Monitoring the library .
Managing the library .
Configuring the library .
Servicing the library . .
.
.
.
.
.
.
.
.
.
.
.
. iii
Figures . . . . . . . . . . . . . . vii
Tables . . . . . . . . . . . . . . . ix
Safety and environmental notices . . . xi
Safety notices . . . . . . . . . . . . . . xi
Laser safety and compliance. . . . . . . . . xii
Performing the safety inspection procedure. . . . xii
Rack safety . . . . . . . . . . . . . . xiii
.
.
.
.
.
.
.
.
.
.
.
.
.
.
.
.
.
.
.
.
.
.
.
.
.
.
.
.
.
.
.
.
.
.
.
.
.
.
.
.
.
.
.
.
.
.
.
.
.
.
.
.
.
.
.
.
.
.
.
.
.
.
.
.
.
.
.
.
.
.
. 4-3
. 4-3
. 4-4
. 4-9
. 4-14
. 4-16
. 4-17
. 4-20
. 4-23
. 4-34
Chapter 5. Media . . . . . . . . . . 5-1
Front panel . . . . . . . . . . . . . . 1-2
Cartridge magazine . . . . . . . . . . . 1-4
Rear panel . . . . . . . . . . . . . . 1-5
Bar code reader . . . . . . . . . . . . . 1-6
SAS host interface . . . . . . . . . . . . 1-6
Encryption . . . . . . . . . . . . . . 1-6
Supported Internet Protocols . . . . . . . . 1-7
Simple Network Management Protocol (SNMP)
messaging . . . . . . . . . . . . . . 1-7
Network Time Protocol . . . . . . . . . . 1-7
Ultrium tape drives . . . . . . . . . . . 1-8
Media . . . . . . . . . . . . . . . . 1-8
Logical Unit Number (LUN) scanning . . . . . 1-9
Location coordinates and element addresses . . . 1-9
Library specifications . . . . . . . . . . 1-10
Product environment . . . . . . . . . . 1-11
Supported device drivers . . . . . . . . . 1-12
Data cartridges . . . . . . . . . . . .
Cartridge compatibility . . . . . . . .
Write once, read many (WORM) cartridges . .
WORM media . . . . . . . . . . .
Data security on WORM media . . . . .
WORM media errors . . . . . . . . .
Requirements for WORM capability . . . .
Cleaning cartridge . . . . . . . . . . .
Bar code labels . . . . . . . . . . . .
Guidelines for the use of bar code labels . .
Write-Protect switch . . . . . . . . . .
Cartridge care and handling . . . . . . .
Provide training . . . . . . . . . .
Ensure proper packaging . . . . . . .
Provide proper acclimation and environmental
conditions . . . . . . . . . . . .
Perform a thorough inspection . . . . . .
Handle the cartridge carefully . . . . . .
Examples of cartridge problems . . . . .
Environmental and shipping specifications for
tape cartridges. . . . . . . . . . . .
Chapter 2. User interfaces . . . . . . 2-1
Chapter 6. Troubleshooting
Operator Panel . .
Web User Interface.
How the library reports problems. . . . . . . 6-1
Library error message content . . . . . . . . 6-2
Diagnosing a problem . . . . . . . . . . 6-3
Isolating problems . . . . . . . . . . . . 6-6
Installation and configuration problems. . . . . 6-8
Interpreting front panel LEDs . . . . . . . . 6-8
Reseating cables . . . . . . . . . . . . 6-10
Emailing logs . . . . . . . . . . . . . 6-10
Preface . . . . . . . . . . . . . . xv
Chapter 1. Product description . . . . 1-1
.
.
.
.
.
.
.
.
.
.
.
.
.
.
.
.
.
.
.
.
. 2-1
. 2-5
Chapter 3. Installation and
configuration. . . . . . . . . . . . 3-1
Choosing a location . . . . . . . . . .
Installing in a rack . . . . . . . . . . .
Removing the accessor locking screw . . . .
Attaching the library to a server . . . . . .
Configuring the library . . . . . . . . .
Configuring your library with the Web User
Interface . . . . . . . . . . . . .
Configuring your library with the Operator
Panel . . . . . . . . . . . . . .
Populating the library with cartridges . . . .
Verifying library and drive operation . . . .
Taking the Library Online . . . . . . . .
Registering for support notification . . . . .
. 3-1
. 3-2
. 3-7
. 3-8
. 3-10
. 3-11
.
.
.
.
.
3-24
3-27
3-28
3-29
3-29
.
.
.
.
.
.
.
.
.
.
.
.
.
.
5-2
5-3
5-3
5-3
5-4
5-4
5-4
5-4
5-5
5-6
5-6
5-7
5-7
5-8
. 5-8
. 5-9
. 5-9
. 5-10
. 5-10
. . . . . 6-1
Chapter 7. Service procedures . . . . 7-1
| ITDT-DCR . . . . . . . . . . . . . . 7-1
| Contacting Dell technical support . . . . . . . 7-2
Chapter 8. Removal and replacement
procedures . . . . . . . . . . . . 8-1
Required tools . . . . . . . . . . .
Replacing a defective cartridge magazine . .
Unlocking the cartridge magazine manually .
.
.
.
. 8-1
. 8-1
. 8-1
v
Appendix A. Error codes . . . . . . A-1
Library sense data. .
Tape drive sense data
.
.
.
.
.
.
.
.
.
.
.
.
.
.
.
.
.
.
. C-1
. C-3
Library error codes . . . . . . . . . . . A-1
Drive error codes . . . . . . . . . . . A-11
Web User Interface error messages . . . . . . A-11
Trap definitions (types) . . . . . . . . . A-14
Appendix D. Library Configuration
Form . . . . . . . . . . . . . . . D-1
Appendix B. TapeAlert flags . . . . . B-1
Accessibility . . . . . . . . . . . . E-1
TapeAlert flags supported by the library . . .
TapeAlert flags supported by the Ultrium tape
drive . . . . . . . . . . . . . . .
. B-1
. B-3
Appendix C. Sense data . . . . . . . C-1
Sense Key definitions.
vi
.
.
.
.
.
.
.
.
.
. C-1
Dell PowerVault TL1000 Tape Autoloader User's Guide
Glossary
. . . . . . . . . . . . . F-1
Index . . . . . . . . . . . . . . . X-1
Figures
| 1-1.
|
1-2.
1-3.
1-4.
1-5.
1-6.
1-7.
2-1.
2-2.
2-3.
2-4.
2-5.
2-6.
2-7.
2-8.
2-9.
2-10.
3-1.
| 3-2.
|
|
3-3.
3-4.
3-5.
3-6.
3-7.
3-8.
3-9.
3-10.
3-11.
3-12.
3-13.
3-14.
3-15.
3-16.
3-17.
3-18.
3-19.
3-20.
3-21.
3-22.
3-23.
3-24.
3-25.
3-26.
3-27.
3-28.
4-1.
4-2.
4-3.
4-4.
4-5.
4-6.
4-7.
4-8.
4-9.
TL1000 Tape Autoloader . . . . . . . 1-1
Front panel components . . . . . . . 1-2
Cartridge Magazine . . . . . . . . . 1-4
Cartridge magazine (top view) . . . . . 1-4
Rear panel components. . . . . . . . 1-5
Ultrium half-high tape drive . . . . . . 1-8
Location coordinates . . . . . . . . 1-10
Operator Panel components . . . . . . 2-1
Library ready screen . . . . . . . . 2-4
Password entry screen . . . . . . . . 2-4
Screen elements . . . . . . . . . . 2-5
Confirmation screen . . . . . . . . . 2-5
Java security warning message . . . . . 2-6
Login page . . . . . . . . . . . . 2-6
User account window . . . . . . . . 2-7
Superuser account window . . . . . . 2-7
Administrator account window . . . . . 2-8
Rack mount screw locations for front and
rear vertical rails . . . . . . . . . . 3-3
Attaching the front brackets to the library
chassis . . . . . . . . . . . . . 3-4
Attaching the rear brackets to the rails
3-4
Creating the rail assemblies . . . . . . 3-5
Installing the rail assemblies . . . . . . 3-6
Securing the front of the library in the rack 3-6
Securing the rear of the library in the rack
3-7
The cables at the rear of the library
3-7
accessor locking screw . . . . . . . . 3-8
Interface cable connection . . . . . . . 3-8
Java security warning message . . . . . 3-12
Web User Interface login screen
3-13
System summary . . . . . . . . . 3-13
Logical library mode settings . . . . . 3-14
Cartridge assignment settings . . . . . 3-15
Network settings . . . . . . . . . 3-16
Date and time settings . . . . . . . 3-17
Encryption settings. . . . . . . . . 3-18
Encryption enabled settings . . . . . . 3-19
Email notifications . . . . . . . . . 3-20
Trap notifications . . . . . . . . . 3-21
Trap list settings . . . . . . . . . 3-22
SNMPv3 user list settings . . . . . . 3-22
User access settings . . . . . . . . 3-23
Add User dialog . . . . . . . . . 3-23
Save configuration . . . . . . . . . 3-24
Cartridge release gate . . . . . . . . 3-27
Cartridge orientation . . . . . . . . 3-28
Operator Panel top menus . . . . . . 4-3
Configuration settings . . . . . . . . 4-3
Current information . . . . . . . . . 4-4
Firmware revision . . . . . . . . . 4-4
Unlock I/O station command . . . . . 4-4
I/O station unlocked . . . . . . . . 4-5
Unlock magazine command . . . . . . 4-5
Move cartridge command . . . . . . . 4-6
Unload command . . . . . . . . . 4-6
4-10.
4-11.
4-12.
4-13.
4-14.
4-15.
4-16.
4-17.
4-18.
4-19.
4-20.
4-21.
4-22.
4-23.
4-24.
4-25.
4-26.
4-27.
4-28.
4-29.
4-30.
4-31.
4-32.
4-33.
4-34.
4-35.
4-36.
4-37.
4-38.
4-39.
4-40.
4-41.
4-42.
4-43.
4-44.
4-45.
4-46.
4-47.
4-48.
4-49.
4-50.
4-51.
4-52.
4-53.
4-54.
4-55.
5-1.
5-2.
5-3.
5-4.
5-5.
5-6.
6-1.
8-1.
Clean Drive command . . . . . . . . 4-6
Inventory command . . . . . . . . . 4-7
Online/Offline command . . . . . . . 4-7
Move to Ship Position command . . . . 4-7
Reboot Drive command . . . . . . . 4-8
Reboot Library command . . . . . . . 4-8
Logout command . . . . . . . . . 4-8
Auto Cleaning settings . . . . . . . . 4-9
Active slot count settings . . . . . . . 4-9
Library access mode settings . . . . . 4-10
Date and time settings . . . . . . . 4-11
Network settings . . . . . . . . . 4-12
Operator Panel settings . . . . . . . 4-13
Factory default settings . . . . . . . 4-13
Error status menu . . . . . . . . . 4-14
Run Library Verify command . . . . . 4-14
Drive diagnostic procedures. . . . . . 4-15
Web User Interface menu . . . . . . 4-16
System Summary screen . . . . . . . 4-17
Library Map screen . . . . . . . . 4-18
Move Cartridges screen . . . . . . . 4-20
Unload Drive screen . . . . . . . . 4-21
Clean Drive screen . . . . . . . . . 4-21
Library State screen . . . . . . . . 4-21
Inventory screen . . . . . . . . . 4-22
Inventory progress bar . . . . . . . 4-22
Unlock magazine . . . . . . . . . 4-22
User Access screen . . . . . . . . . 4-23
Physical library settings screen . . . . . 4-24
Logical library settings screen . . . . . 4-24
Network settings screen . . . . . . . 4-26
Encryption settings screen . . . . . . 4-27
Encryption settings enabled screen
4-28
Date and time settings screen . . . . . 4-28
Email settings screen . . . . . . . . 4-30
SNMP settings screen . . . . . . . . 4-31
Save/Restore configuration with cookies
4-33
Save/Restore screen . . . . . . . . 4-33
Operator interventions screen . . . . . 4-34
View Library Logs screen . . . . . . 4-35
Traces screen . . . . . . . . . . . 4-36
Download Drive Logs screen . . . . . 4-36
Download Library Logs screen . . . . . 4-37
Reset library and drive screen . . . . . 4-37
Firmware Update screen . . . . . . . 4-38
Usage Statistics screen. . . . . . . . 4-39
The LTO Ultrium Data Cartridge . . . . 5-1
Ultrium data and WORM tape cartridges
5-4
Sample bar code label on the LTO Ultrium 6
Tape Cartridge . . . . . . . . . . 5-6
Setting the write-protect switch . . . . . 5-7
Double-boxing tape cartridges for shipping 5-8
Checking for gaps in the seams of a
cartridge . . . . . . . . . . . . 5-9
Front panel LEDs . . . . . . . . . 6-8
Cartridge magazine lock release access hole 8-2
vii
viii
Dell PowerVault TL1000 Tape Autoloader User's Guide
Tables
1.
1-1.
1-2.
1-3.
1-4.
1-5.
1-6.
1-7.
1-8.
1-9.
2-1.
3-1.
3-2.
5-1.
5-2.
5-3.
5-4.
Class I Laser Product . . . . . . . . xii
Data capacity and recording format
1-2
Front panel component descriptions
1-2
Rear panel component descriptions
1-5
Ultrium data and cleaning cartridge
compatibility with Ultrium tape drive . . . 1-9
Physical specifications. . . . . . . . 1-10
Electrical specifications . . . . . . . 1-10
Environmental specifications . . . . . 1-10
Operational specifications . . . . . . 1-11
Acoustical specifications . . . . . . . 1-11
Operator Panel component descriptions
2-1
Location criteria . . . . . . . . . . 3-1
Default library configuration settings
3-10
Cartridge types and colors . . . . . . 5-2
Cartridge Data Capacity and Recording
Formats . . . . . . . . . . . . . 5-2
Nominal cartridge life: Load/unload cycles 5-3
Ultrium data cartridge compatibility with
Ultrium tape drive . . . . . . . . . 5-3
5-5.
5-6.
5-7.
6-1.
A-1.
A-2.
A-3.
A-4.
B-1.
B-2.
C-1.
C-2.
C-3.
C-4.
Cartridges and VOLSERs compatible with
the Ultrium Tape Drives . . . . . . . 5-5
Location of the write-protect switch
5-7
Environment for operating, storing, and
shipping the LTO Ultrium Tape Cartridge . 5-10
Front Panel LED indicators . . . . . . 6-9
Library error codes . . . . . . . . . A-1
Drive error codes . . . . . . . . . A-11
Web user error messages . . . . . . A-11
Trap list . . . . . . . . . . . . A-14
TapeAlert flags supported by the library
B-1
TapeAlert flags supported by the Ultrium
tape drive . . . . . . . . . . . . B-3
Sense key definitions . . . . . . . . C-1
Library sense data . . . . . . . . . C-1
Ultrium Tape drive sense data . . . . . C-3
Ultrium Tape drive sense data - Bytes 12
and 13 . . . . . . . . . . . . . C-4
ix
x
Dell PowerVault TL1000 Tape Autoloader User's Guide
Safety and environmental notices
Safety notices and environmental notices for this product are shown and described.
Safety notices
Observe the safety notices when this product is used. These safety notices contain
danger and caution notices. These notices are sometimes accompanied by symbols
that represent the severity of the safety condition.
Most danger or caution notices contain a reference number (Dxxx or Cxxx).
The sections that follow define each type of safety notice and give examples.
Danger notice
A danger notice calls attention to a situation that is potentially lethal or extremely
hazardous to people. A lightning bolt symbol always accompanies a danger notice
to represent a dangerous electrical condition. A sample danger notice follows:
DANGER: An electrical outlet that is not correctly wired could place
hazardous voltage on metal parts of the system or the devices that
attach to the system. It is the responsibility of the customer to ensure
that the outlet is correctly wired and grounded to prevent an electrical
shock. (D004)
Caution notice
A caution notice calls attention to a situation that is potentially hazardous to
people because of some existing condition, or to a potentially dangerous situation
that might develop because of some unsafe practice. A caution notice can be
accompanied by one of several symbols:
If the symbol is...
It means...
A hazardous electrical condition with less severity than
electrical danger.
A hazardous condition that is not represented by other
safety symbols.
This product contains a Class II laser. Do not stare into the
beam. (C029) Laser symbols are always accompanied by the
classification of the laser as defined by the U. S.
Department of Health and Human Services (for example,
Class I, Class II).
A hazardous condition due to mechanical movement in or
around the product.
xi
If the symbol is...
It means...
This part or unit is heavy but has a weight smaller than 18
kg (39.7 lb). Use care when lifting, removing, or installing
this part or unit. (C008)
A hazardous condition due to the unit's susceptibility to
electrostatic discharge.
Laser safety and compliance
Table 1. Class I Laser Product
The library might contain a laser assembly that complies with the performance
standards set by the US Food and Drug Administration for a Class I laser
product. Class I laser products do not emit hazardous laser radiation. The
library has the necessary protective housing and scanning safeguards to ensure
that laser radiation is inaccessible during operation or is within Class I limits.
External safety agencies have reviewed the library and have obtained approvals
to the latest standards as they apply.
Performing the safety inspection procedure
Before you service the unit, complete the following safety inspection procedure.
1. Stop all activity between the host and the library’s tape drive.
2. Turn off the power to the library by switching the Power button on the rear of
the tape library to the Off position.
3. Disconnect the tape drive’s SAS cable.
4. Unplug the library’s power cord from the electrical outlet and the library’s
power supply unit.
5. Check the library’s power cords for damage, such as a pinched, cut, or frayed
cord.
6. Check the tape drive’s SAS cable for damage.
7. Check the cover of the library for sharp edges, damage, or alterations that
expose its internal parts.
8. Check the cover of the library for proper fit. It should be in place and secure.
9. Check the product label at the rear of the library to make sure that it matches
the voltage at your outlet.
xii
Dell PowerVault TL1000 Tape Autoloader User's Guide
Rack safety
The following general safety information must be used for all rack mounted
devices.
DANGER
v Always lower the leveling pads on the rack cabinet.
v Always install stabilizer brackets on the rack cabinet.
v To avoid hazardous conditions because of uneven mechanical loading,
always install the heaviest devices in the bottom of the rack cabinet.
Always install servers and optional devices, starting from the bottom
of the rack cabinet.
v Rack mounted devices are not to be used as a shelf or workspace. Do
not place any object on top of rack mounted devices.
v Each rack cabinet might have more than one power cord. Be sure to
disconnect all power cords in the rack cabinet before you service any
device in the rack cabinet.
v Connect all devices that are installed in a rack cabinet to power
devices installed in the same rack cabinet. Do not plug a power cord
from a device that is installed in one rack cabinet into a power device
that is installed in a different rack cabinet.
v An electrical outlet that is not correctly wired might place hazardous
voltage on the metal parts of the system or the devices that attach to
the system. It is the responsibility of the customer to ensure that the
outlet is correctly wired and grounded to prevent an electrical shock.
CAUTION:
v Do not install a unit in a rack where the internal rack ambient
temperatures might exceed the manufacturer's recommended ambient
temperature for all your rack mounted devices.
v Do not install a unit in a rack where the air flow is compromised.
Ensure that air flow is not blocked or reduced on any side, front, or
back of a unit that is used for air flow through the unit.
v Consideration must be given to the connection of the equipment to
the supply circuit so that overloading of the circuits does not
compromise the supply wiring or overcurrent protection. To provide
the correct power connection to a rack, refer to the rating labels on the
equipment in the rack to determine the total power requirement of the
supply circuit.
v (For sliding drawers) Do not pull out or install any drawer or feature
if the rack stabilizer brackets are not attached to the rack. Do not pull
out more than one drawer at a time. The rack might become unstable
if you pull out more than one drawer at a time.
v (For fixed drawers) This drawer is a fixed drawer and must not be
moved for servicing unless specified by the manufacturer. Attempting
to move the drawer partially or out of the rack might cause the rack
to become unstable or cause the drawer to fall out of the rack.
(R001)
Safety and environmental notices
xiii
CAUTION:
Removing components from the upper positions in the rack cabinet
improves rack stability during relocation. Follow these general
guidelines whenever you relocate a populated rack cabinet within a
room or building:
v Reduce the weight of the rack cabinet by removing equipment,
starting at the top of the rack cabinet. When possible, restore the rack
cabinet to the configuration of the rack cabinet as you received it. If
this configuration is not known, you must do the following:
– Remove all devices in the 32U position and above.
– Ensure that the heaviest devices are installed in the bottom of the
rack cabinet.
– Ensure that there are no empty U-levels between devices that are
installed in the rack cabinet below the 32U level.
v If the rack cabinet you are relocating is part of a suite of rack cabinets,
detach the rack cabinet from the suite.
v Inspect the route that you plan to take to eliminate potential hazards.
v Verify that the route that you choose can support the weight of the
loaded rack cabinet. Refer to the documentation that comes with your
rack cabinet for the weight of a loaded rack cabinet.
v Verify that all door openings are at least 760 x 2032 mm (30 x 80 in.).
v Ensure that all devices, shelves, drawers, doors, and cables are secure.
v Ensure that the four leveling pads are raised to their highest position.
v Ensure that there is no stabilizer bracket that is installed on the rack
cabinet during movement.
v Do not use a ramp that is inclined at more than 10 degrees.
v When the rack cabinet is in the new location:
– Lower the four leveling pads.
– Install stabilizer brackets on the rack cabinet.
– If you removed any devices from the rack cabinet, repopulate the
rack cabinet from the lowest position to the highest position.
v If a long-distance relocation is required, restore the rack cabinet to the
configuration of the rack cabinet as you received it. Pack the rack
cabinet in the original packaging material, or equivalent. Also, lower
the leveling pads to raise the casters off the pallet and bolt the rack
cabinet to the pallet.
(R002)
xiv
Dell PowerVault TL1000 Tape Autoloader User's Guide
Preface
|
This manual contains information and instructions necessary for the setup,
operation, and servicing of the Dell™ PowerVault™ TL1000 Tape Library.
xv
xvi
Dell PowerVault TL1000 Tape Autoloader User's Guide
Chapter 1. Product description
“Front panel” on page 1-2
“Cartridge magazine” on page 1-4
“Rear panel” on page 1-5
“Bar code reader” on page 1-6
“SAS host interface” on page 1-6
“Encryption” on page 1-6
“Supported Internet Protocols” on page 1-7
“Simple Network Management Protocol (SNMP) messaging” on page 1-7
“Network Time Protocol” on page 1-7
“Ultrium tape drives” on page 1-8
“Media” on page 1-8
“Logical Unit Number (LUN) scanning” on page 1-9
“Location coordinates and element addresses” on page 1-9
“Library specifications” on page 1-10
“Product environment” on page 1-11
a29z0176
“Supported device drivers” on page 1-12
Figure 1-1. TL1000 Tape Autoloader
|
|
|
|
|
The Dell™ PowerVault™ TL1000 Tape Autoloader provides compact, high-capacity,
low-cost solutions for simple, unattended data backup. The library has a compact
1U form factor with easy access to tape cartridges with a removable magazine. The
TL1000 Tape Autoloader is an external stand-alone or rack-mountable unit that
incorporates an Ultrium 6 Half-High Tape Drive (Model S6H), Ultrium 5 Half-High
Tape Drive (Model S5H), or Ultrium 4 Half-High Tape Drive (Model S4H). It is
equipped with a SAS (Serial Attached SCSI) host adapter attachment that has a
data transfer rate of up to 6.0 Gbps.
The TL1000 Tape Autoloader has a 10-position removable cartridge magazine,
providing a maximum of 9 data cartridge positions, or a maximum of 8 data
cartridge positions with a configurable 1-slot I/O station. One position is reserved
as the tape drive exchange position and can be accessed by the library only. Tape
cartridges that are supported in the TL1000 Tape Autoloader include the 2500 GB
native physical capacity LTO Ultrium Tape Cartridge (Ultrium 6), 1500 GB native
physical capacity LTO Ultrium Tape Cartridge (Ultrium 5), 800 GB native physical
capacity LTO Ultrium Tape Cartridge (Ultrium 4), 400 GB Tape Cartridge (Ultrium
1-1
3), 200 GB Tape Cartridge (Ultrium 2), and WORM (Ultrium 6, Ultrium 5, Ultrium
4). The library data storage capacity can be further increased by using hardware
compression.
Table 1-1. Data capacity and recording format
Type
Native Data Capacity
Recording Format
Ultrium 6
2500 GB (6250 GB at 2.5:1
compression)
Reads and writes data on
2176 tracks, 16 tracks at a
time.
Ultrium 5
1500 GB (3000 GB at 2:1
compression)
Reads and writes data on
1280 tracks, 16 tracks at a
time.
Ultrium 4
800 GB (1600 GB at 2:1
compression)
Reads and writes data on 896
tracks, 16 tracks at a time.
Ultrium 3
400 GB (800 GB at 2:1
compression)
Reads and writes data on 704
tracks, 16 tracks at a time.
Ultrium 2
200 GB (400 GB at 2:1
compression)
Reads and writes data on 512
tracks, 8 tracks at a time.
Ultrium 1
100 GB (200 GB at 2:1
compression)
Reads and writes data on 384
tracks, 8 tracks at a time.
Front panel
PowerVault TL1000
5
3
5
4
1
2
a29z0175
UNLOCK
I/O STATION
Figure 1-2. Front panel components
2
Table 1-2. Front panel component descriptions
Number
Component
Description
1
Operator Panel
The Operator Panel features a monochrome
16-character LCD graphic display that is on the
front of the library. Library operations and
service functions are completed from this screen.
The Web User Interface offers some of the same
functionality as the Operator Panel with a web
browser for remote access to the library. For
information about the Operator Panel and the
Web User Interface, see Chapter 2, “User
interfaces,” on page 2-1.
2
1-2
Control keys
Dell PowerVault TL1000 Tape Autoloader User's Guide
The control keys are located to the right of the
Operator Panel LCD display on the front of the
library.
Table 1-2. Front panel component descriptions (continued)
Number
Component
Description
3
Cartridge magazine
The tape library has a single cartridge magazine
that can hold up to 9 data cartridges, or 8 data
cartridges with a 1-slot I/O station. See
Figure 1-3 on page 1-4.
Column 5/Tier 1 in the cartridge magazine can
be configured as a 1-slot I/O station. Column
5/Tier 2 in the cartridge magazine is reserved
for the exchange position and can be accessed by
the library only. The I/O station is used to
import and export cartridges without
interrupting normal library operation. Beginning
with Column 4, a minimum of one column can
be reserved for cleaning cartridges. Cleaning
cartridges are used to clean the tape drive heads.
For configuration details, see Chapter 3,
“Installation and configuration,” on page 3-1.
|
4
Cartridge magazine
release
5
Air vents
Emergency cartridge magazine lock release.
When the I/O station is locked, insert a large,
straightened paper clip twice or hold the paper
clip in place while the cartridge magazine slides
past the I/O station lock.
These vents draw cooler air into the library
enclosure and allow warm air to escape which
helps keep the library at a normal operating
temperature.
Chapter 1. Product description
1-3
Cartridge magazine
o
l
T um
ie n
r 5
1
C
C
o
l
T um
ie n
r 5
2
o
l
T um
ie n
r 4
1
C
C
o
l
T um
ie n
r 4
2
o
l
T um
ie n
r 3
1
C
o
l
T um
ie n
r 3
2
C
o
l
T um
ie n
r 2
1
C
o
l
T um
ie n
r 2
2
C
o
l
T um
ie n
r 1
1
C
o
l
T um
ie n
r 1
2
1
a29z0025
C
2
3
Figure 1-3. Cartridge Magazine
1
Cartridge locations as they appear
in the Library Map.
Note: These labels are for reference
only and do not display on the
magazine.
2
3
Cartridge magazine
Magazine handle
Figure 1-4 shows the cartridge location label 1 and ruler 2 that appears on the
cartridge magazine. The ruler provides an indication of the distance, when the
magazine is opened or withdrawn, to the end of the magazine before it clears the
front edge of the library. To prevent dropping the magazine, support both ends of
the magazine before it clears the front edge of the library.
2
a29z0057
1
Figure 1-4. Cartridge magazine (top view)
1-4
Dell PowerVault TL1000 Tape Autoloader User's Guide
Rear panel
5
4
1
2
6
a29z0003
3
Figure 1-5. Rear panel components
Table 1-3. Rear panel component descriptions
Number
Component
1
Power connector
2
Power switch
The library is powered ON when the power supply
switch on the rear panel is ON (|). The library has no
independent power switch on the front panel.
3
SAS host interface
connector
Serial-attached SCSI host interface cable connection.
The Ultrium 4, 5, and 6 SAS drives use the SFF-8088
connection at the drive end and SFF-8088 or SFF-8470
at the host adapter end.
4
Ethernet port
This port is used to connect the library to a network.
5
6
Description
The library connects to a 110/220 volt ac power
supply.
Accessor locking screw The accessor locking screw is used to lock the
accessor in place during transportation.
Important: Remove the accessor locking screw before
the library is powered ON.
Air vent
These vents allow air to escape from the power
supply and tape drive sled.
Chapter 1. Product description
1-5
Bar code reader
The bar code reader is a part of the library accessor. The bar code reader reads
each cartridge bar code label that identifies the types of cartridge magazines and
tape drive that is installed in the library. It also provides inventory feedback to the
host application, Operator Panel, and Web User Interface. The library stores the
customized inventory data in memory. Library firmware supports a 6 or
8-character volume serial number (VOLSER) on the bar code label on the tape
cartridge.
SAS host interface
The Ultrium 4, Ultrium 5, and Ultrium 6 Half-High Tape Drives support the Serial
Attached SCSI (SAS) interface. The SFF-8088 SAS connector on the Ultrium 4,
Ultrium 5, and Ultrium 6 is compatible with SAS-1 or SAS-2 cables.
|
|
A drive with a SAS (Serial Attached SCSI) interface is linked directly to controllers.
SAS is a performance improvement over traditional SCSI. SAS enables multiple
devices (up to 128) of different sizes and types to connect simultaneously with
thinner and longer cables. Its full-duplex signal transmission supports 6.0 Gb/s
(S4H, S5H, and S6H). In addition, the TL1000 Tape Autoloader is hot-plugged, if
necessary. SAS drives can auto-negotiate speed.
|
Encryption
The LTO Ultrium 6, Ultrium 5, and Ultrium 4 Tape Drives support host
Application Managed Encryption (AME) with T10 encryption methods, for SAS
drives. Data encryption is supported by LTO Ultrium 6, Ultrium 5, and Ultrium 4
Data Cartridges only.
Note: Application Managed Encryption (AME) does not require a key.
The encryption enabled drive contains the necessary hardware and firmware to
encrypt and decrypt host tape application data. Encryption policy and encryption
keys are provided by the host application or host server. A drive digital certificate
is installed at manufacturing time. Each drive receives a unique serial number and
certificate. The T10 application validates each drive instance by checking the
drive’s digital certificate.
The LTO Ultrium encryption environment is complex and requires knowledge
beyond that of product trained Service Support Representatives (SSRs). The
Encryption function on tape drives (desktop, stand-alone, and within libraries) is
configured and managed by the customer. In some instances, SSRs are required to
enable encryption at a hardware level when service access or service password
controlled access is required. Customer setup support is by Field Technical Sales
Support (FTSS), customer documentation, and software support for encryption
software problems. Customer 'how to' support is also provided by way of support
line contract.
The encryption-capable library firmware allows the user to select None or
Application Managed encryption from the Web User Interface. The factory default
is None.
1-6
Dell PowerVault TL1000 Tape Autoloader User's Guide
Supported Internet Protocols
|
The TL1000 Tape Autoloader supports the Internet protocols:
v IPv4
v IPv6
To learn more about IPv4, visit http://www.iana.org/. To learn more about IPv6,
visit http://www.ipv6.org/..
Simple Network Management Protocol (SNMP) messaging
Occasionally, the library might encounter a situation that you want to know about,
such as an open magazine or a fault that causes the library to stop. The library
provides a standard TCP/IP protocol called Simple Network Management Protocol
(SNMP) to send alerts about conditions (such as need for operator intervention)
over a TCP/IP LAN network to an SNMP monitoring station. These alerts are
called SNMP traps. With the information supplied in each SNMP trap, the
monitoring station (together with customer-supplied software) can alert operations
personnel of possible problems or operator interventions that occur.
SNMP traps
SNMP Traps are alerts or status messages that can be collected, monitored, and
used to proactively manage attached libraries with SNMP protocol with the SNMP
monitoring stations. In summary, each trap provides the following information:
v Product Identification such as product name, description, manufacturer, model
number, firmware level, and the URL that the trap is designated for.
|
v Product Status such as the severity of the trap, status (current and previous) and
the time the trap occurred.
v Library State (physical device status) such as identification and status of devices
that is monitored. It would include enclosure, power supply, controller,
magazine status, drive count, cartridge slot count, and I/O station count. Also
included would be certain library statistics, and where appropriate, the fault FSC
(fault symptom code) including the severity and description of that fault.
v Drive Status such as the identification of each drive in the library, firmware
level, serial number, and other address and status information.
v Trap Definitions such as library status change, open magazine, I/O accessed,
hard fault information, requests to clean the drive, excessive retries, and
returning to normal operations.
v SNMP MIBs: The library's Management Information Base (MIB) contains units
of information that specifically describe an aspect of the system, such as the
system name, hardware number, or communications configuration. When with
SNMP to monitor your TL1000 Tape Autoloader, make sure that the TL1000 MIB
file is loaded on your SNMP monitoring station. SNMP traps are sent to the
SNMP monitoring stations that are defined for your library (see “Configuring
SNMP trap notifications” on page 4-31).
Network Time Protocol
NTP is an Internet standard protocol that assures accurate synchronization of
computer clock times in a network of computers. Running as a continuous
background client program on a computer, NTP sends periodic time requests to a
server, obtaining server time stamps, and with them to adjust the client’s clock.
Chapter 1. Product description
1-7
Ultrium tape drives
The TL1000 Tape Autoloader supports the Ultrium 4 (S4H), Ultrium 5 (S5H), and
Ultrium 6 (S6H) half-high tape drives.
|
a80hh015
The Ultrium 4, Ultrium 5, and Ultrium 6 half-high tape drives support the Serial
Attached SCSI (SAS) interface. They have one Mini-SAS (SFF-8088) connector.
Figure 1-6. Ultrium half-high tape drive
Speed matching
To improve system performance, the Ultrium 4, Ultrium 5, and Ultrium 6 Tape
Drives use a technique that is called speed matching to dynamically adjust its
native (uncompressed) data rate to the slower data rate of the attached server.
Channel calibration
The channel calibration feature of the Ultrium 4, Ultrium 5, and Ultrium 6 Tape
Drives customizes each read/write data channel for optimum performance. The
customization enables compensation for variations in the recording channel
transfer function, media characteristics, and read/write head characteristics.
Power management
The Ultrium 4, Ultrium 5, and Ultrium 6 Tape Drives feature a power management
function. This function controls the drive’s electronics so that part of the electronics
completely turns OFF when circuit functions are not needed for the drive’s
operation.
Media
The TL1000 Tape Autoloader uses Ultrium tape cartridges that provide up to
2500-GB native capacity (up to 6250 GB with 2.5:1 hardware data compression) for
Ultrium 6 tape drives, 1500-GB native capacity (up to 3000 GB with 2:1 hardware
data compression) for Ultrium 5 tape drives, and 800-GB native capacity (up to
1600 GB with 2:1 hardware data compression) for Ultrium 4 tape drives.
|
|
1-8
Dell PowerVault TL1000 Tape Autoloader User's Guide
Table 1-4. Ultrium data and cleaning cartridge compatibility with Ultrium tape drive
Ultrium
Tape Drive
Ultrium 6
Ultrium 5
LTO Ultrium Data Cartridges
2500 GB
1500 GB
800 GB
400 GB
200 GB
100 GB
(Ultrium 6) (Ultrium 5) (Ultrium 4) (Ultrium 3) (Ultrium 2) (Ultrium 1)
Read/Write Read/Write
Read only
Read/Write Read/Write
Ultrium 4
Read/Write Read/Write
Ultrium 3
|
Read only
Read only
Read/Write Read/Write
Read only
Ultrium 2
Read/Write Read/Write
Ultrium 1
Read/Write
Note: The TL1000 Tape Autoloader supports the Ultrium 4 (S4H), Ultrium 5 (S5H),
and Ultrium 6 (S6H) Tape Drives only.
For more information about media compatibility, see Chapter 5, “Media,” on page
5-1.
Logical Unit Number (LUN) scanning
|
The TL1000 Tape Autoloader uses a single SCSI ID and dual LUNs to control the
tape drive (LUN 0) and library accessor (LUN 1). The library requires a Host Bus
adapter (HBA) that supports LUN scanning. If it is not enabled, your host system
cannot scan beyond LUN 0 and fails to detect the library. It sees only the tape
drive.
Important: Some HBAs, such as RAID controllers, do not support LUN scanning.
Location coordinates and element addresses
|
The TL1000 Tape Autoloader incorporates patented high-density (HD) slot
technology, which allows multiple cartridges to be stored in a tiered architecture.
The depth of a cartridge location in a high-density slot is known as a tier.
High-density slots are designed to contain multiple cartridges in Tiers 1 and 2.
Note: Each column has a spring-loaded mechanism that pushes a tape cartridge
into Tier 1 when it is the only cartridge in that column. A single cartridge in
a column takes on the Tier 2 element address even though it is physically in
Tier 1.
Chapter 1. Product description
1-9
Front
Reserved slot
Rear
Column 5
Column 4
Column 3
Column 2
Tier 2
Tier 2
Tier 2
Tier 2
Column 5
Column 4
Column 3
Column 2
Column 1
Tier 1
Tier 1
Tier 1
Tier 1
Tier 1
Column 1
Tier 2
Drive
Accessor
Figure 1-7. Location coordinates
A storage element address is assigned to each cartridge at the time the cartridge is
inserted. Storage element addresses range from 4097 to 4105 (0x1001 to 0x1009)
when the I/O station is not enabled, and from 4097 to 4104 (0x1001 to 0x1008)
when the I/O station is enabled.
Library specifications
Table 1-5. Physical specifications
Parameter
Measurement
Front panel width (chassis/bezel)
445 mm (17.52 in.)/483 mm (19.02 in.)
Depth
850 mm (33.46 in.)
Height
44 mm (1.73 in.)
Weight (library only)
13 kg (28.66 lbs)
Table 1-6. Electrical specifications
Parameter
Measurement
Voltage
100 - 240 Vac. (4.0 to 1.5 A)
Frequency
50 - 60 Hz
Power consumption
110 W
For more information about installation specifications, see Chapter 3, “Installation
and configuration,” on page 3-1.
Table 1-7. Environmental specifications
Parameter
Operating (see Note)
Storage
Shipping
Temperature
10 - 38 °C (50 - 100
°F)
1 - 60 °C (34 - 140 °F)
-40 to 60 °C (-40 to
140 °F)
Temperature
variation
10 °C/hour
(maximum)
10 °C/hour
(maximum)
10 °C/hour
(maximum)
20 - 80%
10 - 90%
10 - 90%
26 °C (78.8 °F)
maximum
29 °C (84 °F)
maximum
29 °C (84 °F)
maximum
Relative humidity
Wet bulb temperature
1-10
Dell PowerVault TL1000 Tape Autoloader User's Guide
Table 1-7. Environmental specifications (continued)
Parameter
Operating (see Note)
Storage
Shipping
0 - 2,500
0 - 2,500
0 - 2,500
Altitude (meters)
Note: The operating environment of the library must not conflict with the media storage
requirements. The library can operate at elevated temperatures for an extended period.
However, the temperature might shorten the useful life of media that is stored in the
library. If media is stored in the library for more than 10 hours, the storage temperature
requirements for media are met. It is assumed that media stored in the library is
approximately 2 degrees above ambient temperature when the library is powered ON.
Table 1-8. Operational specifications
Parameter
Maximum storage
capacity
Model S6H
Model S5H
Model S4H
22.5 TB (56.2 TB with
2.5:1 compression)
13.5 TB (27 TB with
2:1 compression)
7.2 TB (14.4 TB with
2:1 compression)
Maximum number of
data cartridges
9 (including an optional I/O Station)
Drive types
Ultrium 6 Half High
Ultrium 5 Half High
Ultrium 4 Half High
Sustained native data
transfer rate
160 MB/s (320 MB/s
with 2:1
compression)
140 MB/s (280 MB/s
with 2:1
compression)
120 MB/s (240 MB/s
with 2:1
compression)
Interface
6 Gb/s SAS
3 Gb/s SAS
Note: The Ultrium 4 Half-High tape drive in S4H libraries that are manufactured after
March 2011 support 6.0 Gb/s and a sustained native data rate of 120 Gb/s.
Table 1-9. Acoustical specifications
Parameter
Measurement
Idling acoustical noise sound power level
LwAD in Bels (1 Bel = 10 dB)
6.6
Maximum acoustical noise sound power
level LwAD in Bels (1 Bel = 10 dB)
6.8
Product environment
|
The TL1000 Tape Autoloader is designed to operate in a general business
environment.
The library meets the acoustical requirements for general business area category
2D. Category 2D states that the library can be installed a minimum of 4 m (13 ft.)
from a permanent work station.
To allow for service access, install the library a minimum of 0.9 m (3 ft.) from all
obstacles.
The library is a precision computer peripheral device. To ensure maximum
longevity of your library, locate the library away from dust, dirt, and airborne
particulates, as follows:
v Keep the library away from high-traffic areas, especially if the floor is carpeted.
Carpeting harbors dust and walking on the carpet can cause the carpet fibers
and the dust to become airborne.
Chapter 1. Product description
1-11
v Keep the library out of printer and copier rooms because of toner and paper
dust. Additionally, do not store paper supplies next to the library.
v Keep the library away from moving air caused by doorways, open windows,
fans, and air conditioners.
Ensure that the machine covers are always kept closed to minimize any
contamination from airborne particles.
Supported device drivers
Device drivers enable the drive to interact with various servers. For applications
that use device drivers, see the application’s documentation to determine which
drivers to use.
Note: If you do not have Internet access and you need information about device
drivers, contact your sales representative.
1-12
Dell PowerVault TL1000 Tape Autoloader User's Guide
Chapter 2. User interfaces
“Operator Panel”
“Web User Interface” on page 2-5
The library has a local interface, the Operator Panel, and a remote Web User
Interface (UI).
The Operator Panel is on the front of the library and allows users to work locally
on the library. The Web User Interface allows users and administrators to view and
perform some library functions from remote sites.
The Web User Interface is implemented as a Java™ Applet that runs in a web
browser from any PC on the network. The Java Applet requires that Java 1.5.0 or
higher is installed on your host computer for full functionality, and is best viewed
with Internet Explorer 6.0 or higher. Internet Explorer 7.0 or higher is required for
IPv6.
Operator Panel
6
8
7
9
1
2
4
3
5
a29z0177
The Operator Panel is on the front bezel of the library. The Operator Panel displays
library information and menu commands that are used to run library management
functions in response to the control keys on the right of the LCD display.
Figure 2-1. Operator Panel components
Table 2-1. Operator Panel component descriptions
Number
Component
1
LCD display
|
2
Up key (Δ)
|
3
Down key (∇)
Description
16-character LCD graphic display
Button that is used to navigate upward (↑) through the menu
items
Button that is used to navigate downward (↓) through the
menu items
2-1
Table 2-1. Operator Panel component descriptions (continued)
Number
Component
4
Cancel key
Button that is used to cancel a user action and return to the
last menu item
5
Enter key
Button that is used to display a submenu or to select a user
action
6
Description
Ready/Activity Green LED lit when the unit is powered ON. The LED
LED
flashes when there is any library activity or the library is
offline.
7
Clean Drive
LED
8
Attention LED
Amber LED lit when a cartridge is incompatible with the
drive, marginal, or invalid. The LED turns OFF when the
media is removed from the drive. The LED might also be lit
when there is a power supply problem.
9
Error LED
Amber LED lit when there is an unrecoverable library or
drive failure. The corresponding error message displays on
the LCD display.
Amber LED lit when the drive needs cleaning. The LED
turns OFF after the drive is cleaned successfully.
The Operator Panel operates in two basic modes:
v User Interaction mode - Mode that is employed when a user is pushing keys on
the Operator Panel.
v System Driven mode - Normal mode of operation where the Operator Panel
displays status in response to commands issued from the drive's internal
interface.
When an Operator Panel key is pressed and released, the Operator Panel
automatically changes to User Interaction mode. User Interaction mode continues
until 3 minutes after a user stops pushing keys, or the requested accessor action
stops, whichever is longer. Then, the Operator Panel returns to System Driven
mode.
If necessary, the Operator Panel automatically changes to System Driven mode.
When this change occurs, the library remembers what the user was doing before
the display mode changed.
Any operational conflict between commands that are received over the host
interface or the Web User Interface and those commands that are entered by way
of the Operator Panel are avoided with a reservation mechanism on a first-come,
first-served basis. Operator Panel commands are canceled by an Operator Panel
logout or timeout.
Library firmware does not allow a user to select an impossible request. Those
situations include, but are not limited to v
v
v
v
Moving a cartridge from any source to a position occupied by another cartridge
Moving a cartridge from an empty cartridge position
Loading a cartridge from any source to a full drive
Unloading a cartridge from an empty drive
Any error that is detected by the library or drive controller and not recoverable
through predetermined firmware algorithms is considered unrecoverable. When an
error occurs, an error code is displayed on the Operator Panel display and the
2-2
Dell PowerVault TL1000 Tape Autoloader User's Guide
error LED is ON. The error code remains on the Operator Panel until a key is
pressed, which causes the Operator Panel to return to the Home Screen. Numeric
error codes are used for unrecoverable errors. Otherwise, text status messages are
displayed.
When the library powers ON or resets, it goes through several internally controlled
initialization processes, called the Power-On-Self-Test (POST).
Front panel LEDs
All LEDs are updated during power ON and reset sequences. At power ON or
software reset, all LEDs turn ON as soon as POST allows. When initialization
starts, all LEDs turn OFF and the Ready/Activity LED flashes at a rate of
approximately 2 seconds per cycle. When the mechanical initialization is complete,
the Ready/Activity LED stops flashing and turns ON.
If a library failure occurs, the Ready/Activity LED turns OFF and the Error LED
turns ON. The Operator Panel also displays an appropriate error code to help
identify the failure.
The following are more operational details of LEDs:
v The Ready/Activity LED (6 in Figure 2-1 on page 2-1) turns ON any time the
unit is powered ON and functional. The Ready/Activity LED flashes whenever
there is library. This LED also flashes when the library is offline.
v The Clean Drive LED (7 in Figure 2-1 on page 2-1) turns ON when a
“cleaning required” command is issued by the drive. The LED turns OFF after a
successful drive cleaning operation.
v The Attention LED (8 in Figure 2-1 on page 2-1) turns ON to indicate that a
piece of media is bad/marginal, or invalid. The LED turns OFF when all
marginal and invalid cartridges are exported from the library. The Attention LED
also turns ON if Autoclean is enabled and no cleaning cartridge is in a cleaning
position.
v The Error LED (9 in Figure 2-1 on page 2-1) turns ON when there is an
unrecoverable drive or library failure. An error message is displayed on the
screen and the LED remains ON until the error state is resolved.
For information, see “Interpreting front panel LEDs” on page 6-8.
Input modes
There are several ways to enter values in the different menu items. These values
are selectable predefined values, toggle values (for example, ON/OFF) and
numerical values like network addresses.
Selecting predefined values
1. To set the predefined values, press the Enter key to select the menu item.
2. With the Plus and Minus keys, select one of the various predefined values for
that item.
3. As soon as the Operator Panel display shows the correct value, press the Enter
key to apply the value.
Toggling values
Toggle values are used to switch between two different states like ON and OFF.
Chapter 2. User interfaces
2-3
1. After you navigate to the menu item, press the Enter key to select the menu
item.
2. With the Plus and Minus keys, select one of the various predefined states for
that item.
3. Press the Enter key to apply the new state.
Entering numerical values
Numerical values are needed for network addresses, password entries, and other
configuration entries.
1. After you navigate to the menu item, the current value is displayed and the
cursor highlights the first digit of the value that can be changed.
2. For each digit to be changed in the value:
a. Use the Plus and Minus keys to increment or decrement the digit.
b. Press the Enter key to highlight the next editable digit.
3. Press the Enter key at the last digit to apply the complete entry. Press the
Cancel key to cancel the whole edit process and maintain the original value.
Logging in
a29z0028
At power ON or software reset, the library ready screen displays when POST
initialization completes successfully.
Figure 2-2. Library ready screen
a29z0029
To log in to the Operator Panel, press the Enter key. The password entry screen
displays.
Figure 2-3. Password entry screen
Press the UP and DOWN arrow keys to change the current digit. Press the Enter
key to advance to the next digit. The default password is 0000. When you are
logged in, you can change the password with the Change Login Password
command. See “Configuring Operator Panel settings” on page 4-13.
2-4
Dell PowerVault TL1000 Tape Autoloader User's Guide
Screen elements
3
a29z0030
2
1
Figure 2-4. Screen elements
The Operator Panel displays a single menu item (1 in Figure 2-4) on each screen.
The existence of other menu items above and below the currently displayed item is
indicated by the arrows (2 in Figure 2-4) on the right side of the screen.
a29z0032
In the Configuration menu, the current configuration setting is indicated by an
asterisk (3 in Figure 2-4) on the right side of the screen. For example, in
Figure 2-4, the I/O station is enabled. When a configuration setting is changed, the
confirmation screen in Figure 2-5 displays. Press the Enter key to confirm, or
Cancel to return to the previous screen.
Figure 2-5. Confirmation screen
Web User Interface
The Web User Interface Java Applet requires Java 1.5.0 or higher be installed on
your host computer for full function, and is best viewed with Internet Explorer 6.0
or higher. Internet Explorer 7.0 or higher is required for IPv6. If your computer
does not have Java installed or you must upgrade your installation, download the
latest version of the Java Runtime Environment (JRE) for your platform from
http://www.java.com/. Follow the instructions that are provided to enable and
configure the Java Runtime Environment for your browser.
The Web User Interface can also be used to update the library and drive firmware,
and to download error logs, drive memory dumps, and other library data.
|
Before the TL1000 Tape Autoloader can be managed over a network with the Web
User Interface, set up the initial network configuration of the library with the
Operator Panel. For information, see “Configuring network settings” on page 3-24.
Logging in
To log in to the Web User Interface from Internet Explorer, you must enter the IP
address of the library. The IP address can be obtained with the View Settings
command from the Operator Panel. For example, http://192.168.1.1.
When the applet starts, the following warning message displays. This message is
normal and does not indicate a problem.
Chapter 2. User interfaces
2-5
a29z0194
Figure 2-6. Java security warning message
a29z0195
After the Web User Interface is started, the login window is displayed.
Figure 2-7. Login page
The factory default account login and password for an Administrator account is
v Account: admin
v Password: secure
The account name and password are case-sensitive. After your account name and
password are entered, use your mouse to click Login or press the Enter key.
For information about account privileges, see “User privileges” on page 2-8.
Common header elements
All Web User Interface windows (except for the Login screen) contain the
following common elements in the header
v Help - Click to read context-sensitive help for the associated page.
2-6
Dell PowerVault TL1000 Tape Autoloader User's Guide
v Logoff - Click to log out of the Web User Interface.
Menus available from the Web User Interface
a29z0196
Figure 2-8 shows the Web User Interface window for a User account, Figure 2-9
shows the window for a Superuser account, and Figure 2-10 on page 2-8 shows the
window for an Administrator account.
a29z0197
Figure 2-8. User account window
Figure 2-9. Superuser account window
Chapter 2. User interfaces
2-7
a29z0198
Figure 2-10. Administrator account window
For a complete description of all Web User Interface menu options, see Chapter 4,
“Operations,” on page 4-1.
User privileges
User privilege levels are manually assigned to user accounts created within the
library. Controlling access to screens and operations within the library preserves
the integrity of the library and the data that is stored within the library.
There are three types of user privileges in the library.
v Users are allowed to monitor the library, but not complete actions that affect the
physical library.
v Superusers are allowed to operate the physical and logical library, but not
complete actions that affect the library configuration.
v Administrator users are allowed access to the entire physical library and logical
library, including configuration. Only one administrator user must be assigned
the login name admin.
User privileges include
v Multiple users can be logged in at one time on the Web User Interface.
v Any user can be logged in to only one interface at a time.
2-8
Dell PowerVault TL1000 Tape Autoloader User's Guide
Chapter 3. Installation and configuration
“Choosing a location”
|
“Installing in a rack” on page 3-2
“Removing the accessor locking screw” on page 3-7
“Attaching the library to a server” on page 3-8
“Configuring your library with the
Web User Interface” on page 3-11
“Logging in to the Web User Interface” on page 3-12
“Checking firmware level” on page 3-13
“Configuring library settings” on page 3-14
“Configuring network settings” on page 3-16
“Configuring date and time settings” on page 3-17
“Configuring encryption settings” on page 3-18
“Configuring email notifications” on page 3-20
“Configuring trap notifications” on page 3-21
“Managing user access” on page 3-23
“Saving the library configuration” on page 3-24
“Configuring your library with the
Operator Panel” on page 3-24
“Logging in to the Operator Panel” on page 3-24
“Configuring network settings” on page 3-24
“Configuring library settings” on page 3-26
“Populating the library with cartridges” on page 3-27
“Verifying library and drive operation” on page 3-28
“Taking the Library Online” on page 3-29
“Registering for support notification” on page 3-29
|
To install and configure a TL1000 Tape Autoloader, complete these procedures in
the order they are presented.
Choosing a location
Table 3-1. Location criteria
Criteria
Definition
Room temperature
16 - 32 °C (60 - 90 °F)
Voltage
100 - 240 Vac. (4.0 to 1.5 A)
Note: The power switch is on the rear of the
library and must be easily accessible.
Frequency
50 - 60 Hz
Relative humidity
20 - 80% non-condensing
Air quality
The library must be placed in an area with
minimal sources of particulate
contamination. Avoid areas near frequently
used doors and walkways, stacks of supplies
that collect dust, printers, and smoke-filled
rooms. Excessive dust and debris can
damage cartridges and the tape drive.
3-1
Table 3-1. Location criteria (continued)
Criteria
Definition
Clearance
v Back: Minimum of 15 cm (6 in.)
v Front: Minimum of 30 cm (12 in.)
v Sides: Minimum of 5 cm (2 in.)
Rack requirements
Standard EIA 19-inch rack: 1U space
Installing in a rack
The TL1000 Tape Autoloader can be easily installed into a standard 19-inch rack
system. A standard 19-inch rack system contains multiple mounting locations that
are called EIA units as defined by the Electronics Industries Association. Each EIA
unit contains three square or round holes that are used to mount rack designed
equipment. The library requires 1 EIA unit (1U) of rack space. Each unit is
separated by a small space.
|
When you decide on a location in your rack for the library, consider that the
Operator Panel has a small LCD screen. The library must be positioned to allow
for easy viewing. The rear of the library must be free from any obstructions to
allow easy access to the power switch and other rear panel components.
Note: Before you begin the rack installation of the library, read the safety
information in “Rack safety” on page xiii. Also, verify that no desktop feet
are attached to the bottom of the library.
To install the library in a rack:
1. Verify that your rack kit includes all the necessary contents.
2. Determine the location in your rack for your library to be installed. With a
pencil, mark the location on the front vertical rails and rear vertical rails
(Figure 3-1 on page 3-3) in your rack.
3-2
Dell PowerVault TL1000 Tape Autoloader User's Guide
a29z0015
| Figure 3-1. Rack mount screw locations for front and rear vertical rails
|
|
3. Place the screws 11 into the left and right brackets.
|
|
|
|
4. Attach the left 3 and right 4 (Figure 3-2 on page 3-4) front brackets to the
front of the library chassis with 2 flat-head screws 8 on each side. Use the
top two screw holes on each side. The flange of each bracket with the inserted
screws (11) fits into the cutout on each side of the bezel.
Chapter 3. Installation and configuration
3-3
|
8
3
a29z0185
4
11
8
|
| Figure 3-2. Attaching the front brackets to the library chassis
|
5. Attach the left 1 and right 2 rear brackets to the left 5 and right 6
front rails with 2 round-head screws 10 on each side (Figure 3-3).
12
1
2
5
6
a29z0019
10
Figure 3-3. Attaching the rear brackets to the rails
Important: Do NOT tighten these screws completely.
6. Slide in the rear rails 7 from back to front, to create the rail assemblies.
Ensure that the screw holes face outwards (Figure 3-4 on page 3-5).
3-4
Dell PowerVault TL1000 Tape Autoloader User's Guide
a29z0018
7
Figure 3-4. Creating the rail assemblies
|
|
7. Install the rail assemblies into the rack (Figure 3-5 on page 3-6). Ensure the 3
holes in the front of the unit align with the 1U space marked on the vertical
rails in Step 2. Secure the rails to the rack with 4 flat-head screws 9 on each
side of the rack. Use the top and bottom screw locations on the front and rear
of the rack rail (Figure 3-1 on page 3-3)).
Chapter 3. Installation and configuration
3-5
9
a29z0020
9
Figure 3-5. Installing the rail assemblies
8. Slide the library chassis into the rack. The heads of the large screws 11
appear through the oval openings on each side of the bezel. Use a Phillips
screwdriver to attach these screws to the rack (Figure 3-6).
|
|
|
a29z0186
|
|
| Figure 3-6. Securing the front of the library in the rack
|
3-6
Dell PowerVault TL1000 Tape Autoloader User's Guide
9. Secure the rear of the library to the rack with a round-head screw 10 on
each rear bracket (Figure 3-7). Tighten the other rear bracket screws to secure
the library to the rack.
10
a29z0022
10
Figure 3-7. Securing the rear of the library in the rack
10. Run the SAS cable, power cable, and Ethernet cable through the
hook-and-loop fastener strap 12. Leave enough slack to reach the
corresponding connectors, then tighten the strap (Figure 3-8).
a29z0023
12
Figure 3-8. The cables at the rear of the library
Note: For information about converting and relocating the library, see
Chapter 8, “Removal and replacement procedures,” on page 8-1.
Removing the accessor locking screw
Important: The accessor locking screw prevents the library accessor from moving
during shipment and must be removed before the library is powered
ON.
Remove the accessor locking screw, located on the rear panel of the library (1 in
Figure 3-9 on page 3-8).
Chapter 3. Installation and configuration
3-7
a29z0102
1
Figure 3-9. accessor locking screw
Attaching the library to a server
The drive is attached to a server with the Serial Attached SCSI (SAS) interface. The
Web User Interface accesses the library with an ethernet interface.
Connecting the Host Interface cables
To connect the host interface cable to the library:
Note: It is recommended that you shut down and turn OFF the associated server
before you connect the SAS interface cable. Turn ON the associated server
after the SAS interface cable is connected to the library and server, the
library is powered ON, and the library completed the initialization.
2
3
a29z0100
1
Figure 3-10. Interface cable connection
1. Attach an ethernet cable to the ethernet port (1 in Figure 3-10)
Note: On rack mount installations, run the cable through the hook-and-loop
fastener strap on the right rear bracket.
3-8
Dell PowerVault TL1000 Tape Autoloader User's Guide
2. Attach the host end of the SAS cable to the drive’s SAS connector (2 in
Figure 3-10 on page 3-8). See “SAS host interface” on page 1-6 for information
about the type of SAS connector that is required for attachment to the drive.
Note: On rack mount installations, run the cable through the hook-and-loop
fastener strap on the right rear bracket.
3. Attach the other end of the host SAS interface cable to the host or to an
interposer if required.
4.
v Method 1: Plug the ethernet cable into your server or PC to access the Web
User Interface directly. This method modifies your server or PC network
settings to match the library default settings. You can also use the library
Operator Panel to change the library network settings to match the server or
PC network settings before you use the Web User Interface to access the
library. If the ethernet connection is directly attached to a server or a PC, a
crossover ethernet cable might be required.
v Method 2: Plug the ethernet cable into an ethernet switch or router to access
the Web User Interface on a LAN (local area network). The library network
settings must be entered with the Operator Panel before the Web User
Interface is used to access the library.
Connecting the power cord
Important: This product can ONLY be used with an approved power cord for your
specific geographic region. Use of an unapproved power cord might result in
v Not meeting individual country-specific safety requirements
v Overheating with potential personal injury or property damage
v A fracture that results in internal contacts that are exposed, which might subject
the user to a shock hazard
To connect a power cord:
1. Plug one end of the power cord or rack PDU power cord into the power
connector (3 in Figure 3-10 on page 3-8) on the rear panel of the library.
Note: On rack mount installations, run the rack PDU power cord through the
hook-and-loop fastener strap on the right rear bracket, and tighten the
strap. The rack PDU power cord is a special power cord that plugs into a
rack power strip.
2. Plug the other end of the power cord into the nearest properly grounded
power outlet. On rack mount installations, plug the other end of the rack PDU
power cord into the nearest rack PDU.
3. Power ON the library by toggling the power switch on the power supply to the
ON (|) position.
4. Wait for the library to initialize.
During initialization, the library completes a Power ON Self Test (POST) to
ensure that the library hardware is functional. The library also tests
communications with the tape drive over the internal bus.
Note: If the Operator Panel does not initialize, check all cable connections, and
ensure that the cartridge magazine is closed and in the locked position.
Ensure that the power supply switch is in the ON position. If the Operator
Panel still does not initialize, see Chapter 6, “Troubleshooting,” on page 6-1.
Chapter 3. Installation and configuration
3-9
Important: To disconnect all power from the library, turn the power switch to the
OFF position, then remove the power cord from the outlet. The power
switch removes power from portions of the library and the drive, but
the power supply still has ac power at its input.
Note: When the library is power-cycled, wait 10 seconds after the power is OFF
before the library is powered ON again.
Configuring the library
The library can be configured with the Web User Interface or the Operator Panel.
The preferred method for configuring your library is by using the Web User
Interface. See “Configuring your library with the Operator Panel” on page 3-24
and “Configuring your library with the Web User Interface” on page 3-11.
For complete detailed information about all of the functions available on the
library with the Operator Panel and the Web User Interface, see Chapter 4,
“Operations,” on page 4-1.
The default library configuration settings are listed in Table 3-2.
Table 3-2. Default library configuration settings
Configuration Item
Default Setting
NETWORK
Ethernet link speed
Auto
SSL security
Disabled
IPv4 settings
Enabled
DHCP (Dynamic Host Configuration
Protocol)
Enabled
Static IP address
Disabled
IPv4 address
0.0.0.0
Subnet mask
255.255.255.0
Gateway
0.0.0.0
IPv6 settings
Disabled
DHCP (Dynamic Host Configuration
Protocol)
Enabled
Stateless auto-configuration
Enabled
Static IP address
Disabled
IPv6 address
0:0:0:0:0:0:0:0
Prefix length
64
Gateway
0:0:0:0:0:0:0:0
DNS setting
Disabled
DNS IP address
0.0.0.0
PHYSICAL
Library name
(Blank)
Auto Cleaning
Disabled
Bar code label length
8 characters
LOGICAL
3-10
Dell PowerVault TL1000 Tape Autoloader User's Guide
Table 3-2. Default library configuration settings (continued)
Configuration Item
Default Setting
Library mode
Random
Loop
Enabled
Auto Load
Enabled
Active slots
9+0
ENCRYPTION
Encryption method
None
DATE and TIME
NTP server
Disabled
NTP server address
0.0.0.0
Time zone (GMT)
+00:00
Date (MM/DD/YYYY)
01/08/2008
Auto adjustment by PC
Every 1 minute
NOTIFICATIONS
SMTP (mail) settings
Mail server address
Mail event
0.0.0.0
Error events enabled
SNMP (trap) settings
Community
Public
Trap event
Error events enabled
SNMPv3 engine ID
(Set by library firmware)
Static library network settings must be entered with the Operator Panel before the
library can be accessed remotely with the Web User Interface. If your system is
serviced by a Dynamic Host Configuration Protocol (DHCP) server, the network
parameters are automatically set. Once remote access is established, you can
complete the configuration of your library remotely.
If you choose to use the Operator Panel to configure your library, go to
“Configuring your library with the Operator Panel” on page 3-24.
Configuring your library with the Web User Interface
If you choose to use the Web User Interface to configure your library, first enter
your library network settings with the Operator Panel (see “Configuring network
settings” on page 4-12).
To configure your library with the Web User Interface:
1. Install Java 1.5.0 or higher on your host computer. Download the latest
version of the Java Runtime Environment (JRE) for your platform from
http://www.java.com/.
2. “Logging in to the Web User Interface” on page 3-12
3. “Checking firmware level” on page 3-13
4. “Configuring library settings” on page 3-14
5. “Configuring network settings” on page 3-16
6. “Configuring date and time settings” on page 3-17
Chapter 3. Installation and configuration
3-11
7.
8.
9.
10.
11.
“Configuring encryption settings” on page 3-18
“Configuring email notifications” on page 3-20
“Configuring trap notifications” on page 3-21
“Managing user access” on page 3-23
“Saving the library configuration” on page 3-24
Logging in to the Web User Interface
To log in to the Web User Interface:
1. If necessary, obtain the IP address of the library on the Operator Panel.
a. From the top menu of the Operator Panel, press the Minus key to select
View Current Information, and press Enter.
b. Press the Minus key until the IP Address setting is displayed and make a
note of the IP address.
c. Press the Cancel key repeatedly to log out of the Operator Panel.
2. Open Internet Explorer on your server or PC to access the Web User Interface.
3. In the browser address field, enter your library's IP address URL to start the
Web User Interface applet in the browser window. For example,
http://192.168.1.1
a29z0194
When the applet launches, the warning message in Figure 3-11 displays. This
message is normal and does not indicate a problem.
4. Click Run.
Figure 3-11. Java security warning message
5. On the Web User Interface login screen, enter the administrator login account
name and default password.
v Account: admin
v Password: secure
3-12
Dell PowerVault TL1000 Tape Autoloader User's Guide
a29z0099
Figure 3-12. Web User Interface login screen
6. Click Login.
a29z0193
Checking firmware level
Figure 3-13. System summary
Check the current level of library firmware that is displayed in the System
Summary. If an updated level of firmware is available, download and update the
library firmware before normal operation starts. See “Updating library and drive
firmware” on page 4-38.
Chapter 3. Installation and configuration
3-13
Configuring library settings
a29z0124
Logical library settings
Figure 3-14. Logical library mode settings
To configure the library access mode settings for the logical library:
1. Expand Configure Library, if necessary, and click Logical in the left navigation
pane of the Web User Interface.
2. Select the Library Mode.
v Random - In random mode, the library allows the server's (host's)
application software to select any data cartridge in any order.
v Sequential - In sequential mode, the library's firmware predefines the
selection of the cartridges. After initialization, the firmware causes the library
to select the first available cartridge found (counting from the lowest
Column/Tier position through the highest cartridge position in your library)
for loading into the drive. See “Location coordinates and element addresses”
on page 1-9.
– Loop - Sequential mode with loop mode ON loads the cartridge in the
lowest Column/Tier cartridge position after the cartridge in the highest
Column/Tier cartridge position is filled with data and sent back to its
home position. This mode allows endless backup operations without user
interaction.
– Autoload - Sequential mode with autoload mode ON loads the first
available cartridge (the lowest Column/Tier cartridge position that
contains a cartridge) automatically if the library powers ON, or resets,
with an empty drive. If the library powers ON with a cartridge already in
the drive, sequential mode starts from the home position of that cartridge,
unless the host issues a rewind and unload command to the drive. In
which case the next cartridge in sequence will be loaded into the drive.
To start sequential mode if autoload is OFF, use the Move Cartridge
command to load the first cartridge into the drive. The sequence starts from
the home position of that cartridge. Cartridges need not to be in contiguous
slots.
To stop sequential mode, use the Move Cartridge command to unload the
drive. This command cancels sequential mode; the next sequential cartridge
is NOT loaded.
To restart sequential mode, use the Move Cartridge command again to load a
cartridge; the loading sequence resumes from the home position of that
cartridge.
v Number of active slots - Select the number of active slots you would like to
assign in your library. Selecting the number of active slots defines the
number of storage slots, number of cleaning/inactive slots, whether the I/O
Station is enabled/disabled, and whether auto cleaning is allowed. The first
digit configures the number of active storage positions (4, 6, 8, or 9). The
3-14
Dell PowerVault TL1000 Tape Autoloader User's Guide
second digit configures Column 5, Tier 1 of the magazine as an I/O Station
(0 when disabled, and 1 when enabled). The Auto Cleaning function can be
enabled only if there is at least one inactive position in the magazine. If Auto
Cleaning is enabled, the inactive positions become cleaning cartridge
positions.
3. Click Submit to enable the settings.
a29z0123
Physical library settings
Figure 3-15. Cartridge assignment settings
To configure the library cartridge assignment settings, complete the following
procedure:
1. Expand Configure Library, if necessary, and click Physical in the left
navigation pane of the Web User Interface.
2. Select the Library settings.
v Library name - Enter a name for your library.
v Auto Cleaning - Automatically cleans the drive when the drive requests that
cleaning and a cleaning cartridge is present in the library. Auto cleaning can
be enabled only when there is at least one inactive position in the magazine
in the library.
v Bar code label length - Use to choose the number of characters in the
cartridge bar code that is reported to the host computer.
3. Click Submit to enable the settings.
Chapter 3. Installation and configuration
3-15
a29z0125
Configuring network settings
Figure 3-16. Network settings
Once the network settings are entered on the Operator Panel, the current network
configuration of the library can be modified with the Web User Interface. The
changes that are made to the network settings do not take effect until after the
library is rebooted.
To modify the network settings:
1. Expand Configure Library, if necessary, and click Network in the left
navigation pane of the Web User Interface.
2. Select the Ethernet Link speed (duplex mode).
3. Select the TCP/IP settings. To enable dual IPv4/IPv6 protocol, select both Use
IPv4 and Use IPv6 and enter parameters for both.
v Security - Select Enable SSL for Web to provide secure communications
between the web browser and the tape library.
v IPv4 setting - Select Use IPv4 to enable the IPv4 Internet Protocol. Select the
corresponding button to obtain an IP address automatically (DHCP) or use
static IP address settings. When with DHCP, use the Operator Panel to
determine the library's assigned IP address. See “Configuring network
settings” on page 4-12. Enter the following parameters if with static IP
address settings.
– IPv4 address - Sets the TCP/IPv4 address of the library on the network.
– Subnet mask - Defines and limits users within a local network.
– Gateway - Allows access outside the local network.
v IPv6 setting - Select Use IPv6 to enable the IPv6 Internet Protocol. Select the
corresponding button to obtain an IP address automatically (DHCP), to
obtain an IP address with stateless auto configuration, or use static IP
address settings. Enter the following parameter if with static IP address
settings.
– IPv6 address - Sets the TCP/IPv6 address of the library on the network.
3-16
Dell PowerVault TL1000 Tape Autoloader User's Guide
– Prefix length - Decimal value that indicates the number of contiguous,
high-order bits comprising the network portion of the address.
– Gateway - Allows access outside the local network.
v DNS setting - Select Use DNS to use a domain name server. The DNS
server, if entered, allows the encryption, date and time, and notifications IP
addresses to be specified with host names instead of numerical IP addresses.
– DNS IP address - Sets the IP address of the DNS server.
4. Click Submit to enable the settings.
a29z0170
Configuring date and time settings
Figure 3-17. Date and time settings
Configure the date and time settings with one of three methods: automatically with
a remote NTP time server on the network, automatically with the clock on your
host computer, or manually.
Note: Selecting Refresh refreshes the date and time.
Note: If you choose to manually set your date and time, you must reset the date
and time after the library is power-cycled and after a library reset.
Note: When the library is power-cycled, wait 10 seconds after the power is OFF
before the library is powered ON again.
Once the network settings are entered on the Operator Panel, the current date and
time can be modified with the Web User Interface.
|
The TL1000 Tape Autoloader communicates with an NTP server with the following
conditions:
v Client/server basis operation
v UDP (User Datagram Protocol) to access the NTP server
v Does not use authentication keys
v Library polling is every 12 hours
To modify the date and time settings:
1. Expand Configure Library, if necessary, and click Date and Time in the left
navigation pane of the Web User Interface.
2. Select the Date and Time settings.
v NTP Server - Enables time and date control with a time server on the
network.
Chapter 3. Installation and configuration
3-17
– NTP server address - Enter the IP address of the time server. IPv4 and
IPv6 addresses are supported, depending on the TCP/IP settings. Host
names can be entered instead of numerical IP addresses if Use DNS is
selected in the Network settings.
– Time zone - Enter the time zone relative to Greenwich Mean Time (GMT).
v If the time server is disabled, enter the local time and date manually.
– Date - Enter the date with the MM/DD/YYYY format.
– Time - Enter the time with the HH:MM:SS format.
v Auto Adjustment by PC - Select a time interval and click Start to
synchronize the library with the clock on your host computer at regular
intervals. The Web User Interface Java Applet must be running continuously
to use this function.
3. Click Submit to update the settings.
a29z0199
Configuring encryption settings
Figure 3-18. Encryption settings
Before you can use the encryption capability of the tape drive, you must be sure
that certain software and hardware requirements are met.
3-18
Dell PowerVault TL1000 Tape Autoloader User's Guide
a29z0200
Figure 3-19. Encryption enabled settings
|
|
|
|
|
|
To modify the encryption settings:
1. Expand Configure Library, if necessary, and click Encryption in the left
navigation pane of the Web User Interface.
2. In the Encryption method: drop-down menu, choose Application Managed to
enable encryption in your library. No further configuration steps are necessary.
Note: Library Managed Encryption and System Managed Encryption are not
supported in this Library. Library Managed Encryption configuration
options and Keypath Diagnostics menus are greyed out in the Library
Web Interface.
3. Click Submit to enable the settings.
Chapter 3. Installation and configuration
3-19
a29z0127
Configuring email notifications
Figure 3-20. Email notifications
Note: This procedure is optional.
To set up email notifications of library events:
1. Expand Configure Library, if necessary, and click Notifications in the left
navigation pane of the Web User Interface.
2. Click the SMTP (Mail) Settings tab.
3. Configure the SMTP server and header settings.
v SMTP server address - SMTP mail server address. IPv4 and IPv6 addresses
are supported. Host names can be entered instead of numerical IP addresses
if the DNS server is specified in the Network settings.
v Sender address - Mail header information.
v Subject - Mail header information.
4. Enter the email addresses to be notified when an event takes place in the Mail
To fields.
5. Select the event level to report in the Mail Event field.
6. Click Test to send a test email message to the enabled addresses.
7. Click Submit to enable the settings.
3-20
Dell PowerVault TL1000 Tape Autoloader User's Guide
a29z0128
Configuring trap notifications
Figure 3-21. Trap notifications
Note: This procedure is optional. SNMP notifications are not enabled unless there
is a check mark in the SNMP Enabled check box. To disable SNMP
notifications, clear the SNMP Enable check box and click Submit.
|
The traps that are supported by the TL1000 Tape Autoloader are listed in “Trap
definitions (types)” on page A-14.
To set up trap notifications for an SNMP server:
1. Expand Configure Library, if necessary, and click Notifications in the left
navigation pane of the Web User Interface.
2. Click the SNMP Settings tab.
3. Click to place a check mark in the SNMP Enabled check box.
4. Configure the SNMP server and header settings.
v Community - SNMP community name to which the library belongs.
v Name - Unique SNMP name for the system.
v Location - Physical location of the system.
v Contact - Contact person's name.
v SNMPv3 engine ID - A read-only attribute that identifies the SNMPv3
engine.
5. Enter the trap IP addresses of the SNMP monitoring stations to be notified
when an event takes place and the security settings in the Trap List menu.
Chapter 3. Installation and configuration
3-21
a29z0140
Figure 3-22. Trap list settings
v Validity - Enable/Disable setting.
v Trap version - v1, v2c, or v3. For v2c and v3, the Inform check box
determines whether an SNMP INFORM request is sent instead of a trap
event.
v IP address - IPv4 and IPv6 addresses are supported. Host names can be
entered instead of numerical IP addresses if the DNS server is specified.
v Community (v1 or v2c) - SNMP community name.
v User name (v3 only) - SNMPv3 unique user name.
v Authentication (v3 only) - Authentication algorithm, MD5, or SHA. When an
algorithm is specified, an authentication password and confirmation of the
password are required.
v Privacy (v3 only) - Privacy service encryption and decryption algorithm, DES
or AES. When an algorithm is specified, a privacy password and
confirmation of the password are required.
a29z0141
6. Enter the SNMPv3 users who are allowed to access the tape library in the
SNMPv3 User List menu.
Figure 3-23. SNMPv3 user list settings
v Validity - Enable/Disable setting.
v User name - SNMPv3 unique user name.
v Authentication - Authentication algorithm, MD5, or SHA. When an
algorithm is specified, an authentication password and confirmation of the
password are required.
3-22
Dell PowerVault TL1000 Tape Autoloader User's Guide
v Privacy - Privacy service encryption and decryption algorithm, DES or AES.
When an algorithm is specified, a privacy password and confirmation of the
password are required.
7. Select the event level to report in the Trap event field.
8. Click Test to send a test trap notification to the enabled IP addresses.
9. Click Submit to enable the settings.
a29z0122
Managing user access
Figure 3-24. User access settings
Note: This procedure is optional.
To add users able to access the library with the Web User Interface:
1. Expand Configure Library, if necessary, and click User Access in the left
navigation pane of the Web User Interface.
a29z0139
2. Select the Add action in the menu.
v Add - To add new users.
v Modify - To change the selected user's access role or password.
v Remove - To delete the selected user from the system.
Figure 3-25. Add User dialog
3. Enter the user name and password information in the dialog box.
Chapter 3. Installation and configuration
3-23
4. Assign a user access role.
v User - User access permission allows users to monitor the library, but not to
complete functions that affect the library.
v Superuser - Superuser access permission allows users to operate the physical
and logical library, but not to change configuration settings.
v Administrator - Administrator access permission allows users to complete
tape library functions and change configuration settings.
5. Click Submit to enable the settings.
a29z0129
Saving the library configuration
Figure 3-26. Save configuration
Note: This procedure is recommended.
Each time that you change the configuration of your library, save the configuration.
This function also maintains several library configuration profiles that can be
restored to the library when wanted with the Web User Interface.
To save library configuration:
1. Expand Configure Library, if necessary, and click Save/Restore in the left
navigation pane of the Web User Interface.
2. Click Save to create a configuration file of your library on your computer.
Configuring your library with the Operator Panel
To configure your library with the Operator Panel, complete the following
procedures:
1. “Logging in to the Operator Panel”
2. “Configuring network settings”
3. “Configuring library settings” on page 3-26
Logging in to the Operator Panel
In many environments, the default network settings might be sufficient to access
your tape library on a network. To change the default network settings with the
Operator Panel, complete the following procedure:
1. When the library is initialized, press Enter to move to the Password screen.
2. Enter 0000, the default password. The top menu screen displays.
3. When finished with the Operator Panel, press Cancel to return to the top menu
screen.
4. When finished, press the Minus key to select Logout, and press Enter.
Configuring network settings
In many environments, the default network settings might be sufficient to access
your tape library on a network. To change the default network settings with the
Operator Panel, complete the following procedure:
1. From the top menu screen, press the Minus key to select Configuration, and
press Enter.
3-24
Dell PowerVault TL1000 Tape Autoloader User's Guide
2. Link speed (Default: Auto Negotiation)
a. Select Configure Network Settings > Configure Link Speed.
b. Select the required speed and press Enter.
c. Press Enter again to apply the setting, or Cancel to reject the setting.
The speed must be set to Set Auto Negotiation for gigabit Ethernet
networks.
d. Press Cancel to backtrack through the menu hierarchy.
3. DHCP IPv4 (Default: Enabled)
a. Select Configure Network Settings > Configure DHCP > Configure
DHCPIPv4.
b. Select Enable DHCP IPv4 and press Enter to enable, or press Down and
select Disable DHCP IPv4 to disable.
c. Press Enter again to apply the setting, or Cancel to reject the setting.
d. Press Cancel to backtrack through the menu hierarchy.
4. DHCP IPv6 (Default: Disabled)
a. Select Configure Network Settings > Configure DHCP > Configure
DHCPIPv6.
b. Select Enable DHCP IPv6 and press Enter to enable, or press Down and
select Disable DHCP IPv6 to disable.
c. Press Enter again to apply the setting, or Cancel to reject the setting.
d. Press Cancel to backtrack through the menu hierarchy.
5. IPv4/IPv6 Address (Default: 0.0.0.0). If DHCP is disabled, set the IP address
manually.
a. Select Configure Network Settings > Change IP Address.
b. Select Set IP Address IPv4 to enter the IPv4 address of the tape library.
Set IP Address IPv6 to enter the IPv6 IP address (split over 4 screens).
c. Press Enter again to apply the setting, or Cancel to reject the setting.
d. Press Cancel to backtrack through the menu hierarchy.
6. IPv4 Subnet Mask (Default: 255.255.255.0). If DHCP IPv4 is disabled, set the
IPv4 subnet mask manually.
a. Select Configure Network Settings > Change Subnet Mask > Set Subnet
Mask.
b. Enter the IPv4 subnet mask.
c. Press Enter again to apply the setting, or Cancel to reject the setting.
d. Press Cancel to backtrack through the menu hierarchy.
7. IPv6 Prefix Length (Default: 64). If DHCP IPv6 is disabled, set the IPv6 prefix
length manually.
a. Select Configure Network Settings > Change Subnet Mask > Set Prefix
Length.
b. Enter the IPv4 prefix length.
c. Press Enter again to apply the setting, or Cancel to reject the setting.
d. Press Cancel to backtrack through the menu hierarchy.
8. IPv4/IPv6 Gateway (Default: 0.0.0.0). If DHCP is disabled, set the IP address
manually.
a. Select Configure Network Settings > Change Gateway.
b. Select Set Gateway Address IPv4 to enter the IPv4 gateway address or Set
Gateway Address IPv6 to enter the IPv6 gateway address (split over 4
screens).
Chapter 3. Installation and configuration
3-25
c. Press Enter again to apply the setting, or Cancel to reject the setting.
d. Press Cancel to backtrack through the menu hierarchy.
9. Press Cancel to return to the Network Settings menu.
10. Press Cancel to return to the Configuration menu.
11. Press Cancel to return to the top menu screen.
Configuring library settings
To configure the library settings, complete the following procedure:
1. From the top menu screen, press the Minus key to select Configuration, and
press Enter.
2. Select Configure Library, and press Enter.
3. I/O Station (Default: Disabled)
a. Select Configure Library > Configure I/O Station.
b. Select Enable I/O Station to enable the 1-slot I/O station or Disable I/O
Station to disable.
c. Press Enter again to apply the setting, or Cancel to reject the setting.
d. Press Cancel to backtrack through the menu hierarchy.
4. Active Slots (Default: All)
a. Select Configure Library > Set Active Slots Count.
b. Select the number of active slots you would like to assign for the logical
library.
c. Press Enter again to apply the setting, or Cancel to reject the setting.
5. Library Mode (Default: Random)
a. Select Configure Library > Configure Library Mode.
b. Select Set Random Mode or Configure Sequential Mode, and press Enter.
Random - In random mode, the library allows the server's (host's)
application software to select any data cartridge in any order.
Sequential - In sequential mode, the library's firmware predefines the
selection of the cartridges. After initialization, the firmware causes the
library to select the first available cartridge found (counting from the lowest
Column/Tier position through the highest cartridge position in your library)
for loading into the drive.
v Loop - Sequential mode with loop mode ON loads the cartridge in the
lowest Column/Tier cartridge position after the cartridge in the highest
Column/Tier cartridge position is filled with data and sent back to its
home position. This procedure allows endless backup operations without
user interaction.
v Autoload - Sequential mode with autoload mode ON loads the first
available cartridge (the lowest Column/Tier cartridge position that
contains a cartridge) automatically if the library powers ON, or resets,
with an empty drive. If the library powers ON with a cartridge already in
the drive, sequential mode starts from the home position of that
cartridge, unless the host issues a rewind and unload command to the
drive. In which case the next cartridge in sequence is loaded into the
drive.
To start sequential mode if autoload is OFF, use the Move Cartridge
command to load the first cartridge into the drive. The sequence starts from
the home position of that cartridge. Cartridges need not to be in contiguous
slots.
3-26
Dell PowerVault TL1000 Tape Autoloader User's Guide
To stop sequential mode, use the Move Cartridge command to unload the
drive. This command cancels sequential mode; the next sequential cartridge
is NOT loaded.
To restart sequential mode, use the Move Cartridge command again to load
a cartridge; the loading sequence resumes from the home position of that
cartridge.
c. Press Enter again to apply the setting, or Cancel to reject the setting.
d. Press Cancel to backtrack through the menu hierarchy.
6. Date/Time - Enter the local time and date manually if you do not plan to use a
network-based time server.
a. Select Configure Library > Configure Date/Time.
b. Select Set Date or Set Time, and press Enter.
v Date - Enter the date with the MM/DD/YYYY format.
v Time - Enter the time with the HH:MM:SS format.
c. Press Cancel to backtrack through the menu hierarchy.
7. Auto Cleaning (Default: Disabled)
a. Select Cofiguration > Configure Auto Cleaning.
b. Select Enable Auto Cleaning or Disable Auto Cleaning, and press Enter.
The Auto Cleaning function is enabled only if there is at least one inactive
position in the magazine in the library.
c. Press Enter again to apply the setting, or Cancel to reject the setting.
d. Press Cancel to backtrack through the menu hierarchy.
Populating the library with cartridges
The magazine is opened with the Operator Panel.
To populate the library with data and cleaning cartridges, complete the following
procedure:
1. From the top menu screen on the Operator Panel, press the Minus key to select
Unlock Magazine, and press Enter, or from Web User Interface: Manage
Library > Unlock Magazine.
2. Insert cartridges in the magazine.
1
a29z0101
Note: A blue release gate (1 in Figure 3-27) in the upper left corner of each
column in the cartridge magazine prevents each cartridge from falling
out of the front of the magazine. When manually releasing the gate with
one hand, position your other hand in front of the column opening to
protect cartridges that are ejected by the internal column spring.
Figure 3-27. Cartridge release gate
Chapter 3. Installation and configuration
3-27
Note: Column 5 Tier 2 is reserved as the exchange position. This position is
accessible by the library only. A locking mechanism prevents insertion of
a cartridge into the reserved slot.
Each cartridge must be inserted with the indicator arrow on the leading edge of
the upper surface of the cartridge pointing towards the cartridge magazine (see
Figure 3-28).
Note: Do not rely on the bar code label orientation, if attached, to provide an
indication of the correct cartridge orientation. The bar code label is right
side up if attached correctly.
T
O
1
2
3
L4
a29z0056
L
Figure 3-28. Cartridge orientation
The Auto Cleaning function can be enabled only if the number of active slots is
less than the maximum available slots. The active slots are always enabled
starting with the lowest numerical cartridge position number in the magazine.
This position is at the drive end of the cartridge magazine. Place cleaning
cartridges in inactive cartridge positions for use by the auto cleaning function.
Do not store data or cleaning cartridges in the I/O Station (Column 5, Tier 1) if
the I/O station is enabled.
3. Put the magazine back into the library and wait for the library inventory to
complete. Then, you can proceed to the next step.
4. Press Cancel to return to the top-level menu.
Verifying library and drive operation
To verify the library is operating correctly:
1. From the top menu screen on the Operator Panel, press the Minus key to select
Service, and press Enter.
2. Press the Minus key to select Diagnostics, and press Enter.
3. Select Run Library Verify, and press Enter. Follow the on-screen instructions.
If there is a cartridge in a drive, the library moves the cartridge to its home
position, or to the I/O station if the home position is not known.
3-28
Dell PowerVault TL1000 Tape Autoloader User's Guide
4. When prompted, insert a customer supplied scratch cartridge into the I/O
station.
When the scratch cartridge is loaded, the bar code reader reads the bar code
label on the cartridge and stores it for later comparison. The cartridge is then
moved to the tape drive, where the drive runs its own write/read/verify test.
When the test is done, the library tells the drive to eject the cartridge, and then
the cartridge is moved back to the I/O station. The bar code is read again and
compared with the value stored earlier.
5. When prompted, remove the cartridge from the I/O station.
The result of the test is reported on the Operator Panel.
If an error occurs, note the error code number and see Appendix A, “Error
codes,” on page A-1.
6. Press Cancel to return to the top-level menu.
Taking the Library Online
When your library is configured, you are ready to save the library configuration
and take the library online.
Note: The tape drive is always online, regardless of whether the library is online
or offline.
To take the library online with the Operator Panel:
1. From the top menu screen, press the Minus key to select Commands, and press
Enter.
2. Select Change Library State, and press Enter.
3. Select Set Library Online, and press Enter.
4. Press Cancel repeatedly to return to the top-level menu.
5. Press the Minus key to select Logout, and press Enter.
To take the library online with the Web User Interface:
1. Save the library configuration.
a. Expand Configure Library, if necessary, and click Save/Restore in the left
navigation pane of the Web User Interface.
b. Click Save, and then enter a file name and select a location to save the
configuration file.
2. Verify the library state.
a. Click Library State in the left navigation pane of the Web User Interface.
b. If the library is offline, click Bring Online.
c. Click Yes to confirm when prompted.
A message dialog displays when the operation is completed.
3. Click Logoff in the upper right corner of the window.
Registering for support notification
Support notification registration provides email notification when new firmware
levels are updated and are available for download and installation.
Enter your user name and password on the Appendix D, “Library Configuration
Form,” on page D-1.
Chapter 3. Installation and configuration
3-29
Note: Library firmware and tape drive firmware are verified and released together.
When the latest firmware is updated, verify that all installed components
such as the tape drive and library are at the latest levels noted on the
Support website. Mixing different levels of library and tape drive firmware
is not supported and might cause unpredictable results.
Dell suggests that you update library and drive firmware when new levels become
available. For instructions on updating library and drive firmware, see “Updating
library and drive firmware” on page 4-38.
Now you are ready to use your library.
3-30
Dell PowerVault TL1000 Tape Autoloader User's Guide
Chapter 4. Operations
“The Operator Panel”
on page 4-3
Monitoring the Library
“Configuration settings” on page 4-3
“Current information” on page 4-4
“Firmware revision” on page 4-4
Managing the Library
“Unlocking the I/O station” on page 4-4
“Unlocking the cartridge magazine” on page 4-5
“Moving cartridges” on page 4-6
“Unloading the drive” on page 4-6
“Cleaning the drive manually” on page 4-6
“Conducting a library inventory” on page 4-7
“Taking the library online and offline” on page 4-7
“Powering down the library” on page 4-7
“Shipping the library” on page 4-7
“Rebooting the drive” on page 4-8
“Rebooting the library” on page 4-8
“Logging out of the library” on page 4-8
Configuring the Library
“Configuring auto cleaning” on page 4-9
“Configuring the number of active slots” on page 4-9
“Configuring the library access mode” on page 4-10
“Configuring date and time settings” on page 4-11
“Configuring network settings” on page 4-12
“Configuring Operator Panel settings” on page 4-13
“Setting the library to factory defaults” on page 4-13
Servicing the Library
“Checking the library error status” on page 4-14
“Running library verify diagnostic procedures” on page 4-14
“Running drive diagnostic procedures” on page 4-15
4-1
“The Web User
Interface” on
page 4-16
Monitoring the Library
“The system summary” on page 4-17
“The library map” on page 4-18
Managing the Library
“Moving cartridges” on page 4-20
“Unloading the drive” on page 4-21
“Cleaning the drive manually” on page 4-21
“Taking the library online and offline” on page
4-21
“Conducting a library inventory” on page 4-22
“Unlocking the cartridge magazine” on page
4-22
Configuring the Library “Managing user access” on page 4-23
“Configuring physical library settings” on page
4-24
“Configuring logical library settings” on page
4-24
“Configuring network settings” on page 4-26
“Configuring encryption settings” on page 4-27
“Configuring date and time settings” on page
4-28
“Configuring email notifications” on page 4-30
“Configuring SNMP trap notifications” on page
4-31
“Saving and restoring configuration settings”
on page 4-32
“Operator
interventions” on page
4-34
“Library logs” on page
4-35
“Trace data” on page
4-36
“Downloading drive
logs” on page 4-36
“Downloading library
logs” on page 4-37
“Resetting the library
and drives” on page
4-37
“Updating library and
drive firmware” on
page 4-38
“Accessor statistics” on
page 4-39
4-2
Dell PowerVault TL1000 Tape Autoloader User's Guide
The Operator Panel
Figure 4-1 shows the top-level menu tree structure of the Operator Panel on the
front of the TL1000 Tape Autoloader. For details on how to select commands and
options, see the description in “Operator Panel” on page 2-1.
|
Top Level
Configuration
Commands
Service
Move Cartridge
Configure Library
View Error Status
Unlock Magazine
Unload
Configure Auto Cleaning
Diagnostics
Commands
Clean Drive
Configure Network Settings
View Firmware Revision
Configuration
Inventory
Configure Op Panel Settings
Telnet Service Port*
* For use by technical
support personnel only.
View Current Information
Move to Ship Position
View Settings
Service
Reboot Drive
Set Default
Logout
Reboot Library
* If enabled.
Change Library State
a29z0064
Unlock I/O Station*
Figure 4-1. Operator Panel top menus
Monitoring the library
Configuration settings
Configuration
View Settings
Figure 4-2. Configuration settings
Use Configuration > View Settings to display a list of the library configuration
settings.
The settings that are displayed include:
v Library settings
– I/O station (On/Off)
– Auto cleaning (On/Off)
– Number of cleaning slots when Auto cleaning is enabled
– Operator Panel back light setting
v Network settings
– Link speed
– IP address protocol
– IPv4 settings (IP address, subnet mask address, gateway address, DHCP)
– IPv6 settings (IP address, gateway address, prefix length, DHCP, stateless
Auto configuration)
v Drive settings
– Model number
Chapter 4. Operations
4-3
Current information
View Current Information
Figure 4-3. Current information
Use View Current Information to display the network settings information.
The settings that are displayed include:
v Network settings
– Worldwide node name
– IP address protocol stack
– IP address
Firmware revision
Service
View Firmware Revision
Figure 4-4. Firmware revision
Select Service > View Firmware Revision to display the current version of the
library firmware.
Managing the library
Unlocking the I/O station
Unlock I/O Station
Figure 4-5. Unlock I/O station command
Select Unlock I/O Station to unlock the I/O station. This menu option is available
only when the I/O station is enabled in the library configuration settings.
4-4
Dell PowerVault TL1000 Tape Autoloader User's Guide
a29z0024
Figure 4-6. I/O station unlocked
After the I/O station is closed, wait for the library to complete its inventory before
you proceed with normal library operations.
Note: A blue release gate in the upper left corner of each column in the cartridge
magazine prevents each cartridge from falling out of the front of the
magazine. When manually releasing the gate with one hand, position your
other hand in front of the column opening to protect cartridges that are
ejected by the internal column spring.
Unlocking the cartridge magazine
Unlock Magazine
Figure 4-7. Unlock magazine command
Select Unlock Magazine to unlock and remove the cartridge magazine.
When the cartridge magazine is unlocked, it can be removed from the library to
insert or remove data and cleaning cartridges. When the cartridge magazine is
fully inserted, the magazine locks into place.
After the magazine is closed, wait for the library to complete its inventory before
you proceed with normal library operations.
Note: A blue release gate in the upper left corner of each column in the cartridge
magazine prevents each cartridge from falling out of the front of the
magazine. When manually releasing the gate with one hand, position your
other hand in front of the column opening to protect cartridges that are
ejected by the internal column spring.
Chapter 4. Operations
4-5
Moving cartridges
Commands
Move Cartridge
Source Slot
Destination Slot
Figure 4-8. Move cartridge command
Select Commands > Move Cartridge to move data cartridges and cleaning
cartridges between the I/O station, storage positions, and tape drive.
Specify the following parameters:
v Source Slot - Specify a source that contains a cartridge.
v Destination Slot - Specify the destination.
Press the Enter key to move the cartridge from the source to the destination.
Note: Cartridges cannot be moved to the accessor with this command, but can be
moved from the accessor if, for example, the library was powered OFF with
a tape still held in the Picker.
Unloading the drive
Commands
Unload
Figure 4-9. Unload command
Select Commands > Unload to unload the cartridge from the tape head
mechanism.
Unload when library is in Random mode: The cartridge in the drive is unloaded
from the tape head mechanism, but is still retained inside the tape drive housing.
The Move Cartridge command moves the cartridge from the drive to another
location. Moving a tape cartridge from a drive to another location both unloads
and moves the cartridge in a single action.
Unload when library is in Sequential mode: The cartridge in the drive is unloaded
from the tape head mechanism, and returned to the cartridge home position.
Press the Enter key to unload the cartridge from the tape head mechanism.
Cleaning the drive manually
Commands
Clean Drive
Figure 4-10. Clean Drive command
Select Commands > Clean Drive to clean the tape drive manually with a cleaning
cartridge in either a cartridge storage position or the I/O station.
4-6
Dell PowerVault TL1000 Tape Autoloader User's Guide
Press the Enter key to move the cleaning cartridge to the drive and start drive
head cleaning. The cleaning cartridge is returned to its home position when drive
cleaning is finished.
Conducting a library inventory
Commands
Inventory
Figure 4-11. Inventory command
Select Commands > Inventory to force the library to run an inventory of the
cartridge magazine, accessor, and tape drive to refresh the library map. An
inventory is conducted automatically when power is first turned ON or when the
cartridge magazine is removed and reinserted.
Press the Enter key to conduct the inventory.
Taking the library online and offline
Commands
Change Library State
Set Library Online
Set Library Offline
Figure 4-12. Online/Offline command
Select Commands > Change Library State to take the library online or offline.
It is sometimes necessary to take the library offline before servicing functions for
the library are done. Once these operations are finished, it is necessary to bring the
library online.
Note: The tape drive is always online, even when the library is offline.
Powering down the library
Before powering OFF the library, ensure that the library is in an idle state with no
mechanical movement of the accessor, and all data operations (for example, backup
operations, accessing of log files) are complete. Then, power OFF the library with
the power switch on the rear panel of the library.
Important: If you switch the library power OFF while the library is being
accessed, loss of data might occur.
Note: When power cycling the library, wait 10 seconds after the power is OFF
before the library is powered ON again.
Shipping the library
Commands
Move to Ship Position
Figure 4-13. Move to Ship Position command
Chapter 4. Operations
4-7
Select Commands > Move to Ship Position when the library is prepared to move
to a new location. The accessor must be placed in a parked position within the
library housing. Move to Ship Position finishes all active commands that are
received from the host application, does not process any new commands, and
moves the accessor to the parked position before the power is turned OFF.
1. When Unlock Magazine is displayed, press the Enter key to unlock the
cartridge magazine. The magazine unlocks and the display prompts the
removal of the magazine.
2. Remove all cartridges from the magazine and reinsert the magazine into the
slide mechanism. The library completes an inventory to verify no cartridges are
in the magazine.
3. If the magazine is empty, the library moves the accessor to the ship position.
The library can be powered down. If the magazine is NOT empty, the library
prompts to remove cartridges. After all cartridges are removed and the
magazine is replaced, start the ship position process again.
Rebooting the drive
Commands
Reboot Drive
Figure 4-14. Reboot Drive command
Select Commands > Reboot Drive to force the drive to reboot. You also specify
whether the library will come online or offline after it finishes rebooting.
Press the Enter key to reboot the drive.
Rebooting the library
Commands
Reboot Library
Figure 4-15. Reboot Library command
Select Commands > Reboot Library to force the library to reboot. You also specify
whether the library will come online or offline after it finishes rebooting.
Press the Enter key to reboot the library.
Logging out of the library
Logout
Figure 4-16. Logout command
Select Logout to log out of the library. The login screen is displayed for the next
user.
4-8
Dell PowerVault TL1000 Tape Autoloader User's Guide
Configuring the library
Configuring auto cleaning
Configuration
Configure Auto Cleaning
Enable Auto Cleaning
Disable Auto Cleaning
Figure 4-17. Auto Cleaning settings
Select Configuration > Configure Auto Cleaning to enable or disable automatic
head cleaning of the tape drive in the library.
|
Note: It is recommended that the Auto Clean function is enabled on the library.
With the Auto Clean function enabled, drive cleaning occurs automatically.
The only time Auto Cleaning is disabled is when your Backup Application
requires that it has control.
The drive can also be cleaned manually. For details, see “Cleaning the drive
manually” on page 4-6.
Configuring the number of active slots
Configuration
Configure Library
Set Active Slots Count
Active Slots
Figure 4-18. Active slot count settings
Select Configuration > Configure Library > Set Active Slots Count to set the
number of active data cartridge positions within the logical library.
Configure the number of active slots with the following setting:
v Active Slots - The maximum number of active slots that can be set is dependent
upon the I/O station configuration and auto cleaning setting.
The active cartridge slots always begin with the cartridge position with the lowest
cartridge address within the logical library.
Chapter 4. Operations
4-9
Configuring the library access mode
Configuration
Configure Library
Configure Library Mode
Set Random Mode
Set Sequential Mode
Configure Loop Mode
Enable Loop Mode
Disable Loop Mode
Configure Autoload Mode
Enable Autoload Mode
Disable Autoload Mode
Figure 4-19. Library access mode settings
Select Configuration > Configure Library > Configure Library Mode to set the
logical library access mode.
Configure the library access mode with the following settings:
v Random Mode - In random mode, the library allows the server's (host's)
application software to select any data cartridge in any order.
v Sequential Mode - In sequential mode, the library's firmware predefines the
selection of the cartridges. After initialization, the firmware causes the library to
select the first available cartridge found (counting from the lowest Column/Tier
position through the highest cartridge position in your library) for loading into
the drive.
– Loop - Sequential mode with loop mode ON loads the cartridge in the lowest
Column/Tier cartridge position after the cartridge in the highest Column/Tier
cartridge position is filled with data and sent back to its home position. This
mode allows endless backup operations without user interaction.
– Autoload - Sequential mode with autoload mode ON loads the first available
cartridge (the lowest Column/Tier cartridge position that contains a cartridge)
automatically if the library powers ON, or resets, with an empty drive. If the
library powers ON with a cartridge already in the drive, sequential mode will
start from the home position of that cartridge, unless the host issues a rewind
and unload command to the drive, in which case the next cartridge in
sequence will be loaded into the drive.
To start sequential mode if autoload is OFF, use the Move Cartridge command to
load the first cartridge into the drive. The sequence starts from the home
position of that cartridge. Cartridges do not need to be in contiguous slots.
To stop sequential mode, use the Move Cartridge command to unload the drive.
This mode cancels sequential mode; the next sequential cartridge is NOT loaded.
To restart sequential mode, use the Move Cartridge command again to load a
cartridge; the loading sequence resumes from the home position of that
cartridge.
4-10
Dell PowerVault TL1000 Tape Autoloader User's Guide
Configuring date and time settings
Configuration
Configure Library
Configure Date/Time
Set Date
Set Time
Figure 4-20. Date and time settings
Select Configuration > Configure Library > Configure Date/Time to set the date
and time on your library manually after a power disruption and when daylight
saving time starts and ends. The date is set in MM/DD/YYYY format, and the
time is set in 24-hour HH:MM:SS format.
The current date and time is also controlled automatically with a network-based
Network Time Protocol (NTP) server. For more information, see “Configuring
network settings” on page 4-12.
Chapter 4. Operations
4-11
Configuring network settings
Configuration
Configure Network Settings
Configure Link Speed
Set Auto Negotiation
Set 10 Base-T Full
Set 10 Base-T Half
Set 100 Base-T Full
Set 100 Base-T Half
Configure DHCP
Configure DHCP IPv4
Enable DHCP IPv4
Disable DHCP IPv4
Configure DHCP Ipv6
Enable DHCP IPv6
Disable DHCP Ipv6
Change IP Address
Set IP Address Ipv4
Input IP Address
Set IP Address Ipv6
Input IP Address x 4
Change Subnet Mask
Set Subnet Mask
Input Subnet Mask
Set Prefix Length
Input Prefix
Change Gateway
Set Gateway Address Ipv4
Input Gateway
Set Gateway Address Ipv6
Input Gateway x 4
Figure 4-21. Network settings
Select Configuration > Configure Network Settings to set the network settings for
the library.
Note: The Internet Protocol (IPv4, IPv6, or dual IPv4/IPv6) selection is used for
the TL1000 Tape Autoloader IP address, subnet mask, gateway address, time
server address, mail server address, SNMP trap address, and EKM server
addresses.
|
Configure the network with the following settings:
v Link Speed - Ethernet duplex mode (Auto, 10Base-T Full, 10Base-T Half,
100Base-TX Full, 100Base-TX Half).
v DHCP - (Dynamic Host Configuration Protocol) Enable DHCP to have the
library server or router negotiate the connection with the library.
– IPv4 - Select to enable DHCP with the IPv4 protocol.
– IPv6 - Select to enable DHCP with the IPv6 protocol
v IP Address - If DHCP is disabled, set the IP address of the library manually.
4-12
Dell PowerVault TL1000 Tape Autoloader User's Guide
– IPv4 - Select to enter the library IP address with the IPv4 protocol.
– IPv6 - Select to enter four library IP addresses with the IPv6 protocol.
v Subnet Mask - If DHCP is disabled, set the IP address of the subnet mask.
– Subnet Mask - Select to enter the subnet mask address with the IPv4
protocol.
– Prefix Length - Select to enter the prefix length for the IPv6 protocol.
v Gateway - If DHCP is disabled, set the IP address of the gateway.
– IPv4 - Select to enter the gateway IP address with the IPv4 protocol.
– IPv6 - Select to enter four gateway IP addresses with the IPv6 protocol.
Configuring Operator Panel settings
Configuration
Configure Op Panel Settings
Configure LCD Back Light
Enable Auto Back Light
Input Count (min)
Disable Auto Back Light
Change Login Password
New Password
Reenter Password
Figure 4-22. Operator Panel settings
Select Configuration > Configure Op Panel Settings to set the preferences when
with the Operator Panel.
Configure the Operator Panel with the following settings:
v Back light - Select to enable the LCD back light when with the Operator Panel.
– Input Count - If the auto back light is enabled, specify the time duration
before the back light turns OFF. The setting uses a four-digit timer in minutes.
v Login Password - Select to change the Operator Panel four-character login
password. The new password must be reentered for confirmation before the
password is changed (default: 0000).
Setting the library to factory defaults
Configuration
Set Default
Figure 4-23. Factory default settings
Select Configuration > Set Default to reset the library to the factory default
settings. See Table 3-2 on page 3-10. The date and time must be reset after restoring
factory default settings. See “Configuring date and time settings” on page 4-11.
Important: This configuration setting deletes all current library settings, and
should be used with utmost caution.
Chapter 4. Operations
4-13
To restore your library configuration, see “Saving and restoring configuration
settings” on page 4-32.
Servicing the library
The Service menu on the Operator Panel gives users access to troubleshooting and
maintenance diagnostic tools.
Checking the library error status
Service
View Error Status
View Library Error Status
View Drive Error Status
Figure 4-24. Error status menu
Select Service > View Error Status to check the status of the major library
components.
Select the component to view its error status:
v Library - Checks the error status of the library.
v Drive - Checks the error status of the tape drive.
If an error occurs, press the Enter key to display specific error information. You
can check the meaning of error codes in Appendix A, “Error codes,” on page A-1.
Running library verify diagnostic procedures
Service
Diagnostics
Run Library Verify
Figure 4-25. Run Library Verify command
Select Service > Diagnostics > Run Library Verify to test the library and drive
hardware, communications, and the read or write capability of the library. Library
Verify is the most critical and most frequently used test, and is run after all
maintenance procedures to ensure correct library performance.
Note: Running the Library Verify diagnostic test unloads tape cartridges in the
drives if the host application has not already done so.
To run library verification diagnostic tests:
1. Select Run Library Verify, and press Enter. Follow the on-screen instructions. If
there is a cartridge in the drive, the library moves the cartridge to its home
position, or to the I/O station if the home position is not known.
2. When prompted, insert a scratch cartridge into the I/O station.
When the scratch cartridge is loaded, an inventory is conducted and the bar
code reader reads the bar code label on the cartridge and stores it for later
comparison. The scratch cartridge is then moved to the tape drive, where the
drive runs its own write/read/verify test. When the test is done, the library
4-14
Dell PowerVault TL1000 Tape Autoloader User's Guide
tells the drive to eject the scratch cartridge, and then the cartridge is moved
back to the I/O station. The bar code is read again and compared with the
value stored earlier.
3. When prompted, remove the scratch cartridge from the I/O station.
The result of the test (PASSED or error message) is reported on the Operator
Panel.
4. View the Error Log to check if any errors occur.
If an error occurs, see Appendix A, “Error codes,” on page A-1 to identify and
locate the problem.
Running drive diagnostic procedures
Figure 4-26. Drive diagnostic procedures
Select Service > Diagnostics > Drive Diagnostics to run various drive-related
diagnostic tests.
To run drive diagnostic tests:
1. Select Drive Diagnostics, and press Enter. Select one of the diagnostic tests and
follow the on-screen instructions.
2. When prompted, insert a scratch (blank) cartridge into the I/O station.
v Normal R/W Test - Runs a shortened version of the Performance R/W Test.
It does not include the POST diagnostic, calibrate drive, or unique tape
motion tests. It checks the motors and head by running read/write tests on a
shortened section of tape, both inbound and outbound. Takes approximately
4 minutes (if no error occurs) to 9 minutes (if calibration is required).
v Perform R/W Test (Performance R/W Test) - Runs most of the tests that
normally occur when the library is powered ON (POST). When prompted,
load a CE scratch cartridge to run the calibrate drive, read/write, and tape
motion tests. These tests calibrate the read/write channel to optimum
settings, run a long read/write test with all servo positions, and exercise all
of the tape motion functions of the drive. Takes up to 30 minutes.
v When prompted, remove the cartridge from the I/O station.
The result of the test (PASSED or error message) is reported on the Operator
Panel.
v View the Error Log to check if any errors occur.
If an error occurs, see Appendix A, “Error codes,” on page A-1 to identify
and locate the problem.
Chapter 4. Operations
4-15
The Web User Interface
Figure 4-27 shows all the menu options available from the Web User Interface for
the Administrator User account. For information on the menu user access
privileges for User, Superuser, and Administrator accounts, see Chapter 2, “User
interfaces,” on page 2-1.
Manage Library
Configure Library
Service Library
System Summary
Move Cartridges
User Access
Key Path Diagnostics
Library Map
Unload
Physical
Operator Interventions
Clean Drive
Logical
View Library Logs
Library State
Network
Traced
Inventory
Encryption
Download Drive Logs
Unlock Magazine
Date and Time
Download Library Logs
Notifications
Reset Library/Drive
Save/Restore
Firmware Update
Usage Statistics
Figure 4-27. Web User Interface menu
4-16
Dell PowerVault TL1000 Tape Autoloader User's Guide
a29z0090
Monitor Library
Monitoring the library
a29z0193
The system summary
Figure 4-28. System Summary screen
Select Monitor Library > System Summary to display a summary of the status of
the tape drive and the library, and the current configuration of the library,
comprising:
v Library name
v Library status (OK, Degraded, or Failed). It displays Not Ready while
initializing.
v Drive status (OK, Degraded, or Failed). It displays Empty, Loading, or Ejected
when the drive is empty, loading media, or media is ejected or unloaded in the
drive. It displays Cleaning when the cleaning cartridge is in the drive, and
Initializing while initializing.
v I/O Station status (Open/Closed, when I/O Station is enabled)
v Operator Panel LED indicators
Chapter 4. Operations
4-17
v Number of cartridges and slot configuration
– Cartridge in the drive (0 or 1); Slots value is always “N/A”
– Number of cartridges in the active slots; Number of active slots
– Number of cartridges in the cleaning/inactive slots; Number of
cleaning/inactive slots
– Number of cartridges in the I/O Station (0 or 1) when enabled; Number of
I/O Station slots
– Number of cartridges in the reserved slot; Number of reserved slots
v Library firmware version
v Library serial number
v Drive firmware version
a29z0115
The library map
Figure 4-29. Library Map screen
Select Monitor Library > Library Map to display a graphical view of the library.
Each component of the library is represented by a clickable icon. Select a
component in the library map to display detailed information for that component
of the library on the right side of the page. A grayed-out column represents the
I/O station. The information that is displayed varies according to the type of
device selected:
v Library information
– Accessor status (OK, Degraded, or Failed)
– Drive Status (OK, Degraded, or Failed). Drive Status displays Empty,
Loading, or Ejected when the drive is empty, loading media, or media is
ejected/unloaded in the drive. It displays Cleaning when the cleaning
cartridge is in the drive, and Initializing while initializing.
– I/O station (Enabled or Disabled)
– Auto cleaning (Enabled or Disabled)
– Magazine status (Inserted or Open)
4-18
Dell PowerVault TL1000 Tape Autoloader User's Guide
– Library mode (Random or Sequential). In Sequential mode, Loop and Auto
load mode are also displayed.
v Ethernet information
– Status
– Protocol
– IP addresses
– DHCP (Enabled or Disabled)
– Subnet mask
–
–
–
–
–
–
–
Gateway address
Library worldwide node name
MAC address
Link speed
NTP server
SNMP trap
Email address
v Cartridge
–
–
–
–
Cartridge label that is detected by the bar code reader
Encryption setting (for data cartridges)
Media status (OK, Degraded, or Failed)
Remaining uses for cleaning cartridges. When a cleaning cartridge is added to
the library (I/O station or cleaning slot) the remaining uses is displayed as 50.
The actual remaining uses are updated when the cleaning cartridge is loaded
into the tape drive. See “Cleaning cartridge” on page 5-4.
v Column n, Tier n
– Slot type (Storage, I/O station, or Cleaning)
– Element address
v Drive information
– Status (OK, Degraded, or Failed). Drive Status displays Empty, Loading, or
Ejected when the drive is empty, loading media, or media is ejected/unloaded
in the drive. It displays Cleaning when the cleaning cartridge is in the drive,
and Initializing while initializing.
– Vendor ID
– Product ID
– Firmware version
– Serial number
– Worldwide node name
– Encryption capability
– Drive event
– Cartridge information
v Accessor information
– Status (OK, Degraded, or Failed)
– Accessor event
Chapter 4. Operations
4-19
Managing the library
a29z0116
Moving cartridges
Figure 4-30. Move Cartridges screen
Use Manage Library > Move Cartridges to move data and cleaning cartridges
between the I/O station, storage positions, inactive slots, and tape drive. Move
cartridges by clicking and dragging a cartridge from one location to another, or by
right-clicking a cartridge and selecting a destination.
Select a cartridge to display information for that cartridge in the Source pane on
the right side of the page. Drag the cartridge to a valid destination location to
display information in the Destination pane. Release the mouse button to run the
move.
The following information is displayed:
v Source
– Location coordinates in the library (Column, Tier)
– Slot type (Storage, I/O station, or Cleaning)
– Element address
– Cartridge label
– Encryption capability for storage cartridges
– Remaining uses for cleaning cartridges. When a cleaning cartridge is added to
the library (I/O station or cleaning slot) the remaining uses are displayed as
50. The actual remaining uses are updated when the cleaning cartridge is
loaded into the tape drive. See “Cleaning cartridge” on page 5-4.
– Media status (OK, Degraded, or Failed)
v Destination
– Location coordinates in the library (Column, Tier)
– Status (for the tape drive)
– Slot type and element address
4-20
Dell PowerVault TL1000 Tape Autoloader User's Guide
Note: Each column has a spring loaded mechanism that pushes the cartridges into
Tier 1. Moving a second cartridge into a column moves the first cartridge
into Tier 2. Cartridges cannot be moved directly from Tier 1 in one column
to Tier 2 in another column in a single move operation (intermediate move
operations are required).
Note: Cartridges cannot be moved to the accessor with this command. However,
cartridges can be moved from the accessor with this command if the library
was powered OFF with a cartridge still held in the accessor.
Unloading the drive
Figure 4-31. Unload Drive screen
Select Manage Library > Unload Drive and click Unload to unload the tape
cartridge from the tape drive head.
Unload when library is in Random mode: The cartridge in the drive is unloaded
from the tape head mechanism, but is still retained inside the tape drive housing.
The Move Cartridge command moves the cartridge from the drive to another
location. Moving a tape cartridge from a drive to another location both unloads
and moves the cartridge in a single action.
Unload when library is in Sequential mode: The cartridge in the drive is unloaded
from the tape head mechanism, and returned to the cartridge home position
Cleaning the drive manually
Figure 4-32. Clean Drive screen
Select Manage Library > Clean Drive to clean a drive manually. Select a cleaning
cartridge to use (from the magazine or from the I/O station), and click Clean.
The cleaning cartridge is returned to its home position when the drive cleaning is
finished.
Taking the library online and offline
Figure 4-33. Library State screen
Select Manage Library > Library State to take the library online or offline. Check
the library status, and click the button that is displayed to change the library
status.
Chapter 4. Operations
4-21
It is sometimes necessary to take the library offline before library servicing
functions are completed. Once these operations are finished, it is necessary to bring
the library back online.
Note: The tape drive is always online, even when the library is offline.
Conducting a library inventory
Figure 4-34. Inventory screen
a29z0138
Select Manage Library > Inventory to force the library to run an inventory of the
cartridge magazine, accessor, and tape drive to refresh the library map. Conduct an
inventory by clicking the Start button. The Inventory Progress bar indicates the
process in action. Wait until the operation finishes before normal library operations
resume.
Figure 4-35. Inventory progress bar
An inventory is conducted automatically when the power is first turned ON or
when a cartridge magazine is inserted.
Unlocking the cartridge magazine
Unlock
a29z0174
Magazine state: Locked
Figure 4-36. Unlock magazine
Select Manage Library > Unlock Magazine to unlock and remove the cartridge
magazine. When the cartridge magazine is unlocked, it can be removed from the
library to insert or remove data and cleaning cartridges. When the cartridge
magazine is fully inserted, the magazine locks into place. After the magazine is
closed, wait for the library to complete its inventory before normal library
operations resume.
Note: A blue release gate in the upper left corner of each column in the cartridge
magazine prevents each cartridge from falling out of the front of the
magazine. When manually releasing the gate with one hand, position your
other hand in front of the column opening to protect cartridges that are
ejected by the internal column spring.
Note: If the cartridge magazine is not removed within 5 minutes, it is
automatically locked.
4-22
Dell PowerVault TL1000 Tape Autoloader User's Guide
Configuring the library
a29z0122
Managing user access
Figure 4-37. User Access screen
Select Configure Library > User Access to add, modify, or remove administrator,
superuser, and user accounts, and to change passwords. Up to 7 users can be
configured with the Web User Interface.
Add, modify, or remove users with the following information:
v Select action
– Add - To add new users.
– Modify - To change the selected user’s access role or password.
– Remove - To delete the selected user from the system.
v User Name - The user name of a registered user.
v Password - Case-sensitive password for the registered user.
v Role - The user access level for the registered user.
– Users are allowed to monitor the library, but not complete actions that affect
the physical library.
– Superusers are allowed to operate the physical and logical library, but not
complete actions that affect the library configuration.
– Administrator users are allowed access to the entire physical library and
logical library, including configuration. Only one administrator user must be
assigned the login name admin.
An administrator can add/modify/remove extra administrator, superuser, and user
accounts, and change passwords. User accounts are restricted to specific areas of
the library. For more information, see Chapter 2, “User interfaces,” on page 2-1.
A User account can be modified by an administrator to provide a user with
superuser or administrator access permissions to the library functions.
Enter all user IDs and passwords on the Library Configuration form in
Appendix D, “Library Configuration Form,” on page D-1.
Chapter 4. Operations
4-23
Click Submit to transfer the settings to the library. A dialog message is displayed
when the settings are updated successfully.
Click Refresh to read the current settings from the library.
a29z0123
Configuring physical library settings
Figure 4-38. Physical library settings screen
Select Configure Library > Physical to configure the I/O station and auto
cleaning.
Configure the I/O station and auto cleaning cartridge slot assignment with the
following settings:
v Library name - Use to enter a name for your library.
v Auto cleaning - Use to enable automatic cleaning of the tape drive. Auto
cleaning can be enabled only when there the number of active slots is less than
the total number of available slots in the library.
v Bar code label length - Use to choose the number of characters in the cartridge
bar code that is reported to the host computer.
Click Submit to transfer the settings to the library. A dialog message is displayed
when the settings are updated successfully.
Click Refresh to read the current settings from the library.
a29z0124
Configuring logical library settings
Figure 4-39. Logical library settings screen
Select Configure Library > Logical to configure the library access mode for the
logical library and the number of active cartridge slots.
Configure the library access mode with the following settings:
v Library mode - The library mode can be set to Random or Sequential.
– Random - In random mode, the library allows the server's (host's) application
software to select any data cartridge in any order.
4-24
Dell PowerVault TL1000 Tape Autoloader User's Guide
– Sequential - In sequential mode, the library's firmware predefines the
selection of the cartridges. After initialization, the firmware causes the library
to select the first available cartridge found (counting from the lowest
Column/Tier position through the highest cartridge position in your library)
for loading into the drive. See “Location coordinates and element addresses”
on page 1-9.
Loop - Sequential mode with loop mode ON loads the cartridge in the lowest
Column/Tier cartridge position after the cartridge in the highest Column/Tier
cartridge position is filled with data and sent back to its home position. This
mode allows endless backup operations without user interaction.
Autoload - Sequential mode with autoload mode ON loads the first available
cartridge (the lowest Column/Tier cartridge position that contains a cartridge)
automatically if the library powers ON, or resets, with an empty drive. If the
library powers ON with a cartridge already in the drive, sequential mode will
start from the home position of that cartridge, unless the host issues a rewind
and unload command to the drive, in which case the next cartridge in
sequence will be loaded into the drive.
To start sequential mode if autoload is OFF, select the Move Cartridges
command to load the first cartridge into the drive. The sequence starts from the
home position of that cartridge. Cartridges need not to be in contiguous slots.
To stop sequential mode, select the Move Cartridges command to unload the
drive. This mode cancels sequential mode; the next sequential cartridge is NOT
loaded.
To restart sequential mode, select the Move Cartridges command again to load a
cartridge; the loading sequence resumes from the home position of that
cartridge.
v Number of active slots - Select the number of active slots you would like to
assign in your library. Selecting the number of active slots defines the number of
storage slots, number of cleaning/inactive slots, whether the I/O station is
enabled/disabled, and whether auto cleaning is allowed.
The first digit configures the number of active storage positions (4, 6, 8, or 9).
The second digit configures Column 5, Tier 1 of the magazine as an I/O Station
(0 when disabled, and 1 when enabled).
The Auto Cleaning function can be enabled only if there is at least one inactive
position in the magazine. If auto cleaning is enabled, the inactive positions
become cleaning cartridge positions.
Click Submit to transfer the settings to the library. A dialog message is displayed
when the settings are updated successfully.
Click Refresh to read the current settings from the library.
Chapter 4. Operations
4-25
a29z0125
Configuring network settings
Figure 4-40. Network settings screen
Use Configure Library > Network to set the network settings for the library.
Note: The Internet Protocol (IPv4, IPv6, or dual IPv4/IPv6) selection is used for
the TL1000 Tape Autoloader IP address, subnet mask, gateway address, time
server address, mail server address, SNMP trap address, and EKM server
addresses.
|
Configure the network with the following settings:
v Link speed - Ethernet duplex mode (Auto, 10Base-T Full, 10Base-T Half,
100Base-TX Full, 100Base-TX Half).
v TCP/IP settings - IPv4, IPv6, and dual stack IPv4/IPv6 are supported. To enable
the dual IPv4/IPv6 protocol, select both Use IPv4 and Use IPv6 and enter
parameters for both.
v Security - Select Enable SSL for Web to provide secure communications
between the web browser and the tape library.
v IPv4 setting - Select Use IPv4 to enable the IPv4 Internet Protocol. Select the
corresponding button to obtain an IP address automatically (DHCP) or use static
IP address settings. When with DHCP, use the Operator Panel to determine the
library's assigned IP address. See “Current information” on page 4-4. Enter the
following parameters if with static IP address settings.
– IPv4 address - Sets the TCP/IPv4 address of the library on the network.
– Subnet mask - Defines and limits users within a local network.
– Gateway - Allows access outside the local network.
v IPv6 setting - Select Use IPv6 to enable the IPv6 Internet Protocol. Select the
corresponding check boxes to obtain an IP address automatically (DHCP), to
obtain an IP address with stateless auto configuration, or use static IP address
settings. Enter the following parameter if with static IP address settings.
– IPv6 address - Sets the TCP/IPv6 address of the library on the network.
4-26
Dell PowerVault TL1000 Tape Autoloader User's Guide
– Prefix Length - Decimal value 0 - 128 indicating the number of contiguous,
high-order bits comprising the network portion of the address.
– Gateway - Allows access outside the local network.
v DNS setting - Select Use DNS to use a domain name server. The DNS server, if
entered, allows the encryption, date and time, and notifications IP addresses to
be specified with host names instead of numerical IP addresses.
– DNS IP address - Sets the IP address of the DNS server.
Click Submit to transfer the settings to the library. A dialog message is displayed
when the settings are updated successfully.
Click Refresh to read the current settings from the library.
a29z0199
Configuring encryption settings
Figure 4-41. Encryption settings screen
Select Configure Library > Encryption to configure an encryption method for data
that is stored on tape cartridges.
Note: Application Managed Encryption (AME) does not require a key.
Chapter 4. Operations
4-27
a29z0200
Figure 4-42. Encryption settings enabled screen
Configure encryption with the following settings:
1. Expand Configure Library, if necessary, and click Encryption in the left
navigation pane of the Web User Interface.
2. In the Encryption method: drop-down menu, choose Application Managed to
enable encryption in your library. No further configuration steps are necessary.
|
|
|
|
Note: Library Managed Encryption and System Managed Encryption are not
supported in this Library. Library Managed Encryption configuration
options and Keypath Diagnostics menus are greyed out in the Library
Web Interface.
|
|
|
|
To determine whether a cartridge is encrypted, use Configure Library > Library
Map and select the cartridge. The screen displays whether the cartridge is
encrypted, not encrypted, or unknown.
Click Submit to transfer the settings to the library. A dialog message is displayed
when the settings are updated successfully.
a29z0170
Configuring date and time settings
Figure 4-43. Date and time settings screen
Select Configure Library > Date and Time to configure the date and time settings
with one of three methods. The date and time can be automatically updated with a
4-28
Dell PowerVault TL1000 Tape Autoloader User's Guide
remote NTP time server over the network. Alternatively, the date and time can be
synchronized with the clock on your host computer. And lastly, that date and times
can be set manually.
Note: Selecting Refresh refreshes the date and time.
Note: If you choose to manually set your date and time, you must reset the date
and time after the library is power cycled and after a library reset.
Note: When the library is power cycled, wait 10 seconds after the power is OFF
before powering ON the library again.
|
The TL1000 Tape Autoloader communicates with an NTP server with the following
conditions:
v Client/server basis operation
v UDP (User Datagram Protocol) to access the NTP server
v Does not use authentication keys
v Library polling is every 12 hours
Configure the date and time with the following settings:
v NTP Server - Enables time and date control with a time server on the network.
– NTP server address - The IP address of the time server. IPv4 and IPv6
addresses are supported, depending on the TCP/IP settings. Host names can
be entered instead of numerical IP addresses if Use DNS is selected in the
Network settings.
– Time zone - The time zone relative to Greenwich Mean Time (GMT).
v If the time server is disabled, enter the local time and date manually.
– Date - The date with the MM/DD/YYYY format.
– Time - The time with the HH:MM:SS format.
v Auto Adjustment by PC - Select a time interval and click Start to synchronize
the library with the clock on your host computer at regular intervals. The Web
User Interface Java Applet must be running continuously to use this function.
Click Submit to transfer the settings to the library. A dialog message is displayed
when the settings have been updated successfully.
Click Refresh to read the current settings from the library.
Chapter 4. Operations
4-29
a29z0127
Configuring email notifications
Figure 4-44. Email settings screen
Select Configure Library > Notifications > SMTP (Mail) Settings to configure the
email settings for sending event information whenever an event of a certain level
occurs.
Configure email notification with the following settings:
v SMTP server address - SMTP mail server IPv4 or IPv6 address (depending on
network configuration)
v Sender address - email message header information
v Subject - email message header information
v Mail to - email addresses of contacts to be notified of the event
v Mail event - Event level notification threshold
– Error events
– Error and Warning events
– Error, Warning, and Information events
Click Test to send a test message to the addresses enabled in the Mail to fields.
Click Submit to transfer the settings to the library. A dialog message is displayed
when the settings are updated successfully.
Click Refresh to read the current settings from the library.
4-30
Dell PowerVault TL1000 Tape Autoloader User's Guide
a29z0128
Configuring SNMP trap notifications
Figure 4-45. SNMP settings screen
|
Use Configure Library > Notifications > SNMP Settings to configure the trap
settings for sending event information whenever an event of a certain level occurs,
and to register users who can access the tape library with SNMP Version 3. The
traps that are supported by the TL1000 Tape Autoloader are listed in “Trap
definitions (types)” on page A-14.
Download the SNMP MIB file for this library from http://www.dell.com/support.
Install the MIB file on your SNMP server. Refer to your server application
documentation for instructions.
|
Configure SNMP trap notification with the following settings:
v SNMP Enabled - The SNMP Enabled check box must have a check mark to
enable SNMP notifications.
v Community - SNMP community name (for example, “public”)
v Name - Device name (for example, “TL1000 Tape Autoloader”)
v Location - Physical location of the tape library
v Contact - Contact individual's name
v SNMPv3 engine ID - A read-only attribute that identifies the SNMPv3 engine.
v Trap event - Event level notification threshold
– Error events
– Error and Warning events
– Error, Warning, and Information events
v Trap List - IP addresses of the SNMP monitoring stations to be notified when an
event takes place and the security settings.
– Validity - Enable/Disable setting.
– Trap version - v1, v2c, or v3. For v2c and v3, the Inform check box
determines whether an SNMP INFORM request is sent instead of a trap
event.
Chapter 4. Operations
4-31
–
–
–
–
IP address - IPv4 and IPv6 addresses are supported.
Community (v1 or v2c) - SNMP community name.
User name (v3 only) - SNMPv3 unique user name.
Authentication (v3 only) - Authentication algorithm, MD5, or SHA. When an
algorithm is specified, an authentication password and confirmation of the
password are required.
– Privacy (v3 only) - Privacy service encryption and decryption algorithm, DES
or AES. When an algorithm is specified, a privacy password and confirmation
of the password are required.
v SNMPv3 User List - SNMPv3 users who can access the tape library.
– Validity - Enable/Disable setting.
– User name - SNMPv3 unique user name.
– Authentication - Authentication algorithm, MD5, or SHA. When an algorithm
is specified, an authentication password and confirmation of the password are
required.
– Privacy - Privacy service encryption and decryption algorithm, DES or AES.
When an algorithm is specified, a privacy password and confirmation of the
password are required.
Click Test to send a test trap to the IP addresses enabled in the Trap to fields.
Click Submit to transfer the settings to the library. A dialog message is displayed
when the settings are updated successfully.
Click Refresh to read the current settings from the library.
Saving and restoring configuration settings
Your library configuration can be saved and restored automatically by a cookie and
manually by with the Web User Interface. It is recommended that you use the Web
User Interface method whether you use the cookie method.
Important: Verify all configuration settings after your library configuration is
restored. Reset the library date and time (see “Configuring date and
time settings” on page 4-28).
Saving and restoring configuration automatically with cookies
If allowed by your web browser preference settings, cookies are employed to
automatically save your library configuration on your host computer and
automatically restore your library configuration if your library network
configuration uses a static IP address. The following flowchart illustrates how VPD
data is saved from and restored to a library with cookies.
4-32
Dell PowerVault TL1000 Tape Autoloader User's Guide
Does Auto Saved
VPD Data exist for Library
IP Address?
Yes
No
VPD Data
is Saved
Does Library S/N =
Auto Saved S/N?
Yes
No
VPD Data
is Saved
Write Auto
Saved VPD Data to
Library?
Yes
No
Auto Saved VPD
Data is written
to Library
Overwrite Auto
Saved VPD Data?
Yes
No
Auto Saved
VPD Data is
overwritten
Auto Saved
VPD Data is
not overwritten
Figure 4-46. Save/Restore configuration with cookies
a29z0129
Saving and restoring configuration manually with Web User Interface
Figure 4-47. Save/Restore screen
Select Configure Library > Save/Restore to manually save library configuration
settings to an external file or restore configuration settings from a file. This
function is useful when you have several logical configurations for different tape
storage implementations that you must switch between regularly.
Note: When the library configuration is saved manually, the library must be offline
to save to files and to restore from files.
Click Save to save the current settings to a file.
Click Restore to load the settings from a file.
Chapter 4. Operations
4-33
Servicing the library
a29z0130
Operator interventions
Figure 4-48. Operator interventions screen
Select Service Library > Operator Interventions to display a log history summary
of information, warning, and error events that occurred for the selected library
component units.
The summary can be filtered to display the operator intervention log for a specific
hardware component and specific event levels. The log is stored in memory on the
library control board. When the memory buffer is full, new events overwrite the
oldest events. The log is not cleared from memory when power is turned OFF.
Click Refresh to read the log of operator interventions from the tape library. You
can select an event in the Index List panel to display data specific to that event in
the Detail panel.
The information that is displayed for the operator intervention event comprises:
v Index number of the event
v Date the event occurred
v
v
v
v
4-34
Time the event occurred
Unit in the library where the event occurred
Event level
Description of the event
Dell PowerVault TL1000 Tape Autoloader User's Guide
a29z0131
Library logs
Figure 4-49. View Library Logs screen
Select Service Library > View Library Logs to display a log history summary of
errors that occurred.
The error log is displayed with sense data information. The summary can be
filtered to display errors with specific sense data code types.
Click Refresh to read the log of errors from the tape library. You can select an error
in the Index List panel to display data specific to that error in the Detail panel.
The information that is displayed for the error comprises:
v
v
v
v
Index number of the error
Date and time the error occurred
Error code
Description of the error
There are two types of error data that are displayed in the library log with
different Code attributes:
v Library/Drive sense data (Sense key/ASC/ASCQ)
For example, a 5/3B/0D error states that an illegal request was initiated that
resulted in a “medium destination element full” error that is reported by the
library. Selecting log entry 012 provides detailed sense data for this failure.
Information about sense data is listed in Appendix C, “Sense data,” on page C-1.
v Library/Drive error code ([Code])
For example, in log entry 010, a [0222] error states that the library cannot eject
medium because drive is in state of Prevent Media Removal. Information about
errors and action to resolve the problem are listed in Appendix A, “Error codes,”
on page A-1.
Chapter 4. Operations
4-35
a29z0136
Trace data
Figure 4-50. Traces screen
Select Service Library > Traces to display a trace history of errors that occurred.
The summary can be filtered to display the type of errors that are occurring within
a specified time period.
The system trace data for the interval that is entered in the Number of Minutes
field is displayed. The summary can be filtered to trace data for specific system
logs.
Click Refresh to read the system trace data from the tape library.
The information that is displayed in the system trace data comprises:
v Index number
v Date and time of event
v Sense data
a29z0137
Downloading drive logs
Figure 4-51. Download Drive Logs screen
Select Service Library > Download Drive Logs to download a tape drive memory
dump to file for use by support personnel to help troubleshoot a problem. To
create a drive memory dump, you must create both normal memory dump data
(currently stored in flash) and force memory dump data (currently stored in
memory and moved to flash).
4-36
Dell PowerVault TL1000 Tape Autoloader User's Guide
Note: Both file name fields must be entered and the file names must be unique.
To download a drive log:
1. Take the library offline.
2. For each type of memory dump (normal or forced), click the corresponding
Browse button to display a dialog to enter a file name and to select a location
to save the drive log.
3. Click Download to download the drive log and save to a file.
a29z0169
Downloading library logs
Figure 4-52. Download Library Logs screen
Select Service Library > Download Library Logs to download a tape library dump
to file for use by support personnel to help troubleshoot a problem.
To download a library log:
1. Take the library offline.
2. Click Browse to display a dialog to enter a file name and to select a location to
save the library log.
3. Click Download to download the library log and save to a file.
a29z0121
Resetting the library and drives
Figure 4-53. Reset library and drive screen
Select Service Library > Reset Library/Drive to reset the library or the tape drive.
Select the target device and click Reset. The library and tape drive status is
displayed. A dialog message is displayed when the unit is reset. The reset
operation is fully completed when the tape library is taken online.
Chapter 4. Operations
4-37
a29z0132
Updating library and drive firmware
Figure 4-54. Firmware Update screen
Select Service Library > Firmware Update to update the library and drive
firmware.
Note: It is the customer's responsibility to maintain the library and drive firmware
at the most recent level.
Consider these recommendations to provide maximum performance and reliability:
v The latest version of microcode must be installed on your tape libraries and
devices.
v The library code must be updated first, unless noted otherwise. This action
supports any changes that are introduced in the library code for that drive, or
any changes made to the drive for that release.
v These firmware updates are intended to increase overall reliability, improve tape
handling, reduce the possibility of data errors, and enhance diagnostic
capabilities.
To determine the correct version of drive firmware in an S4H library:
1. Use Monitor System > Library Map to display the graphical view of the
library.
2. Select the Drive component in the library map to display Drive information
about the right side of the page.
3. Refer to the Product ID to determine which drive is installed in the library.
v Product ID: ULT3580-HH4
v Product ID: ULT3580-HH4 V2
4. Ensure that you download and install the correct drive firmware.
v Firmware for the ULT3580-HH4 drive is not compatible with the
ULT3580-HH4 V2 drive.
v Firmware for the ULT3580-HH4 V2 drive is not compatible with the
ULT3580-HH4 drive.
To update library and drive firmware:
1. Unload the tape drive, if there is a cartridge in the tape drive, before the library
and drive firmware are updated.
4-38
Dell PowerVault TL1000 Tape Autoloader User's Guide
|
2. Use Service Library > Firmware Update and click Browse to locate the library
firmware file with extension ".fmg" (for example, TL1000_31.3000.fmg) or the
LTO SAS drive firmware file with extension".ro" (for example, 85F0L3AH.ro)
that you downloaded from the Dell web site, then click Update. The Web User
Interface indicates that the operation is complete. This means that the firmware
file is successfully moved from the host computer to the library.
3. Wait for the library to reboot before normal library operations resume. It can
take several minutes before the library reboots.
4. Verify the firmware update by viewing the System Summary on the Web User
Interface.
Important: After the update process starts, you must wait until the library reboots.
Do not attempt to interrupt the process in any way, or the upgrade will
not be successful.
Accessor statistics
a29z0135
|
Figure 4-55. Usage Statistics screen
Select Service Library > Usage Statistics to view statistics information about the
movement of the robotics of the library.
v Motion counts - Lists the accumulated operation count for all movements,
accessor movements, picker movements, and X-axis movements.
v Retry counts - Lists the accumulated number of retries (reattempts to load
cartridges) in the drive and the cartridges positions by the accessor.
v Error counts - Lists the accumulated number of errors for the accessor, X-axis
movements, and drive load and unload operations.
Click Refresh to read the accessor statistics from the library. The Last refresh
shows the time of the most recent library data refresh.
Chapter 4. Operations
4-39
4-40
Dell PowerVault TL1000 Tape Autoloader User's Guide
Chapter 5. Media
“Data cartridges” on page 5-2
“Write once, read many (WORM) cartridges” on page 5-3
“Cleaning cartridge” on page 5-4
“Bar code labels” on page 5-5
“Write-Protect switch” on page 5-6
“Cartridge care and handling” on page 5-7
“Environmental and shipping specifications for tape cartridges” on page 5-10
|
|
To ensure that your Ultrium Tape Drive conforms to Dell's specifications for
reliability, use only LTO Ultrium tape cartridges. You might use other LTO-certified
data cartridges, but they might not meet the standards of reliability that are
established by Dell. The LTO Ultrium Data Cartridge cannot be interchanged with
the media used in other non-LTO Ultrium tape products.
Figure 5-1 shows the LTO Ultrium Data Cartridge and its components.
1
2
3
LTO cartridge memory
Cartridge door
Leader Pin
4
5
6
Write-protect Switch
Label area
Insertion guide
Figure 5-1. The LTO Ultrium Data Cartridge
Note: The same components are on all the LTO Ultrium Data Cartridges.
5-1
Data cartridges
The different generations of Ultrium data cartridges can be identified by color:
Table 5-1. Cartridge types and colors
Type
Color
Ultrium 6
Black
Ultrium 6 WORM
Black and Silvery gray
Ultrium 5
Burgundy
Ultrium 5 WORM
Burgundy and Silvery gray
Ultrium 4
Green
Ultrium 4 WORM
Green and Silvery gray
Ultrium 3
Slate Blue
Ultrium 3 WORM
Slate Blue and Silvery gray
Ultrium 2
Purple
Ultrium 1
Black
All generations contain 1/2-inch, dual-coat, magnetic tape.
You can order tape cartridges with the bar code labels included, or you can order
custom labels.
When tape is processed in the cartridges, Ultrium Tape Drives use a linear,
serpentine recording format. The native data capacity and recording format of
Ultrium data cartridges is as follows:
Table 5-2. Cartridge Data Capacity and Recording Formats
Type
Native Data Capacity
Recording Format
Ultrium 6
2500 GB (6250 GB at 2.5:1
compression)
Reads and writes data on 2176
tracks, sixteen tracks at a time
Ultrium 5
1500 GB (3000 GB at 2:1
compression)
Reads and writes data on 1280
tracks, sixteen tracks at a time
Ultrium 4
800 GB (1600 GB at 2:1
compression)
Reads and writes data on 896
tracks, sixteen tracks at a time.
Ultrium 3
400 GB (800 GB at 2:1
compression)
Reads and writes data on 704
tracks, sixteen tracks at a time
Ultrium 2
200 GB (400 GB at 2:1
compression)
Reads and writes data on 512
tracks, eight tracks at a time
Ultrium 1
100 GB (200 GB at 2:1
compression)
Reads and writes data on 384
tracks, eight tracks at a time
The first set of tracks is written from near the beginning of the tape to near the
end of the tape. The head then repositions to the next set of tracks for the return
pass. This process continues until all tracks are written and the cartridge is full, or
until all data is written.
The cartridge door (2 in Figure 5-1 on page 5-1) protects the tape from
contamination when the cartridge is out of the drive. The tape is attached to a
leader pin (3 in Figure 5-1 on page 5-1) behind the door. When the cartridge is
inserted into the drive, a threading mechanism pulls the pin (and tape) out of the
5-2
Dell PowerVault TL1000 Tape Autoloader User's Guide
cartridge, across the drive head, and onto a non-removable take-up reel. The head
can then read or write data from or to the tape.
The write-protect switch (4 in Figure 5-1 on page 5-1 prevents data from being
written to the tape cartridge. For more information, see “Write-Protect switch” on
page 5-6.
The label area (5 in Figure 5-1 on page 5-1) provides a location to place a label. .
The insertion guide (6 inFigure 5-1 on page 5-1) is a large, notched area that
prevents the cartridge from being inserted incorrectly.
Table 5-3. Nominal cartridge life: Load/unload cycles
Type
Load/Unload Cycles
Ultrium 6
20,000 (20K)
Ultrium 5
20,000 (20k)
Ultrium 4
20,000 (20k)
Ultrium 3
20,000 (20k)
Ultrium 2
10,000 (10k)
Ultrium 1
5000 (5k)
Cartridge compatibility
Table 5-4. Ultrium data cartridge compatibility with Ultrium tape drive
Ultrium
Tape
Drive
LTO Ultrium Data Cartridges
2500 GB
Ultrium 6
1500 GB
Ultrium 5
Ultrium
6
Read/Write Read/Write
Ultrium
5
Read/Write
Ultrium
4
800 GB
Ultrium 4
400 GB
Ultrium 3
200 GB
Ultrium 2
100 GB
Ultrium 1
Read only
Read/Write
Read only
Read/Write Read/Write
Ultrium
3
Read only
Read/Write Read/Write
Read only
Ultrium
2
Read/Write Read/Write
Ultrium
1
Read/Write
Write once, read many (WORM) cartridges
Certain Records retention and data security applications require a write once, read
many (WORM) method for storing data on tape. The LTO Ultrium 6, Ultrium 5,
and Ultrium 4 drives enable WORM support when a WORM tape cartridge is
loaded into the drive.
WORM media
Because standard read/write media are incompatible with the WORM feature, a
specially formatted WORM tape cartridge (see Figure 5-2 on page 5-4) is required.
Chapter 5. Media
5-3
Each WORM cartridge has a unique, worldwide cartridge identifier (WWCID),
which consists of the unique CM chip serial number and the unique tape media
serial number. Ultrium 6 WORM cartridges are two-tone black and silvery-gray.
Figure 5-2. Ultrium data and WORM tape cartridges
Data security on WORM media
Certain built-in security measures help ensure that the data written on a WORM
cartridge does not become compromised, for example:
v The format of an Ultrium 6, Ultrium 5, or Ultrium 4 WORM tape cartridge is
unlike that of standard read/write media. This unique format prevents a drive
that lacks WORM-capable firmware from writing on a WORM tape cartridge.
For LTO 6, native data capacity is 2500 GB and compressed data capacity is 6250
GB.
v When the drive senses a WORM cartridge, the firmware prohibits the changing
or altering of user data that are already written on the tape. The firmware tracks
the last appendable point on the tape.
WORM media errors
The following conditions cause WORM media errors to occur:
v Information in the servo manufacturer's word (SMW) on the tape must match
information from the cartridge memory (CM) module in the cartridge. If it does
not match, a media error code 7 posts on the drive's single-character display
(SCD).
v Inserting a WORM tape cartridge into a drive that is not compatible with
WORM causes the cartridge to be treated as an unsupported medium. The drive
reports a media error code 7. Upgrading the drive firmware to the correct code
level resolves the problem.
Requirements for WORM capability
To use the WORM capability of your LTO Ultrium generation 6, 5, or 4 drive, you
must use a compatible WORM tape cartridge. See “Cartridge compatibility” on
page 5-3 for cartridge and VOLSER compatibility.
|
Cleaning cartridge
An Ultrium Universal Cleaning Cartridge is required to clean the tape drive. The
drive itself determines when it must be cleaned and notifies the library. When
notified, the library indicates that the drive needs cleaning by turning ON the
"Clean Drive" LED on the front panel of the library and posting a message on the
library display.
5-4
Dell PowerVault TL1000 Tape Autoloader User's Guide
A tape drive within a library requires the use of a library menu function to either
automatically or manually clean the tape drive. See Chapter 4, “Operations,” on
page 4-1.
Important: The drive must be cleaned only when it is requested by the drive.
The Ultrium Universal Cleaning Cartridge is valid for 50 uses. The cartridge's
LTO-CM (Cartridge Memory) chip tracks the number of times that the cartridge is
used.
Note: The drive automatically ejects an expired cleaning cartridge.
Bar code labels
A bar code label contains:
v A volume serial number (VOLSER) that is human-readable
v A bar code that the library can read
Note: The LTO Ultrium 5 and 6 Tape Drives do not require bar code labels, but
you might choose to use labels for tape cartridge identification purposes.
When read by a library's bar code reader, the bar code identifies the cartridge's
VOLSER to the library. The bar code also tells the library whether the cartridge is a
data cartridge or cleaning cartridge. In addition, the bar code includes the
two-character media-type identifier Lx, where x equals 1, 2, 3, 4, 5 or 6. L identifies
the cartridge as an LTO cartridge and the number represents the generation of
cartridge for that cartridge type. Figure 5-3 on page 5-6 shows a sample bar code
label for the LTO Ultrium Tape Cartridge.
Tape cartridges can be ordered with the labels included or with custom labels.
Table 5-5. Cartridges and VOLSERs compatible with the Ultrium Tape Drives
Cartridges
VOLSER
Ultrium 6 Data Cartridge
xxxxxxL6
Ultrium 6 WORM Cartridge
xxxxxxLW
Ultrium 5 Data Cartridge
xxxxxxL5
Ultrium 5 WORM Cartridge
xxxxxxLV
Ultrium 4 Data Cartridge
xxxxxxL4
Ultrium 4 WORM Cartridge
xxxxxxLU
Ultrium 3 Data Cartridge
xxxxxxL3
Ultrium 3 WORM Cartridge
xxxxxxLT
Ultrium 2 Data Cartridge
xxxxxxL2
Ultrium 1 Data Cartridge (READ ONLY)
xxxxxxL1
LTO Ultrium Cleaning Cartridge
CLNxxxLx
To determine the complete specifications of the bar code and the bar code label,
contact your sales representative.
When a bar code label is attached to a tape cartridge, place the label only in the
recessed label area (see 5 in Figure 5-1 on page 5-1). A label that extends outside
of the recessed area can cause loading problems in the drive.
Chapter 5. Media
5-5
Attention: Do not place any type of mark on the white space at either end of the
bar code. A mark in this area might prevent the library from reading the label.
T
O
1
2
3
L6
a69i0360
L
Figure 5-3. Sample bar code label on the LTO Ultrium 6 Tape Cartridge. The volume serial number (LTO123) and bar
code are printed on the label.
Guidelines for the use of bar code labels
Apply the following guidelines whenever using bar code labels:
v Do not reuse a label or reapply a used label over an existing label.
v Before you apply a new label, remove the old label by slowly pulling it at a
right angle to the cartridge case.
v Use peel-clean labels that do not leave a residue after they are removed. If there
is glue residue on the cartridge, remove it by gently rubbing it with your finger.
Do not use a sharp object, water, or a chemical to clean the label area.
v Examine the label before it is applied to the cartridge. Do not use the label if it
has voids or smears in the printed characters or bar code (a library's inventory
operation takes much longer if the bar code label is not readable).
v Remove the label from the label sheet carefully. Do not stretch the label or cause
the edges to curl.
v Position the label within the recessed label area (see 5 in Figure 5-1 on page
5-1).
v With light finger pressure, smooth the label so that no wrinkles or bubbles exist
on its surface.
v Verify that the label is smooth and parallel, and has no roll-up or roll-over. The
label must be flat to within 0.5 mm (0.02 in.) over the length of the label and
have no folds, missing pieces, or smudges.
v Do not place other machine-readable labels on other surfaces of the cartridge.
They might interfere with the ability of the drive to load the cartridge.
Write-Protect switch
The position of the write-protect switch on the tape cartridge (see 1) determines
whether you can write to the tape. If the switch is set to:
(solid red), data cannot be written to the tape.
v The locked position
v The unlocked position (black void), data can be written to the tape.
If possible, use your server's application software to write-protect your cartridges
(rather than manually setting the write-protect switch). This application allows the
server's software to identify a cartridge that no longer contains current data and is
5-6
Dell PowerVault TL1000 Tape Autoloader User's Guide
eligible to become a scratch (blank) data cartridge. Do not write-protect scratch
(blank) cartridges. The tape drive cannot write new data to them.
1
a67e0026
If you must manually set the write-protect switch, slide it left or right to the
desired position.
Figure 5-4. Setting the write-protect switch
Table 5-6. Location of the write-protect switch
1
Write-Protect switch
Cartridge care and handling
Attention: Do not insert a damaged tape cartridge into the drive. A damaged
cartridge can interfere with the reliability of a drive and might void the warranties
of the drive and the cartridge. Before inserting a tape cartridge, inspect the
cartridge case, cartridge door, and write-protect switch for breaks.
Incorrect handling or an incorrect environment can damage cartridges or their
magnetic tape. To avoid damage to your tape cartridges and to ensure the
continued high reliability of your LTO Ultrium Tape Drives, use the following
guidelines:
Provide training
v Post procedures that describe proper media handling in places where people
gather.
v Ensure that anyone who handles tape has been properly trained in handling and
shipping procedures. This includes operators, users, programmers, archival
services, and shipping personnel.
v Ensure that any service or contract personnel who perform archiving are
properly trained in media-handling procedures.
v Include media-handling procedures as part of any services contract.
v Define and make personnel aware of data recovery procedures.
Chapter 5. Media
5-7
Ensure proper packaging
v When shipping a cartridge, use the original or better packaging.
v Always ship or store a cartridge in a jewel case.
v Use only a recommended shipping container that securely holds the cartridge in
its jewel case during transportation.
v Never ship a cartridge in a commercial shipping envelope. Always place it in a
box or package.
v If you ship the cartridge in a cardboard box or a box of a sturdy material, ensure
the following:
– Place the cartridge in polyethylene plastic wrap or bags to protect it from
dust, moisture, and other contaminants.
– Pack the cartridge snugly; do not allow it to move around.
– Double-box the cartridge (place it inside a box, then place that box inside the
shipping box) and add padding between the two boxes (see Figure 5-5).
Figure 5-5. Double-boxing tape cartridges for shipping
Provide proper acclimation and environmental conditions
v Before you use a tape cartridge, acclimate it to the operating environment for 24
hours or the time necessary to prevent condensation in the drive (the time will
vary, depending on the environmental extremes to which the cartridge was
exposed).
v Ensure that all surfaces of a cartridge are dry before inserting it.
v Do not expose the cartridge to moisture or direct sunlight.
v Do not expose recorded or blank cartridges to stray magnetic fields of greater
than 100 oersteds (for example, terminals, motors, video equipment, X-ray
equipment, or fields that exist near high-current cables or power supplies). Such
exposure can cause the loss of recorded data or make the blank cartridge
unusable.
v Maintain the conditions that are described in “Environmental and shipping
specifications for tape cartridges” on page 5-10.
5-8
Dell PowerVault TL1000 Tape Autoloader User's Guide
Perform a thorough inspection
After you purchase a cartridge and before you use it, complete the following steps:
v Inspect the cartridge's packaging to determine potential rough handling.
v When a cartridge is inspected, open only the cartridge door. Do not open any
other part of the cartridge case. The upper and lower parts of the case are held
together with screws. Separating them destroys the usefulness of the cartridge.
v Inspect the cartridge for damage before you use or store it.
v Inspect the rear of the cartridge (the part that loads first into the tape load
compartment) and ensure that there are no gaps in the seam of the cartridge
case. If there are gaps in the seam (see Figure 5-6), the leader pin might be
dislodged.
Figure 5-6. Checking for gaps in the seams of a cartridge
v Check that the leader pin is properly seated.
v If you suspect that the cartridge was mishandled but it appears usable, copy any
data onto a good cartridge immediately for possible data recovery. Discard the
mishandled cartridge.
v Review handling and shipping procedures.
Handle the cartridge carefully
v Do not drop the cartridge. If the cartridge drops, slide the cartridge door back
and ensure that the leader pin is properly seated in the pin-retaining spring
clips.
v Do not handle tape that is outside the cartridge. Handling the tape can damage
the tape's surface or edges, which might interfere with read or write reliability.
Pulling on tape that is outside the cartridge can damage the tape and the brake
mechanism in the cartridge.
v Do not stack more than six cartridges.
v Do not degauss a cartridge that you intend to reuse. Degaussing makes the tape
unusable.
Chapter 5. Media
5-9
Examples of cartridge problems
Example: Split Cartridge Case (see “Perform a thorough inspection” on page 5-9)
The cartridge's case is damaged. There is a high possibility of media damage and
potential loss. Perform the following steps:
1. Look for cartridge mishandling.
2. Use the Leader Pin Reattachment Kit (part number 08L9129) to correctly seat
the pin. Then, immediately use data recovery procedures to minimize chances
of data loss.
3. Review media-handling procedures.
Example: Improper Placement of Leader Pin
1. Look for cartridge damage.
2. Use the Leader Pin Reattachment Kit (part number 08L9129) to correctly seat
the pin. Then, immediately use data recovery procedures to minimize chances
of data loss.
Environmental and shipping specifications for tape cartridges
Before you use a tape cartridge, acclimate it to the operating environment for 24
hours or the time necessary to prevent condensation in the drive (the time varies,
depending on the environmental extremes to which the cartridge was exposed).
The best storage container for the cartridges (until they are opened) is the original
shipping container. The plastic wrapping prevents dirt from accumulating on the
cartridges and partially protects them from humidity changes.
When you ship a cartridge, place it in its jewel case or in a sealed, moisture-proof
bag to protect it from moisture, contaminants, and physical damage. Ship the
cartridge in a shipping container that has enough packing material to cushion the
cartridge and prevent it from moving within the container.
Table 5-7 gives the environment for operating, storing, and shipping LTO Ultrium
Tape Cartridges.
Table 5-7. Environment for operating, storing, and shipping the LTO Ultrium Tape Cartridge
Environmental Specifications
Environmental Factor
Temperature
Relative humidity
(non-condensing)
Maximum wet bulb
temperature
Operating
Operational Storage1
Archival Storage2
Shipping
10 - 45°C (50 - 113°F)
16 - 32°C (61 - 90°F)
16 - 25°C (61 - 77°F)
-23 to 49°C (-9 to
120°F)
10 - 80%
20 - 80%
20 - 50%
5 - 80%
26°C(79°F)
26°C(79°F)
26°C(79°F)
26°C(79°F)
Note:
1. The short term or operational storage environment is for storage durations of up to six months.
2. The long term or archival storage environment is for durations of six months up to 10 years.
5-10
Dell PowerVault TL1000 Tape Autoloader User's Guide
Chapter 6. Troubleshooting
“How the library reports problems”
“Library error message content” on page 6-2
“Diagnosing a problem” on page 6-3
“Isolating problems” on page 6-6
“Installation and configuration problems” on page 6-8
“Interpreting front panel LEDs” on page 6-8
“Reseating cables” on page 6-10
“Emailing logs” on page 6-10
|
|
The TL1000 Tape Autoloader is a customer replaceable unit (CRU). The customer is
responsible for the setup and maintenance of the library. Warranty replacement of
the TL1000 Tape Autoloader, if required, is provided by exchanging the old unit
with a new unit. The customer is charged for onsite service if a service contract is
not in place.
When an error occurs during operation of the library, the library stops the current
operation and displays an error code on the Operator Panel. Unless otherwise
noted, try to resolve the problem by cycling power to the library and retrying the
last operation.
Note: When power cycling the library, wait 10 seconds after the power is switched
OFF before the library is powered ON again.
|
Before you place a service call or inform Dell Technical Support, observe the LEDs
on the front panel and error messages on the Operator Panel to determine exactly
which part is failing. See “Interpreting front panel LEDs” on page 6-8. If the LEDs
on all components are functioning properly, see “Diagnosing a problem” on page
6-3.
How the library reports problems
The library uses advanced problem detection, reporting, and notification
technology to alert customers of problems as soon as they occur. It completes
numerous self-tests to monitor the library's temperature, voltage and currents, and
standard library operations. These tests monitor the library when the library is
powered ON, and during normal operation when the library is idle.
If the test detects a problem, the library generates a message that identifies which
component is likely causing the problem. The library's Error LED and Attention
LED might turn ON to indicate an abnormal state. If the problem is not severe, the
Attention LED turns ON and the library continues to provide full functionality to
the library. If the problem is not recoverable, the Error LED turns ON and an error
message is displayed on the Operator Panel.
When the library generates an attention event or an error event, support staff can
be notified immediately by setting up email event notification or SNMP trap
notification. The type of event that generates email notification or SNMP trap
notification can be selected to limit the number of events to a specific priority
level.
6-1
Customers can frequently resolve a simple problem themselves by with the
information found in “Diagnosing a problem” on page 6-3. If the problem is
unrecoverable, the customer must contact Dell Technical Support (see “Contacting
Dell technical support” on page 7-2).
|
|
Library error message content
When a library event occurs, the event is logged in to flash memory on the Library
Control Board.
The library error log is viewed on the Operator Panel by selecting Service > View
Error Status. The log lists all of the library error messages in the order in which
they occurred, starting with the most recent at the top.
The Web User Interface can display a log history summary of information,
warning, and error events that occurred by selecting Service Library > Operator
Interventions. The summary can be filtered to display the operator intervention
log for a specific hardware component and specific event levels. The log is stored
in memory on the Library Control Board. When the memory buffer is full, new
events overwrite the oldest events. The log is not cleared from memory when
power is turned OFF. The information that is displayed in the Detail panel for the
selected operator intervention event consists of:
v Index number of the event
v Date the event occurred
v Time the event occurred
v Unit in the library where the event occurred
v Event level
v Description of the event
The Web User Interface can also display a log history summary of errors that
occurred by selecting Service Library > View Library Logs. The error log is
displayed with sense data information. The summary can be filtered to display
errors with specific sense data code types. The information that is displayed in the
Detail panel for the selected error consists of:
v Index number of the error
v Date and time the error occurred
v Error code
v Description of the error
6-2
Dell PowerVault TL1000 Tape Autoloader User's Guide
Diagnosing a problem
Problem Area
If...
Then...
Cartridge
A cartridge is not ejecting from
the drive...
1. Try unloading the drive (Operator Panel: Commands
> Unload).
2. Power cycle the library.
3. If the cartridge does not eject from the drive, see
“Contacting Dell technical support” on page 7-2.
|
The cartridge case or tape inside
the cartridge is damaged...
Replace the tape cartridge.
Your cleaning cartridge expires...
Replace the cleaning cartridge.
A bar code label cannot be read
by the bar code reader...
1. Export the suspect cartridge from the library.
2. Confirm that the bar code label is not damaged or
missing. Replace the bar code label, if necessary.
3. Import the cartridge back into the library.
4. Inventory the library.
a. If no errors are reported, resume normal library
operations.
b. If an error is reported, see Appendix A, “Error
codes,” on page A-1.
Cartridge Magazine The magazine will not unlock
after issuing the Unlock
Magazine command from the
Operator Panel...
1. Power cycle the library.
2. Try unlocking the magazine again (Operator Panel:
Unlock Magazine or Web user Interface: Manage
Library > Unlock Magazine).
a. If the magazine does not unlock, see “Unlocking
the cartridge magazine manually” on page 8-1.
b. If the magazine does unlock, resume normal
library operations.
The magazine can be partially
removed from the library...
The magazine seems stuck on
something inside the library...
|
|
1. Verify that you requested the library to unlock the
entire magazine, not just the I/O station (if enabled)
then retry the operation.
2. Carefully pull the magazine out of the library. Stop if
you feel any resistance (as if something is blocking the
magazine inside the library).
3. If the magazine still cannot be removed from the
library, see “Contacting Dell technical support” on
page 7-2.
Chapter 6. Troubleshooting
6-3
Problem Area
If...
Then...
Communication
Functions
You are experiencing difficulty
with exercising some library
functions (for example, updating
firmware or logging in to the
library remotely)...
1. If you have a recent backup of your configuration,
proceed to the next step. If you do not, try to save one
now (Web User Interface: Configure Library >
Save/Restore).
2. If a static IP address is used, make note of your
library's IP address. With DHCP, proceed to the next
step.
3. Restore factory defaults (Operator Panel:
Configuration > Set Default).
4. With a static IP address, disable DHCP (the default
setting) and enter the library IP address (Web User
Interface: Configure Library > Network; Operator
Panel: Configuration > Configure Network Settings).
With DHCP, proceed to the next step.
5. Restore the library configuration (Web User Interface:
Configure Library > Save/Restore).
Encryption
Encryption error displayed when
the drive detects an error
associated with an encryption
operation, if the problem
occurred while the tape drive
was writing data to, or reading
data from, tape...
1. Check the host application to ensure that the host
application is providing the correct encryption key.
a. Refer to the Sense Data that are returned for an
encryption operation.
b. Retry the encryption operation after the host
application problems are resolved.
2. Reset the drive.
a. Refer to the error code displayed on the Operator
Panel if the drive resets and POST fails.
b. Retry the encryption operation if the drive resets
and POST complete without errors.
3. Ensure that the correct media is being used. Data
encryption is supported by LTO Ultrium 6, 5, and 4
Data Cartridges only.
Encryption-related error is
posted...
6-4
Dell PowerVault TL1000 Tape Autoloader User's Guide
Check the host application's error logs, device driver logs,
tape library error logs, and tape drive error logs for
entries that are related to encryption.
Problem Area
If...
Then...
Error Codes or
TapeAlert Flags
The library issued an error code... 1. Make note of the error code.
An error message was received
2. Power cycle the library.
by way of email notification (if
a. If the error recurs, see Appendix A, “Error codes,”
enabled)...
on page A-1.
b. If the error does not recur, resume normal library
operations.
A TapeAlert flag was received...
1. Make note of the TapeAlert flag.
2. Power cycle the library.
a. If the TapeAlert recurs, see Appendix B, “TapeAlert
flags,” on page B-1.
b. If the TapeAlert does not recur, resume normal
library operations.
|
The error code represents an
unrecoverable error...
See “Contacting Dell technical support” on page 7-2.
You get repeated errors...
1. Reset the library.
2. If the library is still reporting errors, power cycle the
library. If no errors are reported, resume normal
library operations.
3. If the library still fails, reset factory defaults. If no
errors are reported, resume normal library operations.
|
|
4. If the problem persists, see “Contacting Dell technical
support” on page 7-2.
You are experiencing a problem
with your library and no error
code was created...
|
|
1. Run Library Verify to identify and resolve the
problem. See “Running library verify diagnostic
procedures” on page 4-14.
2. If the problem persists, see “Contacting Dell technical
support” on page 7-2.
Firmware
Failure of the login screen to display on the Operator
The Library firmware does not
complete the boot-up process and Panel in 15 minutes indicates that the boot-up process is
not completing.
appears hung...
1. Power OFF the library and wait at least 1 minute
before the library is powered ON to recover from the
problem.
2. If a library firmware update was completed, try
repeating the update procedure.
|
All firmware (library and drive)
is not at the latest level...
See “Updating library and drive firmware” on page 4-38.
Front Panel LEDs
One or more front panel LEDs is
ON or blinking...
See “Interpreting front panel LEDs” on page 6-8.
Host Attachment
Interface
You are experiencing host
attachment interface problems...
See “Isolating host attachment interface problems” on
page 6-7.
Installation and
Configuration
You are experiencing trouble
installing or configuring your
library...
See “Installation and configuration problems” on page
6-8.
ITDT-DCR
The Performance Test duration
varies...
Items affecting the duration of the test:
v The level of adapter device driver
v Your adapter model and type
Chapter 6. Troubleshooting
6-5
Problem Area
If...
Then...
Library Not
Booting
There is a blank operator
panel/display...
Failure of the login screen to display on the Operator
Panel in 15 minutes indicates that the boot-up process is
not completing.
The accessor does not move...
1. Power OFF the library and wait at least 1 minute
before the library is powered ON to recover from the
The display is stuck on
problem.
initialization for extended period
2.
If a library firmware update was completed, try
of time...
repeating the update procedure.
You are required to download the Using the Web User Interface.
library log or drive log...
v Library log: Service Library > Download Library Logs
Logs
v Drive log: Service Library > Download Drive Logs
Network Time
Protocol (NTP)
The library time is not being
updated by the NTP server...
Using the Web User Interface.
1. Disable NTP.
2. Set the time manually.
3. Enable NTP.
Power
If the power supply switch is ON See “Isolating library power problems.”
and the library is OFF...
Web User Interface
HTML error 404 appears on
computer screen when trying to
launch the Web User Interface...
See “Isolating Web User Interface problems” on page 6-7.
Isolating problems
Isolating library power problems
1. Ensure that the power cord is plugged in at the power supply and at the
electrical outlet, then turn library power ON. Feel for air that is flowing out of
the cooling fan grill on the rear of the library. Power is good if air is flowing
from the cooling fan grill.
2. If power is not working:
a. Plug the power cord into another electrical outlet.
b. Plug another device into the outlet to test.
c. If the outlet tests OK, try another power cord.
3. If you verified that the electrical outlet and power cord works properly, but the
power supply is still failing, replace the library.
4. If the power supply seems to be delivering power to the library; but air does
not flow from the power-supply cooling fan grill on the rear of the library,
replace the library.
Isolating drive problems
1. Ensure that the drive firmware is at the latest level (visit http://
www.dell.com/support).
2. Cycle library power.
3. If the drive is experiencing permanent or temporary errors or if the Clean LED
is lit on the front panel of the library, clean the drive.
4. Run Library Verify.
a. If the test fails, replace the library.
5. With the host interface test tool, ITDT, run the Scan functions to verify that the
host application interface can detect the drive and the library. To further test
6-6
Dell PowerVault TL1000 Tape Autoloader User's Guide
the interface communication path, run the Test Device function, if available,
after the drive is selected. This function writes and reads data across the
interface, also sending a command to the drive to run the internal performance
read/write test.
6. If the host tool, ITDT, cannot detect the drive or library, look for problems with
the host interface cabling, the HBA, the device driver, or the backup application
software.
Isolating Web User Interface problems
1. Verify that you entered the account name and password correctly. The account
name and password are case-sensitive.
2. Verify that other library users are not entering commands from the Web User
Interface or Operator Panel at the same time you are issuing commands.
3. Ensure that library firmware is at the latest level (visit http://www.dell.com/
support).
4. Ensure that the Ethernet cable is securely plugged in the rear of the library at
the Ethernet port.
5. Ensure that the correct IP, netmask, and gateway addresses are keyed into the
network parameters.
6. Ensure that the correct IP address is being used on the web browser.
7. If the Ethernet connection is a direct connection between the PC and the library,
a special "crossover" Ethernet cable is required.
|
|
Note: On newer PCs, either straight through or crossover Ethernet cables might
be used since the crossover requirement is provided internally.
8. Check the Ethernet cable carefully (or try another cable) and, if the cable is
connected to a network hub or switch, try a different port.
9. If the Web User Interface is still malfunctioning, refer to “Contacting Dell
technical support” on page 7-2.
Isolating host attachment interface problems
|
|
|
|
|
|
After successfully exercising “Isolating drive problems” on page 6-6, and more
specifically “Running library verify diagnostic procedures” on page 4-14 from the
Operator Panel (Service > Library Verify), the following procedures are suggested
to help isolate the failure to properly establish connectivity to the Host Bus adapter
(HBA).
1. Use the ITDT-DCR utility to evaluate connectivity from the HBA through the
cabling to the drive. ITDT-DCR does not require separate device drivers, thus
the Operating System can scan, and find all the LTO devices that are attached.
a. If ITDT-DCR cannot successfully locate the LTO drive, suspect cabling or
HBA problems, and skip to Step 4.
b. If ITDT-DCR successfully located the LTO drive, proceed to Step 3. See
“ITDT-DCR” on page 7-1 for a brief description of ITDT-DCR and
instructions on how to download the tool from the web.
2. If ITDT-DCR successfully locates the LTO devices, verify that the correct
application device drivers and backup application software is properly
installed.
3. Ensure that all the required or latest available Operating System files or
updates (DLLs, PTFs) are installed and applied.
Chapter 6. Troubleshooting
6-7
Installation and configuration problems
Problems that are encountered during the installation of the library are caused by
improper application software configuration errors or an incorrectly configured
operating system. If the application software that you are using is not
communicating with the library after installation, check:
v Accessor locking screw: Ensure that the accessor locking screw on the rear panel
of the library is removed before the library is powered ON. See “Removing the
accessor locking screw” on page 3-7.
v HBA LUN 0/1 support: A single ID addresses both drive and library since the
drive is LUN 0 and the library is LUN 1. These models require an HBA that
supports LUN scanning, which must be enabled at the HBA. See “Logical Unit
Number (LUN) scanning” on page 1-9.
v Cable connections: Ensure that there are no bent pins on cables and that all
connections are securely fastened.
v SAS cables and interposers: Ensure that SAS cables and interposers (if any) are
properly attached. See “Connecting the Host Interface cables” on page 3-8.
v Backup application installation: Refer to the documentation included with your
backup application software for instructions on how to verify installation.
v Device driver installation: Ensure that the correct device driver, if applicable, is
installed for the library.
Note: Many backup applications use their own drivers for the library and drive.
Before a driver is installed, make sure that it is not in conflict with the
software. Contact your backup application vendor for this information.
Review the information in Chapter 3, “Installation and configuration,” on page 3-1
to determine whether a step was missed or misread.
If you are still experiencing difficulty with installing or configuring your library,
see “Contacting Dell technical support” on page 7-2.
|
Important: Do not disassemble the library. The warranty on your library is voided
if the unit is disassembled without the approval of Dell Technical
Support.
|
Interpreting front panel LEDs
Light emitting diodes (LEDs) on the front panel of the library provide a visual
indication about the status of certain library components. The LEDs can
communicate that a problem exists when operator interventions cannot.
Figure 6-1. Front panel LEDs
6-8
Dell PowerVault TL1000 Tape Autoloader User's Guide
1
2
3
4
Ready/Activity LED
Cleaning LED
Attention LED
Error LED
Table 6-1. Front Panel LED indicators
Library
Condition
Ready/Activity
LED
POST (Power ON
Self Test)
Message on
Display
Cleaning LED
Attention LED
Error LED
Flashes 2 times
per second
OFF
OFF
OFF
INITIALIZING...
INVENTORY...
Magazine open
Flashes 2 times
per second
OFF
OFF
OFF
PLEASE INSERT
MAGAZINE
Magazine
unlocked
Flashes 2 times
per second
OFF
OFF
OFF
MAGAZINE
UNLOCKED
I/O Station open
Flashes 2 times
per second
OFF
OFF
OFF
PLEASE CLOSE
I/O STATION
I/O Station
unlocked
Flashes 2 times
per second
OFF
OFF
OFF
I/O STATION
UNLOCKED
Library firmware
is being updated
Flashes 2 times
per second
OFF
OFF
OFF
LOADER
FIRMWARE
UPDATING!
Drive firmware is
being updated
Flashes 2 times
per second
OFF
OFF
OFF
DRIVE
FIRMWARE
UPDATING!
Drive dump is
being uploaded to
host computer
Flashes 2 times
per second
OFF
OFF
OFF
DRIVE DUMP
DATA
UPLOADING!
Library is offline
Flashes 2 times
per second
OFF
OFF
OFF
OFFLINE
Cartridge is being Flashes 1 time per
moved
second
OFF
OFF
OFF
READY
Library error
occurred
ON
OFF
OFF
ON
*** CHK ***
Drive error
occurred
ON
Cartridge error
occurred
ON
Cleaning
cartridge expired
ON
OFF
ON
OFF
REPLACE
CLEANING
MEDIA
Drive requested
cleaning
ON
ON
OFF
OFF
CLEAN DRIVE
Drive is being
cleaned
ON
Flashes 1 time per
second
OFF
OFF
CLEANING...
Library is online
and ready to
receive a
command
ON
OFF
OFF
OFF
READY
CODE: [XXXX]
OFF
OFF
ON
DRIVE FAULT
CODE: [X]
OFF
ON
OFF
MEDIA FAULT
CODE: [X]
Chapter 6. Troubleshooting
6-9
Reseating cables
To reseat external library cables, complete the following steps:
1. Locate the following cables on the rear panel of the library.
a. SAS attachment for the drive
b. Ethernet cable for connection to a network
c. Power supply cable
2. Check and reseat, if necessary, all of the cables that are connected to your
library.
3. Verify that there is no damage to any connector pins.
Emailing logs
Logs provide a summary of the status, warnings, and errors in the library, and
include configuration settings and information that is provided in Operator
Interventions.
Download current logs of the library and drive when requested by your service
representative. To email current logs:
1. Ensure that no applications are accessing the library. If a library operation is in
progress, wait until it finishes before attempting to generate the logs.
2. Download the current library log from the Web User Interface by selecting
Service Library > Download Library Logs, click Refresh, and click Download.
3. Download the current drive log from the Web User Interface by selecting
Service Library > Download Drive Logs, click Refresh, and click Download.
4. When requested by Dell, attach the log to an email message and send it to Dell
technical support for further diagnosis.
|
6-10
Dell PowerVault TL1000 Tape Autoloader User's Guide
Chapter 7. Service procedures
|
“ITDT-DCR”
|
“Contacting Dell technical support” on page 7-2
|
|
|
ITDT-DCR
ITDT-DCR is a tool with multifunction capability and is a quick, convenient, and
efficient method for drive firmware updates. It can also assist with drive dump
retrievals.
Some of the capabilities of this tool:
v Runs quick or extended diagnostic procedures on tape drives. If the library is
online to the server/host where the tool is, ITDT-DCR communicates with the
drive through the library to load and unload a test cartridge.
v Retrieves firmware memory dumps from tape drives and libraries.
v Completes a firmware update on tape drives or libraries. See the note about
library firmware updates.
v Tests the performance of the environment by completely writing a cartridge and
measuring performance.
v Retrieves and displays cartridge information.
v Verifies the encryption environment.
v Does not require special device drivers.
v Is available for most major platforms. Scans the host interface and finds and
displays for selection all LTO devices.
|
|
|
|
|
The Tape Diagnostic tool (ITDT-DCR) is available as a command-line utility and a
graphical user interface (GUI) version.
v The Tape Diagnostic Tool (ITDT-DCR) is a command-line utility. Start it by
entering the executable command from the directory where the tool is located.
The Help feature gives a brief explanation of each function and shows the
required syntax.
v The Tape Diagnostic Tool (ITDT-DCR) is a GUI version for Microsoft Windows.
Microsoft Windows XP and Microsoft Windows Server 2003 (IX86, 32-bit) are
supported.
Note: Be sure that you have the most current version of ITDT-DCR if you are
updating firmware on a recent drive type. Before ITDT-DCR is used, verify
that your library host operating system is at the latest released level. This
verification ensures optimum read/write operations for diagnostic
procedures.
Note: If the library has a BCR (Barcode Reader) that requires 9.00 or greater
firmware, the Update function stops with an error code of "Unexpected
Data" if you attempt to downgrade the library firmware.
|
|
To download the ITDT-DCR tool and instructions for using the tool, visit
http://www.dell.com/support.
7-1
|
Contacting Dell technical support
|
For customers in the United States, call 800-WWW-DELL (800-999-3355).
|
|
|
Note: If you do not have an active Internet connection, you can find contact
information about your purchase invoice, packing slip, bill, or Dell product
catalog.
|
|
|
|
|
|
|
|
|
|
Dell provides online and telephone-based support and service options. Service
availability varies by country and product, and some services might not be
available in your area. To contact Dell for sales, technical support, or customer
service issues follow the steps that are listed:
1. Visit http://www.dell.com/support.
2. Verify your country or region in the Choose A Country/Region menu at the
bottom of the page.
3. Click Contact Us on the left side of the page.
4. Select the appropriate service or support link that is based on your need.
5. Choose the method of contacting Dell that is convenient for you.
7-2
Dell PowerVault TL1000 Tape Autoloader User's Guide
Chapter 8. Removal and replacement procedures
“Required tools”
“Replacing a defective cartridge magazine”
“Unlocking the cartridge magazine manually”
Required tools
Installing or relocating the rack mount kit or deskside kit for your library requires
the following tool:
v #2 Phillips screwdriver
Replacing a defective cartridge magazine
After your replacement cartridge magazine is received, complete the following
steps to replace the defective cartridge magazine. The library does not need to be
powered OFF for this procedure.
1. Remove the defective cartridge magazine from the library with the Operator
Panel, the Web User Interface, or the manual method of removal.
v Operator Panel: Use the Unlock Magazine command. See “Unlocking the
cartridge magazine” on page 4-5.
v Web UI: Manage Library > Unlock Magazine. See “Unlocking the cartridge
magazine” on page 4-22.
v Manual method: See “Unlocking the cartridge magazine manually.”
2. After the defective magazine is removed from the library, remove all cartridges
from the defective magazine and insert them into the replacement magazine.
3. Insert the new magazine with cartridges into the library. Wait for the library to
complete its inventory before normal library operations resume.
4. Properly dispose of the defective magazine.
Unlocking the cartridge magazine manually
This procedure is used to remove the cartridge magazine manually when, for
example, the power is turned OFF or if the magazine fails to unlock in response to
the Unlock Magazine command from the Operator Panel and Web User Interface.
To unlock the cartridge magazine manually:
1. On the front panel, locate the access hole for the cartridge magazine lock
release mechanism to the left of the Operator Panel (1 in Figure 8-1 on page
8-2).
8-1
Figure 8-1. Cartridge magazine lock release access hole
2. Insert the end of a straightened paper clip, or similar object, into the lock
release access hole. Gently push the lock mechanism to release the lock and
eject the cartridge magazine.
3. If the I/O station is enabled, push the lock mechanism twice or push and hold
the lock mechanism until the cartridge is withdrawn far enough to clear the
I/O station lock.
4. Remove the cartridge magazine from the front of the library. If the magazine is
stuck in the library and does not eject, see “Contacting Dell technical support”
on page 7-2
5. Examine the magazine and cartridges for damage.
|
|
v If there is damage to a cartridge, replace that cartridge.
v If there is damage to the magazine, replace the magazine.
8-2
Dell PowerVault TL1000 Tape Autoloader User's Guide
Appendix A. Error codes
“Library error codes”
“Drive error codes” on page A-11
“Web User Interface error messages” on page A-11
“Trap definitions (types)” on page A-14
When an error occurs during operation of the library, the library stops the current
operation and displays an error code on the Operator Panel. Unless otherwise
noted, try to resolve the problem by cycling power to the library and retrying the
last operation.
Note: When power cycling the library, wait 10 seconds after the power is switched
OFF before powering ON again.
Library error codes
Table A-1. Library error codes
Code (H)
Description
Panel Indication
Action Required
0000
No valid error code information.
-
0001
At power-on initialization, a
firmware error was detected.
All 4 LEDs ON
0002
At power-on initialization, a RAM
(base area) error was detected.
Ready/Activity
LED ON and
Error LED ON
v If the problem is corrected, run Library
Verify before normal library operations
resume.
0003
At power-on initialization, a RAM
(buffer area) error was detected.
CHK 0003
v If the problem persists, see “Contacting
Dell technical support” on page 7-2.
1. Upgrade/reinstall firmware and try again.
2. Cycle the power supply and try again.
1. Observe LEDs. See “Interpreting front panel
LEDs” on page 6-8.
2. Reseat all cables. See “Reseating cables” on
page 6-10.
0008
A usable drive could not be
detected.
CHK 0008
3. Cycle the power supply and try again.
v If the problem is corrected, run Library
Verify before normal library operations
resume.
v If the problem persists, see “Contacting
Dell technical support” on page 7-2.
1. Remove the accessor locking screws. See
“Removing the accessor locking screw” on
page 3-7.
0009
The accessor locking screw has
not been removed.
2. Cycle the power supply and try again.
CHK 0009
v If the problem is corrected, run Library
Verify before normal library operations
resume.
v If the problem persists, see “Contacting
Dell technical support” on page 7-2.
A-1
Table A-1. Library error codes (continued)
Code (H)
Description
Panel Indication
Action Required
1. Observe LEDs. See “Interpreting front panel
LEDs” on page 6-8.
2. Confirm the DHCP server settings.
0010
Information acquisition from the
DHCP server failed.
3. Reseat all cables. See “Reseating cables” on
page 6-10.
-
4. Cycle the power supply and try again.
v If the problem is corrected, run Library
Verify before normal library operations
resume.
v If the problem persists, see “Contacting
Dell technical support” on page 7-2.
1. Observe LEDs. See “Interpreting front panel
LEDs” on page 6-8.
2. Confirm the time server settings.
0011
Time acquisition from the NTP
server failed.
3. Reseat all cables. See “Reseating cables” on
page 6-10.
-
4. Cycle the power supply and try again.
v If the problem is corrected, run Library
Verify before normal library operations
resume.
v If the problem persists, see “Contacting
Dell technical support” on page 7-2.
LDI I/F error.
0020
Transmit data abnormality
detected (NAK reception).
-
2. Reseat all cables. See “Reseating cables” on
page 6-10.
LDI I/F error.
0021
Receive timeout detected
(ACK/NAK reception).
3. Cycle the power supply and try again.
-
LDI I/F error.
0022
Response packet reception
timeout detected.
1. Observe LEDs. See “Interpreting front panel
LEDs” on page 6-8.
-
v If the problem is corrected, run Library
Verify before normal library operations
resume.
v If the problem persists, see “Contacting
Dell technical support” on page 7-2.
LDI I/F error.
0023
ENQ receive timeout detected.
LDI I/F error.
0024
0029
Receive data abnormality
detected.
LDI command ends abnormally.
-
-
1. Confirm the Encryption Key Manager
settings.
2. Reseat all cables. See “Reseating cables” on
page 6-10.
3. Cycle the power supply and try again.
002A
Commands to the Encryption Key
Manager over the retry limit.
-
v If the problem is corrected, run Library
Verify before normal library operations
resume.
v If the problem persists, see “Contacting
Dell technical support” on page 7-2.
A-2
Dell PowerVault TL1000 Tape Autoloader User's Guide
Table A-1. Library error codes (continued)
Code (H)
Description
Panel Indication
Action Required
1. Reseat all cables. See “Reseating cables” on
page 6-10.
2. Cycle the power supply and try again.
002B
Commands to the encryption
capable drive over the retry limit.
-
v If the problem is corrected, run Library
Verify before normal library operations
resume.
v If the problem persists, see “Contacting
Dell technical support” on page 7-2.
LDI I/F error.
002C
Cycle the power supply and try again.
-
ACK IU event timeout detected.
LDI I/F error.
002D
Response IU event timeout
detected.
-
v If the problem is corrected, run Library Verify
before normal library operations resume.
v If the problem persists, see “Contacting Dell
technical support” on page 7-2.
LDI I/F error.
002E
Transfer Ready IU event timeout
detected.
-
LDI I/F error.
002F
Undefined error detected.
0040
A drive media error detected
upon insertion.
1. Verify that the cartridge is compatible with
the drive in your library. See “Cartridge
compatibility” on page 5-3.
CHK 0040
2. Verify that the cartridge is not
write-protected. See “Write-Protect switch”
on page 5-6.
3. If it is a cleaning cartridge, verify that the
cartridge is not expired. See “Cleaning
cartridge” on page 5-4.
4. Cycle the power supply and try again.
0041
A hardware error detected upon
media insertion
CHK 0041
v If the problem is corrected, run Library
Verify before normal library operations
resume.
v If the problem persists, see “Contacting
Dell technical support” on page 7-2.
Cycle the power supply and try again.
0042
A drive load timeout error
detected upon insertion.
CHK 0042
v If the problem is corrected, run Library Verify
before normal library operations resume.
v If the problem persists, see “Contacting Dell
technical support” on page 7-2.
Verify that the cartridge is compatible with the
drive installed in the library. See “Cartridge
compatibility” on page 5-3.
0048
Incompatible medium installed.
CHK 0048
v If the problem is corrected, run Library Verify
before normal library operations resume.
v If the problem persists, see “Contacting Dell
technical support” on page 7-2.
Appendix A. Error codes
A-3
Table A-1. Library error codes (continued)
Code (H)
Description
Panel Indication
0053
Response acknowledge error
received from bar code reader.
Suspect the bar code reader cable
connection.
0056
Receive data checksum error
received from bar code reader.
Suspect the bar code reader cable
connection.
CHK 0056
0057
Invalid data received from bar
code reader. Suspect the bar code
reader cable connection.
CHK 0057
0058
A bar code reader read-error
detected. Suspect the bar code
reader cable connection.
CHK 0058
0059
A bar code reader FLASH control
error detected. Suspect the bar
code reader cable connection.
CHK 0059
005A
A bar code reader diagnostics
error detected. Suspect the bar
code reader cable connection.
CHK 005A
005B
I2C I/F error. A transfer retry
detected. Suspect the bar code
reader cable connection.
CHK 005B
005C
I2C I/F error. Interrupt timeout
detected. Suspect the bar code
reader cable connection.
CHK 005C
CHK 0053
Action Required
1. Initiate an inventory. See “Conducting a
library inventory” on page 4-7 (Operator
Panel) or “Conducting a library inventory”
on page 4-22 (Web User Interface).
2. Cycle the power supply and try again.
v If the problem is corrected, run Library
Verify before normal library operations
resume.
v If the problem persists, see “Contacting
Dell technical support” on page 7-2.
I2C I/F error.
005D
Invalid signal (NAK) detected.
Suspect the bar code reader cable
connection.
CHK 005D
I2C I/F error.
005E
Bus arbitration lost error detected.
Suspect the bar code reader cable
connection.
CHK 005E
I2C I/F error.
005F
0070
Ready condition does not occur.
Suspect the bar code reader cable
connection.
Calibration failed because the
accessor contains media. Suspect
the centering sensor.
CHK 005F
1. Attempt to unload the cartridge from the
accessor. See“Moving cartridges” on page 4-6
(Operator Panel) or “Moving cartridges” on
page 4-20 (Web User Interface).
CHK 0070
2. Cycle the power supply and try again.
v If the problem is corrected, run Library
Verify before normal library operations
resume.
v If the problem persists, see “Contacting
Dell technical support” on page 7-2.
A-4
Dell PowerVault TL1000 Tape Autoloader User's Guide
Table A-1. Library error codes (continued)
Code (H)
Description
Panel Indication
0071
Calibration failed due to an
empty magazine. Suspect the
magazine set sensor.
CHK 0071
0072
Calibration measurement invalid
data error. Suspect the centering
sensor, X motor, or P motor.
CHK 0072
0074
GET, centering check, or bar code
reader read operation failed
because the accessor contains
media. Suspect the centering
sensor.
CHK 0074
0075
PUT operation failed because the
accessor contains no media.
Suspect the centering sensor.
CHK 0075
007C
Drive does not enter EJECT state
(and media not ejected) within
200 seconds of a GET command.
Suspect the drive.
Action Required
Cycle the power supply and try again.
CHK 007C
v If the problem is corrected, run Library Verify
before normal library operations resume.
v If the problem persists, see “Contacting Dell
technical support” on page 7-2.
1. If the cartridge does not eject, try to unload
the cartridge from the drive with the
Operator Panel (Commands > Unload) or
the Web User Interface (Manage Library >
Unload). Move the cartridge from the drive
to the I/O Station. Remove the cartridge
from the library and inspect for damage and
replace, if necessary.
2. Cycle the power supply and try again.
v If the problem is corrected, run Library
Verify before normal library operations
resume.
v If the problem persists, see “Contacting
Dell technical support” on page 7-2.
Cycle the power supply and try again.
007D
Drive does not enter MOUNT
state within 200 seconds of a PUT
command. Suspect the drive or X
motor.
CHK 007D
007E
Drive does not enter SET state
within 3 seconds of a PUT
command. Suspect the drive or X
motor.
CHK 007E
v If the problem is corrected, run Library Verify
before normal library operations resume.
v If the problem persists, see “Contacting Dell
technical support” on page 7-2.
1. Reseat all cables. See “Reseating cables” on
page 6-10.
007F
Drive I/F or connection error
occurs during a PUT operation or
GET operation. Suspect the drive.
2. Cycle the power supply and try again.
CHK 007F
v If the problem is corrected, run Library
Verify before normal library operations
resume
v If the problem persists, see “Contacting
Dell technical support” on page 7-2.
Appendix A. Error codes
A-5
Table A-1. Library error codes (continued)
Code (H)
Description
Panel Indication
Action Required
CHK 0080
1. Check the accessor locking screw and
remove it if it is installed. See “Removing the
accessor locking screw” on page 3-7.
X movement error #1.
0080
During X movement, the target
stop position's origin sensor error
detected. Suspect the X origin
sensor or X motor.
2. Cycle the power supply and try again.
v If the problem is corrected, run Library
Verify before normal library operations
resume.
X movement error #2.
0081
During X movement, a motor
sync error detected. Suspect the X
encoder sensor or X motor.
CHK 0081
v If the problem persists, see “Contacting
Dell technical support” on page 7-2.
X movement error #3.
0082
During initialization, a motor sync
error detected. Suspect the X
encoder sensor or X motor.
CHK 0082
0083
During an eject operation or move
operation (to a storage position),
the X origin sensor could not be
detected. Suspect the X origin
sensor or X motor.
CHK 0083
0084
During initialization, the X origin
position could not be detected.
Suspect the X origin sensor or X
motor.
CHK 0084
X calibration error #1.
0088
During X calibration, centering
sensor OFF condition could not be
detected.
CHK 0088
X calibration error #2.
0089
During X calibration, centering
sensor ON condition could not be
detected.
CHK 0089
1. Confirm that the magazine is closed.
2. Cycle the power supply and try again.
008F
During X operation, the cartridge
magazine was removed. Suspect
the magazine set sensor.
CHK 008F
v If the problem is corrected, run Library
Verify before normal library operations
resume.
v If the problem persists, see “Contacting
Dell technical support” on page 7-2.
1. Confirm the media is compatible.
00B0
Failed to detect media in the
accessor at completion of GET
operation. Suspect the centering
sensor, X motor, or P motor.
2. Cycle the power supply and try again.
CHK 00B0
v If the problem is corrected, run Library
Verify before normal library operations
resume.
v If the problem persists, see “Contacting
Dell technical support” on page 7-2.
A-6
Dell PowerVault TL1000 Tape Autoloader User's Guide
Table A-1. Library error codes (continued)
Code (H)
00B1
00B2
Description
No media is contained in the
specified cell (Cell Empty).
Suspect the centering sensor, X
motor, or P motor.
Media detected in the accessor at
completion of centering check
operation. Suspect the centering
sensor.
Panel Indication
Action Required
Cycle the power supply and try again.
CHK 00B1
v If the problem is corrected, run Library Verify
before normal library operations resume.
v If the problem persists, see “Contacting Dell
technical support” on page 7-2.
CHK 00B2
1. If the cartridge remains in the accessor, try to
move the cartridge from the accessor to the
I/O Station with the Operator Panel or Web
User Interface. Remove the cartridge from
the library and inspect for damage and
replace, if necessary.
2. Cycle the power supply and try again.
00B3
Media detected in the accessor at
completion of PUT operation.
Suspect the centering sensor.
CHK 00B3
v If the problem persists, see “Contacting
Dell technical support” on page 7-2.
accessor error #1.
00B8
Reverse REV position (PP1) error
(accessor origin not detected or
FWD position detected). Suspect
the P origin sensor, FWD sensor,
or P motor.
CHK 00B8
00B9
1. Check the accessor locking screw and
remove it if it is installed. See “Removing the
accessor locking screw” on page 3-7.
2. Cycle the power supply and try again.
v If the problem is corrected, run Library
Verify before normal library operations
resume.
accessor error #2.
Forward FWD position (PP2)
error (accessor origin detected or
FWD not detected). Suspect the P
origin sensor, FWD sensor, or P
motor.
v If the problem is corrected, run Library
Verify before normal library operations
resume.
v If the problem persists, see “Contacting
Dell technical support” on page 7-2.
CHK 00B9
accessor error #3.
00BA
PUT/GET/bar code reader
position (PP4/PP5/PPBF/PPBR)
error (accessor origin or FWD
detected, or cell full). Suspect the
P origin sensor, FWD sensor, or P
motor.
CHK 00BA
00BC
During initialization, the accessor
origin could not be detected.
Suspect the P origin sensor, FWD
sensor, or P motor.
CHK 00BC
00BD
During accessor movement, the
movement stop condition
detected. Suspect the P encoder
sensor or P motor.
CHK 00BD
00BF
No gap condition detected at the
completion of accessor operation.
Suspect the centering sensor, P
origin sensor, FWD sensor, or P
motor.
CHK 00BF
Appendix A. Error codes
A-7
Table A-1. Library error codes (continued)
Code (H)
Description
Panel Indication
Action Required
1. Confirm that the magazine is closed.
00C0
accessor operation disabled
because a cartridge magazine was
removed. Suspect the magazine
set sensor.
2. Cycle the power supply and try again.
CHK 00C0
v If the problem is corrected, run Library
Verify before normal library operations
resume.
v If the problem persists, see “Contacting
Dell technical support” on page 7-2.
Centering calibration error #1.
00C8
During centering calibration,
centering sensor OFF condition
could not be detected. Suspect the
centering sensor or P motor.
Cycle the power supply and try again.
CHK 00C8
v If the problem is corrected, run Library Verify
before normal library operations resume.
v If the problem persists, see “Contacting Dell
technical support” on page 7-2.
Centering calibration error #2.
00C9
During centering calibration,
centering sensor ON condition
could not be detected. Suspect the
centering sensor, X motor, or P
motor.
CHK 00C9
1. Confirm the firmware file version.
00D0
Checksum error detected during
firmware update.
00D1
Firmware ID error detected
during firmware update.
CHK 00D1
v If the problem is corrected, run Library
Verify before normal library operations
resume.
00D2
Boot information error detected
during firmware update.
CHK 00D2
v If the problem persists, see “Contacting
Dell technical support” on page 7-2.
CHK 00D0
2. Reinstall the firmware file.
3. Cycle the power supply and try again.
00D3
Bar code reader is not in
maintenance mode during bar
code reader firmware update
(operation interrupted). Suspect
the bar code reader cable
connection.
1. Initiate an inventory. See “Conducting a
library inventory” on page 4-7 (Operator
Panel) or “Conducting a library inventory”
on page 4-22 (Web User Interface).
CHK 00D3
2. Cycle the power supply and try again.
v If the problem is corrected, run Library
Verify before normal library operations
resume.
v If the problem persists, see “Contacting
Dell technical support” on page 7-2.
00D9
Magazine failed to unlock.
Suspect the magazine or
magazine sensor.
00DA
I/O Station failed to unlock.
Suspect the magazine or
magazine sensor.
A-8
1. Cycle the power supply and try again.
CHK 00D9
CHK 00DA
Dell PowerVault TL1000 Tape Autoloader User's Guide
2. Manually unlock the magazine, remove the
magazine from the library, and inspect it for
damage.
v If not damaged, return it to the library and
run Library Verify before normal library
operations resume.
v If damaged, replace the magazine.
Table A-1. Library error codes (continued)
Code (H)
00DD
Description
An error detected during bar code
reader firmware check. Suspect
the bar code reader cable
connection.
Panel Indication
Action Required
1. Initiate an inventory. See “Conducting a
library inventory” on page 4-7 (Operator
Panel) or “Conducting a library inventory”
on page 4-22 (Web User Interface).
CHK 00DD
2. Cycle the power supply and try again.
v If the problem is corrected, run Library
Verify before normal library operations
resume.
v If the problem persists, see “Contacting
Dell technical support” on page 7-2.
00E0
Write operation not finished
within 1 ms when writing data to
flash memory.
CHK 00E0
Cycle the power supply and try again.
00E1
Clear operation not finished
within 10 seconds when clearing a
sector in flash memory.
CHK 00E1
00E2
Error detected in tape library
configuration stored in flash
memory.
CHK 00E2
00E3
Checksum error detected in flash
memory.
CHK 00E3
v If the problem is corrected, run Library Verify
before normal library operations resume.
v If the problem persists, see “Contacting Dell
technical support” on page 7-2.
Sensor error #1.
00F0
Accessor encoder sensor B error
detected during blink check.
Suspect the accessor encoder
sensor B.
CHK 00F0
Appendix A. Error codes
A-9
Table A-1. Library error codes (continued)
Code (H)
Description
Panel Indication
Sensor error #2.
00F1
Accessor encoder sensor A error
detected during blink check.
Suspect the accessor encoder
sensor A.
Cycle the power supply and try again.
CHK 00F1
X encoder sensor error detected
during blink check. Suspect the X
encoder sensor.
CHK 00F2
Sensor error #4.
00F3
Magazine sensor error detected
during blink check. Suspect the
magazine sensor.
CHK 00F3
Sensor error #5.
00F8
X origin sensor error detected
during blink check. Suspect the X
origin sensor.
CHK 00F8
Sensor error #6.
00F9
Cartridge sensor error detected
during blink check. Suspect the
cartridge sensor.
CHK 00F9
Sensor error #7.
00FA
accessor forward sensor error
detected during blink check.
Suspect the accessor forward
sensor.
CHK 00FA
Sensor error #8.
00FB
A-10
accessor origin sensor error
detected during blink check.
Suspect the accessor origin sensor.
v If the problem is corrected, run Library Verify
before normal library operations resume.
v If the problem persists, see “Contacting Dell
technical support” on page 7-2.
Sensor error #3.
00F2
Action Required
CHK 00FB
Dell PowerVault TL1000 Tape Autoloader User's Guide
Drive error codes
Table A-2. Drive error codes
Code (H)
Description
Panel indication
0200
Invalid data sent to drive.
CHK 0200
NAK detected.
0201
Timeout error occurred
while drive is waiting for
response.
CHK 0201
0203
Drive disconnected.
CHK 0203
0205
Drive busy.
CHK 0205
0206
Command could not be
executed because drive is
not mounted.
CHK 0206
020E
Drive error detected.
CHK 020E
020F
Unsupported drive
detected.
CHK 020F
0222
Media could not be
ejected because drive is
in Prevent Medium
Removal state.
CHK 0222
Action Required
1. Reseat all cables. See “Reseating
cables” on page 6-10.
2. Cycle the power supply and try
again.
v If the problem is corrected, run
Library Verify before normal
library operations resumes.
v If the problem persists, see
“Contacting Dell technical
support” on page 7-2.
1. Release the drive Prevent Medium
Removal state from the host.
2. Reseat all cables. See “Reseating
cables” on page 6-10.
3. Cycle the power supply and try
again.
v If the problem is corrected, run
Library Verify before normal
library operations resumes.
v If the problem persists, see
“Contacting Dell technical
support” on page 7-2.
Web User Interface error messages
Table A-3. Web user error messages
Title
Error
Message
Issuing Panel
Users full.
User Access
You cannot remove yourself.
User Access
Appendix A. Error codes
A-11
Table A-3. Web user error messages (continued)
Title
Parameter Error
Command Error
Message
Issuing Panel
Login failure.
Login
Unsupported update file.
Firmware Update
Invalid parameter found in [***].
Configure Library
Please input parameter of [***].
Configure Library
Password parameter error.
User Access
User name parameter error.
User Access
Not enough role.
User Access
A user name unmatched.
User Access
A user is already existing.
User Access
Users full.
User Access
Flush ROM write error detected.
User Access
User information access failure.
User Access
Move command execution failure.
(Code:"****")
Move Cartridges
Unload command execution failure:
[****].
Unload Drive
Drive not ready.
Unload Drive, Download Drive Logs,
Firmware Update
Medium not present.
Unload Drive
Online command execution failure:
[****].
Library State
Offline command execution failure:
[****].
Library State
Reset command execution failure:
[****].
Reset Library/Drive
Inventory command execution
failure: [****].
Inventory
"Normal Dump" command execution
failure: [****].
Download Drive Logs
"Force Dump" command execution
failure: [****].
Download Drive Logs
Restore failure.
Save/Restore
Library serial number is unmatched
Writing to cookie was failure.
The configuration data was not saved
to cookie.
A-12
Dell PowerVault TL1000 Tape Autoloader User's Guide
All
Table A-3. Web user error messages (continued)
Title
Cleaning Command Error
I/O Error
Network Error
Message
Issuing Panel
Illegal medium.
Clean Drive
Source element empty.
Clean Drive
Destination element full.
Clean Drive
Drive failure.
Clean Drive
Prevent medium removal.
Clean Drive
During import/export element
access.
Clean Drive
Gap detected.
Clean Drive
Not loaded.
Clean Drive
Expired medium.
Clean Drive
Write protect error.
Clean Drive
Cleaning execution failure: [****].
Clean Drive
File open failure.
Download Drive Logs, Download
Library Logs, Save/Restore,
Firmware Update
Unsupported file.
Save/Restore, Firmware Update
*** command transmission failure.
Manage Library
*** information access failure.
All
Library logs download failure.
Download Library Logs
Retry download.
Email submit failure.
Notifications
SNMP trap submit failure.
Notifications
Log data access failure.
Traces, View Library Logs
Port open failure [**.**.**.**:****].
Applet 3 times retry
Do you want to retry?
Port open failure [**.**.**.**:****].
Check the library and the network
condition setting.
Displayed after 3 unsuccessful
attempts using the Java Applet.
Applet shutdown.
Web interface version is not matched
between Library and Java Applet.
All
Shut a browser and restart the
Applet.
There is a possibility of
malfunctioning if you proceed
operation from Web.
Clear the cache of Java when this
message displays even if it restarts.
Library Busy
Library information updating now.
All
Cannot access library information
Appendix A. Error codes
A-13
Trap definitions (types)
The TL1000 library supports the following types of SNMP traps.
|
Table A-4. Trap list
Trap ID
1
Event Type
Emergency
2
21
Error
22
51
Warning
(Library)
53
(Drive)
54
(Library)
102
(Library)
Attention LED
Error LED
v Drive error
-
-
ON
v Library error
-
-
ON
v Drive error
-
-
ON
v Library error
-
-
ON
v Drive error
-
-
ON
v Cleaning
demand
reception from
drive
ON
-
-
v Cleaning
cartridge
demand for an
exchange
-
ON
-
v Beginning of
inventory
-
-
-
v Endurance
frequency
attainment
52
(Drive)
Clean Drive LED
v Library error
(Drive)
101
Description
Information
v Change in
library
operation mode
v Beginning of
medium move
v Completion of
medium move
v Library/Drive
not ready
v Library/Drive
to online
v Magazine
unlock
operation
v I/O Station
unlock
operation
A-14
Dell PowerVault TL1000 Tape Autoloader User's Guide
Appendix B. TapeAlert flags
“TapeAlert flags supported by the library”
“TapeAlert flags supported by the Ultrium tape drive” on page B-3
Additional information is provided to the reader about the tape library and tape
drive. All error code and diagnostic information cannot be accessed from the
Operator Panel of the library. The Operator Panel will, however, display other
library error codes and drive error codes when problems occur. For a listing of
Operator Panel error messages, see Appendix A, “Error codes,” on page A-1.
TapeAlert is a standard that defines status conditions and problems that are
experienced by devices such as tape drives, autoloaders, and libraries. The
standard enables a server to read TapeAlert messages (called flags) from a tape
drive. The server reads the flags from Log Sense Page 0x2E.
This library is compatible with TapeAlert technology, which provides error and
diagnostic information about the drives and the library to the server. Because
library and drive firmware might change periodically, the SNMP interface in the
library does not require code changes if devices add extra TapeAlerts that are not
supported today. However, if this change occurs, the MIB is written to minimize
impact to the SNMP monitoring station. At the time of this writing, the TapeAlert
flags in this appendix correctly represent TapeAlerts that are sent. The MIB file
must not be taken to mean that all traps that are defined in the MIB will be sent
by the library or that they will be sent in the future.
TapeAlert flags supported by the library
Table B-1. TapeAlert flags supported by the library
Flag
Number
Flag Name
Description
Action Required
Type1
01
Library
Hardware A
The library
1. Cycle the power supply and try again.
mechanism is
2. If the problem persists, see “Contacting
having trouble with
Dell technical support” on page 7-2.
communicating
with the tape drive.
C
02
Library
Hardware B
The library
mechanism has a
hardware fault.
W
03
Library
Hardware C
Library mechanism 1. Reset the library. For details, see
has a hardware
“Rebooting the drive” on page 4-8.
fault that requires a
2. Restart the operation.
reset to recover.
3. If the problem persists, see “Contacting
Dell technical support” on page 7-2.
C
B-1
Table B-1. TapeAlert flags supported by the library (continued)
Flag
Number
04
06
Flag Name
Description
Action Required
Library
Hardware D
The library
mechanism has a
hardware fault that
is not
mechanism-related,
or requires power
cycle to recover.
1. Cycle the power supply and try again.
Library
Interface
The library
identified an
interface fault.
1. Check all cables and cable connections.
Preventive maintenance of the library is
required. Consult the library user's manual for
device-specific preventive maintenance tasks.
Type1
C
2. If the problem persists, see “Contacting
Dell technical support” on page 7-2.
C
2. Restart the operation.
3. If the problem persists, see “Contacting
Dell technical support” on page 7-2.
08
Library
Maintenance
Library preventive
maintenance
required.
12
Library Stray
Tape
A cartridge was left 1. Try unloading the cartridge from the drive
in the drive inside
with the Operator Panel or Web User
the library by a
Interface.
previous hardware
v If the cartridge unloads, move the
fault.
cartridge from the drive to the I/O
station. Remove the cartridge and inspect
for damage. If not damaged, return the
cartridge to the library. Run Library
Verify before normal library operations
resume.
W
C
v If the cartridge did not unload from the
drive, cycle the power supply and try
again.
2. If the problem persists, see “Contacting
Dell technical support” on page 7-2.
B-2
13
Library Pick
Retry
There is a potential
problem with the
drive ejecting a
cartridge short or
with the library
mechanism picking
a cartridge from a
slot.
No action is required.
W
14
Library Place
Retry
There is a potential
problem with the
library mechanism
placing a cartridge
into a slot.
No action is required.
W
16
Library I/O
station
The operation failed Close the I/O station.
because the library
I/O station is open.
W
17
Library
Mailslot
Mechanical problem There is a mechanical problem with the library
with the I/O
I/O station.
station.
C
Dell PowerVault TL1000 Tape Autoloader User's Guide
Table B-1. TapeAlert flags supported by the library (continued)
Flag
Number
18
Flag Name
Library
Magazine
Description
Library magazine
not present.
Type1
Action Required
The library cannot operate without the
magazine.
C
1. Insert the magazine into the library.
2. Restart the operation.
1
21
Library Offline Library manually
turned offline.
The library was manually turned offline and is
unavailable for use.
I
22
Library Drive
Offline
Library turned
internal drive
offline.
The drive inside the library was taken offline.
This flag is for information purposes only. No
action is required.
I
23
Library Scan
Retry
There is a potential
problem with the
bar code label of
the scanner
hardware in the
library mechanism.
No action is required.
W
28
Power Supply
PSU failure inside
the library
subsystem.
The power supply failed inside the library. See
“Contacting Dell technical support” on page
7-2.
W
C = Critical: Needs immediate action. W = Warning: Action to be taken. I = Information: Information for user.
TapeAlert flags supported by the Ultrium tape drive
Table B-2. TapeAlert flags supported by the Ultrium tape drive
Flag Number
Flag Name
Description
Action Required
3
Hard error
Set for any unrecoverable read,
See the action that is required for
write, or positioning error (this flag Flag Number 4, 5, or 6, if set, in
is set with flags 4, 5, or 6).
this table.
4
Media
Set for any unrecoverable read,
write, or positioning error that is
because of a faulty tape cartridge.
Replace the tape cartridge.
5
Read failure
Set for any unrecoverable read
error where the isolation is
uncertain and failure might be
because of a faulty tape cartridge
or drive hardware.
If Flag Number 4 is also set, the
tape cartridge is defective. Replace
the tape cartridge.
6
Write failure
Set for any unrecoverable write or
positioning error where isolation is
uncertain and failure might be
because of a faulty tape cartridge.
If Flag Number 9 is also set, make
sure that the write-protect switch is
set so that data can be written to
the tape. See “Write-Protect switch”
on page 5-6.
If Flag Number 4 is also set, the
tape cartridge is defective. Replace
the tape cartridge.
7
Media life
Set when the tape cartridge reaches 1. Copy the data to another tap
its end of life (EOL).
cartridge.
2. Discard the old (EOL) tape.
Appendix B. TapeAlert flags
B-3
Table B-2. TapeAlert flags supported by the Ultrium tape drive (continued)
Flag Number
B-4
Flag Name
Description
Action Required
8
Not data grade
Set when the tape cartridge is not
Replace the tape cartridge with a
data-grade. Any data that you back data-grade tape cartridge.
up to the tape is at risk.
9
Write protect
Set when the tape drive detects
that the tape cartridge is
write-protected.
10
No removal
Set when the tape drive receives an Refer to the documentation for
UNLOAD command after the
your server's operating system.
server prevented the tape cartridge
from being removed.
11
Cleaning media
Set when a cleaning tape is loaded
into the drive.
12
Unsupported format Set when a non-supported
cartridge type is loaded into the
drive or when the cartridge format
was corrupted.
Replace the invalid cartridge with a
supported tape cartridge.
14
Unrecoverable
snapped tape
Set when the operation failed
because the tape in the drive
snapped.
Do not attempt to extract the tape
cartridge. See “Contacting Dell
technical support” on page 7-2.
15
Cartridge memory
chip failure
Set when a cartridge memory (CM) Replace the tape cartridge.
failure is detected on the loaded
tape cartridge.
16
Forced eject
No action that is required. Status
Set when a tape cartridge was
unloaded manually while the drive only.
was reading or writing.
17
Media that are
loaded is Read-only
format
Set when a cartridge marked as
read-only is loaded into the drive.
The flag is cleared when the
cartridge is ejected.
No action that is required. Status
only.
18
Tape directory that
is corrupted in
cartridge memory
Set when the tape drive detects
that the tape directory in the
cartridge memory was corrupted.
Re-read all data from the tape to
rebuild the tape directory.
19
Nearing media life
Set when the tape cartridge is
nearing its specified end of life. It
is cleared when the cartridge is
removed from the drive.
1. Copy the data to another tape
cartridge.
Ensure that the cartridge's
write-protect switch is set so that
data can be written to the tape. See
“Write-Protect switch” on page 5-6.
No action that is required. Status
only.
2. Replace the tape cartridge.
20
Clean now
Set when the tape drive detects
that it needs cleaning.
Clean the tape drive.
21
Clean periodic
Set when the tape drive detects
that it needs routine cleaning.
Clean the tape drive as soon as
possible. The drive can continue to
operate, but requires cleaning soon.
22
Expired cleaning
media
Set when the tape drive detects a
cleaning cartridge that is expired.
Replace the cleaning cartridge.
23
Invalid cleaning
cartridge
Set when the drive expects a
Use a valid cleaning cartridge.
cleaning cartridge to be loaded and
the loaded cartridge is not a
cleaning cartridge.
30
Hardware A
Set when a hardware failure occurs See “Contacting Dell technical
that requires that you reset the tape support” on page 7-2.
drive to recover.
Dell PowerVault TL1000 Tape Autoloader User's Guide
Table B-2. TapeAlert flags supported by the Ultrium tape drive (continued)
Flag Number
Flag Name
Description
Action Required
31
Hardware B
Set when the tape drive fails its
internal Power-On Self-Tests
(POSTs).
Note the error code on the
single-character display and see
“Contacting Dell technical support”
on page 7-2.
32
Interface
Set when the tape drive detects a
problem with the host interface.
See “Contacting Dell technical
support” on page 7-2.
33
Eject media
Set when a failure occurs that
requires the tape cartridge to be
unloaded from the drive.
Unload the tape cartridge, then
reinsert and restart the operation. If
this procedure fails, use different
media.
34
Download fail
Set when an FMR image is
unsuccessfully downloaded to the
tape drive via the SAS interface.
Check the FMR image is correct. If
necessary, download the correct
FMR image.
36
Drive temperature
Set when the drive temperature
sensor indicates that the drive's
temperature exceeds the
recommended temperature of the
library.
37
Drive voltage
Set when the drive detects power
supply voltages that approach or
exceed the specified voltage limits.
38
Predictive failure of
drive hardware
Set when a hardware failure of the
tape drive is predicted.
39
Diagnostics required Set when the tape drive detects a
failure that requires diagnostics for
isolation.
51
Tape directory
invalid at unload
Set when the tape directory on the
tape cartridge that was previously
unloaded is corrupted. The
file-search performance is
degraded.
52
Tape system area
write failure
Copy the data to another tape
Set when the tape cartridge that
was previously unloaded might not cartridge, then discard the old tape
cartridge.
write its system area successfully.
53
Tape system area
read failure
Set when the tape system area
might not be read successfully at
load time.
See “Contacting Dell technical
support” on page 7-2.
Use your backup software to
rebuild the tape directory by
reading all the data.
Copy the data to another tape
cartridge, then discard the old tape
cartridge.
Appendix B. TapeAlert flags
B-5
Table B-2. TapeAlert flags supported by the Ultrium tape drive (continued)
Flag Number
55
Flag Name
Load failure
Description
Set when a hardware malfunction
prevents the tape cartridge from
being loaded into the drive, or
when a tape cartridge is stuck in
the drive.
Action Required
If the tape cartridge does not load
in the drive:
1. Remove the tape cartridge from
the library and inspect it for
damage. If damaged, discard it.
2. Insert another tape cartridge
into the tape drive. If the
problem persists, see
“Contacting Dell technical
support” on page 7-2.
If the tape cartridge is stuck in the
drive:
1. Attempt to unload the tape
from the drive with the host
backup application that is with
the drive, or with the remote or
local UI.
2. If the cartridge still does not
unload, see “Contacting Dell
technical support” on page 7-2.
56
Unload failure
Set when a drive hardware error
1.
prevents the tape cartridge from
being unloaded from the tape
drive, or when the tape cartridge is
2.
stuck in the drive.
Unload the cartridge from the
drive with the Operator Panel
or the Web User Interface.
Try a power cycle of the entire
library. This procedure causes
the drive to reset and attempt
to rewind and unload when
power is restored. If the
cartridge unloads, remove it
from the library and inspect it.
If damaged, discard it.
3. Try to unload the cartridge
from the drive again with the
Operator Panel or the Web User
Interface.
4. If the cartridge still does not
unload from the drive, see
“Contacting Dell technical
support” on page 7-2.
B-6
59
WORM Media
integrity check
failed
Set when the drive determines that 1. Copy the data to another
the data on the tape is suspect from
WORM tape cartridge.
a WORM point of view.
2. Discard the old WORM tape.
60
WORM Media
Set when the drive rejects a write
overwrite attempted operation because the rules for
allowing WORM writes are not
met. Data is appended to WORM
media only. Overwrites to WORM
media are not allowed.
Dell PowerVault TL1000 Tape Autoloader User's Guide
Append the information about a
WORM tape cartridge or write the
data to a non-WORM cartridge.
Appendix C. Sense data
“Sense Key definitions”
“Library sense data”
“Tape drive sense data” on page C-3
Sense Key definitions
Table C-1. Sense key definitions
SK
Definition
00
No Sense
01
Recovered Error
02
Not Ready
03
Media Error
04
Hardware Error
05
Illegal Request
06
Unit Attention
07
Data Protect
08
Blank Check
09
Reserved
0A
Reserved
0B
Aborted Command
0C
Reserved
0D
Volume Overflow
0E
Reserved
0F
Reserved
Library sense data
“Library sense data” lists the Additional Sense Codes (ASC) and Additional Sense
Code Qualifiers (ASCQ) associated with the reported Sense Keys.
A sense key of 00h (no sense) has no ASC/ASCQ associated with it. A few
ASC/ASCQs are associated with more than one sense key. The sense keys that can
give a particular ASC/ASCQ are indicated within the Sense Key column.
Table C-2. Library sense data
Sense Key
ASC
ASCQ
No Sense (00)
00
00
No sense
30
03
Cleaning cartridge installed
5B
02
Log counter at maximum
Recovered Error (01)
Description
C-1
Table C-2. Library sense data (continued)
Sense Key
ASC
ASCQ
Not Ready (02)
04
00
Logical unit not ready, cause not reportable
04
01
Logical unit is in process of becoming ready
04
03
Manual intervention required
3A
02
Media not present (tray open)
80
05
During reprogramming mode
15
01
Mechanical position error
40
nn
Diagnostic failure on component nn (80h-ffh)
44
00
Internal target failure
53
00
Media load or eject failed
80
07
NVRAM failure
1A
00
Parameter list length error
20
00
Invalid command operation code
21
01
Invalid element address
24
00
Invalid field in CDB
25
00
Logical unit not supported
26
00
Invalid field in parameter list
30
00
Incompatible medium installed
3B
0D
Media destination element full
3B
0E
Media source element empty
3B
83
Source drive not unloaded
53
02
Media removal prevented
80
10
Drive failure
80
20
Exchange slot full
80
21
Cartridge wrong insertion
28
00
Not-ready to ready transition, media may
have changed
28
01
Import or export element accessed
29
00
Power ON occurred
2A
02
Log parameter changed
3F
01
Microcode has been changed
41
FE
Drive error message detected*
41
nn
LDI command failure**
Hardware Error (04)
Illegal Request (05)
Unit Attention (06)
Aborted Command (0B)
Description
* This code is preserved only in the library log when “FID” or “ATTN DRV” message is received from the tape
drive. This code is not reported to the host server.
** This code is preserved only in the library log. This code is not reported to the host server.
C-2
Dell PowerVault TL1000 Tape Autoloader User's Guide
Tape drive sense data
Table C-3. Ultrium Tape drive sense data
Byte
0
Bit Address or Name
7
6
5
4
Valid
Address Bit
2
1
Segment Number x'00'
Filemark
EOM
ILI
Reserved
(End of
medium)
(Incorrect
length
indicator
Sense Key
See “Sense Key definitions” on page C-1.
3
Information byte (most significant byte)
4-5
Information bytes
6
Information byte (least significant byte)
7
Additional sense length
8-11
Command specific information bytes
12-13
For Ultrium Tape drive sense data for Bytes 12 and 13, see Table C-4 on page C-4.
14
Field Replaceable Unit (FRU) ID
15
0
Error Code
1
2
3
SKSV
C/D
Reserved
BPV
Bit pointer
(Bit pointer
valid)
16-17
SKSV =0: First Error Fault Symptom Code (FSC); SKSV = 1: Field Pointer
18-19
First Error Flag Data
20
Reserved (0)
21
CLN
22-28
Volume Label
29
Current Wrap
30-33
Relative LPOS
34
SCSI Address
35
Reserved
Frame number
36-39
Reserved
VolValid
Drive number
Port Identifier (Relative Target Port Address) Reporting Sense
This is the hashed SAS address of the drive port (for example, F32A94) with byte 36 being reserved.
40
Tape
Directory
Valid
Reserved
Reserved
Reserved
Reserved
Relative Target Port Reporting Sense
0: Reserved
1: Relative Target Port 1 (Port 0)
2: Relative Target Port 2 (Port 1)
3: Relative Target Port 3 (Library Port)
41
Host Command (SCSI Opcode)
Appendix C. Sense data
C-3
Table C-3. Ultrium Tape drive sense data (continued)
Bit Address or Name
Byte
7
6
42
5
4
3
Density Type
2
1
0
Media Type (Vendor Reserved)
0: No media present
1: Gen1 (384 track)
2: Gen2 (512 track)
3: Gen3 (704 track)
43-44
Volume Label Cartridge Type
45-48
Logical Block Number
(Current LBA that would be reported in Read Position command)
49-52
Data Set Number
53-54
1st Error FSC
55-56
1st Error Flag Data
57-58
2nd Error FSC
59-60
2nd Error Flag Data
61-62
Next-to-Last Error FSC
63-64
Next-to-Last Error Flag Data
65-66
Last Error FSC
67-68
Last Error Flag Data
69
LPOS Region
70-85
ERP Summary Information
86-89
Product Revision Label: YMDV
(As defined in Standard Inquiry; this is also known as the Code Level)
90-95
Reserved (0)
Table C-4. Ultrium Tape drive sense data - Bytes 12 and 13
Byte 12 ASC
Byte 13 ASCQ
Description
00
00
No additional sense - The flags in the sense data indicate the reason for the
command failure
00
01
Filemark detected - A Read or Space command terminated early due to an FM. The
FM flag is set.
00
02
EOM - A Write or Write File Marks command failed because the physical end of
tape was encountered, or a Read or Space command encountered EOM. The EOM
flag is set.
00
04
BOM - A space command ended at Beginning of Tape. The EOM bit is also set.
00
05
EOD - Read or Space command terminated early because End of Data was
encountered.
04
00
Cause not reportable - A cartridge is present in the drive, but it is in the process of
being unloaded.
04
01
Becoming Ready - A media access command was received during a front panel
initiated load or an immediate reported load command.
C-4
Dell PowerVault TL1000 Tape Autoloader User's Guide
Table C-4. Ultrium Tape drive sense data - Bytes 12 and 13 (continued)
Byte 12 ASC
Byte 13 ASCQ
Description
04
02
Initializing Command Required - A cartridge is present in the drive, but is not
logically loaded. A Load command is required.
04
03
Manual Intervention Required - A cartridge is present in the drive but could not be
loaded or unloaded without manual intervention.
0C
00
Write Error - A Write operation has failed. This is probably due to bad media, but
may be hardware related.
11
00
Unrecovered Read Error - A Read operation failed. This is probably due to bad
media, but may be hardware related.
11
12
Auxiliary memory read error. The drive reported that it is unable to read the
Auxiliary Memory in a WORM cartridge.
14
00
Recorded Entity Not Found - A space or Locate command failed because a format
violation prevented the target from being found.
14
03
End Of Data not found - A Read type operation failed because a format violation
related to a missing EOD data set.
14
10
Not Ready - Auxiliary memory not accessible. The drive is not able to become
ready because it is unable to access the Auxiliary Memory in a WORM cartridge.
1A
00
Parameter list length error - The amount of parameter data sent is incorrect.
20
00
Invalid Command Operation Code - The Operation Code in the command was not
a valid Operation Code.
24
00
Invalid field in CDB - An invalid field has been detected in a Command Descriptor
Block.
25
00
LUN not supported - The command was addressed to a non-existent logical unit
number.
26
00
Invalid Field in Parameter List - An invalid field has been detected in the data sent
during the data phase.
27
00
Write Protect - A Write type operation has been requested on a cartridge which has
been write protected.
28
00
Not Ready to Ready Transition - A cartridge has been loaded successfully into the
drive and is now ready to be accessed.
29
00
Reset - The drive has powered on, received a reset signal or a bus device reset
signal since the initiator last accessed it.
2A
01
Mode Parameters Changed - The Mode parameters for the drive have been
changed by an initiator other than the one issuing the command.
30
00
Incompatible Media Installed - A write type operation could not be executed
because it is not supported on the cartridge type that is loaded.
30
01
Unknown Format - An operation could not be carried out because the cartridge in
the drive is of a format not supported by the drive.
30
02
Incompatible Format - An operation could not be completed because the Logical
Format is not correct.
30
03
Cleaning Cartridge Installed - An operation could not be carried out because the
cartridge in the drive is a cleaning cartridge.
30
07
Cleaning Failure - A cleaning operation was attempted, but could not be completed
for some reason.
30
0C
Data Protect - WORM overwrite attempted. The drive rejected a write operation
because it would have resulted in an overwrite. Overwrite is not allowed on
WORM media.
Appendix C. Sense data
C-5
Table C-4. Ultrium Tape drive sense data - Bytes 12 and 13 (continued)
Byte 12 ASC
Byte 13 ASCQ
Description
30
0D
Medium Error - WORM integrity check. The drive rejected a Read or Write
operation because the cartridge is a suspicious WORM cartridge.
31
00
Media format corrupted - Data could not be read because the format on tape is not
valid, but is a known format. A failure occurred attempting to write the FID.
37
00
Rounded parameter - A Mode Select command parameter has been rounded
because the drive can not store it with the accuracy of the command.
3A
00
Media Not Present - A media access command has been received when there is no
cartridge loaded.
3B
00
Sequential Positioning Error - A command has failed and left the logical position at
an unexpected location.
3D
00
Invalid bits in identify Message - An illegal Identify Message has been received at
the drive at the start of a command.
3E
00
Logical Unit has not Self-Configured - The drive has just powered on and has not
completed its self test sequence and can not process commands.
3F
01
Code Download - The firmware in the drive has just been changed by a Write
Buffer command.
40
xx
Diagnostic failure - A diagnostic test has failed. The xx (ASCQ) is a vendor specific
code indicating the failing component.
43
00
Message Error - A message could not be sent or received due to excessive
transmission errors.
44
00
Internal target failure - A hardware failure has been detected in the drive that has
caused the command to fail.
45
00
Select/Reset Failure - An attempt to reselect an initiator in order to complete the
command has failed.
4B
00
Data Phase Error - A command could not be completed because too many parity
errors occurred during the Data phase.
4E
00
Overlapped Commands - An initiator selected the drive even though it already
had a command outstanding in the drive.
50
00
Write Append Error - A write type command failed because the point at which to
append data was unreadable.
51
00
Erase failure - An Erase command failed to erase the required area on the media.
52
00
Cartridge fault - A command could not be completed due to a fault in the tape
cartridge.
53
00
Media Load/Eject Failed - (Sense Key 03) An attempt to load or eject the cartridge
failed due to a problem with the cartridge.
53
00
Media Load/Eject Failed - (Sense Key 04) An attempt to load or eject the cartridge
failed due to a problem with the drive.
53
02
Media Removal Prevented - An Unload command has failed to eject the cartridge
because media removal has been prevented.
5D
00
Failure Prediction Threshold - Failure Prediction thresholds have been exceeded
indicating that a failure may occur soon.
5D
FF
Failure Prediction False - A Mode Select command has been used to test for Failure
Prediction system.
82
82
Drive requires cleaning - The drive has detected that a cleaning operation is
required to maintain good operation.
82
83
Bad Code Detected - The data transferred to the drive during a firmware upgrade
is corrupt or incompatible with drive hardware.
C-6
Dell PowerVault TL1000 Tape Autoloader User's Guide
Table C-4. Ultrium Tape drive sense data - Bytes 12 and 13 (continued)
Byte 12 ASC
Byte 13 ASCQ
Description
Sense Key 0 (No Sense)
EE
13
Encryption - Key Translate
EF
13
Encryption - Key Translate EKM
Sense Key 3 (Medium Error)
30
02
Encryption - Encryption feature is not enabled so format/processing is not
supported.
EE
60
Encryption - Proxy Command Error
EE
D0
Encryption - Data Read Decryption Failure
EE
D1
Encryption - Data Read after Write Decryption Failure
EE
E0
Encryption - Key Translation Failure
EE
E1
Encryption - Key Translation Ambiguous
EE
F0
Encryption - Decryption Fenced (Read)
EE
F1
Encryption - Encryption Fenced (Write)
Sense Key 4 (Hardware Error)
EE
0E
Encryption - Key Service Timeout
EE
0F
Encryption - Key Service Failure
40
00
Encryption - Failure Hardware, POST or Module Failure
Sense Key 5 (Illegal Request)
EE
00
Encryption - Key Service Not Enabled
EE
01
Encryption - Key Service Not Configured
EE
02
Encryption - Key Service Not Available
EE
10
Encryption - Key Required
EE
20
Encryption - Key Count Exceeded
EE
21
Encryption - Key Alias Exceeded
EE
22
Encryption - Key Reserved
EE
23
Encryption - Key Conflict
EE
24
Encryption - Key Method Change
EE
25
Encryption - Key Format Not Supported
EE
26
Encryption - Unauthorized Request - dAK
EE
27
Encryption - Unauthorized Request - dSK
EE
28
Encryption - Unauthorized Request - eAK
EE
29
Encryption - Authentication Failure
EE
2A
Encryption - Invalid RDKi
EE
2B
Encryption - Key Incorrect
EE
2C
Encryption - Key Wrapping Failure
EE
2D
Encryption - Sequencing Failure
EE
2E
Encryption - Unsupported Type
EE
2F
Encryption - New Key Encrypted Write Pending
EE
30
Encryption - Prohibited Request
EE
31
Encryption - Key Unknown
Appendix C. Sense data
C-7
Table C-4. Ultrium Tape drive sense data - Bytes 12 and 13 (continued)
Byte 12 ASC
Byte 13 ASCQ
Description
EE
32
Encryption - Keystore Related Problem
EE
42
Encryption - EKM Challenge Pending
EE
E2
Encryption - Key Translation Disallowed
EE
FF
Encryption - Security Prohibited Function
EF
01
Encryption - Key Service Not Configured
26
11
Encryption - Incomplete Key - Associate Data Set
26
12
Encryption (T10) - Vendor Specific Reference Key Not Found
55
08
Encryption (T10) - Maximum Number of Supplemental Keys Exceeded
Sense Key 6 (Unit Attention)
EE
12
Encryption - Key Change Detected
EE
18
Encryption - Changed (Read)
EE
19
Encryption - Changed (Write)
EE
40
Encryption - EKM Identifier Changed
EE
41
Encryption - EKM Challenge Changed
EE
50
Encryption - Initiator Identifier Changed
EE
51
Encryption - Initiator Response Changed
2A
11
Encryption - Data Encryption Parameters Changed by Another I_T Nexus
2A
12
Encryption - Data Encryption Parameters Changed by Vendor Specific Event
Sense Key 7 (Data Protect)
EF
10
Encryption - Key Required
EF
11
Encryption - Key Generation
EF
13
Encryption - Key Translate
EF
1A
Encryption - Key Optional
EF
C0
Encryption - No Operation
26
10
Encryption - Data Decryption Key Fail Limit
2A
13
Encryption - Data Encryption Key Instance Counter Changed
74
00
Security Error
74
01
Encryption - Unable to Decrypt Data
74
02
Encryption - Unencrypted Data Encountered While Decrypting
74
03
Encryption - Incorrect Data Encryption Key
74
04
Encryption - Cryptographic Integrity Validation Failed
74
05
Encryption - Error Decrypting Data
The descriptions below serve only as an overview of sense reporting in the tape
drive. This tape drive conforms to all sense field reporting as specified in the SCSI
standards.
1. The Error Code field (Byte 0) is set to 70h to indicate a current error, that is
one associated with the most recently received command. It is set to 71h to
indicate a deferred error which is not associated with the current command.
2. The segment number (Byte 1) is zero since the Copy, Compare, and Copy and
Verify commands are not supported.
C-8
Dell PowerVault TL1000 Tape Autoloader User's Guide
3. The File Mark flag (Byte 2, bit 7) is set if a Space, Read, or Verify command
did not complete because a file mark was read.
4. The End of Media (EOM) flag (Byte 2, bit 6) is set if a Write or Write File
Marks command completed in the early warning area. Spacing into BOM also
causes this flag to be set. It is also set on an attempt to read or space past
EOD, or if an attempt is made to space into Beginning of Media.
5. The Illegal Length Indicator (ILI) flag (Byte 2, bit 5) is set if a Read or Verify
ended because a block was read from tape that did not have the block length
requested in the command.
6. The Information Bytes (Bytes 3-5) are only valid if the Valid flag is set. This
occurs only for current errors and not for deferred errors.
7. The Field Replaceable Unit field (Byte 14) is set to either zero or to a non-zero,
vendor-specific code indicating which part of the drive is suspected of causing
the failure.
8. The Clean (CLN) flag (Byte 21, bit 3) is set if the drive needs cleaning and
clear otherwise.
9. The Volume Label Fields Valid (VolValid) bit (Byte 21, bit 0) is set if the
Volume Label being reported is valid.
10. The Volume Label field (Bytes 22-28) reports the volume label if a cartridge is
loaded in the drive and Volume Label Fields Valid is set.
11. The Current Wrap field (Byte 29) reports the physical wrap of the tape. The
least significant bit reflects the current physical direction. A0h means that the
current direction is away from the physical beginning of the tape. A1h means
that the current direction is towards the physical beginning of the tape.
12. Relative LPOS fields (Bytes 30-33) reports the current physical position on the
tape.
13. SCSI Address field (Byte 34) reports the SCSI Bus Address for the drive.
Values returned range from 00h to 0Fh.
14. This field (Byte 35) contains the frame and drive number, passed across the
RS-422 serial interface.
Appendix C. Sense data
C-9
C-10
Dell PowerVault TL1000 Tape Autoloader User's Guide
Appendix D. Library Configuration Form
Make a copy of this form, fill it out as you are installing and configuring your
library. Update the form each time changes are made to the library. The
information that is contained on this form is important, and helpful if a call to Dell
service is necessary. Store this form in a secure location.
|
Physical Library
|
Machine type
TL1000
Serial Number
Library Name
Auto Cleaning
Bar code label length
Logical Library
Library Access Mode
Loop
Autoload
Active Slots
Tape Drive
Serial Number
Worldwide Node Name
Network Settings
Ethernet Link Speed
SSL Security
IPv4
DHCP
Static IP address
Subnet Mask Address
Gateway Address
IPv6
DHCP
Stateless Auto Configuration
Static IP address
Prefix Length
Gateway
DNS
D-1
DNS IP address
NTP Date/Time Server
NTP Server IP address
Time Zone
Auto Adjustment by PC
SMTP (Mail) Server
SMTP Server Address
Sender Address
Subject
Mail to 01
Mail to 02
Mail to 03
Mail to 04
Mail Event Level
SNMP Server
Community
Name
Location
Contact
Trap to 01
Trap to 02
Trap to 03
Trap to 04
User 1
User 2
User 3
User 4
Trap Event Level
Library and Drive Firmware
Type of Firmware
Current Firmware Level
Library
Drive
Users Accounts
The Administrator (admin) password is listed in the table below. Modify and add
extra Administrator, Superuser, and User names and passwords that are created.
User name
Access Level
Password
admin
Administrator
secure
D-2
Dell PowerVault TL1000 Tape Autoloader User's Guide
User name
Access Level
Password
Support Notification
User name
Password
Appendix D. Library Configuration Form
D-3
D-4
Dell PowerVault TL1000 Tape Autoloader User's Guide
Accessibility
Accessibility features help a user with a physical disability, such as restricted
mobility or limited vision, successfully use the HTML version of the customer
documentation.
Features
|
|
These are the major accessibility features for the HTML version of the Dell
PowerVault TL1000 Tape Autoloader User's Guide.
v You can use screen-reader software and a digital speech synthesizer to hear what
is displayed on the screen. The following screen readers are tested: WebKing and
Window-Eyes.
v You can operate all features with the keyboard instead of the mouse.
Navigate by keyboard
|
You can use keys or key combinations to perform operations and initiate many
menu actions that can also be done through mouse actions. You can navigate the
HTML version of the Dell PowerVault TL1000 Tape Autoloader User's Guide help
system from the keyboard. Use the following keyboard combinations:
v
v
v
v
v
http://www.dell.com/support
To traverse to the next link, button, or topic, press Tab inside a frame (page).
To move to the previous topic, press ^ or Shift+Tab.
To scroll all the way up or down, press Home or End.
To print the current page or active frame, press Ctrl+P.
v To select, press Enter.
Access the publications
You can view the publications for this library in Adobe Portable Document Format
(PDF) with the Adobe Acrobat Reader. The PDFs are provided at the following
website: http://www.dell.com/support.
E-1
E-2
Dell PowerVault TL1000 Tape Autoloader User's Guide
Glossary
This glossary defines the special terms, abbreviations, and acronyms that are used
in this publication. If you do not find the term that you are looking for, refer to the
index or to the Dictionary of Computing, 1994.
Numbers
2:1 compression
The relationship between the quantity of data that can be stored with
compression as compared to the quantity of data that can be stored
without compression. In 2:1 compression, twice as much data can be stored
with compression as can be stored without compression.
A
A
Ampere.
ac
Alternating current.
access method
A technique for moving data between main storage and input or output
devices.
accessor
This component contains the library robot and bar code reader. The
accessor moves cartridges to and from the I/O station, storage slots, and
tape drives.
adapter card
A circuit board that adds function to a computer.
adj
Adjustment.
AH
Authentication Header. An Internet Protocol intended to guarantee
connectionless integrity and data origin authentication of IP datagrams.
Further, it can optionally protect against replay attacks by using the sliding
window technique and discarding old packets.
AIX
Advanced Interactive Executive. IBM's implementation of the UNIX
operating system. The System p system, among others, uses AIX as it's
operating system.
alphanumeric
Pertaining to a character set that contains letters, numerals, and other
characters, such as punctuation marks.
alter
To change.
ambient temperature
The temperature of air or other media in a designated area, particularly the
area that is surrounding equipment.
AME
Application Managed Encryption.
ampere (A)
A unit of measure for electric current that is equivalent to a flow of 1
coulomb per second, or to the current produced by 1 volt applied across a
resistance of 1 ohm.
F-1
ANSI American National Standards Institute.
application-managed encryption
Tape encryption that is controlled by an application.
archive
To collect and store files in a designated place.
ASCII American National Standard Code for Information Interchange. A 7 bit
coded character set (8 bits including parity check) that consists of control
characters and graphic characters.
assigning a device
The establishing of the relationship of a device to a running task, process,
job, or program.
assignment
The naming of a specific device to perform a function.
asynchronous
Pertaining to two or more processes that do not depend upon the
occurrence of specific events such as common timing signals.
attention (notice)
A word for calling attention to the possibility of danger to a program,
device, or system, or to data. Contrast with caution and danger.
ATTN Attention.
B
backup
To make extra copies of documents or software for safekeeping.
bar code
A code that represents characters by sets of parallel bars of varying
thickness and separation, which are read optically by transverse scanning.
bar code label
Paper bearing a bar code and having an adhesive backing. The bar code
label must be affixed to a tape cartridge to enable the library to identify
the cartridge and its volume serial number.
bar code reader
A laser device that is specialized for scanning and reading bar codes and
converting them into either the ASCII or EBCDIC digital character code.
bezel
Decorative and safety cover.
bicolored
Having two colors.
bit
Either of the digits 0 or 1 when used in the binary numbering system.
BOM or bill of materials
A list of specific types and amounts of direct materials that are expected to
be used to produce a specific job or quantity of output.
Border Gateway Protocol (BGP)
BGP is the core routing protocol of the Internet. It works by maintaining a
table of IP networks or 'prefixes' that designate network reachability
among autonomous systems (AS).
BRMS Backup Recovery and Media Services.
F-2
Dell PowerVault TL1000 Tape Autoloader User's Guide
browser
A client program that initiates requests to a web server and displays the
information that the server returns.
buffer
A routine or storage that is used to compensate for a difference in rate of
flow of data or time of occurrence of events, when data is transferred from
one device to another.
bus
A facility for transferring data between several devices that are located
between two end points, only one device able to transmit at a specified
moment.
byte
A string that consists of some bits (usually 8) that are treated as a unit and
represent a character. A fundamental data unit.
C
CA certification
In cryptography, a certificate from a certificate authority (CA).
capacity
The amount of data that can be contained on storage media and expressed
in bytes of data.
cartridge manual rewind tool
A device that can be fitted into the reel of a cartridge and used to rewind
tape into or out of the cartridge.
cartridge memory (CM)
Within each data cartridge, an embedded electronics and interface module
that can store and retrieve a cartridge's historical usage and other
information.
cartridge storage slot
Individual slot that is located within a magazine that is used to house tape
cartridges.
caution (notice)
A word to call attention to possible personal harm to people. Contrast with
attention and danger.
CE
Customer engineer; field engineer; service representative.
centimeter (cm)
One one-hundredth of a meter (0.01 m). Approximately 0.39 inch.
channel command
An instruction that directs a data channel, control unit, or device to
perform an operation or set of operations.
char
Character.
CHK
Check.
cleaning cartridge
A tape cartridge that is used to clean the heads of a tape drive. Contrast
with data cartridge.
COD
Capacity On Demand.
command
A control signal that initiates an action or the start of a sequence of actions.
Glossary
F-3
compact disc (CD)
A disc, usually 4.75 inches in diameter, from which data is read optically
by using a laser.
compression
The process of eliminating gaps, empty fields, redundancies, and
unnecessary data to shorten the length of records or blocks.
concurrent
Refers to diagnostic procedures that can be run on one control unit while
the rest of the subsystem remains available for customer applications.
contingent connection
A connection between a channel path and a drive that is caused when a
unit check occurs during an I/O operation.
controller
A device that provides the interface between a system and one or more
tape drives.
control path drive
controllerA device that provides the interface between a system and one or
more tape drives.control path drive A drive that communicates messages
from the host computer to the library in which the drive is installed.
cookie A packet of data that is exchanged between the library and a web browser
to track configuration.
CP
Circuit protector.
CPF
Control Path Failover.
CRU
Customer Replaceable Unit.
CSA
Canadian Standards Association.
ctrl
Control.
CU
Control unit.
D
danger (notice)
A word to call attention to possible lethal harm to people. Contrast with
attention and caution.
data
Any representations such as characters or analog quantities to which
meaning is or might be assigned.
data buffer
The storage buffer in the control unit. This buffer is used to increase the
data transfer rate between the control unit and the channel.
data cartridge
A tape cartridge that is dedicated to storing data. Contrast with cleaning
cartridge.
data check
A synchronous or asynchronous indication of a condition that is caused by
invalid data or incorrect positioning of data.
F-4
dc
Direct current.
DCS
Designated Cleaning Slot.
Dell PowerVault TL1000 Tape Autoloader User's Guide
degauss
To make a magnetic tape nonmagnetic by using electrical coils that carry
currents that neutralize the magnetism of the tape.
degausser
A device that makes magnetic tape nonmagnetic.
degradation
A decrease in quality of output or throughput or an increase in machine
error rate.
degraded
Decreased in quality of output or throughput or increased machine error
rate.
deserialize
To change from serial-by-bit to parallel-by-byte.
detented
A part that is held in position with a catch or lever.
device Any hardware component or peripheral device, such as a tape drive or
tape library, that can receive and send data.
device driver
A file that contains the code that is needed to use an attached device.
DHCPv6
The Dynamic Host Configuration Protocol for IPv6. Although IPv6's
stateless address autoconfiguration removes the primary motivation for
DHCP in IPv4, DHCPv6 can still be used to statefully assign addresses if
the network administrator wants more control over addressing.
DH group
Diffie-Hellman group.
DIAG
Diagnostic section of maintenance information manual.
differential
See High Voltage Differential (HVD).
direct access storage
A storage device in which the access time is independent of the location of
the data.
display contrast
The brightness of the display on the Operator Panel.
DLL
Dynamic Link Library. The Microsoft implementation of the shared library
concept. These libraries usually have the file extension dll, ocs (for libraries
that contain activeX controls, or drv (for legacy system drivers).
DNS
Directory Name System. This allows the library to recognize text-based
addresses instead of numeric IP addresses.
download
To transfer programs or data from a computer to a connected device,
typically a personal computer.
To transfer data from a computer to a connected device, such as a
workstation or personal computer.
DPF
Data Path Failover.
Glossary
F-5
DRAM
Dynamic random-access memory.
drive, magnetic tape
A mechanism for moving magnetic tape and controlling its movement.
Drive Not Configured
This message occurs during the first boot after a factory settings restore is
run. This message is not a real issue since it takes time for the library to
configure.
DRV
Drive.
DSA key
Encryption key type.
DSE
Data security erase.
DSP
Digital signal processor.
E
EBCDIC
Extended binary-coded decimal interchange code.
EC
Edge connector. Engineering change.
ECC
Error correction code.
EEB
Ethernet Expansion Blade
EEPROM
Electrically erasable programmable read-only memory.
EIA
Electronics Industries Association.
EIA unit
A unit of measure, which is established by the Electronic Industries
Association, equal to 44.45 millimeters (1.75 inches).
eject
To remove or force out from within.
EKM
Encryption Key Manager.
electronic mail
Correspondence in the form of messages that are transmitted between user
terminals over a computer network.
email
See electronic mail.
encryption
A method of storing data in a format that helps protect data from
inadvertent or deliberate compromise. An encryption-enabled drive
contains the necessary hardware and firmware to encrypt and decrypt host
tape application data. Encryption policy and encryption keys are provided
by the host application or host server.
encryption key manager (EKM)
A Java software program that assists encrypting tape drives in generating,
protecting, storing, and maintaining encryption keys that encrypt
information that is written to and decrypt information that is read from
tape media.
entitlement
Entitlement is the official right to receive service and support for your tape
library.
F-6
Dell PowerVault TL1000 Tape Autoloader User's Guide
EPO
Emergency power off.
EPROM
Erasable programmable read only memory.
EQC
Equipment check.
equipment check
An asynchronous indication of a malfunction.
Error log
A data set or file in a product or system where error information is stored
for later access.
ESD
Electrostatic discharge.
ESP
Encapsulating Security Payload. An Internet Protocol that provides origin
authenticity, integrity, and confidentiality protection of a packet. ESP also
supports encryption-only and authentication-only configurations, but
encryption without authentication is discouraged because it is insecure.
F
fault symptom code (FSC)
A hexadecimal code that is generated by the drive or the control unit
microcode in response to a detected subsystem error.
FC
Feature code.
FCC
Federal communications commission.
FE
Field engineer, customer engineer, or service representative.
fiducial
A target that is used for teaching a physical location to a robot.
field replaceable unit (FRU)
An assembly that is replaced in its entirety when any one of its
components fails.
file
A named set of records that are stored or processed as a unit. Also referred
to as a data set.
file protection
The processes and procedures that are established in an information
system that are designed to inhibit unauthorized access to, contamination
of, or deletion of a file.
file transfer protocol (FTP)
In the Internet suite of protocols, an application layer protocol that uses
TCP and Telnet services to transfer bulk-data files between machines or
hosts.
firmware
Proprietary code that is delivered as microcode as part of an operating
system. Firmware is more efficient than software loaded from an alterable
medium and more adaptable to change than pure hardware circuitry. An
example of firmware is the Basic input/output system (BIOS) in read-only
memory (ROM) on a PC system board.
FLASH EEPROM
An electrically erasable programmable read-only memory (EEPROM) that
can be updated.
FMR
Field microcode replacement.
Glossary
F-7
format
The arrangement or layout of data on a data medium.
formatter
Part of a magnetic tape subsystem that performs data conversion, speed
matching, encoding, first level error recovery, and interfaces to one or more
tape drives.
FP
File protect.
frayed Damaged as if by an abrasive substance.
FRU
Field replaceable unit.
FSC
Fault symptom code.
FSI
Fault symptom index.
FTSS
Field Technical Sales Support.
functional microcode
Microcode that is resident in the machine during normal customer
operation.
G
g
Gram.
GB
gigabyte.
GBIC Gigabit Interface Converter.
Gbs
gigabits/second
Gbi
gigabit
gigabit (Gbit)
1 000 000 000 bits.
gigabyte (GB)
1 000 000 000 bytes.
Gigabit Interface Converter (GBIC)
Converts copper interface to optic interface.
gnd
Ground.
H
HBA
Host Bus Adapter.
HD Slot Technology
High-density (HD) slot technology. Allows multiple cartridges to be stored
in a tiered architecture.
hertz (Hz)
Unit of frequency. 1 hertz equals one cycle per second.
hex
Hexadecimal.
High Voltage Differential (HVD)
A logic signaling system that enables data communication between a
supported host and the library. HVD signaling uses a paired plus and
minus signal level to reduce the effects of noise on the SCSI bus. Any noise
that is injected into the signal is present in both a plus and minus state,
and is canceled. Synonymous with differential.
F-8
Dell PowerVault TL1000 Tape Autoloader User's Guide
HVD
SCSI Bus High Voltage Differential
Hz
Hertz (cycles per second).
I
ID
Identifier.
identifier (ID)
(1) In programming languages, a lexical unit that names a language object;
for example, the names of variables, arrays, records, labels, or procedures.
An identifier usually consists of a letter optionally followed by letters,
digits, or other characters. (2) One or more characters that are used to
identify or name data element and possibly to indicate certain properties of
that data element. (3) A sequence of bits or characters that identifies a
program, device, or system to another program, device, or system.
IEC
International Electrotechnical Commission.
IKE
Internet Key Exchange that is used in the IPsec protocol.
IML
Initial microprogram load.
incompatible magazine
This message might display on the Operator Panel during library
initialization. It occurs during factory restore or VPD. This message is not a
real issue since it takes time for the library to configure.
initial microprogram load (IML)
The action of loading a microprogram from an external storage to writable
control storage.
initiator
The component that runs a command. The initiator can be the host system
or the tape control unit.
INST
Installation.
interface
A shared boundary. An interface might be a hardware component to link
two devices or it might be a portion of storage or registers accessed by two
or more computer programs.
Internet Protocol Version 4 (IPv4)
See IPv4.
Internet Protocol Version 6 (IPv6)
See IPv6.
interposer
The part that is used to convert a 68-pin connector to a 50-pin D-shell
connector.
intervention required
Manual action is needed.
INTRO
Introduction.
I/O
Input/output.
I/O station
Cartridge location that is dedicated for the insertion of cartridges into and
the removal of cartridges from the library.
Glossary
F-9
IOP
Input/output processor.
IP
Internet Protocol.
IP address
An identifier for a computer or device on an Internet Protocol (TCP/IP)
network. Networks that use the TCP/IP protocol route messages that are
based on the IP address of the destination. See IPv4 and IPv6.
IPL
Initial program load.
IPSec (IP security)
A set of protocols for securing IPv6 network communications by
authentication and encryption.
IP Stack
A TCP/IP protocol stack that manages static IP addresses.
IPv4
A network layer protocol for packet-switched networks. IPv4 supports 232
(about 4.3 billion) addresses.
IPv6
A network layer protocol for packet-switched networks. It is the designated
successor of IPv4 for general use on the Internet. The main improvement
that is brought by IPv6 is the increase in the number of addresses available
for networked devices, allowing, for example, each mobile phone and
mobile electronic device to have its own unique address.
ISV
Independent software vendor.
ITST
Idle-time self-test.
K
Kerberos
Kerberos Authentication is a standard (RFC 1510) third-party
authentication protocol that provides end-to-end security for distributed
computing environments.
kilogram (kg)
1000 grams (approximately 2.2 pounds).
km
kilometer. 1000 Meters, Approximately 5/8 mile.
L
LAN
Local area network. A computer network within a limited area.
LCB
Library Control Blade
LCD
See liquid crystal display.
LDAP Lightweight Directory Access Protocol. This allows the library to use login
and password information that is stored on a server to grant access to the
library functionality.
LDAPS
Secure LDAP over SSL.
LDI
Library Drive Interface.
LED
Light-emitting diode.
library certification
In cryptography, a certificate that is provided by the library.
F-10
Dell PowerVault TL1000 Tape Autoloader User's Guide
library-managed encryption
Tape encryption that is controlled by the tape library.
Linear Tape-Open (LTO)
A type of tape storage technology that is developed by the IBM
Corporation, Hewlett-Packard, and Quantum. LTO technology is an “open
format” technology, which means that its users have multiple sources of
product and media. The “open” nature of LTO technology enables
compatibility between different vendors' offerings by ensuring that vendors
comply with verification standards. The LTO technology is implemented in
two formats: the Accelis format focuses on fast access; the Ultrium format
focuses on high capacity. The Ultrium format is the preferred format when
capacity (rather than fast access) is the key storage consideration. An
Ultrium cartridge has a compressed data capacity of up to 6250 GB (2.5:1
compression) and a native data capacity of up to 2500 GB.
liquid crystal display (LCD)
A low-power display technology that is used in computers and other I/O
devices.
loadable
The ability to be loaded.
LME
Library Managed Encryption.
LTO cartridge memory (LTO-CM)
Within each LTO Ultrium data cartridge, an embedded electronics and
interface module that can store and retrieve a cartridge's historical usage
and other information.
LUN
Logical Unit Number.
LVD
SCSI Bus Low Voltage Differential
M
MAC address
The Media Access Control address of a computer networking device.
magnetic tape
A tape with a magnetic surface layer on which data can be stored by
magnetic recording.
MAP
Maintenance analysis procedure.
mask
A pattern of characters that controls the retention or elimination of portions
of another pattern of characters. To use a pattern of characters to control
the retention or elimination of portions of another pattern of characters.
master file
A file that is used as an authority in a job and that is relatively permanent,
even though its contents might change. Synonymous with main file.
Maximum Transmission Unit (MTU)
The size of the largest packet that a network protocol can transmit.
MB
Megabyte (expressed as data rate in MB/s or MB/second).
media capacity
The amount of data that can be contained on a storage medium, expressed
in bytes of data.
media-type identifier
Pertaining to the bar code on the bar code label of the Ultrium Tape
Glossary
F-11
Cartridge, a 2-character code, L1, that represents information about the
cartridge. L identifies the cartridge as one that can be read by devices that
incorporate LTO technology; 1 indicates that it is the first generation of its
type.
mega
One million of.
meter In the Metric System, the basic unit of length; equal to approximately 39.37
inches.
MIB
Management Information Base. Information repository that is used by
SNMP.
micro One millionth of.
microcode
(1) One or more micro instructions. (2) A code, representing the
instructions of an instruction set, which is implemented in a part of storage
that is not program-addressable. (3) To design, write, and test one or more
micro instructions. (4) See also microprogram.
microdiagnostic routine
A program that runs under the control of a supervisor, usually to identify
field replaceable units.
microdiagnostic utility
A program that is run by the customer engineer to test the machine.
microinstruction
A basic or elementary machine instruction.
microprogram
A group of microinstructions that when run performs a planned function.
The term microprogram represents a dynamic arrangement or selection of
one or more groups of microinstructions for execution to perform a
particular function. The term microcode represents microinstructions that
are used in a product as an alternative to hard-wired circuitry to
implement certain functions of a processor or other system component.
MIM
Media information message.
mm
Millimeter.
modifier
That which changes the meaning.
mount a device
To assign an I/O device with a request to the operator.
MP
Microprocessor.
ms
Millisecond.
MSG
Message.
multipath
Pertaining to using more than one path.
N
N/A
Not applicable.
Network Address Translation (NAT)
NAT involves rewriting the source or destination addresses of IP packets
F-12
Dell PowerVault TL1000 Tape Autoloader User's Guide
as they pass through a router or firewall. Most systems that use NAT do so
to enable multiple hosts on a private network to access the Internet over a
single public IP address.
NEMA
National Electrical Manufacturers Association.
node
In a network, a point at which one or more functional units connect
channels or data circuits.
NTP
Network Time Protocol. This protocol allows the library to set its internal
date and time that is based on the date and time of a server.
NVS
Nonvolatile storage. A storage device whose contents are not lost when
power is cut off.
O
oersted
The unit of magnetic field strength in the unrationalized
centimeter-gram-second (cgs) electromagnetic system. The oersted is the
magnetic field strength in the interior of an elongated, uniformly wound
solenoid that is excited with a linear current density in its winding of`1
abampere per 4π centimeters of axial length.
offline
Pertaining to the operation of a functional unit without the continual
control of a computer. Contrast with online.
online Pertaining to the operation of a functional unit that is under the continual
control of a computer. Contrast with offline.
OPER Operation.
ov
Over voltage.
overrun
Loss of data because a receiving device is unable to accept data at the rate
it is transmitted.
overtightening
To tighten too much.
P
parameter
A variable that is given a constant value for a specified application and
that might denote the application.
p bit
Parity bit.
PC
Parity check.
PCC
Power control compartment.
PDF
Portable Document Format.
PE
Parity error. Product engineer.
PFS
Perfect forward secrecy.
pick
Pertaining to the library, to remove, by using a robotic device, a tape
cartridge from a storage slot or drive.
picker A robotic mechanism that is located inside the library that moves
cartridges between the cartridge storage slots and the drive.
Glossary
F-13
PM
Preventive maintenance.
POR
Power-on reset.
port
A physical connection for communication between the 3590 and the host
processor. The 3590 has 2 SCSI ports.
Portable Document Format (PDF)
A standard that is specified by Adobe Systems, Incorporated, for the
electronic distribution of documents. PDF files are compact, can be
distributed globally (by way of email, the web, intranets, or CD-ROM), and
can be viewed with the Acrobat Reader, which is software from Adobe
Systems that can be downloaded at no cost from the Adobe Systems home
page.
Private key
A cryptographic key that is used to decrypt a message.
PROM
Programmable read only memory.
PS
Power supply.
PTF
Program temporary fix. A single bugfix or group of bugfixes that are
distributed in a form ready to install for customers.
PWR
Power.
R
rack
A unit that houses the components of a storage subsystem, such as the
library.
rackmount kit
A packaged collection of articles that are used to install the rack mounted
version of the library.
RAM
Random access memory.
Random access memory
A storage device into which data is entered and from which data is
retrieved in a nonsequential manner.
RAS
Reliability, availability, and serviceability.
record A collection of related data or words, which are treated as a unit.
recording density
The number of bits in a single linear track measured per unit of length of
the recording medium.
recoverable error
An error condition that allows continued execution of a program.
ref
Reference.
reg
Register.
reinventory
To inventory again.
retension
The process or function of tightening the tape onto the cartridge, if it is
sensed that the tape has a loose wrap on the cartridge.
F-14
Dell PowerVault TL1000 Tape Autoloader User's Guide
RFC (Request for Comments)
Request for Comments (RFC) documents are a series of memoranda, which
encompasses new research, innovations, and methodologies applicable to
Internet technologies.
RH
Relative humidity.
RID tag
Repair identification tag.
RML
Rack Mount Line.
robot
Picker.
robotics
Picker assembly.
root CA certification
In cryptography, a root certificate from a certificate authority (CA).
RPQ
Request for price quotation.
RSA key
Encryption key type.
R/W
read/write.
S
s
Seconds of time.
SAC
Service Action Code. Code that is developed to indicate possible FRU or
FRUs to replace to repair the hardware.
SAN
Storage area network.
SAS
Serial Attached SCSI. A computer bus technology and serial
communication protocol for direct attached storage devices. SAS is a
replacement for parallel SCSI with higher speeds, but still utilizing SCSI
commands.
scratch cartridge
A data cartridge that contains no useful data, but can be written to with
new data.
SCD
Single Character Display.
SCSI
Small computer system interface.
SE
Single-ended.
segment
A part.
sel
Select.
Serial Attached SCSI (SAS)
A drive with a SAS interface can be linked directly to controllers. SAS is a
performance improvement over traditional SCSI because SAS enables
multiple devices (up to 128) of different sizes and types to be connected
simultaneously with thinner and longer cables. It supports full-duplex
signal transmission up to 3 Gb/s. In addition, SAS drives can be
hot-plugged.
serialize
To change from parallel-by-byte to serial-by-bit.
Glossary
F-15
serializer
A device that converts a space distribution of simultaneous states, which
represents data into a corresponding time sequence of states.
servo, servos
An adjective for use in qualifying some part or aspect of a
servomechanism.
servomechanism
A feedback control system in which at least one of the system signals
represents mechanical motion.
signature
A digital signature that is used in cryptography to identify one party to
ensure authenticity.
slot blocker
A slot blocker is used to restrict/close off a data cell so a data cartridge
cannot be inserted.
Small Computer Systems Interface (SCSI)
A standard that is used by computer manufacturers for attaching
peripheral devices (such as tape drives, hard disks, CD-ROM players,
printers, and scanners) to computers (servers). Pronounced “scuzzy”.
Variations of the SCSI interface provide for faster data transmission rates
than standard serial and parallel ports (up to 320 megabytes per second).
The variations include:
v Fast/Wide SCSI: Uses a 16-bit bus, and supports data rates of up to 20
MBps.
v SCSI-1: Uses an 8-bit bus, and supports data rates of 4 MBps.
v SCSI-2: Same as SCSI-1, but uses a 50-pin connector instead of a 25-pin
connector, and supports multiple devices.
v Ultra SCSI: Uses an 8- or 16-bit bus, and supports data rates of 20 or 40
MBps.
v Ultra2 SCSI: Uses an 8- or 16-bit bus and supports data rates of 40 or 80
MBps.
v Ultra3 SCSI: Uses a 16-bit bus and supports data rates of 80 or 160
MBps.
v Ultra160 SCSI: Uses a 16-bit bus and supports data rates of 80 or 160
MBps.
v Ultra320 SCSI: Uses a 16-bit bus and supports data rates of 320 MBps.
SMI-S See Storage Management Initiative Specification (SMI-S).
SMTP Simple Mail Transfer Protocol. SMTP is a standard for email transmissions
across the internet.
SNMP
Simple Network Management Protocol. SNMP is used by network
management systems to monitor network-attached devices for conditions
that warrant administrative attention.
SNTP Simple Network Time Protocol. Used to synchronize the clocks of
network-attached devices.
SMW Servo Manufacturer's Word.
SNS
F-16
Sense.
Dell PowerVault TL1000 Tape Autoloader User's Guide
special feature
A feature that can be ordered to enhance the capability, storage capacity, or
performance of a product, but is not essential for its basic work.
SPI
Security Parameters Index.
SR
Service representative, see also CE.
SRAM
Static random access memory.
SS
Status store.
SSL (Secure Sockets Layer)
A set of cryptographic protocols for secure communications on the Internet
for such things as web browsing, email, Internet faxing, instant messaging,
and other data transfer. SSL allows applications to communicate across a
network in a way that is designed to prevent eavesdropping, tampering,
and message forgery.
SSP
Serial SCSI Protocol.
ST
Store.
standard feature
The significant design elements of a product that are included as part of
the fundamental product.
START
Start maintenance.
StartTLS
Secure LDAP communication that uses TLS.
Storage Management Initiative Specification (SMI-S)
A storage standard that is developed and maintained by the Storage
Networking Industry Association (SNIA). It is also ratified as an ISO
standard. The main objective of SMI-S is to enable broad interoperable
management of heterogeneous storage vendor systems.
subsystem
A secondary or subordinate system, capable of operating independently of,
or asynchronously with, a controlling system.
SUPP Support.
sync
Synchronous, synchronize. Occurring with a regular or predictable time
relationship.
T
tachometer, tach
A device that emits pulses that are used to measure/check speed or
distance.
tape cartridge
A container that holds magnetic tape, that can be processed without
separating it from the container.
tape void
An area in the tape in which no signal can be detected.
TCP/IP
Transmission Control Protocol/Internet Protocol.
Glossary
F-17
|
TCU
Tape control unit.
TDT
Tape Diagnostic tool.
TH
Thermal.
thread/load operation
A procedure that places tape along the tape path.
TM
Tapemark.
transport mode
End-to-end communications security in which the end-point computers do
the security processing.
trusted certification
In cryptography, a trustworthy certificate that is not registered with a
certificate authority.
tunnel mode
Port-to-port communications security in which security is provided to
several machines by a single node.
U
UART Universal asynchronous receiver/transmitter.
UL
Underwriter's Laboratories.
Ultrium Tape Drive
Located within the library, a data-storage device that controls the
movement of the magnetic tape in an LTO Ultrium Tape Cartridge. The
drive houses the mechanism (drive head) that reads and writes data to the
tape.
|
|
|
|
|
unload
Prepare the tape cartridge for removal from the drive.
utilities
Utility programs.
utility programs
A computer program in general support of the processes of a computer; for
instance, a diagnostic program.
uv
Under voltage.
V
VOLSER
Volume serial number.
volume
A certain portion of data, together with its data carrier, that can be handled
conveniently as a unit.
VPD
Vital product data. The information that is contained within the tape drive
that requires nonvolatile storage that is used by functional areas of the
drive, and information that is required for manufacturing, RAS, and
engineering.
W
word
F-18
A character string that is convenient for some purpose to consider as an
entity.
Dell PowerVault TL1000 Tape Autoloader User's Guide
World Wide Node Name (WWNN)
A unique character string which identifies Fibre Channel Host Bus
adapters (HBA).
WORM
Write Once Read Many.
Write
Write command.
WT
World trade.
WWCID
Worldwide Cartridge Identifier.
WWN Worldwide Name.
WWNN
Worldwide Node Name.
WWPN
Worldwide port name.
X
XR
External register.
XRA
External register address register.
Glossary
F-19
F-20
Dell PowerVault TL1000 Tape Autoloader User's Guide
Index
A
access mode
library configuration 3-14
accessibility
keyboard E-1
repeat rate of up and down
buttons E-1
shortcut keys E-1
accessor 4-39
accessor locking screw
removing 3-7
Accessor locking screw 1-5
accessor statistics, viewing 4-39
account types 2-5
Acoustical specifications 1-10
active slots 3-14, 3-26, 4-9, 4-24
address 3-17
administrator 4-23
application managed encryption 4-27
application managed encryption
(AME) 3-18
Attention LED 2-1
authentication 3-21
auto cleaning 3-14, 3-26, 4-24
autoload 3-14, 3-26
configuration 3-8, 3-10, 4-3, 4-9, 4-26,
4-28, 4-32
Web User Interface 3-11
configuring auto cleaning 4-9
control keys 1-2
D
data cartridges 1-9
date and time settings 4-28
date settings 3-26, 4-11, 4-28
default settings 3-10, 4-13
device drivers, supported 1-12
DHCP 3-16, 3-24, 4-12
diagnosing problems 6-3
diagnostics 4-14, 4-15
display elements 2-5
DNS server IP address 3-16, 3-24
downloading drive logs 4-36
downloading library logs 4-37
drive A-11
rebooting 4-8
drive cleaning 4-6
drive diagnostics 4-15
drive logs, downloading 4-36
B
E
back light 4-13
bar code label length 4-24
Bar code labels 5-5
guidelines for using 5-6
Bar code reader 1-6
EKM 3-18
electrical specifications 1-10
email 3-20, 4-30
email notifications 3-20, 4-30
emailing 6-10
emailing logs 6-10
emergency release 1-4
Encryption 1-6
configuration 3-18
encryption key manager 3-18
Encryption Key Manager (EKM) 3-18
encryption key manager
configuration 3-18
encryption policy 3-18, 4-27
encryption settings 4-27
environmental specifications 1-10
error codes A-1, A-11
Error LED 2-1
error logs 6-2, 6-10
error messages 6-2, A-11
error messages and resolutions 6-2
error status 4-14
ethernet port 1-5, 3-8
C
cables 6-10
cables, reseating 6-10
cartridge
Write-Protect switch 5-6
Cartridge 5-1
capacity scaling 5-2
cleaning 5-4
compatibility 5-3
data 5-2
proper handling 5-7
specifications 5-10
cartridge assignment 3-14
cartridge magazine 1-2, 1-4, 8-1
cartridge magazine, unlocking 4-22
cartridge magazines 4-5
Cartridge, environment 5-8
cartridges 1-9, 3-27, 4-6
cleaning 1-9
CE log, dumping 4-37
channel calibration 1-8
Clean Drive LED 2-1
cleaning 4-6
cleaning the drive 4-21
F
firmware 4-4
firmware, updating 4-38
frequency, electrical supply 1-10
front panel 1-2
G
gateway 3-16, 3-24, 4-12
glossary F-1
H
hardware attributes, viewing 4-4
Host Bus Adapter (HBA) 1-9
host interface cable 3-8
Host interface cables, connecting 3-8
I
I/O station 4-4, 4-24
I/O Station 3-26
I/O Station, configuration 3-14
Input modes 2-1
installation 1-11, 3-1, 3-2, 3-7, 3-10, 3-28,
8-1
rack
safety xiii
installation location 3-1, 3-2
installing rails 3-2
inventory 4-7, 4-22
IP address 3-16, 3-24, 4-12
IPv4 address 3-16, 3-24
IPv4 settings 4-13, 4-26
IPv6 address 3-16, 3-24
IPv6 prefix length 3-16, 3-24, 4-13, 4-26,
4-28
IPv6 settings 4-13, 4-26
ITDT-DCR 7-1
J
Java
3-12
K
keyboard E-1
L
labels
bar code 5-5
Labels
bar code
guidelines for using 5-6
laser
compliance xii
safety xii
LCD contrast 4-13, 4-28
LCD display 1-2
LEDs 6-8
LEDs, front panel 6-8
LEDs, interpreting 6-8
library 3-1, 3-29, 6-1, A-1, B-1
auto cleaning 4-9
X-1
library (continued)
configuring 3-10
configuring active slots 4-9
logging out 4-8
powering down 4-7
preparing to ship 4-7
rebooting 4-8
Library 3-27
library access mode 3-14
library and drives, resetting 4-37
Library configuration
save/restore 3-24
Library Configuration Form D-1
library depth 1-10
library dimensions 1-10
library in rack 3-2
library inventory 4-22
library logs, downloading 4-37
library managed encryption 4-27
library managed encryption (LME) 3-18
library map 4-17
library mode 4-10
library settings 4-10, 4-24
Library settings
configuration 3-26
library state 4-21
library verify 4-14
Library verify
diagnostics 3-28
library verify diagnostic procedures 4-14
library weight 1-10
library width 1-10
library, diagnosing problems 6-3
library, viewing logs 4-35
link speed 3-16, 3-24, 4-26
link speed (ethernet) 3-16, 3-24, 4-12,
4-26
location 3-1
location in rack 3-2
logging out of the library 4-8
logical library settings 4-24
Logical Unit Number (LUN)
scanning 1-9
login 2-5
Web User Interface 3-12
logs, emailing 6-10
looping 3-14
looping access mode 3-26
LUN scanning 1-9
M
maintenance 8-1
Media 1-9, 5-1
media errors 5-4
menus 2-5, 4-1, 4-16
mounting location, library 3-1
moving 4-6
moving cartridges 4-20
N
Network
configuration 3-16, 3-24
network settings 1-5, 4-26
Network settings 3-16, 3-24, 4-12
X-2
Network Time Protocol (NTP) 1-7
notification settings 3-20, 4-30
Notification settings 3-21
notification settings, email 3-20
NTP 1-7
NTP address 3-17, 4-28
NTP server 4-28
configuration 3-17
O
offline 4-7
online 4-7
online or offline 4-21
online/offline icon 2-1
Operating procedures
Operator Panel 4-1
operational specifications 1-10
operator interventions 4-34
Operator Panel 1-2, 2-1, 3-24, 3-26, 3-28,
4-7, 4-8, 4-9, 4-10, 4-11, 4-12, 4-13, 4-14,
4-15
current information 4-4
firmware revision 4-4
library inventory 4-7
manually cleaning the drive 4-6
menus 4-3
moving cartridges 4-6
taking the library online and
offline 4-7
unloading the drive 4-6
unlocking cartridge magazine 4-5
unlocking I/O station 4-4
viewing settings 4-3
Operator Panel settings 4-13
Ordering media
Ordering WORM cartridges 5-3
P
passwords 2-5
passwords, changing 2-5, 4-13, 4-23
physical library settings 4-24
physical specifications 1-10
policy configuration 3-18
populating the library with
cartridges 3-27
power button 1-5
power connector 1-5
power consumption 1-10
power cord, connecting 3-8
power management 1-8
power socket 1-5
power supply 1-5
problem diagnosis 6-3
product environment 1-11
R
rack installation
safety xiii
rack mounting 3-2
rack mounting rails 3-2
RAID 1-9
random access mode 3-14, 3-26, 4-10
Read/Write capability 5-3
Dell PowerVault TL1000 Tape Autoloader User's Guide
Ready/Activity LED 2-1
rear panel 1-5
rebooting the drive 4-8
rebooting the library 4-8
removing accessor locking screw 3-7
removing during installation 8-1
reporting library problems 6-1
reporting problems 6-1
reseating cables 6-10
resetting the library and drives 4-37
S
safety information
laser compliance xii
laser safety xii
SAS 3-8
SAS Host Interface 1-6, 3-8
SAS interface 1-5
saving/restoring 4-32
SCSI ID 1-9
security 3-12
sending your comments iii
sequential access mode 3-14, 3-26, 4-10
serial attached SCSI 1-5
Serial Attached SCSI (SAS) 1-5
serial number label 1-2, 1-4
Server attachment 3-8
service library 4-34
service mode 4-14
service procedures 7-1
shipping the library 4-7
shortcut keys E-1
SNMP 3-21, 4-31
messaging 1-7
SNMP notifications 3-21, 4-31
SNTP server 4-12
sound 4-13
Specifications
cartridges 5-10
library 1-10
specifications, physical 1-10
speed matching 1-8
SSL 3-16, 3-24
Stateless DHCP 4-13
storage capacity 1-10
subnet mask 3-16, 3-24, 4-12
superuser 4-23
support notification iii
Support Notification
registration 3-29
system summary 4-17
T
taking online 3-29
taking the library online or offline
tape alert flags B-1, B-3
tape drive 4-6, B-3
tape drive configuration 3-14
tape drive diagnostics 4-15
tape drives, downloading drive
logs 4-36
TCP/IP 3-16, 3-24, 4-26
TCP/IP configuration 3-16, 3-24
technical support iii
4-21
time server 3-17, 4-28
time settings 3-26, 4-11, 4-28
tools, required 8-1
top menu 4-3
top menus 4-16
trace data 4-36
trace date, viewing 4-36
trap definitions A-14
trap notifications 4-31
Trap notifications
configuration 3-21
troubleshooting 6-1
types A-14
U
Ultrium tape drives 1-8
unloading 4-6
unloading drive 4-21
unlock 4-22
unlocking 4-5
unlocking the cartridge magazine
updating library and drive
firmware 4-38
user 4-23
user access, managing 4-23
user accounts 4-23
User accounts
configuration 3-23
user interfaces 2-1
user privileges 2-5
user roles 4-23
4-22
V
verifying library 3-28
viewing accessor statistics 4-39
viewing communication information 4-3
viewing library logs 4-35
viewing settings 4-17
viewing trace data 4-36
voltage 1-10
W
Web User Interface 2-1, 2-5, 4-1, 4-16,
4-17, 4-20, 4-21, 4-22, 4-23, 4-24, 4-26,
4-27, 4-28, 4-30, 4-31, 4-32, 4-34, 4-35,
4-36, 4-37, 4-38, 4-39, A-11
WORM 5-3, 5-4
WORM (write once, read many) 5-3
WORM capability 5-4
WORM, data security 5-4
wrap test 4-15
Write once, read many 5-4
Write once, read many (see WORM) 5-3
Write-Protect switch
setting 5-6
Index
X-3
X-4
Dell PowerVault TL1000 Tape Autoloader User's Guide
Printed in USA