1
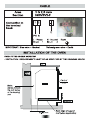
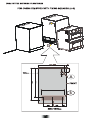
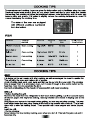
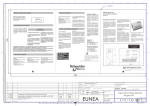
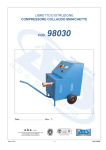
OVENS
USER INSTRUCTIONS
CANDY HOOVER GROUP S.R.L. • Via Privata Eden Fumagalli • 20047 Brugherio Milano Italy
GB
SAFETY INSTURUCTIONS
WARNING: The appliance and its accessible parts become hot during
use. Care should be taken to avoid touching heating elements.
• Children under 8 Year of age must be kept away from the appliance
unless they are continuously supervised.
• This appliance can be used by children aged from 8 years and above and
persons with reduced physical, sensory or mental capabilities or lack of
experience and knowledge if they have been given supervision or
instruction concerning use of the appliance in a safe way and understand
the hazards involved.
• Children must not play with the appliance.
• Cleaning and user maintenance shall not be made by children without
supervision.
• During use the appliance becomes hot. Care should be taken to avoid
touching heating elements inside the oven.
WARNING: Accessible parts may become hot during use. Young children
must be kept away.
• Do not use harsh abrasive cleaners or sharp metal scrapers to clean the
oven door glass since they can scratch the surface, which may result in
shattering of the glass.
• The oven must be switched off before removing the guard, after
cleaning, the guard must be replaced in accordance with the instructions.
• Only use the temperature probe recommended for this oven.
• Do not use a steam cleaner for cleaning operations.
• WARNING: Avoid possibility of electric shock - ensure the appliance is
switched off before replacing the lamp.
• The means for disconnection must be incorporated in the fixed wiring in
accordance with the wiring rules.
• The instructions state the type of cord to be used, taking into account the
temperature of the rear surface of the appliance.
• If the supply cord is damaged, it must be replaced by a special cord or
assembly available from the manufacturer or its service agent.
• CAUTION: In order to avoid a hazard due to inadvertent resetting of the
thermal cutout, this appliance must not be supplied through an external
switching device, such as a timer, or connected to a circuit that is regularly
switched on and off by the utility.
CAUTION: Accessible parts may be hot when the grill is in use. Young
children must be kept away.
03
04
05
HDO 906 X - HDO 906 NX - HDO 909 X - HDO 909 NX
HDO 707 X - HDO 707 NX
06
HDO 906 X - HDO 906 NX - HDO 909 X
HDO 909 NX - HDO 707 X - HDO 707 NX
Bottom + Top + Fan
Both top and bottom heating elements are used in
conjunction with the fan, which circulates hot air
throughout the oven.We recommend this method for
poultry, pastries, fish and vegetables. By using this
method better heat penetration is achieved and cooking
and preheating times are also reduced. The fan cooking
option allows you to cook different foods together at
different positions in the oven all at the same time,
providing even heat distribution but without the risk of
mingling tastes and smells. When cooking different
foods at the same time allow a further 10 minutes.
07
WARNING : the first operation to carry out after the oven has been
installed or following the interruption of power supply (this is
recognizable the display pulsating and showing 12:00 ) is setting
the correct time. This is achieved as follows
•Push the central button 1 times
•Set time with ▼ ▲ buttons.
•Release all buttons.
L1, L2, L3 SET ACUSTIC SIGNAL
• Push the central button 5 times.
• Set time with ▼ ▲ buttons.
• Release all buttons.
ATTENTION the oven only operates if set on manual function or preset time.
N.B.: on some models the symbols
are replaced by - and + .
08
USE OF THE ELECTRONIC PROGRAMMER
FUNCTION
HOW TO ACTIVATE IT
HOWTO SWITCH IT OFF
MINUTE
MINDER
•Push the central button
1 times
•Press the buttons - or +
to set the required time
•Release all the buttons
•When the set time as
elapsed an audible alarm
is activated (this alarm will
stop on its own, after
7 minutes however it can be
stopped immediately by
pressing the button) SELECT.
MANUAL
FUNCTION
•Push the central button •Turn the oven function
1 times
selector to position O.
•Set the cooking function
with the oven function
selector
WHAT IT DOES
•Sounds an alarm at the
end of the set time.
•During the process, the
display shows the
remaining time: min, sec.
•Allows to use the oven as
alarm clock (could be
activated either with
operating the oven or with
out operating the oven)
•Enables you to operate
the oven.
•For cooking the desired
recipes
•Push the central button
2 times
COOKING
•Press the buttons - or +
TIME
to set the lenght of
cooking required
•Release all buttons
•Set the cooking function
with the oven function
selector
•When the time is elapsed •It allows to preset the
the oven will switch off
cooking time required
automatically. Should you for the recipe chosen
wish to stop cooking earlier•To check how long is left
either turn the function
to run press the SELECT
selector to 0, or set time button 2 Times.
to 0:00 (SELECT and
•To alter/change the
(-) (+) buttons)
preset time press SELECT
and (-) (+) buttons
•Push the central
button 3 times
END OF •Press the buttons
COOKING (-) (+) to set the time
at which you wish the
oven to switch off
•Release the buttons
•Set the cooking
function with the oven
function selector.
•At the time set, the oven
will switch off. To switch
off manually, turn the oven
function selector to
position O.
•Child Lock function is
activated by touching
Set+) for a minimum of 5
seconds until the
KEY LOCK Child Lock symbol is
displayed. From this
moment on all other
function are locked.
•Child Lock function is
deactivated by touching
touchpad Set (+) again
for a minimum of 5
seconds until the Child
Lock symbol
switches off. From this
moment on all functions
are selectable again.
09
WHAT IT IS FOR
•Push any button to stop
the signal. Push the central
button to return to the clock
function
•Enables you to set the •This function is typically used
end of cooking time
with “cooking time” function. For
•To check the preset time example if the dish has to be
push the central button cooked for 45 minutes and needs
3 times
to be ready by 12:30, simply
•To modify the preset
select the required function, set
time press buttons
the cooking time to 45 minutes
SELECT + (-) (+)
and the end of cooking time to
12:30.
•At the end of the cooking set
time, the oven will switch off
automatically and an audible
alarm will ring.
•Cooking will start automatically
at 11:45 (12:30 minus 45 mins)
and will continue until the pre-set
end-of-cooking-time, when the
oven will switch itself off
automatically.
WARNING.
If the END of cooking is
selected without setting the
length of cooking time, the
oven will start cooking
immediately and it will stop at
the END of cooking time set.
10
11
12
13
14
15
16
17
50
-6
0
0
50
55
0m
-60
5
59
22
64
4
55
+5
54
5
05.2013 • REV:0 • 42811663
0
50
3
55
50
A: 885
B: 720
A: 875 - 878
B: 705 - 708
in.
GB
The manufacturer will not be responsible for any inaccuracy resulting from printing or transcript errors contained in this brochure. We
reserve the right to carry out modifications to products as required, including the interests of consumption, without prejudice to the
characteristics relating to safety or function.