1
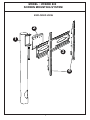
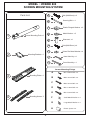
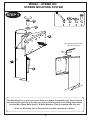
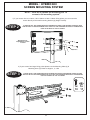
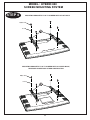
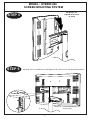
ASSEMBLY INSTRUCTIONS
PLEASE KEEP THIS FOR FUTURE REFERENCE
MODEL : HYBRID 800
SCREEN MOUNTING SYSTEM
FLOOR AREA
2.0M X2.0M
30 mins
APPROXIMATE ASSEMBLY TIME
2 PERSON ASSEMBLY
REQUIRED ASSEMBLY SPACE
TOOLS REQUIRED
CROSS-HEAD SCREWDRIVER
S Y S T E M
C O M P A T I B L E
!
THIS ITEM IS INTENDED ONLY FOR USE WITH MDA DESIGNS
HYBRID COMPATIBLE MODELS
www.mda-designs.co.uk
MDAHYBRID-8001000AI002
ISSUE 1 120814
MODEL : HYBRID 800
SCREEN MOUNTING SYSTEM
EXPLODED VIEW
2
1
3
4
1
MODEL : HYBRID 800
SCREEN MOUNTING SYSTEM
Parts List
1
2
5
Bolt (M6x30mm) x 2
6
Securing Bolt x 1
7
Plastic Flanged Washer x 2
8
Metal Washer x 3
9
Sleevenut x 1
Screen Mounting Pole x 1
10
Bolt (M6x25mm) x 4
11
20mm Dia Metal Washer x 4
Mounting Bracket x 1
12
4mm Allen Key x 1
13
5mm Allen Key x 1
Screen Mounting Fixings
3
4
A
M5 x 20mm Bolt x 4
B
M6 x 14mm Bolt x 4
C
M6 x 25mm Bolt x 4
D
M8 x 14mm Bolt x 4
E
M8 x 25mm Bolt x 4
F
Small Metal Washer x 4
G
Large Metal Washer x 4
H
Plastic Spacer x 4
Mounting Plate x 1
Mounting Arms x 2
2
MODEL : HYBRID 800
SCREEN MOUNTING SYSTEM
Top Tips before you start!
1. Please check that all parts are present before you start the assembly of your furniture.
2. For ease and speed of assembly, we recommend that before you commence each
step of the assembly, that you identify all the parts required for that step.
3. For larger items, please ensure that you have sufficient space and people ( as
indicated on page 1) to assemble your product safely
4. We recommend that, where possible, all items are assembled near to the area in
which they will be placed in use, to avoid moving the product unnecessarily once
assembled.
5. For the protection of your furniture, particularly items of high gloss finish, we
recommend that the product is placed on a protected surface during assembly to
prevent any damage.
6. During assembly please take care not to over-tighten any fittings, as this may
damage the product.
Care and Maintenance of your Furniture
•
•
•
•
•
•
•
•
•
Please periodically check all fittings and re-tighten as necessary.
Please do not sit or stand on this item.
Never allow any kind of liquid to remain on your furniture, Absorption can cause
wood to warp or finishes to de-laminate
Please do not drag and pull your furniture.
If the glass is chipped or broken, stop using the product and consult the
manufacturer or supplier.
Please do not place very hot or very cold items on the glass surface, unless
adequately thick table mats are used to prevent such items from coming into
contact with the glass.
Please do not use the glass as a chopping surface. Do not strike the glass with
hard or pointed items.
When cleaning glass panels use a damp cloth or leather with washing up liquid or
soft soap if necessary, do not use washing powders or any other substances
containing abrasives since these substances scratch glass.
The glass used in this product is toughened and complies with BS EN 121501:2000, clauses 8.3 & 8.4
3
MODEL : HYBRID 800
SCREEN MOUNTING SYSTEM
STEP 1
9
1x
6
8
2x
7
1x 1x
8 9
2
Fully tighten Sleevenut with
Allen Key supplied
7
1
6
The Mounting Pole is now ready to be fitted to a Hybrid Compatible unit. Please refer to
the instructions specific to the unit you wish to fit this system to for fitting instructions.
Use the M6 x 30mm Bolts (part 5) & Metal Washers (Part 8) supplied with this unit.
Once the Mounting Pole is fitted to the unit then commence to Step 2.
4
MODEL : HYBRID 800
SCREEN MOUNTING SYSTEM
NOTE : There are 2 options for mounting your TV
screen to the mounting system :
1) If your screen has 75 x 75mm, 100 x 100mm or 200 x 100mm fixing points you can mount the
screen directly to the small mounting bracket (2) (Stage 2 below).
STEP 2
PLEASE SELECT THE SCREEN MOUNTING SCREWS WITH GREAT CARE ENSURE THE BOLTS USED
ARE NOT ABLE TO PROTRUDE MORE THAN 10mm INTO THE THREADED SECTION OF THE MOUNTING
POINT IN THE BACK OF THE TV SCREEN.
Two persons are
required to fit screen
to stand
A,B or C
F
2) If your screen has larger fixing points please use the Mounting Plate (3) &
Mounting Arms (4). Refer to stages 3, 4, 5 & 6
STEP 3
PLEASE SELECT THE SCREEN MOUNTING SCREWS WITH GREAT CARE ENSURE THE BOLTS USED
ARE NOT ABLE TO PROTRUDE MORE THAN 10mm INTO THE THREADED SECTION OF THE MOUNTING
POINT IN THE BACK OF THE TV SCREEN.
1x 1x
10 11
3
5
MODEL : HYBRID 800
SCREEN MOUNTING SYSTEM
STEP 4
MOUNTING BRACKETS TO A TV SCREEN WITH A FLAT BACK
A,B,C or D
F or G
4
CREEN
FS
TOP O
MOUNTING BRACKETS TO A TV SCREEN WITH A CURVED BACK,
RECESSED INSERTS OR OTHER OBSTRUCTION
A,B,C or D
F or G
4
F
TOP O
6
N
SCREE
MODEL : HYBRID 800
SCREEN MOUNTING SYSTEM
Two persons are
required to fit screen
to stand
STEP 5
STEP 6
SECURE THE TV SCREEN BY TIGHTENING THE 2 BOLTS ON THE MOUNTING ARMS
Cables can now be routed through the
mounting pole
7