1
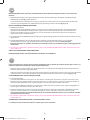
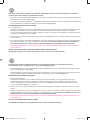
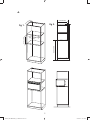
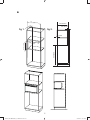
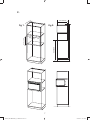
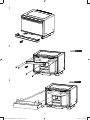
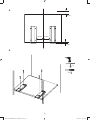
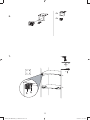
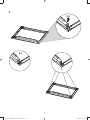
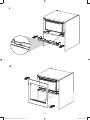
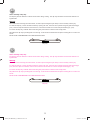
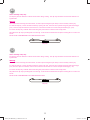
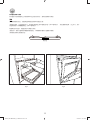
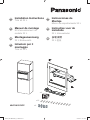
en
Installation Instructions
Trim kit 32 L
es
Instrucciones de
Montaje
Marco de empotramiento 32 L
fr
Manuel de montage
nl
Kit d’encastrement du
modèle 32 L
de
Montageanweisung
It
Istruzioni per il
montaggio
Instructies voor de
installatie
32 L Inbouwkader
zh
32 L Einbausatz.
安装说明
32 L 框架
Trim kit 32 L
x4
x12
NN-TK813CSCP
IP4704_F0313BH20BP_22_130812.indd 1
x4
2013-8-12 15:18:05
en
Microwave ovens should not be built into a unit directly above a top front venting conventional cooker. This will
invalidate your one year guarantee.
1. This trim kit can be installed into a cabinet.The cabinet opening must have the following internal dimensions as shown in
fig.1, p.5-7.
A vent is required at the rear of the cabinet it should travel the full height of the cabinet and the cabinet should not be
obstructed. Minimum dimension of vent 45 mm x 562 mm (fig.2, p.5-7).
MINIMUM INSTALLATION HEIGHT 850 MM.
2. Electrical Connections
The appliance is supplied with a mains plug attached and should only be connected into an earthed socket that has been
installed according to the relevant safety regulations.
If the plug is no longer accessible after the appliance has been built into the cabinet, a dual pole isolator must be installed
to conform to the relevant safety standards.
3. It is essential that the cabinet is fixed to the wall for stability. The shelf must be able to support a weight of 30 kg.
4. If the microwave oven is to be removed from the kitchen cabinet and used free standing, the built in parts must be
removed, and the oven returned to its original condition. Keep these installation instructions for future reference so the
installation process can be reversed.
5. The trim kit is supplied with a replacement drip tray for the oven (labelled NN-TK813CSCP), which must be used in order
for the frame to fit.
TAKE CARE NOT TO KINK OR TRAP THE MICROWAVE ELECTRICAL CABLE.
The diagram may vary from the actual unit and is only for your reference.
fr
Un four à micro-ondes ne doit pas être encastré dans une unité directement au dessus d’un four traditionnel avec
ventilation par le haut. Cela invalidera votre garantie d’un an.
1. Ce kit d’encastrement peut être encastré.L’emplacement prévu doit avoir les dimensions intérieures mentionnées dans la
fig.1, p.5-7.
Une ventilation doit être prévue à l’arrière du meuble ; elle doit couvrir toute la hauteur du meuble et ne peut en aucun cas
être obstruée. Dimensions minimales de l’espace de ventilation : 45 mm x 562 mm (fig.2, p.5-7).
LA HAUTEUR MINIMUM POUR INSTALLER LE FOUR DOIT ÊTRE DE 850 MM.
2. Branchement électrique
L’appareil est fourni avec un cordon d’alimentation et peut être connecté uniquement à une prise de courant avec mise à la
terre, conforme aux réglementations de sécurité en vigueur. Un commutateur bipolaire doit être installé conformément aux
normes de sécurité en vigueur dans le cas où la prise de courant ne serait plus accessible après l’installation de l’appareil
dans un meuble.
3. Le meuble doit être fixé solidement au mur afin d’obtenir une stabilité adéquate. la tablette inférieure du meuble doit
pouvoir supporter un poids de 30 kg.
4. Si le four à micro-ondes doit être retiré du meuble et utiliser de manière isolée, les élément ajoutés doivent être retirés et
le four remis dans son étal initial. Conservez ces instructions d’installation pour référence ultérieure de manière à
pouvoir inverser le processus d’installation.
5. The trim kit is supplied with a replacement drip tray for the oven (labelled NN-TK813CSCP), which must be used in order
for the frame to fit.
PRENDRE GARDE DE NE PAS COINCER NI ENTORTILLER LE CÂBLE ÉLECTRIQUE.
Le schéma peut différer légèrement du modèle de four en votre possession. Il vous sert seulement de référence.
1
IP4704_F0313BH20BP_22_130812.indd Sec1:1
2013-8-12 15:18:05
de
Mikrowellengeräte sollten nicht über den Abluftschlitzen eines Backofens eingebaut werden, sonst erlischt die
Garantie.
1. Dieser Einbausatz kann in einen Schrank eingebaut werden. Die Schranköffnung muss folgende Innenabmessungen
(Nischenmaß), gemäß fig.1, p.5-7. aufweisen.
Auf der Rückseite des Schranks muss ein Abzug vorhanden sein. Dieser sollte über die gesamte Höhe des Schranks
verlaufen und nicht abgedeckt sein. Mindestabmessung des Abzugs: 45 mm x 562 mm (fig.2, p.5-7).
INSTALLATIONSHÖHE: MINDESTENS 850 MM.
2. Elektrische Anschlüsse
Das Gerät ist mit einem Netzkabel versehen und sollte nur an eine Schutzkontakt-steckdose, die entsprechend den
geltenden Sicherheitsrichtlinien installiert wurde, angeschlossen werden. Wenn der Stecker nach dem Einbau des
Geräts in den Schrank nicht mehr zugänglich ist, muss ein zweipoliger Trennschalter entsprechend den geltenden
Sicherheitsvorschriften installiert werden.
3. Der Schrank muss aus Stabilitätsgründen unbedingt an der Wand befestigt werden. Der Schrank muss ein Gewicht von 30 kg
tragen können.
4. Soll das Mikrowellengerät aus dem Küchenschrank ausgebaut und frei aufgestellt werden, ist es erforderlich,
die Einbauteile zu entfernen und das Gerät wieder in den Originalzustand zu versetzen. Heben Sie diese
Einbauanweisungen zur späteren Verwendung auf, damit Sie wissen, wie der Einbauvorgang rückgängig gemacht
werden kann.
5. The trim kit is supplied with a replacement drip tray for the oven (labelled NN-TK813CSCP), which must be used in order
for the frame to fit.
KABEL NICHT EINKLEMMEN ODER ABKNICKEN.
Die Zeichnungen können vom Gerät abweichen und dienen nur als Referenz.
it
I forni a microonde non devono essere incassati direttamente sopra il sistema di areazione di alcun piano cottura. La
suddetta installazione invaliderà la copertura legata alla garanzia.
1. Il presente Trim kit essere installato in un mobile da incasso. La luce di apertura del mobile da incasso deve presentare le
dimensioni interne riportate in figura fig.1, p.5-7.
Sulla parte posteriore del mobile da incasso deve essere prevista una presa d’aria che dovrà correre per l’intera altezza del
mobile da incasso e non risultare OSTRUITA. Dimensioni minime della presa d’aria 45 mm x 562 mm (fig.2, p.5-7).
ALTEZZA MINIMA PER L’INSTALLAZIONE: 850 MM.
2. Connessioni elettriche
II presente elettrodomestico viene fornito con cavo elettrico e relativa spina, da inserire in una presa con messa a terra
installata secondo le vigenti normative di sicurezza. Nel caso in cui, dopo l’incasso, la spina non risulti più accessibile, si
dovrà provvedere all’installazione di un isolatore bipolare conforme alle vigenti normative di sicurezza.
3. Per garantire la stabilità di installazione é essenziale che il mobile da incasso sia fissato a parete. ll piano di appoggio deve
essere in grado di sostenerne un peso pari a circa 30 kg.
4. Qualora si intenda togliere il forno a microonde dal mobile da incasso della cucina componibile e installarlo in posizione
autonoma, si dovranno rimuovere i componenti impiegati per l’incasso e riportare il forno alle condizioni originali.
Conservare le presenti istruzioni di installazione per un eventuale riferimento futuro in caso si decida di installare
nuovamente ad incasso l’unità.
5. The trim kit is supplied with a replacement drip tray for the oven (labelled NN-TK813CSCP), which must be used in order
for the frame to fit.
ATTENZIONE A NON INTRAPPOLARE O ATTORCIGLIARE IL CAVO.
Lo schema può variare dall’unità reale ed è soltanto per il vostro riferimento.
2
IP4704_F0313BH20BP_22_130812.indd Sec1:2
2013-8-12 15:18:05
es
Los hornos microondas no deberían ser instalados directamente encima de una cocina tradicional de ventilación
frontal superior. Ello invalidaría la garantía del producto.
1. Este marco de empotramiento puede instalarse en un armario. La cavidad del armario debe tener las siguientes dimensiones
internas (tal como se ilustra en fig.1, p.5-7.)
Es preciso que el armario disponga de un respiradero posterior que se extienda a lo alto del armario. No debe obstruirse el
armario. Dimensiones mínimas del respiradero: 45 mm x 562 mm (fig.2, p.5-7).
ALTURA MÍNIMA DE INSTALACIÓN: 850 MM.
2. Conexión eléctrica
El aparato se suministra con enchufe de alimentación incorporado. Este enchufe deberá enchufarse únicamente a tomas
de corriente conectadas a tierra que se hayan instalado de conformidad con las normas pertinentes de seguridad.
Si no puede accederse al enchufe tras haber encastrado el aparato en el armario, debe instalarse un aislador bipolar para
cumplir la normativa pertinente de seguridad.
3. Es preciso fijar el armario a la pared para que disponga de la estabilidad adecuada. El estante debe ser capaz de sostener
un peso de 30 kg.
4. Si va a sacarse el horno microondas del armario de cocina para emplearlo como unidad de encimera, deben desmontarse
las piezas de instalación en armarios y devolverlo a su estado original. Conserve estas instrucciones de instalación
para poder consultarlas en el futuro y llevar a cabo el procedimiento de desmontaje cuando sea preciso.
5. The trim kit is supplied with a replacement drip tray for the oven (labelled NN-TK813CSCP), which must be used in order
for the frame to fit.
TENGA CUIDADO DE QUE EL CABLE NO QUEDE ATRAPADO NI RETORCIDO.
El diagrama puede tener un aspecto distinto del producto real y sirve sólo como referencia.
nl
Microgolfovens mogen niet ingebouwd worden in een eenheid direct boven een conventionele oven met
bovenventilatie aan de voorzijde. Dit zal uw 1 jaar garantie ongeldig maken.
1. Deze Inbouwkader kan in een kast geïnstalleerd worden. De kastopening dient aan de binnenzijde de afmetingen te hebben
zoals wordt weergegeven in fig.1, p.5-7.
Aan de achterzijde van de kast dient een luchtopening voorzien te zijn, die over de gehele lengte van de kast loopt en die
niet mag worden belemmerd. Minimale afmeting van de luchtopening 45 mm x 562 mm (fig.2, p.5-7).
MINIMALE INSTALLATIEHOOGTE 850 MM.
2. Elektrische aansluitingen
De apparatuur is voorzien van een stekker die alleen mag worden aangesloten op een geaard stopcontact dat in
overeenstemming met de geldende veiligheidsvoorschriften geïnstalleerd is. Als de stekker niet meer bereikbaar is
wanneer de apparatuur in de kast geïnstalleerd is, dient er een dubbelpolige isolatieschakelaar geïnstalleerd te worden
conform de geldende veiligheidsvo orschriften.
3. De kast moet voor een goede stabiliteit aan de muur worden bevestigd. De plank dient een gewicht van 30 kg te kunnen
dragen.
4. Indien de magnetronoven vanuit de keukenkast naar een open ruimte wordt verplaast, moeten de ingebouwde onderdelen
verwijderd worden en dient de oven in de originele staat teruggebracht te worden. Bewaar de installatie-instructies voor
toekomstig gebruik, zodat het installatieproces terruggedraaid kan worden.
5. The trim kit is supplied with a replacement drip tray for the oven (labelled NN-TK813CSCP), which must be used in order
for the frame to fit.
LET OP DAT DE KABEL NIET KLEMT OF KNIKT.
Het diagram kan afwijken van de eigenlijke eenheid en is alleen bedoeld als referentie.
3
IP4704_F0313BH20BP_22_130812.indd Sec1:3
2013-8-12 15:18:05
zh
1. 此专用框架可安装在开放式橱柜内。橱柜内部尺寸请参考第5-7页图1所示。
橱柜后必须预留有足够高度的通风空隙,并确保橱柜不被阻塞。最小通风尺寸为45 mm x 562 mm (第5-7页图2)。
最小安装高度为850 mm。
2. 线路
本微波炉配有一个接地插头,必须确保插在符合相应安全标准的插座上。
如果微波炉安装至橱柜后,插头不易接近原有插座时,可另行安装符合相应安全标准的插座。
3. 确保有足够稳定性的开放式橱柜,并且能支撑30千克的载重。
4. 如果要将微波炉从橱柜内取出置放在桌上使用,必须去除专用框架部件使微波炉恢复到原来的状态。请妥善保存此安装说明
书以备查阅。
5. 微波炉安装至橱柜后,请替换专用积水盘(贴有标签NN-TK813CSCP)。
不可扭曲或缠绕电线。
图标与实际产品可能有不同,仅供参考。
4
IP4704_F0313BH20BP_22_130812.indd Sec1:4
2013-8-12 15:18:05
A.
mi
5
n4
min 550 mm
mm
fig 2.
5 6 2 + 8 mm
0 mm
min 850 mm
479 ± 2 mm
fig 1.
min 45 mm
5
IP4704_F0313BH20BP_22_130812.indd Sec1:5
2013-8-12 15:18:05
B.
min 598
fig 1.
mi
n4
5
mm
min 566 mm
mm
min 45 mm
fig 2.
5 6 2 + 8 mm
0 mm
min 850 mm
479 ± 2 mm
16 mm
6
IP4704_F0313BH20BP_22_130812.indd Sec1:6
2013-8-12 15:18:05
C.
min 550 mm
mm
min 45 mm
fig 2.
5 6 2 + 8 mm
0 mm
min 850 mm
479 ± 2 mm
fig 1.
mi
5
n4
7
IP4704_F0313BH20BP_22_130812.indd Sec1:7
2013-8-12 15:18:05
1
2
3
8
IP4704_F0313BH20BP_22_130812.indd Sec1:8
2013-8-12 15:18:06
4.
45 mm
142 mm
142 mm
5 mm
5.
ø2
2x
2x
9
IP4704_F0313BH20BP_22_130812.indd Sec1:9
2013-8-12 15:18:06
4x
6.
4x
7.
ø2
8x
2X
2X
2X
2X
10
IP4704_F0313BH20BP_22_130812.indd Sec1:10
2013-8-12 15:18:06
8.
8-1
8-2
4X
11
IP4704_F0313BH20BP_22_130812.indd Sec1:11
2013-8-12 15:18:06
9.
NNTK8
13C
SCP
10.
12
IP4704_F0313BH20BP_22_130812.indd Sec1:12
2013-8-12 15:18:06
en
Care & cleaning of drip tray
The drip tray must be fitted as it collects excess water during cooking. The drip tray should be removed and cleaned on a
regular basis.
Warning
Use caution when removing the trim kit frame, as some exposed edges may be sharp to touch and may cause injury.
To clean the drip tray, remove the trim kit frame by opening the door, hold onto the top frame and gently pull forward (fig.3,
p.16). Once the clips are released, close the door, hold onto the bottom two corners and pull forward (fig.4, p.16).
To remove the drip tray, hold with both hands and gently ease forward. Wash in warm soapy water.
Re-position the drip tray by clicking back onto the legs. Push the trim kit frame back into place ensuring all four corners are
secure.
DO NOT USE A DISHWASHER TO CLEAN THE DRIP TRAY.
NN-TK813CSCP
Drip tray
fr
Care & cleaning of drip tray
The drip tray must be fitted as it collects excess water during cooking. The drip tray should be removed and cleaned on a
regular basis.
Warning
Use caution when removing the trim kit frame, as some exposed edges may be sharp to touch and may cause injury.
To clean the drip tray, remove the trim kit frame by opening the door, hold onto the top frame and gently pull forward (fig.3,
p.16). Once the clips are released, close the door, hold onto the bottom two corners and pull forward (fig.4, p.16).
To remove the drip tray, hold with both hands and gently ease forward. Wash in warm soapy water.
Re-position the drip tray by clicking back onto the legs. Push the trim kit frame back into place ensuring all four corners are
secure.
DO NOT USE A DISHWASHER TO CLEAN THE DRIP TRAY.
NN-TK813CSCP
Drip tray
13
IP4704_F0313BH20BP_22_130812.indd Sec1:13
2013-8-12 15:18:06
de
Care & cleaning of drip tray
The drip tray must be fitted as it collects excess water during cooking. The drip tray should be removed and cleaned on a
regular basis.
Warning
Use caution when removing the trim kit frame, as some exposed edges may be sharp to touch and may cause injury.
To clean the drip tray, remove the trim kit frame by opening the door, hold onto the top frame and gently pull forward (fig.3,
p.16). Once the clips are released, close the door, hold onto the bottom two corners and pull forward (fig.4, p.16).
To remove the drip tray, hold with both hands and gently ease forward. Wash in warm soapy water.
Re-position the drip tray by clicking back onto the legs. Push the trim kit frame back into place ensuring all four corners are
secure.
DO NOT USE A DISHWASHER TO CLEAN THE DRIP TRAY.
NN-TK813CSCP
Drip tray
it
Care & cleaning of drip tray
The drip tray must be fitted as it collects excess water during cooking. The drip tray should be removed and cleaned on a
regular basis.
Warning
Use caution when removing the trim kit frame, as some exposed edges may be sharp to touch and may cause injury.
To clean the drip tray, remove the trim kit frame by opening the door, hold onto the top frame and gently pull forward (fig.3,
p.16). Once the clips are released, close the door, hold onto the bottom two corners and pull forward (fig.4, p.16).
To remove the drip tray, hold with both hands and gently ease forward. Wash in warm soapy water.
Re-position the drip tray by clicking back onto the legs. Push the trim kit frame back into place ensuring all four corners are
secure.
DO NOT USE A DISHWASHER TO CLEAN THE DRIP TRAY.
NN-TK813CSCP
Drip tray
14
IP4704_F0313BH20BP_22_130812.indd Sec1:14
2013-8-12 15:18:06
es
Care & cleaning of drip tray
The drip tray must be fitted as it collects excess water during cooking. The drip tray should be removed and cleaned on a
regular basis.
Warning
Use caution when removing the trim kit frame, as some exposed edges may be sharp to touch and may cause injury.
To clean the drip tray, remove the trim kit frame by opening the door, hold onto the top frame and gently pull forward (fig.3,
p.16). Once the clips are released, close the door, hold onto the bottom two corners and pull forward (fig.4, p.16).
To remove the drip tray, hold with both hands and gently ease forward. Wash in warm soapy water.
Re-position the drip tray by clicking back onto the legs. Push the trim kit frame back into place ensuring all four corners are
secure.
DO NOT USE A DISHWASHER TO CLEAN THE DRIP TRAY.
NN-TK813CSCP
Drip tray
nl
Care & cleaning of drip tray
The drip tray must be fitted as it collects excess water during cooking. The drip tray should be removed and cleaned on a
regular basis.
Warning
Use caution when removing the trim kit frame, as some exposed edges may be sharp to touch and may cause injury.
To clean the drip tray, remove the trim kit frame by opening the door, hold onto the top frame and gently pull forward (fig.3,
p.16). Once the clips are released, close the door, hold onto the bottom two corners and pull forward (fig.4, p.16).
To remove the drip tray, hold with both hands and gently ease forward. Wash in warm soapy water.
Re-position the drip tray by clicking back onto the legs. Push the trim kit frame back into place ensuring all four corners are
secure.
DO NOT USE A DISHWASHER TO CLEAN THE DRIP TRAY.
NN-TK813CSCP
Drip tray
15
IP4704_F0313BH20BP_22_130812.indd Sec1:15
2013-8-12 15:18:06
zh
积水盘的保养与清洁
积水盘用于收集微波炉工作时食物中产生的多余的水分,要求定期拆卸并清洁。
警告
拆除装饰板时请当心,接触某些锋利的边缘时有可能会受伤。
清洁积水盘时,先打开微波炉门,双手握住装饰板上部并轻轻往外拉(如P16图3所示),待连接插件脱离,关上炉门,双手
按住装饰板下方两侧缓慢取出(如P16图4所示)。
轻轻取出积水盘后,用温肥皂水对其进行清洗。
清洁完毕,将积水盘和装饰板重新装回原位,并确保装饰板四个连接插件紧固。
请勿使用洗碗机清洗滴水盘。
NN-TK813CSCP
积水盘
fig.3
fig.4
16
IP4704_F0313BH20BP_22_130812.indd Sec1:16
2013-8-12 15:18:06
Panasonic Corporation
Web Site: http://panasonic.net
© Panasonic Corporation 2013
IP4704_F0313BH20BP_22_130812.indd Sec1:17
F0313BH20BP
IP0813-0
Printed in China
2013-8-12 15:18:06