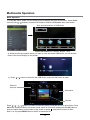
1
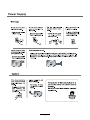
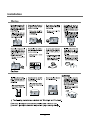
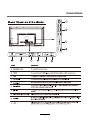
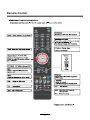
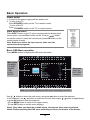
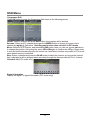
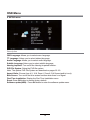
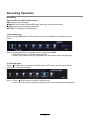
42" 4K ULTRA HD LED TV
Contents
Caution
Safety Information
1
2
Names of earch Part
6
Connections
7
Remote Control
8-9
Basic Operation
10
OSD Menu
1. Channel menu
2. Picture menu
3. Sound menu
4. Time menu
5. Look menu
5. Setup menu
11-18
11-12
13
14
15
16
18
Multimedia Operation
Recording Operation
Maintenance and Service
Specifications
Safty Warnings
19-21
22-23
24
25
26-28
Power Supply
1
Installation
2
Use and Maintenance
3
Important Safety Instructions
4
Important Safety Instructions
5
Names of each part
Front View
SOURCE
MENU
CH+
CHVOL+
VOLSTANDBY
LED
1). (IR) Infrared Receiver: Receives IR signals from the remote control.
(Power on/Standby)LED Indicator: Press
(POWER) to turn on and off.
Indicator on(Red)
Indicator on(Green)
Standby mode
Power on mode
SOURCE: Press to display the input source menu.
MENU: Press to display the OSD menu, press again to exit the menu.
CH+/-: Press to scan through channels.
VOL+/-: Press to adjust the volume.
STANDBY: Turn on/standby theTV set.
4pcs x M4 x 12
User’s Guide
Remote Control
Batteries
6
Connections
7
Remote Control
8
Remote Control
9
Basic Operation
Power on/off
1. Connect to the power supply with the power cord.
2. -To turn on the TV
Press STANDBY button on the TV or remote control.
-To turn off theTV
Press STANDBY button on the TV or remote control.
Input Source select
Press INPUT button on the TV set or remote control to display input
source menu, and use CH+/- button on the TV set or
button
on remote control to select the input source, press OK button on the
remote control to enter.
Note: Before you select the input source, make sure the
connections are prepared.
Basic OSD Menu operation
Press MENU button to display the OSD menu as below:
Main menu
CHANNEL
PICTURE
SOUND
TIME
LOCK
SETUP
Submenu
menu for
(PICTURE
example)
Hint---you should operate the OSD menu according to the hint.
Use /
button to select the main menu, and press
button to enter the submenu.
button to select the function item, press / button to adjust/setup,
In the submenu, use /
or press OK button to enter the submenu.
* (Press MENU button to return to the upper menu.)
* (Press EXIT button to exit the menu display.)
Note1: Only when you input the suitable signal, the relevant items can be activated
Note2: Please operating the OSD menu according to hint on the bottom of the banner .
10
OSD Menu
1. CHANNEL menu
Description
Auto Tuning
Press OK button to enter the hint menu, and Press
/
button to select the Tune Type, then press button, and use
/ / / button to select the Country for the TV, then
press OK button to start auto tuning.
ATV Manual Tuning
Press OK button to enter the ATV Manual Tuning menu.
Current CH: Select a Channel for storing the programme.
Color System: Select from PAL AUTO and SECAM.
Sound System: Select from I, BG, DK
Fine Tune: Press / button to fine-tune.
AFC: Automatic Frequency control ON/OFF.
Search: Press / button to manual search.
DTV Manual Tuning
Press OK button to enter the DTV Manual Tuning
menu, select a DTV channel, and press OK button
to start searching.
11
OSD Menu
Programme Edit
Press OK button to enter the Programme Edit menu as the following picture.
Delete: Select a channel and press RED button, the program will be deleted.
Rename: Select an ATV channel and press the GREEN button to change the name of the
channel by
buttons. Note:Rename function does not work in DTV mode.
and
buttons
Move: Select an ATV channel, and press YELLOW button, then you can use
to change the position of the program, press YELLOW again to confirm the change. Press menu
to exit and it will automatically save the current set. Note:Move function only works in DTV mode
when default country is selected.
Skip: Select a channel and press the BLUE button to label the channel, as long as the channel
has a skip label it will be skipped when searching through the channels with the CH+/- buttons.
Schedule list (DTV mode only)
Hint---you should operate according to the hint.
Signal Information
Display the digital TV-signal information (DTV mode only).
12
OSD Menu
2. PICTURE menu
Description
Picture Mode: Choose from Standard, Dynamic, Personal and Mild.
Note: Contrast, Brightness, Colour and sharpness are only available and can be adjusted
in the User mode option in the Picture Mode Settings.
Contrast: Controls the difference between the brightest and darkest regions of the picture.
Brightness: Controls the overall brightness of the picture.
Colour:Control the color.
Tint: Controls the tint ( NTSC mode only).
Sharpness: Increase this setting to see crisp edges in the picture; decrease it for soft edges.
Colour Temperature: Choose from Cool, Normal and Warm.
Noise Reduction: Choose interference noise modes form Off, Low, Middle, High and Default.
120Hz Mode: Turn ON/Off the 120Hz mode.
13
OSD Menu
3. SOUND menu
Description
Sound Mode: Allows you to select among: Standard, Music, Movie, Sports and Personal.
Treble(Can be adjusted when the sound mode is Personal) : Controls the relative intensity of
higher pitched sounds.
Bass (Can be adjusted when the sound mode is set to Personal): Controls the relative intensity
of lower pitched sounds.
Balance: To adjust the balance of the left and right sound track, or turn off the volume of the
left and right sound track.
Auto Volume: Control the volume of the programme automatically when you turn on the function
by selecting “On”.
SPDIF MODE: Select the spdif mode.
AD Switch: Turn on/off the AD switch.
14
OSD Menu
4. TIME menu
Description
Clock: Display the time.
Time Zone: Allows you to select the time zone.
Sleep Timer: Allows you to setup the sleep timer among: 10min, 20min, 30min, 60min, 90min,
120min,180min, 240min and off.
Auto Standby : According to the latest ERP regulation, this unit will switch off itself automatically
if no change in status within the last sereral 4 hours of operation. You can choose 4H, 6H, 8H,
or Never.
OSD Timer: Allows you to select the time for OSD menu displays on the screen.
15
OSD Menu
5. LOCK menu
Description
Lock System: Turn on/off the Lock System function.
Note: You should enter the code to operate the menu (original code is 1234).
Set Password: Set pin code. If the Pin code has been changed you must enter the
present code.
New : Enter the new password.
Confirm: Enter the new password.
Block Program: You must enter the password to view channels that have been locked. Use
and
buttons to select the channel and press the GREEN button on the remote control to
lock the channel.
Parental Guidance: Allows you to select the Parental Guidance mode.
Key Lock: Lock the buttons on the TV set when you turn on the function.
16
OSD Menu
L
L
Source Lock:
V
A
V
Default Volume: Set the default volume when the program is on.
MAX V
Y
r
Import Database: Import all Hotel Settings from the USB device.
Export Database : Export all Hotel Settings to the USB device.
Clear Lock: Clear all the locks above, it means set all the locks to
OFF and max volume to 100.
17
OSD Menu
6. SETUP menu
Description
OSD Language: Allows you to select menu language.
TT Language: Allows you to select teletext language.
Audio Language: Allows you to select audio language.
Subtitle Language: Allows you to select subtitle language.
Hearing Impaired: Turn on/off the Hearing Impaired function.
PVR File System: Setup the PVR file system.
Note: The options PVR File System are described on pages 22 -23.
Aspect Ratio: Choose from 4:3, 16:9, Zoom1, Zoom2, Full Screen(potit to invot).
Blue Screen: Turn on/off the blue screen function when there’s no signal.
First Time Installation: Display the First Time Installation menu.
Reset: Press OK button to restore factory default.
Software update(USB): Press OK button to enter the software update menu.
18
Multimedia Operation
Basic Operation
1). Press the INPUT button on the remote control to display the input source menu, select Media
source by the /
buttons, and press OK button to enter the Multimedia menu seen below.
Hints and informations of USB device
MAINS MENU: PHOTO MUSIC MOVIE TEXT
2). Select the file type (mains menu) you want to view, and insert USB device, you will find the
name of the device display on the screen.
3). Press
/
button to select the the USB device, and press OK button to enter.
Return to
previous menu
Information
Preview
EXIT
Press /
/
/
buttons to select and the OK button to activate the file or open folder. Press
OK button to play the files in full screen mode. When in full screen mode press the OK button to
show the option menu on the bottom of the screen or press
stop button to return to files.
Note: You can press RED button on the file to delete the file.
19
Multimedia Operation
1. Photo
Photo viewing
Press / button to select the option on the menu, and press OK button to change.
Pause: Play/pause the photo view.
Prev./Next: View the previous/next photo.
Stop: Stop the photo view.
Repeat: Select the repeat mode from Repeat All, Repeat 1, Repeat None.
Music: Play/Pause the music.
Playlist: Display the playlist on the screen and play the file by
/
button and OK button, you can
press button to select “CANCEL”, and press OK button to cancel the list displaying.
Info: Display the information of the file.
Rotate: Rotate the photo clockwise/counterclockwise.
Zoom Out/In: Zoom out/in the photo.
Move View: Move the photo in Zoom in mode.
2. Music
Play the music
Press / button to select the option on the menu, and press OK button to change.
Pause: Play/pause the music.
FB/FF: Fast backward/fast forward.
Prev./Next: Play the previous/next file.
Stop: Stop the music.
Repeat: Select the repeat mode from Repeat All, Repeat 1, Repeat None.
Mute: Mute the sound.
Playlist: Display the playlist on the screen and play the file by / button and OK button, you can
press button to select “CANCEL”, and press OK button to cancel the list displaying or press the “list”
button.
Info: Press “INFO” button to display the information of the file.
Goto Time: Play the music from the time you set.
20
Multimedia Operation
Multimedia Operation
3. Movie
Play the movie
Press / button to select the option on the menu, and press OK button to change.
Pause: Play/pause the music.
FB/FF: Fast backward/fast forward.
Prev./Next: Play the previous/next file.
Stop: Stop the movie.
Char Set: Select a suitable character library of the subtitle of the movie that you are viewing
such as Western Europe(Windows).
Repeat: Select the repeat mode from Repeat All, Repeat 1, Repeat None.
Set A-B: Select and play the preferable part of the file by setting A and B at the beginning and end.
Press OK button to cancel.
Playlist: Display the playlist on the screen.
Info: Display the information of the movie.
Slow Forward: Play the movies at slow speed, press
button to cancel.
Step Forward: Step quickly through the movie by using this option
Goto Time: Program the movie form the time you set.
Zoom out/in: Zoom out/in the movie screen.
Aspect Ratio: Select the aspect ratio of the screen display.
Move View: Move the photo in Zoom in mode.
4. Text
View the text
Press / button to select the option on the menu, and press OK button to change.
Previous/Next page: Turn to previous/next page of the text.
Prev./Next: Turn to previous/next file.
Stop: Stop auto turning pages.
Char Set: Select a suitable character library of the Text file that you are viewing, such as
Western Europe (Windows).
Music: Play/pause the music programme.
Playlist: Display the playlist on the screen.
Info: Display the information of the text.
21
Recording Operation
PVR settings
1. PVR File System
Press the MENU button, select SETUP menu, and select “PVR File System”, then press OK
button to enter the setting menu.
Please check whether your USB device works or not before recording.
Select Disc: Select the device for the Record files.
Check PVR File System: Check the system.
USB Disc: Display the USB state.
Format: Format the USB device for PVR operating.
Time Shift Size: Display the size of the USB device (The device has been formated).
Speed: Display the speed of the USB device (The device has been formated).
Free Record Limit: Display the Free Record Limit state.
2. Recorder
Press REC LIST button on the remote control to display the recorder menu in DTV mode as below.
Note: Select a recorded programme, and press OK button to playback.
Note: You can delete a recorded programme by pressing the RED delete button.
Note: You can press </> to choose REC LIST and Schedule List.
22
Recording Operation
Recording
Record and Time shift function buttons
REC: Press to start recording.
PAUSE: Press to enter the timeshift mode, press play to play the recording.
Stop: Press to stop recording or timeshift.
REC LIST: To display the recorder menu.
1) Recording menu
When you press REC button in DTV mode, the screen will display the recording menu as
below:
Note: a. Display and Exit the navigation menu by pressing the REC .
b. Press STOP button to exit the recording mode.
c. Press PLAY button to play the programme you are recording from the beginning.
2) Timeshift menu
Press PAUSE button to enter the Timeshift mode in DTV mode, and the picture will be
paused, the recording will begin.
Note: a. Press
b. Press
STOP button to exit the Timeshift mode.
PLAY button to play the programme you are recording from the beginning.
23
Maintenance and Service
Simple Troubleshooting
If the display fails or performance dramatically deteriorates, check the display in accordance
with the following instructions. Remember to check the peripherals to pin point the source of
the failure. If the display still fails to perform as expected, please contact the store where the
product was purchased.
No Power
- Check all connections to the TV.
- Press either the power button or the Standby button on the Remote control.
No Picture or Sound
- Ensure that the TV is plugged in and the power is on.
- Ensure that the aerial is connected.
- Try a different program.
Poor Picture Quality
- Check the aerial connections.
- Check that the channel is tuned in properly.
- Adjust the picture settings: Brightness, color, sharpness, contrast, hue.
- Make sure that the TV is not located close to electrical appliances that
may emit radio frequency interference.
No colour
- Adjust the color setting.
- Check that the programme is broadcast in color.
- Check that the channel is tuned properly.
TV does not respond to remote control
- Check that there are no obstructions between the remote control and the unit.
- Check that the remote control is within range of the unit.
- Check that the batteries in the remote control and not weak or exhausted.
This TV is for household use and registered as harmless on electromagnetic waves.
Therefore, you can use it in every location as well as residential areas.
24
Specifications
42 inch LED Panel
3840 (H) x 2160 (V) pixels
300
5000:1
AC 100-240V~ 50Hz/60Hz
Approx. 106cm(42 inch)
65W
Operating Power Consumption
95 kWh
0.5W
200 x 200mm/MB6X10
8W + 8W
947 x 75 x 554 mm
947 x 235 x 592 mm
8.14Kg
25
26
27
28