1
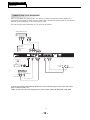
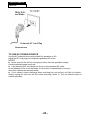
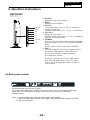
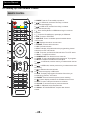
Service Manual
Model No.:
5. Installation Instructions
5-1 External Equipment Connections
Accessories
Remote Control
User GUIDE
Battery
Antenna Connection
Connect one end of a coaxial cable (not included) to the ANT IN jack on the back of
your TV/DVD combo, then connect the other end of the cable into the antenna or cable
TV wall outlet.
To improve picture quality from an antenna in a poor signal area, install a signal
amplifier.
If you need to split the antenna signal to connect two TVs, install a two-way splitter.
- 18 -
Service Manual
Model No.:
CONNECTING TO AV EQUIPMENT
This TV provides one group of AV, one group of YPbPr (component video) inputs for
convenient connection to VCR, DVD or other video equipment. Please refer to the owner's
manual of the equipment to be connected as well.
You can use the input terminals on TV set rear as follows.
VIDEO EQUIPMENT with YPbPr
G
B
R
W
R
Y Yellow (video)
W White(audio L)
R Red(audio R or Pr)
B Blue(Pb)
G
G Green(Y)
R
B
R
W
HDMI INPUT
Pr
Pb
L
AV OUTPUT
PC
AUDIO INPUT
RF INPUT
AV
AV
Y
L
R
R
W
R
W
R
HDMI
TO VIDEO
INPUTS
W
R
TO AUDIO INPUTS
VIDEO EQUIPMENT
W
R
TO VIDEO output
To audio outputs
It can be connected to the following appliances: VCR, multi disc player, DVD, camcorder, video
game or stereo system, etc.....
YPbPr (component video) can support these video formats: 480i,576i,480p,576p,720p,1080i.
-8-
- 19 -
Service Manual
Model No.:
CONNECTING TO PC
STEPS:
Be sure both the TV and computer are set to Power off.
1.Connect VGA and audio cable.
2.Connect the power cord.
3.Power on the TV, switch the input source to VGA mode.
4.Power on the PC.
This sequence is very important.
HDMI INPUT
Pr
Pb
L
AV
Y
R
AV OUTPUT
PC
AUDIO INPUT
RF INPUT
AV
L
R
PRESET MODE
RESOLUTION
V.Freq.(Hz)
H.Freq.(KHz)
1
720*400
70
31.47
2
640*480
60
31.47
3
800*600
56
35.156
4
800*600
60
37.88
5
800*600
72
48.08
6
1024*768
60
48.36
7
1024*768
70
56.48
- 20 -
Service Manual
Model No.:
5-2 HDMI Connections
When the source device(DVD player or Set Top Box) supports HDM
How To Connect
1. Connect the source device to HDMI port of this TV with an HDMI cable(not supplied
with this product).
2. No separated audio connection is necessary.
How To Use
If the source device supports Auto HDMI function, the output resolution of the source
device will be automatically
set to 1280x720p.
If the source device does not support Auto HDMI, you need to set the output resolution
appropriately.
To get the best picture quality, adjust the output resolution of the source device to
1280x720p.
Select HDMI input source in input source option of Select Main source menu.
When the source device(DVD player or Set Top Box) supports DVI
How To Connect
1. Connect the source device to HDMI port of this TV with a HDMI-to-DVI cable(not
supplied with this product).
2. A separated audio connection is necessary.
3. If the source device has an analog audio output connector, connect the source device
audio output to DVI Audio In port located on the PC port.
How To Use
If the source device supports Auto DVI function, the output resolution of the source device
will be automatically
set to 1280x720p.
If the source device does not support Auto DVI, you need to set the output resolution
appropriately.
To get the best picture quality, adjust the output resolution of the source device to
1280x720p.
Press the INPUT button to select HDMI input source in input source option of Select Main
source menu.
Installation
- 21 -
Service Manual
Model No.:
Cable sample
HDMI Cable
(not supplied with the product)
HDMI to DVI Cable
( not supplied with the product)
Analog Audio Cable
(Stereo to RCA type)
(not supplied with the product)
- 22 -
Service Manual
Model No.:
Power source
TO USE AC POWER SOURCE
Use the AC polarized line cord provided for operation on AC.
Insert the AC cord plug into a standard polarized AC outlet.
NOTES:
■ Never connect the AC line cord plug to other than the specified voltage.
Use the attached power cord only.
■ If the polarized AC cord does not fit into a non-polarized AC outlet,
do not attempt to file or cut the blade. It is the user`s responsibility to have an
electrician replace the obsolete outlet.
■ If you cause a static discharge when touching the unit and the unit fails to function,
simply unplug the unit from the AC outlet and plug it back in. The unit should return to
normal operation.
- 23 -
Service Manual
Model No.:
6. Operation Instructions
KEY BOARD
SOURCE
MENU
CH+
CHVOL+
VOLSTANDBY
USB
1. SOURCE:
Displays the input source Menu.
2. MENU:
Displays the main MENU.
3. CH+/CHIn TV mode, press "CH+" or "CH-" to change the
channel up and down.
In MENU mode, press "CH+" or "CH-" to select items.
4. VOL+/VOLAdjusts the sound level.
In MENU mode, press "VOL+" or "VOL-" to adjust the
item that you have selected.
5. STANDBY
Once the TV's main power switch has been activated,
press this button to turn the unit ON from STANDBY
mode.
Press it again to turn the set back to STANDBY.
6. USB
The USB memory stick should be plugged into the
unit directly. USB extension cables should not
be used to avoid failing of data transferring
and interference caused.
To access or play the files on your USB memory
stick using this USB socket on your TV, please
refer to use of the Applications Menu on page 17
of this manual.
6.2 Back panel controls
HDMI INPUT
Pr
Pb
L
AV OUTPUT
PC
AUDIO INPUT
RF INPUT
AV
AV
Y
L
R
R
All the terminals are (from left to right):
AC Power input, HDMI input, YPbPr (component video) input, AV composite video input,
Audio input, PC Audio input, AV output (composite video and audio), VGA input,
Antenna socket.
.
Note:
1. AV and YPbPr inputs share the Rear Audio input channel.
2. When the HDMI port receives a DVI signal, the matching audio signal is received
by the PC Audio input.
- 24 -
Service Manual
Model No.:
03 Remote control
6-3 Setting Up Your Remote Control
REMOTE CONTROL
1
16
2
17
3
18
4
19
5
20
21
FREEZE
6
7
22
8
23
9
10
24
11
12
13
CH
VOL
25
REP
26
14
15
27
1:POWER:To set the TV to standby or power on.
2:
:In USB mode, used as reverse key, in teletext
mode used as subpage key.
3:
: In USB mode, used as forword key, in teletext
mode used as reveal key.
4: : Press the Play Button in USB Mode to begin or continue
Playback.
5: : Press the Pause Button to pause play in USB Mode.
6:TEXT:To enter or TELETEXT.
7: SUBTITLE: To turn on subtitles press the subtitle button
in DTV mode.
8:
: Displays the main on-screen menu.
9 :CURSOR: To move within the menu.
10:OK: Confirms selection.
11: EPG: To display information about the program being viewed
and what's on next in DTV mode.
12:FAV: To access your favourite channels list in TV or DTV mode.
13:VOL+/- : To adjust sound level.
14:NUMERIC KEY: For direct access to channels.
15:AUDIO: To select the available audio language of TV programs .
16:MUTE: To disable or enable the sound output.
17:
: In USB mode, used as next key, in teletext mode used as
list key.
18:
: In USB mode, used as previous key, in teletext mode used
as hold key.
19: :In teletext mode used as index.
20: : Press to stop play in USB mode.
21:INFO: To display the program information of the show you
are watching, press the info button.
22:FREEZE: Press to freeze the picture you are watching.
23: : Press to display and select the available video sources.
24:EXIT: To return to the previous menu or exit menu.
25:CH+/CH-: To access the next or previous channels.
26:REP: In USB mode,select Repeat mode.
27:RECALL: DTV Mode:RECALL:Jumps to last channel
viewed.
- 25 -
Service Manual
Model No.:
TELETEXT
Teletext is an information system broadcast by certain channels which can be
consulted like a newspaper. It also offers access to subtitles for viewers with hearing
problems or who are not familiar with the transmission language (cable networks,
satellite channels, etc.)
Press:
TEXT
You will obtain:
This is used to call or exit teletext modes. The summary appears with
a list of items that can be accessed. Each item has a corresponding
3 digit page number. If the channel selected does not broadcast
teletext, the indication 100 will be displayed and the screen will
remain blank (in this case, exit teletext and select another channel).
Enter the number of the page required using the 0 to 9 up/down.
SELECTING A PAGE Example: page 120, enter 120. The number is displayed top left, the
counter turns and then the page is displayed. Repeat this operation to
view another page. If the counter continues to search, this means
that the page is not transmitted. Select another number.
DIRECT ACCESS
TO THE ITEMS
INDEX
SUB PAGE
HOLD
REVEAL
LIST
Coloured buttons correspond to the colours at the bottom of the
screen. The 4 coloured keys are used to access the items or
corresponding pages. The coloured areas flash when the item or the
page is not yet available.
This returns to the contents page (usually page 100).
Certain pages contain sub-pages which are automatically
displayed successively. This key is used to stop or resume subpage acquisition. The indication appears top left.
To freeze the page.
To display or hide the concealed information (games solutions).
The user can set four favourite pages to be directly linked to the four
color keys. While list mode is activated, it is not possibility to use TOP
or FLOF navigation with the colourkeys. The favourite page numbers
should be stored and restored to/from nonvolatile memory for each
channel by the system software.
Service Manual
Model No.:
04 OPERATION
and Adjustments
8. Measurements
.
Installation Guide
Channel Tuning
TV : 0 Programme(s)
DTV : 0 Programme(s)
Radio : 0 Programme(s)
Data: 0 Programme(s)
Please select an OSD Language
Cesky
English
Dansk
Espanol
Hrvatski
Nederlands Portugues
Deutsch
E
Italiano
Norsk
Fran ais Magyar
~
ka
Polski
96%
Pycck
OK
UHF CH 68 DTV
NOTE:
All the channels including ATV, DTV and Radio
can be tuning by one time,if the Tune Type is
DTV+ATV .
All the stored channels will be disappear after
auto tuning .
Country
Norway
Rumania
Slovenia Switzerland
Morocco
Poland
Russian
Spain
UK
Tunis
Portugal
Serbia
Sweden
NewZealand
Algeria
After auto tuning , the channel will turn to
the first DTV channel.
OK
2).DTV Manual tuning:
You can select a DTV channel then find the
program in this channel.
This screen only appear when the TV first time
turn on or reset to factory set.You can choose
language and country, auto turning programs .
And after turning the screen will skip to the first
DTV program.
to select the channel , then press
Pls press
OK to search the programs .
NOTE:
Bad Normal Good means signal intensity.
1.CHANNEL MENU
The first item of the MENU is channel menu( for
TV or DTV source only).
_
DTV Manual Tuning
VHF CH
+
5
Auto Tuning
<
CHANNEL
DTV Manual Tuning
ATV Manual Tuning
Programme Edit
Signal Information
>
CI Information
Software Update(OAD)Off
Software Update(USB)
Press OK to search
Bad
You can search channels and edit programs here.
1).Auto tuning:
Search all the channels automatically(you can
select ATV and DTV)
Germany
Italy
Greece
Luxembourg
Poland
Hungary
Netherlands
Portugal
_
ATV Manual Tuning
Storage To 1
+
System BG
Norway
Current CH 1
Search
MENU
Fine-Tune
Frequency 255.25 MHz
to select country at first , then
Pls press
press OK button to start auto tuning .
P.13
Good
3). ATV Manual tuning :
You can change the sound system to search
the analog TV channels and fine tune the
channels , then storage the channels you
selected.
DTV+ATV
Tune Type
Nomal
Save
MENU
BUSH|Full HD 1080p LCD TV | User Manual | Helpline:0845 604 0105
- 39-
Service Manual
Model No.:
NOTE:
Picture Mode Standard
Press teletext red button to storage the channels
after manual tuning .
Color Temperature
Aspect Ratio
4). Program edit:
You can Delete ,Rename ,Move, Skip , FAV any
programs.
<
Delete
PICTURE
Picture Mode
Press teletext red button , the program in cursor
will delete.
Standard
Noise Reduction
Screen
>
Color Temperature
Contrast 82
Red 40
Brightness 50
Green 31
Color 50
Blue 50
Medium
Sharpness 50
Rename:
Tint 50
Only can rename ATV programs .
Move the cursor to the program, press teletext
green button to rename the program.
Press
to choose the character. Press
to
move the cursor .
Press MENU button to exit edit , Press EXIT to
exit the menu.
Note: ATV programs name only can be 5 character,
DTV programs name can be 25 character.
MENU
MENU
NOTE:
1).Tint is available in NTSC system only.
2).There are four colors temperature modes
can be selected medium, warm, cool,user
3).Screen is available in PC mode only which,
can adjust Horizontal position, vertical
position, size and phase.
The third item of the MENU is the SOUND
MENU.
You can adjust the sound effect here such as
treble, bass, balance etc.
Press
to move, press OK to adjust.
Press
to choose the program , press teletext
blue button to skip this program, The
will
show on the right side of the program .
Choose the skipped program, press blue button
again , you can cancel the skip ,The
will
disappear .
Sound Mode Standard
<
Balance
Auto Volume
>
SOUND
Favourite
Note:
Auto volume: only available when the input
signal volume is too large or distortion.
Press
to choose the program , press FAV
button , it will show
on the right side of the
program.Choose the FAV program , press
FAV button again , you can cancel the FAV,
the will disappear .
4.TIME MENU
The forth item of the menu is the TIME MENU
You can adjust the clock, power on/off time,
sleep time etc Press
to move, press OK to
adjust
Once your favorite group is created, you can
press the FAV key to quickly access your favorite
channel.
5). CI information: (optional)
This menu can display the CI card' s information.
2. PICTURE MENU
<
The second item of the MENU is PICTURE MENU.
You can adjust picture effect here, such as
contrast, brightness, etc.
Press
to move, press OK to adjust.
TIME
Clock -- -- -Off Time
On Time
Sleep Timer
Auto Sleep
Time Zone
--
>
NOTE:
Within 15 minutes there is no signal, the TV
will auto sleep , if Auto Sleep is set ON. The
clock time can get from the DTV system auto.
BUSH|Full HD 1080p LCD TV | User Manual | Helpline:0845 604 0105
- 40 -
P.14
04 Operation
3.SOUND MENU
Use the Arrow Buttons to select the channel you
wish to move. Then press the Yellow Button to
select Move function. Once active, enter the
number button and then press OK to confirm.
Service Manual
Model No.:
7.EPG Menu(Electronic Program
Guide).
5.OPTION MENU
The fifth item of the MENU is the OPTION
MENU. You can adjust the Menu language,
Audio language,Subtitle language etc.
The EPG menu is used to look at what is being
broadcasted on DTV or Radio channel in the day.
To access the EPG menu, press the EPG
botton,the following menu will be displayed:
OSD Language English
Audio Languages English
< OPTION
Subtitle Languages English
Country UK
Restore Factory Default
PROGRAMME GUIDE
28 Apr 04:39
>
NOTE:
Restore factory default will clear all the programs
and password.
6.LOCK MENU
The sixth item of the menu is the LOCK MENU
You can lock system, set password, block program
and set parental guidance Once you set the lock
system to on, you can not search the channels or
change any programs.
Lock System
Set Password
Block Program
<
LOCK
Parental Guidance Off >
800 SZTVM01
No Information
801 SZTVM02
No Information
802 SZTVM03
No Information
803 SZTVM04
No Information
804 Date
No Information
INFO
Schedule
Remind
INDEX
INFO
1.
to choose the programs , Press
Use
INFO key, you can display the highlight program's
information.
Schedule
2.
Press the teletext yellow key, It can list
all the reminder schedule, press
to choose
the list, press red key
DELETE to delete the
schedule list, Press EPG to return to EPG menu.
Schedule List
Time
NOTE:
The default pass word is 6666.
to choose the
Block program: Press
program ,press teletext green button to block
the program. If you want unblock the program,
pls enter the main menu , input the password,
then press green button again.Parental
guidance: Press
to choose rating.
TIME
Date
04:55 28th Apr
Programme Title
Delete
Channel Name
Remind
3.
Press the blue key to choose one program
and set up one reminder time, the TV screen will
skip to the choosed program in the reminder time
automatically.
_
Reminder setting
802 SZTVM03
+
08 Minute
05 Hour
Apr Month
28 Date
Once Mode
OK
P.15
BACK
BUSH|Full HD 1080p LCD TV | User Manual | Helpline:0845 604 0105
- 41 -
Service Manual
Model No.:
9. Trouble shooting
9-1. Simple check
- 44 -
Service Manual
Model No.:
10 DVD OPERATION
DVD SIDE PANEL
9
Dolby Digital
Multi-angle
32
USB
SD/MMC/MS
Disc data side
NEXT
PREV
STOP
PLAY/PAUSE
Disc label side facing you
KODAK picture CD
Subtitle choices
8
OPEN/CLOSE
MP3 files on
CD-R/CD-RW
USB
In DVD mode when no disc is playing, insert
a USB drive (or an MP3 player with USB
interface) into the USB socket. Press the
DVD/USB button on the Remote Control unit,
and use the / keys to select USB mode for
playing MP3 or JPEG files.
3 in 1 Card Reader
In DVD mode when no disc is playing, insert
three kinds of card (SD ,MMC, MS). Press
DVD/USB button on the Remote control
and use the / key to select SD/MS/MMC
mode for playing MP3 or JPEG files. All the
function is the same to playing a disc.
When the disc is playing, please stop playing
first and insert a USB/CARD, enjoying
USB/CARD by press DVD/USB key on
the remote controller ,and then press /
key to select DISC/USB/CARD,and
press ENTER/OK to comfirm.
Caution:
When using USB/3 in 1 Card Reader
function, please do not insert in the wrong
direction, or else it will damage the unit.
Caution
This DVD Player has a Class 1 laser which
may be harmful to your eyes. Do not
attempt to disassemble the cabinet or make
any adjustments.
Refer all servicing to a qualified
prefessional.
Features
Disc formats supported by this player:
- 57 -
Audio choices
16:9
DVD video
LB
TV Aspect
Ratio modes
R RESTRICTED
Parental Lock
This product incorporates copyright
protection technology that is protected
by method claims of certain
U.S.patents and other intellectual
property rights owned by ROVI
Corporation and other rights owners.
Use of this copyright protection
technology must be authorized by
ROVI Corporation, and is
intended for home and other limited
viewing uses only. Unless otherwise
authorized by ROVI Corporation.
Reverse engineering or disassembly is
prohibited.
The product complies with the KODAK
Picture CD format and will display
KODAK Picture CDs. The "KODAK
Picture CD Compatible" logo is a
trademark of Eastman Kodak Company
and is used with permission.
Manufactured under license from Dolby
Laboratories."Dolby" and the double-D
symbol are trademarks of Dolby
Laboratories. Confidential Unpublished
Works. 1992-1997 Dolby Laboratories, Inc.
All rights reserved.
Service Manual
Model No.:
MENU OPERATION
Press the SETUP button on the remote control,
the SETUP MENU will be displayed. After
accessing the setup menu, press the direction
buttons for up and down movement to select an
item desired, and press RIGHT direction button
to select the SUBMENU item. Then press the
ENTER/OK button to confirm. Press LEFT
direction button return to the menu of upper
level. To exit the setup, press the SETUP button
again. In the SETUP MENU, you may choose
any of the following options as you like.
LANGUAGE SETUP
Select Language in the setup menu, and display
the Language submenu:
SYSTEM SETUP
Aspect Ratio
Select the aspect ratio.
Notes:
The image display ratio is related to the
recorded disc format. Some disc can not display
images in the aspect ratio you choose. If you
play a disc recorded in 4:3 format on a wide
screen TV, black bars will appear on the left and
right side of the screen. You must adjust the
screen setting depending on the type of the
television you have.
TV System
Select the different TV system.
Note: The DVD player setting should be
matched to your TV set. For more information of
output format, refer to the instructions of your
TV set.
Audio
DVD menu
RATING SETUP
Select Rating in the setup menu, and
display the Rating submenu:
OSD Language
Use this item to select the language of the setup
menu and screen display.
Subtitle
This option provides the preset subtitle
language.
Audio
Select the built-in disc dubbing language
options.
DVD Menu
This option provides the film's menu language
options.
VIDEO SETUP
Select Video in the setup menu, and display the
Video submenu:
Parental Control
Set the parental control feature of the player
Note : Password is needed before setting
Parental Control.
Set Password
Input four digits (password), then press ENTER
/Ok to confirm.
Note: If you forget your password, please use
the universal password 6666 to unlock.
MISC SETUP
Select MISC in the setup menu, and
display the submenu:
Use Default Settings
Reset setup data to factory default value.
- 58 -
Service Manual
Model No.:
MP3/WMA/JPEG PLAYBACK
PICTURE CD PLAYBACK
The PICTURE CD disc has such a directory
structure as shown in the following picture.
The MP3/WMA disc has such a directory
structure as shown picture above.
Press Direction key to choose the root directory
and then press ENTER/OK button to enter into
the sub directory. Press Direction key to
choose the desired track and then press
ENTER/OK or PLAY to enjoy the music or
movie. If you want to return to the upper menu,
press Direction key to choose
the icon and
press ENTER/OK button.
Filter: Allows selecting the categories of files
displayed in the browser list.
Repeat: To switch different repeat playing mode
Mode: Select different playing mode as follows:
Normal: Shuffle mode is cancelled.
Shuffle: Shuffle mode enabled. When playback
reaches the end of the currentchapter/track,
playback jumps to a random chapter/track. As
the end of each chapter/track is reached,
another random chapter/track will be played
until all tracks/chapters have been played or the
Shuffle mode is cancelled by toggling to a
different Mode Option.
Edit Mode: To enable programmed playback
mode. When you select the mode, press LEFT
Direction key to directory and press ENTER/OK
to choose the desired track and press Add to
program and press Program view and press
the Edit mode to cancel the edit mode. At last
press Left key to display program track and
press ENTER/OK to start program playback.
Program view: Display program track.
Browser view : Display track directory.
Add to program: Choice the track press Add to
program to add the track of the program play
directory.
Clear program : In the complete stop
state(press the STOP button twice), First press
Edit mode to enable the edit mode. Press Left
key to program track and press ENTER/OK to
cancel the desired track. press Clear program
to delete the track of the program play directory.
Press Direction key to choose the root
directory and then press ENTER/OK
button to enter into the sub directory.
Press Direction key to choose the desired
picture and then press ENTER/OK or
PLAY to enjoy the picture. If you want to
return to the upper menu, press Direction
key to choose
the icon and press
ENTER/OK button.
Image rotation
In picture play state, press Direction key
to rotate the picture.
CARD READER ,USB
3 In 1 Card Reader
If the player has a 3 in1 card jack and it's
NOT in “disc playing” status, you can
insert three kinds of card (MMC, SD , MS)
to play the mp3 music and JPEG files. All
the function is the same to playing a disc.
USB
If the player has a USB slot and it's NOT in “disc
playing” status, you can insert a USB device or a
Mp3 Player with USB Interface to play the MP3
music or and JPEG files. All the function is the
same to play a disc.
When the disc is playing, please stop playing
first and insert a USB/CARD, enjoying
USB/CARD by press
DVD/USB key on the remote controller ,and then
press / key to select DISC/USB/CARD,and
press ENTER/OK to confirm.
Not all USB/CARD device can be supported by
this system.
Note: When using USB/3 in 1 Card Reader
function, please do not insert in the wrong
direction, or else it will damage the unit.
- 59 -
Service Manual
Model No.:
Function Buttons
OPEN/CLOSE
To open the disc tray, press
OPEN/CLOSE; To close the disc tray,
press OPEN/CLOSE again.
SUBTITLE
Press the button to choose different
captions(Requires support from disc)
GOTO
For DVD discs, press the button to
choose the desired title and chapter
andsearch the desired title time and
chapter time.For Super VCD,VCD,CD
discs, press this button to search the
desired disc time and track time and
choose the desired track.
Note: During VCD playback, the PBC
mode must be set to OFF.
0-9 keys
These keys are used to input the
time, as well as title, chapter and
track numbers.When a numeric item
is displayed on the screen, press the
0-9 keys to select the desired entry,
and press ENTER/OK to confirm.
When a VCD is playing(with PBC off),
press the 0-9 keys to select a track
directly.
MENU
During DVD playback, press MENU to
display the disc menu of the current
title.
PBC
During VCD/SVCD playback, press
PBC to control PBC ON/OFF.
SETUP
Press the button to enter the system
setting menu. Press the button again
to exit the menu.
RETURN
When DVD/SVCD/VCD displaying,
press RETURN button to the
menu(PBC ON only).
DISPLAY
Press the button to show the
information of the current playing
disc.
ENTER/OK
Press the button to confirm your
choice on screen.
REV:
During DVD, CD Mp3 or VCD
playback, press REV to scan in
reverse.
The player will review the disc at
different times speed. Press
PLAY/PAUSE
to resume normal playback.
FWD
During DVD, CD,MP3, or VCD
playback, press FWD to scan
forward.The player will cue the disc
at different speed. Press
PLAY/PAUSE to resume normal
playback.
PREV
During DVD, CD,MP3, or VCD
playback, press PREV to play the
previous chapter, title or track.
NEXT
During DVD,CD,MP3, or VCD
playback, press NEXT toplay the next
chapter, title or track.
STOP
Press the button once and the player
will be in memory stop state.
Continuously press this button twice
and the player will be in complete
stop state.
Play/Pause
In pause state or stop state, press the
button, the player will be in playing
state.In play state, press the button
the player will be in pause state.
ANGLE
Press the button to view scenes shot
from ANGLE DIFFERENCE
ANGLES.
(Disc support is required)
- 60 -
Service Manual
Model No.:
11.DVD Trouble shooting
If you have any questions, please consult the troubleshooting guide below:
REMOTE NOT WORKING
NO PICTURE OR SOUND
Ensure the power button is on.
Make sure the Main unit s POWER button is on
Ensure the power outlet is operational.
Ensure the remote batteries are working.
Ensure the power cord is not damaged.
Point the remote control directly at the player s
Ensure the power plug is connected
IRsensor.
firmly to the outlet.
Remove any obstacles between the remote
and theIR sensor.
PICTURE BUT NO SOUND
Ensure the audio is not set to mute.
,
Ensure you have set the player s AUDIO
settings correctly.
UNIT NOT WORKING
Turn off the power, and then turn it on
again.
POOR PICTURE OR SOUND
Ensure you have set the player s AUDIO
settings correctly
Ensure the disc is not scratched or
stained.
“NO DISC”DISPLAYED
Ensure you have put the disc on the tray.
Ensure the disc is not upside down.
Ensure the disc is not distorted, stained or
“BAD DISC”DISPLAYED
scratched.
Ensure the disc is not warped,
damaged or deformed.
Ensure the disc is not badly stained or
damaged.
Ensure the disc format is compatible
with the player.
Please check whether you have tried to
play a software CD. If so, please restart
the player.
- 61 -
Service Manual
Model No.:
2. Specifications
Model
MSDV2413-03-D0
Screen Size
23.6inch
Aspect Ratio
16:9
Resolution
1920*1080
Response Time (ms)
Angel of View
Color Display
8 (GRAY TO
GRAY)
176(H)/176(V)
16.7M
No. of Preset Channels 400
OSD Language
English
Color System
PAL/SECAM
Audio System
DK, BG, I, M, L, L'
Audio Output Power
(Built-in) (W)
3W×2
Audio Output Power
(outer) (W)
No
Total Power Input (W)
60W
Voltage Range (V)
AC100V-240V
Power Frequency (Hz) 50~60Hz
Net Weight (KG)
5.56
Gross Weight (KG)
7.04
Net Dimension (MM)
577*170*427
Packaged Dimension
(MM)
650*201*494
- 07 -