1
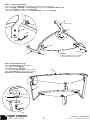
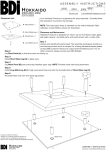
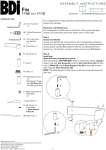
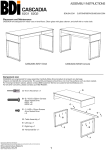
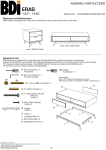
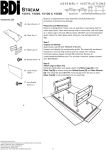
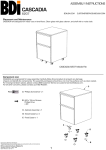
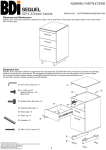
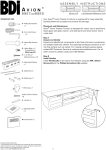
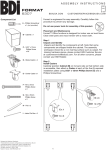
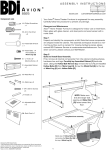
ASSEMBLY INSTRUCTIONS
DINO TABLES
1343 1344 1347
BDIUSA.COM
[email protected]
Placement and Maintenance
DINO TABLES are designed for indoor use on level floors. Clean glass with glass cleaner, and shelf with a moist cloth.
DINO 1343
COFFEE TABLE
DINO 1344
SMALL COFFEE TABLE
DINO 1347
END TABLE
Component List
DINO TABLES are engineered for easy assembly. Carefully follow this procedure to prevent any damage.
Unpack and identify the components. The assembly workspace should be a non-marring surface such as clean carpet.
For missing hardware pieces, please contact BDI Customer Service at [email protected].
For all other concerns, please contact your BDI Retailer.
A - Hex Wrench 4mm
x1
F
B - 1/4-20 x 3/4
Flat Head Screws
4mm Socket Drive
x6
C - 1/4-20 x 1/2
Flat Head Screws
4mm Socket Drive
x3
E
H
D - Legs x 3
E - Shelf x 1
C
F - Glass x 1
D
G - Felt Pads x 3
H - Felt O-Rings x 3
B
G
Designed by Louis A. Lara
These distinctive product configurations are protected by US and international
patents, trade dress, and/or copyright laws.
BDI are trademarks of Becker Designed, Inc.
All Rights reserved. © 2011 BDI
1343 1344 1347 Revision: 02-23-11
1
Step 1 - Attach Legs to Shelf
Place long edge of Shelf (E) on soft surface in order to prevent damage.
Attach Legs (D) to Shelf (E) using Screws (B) and tighten using Hex Drive Wrench (A).
Attach first Leg (D) to middle point of Shelf (E).
Optional: If placed on hard floor, attach Felt Pads (G) to bottom of Legs (D).
D
Attach 1st
G
D
G
A
B
B
D
D
G
E Shelf
Place long edge on soft surface
in order to prevent damage.
G
Step 2 - Attach Glass to Legs
Attach Felt O-Rings (H) to Glass Pucks.
Turn table up onto Legs (D).
Place Glass (F) onto Legs (D).
Loosely start all Screws (C) into Glass Fittings.
After all Screws (C) are started, then tighten
Screws (C) using Hex Drive Wrench (A).
F
D
F
Glass Puck
H
D
C
A
DINO TABLES
1343 1344 1347
2
ASSEMBLY INSTRUCTIONS
BDIUSA.COM
[email protected]