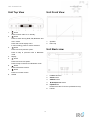
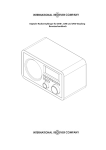
1
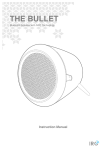
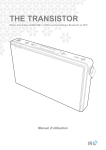
THE TRANSISTOR DAB/DAB+ and FM Digital Radio with Bluetooth and NFC Technology Instruction Manual THE TRANSISTOR THE WHITE LINE Dear friend, Thank you for purchasing an IRC product. We are pleased that you have chosen one of our products. At the same time, we are confident that you will find your new product to your complete satisfaction in many years ahead. IRC is rooted in Denmark, Scandinavia, renowned worldwide for its modern minimalistic design style. Since 2001, IRC has produced and designed digital audio products characterized by an outstanding appearance, advanced technology, ease of use and based on open platforms from world leading suppliers. At IRC, we care about the environment. To avoid paper waste, the product manual is to be found on the attached USB memory stick. We hope you enjoy the attached key hanger as well. To keep you updated with new software upgrades or new functionalities to your product, we kindly ask you to visit our website www.ircgo.com and register your product. We promise only to contact you by email in case of important information in regards to your product. For all registered users, we will offer you a great designed remote control, for your product with 30% discount. When you’re registered, you will receive information about the offer. Should you have any questions or concerns please do not hesitate to contact us at [email protected]. All the best The IRC team You can follow our journey, on social media Facebook www.facebook.com/ircgo and Twitter https://twitter.com/IRC_Nordic. THE TRANSISTOR THE WHITE LINE 9. Important Safety Instructions Repair or replace all electric service cords that have become frayed or otherwise damaged immediately. Do not use a cord that shows cracks or abrasion damage along its length, the plug, or the connector end. 10. To prevent fire or shock hazard, do not use this plug with an extension cord or other outlet unless the blades can be fully inserted to prevent blade exposure. 11. To prevent fire or shock hazard, do not expose 1. Read these instructions. 2. Keep these Instructions. unit to rain or moisture. 3. Heed all Warnings. 12. During lightning or raining days, unplug the unit 4. Follow all instructions. for additional protection during thunderstorms or 5. Do not use the speaker near water. when the unit is not used for prolonged periods. 6. Clean only with dry cloth. This will prevent damage to the unit from lightning and power surges. WARNING: TO REDUCE THE RISK OF FIRE OR 13. Do not attempt to carry out any service work ELECTRIC SHOCK, DO NOT EXPOSE THIS SPEAKER TO RAIN OR MOISTURE. yourself. By opening or removing the cabinet, To reduce the risk of electrical shock, fire, etc.: you may be exposed to dangerous voltage or 1. other hazards. Any service work should be Do not place unit near any heat source such as radiators, heat registers, stoves, or other carried out by qualified technicians. apparatus (including amplifiers) that produce 14. In the interests of safety and to avoid heat. 2. Do not block any ventilation openings of unit. unnecessary energy consumption, never leave 3. The unit shall not be exposed to dripping or the unit switched on while unattended for long splashing and no objects filled with liquids, such periods of time, e.g. overnight, while on holiday as vases, shall be placed on the unit. or while out of the house. Switch it off and Do not place any heavy loads onto the unit, and disconnect the mains plug from the mains do not step on it, the load may fall and cause socket. 4. serious injury to the unit. 5. 6. 15. The battery is only intended for use with the Please read Rating Labels at the back of unit for power supply provided with the product. Do not power input and other safety information. attempt to charge the battery in temperatures This unit is intended to be used only with the outside the range of 0℃~40℃. power supply provided. 7. 16. Do not expose the product or battery to Protect the power cord from being walked on or excessive heat, including direct sunlight or fire. pinched particularly at the plugs, convenience 8. 17. Danger of explosion if battery is incorrectly receptacles, and at any point where they exit replaced. Replace only with the same or from the unit. equivalent type. Never unplug your unit by pulling on the power 18. Please dispose of a used or damaged battery cord. Always grasp the plug firmly and pull promptly and properly, following all local straight out from the outlet. regulations. Do not incinerate. 2 THE TRANSISTOR THE WHITE LINE Content Important Safety Instructions .......................................................................................................................... 2 Content .............................................................................................................................................................. 3 Getting Started .................................................................................................................................................. 4 Unit Top View .................................................................................................................................................... 5 Unit Front View .................................................................................................................................................. 5 Unit Back view ................................................................................................................................................... 5 DAB Mode .......................................................................................................................................................... 6 Display ......................................................................................................................................................... 6 Station List ................................................................................................................................................... 6 Secondary Service ....................................................................................................................................... 6 Full Scan ...................................................................................................................................................... 6 FM Mode ............................................................................................................................................................ 7 Selecting FM Mode ...................................................................................................................................... 7 Display ......................................................................................................................................................... 7 Scan Setting ................................................................................................................................................ 7 Audio Setting ............................................................................................................................................... 7 Bluetooth Mode ................................................................................................................................................. 7 Display ......................................................................................................................................................... 7 NFC (Near Field Communication) .................................................................................................................... 8 Aux in Mode ....................................................................................................................................................... 8 Display ......................................................................................................................................................... 8 General Operation ............................................................................................................................................. 8 Setting Alarm ............................................................................................................................................... 8 Setting Equaliser .......................................................................................................................................... 9 Setting Time ................................................................................................................................................. 9 Setting Backlight .......................................................................................................................................... 9 Setting Language ......................................................................................................................................... 9 Factory Reset .............................................................................................................................................. 9 Software Upgrade ........................................................................................................................................ 9 SW Version .................................................................................................................................................. 9 Specification .................................................................................................................................................... 10 3 THE TRANSISTOR THE WHITE LINE volume when using earphones, especially for Getting Started extended periods of time. Carefully remove your radio from the box. You may Turning the Unit On/Off wish to store the packaging for future use. Connect the power cord to the AC IN socket on the back of the unit. Then insert the plug of power cord What you can find inside of your package n Main unit n Instruction manual n AC power cords n Rechargeable battery n Welcome letter n USB Key hanger with instruction books into the mains socket. Press button to turn the unit on or standby. To switch the unit off completely, unplug the power cord from the mains socket. Your radio includes a built-in battery, once connected radio to mains supply, the battery will be automatically charged and automatically stop Positioning your Radio charging since fully charged. Place your radio on a flat / stable surface that is not When radio doesn’t connect to mains supply, it will subject to vibrations. run by battery power. Press Avoid the following locations: n n unit on or off. Where the radio will be exposed to direct sunlight. Volume Control Where the radio will be close to heat radiating Adjust the radio volume by pressing or buttons, making sure no menu setting is going on. sources. n button to turn the Where the humidity is high and ventilation is poor. n Where it is dusty. n Where it is damp or there is a possibility of water dripping or splashing onto unit. Adjusting the Antenna Extend the antenna to ensure you receive the best reception possible in both DAB/DAB+ and FM radio modes. It may be necessary to adjust the position of the radio and /or antenna to achieve the best signal. Using Headphones You will require headphones fitted with a 3.5 mm diameter stereo plug. The Headphones socket is located on the front of this unit. Headphones are not supplied with this radio. Turn down the volume before connecting earphones. Slowly raise the volume with the earphones on until you reach your desired level. Caution: long-term exposure to loud music may cause hearing damage. It is best to avoid extreme 4 THE TRANSISTOR THE WHITE LINE Unit Top View 1. 2. Unit Front View button Press to switch radio on or standby. button Press to switch among DAB, FM, Bluetooth and Aux in mode. 1. Speaker Press and hold to display menu. 2. NFC chip In menu setting, press to confirm selection. 3. button Unit Back view Press to browse previous option. Press to skip to previous track in Bluetooth mode. 4. 5. Display button Press to browse next option. Press to skip to next track in Bluetooth mode. 6. button Press to decrease volume. 7. button Press to increase volume. 8. Handle 1. DAB/FM antenna 2. AC IN socket 3. AUX IN socket 4. 5. Headphones socket Update Port Please leave this for service professional only! 6. 5 Handle THE TRANSISTOR THE WHITE LINE acceptable signal level. DAB Mode Note: Stations with signal strength below the minimum When you turn on the radio it will automatically signal level may not provide a steady stream of search and store all the available stations. You audio. should conduct an additional Full Scan to ensure all stations are picked up and stored. It is also Station List recommended every few months to run a new scan to pick up any new DAB/DAB+ that may have begun This feature enables you to select a station from broadcasting after purchasing your DAB radio. 1. available station list. For initial use, your radio will conduct a full scan 1. and store stations list in memory. 2. or Once the scanning is completed, the 2. alphanumeric order. The first station in the list buttons to select Station list, press Alternatively, while a program is playing, press or will be selected. 3. Note: Press buttons to show station list. or buttons to browse stations list, and then press The DAB/DAB+ stations will be displayed and button to confirm. The selected station will be broadcast. stored in alphanumeric order. l button, and then press button to confirm. DAB/DAB+ stations will be displayed in l Press and hold If no DAB/DAB+ signal is found, it may be Secondary Service necessary for you to relocate your radio. You may see a “>>” symbol after the name of the Display station, this indicates that there are secondary services available to that station. These secondary This feature enables you to select the station services contain extra services that are related to the information which shows on the display. 1. Press and hold or primary station. E.g. a sports station may want to button, and then press add extra commentaries. The secondary services buttons to select Display, press are inserted directly after the primary station (a “<<” button to confirm. 2. Press or symbol is before the name of the station) in the buttons to browse through station list. Scrolling text, Signal strength, Program Type, To select the secondary station, press Ensemble, Frequency, Signal quality, Bitrate and Codec, Format, Time and Date, and then press or buttons until you find the secondary service you want, then press button to confirm your selection. button to select it. When the secondary service ends, the unit will automatically switch back to the primary station. Showing Signal Strength While you selected Signal strength, a signal bar with Full Scan the strength of the current station will show on the display. This feature enables your radio to scan for all available stations. Press and hold button, and then press buttons to select Full scan, press confirm. The indicator on the signal bar shows the minimum 6 or button to THE TRANSISTOR THE WHITE LINE FM Mode stereo. For weak stations, this may result in a poor Selecting FM Mode 1. 1. Press signal-to-noise ratio (hiss). To play weak stations in mono, press and button, and then press button repeatedly to select FM mode. or to select Audio setting, press 2. For initial use, it will start at the beginning of the hold buttons button to confirm. FM frequency range (87.50MHz). Or it will play 2. the last FM station you were listening to. Press or buttons to browse ‘Forced mono’, and then press 3. To manually change the FM frequency, make button to confirm. sure no other order/system setting is going on, press or Bluetooth Mode buttons to change the frequency by 0.05MHz per step. 4. To automatically scan, while FM frequency shows up, press and hold or Pair the unit with a Bluetooth device to listen to music: buttons to backwards or forwards search. 1. Press button repeatedly to select Bluetooth mode. Display 2. The display will show ‘Discoverable’ . 3. Activate your Bluetooth device and select the This feature enables you to select the station search mode. information which shows on the display. 1. Press and hold or 4. device. button, and then press 5. buttons to select Display, press button to confirm. 2. Press or ‘Transistor’ will appear on your Bluetooth Select ‘Transistor’ and enter “0000” for the password if necessary. 6. buttons to browse through Radio text, Program Type, Ps, Audio info, Time ‘Device connected’ will show on the display when connection is successful. and Date. 7. To disconnect current Bluetooth connection, press and hold or Scan Setting button, and then press buttons to select Disconnect, press button to confirm. By default, FM scans stop at any available station. To play music, press button to skip to This may result in a poor signal-to-noise ratio (hiss) previous track; press button to skip to next from weak stations. track. 1. 8. To change the scan settings to stop only at stations with good signal strength, press and hold 2. button, and then press Display or buttons to select Scan setting, press This feature enables you to select the music button to confirm. information showing on the display. Press or buttons to browse ‘Strong stations only’, and then press 1. button to Press and hold or confirm. button, and then press buttons to select Display, press button to confirm. 2. Press or Time and Date. Audio Setting By default, all stereo stations are reproduced in 7 buttons to browse between THE TRANSISTOR THE WHITE LINE NFC (Near Field Communication) General Operation NFC enable you pair and connect with Bluetooth Setting Alarm devices in a easy way. 1. 2. 3. Press button repeatedly to Your radio includes dual alarms. Set Alarm, making select Bluetooth mode. sure set time at first. Make sure that your NFC is turned “On” on your 1. button, and then press mobile device. or Hold your mobile device about 2cm close to button to confirm. NFC chip for receiving an auto-connection 4. Press and hold 2. buttons to select Alarm, press Press or buttons to select ‘Alarm 1 between your mobile device and radio. Setup’ or ‘Alarm 2 Setup’, and then press Your button to confirm. device then will turn-on Bluetooth automatically and will pair your device with radio. 3. No additional settings are necessary. Press or then press buttons to select options, and button to confirm the setting. Alarm states: Aux in Mode Alarm time: Aux in allows for quick and easy connection to an Alarm MP3 player or other external audio sources. duration time: 1. Alarm source: Before connecting to the mains socket, use a 3.5mm audio cable (not supplied) to connect to Last listened: your external audio device through the AUX IN On or Off On Time: 00:00 (manually set up the time ) 15/30/45/60/90 minutes DAB, FM or Buzzer Only available when DAB or FM source is selected socket on the side of unit. Alarm active Daily, Once, Weekends or 2. Connect power cord to mains socket, press button to switch unit on. day: Weekdays Alarm Press 3. Press volume: to set the alarm volume button repeatedly to select Auxiliary Input mode. 4. 4. In Aux in mode, you may operate your audio buttons When display shows 'Alarm Saved', the alarm setting is successful. device directly for playback features. 5. or To gain optimal volume levels, adjusting the output volume level on the audio device as well is recommended. 5. To turn off alarm, press alarm sounds. button when the 6. To cancel Alarm, refer to steps1-3 to set Alarm states to ‘Off'. Note: Alarm doesn’t work while unit power off under battery Display mode. This feature enables you to select the music information showing on the display. 1. Press and hold or button, and then press buttons to select Display, press button to confirm. 2. Press or buttons to browse between Time and Date. 8 THE TRANSISTOR THE WHITE LINE Setting Equaliser Setting Language This feature enables you to set a sound equalization This feature enables you to change the language of profile. The equalization setting will change the tone displaying menu names. of the sound from your radio. 1. 1. Press and hold or button, and then press or buttons to select Equaliser, press Press or 2. buttons to browse through Treble and Bass, and then press button to Press or Press or buttons to browse, and then press button to select you desired Factory Reset buttons set the level of Treble and Bass, and then press buttons to select Language, press language. confirm. 3. button, and then press button to confirm. button to confirm. 2. Press and hold button to confirm. Doing a factory reset resets all user settings to default values, so time/date, alarm settings and presets are lost. Setting Time 1. 1. Press and hold or or button, and then press buttons to select Time, press 2. ‘Update from DAB’, ‘Set 24 hour’ or ‘Set 12 format: hour’ Set date ‘DD-MM-YYYY’ or format: ‘MM-DD-YYYY' accidentally, please select 'No' to exit this option. SW Version Press and hold display. power on and standby mode. button, and then press buttons to select Backlight, press button to confirm. or or button to confirm. The software version will show on the This feature enables you to change the backlight of Press button, and then press buttons to select SW version, press Setting Backlight 2. button to confirm. If you selected Software Upgrade menu Then setting time according to your personal or buttons to select 'Yes', and Please leave this for service professional! ‘Update from FM’ or ‘No Set 12/24 hour Press and hold or Software Upgrade preference. 1. Press Time and Date update’ 2. buttons to select Factory Reset, press then press Manually set-up both ‘Update from Any’, Auto update: button, and then press button to confirm. button to view options as below: Set Time/date: Press and hold buttons to browse through “High”, “Medium” and “Low”, and then press button to confirm. 9 THE TRANSISTOR THE WHITE LINE Specification ITEMS Description: Frequency SPECIFICATIONS DAB/DAB+ and FM Digital Radio with Bluetooth and NFC Technology FM: 87.5-108MHz Ranges: DAB/DAB+: 174.928 – 239.200MHz Power AC Input: 110-240Vac, 50-60Hz Supply: Battery 3000mAh,7.4V Requirement: Audio Output Power: Power Consumption: Dimension (W x D x H): 7W rms x 2 18W (Max) 360mm x 320mm x 60mm This symbol on the product or in the instructions means that your electrical and electronic equipment should be disposed at the end of its life separately from your household waste. There are separate collection systems for recycling in the EU. For more information, please contact the local authority or your retailer where you purchased the product. 10 THE TRANSISTOR THE WHITE LINE IRC Nordic guarantees warranty according to existing legislation comprising manufacturing and material defect which may be identified by normal use of the article. The warranty does not cover errors, damages or wear, directly or indirectly, caused by improper operation, poor maintenance, force, bashes or drops or unauthorized operations, malfunction due to connection to any equipment – damages related to fire, short circuits, etc. Claims about deficiencies and lapses, which are to be identified by ordinary testing of the article, must be notified to the relevant store within a reasonable period of time. The article can subsequently be handed in for repair. 11