1
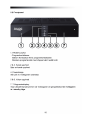
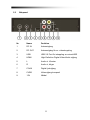
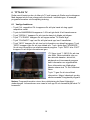
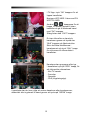
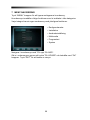
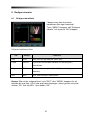
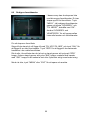
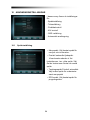
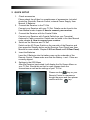
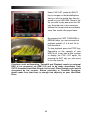
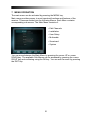
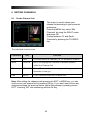
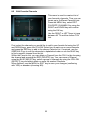
Bruksanvisning 1 SÄKERHET Säkerhetsföreskrifter Vänligen läs noga igenom den här guiden innan du ansluter din box. För komplett manual besök www.dilog.se. Spara guiden för senare bruk. Placera alltid boxen på ett platt, rent och torrt underlag. Om boxen på något sätt skadas bör den alltid undersökas av en verkstad innan den tas i bruk igen. Tag för vana att alltid dra ur strömmen till boxen om du skall resa bort eller om det är risk för åska. Eventuell rengöring görs med lätt fuktad trasa och mild tvållösning. Varning! Öppna aldrig boxens kåpor då du kan skada dels dig själv och dels elektroniken. Säkerställ att det finns gott om plats runt om boxen där den placerats så att god ventilation kan uppnås. Blockera inte heller boxens ventilations hål på något sätt. Placera inte boxen i ett tätt skåp eller ovanpå någon annan utrustning som alstrar värme. Miljö Denna produkt är tillverkad med hänsyn till vår miljö. Den är utvecklad för att ha låg energiförbrukning, reducerad användning av miljö och hälsofarliga ämnen, ökad möjlighet till återanvändning av material samt enkel hantering vid återvinning. Följaktligen skall boxen lämnas på återvinningsstation som hanterar elektronikskrot då den anses förbrukad. Strömkälla Denna digitalbox är konstruerad för att drivas från ett vägguttag med märkspänning 230V 50Hz. Ta aldrig av höljet själv då boxen har spänningsförande delar som kan orsaka allvarliga personskador. All service/ reparation skall utföras av Dilog Nordic AB Vätskor Boxen får inte utsättas för fukt eller vatten, ställ aldrig någon typ av vätska på eller bredvid boxen. Skulle boxen utsättas för vätska, drag omedelbart ut strömkontakten och kontakta verkstad. • Lämna inte din box eller fjärrkontroll på en plats som utsätts för direkt solljus. • Boxen skall placeras på ett plant och stabilt underlag. • Boxen bör inte installeras på platser med hög luftfuktighet. • Placera boxen på en plats med god luftväxling, boxen bör inte placeras i slutna skåp, på eller under andra apparater. 3 • Anslut först kablar till andra enheter, koppla sedan in strömmen till boxen. • Byt ut urladdade batterier till fjärrkontrollen omedelbart efter att de tagit slut och tag ur batterierna om ni inte tänker använda boxen under en tid. 2 SNABBINSTALLATION 1. 2. 3. 4. 5. 6. Kontrollera innehållet Vänligen kontrollera att leveransen är komplett. I förpackningen skall finnas mottagare, fjärrkontroll, batterier samt användarmanual. Inkoppling av mottagaren till TV. Koppla in mottagaren till din TV med HDMI eller RCA kabel. Koppla en antennkabel mellan antenn uttag och boxens antenningång. Slå på mottagaren och TV:n Starta mottagaren genom att trycka in “ON”-knappen på mottagarens framsida. Montera batterier Montera 2 batterier i facket på fjärrkontrollens undersida. Säkerhetställ att du vänder plus mot plus och minus mot minus. Uppstart När mottagaren startar visas installations guiden. Visas inte rutan nedan kort efter att du startat boxen, kontrollera att du kopplat in kablarna korrekt och att du valt korrekt ingång i din TV-Meny. Använd pilknapparna upp/ ned för att stega i menyn och “OK” för att bekräfta val. 4 3 Specifikation • Support för SD / HD (MPEG4 AVC/H.264) • Support för DVB-C / T2 • Kortläsarfack för programkort • USB PVR Funktion (Kräver hårddisk eller minnessticka) - Time Shift funktion (Kräver hårddisk eller minnessticka) • High Definition Video utgång: HDMI • Undertextsupport : OSD & VBI • 4-Digit 7-Segment-Display • Kanalsortering Fria, krypterade, alfabetet • EPG: Pågående, nästa samt upp till 7 dagars EPG • Video upplösning (HDMI): 576p, 720p, 1080i • Flerspråkig meny • Snabba kanalbyten • Upp till 5000 kanaler (TV & Radio) • 8 Favoritlistor • Kanalsortering -Flytta, ta bort, favorit, redigera - Föräldralås, döp om, hoppa över kanal • Manuell eller Nätverkssökning • Coax utgång för Digital Audio, Dolby AC3 • Mjukvaruuppgradering via OTA/OTC • Text-tv med undersidor 6 4 Inkoppling av mottagare OBSERVERA: Signal i HD kvalitet levereras inte via RCA-Video. För bästa bild på både SD och HD kanaler skall mottagaren kopplas in med HDMI kabel om det är möjligt. 4.1 Inkoppling av mottagare till en TV a. Koppla in din antennkabel till uttaget märkt “RF IN“ på mottagarens baksida. b. Koppla en HDMI-kabel mellan HDMI-uttaget på din TV och HDMI uttaget på mottagaren. c. Saknar din TV HDMI ingång, koppla en RCA/SCART-kabel mellan SCART-uttaget på din TV och RCA-uttaget på mottagaren. d. Saknar din Tv både HDMI och SCART, koppla en RCA-kabel mellan RCA-uttaget på din TV och RCA-uttaget på mottagaren. 7 MENU: Med denna knapp öppnar du boxens huvudmeny. EXIT: Med denna knapp går du ur menyer eller ett steg tillbaka i menyträdet. Pil UPP: Med denna knapp går du en kanal upp eller ett steg uppåt i menyn. Pil Vänster: Med denna knapp minskar du volymen. I huvudmenyn navigerar du till vänster. Pil Höger: Med denna knapp ökar du volymen. I huvudmenyn navigerar du till höger. Pil NED: Med denna knapp går du en kanal ned eller ett steg nedåt i menyn. OK/ ENTER: Med denna knapp bekräftar och sparar du val i menyn. INFORMATION. Med denna knapp visar du programinformation om pågående och nästa program på aktuell kanal. ELEKTRONISK PROGRAM GUIDE. Med denna knapp öppnar du programguiden som visar kommande program upp till 7 dagar framåt på respektive kanal. VOL + : Med denna knapp ökar du volymen VOL - : Med denna knapp minskar du volymen FAV/ FAVORIT Med denna knapp öppnar du redan skapade favoritlistor RECORD: Med denna knapp startar du en inspelning (kräver att inspelningsbart media som t.ex Hårddisk eller USB minne är anslutet). CH +: Med denna knapp byter du kanal uppåt ett steg i kanallistan. CH +: Med denna knapp byter du kanal nedåt ett steg i kanallistan. 0-9 NUMERISKA KNAPPAR. Med dessa knappar byter du direkt till önskat kanalnummer. ~ FIND: Med denna knapp kan du söka efter en kanal på kanalnamnet RECALL: Med denna knapp återgår du till kanalen du senast tittade på innan den aktuella. 9 5.3 Bakpanel Nr. Namn Funktion 1 RF IN Antenningång 2 RF OUT Antennutgång för ev. vidarekoppling 3 USB USB 2.0 Port för inkoppling av minne/HDD 4 HDMI High-Definition Digital Video/Audio utgång 5 L Audio ut. Vänster 6 R Audio ut, höger 7 COAX Digital ljudutgång 8 CVBS Videoutgång komposit 9 12V Nätdel 11 6 TITTA PÅ TV Detta avsnitt beskriver hur du tittar på TV och lyssnar på Radio med mottagaren. Med dagens teknik finns många extra funktioner i utsändningen, till exempel programinformation och flerspråkig textning. 6.1 Vanliga funktioner • Tryck CH+ respektive CH- knapparna för att byta kanal ett steg uppåt respektive nedåt. • Tryck de NUMERISKA knapparna 1-9 för att gå direkt till ett kanalnummer. • Tryck “RECALL” knappen för att visa den kanal du tittade på tidigare. • Tryck “TV/ RADIO” knappen för att hoppa mellan TV/ Radio läge. • Tryck ”PILKNAPP” upp/ ned för att byta kanal upp/ ned i kanallistan. • Tryck ”INFO” knappen för att visa kort information om aktuellt program. Tryck “INFO” knappen igen för att visa utökad info. Tryck i detta läge ”HÖGERPIL” för att visa information om nästkommande program. Tryck “INFO” eller “EXIT” knappen för att dölja informationen igen. I TV läge, tryck “i” (INFO) för att visa info fältet. Detta innehåller info om den aktuella kanalen, aktuell tid, pågående och kommande program samt information om signalkvalitet. Även information om tillgängliga tjänster såsom text TV och undertext visas. Tryck “i” igen för att visa utökad information. Höger/ vänsterpil ger dig nästkommande/ föregående program. Notera: Programinformation visas i den utsträckning det finns tillgängligt i utsändningen. Informationen som visas är helt upp till och beroende på kabel-TV leverantör. 12 I TV-läge, tryck “OK” knappen för att öppna kanallistan. Navigera UPP/ NED I listan med PIL UPP/ PIL NED. Använd ‘ / ’ knapparna för att hoppa 10 kanaler upp/ned i listan. bekräfta och gå till markerad kanal med ”OK” knappen. Stäng listan med “EXIT” knappen. Du kan söka efter en kanal på kanalnamn genom att trycka den “BLÅ” knappen på fjärrkontrollen. Skriv de första bokstäverna i kanalnamnet och tryck “GUL” knapp för att komma till sökresultatet i kanallistan. Kanalerna kan grupperas efter typ. I kanallistan tryck på “RÖD” knapp, för att välja mellan alternativen: - Alla TV kanaler - Favoriter - Operatör - CAS (Krypteringstyp) I kanallistan kan du även välja att sortera kanalerna efter kanalnummer, alfabetiskt eller krypterad/ fri kanal genom att trycka på ”GRÖN” knapp. 13 6.2 Option • Textningsspråk (GRÖN knapp): Här kan du välja mellan olika textningsspråk om detta finns tillgängligt I utsändningen, välj med “PIL UPP/ NED”, bekräfta med “OK” knappen. • Ljudspråk (RÖD knapp): Vissa kanaler har flera ljudspår, till exempel olika språk eller flerkanalsljud AC3. Välj med “PIL UPP/ NED”, bekräfta med “OK” knappen. 6.3 EPG (Elektronisk Programguide) Pågående, Nästa och 7 dagars Programinformation EPG startas genom att trycka på “EPG” knappen då du är i vanligt TV läge. EPG:n är uppdelad i 2 olika nivåer. Den första nivån ger en överblick över 10 kanaler och information om pågående och nästkommande program. Genom att trycka GRÖN knapp kommer du till andra nivån som ger information om den kanal du står på upp till 7 dagar framåt. Hur mycket information som visas beror på programleverantören. Tryck på “EXIT” för att lämna EPG läget. Navigera i EPG, första nivån (Multi-EPG) Aktuell kanal och pågående program visas markerat. Navigera mellan kanalerna med pilknapparna på fjärrkontrollen och tryck “OK” för att byta till markerad kanal. Förflytta dig framåt i tiden med “PIL” höger och gå åter med “PIL” vänster. Tryck “BLÅ” knapp för att hoppa framåt en hel dag och använd “GUL” knapp för att gå bakåt hel dag. Notera den lodräta linjen som markerar aktuell tid i programmen. 14 För mer detaljerad information om markerat program, tryck “i” (INFO) knappen. Notera att den information som visas är beroende av programleverantören. Om du vill spela in ett program direkt från EPG, flytta dig till det program du önskar spela in och tryck på “REC” knappen. Programmet läggs nu in i din inspelningslista med alla inställningar och kommer att automatiskt att spelas in under förutsättning att inspelningsbart media t.ex. hårddisk är ansluten, har ledigt utrymme och korrekt installerad. Tryck ”MENU” knappen för att återgå till EPG menyn och spara. Notera: programguiden visar tider och program enligt den info som programbolagen levererat. Detta stämmer inte alltid till 100% med verkligheten. Att lägga till tid före och efter ett program kan därför vara en god ide. Per automatik lägger boxen till 5 minuter innan och 5 minuter efter valt program. Denna tid kan du själv redigera efter eget önskemål i mottagarens huvudmeny under Multimedia/ PVR inställningar. Navigera i EPG, andra nivån (Singel EPG) Genom att trycka “GRÖN” knapp (Toggle), öppnar du EPG andra nivån. Detta ger en komplett översikt för den aktuella kanalen. Stega dig upp/ ned i listan med PIL “UPP/ NED” knapparna. Använd PIL < och > för att byta dag. För att visa detaljerad info om varje program, tryck “OK” knappen. Tryck ”OK” eller ”EXIT” knappen för att återgå. Notera: Hur mycket information som visas beror på programleverantören 15 6.4 EPG-Timer (Timer programming via EPG) I båda EPG lägena finns möjlighet att reservera en eller flera inspelningar på ett mycket enkelt sätt. Navigera bara till det program du önskar spela in och tryck sedan på ”REC” knappen. Ett nytt fönster kommer nu att öppnas som visar den reserverade inspelningen. Om inspelningsbart media t.ex Hårddisk är ansluten kommer programmet att spelas in. Är inspelningsbart media ej anslutet kommer mottagaren att byta till den aktuella kanalen vid tiden för programmet. Välj “EXIT” eller “MENU” knappen för att lämna menyn, bekräfta med “OK” knappen för att spara. Notera: Om du försöker spela in två program som tidsmässigt överlappar varandra kommer boxen att rapportera detta. Du måste då justera någon av tiderna för att ta bort överlappningen. Använd pil “UPP”/ “NED” för att markera den inspelning du vill justera. Tag bort inspelningen helt (RÖD) knapp eller redigera tiden så att den inte överlappar annan inspelning (BLÅ) knapp. 6.5 Text-TV För att starta Text-TV funktionen, tryck (BLÅ, TEXT) knappen. I Text-TV läge startas automatiskt startsidan 100. • Välj Text-TV sida med de numeriska knapparna. Skulle det valda sidnumret inte vara tillgängligt så kommer mottagaren att stå kvar på den tidigare sidan. • För att välja nästa Text-TV sida, tryck (PIL UPP) på fjärrkontrollen. • För att välja föregående Text-TV sida, tryck (PIL NED) på fjärrkontrollen. 16 6.6 PVR Funktion Om inspelningsbart media är anslutet och fungerande kan mottagaren användas för att spela in TV program PVR (Personal Video Recorder). 6.6.1 Direktinspelning För att starta en direktinspelning av den kanal som är vald, tryck “REC” knappen, välj inspelningstid med VÄNSTER / HÖGER och bekräfta med „OK“ knappen. 6.6.2 EPG Inspelning Enklaste sättet att spela in är via EPG – vänligen se kapitel 6.4 för mer info. 6.6.3 Manuell timer inställning Förutom inspelning via EPG finns möjlighet att manuellt programmera inspelning (start-/sluttid, kanal) via inspelningslistan i menyn. Tryck “MENU” och gå till undermenyn “MULTIMEDIA > INSPELNINGSLISTA” och tryck “OK. Lägg manuellt till din inspelning genom att trycka ”GUL” (LÄGG TILL) knappen. Välj datum, start och stopptid. Välj vilken kanal du vill spela in från och välj eventuell upprepning och du återkommande vill spela in (dagligen eller veckovis). Tryck BLÅ knapp för att spara. Exit för att återgå till TV-läge. 17 6.6.4 Timeshift-Funktion Under “vanligt TV-tittande” finns möjlighet att trycka “PAUSE” knappen för starta mottagarens Timeshift funktion. Detta under förutsättning att inspelningsbart media är anslutet. Mottagaren kommer nu att pausa bilden och du kan ta en promenad med hunden eller hämta en kopp kaffe. För att återuppta tittandet, tryck ”PLAY” knappen. Informationslisten visar hur mycket tidsskillnad det är mellan Timeshift och “live” sändning. I Timeshiftläget finns möjlighet att spela fram och tillbaka i det timeshiftade programmet. Naturligtvis kan du inte spela tillbaka längre än till den punkt då timeshiften startades och inte spela framåt längre än till ”live” sändning. 6.6.5 Uppspelning från MyRecord och MediaExplorer Genom att trycka på “USB” knappen får du upp listan över inspelade program på din hårddisk/ minne. Använd “UPP/ NED” knapparna för att välja önskat program och tryck sedan “OK” knappen för att spela upp programmet. Har du tidigare tittat på en del av programmet så kommer mottagaren att fråga dig om du vill återuppta uppspelningen därifrån eller om du vill spela från början. 18 I FIL listan, tryck höger “PIL” för att navigera till MediaExplorer. Under Mediaexplorer finns andra mediafiler om du lagt detta på USB minnet. Välj den fil du vill spela upp och starta genom att trycka på ”OK” knappen. Notera att inte alla typer av filformat stödjs. . Genom att trycka << eller >> knapparna under uppspelning kan du öka uppspelningshastigheten till 2, 4, 8 eller 16x hastigheten både framåt och bakåt. För att stoppa uppspelningen tryck på “STOP” knappen. Beroende på storlek på din hårddisk kan det ta en liten stund att visa fillistan då du växlar tillbaka. Tryck ”EXIT” för att återgå till “live” tv. NOTERA: Funktionerna för inspelning och Timeshift kräver att en extern hårddisk eller minne är anslutet och installerat via mottagarens USB port. Mottagaren stödjer bara hårddiskar formaterade i filsystemet FAT32. Hårddiskar med andra filsystem kommer inte att kännas igen av mottagaren utan måste i så fall först anslutas till t.ex. en dator för att formateras med FAT32. 19 7 MENY NAVIGERING Tryck “MENU” knappen för att öppna mottagarens huvudmeny. Huvudmenyn innehåller viktiga funktioner som är indelade i olika kategorier. Varje kategori har sin egen undermeny med ytterligare funktioner. • Redigera kanaler • Installation • Användarinställning • Multimedia • Programkort • System Navigera i huvudmenyn med “PIL upp/ PIL NED”. Gå in i undermenyer genom att trycka ”PIL HÖGER” och bekräfta med ”OK” knappen. Tryck ”EXIT” för att backa ur menyn. 20 8 Redigera kanaler 8.1 Redigera kanallista I denna meny kan du sortera kanallistan efter eget önskemål. Tryck “MENU” knappen, välj ‘Redigera kanaler” och tryck på “OK” knappen. Följande funktioner finns: Val Knapp Funktion LÅS RÖD Lås och lås upp kanaler (barn lås) Flytta GRÖN Flytta den markerade kanalen till annan plats I kanallistan. Välj GUL Markera kanaler (t.ex. för att flytta en hel grupp av kanaler) Sök BLÅ Sök efter kanaler i kanallistan Notera: Efter att du redigerat klart, tryck “EXIT” eller “MENU” knappen för att bekräfta din nya lista. Vill du inte spara dina ändringar, avbryt genom att trycka vänster “PIL” och välj NEJ., tryck sedan “OK”. 21 8.2 Redigera favoritkanaler I denna meny kan du skapa en lista med dina egna favoritkanaler. Du kan skapa upp till 8st favoritlistor. Tryck “MENY”, välj redigera favoritkanaler genom att trycka “HÖGERPIL” och “PIL NEDÅT”, bekräfta med “OK”. Använd “HÖGERPIL och VÄNSTERPIL” för att hoppa mellan listan alla kanaler och favoritkanaler. För att skapa en favoritlista: Stega till den kanal du vill lägga till med ”PIL UPP/ PIL NED” och tryck ”GUL” för att lägga till en eller flera kanaler. Tryck “RÖD” för att lägga till de markerade kanalerna i den valda favoritlistan. Då du står i favoritlistan kan du ta bort en kanal genom att trycka på ”RÖD” knapp, flytta en kanal genom att trycka ”BLÅ” knapp, markera flera kanaler med ”GUL” knapp för att sedan ta bort eller flytta dem enligt ovan beskrivning. När du är klar, tryck ”MENU” eller ”EXIT” för att spara och avsluta. 22 9 INSTALLATION I installationsmenyn har du fyra val: • Automatisk kanalsökning Kabel-TV • Manuell kanalsökning KabelTV • Automatisk kanalsökning marksänt • Manuell kanalsökning marksänt Sökningstyp: Om du vill söka manuellt och vet frekvenserna välj manuell sökning och ställ in rätt frekvens. Vid Automatisk sökning (standard) söks hela frekvensbandet av. Start av sökning oavsett typ görs med ”RÖD” knapp. • Aktiv antenn: Om du har en AKTIV antenn (som kräver 5V strömförsörjning) välj “på”, om inte välj “av”. 23 10 ANVÄNDARINSTÄLLNINGAR I denna meny finner du inställningar för: - Språkinställning - Tidsinställning - Föräldrakontroll - A/V kontroll - OSD inställning - Automatisk avstängning. 10.1 Språkinställning • Menyspråk: Välj önskat språk för menyer och information. • Primärt/ sekundärt ljudspråk: Vissa kanaler sänder ut 2st ljudströmmar, t.ex. olika språk. Välj det du önskar som första och andra språk. • Textningsspråk Primärt/ sekundärt: Välj önskat språk för undertexter samt menyspråk • EPG språk: Välj önskat språk för programguiden. 24 10.2 Tidsinställning Denna meny innehåller tidsinställning, justering för sommartid och tidszon. Välj “Manuell” eller “Automatisk” läge med vänster eller Höger (PIL), tryck ”OK” för att bekräfta ditt val. I läget auto tar mottagaren tiden ifrån utsändningen och justerar hela tiden så att klockan är korrekt. Vill du manuellt ställa tiden, välj manuell och justera. Inställningen för sommartid kan justeras manuell/ auto. I läget auto hanteras tiden per automatik. 10.3 Föräldrakontroll För att använda föräldrakontrollfunktionen måste du först slå en kod för att komma in I menyn. Alla val i denna meny är skyddade bakom denna kod. Den för inställda standard koden är ‘0000’. - Byta PIN: I denna meny kan du byta till ny önskad hemlig kod. (fyrsiffrig). Ny PIN: Tryck OK och välj sedan en ny fyrsiffrig kod med de numeriska knapparna. Upprepa PIN kod: Upprepa samma fyrsiffriga kod igen för att verifiera att du valt rätt. Meny lås: Om du väljer att slå på menylåset så kommer hela menyn att skyddas. Varje gång du vill ändra något måste din unika kod matas in. 25 10.4 A/V Kontroll I denna meny kan du justera inställningar för bild och ljud för att passa just din kringutrustning. • TV-Modell: Välj det videoformat som stämmer med din tv modell. • Bildförhållande: Ställ in vilket bildförhållande din TV-apparat har. Välj mellan Auto, 4:3, 16:9. (Tjock-tv = 4:3, Platt-tv = 16:9). • Visa format: Om du väljer formatet 4:3 finns det möjlighet att välja hur mottagaren skall presentera bilden vid en 16:9 formats utsändning. • Du kan välja mellan följande alternativ: - Pan & Scan: I detta läge beskärs 16:9 signalen för att passa en 4:3 formats TV. Vissa delar av originalbilden kan därför komma att döljas. - Letterbox: I detta läge behålls proportionerna för 16:9 formatet. På en 4:3 formats TV visas därför en svart list uppe och nere i bilden - Ignorera: Välj detta alternativ om du vill att din TV skall anpassa bilden genom funktionen i TV apparaten. • Video Format: Välj upplösning mellan de tillgängliga formaten: 1080i /720p/ 576p. Notera: Om din TV apparat inte har stöd för något av formaten kommer bilden att bli svart. • AC3: Välj mellan ‘Av, SPDIF, SPDIF + HDMI’. 26 10.5 OSD inställning I denna undermeny kan du justera visningstiden för informationsrutor t.ex. den som visas då du byter kanal. Du kan även välja vilken grad av transparens/ genomskinlighet du vill att informationsrutorna skall visas med. 10.6 Automatisk avstängning I denna undermeny kan du välja om du vill att mottagaren skall stänga ned sig själv till standby efter en viss tid av inaktivitet. En förutsättning för att automatisk avstängning skall ske är att inga kommandon från fjärrkontrollen eller frontknapparna har registrerats inom den ställda tiden. Om du under denna tid satt en timerinspelning påverkas denna inte av inställningen utan går som planerat. Välj mellan: Ingen, 0:30m ~ 3:00h i 30minuters steg. 27 11 MULTIMEDIA (Kräver tillkopplat och installerat inspelningsmedia) I denna undermeny kan du göra inställningar för ditt tillkopplade inspelningsmedia (Hårddisk eller minne). I menyn finns även möjlighet att formatera. Det finns följande val: • Inspelningslista (Timer) • PVR Inställningar • HDD egenskaper • Fil-lista 11.1 Inspelningslista (Timer) Inspelningstimern har till uppgift att slå på och av mottagaren på de inställda tiderna och samtidigt byta till den kanal som valts. Timern används för att spela in program eller för att starta upp mottagaren en specifik tid och på en specifik kanal. Notera: Timerinspelningar som programmerats via EPG (se EPG-timer kapitel 6.4) läggs automatiskt in i timerlistan. Dessa kan justeras genom att trycka “GRÖN” knapp eller raderas genom att trycka “RÖD” knapp. Vill du manuellt lägga till en inspelning i listan väljer du först ett ledigt nummer/ rad, trycke ”GUL” knapp och anger de inställningar som önskas. Spara dina inställningar genom att trycka ”BLÅ” knapp. 28 11.2 PVR Inställningar I denna undermeny kan du välja förvald inspelningstid för direktinspelning (tryck på ”REC” knappen vid ”vanligt tv-tittande”. Vid direktinspelning visas ett fönster som presenterar den förinställda inspelningstiden. Den förinställda inspelningstiden kan justeras. Det lämpligaste alternativet är att välja att mottagaren stänger av inspelningen då det inspelade programmet är slut, mottagaren tar denna info från EPG informationen. Andra alternativ som kan justeras är: Tidstillägg start inspelningstid: Lägger automatiskt till tid innan den aktuella inspelningen för att garantera inspelning av hela programmet trots eventuella tidsskillnader. Välj mellan alternativen ‘Ingen, 5, 10, 15, 20, 25 and 30 minuter’. Tidstillägg stopp inspelningstid: Lägger automatiskt till tid efter den aktuella inspelningen för att garantera inspelning av hela programmet trots eventuella tidsskillnader. Välj mellan alternativen ‘Ingen, 5, 10, 15, 20, 25 and 30 minuter’. 11.3 HDD egenskaper In denna undermeny ser du all information om ditt tillkopplade inspelningsmedia/ hårddisk. Du har även möjlighet att formatera Hårddisken. 29 HDD Information visar filsystem, Total storlek, använt och ledigt utrymme på det tillkopplade inspelningsmediet. HDD Speed Ger dig möjlighet att testa så att prestandan på din hårddisk räcker till det du vill använda den till. - SD: spela in SD kanaler - HD: spela in HD kanaler - HD + Tms: spela in HD kanaler och kunna använda Timeshift Formatera: Efter att du bekräftat med “OK” knappen kommer din hårddisk att formateras. Notera: En formatering innebär att allt innehåll på hårddisken permanent raderas! 11.4 Fil-lista I Fil-listans meny kan du manuellt navigera och öppna mappar och undermappar som finns på din hårddisk/ USB minne. Tryck Ok för att öppna mapparna. 30 13.1.1 OTA mjukvaruuppgradering Då ny förbättrad mjukvara finns tillgänglig skickas detta ut via TV-nätet. Mottagaren meddelar vid dessa tillfällen om detta och installerar automatiskt den senaste mjukvaran. 13.2 Fabriksinställning I den här menyn finns det möjlighet att radera kanaler för TV/ Radio. Du kan också välja att göra en fabriksåterställning av mottagaren. För att göra en total återställning, välj Fabriksåterställning och ändra till fabriksåterställning längst ut till höger. Tryck sedan OK knappen. Notera: En fabriksinställning raderar alla dina inställningar och favoritlistor. 32 USER’S MANUAL TABLE OF CONTENTS 1 2 3 4 5 6 7 8 9 10 11 12 13 14 15 SAFETY ADVICE............................................................................... 3 QUICK SETUP .................................................................................. 5 FEATURES ....................................................................................... 7 HOW TO CONNECT YOUR RECEIVER............................................. 8 HARDWARE...................................................................................... 9 WATCHING TV................................................................................ 13 MENU OPERATION ........................................................................ 21 EDITING CHANNELS ...................................................................... 22 INSTALLATION ............................................................................... 24 USER SETUP .................................................................................. 26 MULTIMEDIA................................................................................... 30 SMARTCARD .................................................................................. 34 SYSTEM.......................................................................................... 34 TROUBLE SHOOTING .................................................................... 36 TECHNICAL ASSISTANCE.............................................................. 37 2 1 SAFETY ADVICE This product has been manufactured to comply with international safety standards. Please read the following safety precautions carefully. MAIN SUPPLY: 90-260V AC 50/60Hz Operate this product only from the type of power supply indicated on the marking label. If you are not sure of the type of power supplied to your home, consult your local power company. - Disconnect the product from the mains before you start any maintenance or installation procedures. OVERLOADING: Do not overload a wall outlet, extension cord or adapter as this may result in electric fire or shock. LIQUID: The product should not be exposed to liquid of any kind. In addition, no objects filled with liquid should be placed on the apparatus. CLEANING: Disconnect the product from the wall outlet before cleaning. Use a light damp cloth (no solvents) to dust the product. VENTILATION: The slots on top of the product must be left uncovered to allow proper airflow into the unit. - Do not stand the product on soft furnishings or carpets. - Do not stack electronic equipments on top of the product. ATTACHMENTS: Do not use any unsupported attachments as these may be hazardous or cause damage to the product. CONNECTION TO THE AERIAL: Disconnect the product from the mains before connecting or disconnecting the cable from the aerial. Failure to do so can damage the aerial. CONNECTION TO THE TV: Disconnect the product from the mains before connecting or disconnecting the cable from the TV. Failure to do so can damage the TV. LOCATION: Place the product indoors to avoid exposing it to lightning, rain or sun. - Do not place it near a radiator or heat register. - Make sure it has more than 10cm clearance from the device. - Do not block the openings with any object, and do not place the product on a bed, sofa, rug, or other similar surface. - If you place the product on a rack or a bookcase, ensure that there is adequate ventilation and that you have followed the manufacturer’s instructions for mounting. 3 - Do not place the product on an unstable cart, stand, tripod, bracket, or table where it can fall. A falling product can cause serious injury to a child or adult, and serious damage to the appliance. LIGHTNING, STORM or NOT IN USE: Unplug the product from the wall outlet and disconnect the antenna during a thunderstorm or when left unattended and unused for long periods of time. This will prevent damage to the unit due to lightning and power-surges. EXTRANEOUS OBJECTS: Do not insert anything through the openings in the unit, where they can touch dangerous voltage points or damage parts. REPLACEMENT of PARTS: Replacement of parts may only be made by service technician specified by the manufacturer. WARNING! To avoid damage of the power cord or plug: - Do not modify or process the power cord or plug arbitrarily. - Do not bend or twist the power cord. - Make sure to disconnect the power cord holding the plug. - Keep heating appliances as far as possible from the power cord in order to prevent the cover vinyl from melting. - The main plug shall remain readily operable. To avoid electrical shock: - Do not open the main body. - Do not insert metal or inflammable objects inside the product. - Do not touch the power plug with wet hands. - Disconnect the power cord in case of lightning. To avoid damage of product: - Do not use the product when it is out of order. If you continue to use the product when defective, serious damage can be caused to it. Make sure to contact your local product distributor if the product is out of order. - Do not insert metal or alien substance into the slots for the modules or smartcards. It may cause damage to the product and reduce its life span. The socket-outlet shall be installed near the equipment and shall be easily accessible. 4 2 QUICK SETUP 1. Check accessories Please check the gift box for completeness of accessories. Included should be: Receiver, Remote Control, external Power Supply, User Manual, 2 Batteries 2. Connect the Receiver to the TV Set Connect your Receiver with your TV Set. Details can be found in the User Manual under chapter 4. How to connect your receiver. Connect the Receiver with the Coaxial Cable Connect your Receiver with Coaxial Cable from your Terrestrial Antenna or Cable connection. Details can be found in the User Manual under chapter 4. How to connect your receiver. 3. 4. 5. 6. Switch on the Receiver and TV Set Switch on the AC-Power Switch on the rear side of the Receiver and then press the Standby button on the Receiver Front Panel (see User Manual for more details: Chapter 5.2 Front Panel and 5.3 Rear Panel) Insert the Batteries Insert the 2 Batteries into the battery case on the underside of the Remote Control. Please make sure that the Battery + and - Poles are correctly aligned. Settings in the OSD Menu After the Receiver has booted it will display the On-Screen Menu on your TV Set. Should this not bet he case, please check the connections as well as the settings of your TV Set. Please use the key on your Remote Control to manoeuvre though the menu and then please confirm with the key. 5 Information about changes to the channel list please see chapter 8. Edit Channels in the User Guide. Under chapter 5.1, you can make yourself familiar with the functions of your remote control. Under chapter 6, the TV, as well as Recording and Playback functions of your receiver are described. 6 3 FEATURES • Supports SD / HD (MPEG4 AVC/H.264) • One CryptoGuard Smartcard Slot • USB PVR Function (by using external HDD) - Time Shift Mode (by using external HDD) • High Definition Video output: HDMI • Subtitle support : OSD & VBI insertion for TV • 4-Digit 7-Segment-Display • Channel sorting by FTA, CAS, Alphabet and Network • EPG : Now and Next and 7 days EPG • Video output resolution: 576p, 720p, 1080i, 1080p • User selectable output resolution • Multi language OSD in F, GB, I, ES, NL, D, PL… • Fast Channel Change • 5.000 Channels (TV und Radio) programmable • 8 Favorite List & Unlimited Programs per each • Channel Edit Function - Move, Delete, Favorite, Edit - Parental Lock, Channel Rename, Channel Skip • Manual PID- and Network Search • Optical S/PDIF-Output for Digital Audio or Dolby AC3 • Software Upgrade via OTA (or OTC) • Teletext with Sub-Page access • Standby < 1 Watt 7 4 HOW TO CONNECT YOUR RECEIVER Please note: HD Signals are not transferred via RCA-Video – For HDTV Signals and also for the best quality on SDTV, please use an HDMI cable where possible. 4.1 Connecting the Receiver to TV a. Connect the coaxial cable from either your Cable connection or your DVB-T Antenna to the connector marked “RF IN” at the rear of the receiver. b. Connect an HDMI-Cable between the HDMI-ports of your TV Set and your Receiver. c. Connect the RCA cable to port “Audio L/R”and “Video”of Receiver to the respective RCA ports of your TV Set. 8 5 HARDWARE 5.1 Remote Control POWER. By pressing this button, the receiver will go into standby mode. When the receiver is in standby mode, it can be awakened by pressing this button again. MUTE. By pressing this button, all audio outputs of the receiver are muted. When muted, Audio output can be regained by pressing this button again. RED / AUDIO: By pressing this button you can choose alternative Audio tracks if provided by the channel operator. GREEN / SUBTITLE: By pressing this button you can display subtitles if provided by the channel operator YELLOW / SLEEP TIMER: By pressing this button one or more times, the user can determine the time after which the receiver will automatically go into Standby. BLUE / TELETEXT: By pressing this button, the user can activate the teletext application. STATUS: Displays Information about the status of the receiver, connected USB device and channel reception data TV FORMAT: By pressing this button you can change the Screen-Format. Should you experience Display problems press repeatedly until your TV Set displays the best picture. TV/RADIO. By pressing this button the user can jump between TV and radio lists of the receiver. USB: By pressing this button you can access the recorded files and media files on a connected USB Hard-Disk-Drive * SLOW MOTION: Slow motion playback* JUMP Back: Jump forward by 10 Channels in the Channel-List or jump forward during playback of a recorded or media file* JUMP Forward: Jump back by 10 Channels in the ChannelList or jump back during playback of a recorded or media file* REWIND: During Playback of recorded files this button can be used to rewind.* STOP: By pressing this button Playback or Recording can be stopped.* PLAY/PAUSE: By pressing this button the archive on the connected USB HDD is displayed. During Rewind or Fast Forward this button returns to regular playback. Press PAUSE to halt Playback.* FAST FORWARD: During Playback of recorded files this button can be used to fast forward* * requires a USB HDD to be connected and opperational 9 MENU: By pressing this button, the user can activate the main menu of the receiver. EXIT: By pressing this button, the user can exit from the menu without saving the made changes or go one step back in the menu structure. cursor UP: By pressing this button, the user can jump to next channel on the channel list. In menu structure, user can move up one row. cursor LEFT: By pressing this button, the user can decrease the audio volume level of the receiver. In menu structure, user can change between selectable options. cursor RIGHT: By pressing this button, the user can increase the audio volume level of the receiver. In menu structure, user can change between selectable options. cursor DOWN: By pressing this button, the user can jump to previous channel on the channel list. In menu structure, user can move down one row. OK / ENTER: By pressing this button, the user can confirm a selection or save settings in a menu. INFORMATION. By pressing this button, the user can see present and following information about the currently watched channel. ELECTRONIC PROGRAM GUIDE. By pressing this button, the user can see current and forthcoming programming information for each channel. 7-day program information guide is also available by using this button. VOL +: Increases the Volume VOL +: Decreases the Volume FAV / FAVORITE: By pressing this button you can open the Favorite Channel Lists, if you have previosly programd. RECORD: By pressing this button you can start a recording (only if a USB HDD is connected and operational)* CH +: Changes up one channel within the channel-list CH +: Changes down one channel within the channel-list 0-9 NUMBER. By pressing one of the number buttons (0 - 9), the user can change channel or enter a number to menu. ~ FIND: Search for a Channel by entering the first letters of the name. RECALL: return to previously viewed channel * requires a USB HDD to be connected and opperational 10 5.2 Front Panel 1. FRONT FLAP: - IRDETO SMARTCARD SLOT Above the Common-Interface Slot you’ll find a Slot for an IRDETO Smartcard. Please insert the smartcard with the chip first facing downwards. 2. CHANNEL UP Selecting TV/Radio channels 3. CHANNEL DOWN Selecting TV/Radio channels 4. POWER BUTTON Switch on- and off (Stand-by). 5. VOLUME DOWN Decrease the volume 6. VOLUME UP Increase the volume 7. 7-Segment Display In operation displays the current channel number. 11 5.3 Rear Panel No. Name FUNCTION 1 RF IN Input for Terrestrial Signal 2 RF OUT Loop-Output for Terrestrial Signal 3 USB USB 2.0 Port 4 HDMI Output High-Definition Digital Video/Audio Output 5 L Audio Output Left 6 R Audio Output Right 7 COAXIAL Digital Audio Output coaxial 8 CVBS Video Composite Output 9 DV 12V = 1A Connection for external Power Supply 12 6 WATCHING TV This chapter describes how to watch TV and listen to radios using the receiver. Thanks to the advantages of Digital TV transmissions, extra features are added to the broadcast, such as information about the current and next program and extra options such as the ability to choose between different languages for Audio and Subtitling. 6.1 General watching • Use the CHANNEL UP or CHANNEL DOWN keys to go to the next and previous channel respectively. • Use the NUMBER keys to input a channel number. • Use RECALL key on the remote control to open a list of channels that the user was watching before the currently selected channel. • Use TV/RADIO key on the remote control to toggle between the last selected TV or Radio channels. • Press UP or DOWN keys on the front panel of the receiver to select the next/previous channel from the current channel list. • Use INFO key to display the information banner about the current program. Press INFO key again to display the information of the current program. With the cursor RIGHT or cursor LEFT, you can see the next event information. Press again INFO key or the EXIT key to hide the banner and event information. In Live TV Mode, press the “i” (INFO) key to display the Information Bar. This contains Information on the current Channel, the current time, the Current and Next Program on this Channel, Information on the Signal Quality as well as Services broadcast on this Channel (i.e. Subtitles, Teletext). Press the “i” key again and, provided this is broadcast by the operator, you will see detailed information on the current program. Press the “< / >” keys to change to the next program information Please note: Program information will only be displayed if it is included in the current transmission. Availability and validity of program information is dependent on the broadcaster. 13 In Live TV Mode, press the OK key to open the Channel List. Move the cursor key UP / DOWN to move in the List channel-by-channel. Use the ‘< / >’ keys to jump 10 channels forward / backward. Choose your desired channel with the OK key. Exit the List with the EXIT key. Find a specific channel by pressing the BLUE (FIND) key on your remote control/ Enter the first letters of the desired Channel and press the YELLOW key to jump to the search result in the Channel List. Display Channels in Groups. In the Channel List, press the RED key to display options: - All TV - Favourite - Provider - CAS (Type of encryption) In the Channel List, you can also sort the Channels by pressing the GREEN key. Options are sorting by numerical, Alphabetical or FTA-to-CAS order. 14 6.2 Options Subtitling language (GREEN key): The user can select from available subtitle languages, if more than one exists. Selection from the available choices is made with cursor UP or cursor DOWN key and confirmation by OK key. Some broadcasters also provide Subtitles in either, DVB- or Teletext Format. Audio track (RED key): Some TV channels broadcast multiple audio tracks, for example different languages or AC3 Audio tracks. Selection from the available choices can be made by pressing the cursor UP or cursor DOWN keys and confirming with the OK key. Beside alternative tracks, you can set the mode to Stereo or Mono-left or -right. Providing the broadcaster transmits, also AC3 Sound can be chosen. 6.3 EPG (Electronic Program Guide) Now, Next, as well as 7 days Program Information EPG application can be activated by pressing the EPG key when watching a TV program or listening to a Radio Channel. EPG application is divided into two levels. The first level gives an overview of 10 continuous channels with information about present and forthcoming programs. By pressing the EPG key once more the second level provides information of all available events for the selected channel for the next 7 days. Availability of Program information data is dependent on the individual broadcaster. By again pressing EXIT key you can close the EPG menu. Navigating on the first level of EPG (Multi-EPG) The currently active channel and the current program are highlighted. Depending on how the EPG data is transmitted, it is possible that program information is not available until one has actually selected the channel. Move the cursor UP or DOWN and confirm with the OK key to change to another channel in the list. 15 Move the cursor LEFT or RIGHT to move to another time of the current day. Use the BLUE key to advance to the next day and use the YELLOW key to go back by one day. For your orientation, please also note the timeline indicating the current time in comparison to the programs. For more detailed Information on a program, press the “i” (INFO) key. Please note that not all broadcasters provide EPG or detailed EPG data. If you wish to add a program to your timer for recording, move the cursor to the desired program and press the REC key on your Remote Control. The event is added to your Record List and, provided a USB Hard-Disk-Drive is connected at the set time with enough free space, the event will be recorded to this USB device. Press the MENU key to return back to the EPG Menu confirming that you want to save the new event in your Record List. Note: The receiver requires time to boot from Standby and to check the current time from the signal and to descramble the program including check for new keys for the inserted smartcard. When adding an event to the record timer, please allow at least 7 minutes before the recording is to begin. Also, when programming more than one event, please allow time in between events accordingly. When programming events via the EPG timer function, you can manually edit the recording list. Also by default, the receiver will add 5 minutes before and 5 minutes after an EPG event – you can edit this padding time (Start and End individually) in the menu MULTIMEDIA / PVR SETTING. Note: any user input during an event (via the remote control or the panel keys) will result in the receiver not returning into standby automatically after the timer event is over. Navigating on the second level of EPG (Single EPG) By pressing the GREEN (Toggle) key, the second level EPG will appear. This application provides complete EPG information for the selected channel. It is possible to scroll between programs in chronological order for a particular day with the cursor UP and cursor DOWN keys. Choose another day using the LEFT and RIGHT keys. After pressing the OK key, detailed information for the Program will be displayed. Press the OK or the EXIT key to exit the detailed Information. Note: Program information will only be displayed if provided by the according channel operator. 16 6.4 EPG-Timer (Timer programming via EPG) In the Single- or Multi-EPG Mode, you have the option to reserve programs in the timer. Move the cursor to the desired program and simply press the REC key on your remote control. An additional window is opened, which displays the timer reservations. If a HDD is connected, the recording will be made accordingly to the connected external HDD. If no HDD is connected, the receiver will switch to the according channel at the program time. At exiting (EXIT or MENU key), please confirm the Event with the OK key. Note: Should two timer reservations overlap, an error message will be displayed. You then need to change or delete one of the two reservations. Use the cursor UP and cursor DOWN keys to move to the reservation you want to change and either delete a reservation with the RED key or change the start or duration time using the BLUE key. 6.5 Teletext Teletext application can be activated deactivated by pressing the TEXT key. The following operations are supported after activating Teletext: • After activating text page 100 will appear after a short time. • Specific Teletext pages can be selected using the number keys. If the Teletext page is currently not available, the last selected page will remain on the screen. • The next Teletext page can be selected with the cursor UP key. • The previous Teletext page can be selected with the cursor DOWN key. 6.6 PVR Function When connecting an external Hard-Disk-Drive to the USB port, the Receiver can be used as a PVR (Personal Video Recorder). 6.6.1 Direct recording To start a recording, press the REC (Record) key, choose a duration time with the LEFT / RIGHT keys and confirm with the OK key. 17 6.6.2 EPG Recording Via the EPG, you can program a Timer reservation – Please also see 6.4 for more details. 6.6.3 Timer Recording via manual Record List Alternatively to programming an Event via the EPG, you can also program an Event manually (Start-/End-Time, Channel) via the RECORD List. Open the MENU and open the submenu MULTIMEDIA/ RECORDING LIST and confirm with OK key. Add an Event manually by pressing the YELLOW (ADD) key. Enter the desired Date, Start and Stop Time, choose the Channel Type (TV or Radio). Choose the channel you wish to record from “Channel” and choose whether you want to repeat this recording on a daily or weekly basis under “Mode'. 18 6.6.4 TimeShift-Function During Live TV, you can press the PAUSE key to activate the TimeShift function. Provided you have connected a USB HDD, the Receiver will pause the program. With the PLAY key, you can continue to watch the time shifted program. The Information Bar indicates how much time you are watching time shifted compare to the live program. As with Playback, you can Fast-Forward and Rewind within the TimeShift Mode. With the EXIT key or by pressing the STOP key, you can stop the TimeShift Mode and resume watching in Live Mode. 6.6.5 Playback from MyRecord and MediaExplorer After pressing the USB key, a list is displayed which contains all the recorded programs on your connected external USB HDD. Use the UP / DOWN keys to move the cursor to the desired program and confirm with the OK key to start playback. If you have previously watched this specific recording, you will be asked if you want to begin playback at the last viewed position. If supported by the Channel operator, by pressing the INFO key in the file list or during playback, details about the recorded program are displayed. 19 Under FILE LIST, press the RIGHT key to navigate to the MediaExplorer. Here you will find media files that are stored on your USB HDD. Move to the file you wish to play and press the OK key. Note that due to the numerous different file formats that are available, some files couldn’t be played back. By pressing the FAST FORWARD or REWIND keys, you can increase the playback speed to 2, 4, 8 and 16x in both directions. To stop playback press the STOP key. Depending on the capacity of your USB Drive, it may take a little moment to display the FILE LIST again. By pressing the EXIT key, you can return to the live channel. Functions such as Recording, Timeshift and Playback require an external HDD to be connected via USB (2.0) and to be ready operational. Only FAT32 formatted Hard-Disk-Drives can be used. Other formats could not be recognized by the receiver. Before recording or TimeShift Operation, please make sure that there is enough free capacity on your Hard-DiskDrive. 20 7 MENU OPERATION The main menu can be activated by pressing the MENU key. Main menu provides access to most important functions and features of the receiver. These are divided into the following Menus. Each Menu contains corresponding sub-menus. The Main Menu consists of: • Edit Channels • Installation • User Setup • Mulimedia • Smartcard • System You can move between the Main Menu by pressing the cursor UP or cursor DOWN key. The available Sub-Menus can be accessed by pressing the cursor RIGHT key and confirming using the OK key. You can exit the menu by pressing the EXIT key. 21 8 EDITING CHANNELS 8.1 Create Channel List This menu is used to shape your channel list according to your personal preference. Press the MENU key, select ‘Edit Channels’ by using the RIGHT cursor and press OK. Change between TV and Radio Channels by pressing the TV/RADIO key. The individual functions are: Command Key Function Lock RED Lock and unlock a Channel (i.e. for access by minors) Move GREEN Move the highlighted Channel to another position within the Channel List Select YELLOW Select Channels (i.e. for moving an entire group of channels in one go) Find BLUE Find Channels within the Channel List Note: After editing the channels and pressing the EXIT or MENU key, you can confirm your new channel list by pressing OK key. If you don’t want to save any changes and keep the previous status, cancel the process by pressing cursor LEFT, choosing “NO” and confirming with the OK key. 22 8.2 Edit Favorite Channels This menu is used to create a list of your favourite channels. Thus you can create up to 8 different Favorite Lists. Press the MENU key, select EDIT FAVORITE CHANNELS by using the RIGHT and DOWN key and confirm using the OK key. Use the RIGHT or LEFT keys to jump between All TV and the chosen FAV List. First, select the channels you would like to add to your favorite list using the UP and DOWN keys, press the YELLOW Select key to mark one or more channels and press the RED key to add to the chosen Favorite List. If required, use the GREEN A-Z key to sort the channels in alphabetical order or use the BLUE key to find a specific channel from the list. Within the Favorite List, you can delete a Channel from the FAV List by choosing the channel and pressing the RED (DELETE) key. You can move a Channel using the BLUE (MOVE) key, select a group of channels by using the YELLOW (SELECT) key and either delete or move the marked Channels. When finished, use the MENU or EXIT key to save your changes (confirming with YES) or abandon (choosing NO). 23 9 INSTALLATION This menu contains following items: • • • • Automatic search cable Manual search cable Automatic search terrestrial Manual search terrestrial 9.1 Automatic Search Cable & Manual Search Cable You have two options for the scan of cable channels. If you already know the parameters of the channels you wish to find, use the manual Channel Search and enter the required parameters accordingly. Otherwise use the Automatic Channel Search in which all Frequencies are scanned. In Manual Mode the search begins with the Start frequency. Enter the Symbolrate and Constellation. Depending on the cable Network choose “Network Scan” on for a fast search for all channels. To start the channel scan please enter the following parameters and press the RED key. • Start frequency: Enter the Transponder frequency by pressing OK and using the numeric keys to enter the according Value. • Constellation: This is an extended Parameter which specifies how the digital TV-Signal is transmitted. Your TV-Network Operator will inform you about the correct value. • Symbolrate: Enter the Symbolrate using the OK- and the numeric keys. 24 • Network Search: Choose „On“, if your Search is to include all Transponders, that are connected to a certain Network. Use the NAVIGATION Keys LEFT and RIGHT to toggle between „On“ and „Off“. • Search Range: Use the NAVIGATION Keys LEFT and RIGHT to toggle between All Channels, Free-To-Air or Scrambled Channels. • Logical Channel: By setting the option to „On“ the sequence of channels in your channel list changes according to what has been determined by your operator. Should your network not provide this function, please switch this option to „Off“. In Automode the Search begins with the Start frequency and ends with the End frequency, the set Frequency steps, the set Symbolrates (6111,6875 and 6900ksps) as well as the set Constellation (16,32,64,128 and 256QAM) is used. Depending on the Cablenetwork it cannot be guaranteed that in Automatic mode all channels are actually found. To start the channel Search enter the following values and then press the RED key. • Start frequency: Set the Start frequency for the channel search using the OKand numerical keys on your remote control. • End frequency: This Search value defines the End of the Search Range. A reduction of the range results in a faster search however, possibly results in less channels being found. • Frequency lists: This extended Search parameter changes the Grid Resolution of the Search. Please only change the value if you are familiar with this function. • Search Range: Use the NAVIGATION Keys LEFT and RIGHT to toggle between All Channels, Free-To-Air or Scrambled Channels. • Logical Channel: By setting the option to „On“ the sequence of channels in your channel list changes according to what has been determined by your operator. • Should your network not provide this function, please switch this option to „Off“. 25 9.2 Terrestrial Scan In automatic channel search choose your region, search range and the logical channel (if available), then start the channel search using the RED key. If all values of the channels are known then choose Manual channel search and enter the following values. • Search Mode: Choose Auto for automatical Searching of all available Frequencies. If you prefer to search single Frequencies, choose manual. • Region: With the Regional settings you can change the geographical and cultural value. • HF Chanel: Use the NAVIGATION Keys LEFT and RIGHT to change the RF-channel number. • Search Range: Use the NAVIGATION Keys LEFT and RIGHT to toggle between All Channels, Free-To-Air or Scrambled Channels. • Logical Channel: By setting the option to „On“ the sequence of channels in your channel list changes according to what has been determined by your operator. Should your network not provide this function, please switch this option to „Off“. • Antenna Booster: If you have connected an active antenna that requires 5V Power supplied by the receiver, choose “on”, otherwise choose “off”. 10 USER SETUP Please use the cursor keys to select: - Language Setting, - Time Setting, - Parental Control, - A/V Control, - OSD Setting, - Automatic Power Down. 26 10.1 Language Setting • Menu Language: Select the preferred language for the system menus. st nd • Audio Language (1 / 2 ): Some TV programs send multiple audio tracks, for example in two different languages. If there are no audio tracks available that match your settings, another language may be used instead. st nd • Subtitle Language (1 / 2 ): Select the preferred language for the subtitling and Program information. • EPG Language: Select the preferred language for the Electronic-Program-Guide 10.2 Time Setting This menu contains Time Setting, Summer Time and GMT Offset. Select “Manual” or “Auto” mode using the cursor LEFT or cursor RIGHT keys and press OK to confirm. If you wish to change time and date manually in time offset menu, please set the option to “Manual”. Also Summertime can either be set to “Auto”, “Off” or “On”. In “Auto” mode the Receiver automatically changes to and from Summertime at the according dates. 27 10.3 Parental Control To use the Parental Control function, you will be asked to enter your access PIN code. All parental control features work on a locking concept with the PIN code as your entrance key. The default PIN code is set to ‘0000’. - Change PIN code: Use this function to change your PIN code to some other four-digit number. - New PIN: Enter a new four-digit PIN code by pressing the OK key and using the number keys on your remote control. Verify new PIN code: Re-enter the same new four-digit PIN code once again to verify the new PIN code. Menu Lock: After turning the Menu Lock to “ON”, the complete Menu will require your PIN code to be entered before opening. - 10.4 A/V Control In the Audio/video menu, you can modify the properties of the audio and video signals to suit your TV and audio equipment. • TV-Type: Please select the video format consistent with your TV. 28 • Aspect ratio: User can inform the receiver about the display aspect ratio of the TV that is connected to the receiver. Possible choices are ‘Auto, 4:3, 16:9’ aspect ratios. • Display Format: If you select the display aspect ratio of TV as “4:3”, then also the preferred aspect ratio conversion scheme for cases in which the transmitted Program is in “16:9” format can be chosen. The options are: - Pan & Scan: The receiver interprets pan & scan vectors encoded in the Program and crops the 16:9 input signal for display on 4:3 TV. - Letterbox: In this mode, the original aspect ratio of the 16:9 input video signal is preserved. Thus there are vertical black bars on the top and bottom of the screen. - Ignore: Use this setting if your TV set handles the aspect ratio conversion. • Video Format: Please choose from the available resolutions 1080p / 1080i 720p or 576p. For 1080p, you will need to confirm with the numeric key “1” on your remote control. Note: a TV set that does not support 1080p (Full-HD) will not be able to display this setting. • AC3: Please choose between ‘Off, SPDIF, SPDIF + HDMI’. 10.5 OSD Setting In this Submenu, you can adjust the display time (i.e. time of the appearing of the info bar or other on-Screen Messages) and the OSD transparency (in %) over the Live picture. 29 10.6 Automatic Power Down In this Submenu, you can choose the time after which the receiver will go into Standby (Sleep-Mode). Provided the receiver is not undertaking any task such as recording, and also provided there is no input via the remote control or the front panel keys, the receiver would go into Standby after the set time. Options are: Off (None), 0:30m ~ 3:00h in 30min. steps 11 MULTIMEDIA (only with a connected and operational external HDD) In this Sub Menu, you can make some settings for your connected Hard-DiskDrive for the PVR Operation and also format the HDD. The Sub Menu includes the following functions: • Record List (Timer) • PVR Settings • HDD Properties • File List 30 11.1 Record List (Timer) A Timer is used to program the receiver to switch on and off again at certain times and to tune to a specified channel. Timers are normally used to record a TV program on the video recorder or to pre-program the receiver for other reasons (i.e. wakeup). A set timer causes the receiver to wake up from standby mode at the specified time or change the channel to the specified one. Note: Timer settings that have been programmed in the EPG (see EPG-Timer point 6.4) are automatically marked in the Timer list as “Recording“ and can be edited (GREEN key) or deleted (RED key) here. In the Record List Sub menu, please press YELLOW key (ADD) to manually add an event to the timer. If an external HDD is connected to the USB port and is operational, recordings can be made directly on the HDD. Please enter: - Date - Start Time - Stop Time - Channel List (TV / Radio) - Channel - Mode (Once / Daily / Weekly) Save the newly set Recording Event by pressing the BLUE key. 31 11.2 PVR Settings In this Sub menu, you can select the default duration for direct recordings. For direct recordings, a window appears after pressing the REC key which displays this pre-defined setting. Before beginning the recording, this st can be adjusted. The 1 suggested option is automatically the end time of the current event that the receiver draws from the EPG Information, if provided by the channel operator. Other options in this menu are: Record Start Padding Time: Automatically adds time before your recording to cater for possible delays in the broadcast. Choose between ‘None, 5, 10, 15, 20, 25 and 30 minutes’. - Record End Padding Time: Automatically adds time to the end of your recording to cater for possible delays in the broadcast. Choose between ‘None, 5, 10, 15, 20, 25 and 30 minutes’. - Jump Duration: Set the size of “jumps” to be performed when you press the 11.3 / keys during playback. Choose between ‘1%, 5%, 10%, 20%’. HDD Properties In this Sub Menu, you can see all information about your connected Hard-Disk Drive as well as an option to format the HDD. 32 HDD Information displays the File System, the Total-, Used- and FreeSize of the connected USB Hard-DiskDrive. HDD Speed gives you the option to perform a speed test to verify that the speed of your connected USB HardDisk-Drive suits the tasks you wish to perform. - SD: For recording of SD channels - HD: For recording of HD channels - HD + Tms: For recording of HD channels and TimeShift Playback Formatting: After confirming with the OK key, the HDD is formatted. Note: All files on the Hard-Disk-Drive will be deleted when formatting. 11.4 File List After opening the File List Sub menu, you can navigate to subfolders on the connected USB HDD. Press the OK key to open the subfolder. Move to the file you wish to play and press the OK key. Please note that due to the numerous different file formats that are available, some files could not be played back. 33 12 SMARTCARD After opening the smartcard settings, the menu will display details of the inserted CryptoGuard Smartcard. Information includes settings and details on your subscription, age settings and changing of the PINCode of the smartcard. 13 SYSTEM The System Menu has 4 Sub menus: - Information, - Software Upgrade, - Default Setting, - OTA. The Information Sub menu is used to display information about the receiver and its hardware, software and loader. 13.1 Software Upgrade This allows to update the system software to maintain the best possible performance of the receiver. 34 13.1.1 OTA (or OTC) Software Upgrade The software’s upgrade will be automatically made via OTA or OTC system. 13.2 Default Setting In this menu, you can delete all channels for TV or Radio. Additionally you can perform a factory reset to set back Channels, the Configuration to the original state as well as perform a Default Setting. Note: it is highly recommended not to perform any factory reset without the presence/injunction of a Technical Operator. 35 14 TROUBLE SHOOTING Problem LED on front panel does not light No picture or sound Possible causes Remedy AC Power cord disconnected Wrong connection of the Video/audio output to TV input terminal Connect power cord properly into the power socket Connect correctly with HDMI cable or RCA Wrong connection of antenna cable Connect the antenna cable correctly No signal or weak signal Check the cable connections and Antenna alignment Wrong setting of channels Information in MENU screen Your TV mode is different from broadcasting mode Type the setting value correctly Batteries exhausted Change the batteries Fluorescent light interfering with the remote control Switch off the fluorescent light Remote control is incorrectly aimed Aim the remote control at the receiver Distorted menu screen Too high brightness and contrast level of TV set Adjust brightness and contrast to a lower level Not working Process down Switch off the receiver, remove the power cord. After a short moment, re-insert the power cord and switch on again Black-and-white screen or V-Hold The remote control is not working 36 Use the same mode on the TV Check the NTSC/PAL converter connection to the receiver and TV 15 TECHNICAL ASSISTANCE Dear Customer, Should you require technical assistance and your dealer or installer was not able to help, please contact our technical support. Company: DILOG Contact number: +46 300 568030 37