1
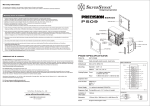
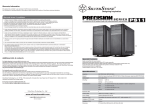
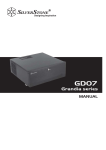
Warranty Information
This product has a limited 1 year warranty in North America and Australia.
For information on warranty periods in other regions, please contact your reseller or SilverStone authorized distributor.
Warranty terms & conditions
1. Product component defects or damages resulted from defective production is covered under warranty.
Defects or damages with the following conditions will be fixed or replaced under SilverStone Technology’s jurisdiction.
a) Usage in accordance with instructions provided in this manual, with no misuse, overuse, or other inappropriate actions.
b) Damage not caused by natural disaster (thunder, fire, earthquake, flood, salt, wind, insect, animals, etc…)
c) Product is not disassembled, modified, or fixed. Components not disassembled or replaced.
d) Warranty mark/stickers are not removed or broken.
Loss or damages resulted from conditions other than ones listed above are not covered under warranty.
An all accommodating ATX tower designed for liquid cooling
2. Under warranty, SilverStone Technology’s maximum liability is limited to the current market value for the product (depreciated value, excluding
shipping, handling, and other fees). SilverStone Technology is not responsible for other damages or loss associated with the use of product.
3. Under warranty, SilverStone Technology is obligated to repair or replace its defective products. Under no circumstances will SilverStone
Technology be liable for damages in connection with the sale, purchase, or use including but not limited to loss of data, loss of business, loss of
profits, loss of use of the product or incidental or consequential damage whether or not foreseeable and whether or not based on breach of warranty,
contract or negligence, even if SilverStone Technology has been advised of the possibility of such damages.
4. Warranty covers only the original purchaser through authorized SilverStone distributors and resellers and is not transferable to a second hand
purchaser.
5. You must provide sales receipt or invoice with clear indication of purchase date to determine warranty eligibility.
KL05-Q
6. If a problem develops during the warranty period, please contact your retailer/reseller/SilverStone authorized distributors or SilverStone
http://www.silverstonetek.com.
Please note that: (i) You must provide proof of original purchase of the product by a dated itemized receipt; (ii) You shall bear the cost of shipping
(or otherwise transporting) the product to SilverStone authorized distributors. SilverStone authorized distributors will bear the cost of shipping
(or otherwise transporting) the product back to you after completing the warranty service; (iii) Before you send the product, you must be issued a
Return Merchandise Authorization (“RMA”) number from SilverStone. Updated warranty information will be posted on SilverStone’s official website.
Please visit http://www.silverstonetek.com for the latest updates.
KL05-W
Special Features
Additional info & contacts
For North America ([email protected])
SilverStone Technology in North America may repair or replace defective product with refurbished product that is not new but has been functionally tested.
Replacement product will be warranted for remainder of the warranty period or thirty days, whichever is longer. All products should be sent
back to the place of purchase if it is within 30 days of purchase, after 30 days, customers need to initiate RMA procedure with SilverStone Technology
in USA by first downloading the “USA RMA form for end-users” form from the below link and follow its instructions.
http://silverstonetek.com/contactus.php
For Australia only ([email protected])
Our goods come with guarantees that cannot be excluded under the Australian Consumer Law.
You are entitled to a replacement or refund for a major failure and for compensation for any other reasonably foreseeable loss or damage.
You are also entitled to have the goods repaired or replaced if the goods fail to be of acceptable quality and the failure does not amount to a major failure.
Please refer to above “Warranty terms & conditions” for further warranty details.
Interference-free design for mounting 240mm or 280mm radiator
Highly flexible storage accommodation of up to 8 or 11 drives*
Quick access filters for easy cleaning
Motherboard back plate opening for quick CPU cooler assembly
Mesh front panel intake maximizes airflow with side window for viewing system innards (KL05-W)
Front-side intake vents with foam padded side panels to minimize noise (KL05-Q)
All black painted interior for stylish look
*Requires purchase of additional drive cage
Specifications
Model No.
SST-KL05B-W , SST-KL05B-Q
Material
Mesh front panel, steel body (SST-KL05B-W), Plastic front panel, steel body (SST-KL05B-Q)
Motherboard
ATX , Micro ATX
SilverStone Technology Co., Ltd. 12F No. 168 Jiankang Rd., Zhonghe Dist., New Taipei City 235 Taiwan R.O.C. + 886-2-8228-1238
(standard international call charges apply)
Drive Bay
External
5.25” x 2
Internal
3.5" x 6 or 2.5” x 6 , 2.5” x 2
For Europe ([email protected])
For all other regions ([email protected])
Cooling System
Front
2 x 120mm/140mm fan slot (1 x 120mm intake fan included)
Rear
120mm fan slot x 1
Top
120mm / 140mm fan slot x 2
Bottom
120mm fan slot x 2
Expansion Slot
8
Front I/O Port
USB 3.0 x 2 / Audio x 1 / MIC x 1
Power Supply
Optional Standard PS2 (ATX)
Expansion Card
Compatible up to 16”
11” with optional drive cage (sold separately) installed
NO:G11222700
Limitation of CPU cooler
165mm
Limitation of PSU
225mm
Dimension
200mm (W) x 525mm (H) x 494mm (D), 52L
Extra
Support Kensington locks
HDD Install
TOP COVER
RESET BUTTON
Remove the hard drive tray as indicated
in the diagram.
Снимите лоток привода жесткого диска,
как показано на рисунке.
Entfernen Sie die Festplattenhalterung wie in der
Abbildung gezeigt.
請依圖示將硬碟拖盤取出
Retirez le plateau du lecteur tel qu’illustré.
図示されるようにハードディスクドライブト
レイを取り外します。
Retire la bandeja para discos duros como se indica
en el diagrama.
그림과 같이 하드 드라이브 브래킷을 분리합니다.
Rimuovere il cassetto del disco rigido come indicato
nella figura.
请依图示将硬碟拖盘取出
Pull the tab of tool-less bracket outward.
Потяните фиксатор кронштейна наружу.
Nase der Halterung nach außen ziehen (kein
Werkzeug erforderlich)
將免工具支架往外扳開
Tirez l'onglet du support sans outil vers l'extérieur
ツール不要ブラケットのタブを外側へ引きます。
Tire de la pestaña del bracket sin herramientas
hacia fuera.
공구 사용이 필요 없는 브래킷의 끝부분을 바깥쪽으로
당겨 뺍니다.
Tirare verso l'esterno la linguetta della staffa
ad incastro
将免工具支架往外扳开
Install your 3.5”or 2.5” drive into the tray
and secure with screws
Установите 3,5-дюймовый или 2,5-дюймовый диск
в лоток и закрепите винтами.
Installieren Sie Ihr 3,5- oder 2,5-Zoll-Laufwerk im
Schacht und sichern Sie es mit Schrauben.
放入3.5”或2.5”硬碟,並鎖上螺絲固定
Installez votre lecteur de disque 3,5" ou 2,5" dans le
plateau et vissez avec les vis.
3.5”または2.5”ドライブをトレイに設置し、
ネジで固定します。
Instale su dispositivo de 3,5” ó 2,5” en la bandeja y
asegúrelo con tornillos.
3.5”또는 2.5” 드라이브를 트레이에 설치하고
나사로 고정합니다.
Installare il disco da 3,5” o 2,5” nell'alloggio e fissare
con viti.
放入3.5“或2.5”硬碟,并锁上螺丝固定
12025 FAN X 2 (OPTION) OR
14025 FAN X 2 (OPTION)
POWER BUTTON
12025 FAN X 1 (OPTION)
POWER LED
RIGHT SIDE
PANEL
USB3.0 X 2 + SPK + MIC
5.25” DRIVE BAY X 2
PS / 2 PSU (OPTION)
LEFT SIDE PANEL
WITH WINDOW
2.5” DRIVE BAY X 2
12025 FAN X 2 (OPTION)
3.5” HDD TRAY X 6 OR 2.5” X 6
12025 FAN X 2 OR
14025 FAN X 2 (OPTION)
FRONT DOOR
LEFT SIDE PANEL
MESH
PICTURE
ITEM
FRONT DOOR
PURPOSE
SCREW-P/W-M3*4-BK
SECURE 2.5” HDD
SCREW-I-6-32*5-BK
SECURE PSU, MB, 3.5”HDD
STANDOFF-6-32*6.5H-6-32
SUPPORT MB
STANDOFF-SOCKET-WRENCH
STANDOFF SCREWS
BUNCH-WIRE-TIES
CABLE MANAGEMENT
CDR Install
SSD Install
Remove the hard drive tray as indicated
in the diagram.
Снимите лоток привода жесткого диска,
как показано на рисунке.
Entfernen Sie die Festplattenhalterung wie
in der Abbildung gezeigt.
請依圖示將硬碟拖盤取出,然後放入2.5”硬碟
Retirez le plateau du lecteur tel qu’illustré.
図示されるようにハードディスクドライブト
レイを取り外します。
Remove the front panel as indicated
in the diagram
Снимите лицевую панель,
как показано на рисунке
Frontblende wie abgebildet entfernen
請依圖示由面板正面取下擋版
Retirez le panneau frontal comme
indiqué dans le diagramme
図示されるようにフロントパネル
を取り外します
그림과 같이 전면 패널을 분리합니다
Retire la bandeja para discos duros como
se indica en el diagrama.
그림과 같이 하드 드라이브 브래킷을 분리합니다.
Retire el panel frontal como se indica
en el diagrama
Rimuovere il pannello frontale come
indicato nella figura
请依图示由面板正面取下挡版
Rimuovere il cassetto del disco rigido come
indicato nella figura.
请依图示将硬碟拖盘取出,然后放入2.5“硬碟
Install your optical drive or 5.25” device as indicated
in the diagram. (Insert your optical drive or 5.25” device
externally to align with the panel and secure the device
with tool-less lock.)
Установите оптический привод или 5,25-дюймовое
устройство, как показано на схеме. (Установите оптический
привод или 5,25-дюймовое устройство снаружи, выровняв
его с панелью и закрепив фиксатором без использования
каких-либо дополнительных инструментов)
Install your 2.5” drive into the tray and secure
with screws from bottom or both sides.
Установите 2,5-дюймовый диск в лоток и
закрепите винтами снизу или с боков.
Installieren Sie das optische Laufwerk oder
5,25-Zoll-Gerät wie in der Abbildung angegeben.
(Setzen Sie Ihr optisches Laufwerk oder externes
5,25-Zoll-Gerät bündig zur Blende ein, fixieren Sie
das Gerät mit dem werkzeuglosen Verschluss.)
依圖示安裝你的光碟機或5.25吋裝置
(由外部將光碟機推入機身與面板平齊,扣具會
自動扣上)
Installieren Sie Ihr 2,5-Zoll-Laufwerk im Schacht
und sichern Sie es von der Unterseite oder
beiden Seiten mit Schrauben.
兩側或底部鎖上螺絲固定
Installez votre lecteur optique ou un périphérique 5,25"
comme indiqué dans l'illustration. (Insérez votre disque
optique ou votre appareil de 5,25” en externe pour
aligner avec le panneau et fixer l'appareil avec le
verrouillage sans outil.)
図のように、光学ドライブまたは5.25”デバイスを
インストールします。 (光学ドライブまたは5.25”
デバイスを外側から入れてパネルに合わせてから、
ツール不要ロックでデバイスを固定します。)
Installez votre lecteur de disque 2,5" dans le
plateau et vissez avec les vis par dessous ou
par les deux cotés.
2.5”ドライブをトレイに設置し、底部または両
サイドからネジで固定します
Instale su dispositivo óptico ó dispositivo de 5,25”
como se indica en el diagrama. (Inserte su dispositivo
óptico ó dispositivo de 5,25” externamente para
alinearlo con el panel y fije el dispositivo con el cierre
sin herramientas.)
광드라이브나 5.25" 장치들을 그림과 같이 설치하십시오.
(광드라이브 또는 5.25” 장치를 외부에서 삽입한 후 장치를
패널과 정렬하고 이를 공구가 필요없는 잠금장치로
고정하십시오.)
Instale su dispositivo de 2,5” en la bandeja y
asegúrelo con tornillos desde el fondo o desde
ambos lados.
2.5” 드라이브를 트레이에 고정하고 바닥 또는
양쪽에서 나사로 고정합니다.
Installare il disco da 2,5” nell'alloggio e fissare
con viti dal basso o da entrambi i lati.
两侧或底部锁上螺丝固定
Installare l'unità ottica o il dispositivo da 5.25" come
indicato nello schema. (Inserire l'unità ottica o l’unità
da 5.25 " esternamente per allinearla con il pannello
e fissare il dispositivo con la serratura ad incastro.)
依图示安装你的光碟机或5.25吋装置
(由外部将光碟机推入机身与面板平齐,扣具会
自动扣上)