1
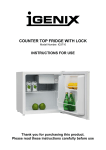
SINGLE HOTPLATE
Model Number: IG8010
INSTRUCTIONS FOR USE
Thank you for purchasing this product.
Please read these instructions carefully before use
Trouble with your hotplate? …
Try our troubleshooting guide on page 4.
If that does not solve the issue contact us …
Tel: 01473 271 272
Email: [email protected]
Fax: 01473 270 733
Website: www.igenix.co.uk
Postal Address:
Customer Service Department
Pik-a-Pak Electrical Distributors
38 Bluestem Road,
Ransomes Europark,
Ipswich, IP3 9RR
When writing or emailing us to report a fault please ensure you attach a copy of your proof of purchase.
Please retain your original
Disposal of Old Electrical Appliances
The European Directive 2002/96/EC on Waste Electrical and Electronic Equipment (WEEE),
requires that old household electrical appliances must not be disposed of in normal unsorted
municipal waste. Old appliances must be collected separately in order to optimise the recovery
and recycling of the materials they contain and reduce the impact on human health and the
environment. The crossed out “wheeled bin” symbol on the product reminds you of your
obligation, that when you dispose of the appliance it must be separately collected. Consumers
should contact their local authority or retailer for information concerning the correct disposal of their old
appliance.
CE Marking certifies that this appliance confirms to the following EEC directives:
Low Voltage Equipment – 72/23/EEC & 93/68 EEC
Electromagnetic Compatibility 89/336/EEC, 92/31/EEC & 93/68/EEC
SAFETY INSTRUCTIONS
Important: This appliance is not intended for use by persons including children with reduced physical,
sensory or mental capabilities, or lack of experience and knowledge, unless they have been given
supervision or instruction concerning use of the appliances by a person responsible for their safety.
•
•
•
•
•
•
•
•
•
•
•
•
•
•
•
•
The hob is only to be used under the supervision of a responsible adult and should be stored out of the
reach of children.
Do not leave the hob unattended while it is plugged in.
Do not immerse the hob, power cord or plug in water or any other liquid. Do not use the hob in a
bathroom, near a source of water or outdoors.
Only use the hob on a stable, level, heat resistant work surface.
Do not use the hob under or near a cupboard, curtains or combustible materials.
Keep the hob away from the edge of the worktop and ensure that the power cord does not hang over the
edge of the worktop.
Ensure that pan handles cannot be knocked or caught.
The hob surfaces will become very hot when it is in use – DO NOT TOUCH
Do not try to move the hob until it has cooled down completely or if there is anything on the hob.
Take extra care when cooking with oil or fat.
Use pans with bases the same size as the hotplate, otherwise overheating may occur.
When you have finished using the hotplate ensure that the control dial is turned to the MIN position and
unplug the hob. Allow the unit to cool down completely before cleaning or storing away the hotplate.
Do not wrap the power cord around the hob.
Keep the cable away from hot surfaces.
This appliance must not be operated by an external timer or remote control system.
Do not operate the hotplate if it has a damaged cord or plug, if it is not working properly or if it has been
damaged or dropped. If the supply cord is damaged, it must be replaced by the manufacturer or a
similarly qualified person in order to avoid a hazard.
2
IG8010 – Single Hotplate at a Glance
1500W Hotplate
Power indicator
light
Temperature
control dial
Using Your Hotplate
Before first use
Before using your hotplate for the first time, it needs to be operated for 5 minutes on the MAX setting. This
allows the protective coating on the hotplates to burn off. This may generate some smoke during this period,
so be sure to be in a well ventilated room when you do this. After 5 minutes turn temperature control dial to
the MIN setting, remove the plug and allow to cool completely. Wipe any residue off the hotplate and
housing. Your hotplate is now ready for use!
Operating Instructions
1. Place the hotplate on a stable, flat surface out of the reach of children, ensuring that it is at least 10cm
away from the wall on all sides.
2. Plug into a suitable power socket, making sure that the cable is not overstretched or could be caught
accidently.
3. The hotplate can be controlled by turning the Temperature control and the red light will illuminate to
indicate that the hotplate is switched on.
4. To switch on the hotplate, turn the dial in a clockwise direction so that it is between MIN for a low heat
and MAX for a high heat.
5. To switch the hotplate off, turn the dial in an anti-clockwise direction. The dial will click and the light will
go out to indicate that the hotplate is turned off.
Useful Tips
1. For greater efficiency and lower running costs, use flat bottomed saucepans wherever possible as this
maximizes the contact between the hotplate and the saucepan.
2. Place the saucepan centrally onto the hotplate.
3. Do not use oversized saucepans as this will reduce the life of the appliance.
Cleaning
1. Switch off the hotplate, disconnect from the power supply and allow to cool down completely.
2. Clean the hotplate with a soft damp cloth to remove any minor stains. Never use a metal scouring pad as
this can cause damage to the hotplate.
3. Never immerse any part of the hotplate, power cord or plug in water or any other liquid.
4. Ensure all parts of the hotplate are dry before storing away.
5. Chemicals, detergents or any abrasive cleaning powder, pads or polish must not be used as they can
damage the hotplate.
6. Never use any pointed or sharp objects for cleaning the hotplate.
3
Troubleshooting
If you are having problems with your hotplate, please use our troubleshooting guide below. If you
are unable to resolve the issue using the guide please ring our Customer Service Department on
01473 271 272. Please have the model code, batch number and purchase information available.
Problem
Possible Cause
1.
The hotplate does not work.
2.
Not properly plugged into the
mains wall socket.
No electricity in the mains wall
socket.
Solution
1.
2.
Plug in firmly.
Check fuse or breaker.
The hotplate must be earthed. Fit a 13A BS1362 fuse in a 13A BS1363 plug. Fit the
green/yellow wire to E, the blue wire to N and the brown wire to L. Fit the cord grip. If in doubt,
call an electrician. Don’t use a non-rewireable plug unless the fuse cover is fitted. If you remove
the plug, dispose of it.
This product is guaranteed for a period of 2 years from the date of purchase against
mechanical and electrical defects.
The warranty does not cover consumable parts that require replacement under
normal use or accessories. This includes filters, belts, and accessory attachments.
1.
2.
If a fault develops within 6 months of purchase it should be returned to the place
of purchase for exchange.
If the fault develops after 6 months and within 24 months of purchase please
contact our customer service department 01473 271 272 or write to us at the
address detailed below.
Please quote the model number which begins IG, the ‘Batch Number’ beginning ‘5’
and give details of the exact fault.
We will then decide whether to repair or replace the item. You will be required to return a copy of your proof of
purchase. Please retain your original.
If an item is replaced under guarantee within 2 years, the guarantee for the replacement item will be calculated from
the purchase date of the original.
Before calling the Customer Service number please ensure you have checked the
Troubleshooting guide.
This product is for domestic household use only. To qualify for the guarantee the product must have
been used according to the instructions in the User Manual. Any misuse of the product will result in
the warranty being void.
View the range online at www.igenix.co.uk
Follow us on Twitter
@Igenix_Products
Disclaimer
Updates to hardware components are made regularly. Therefore some of the instructions, specifications and pictures in
this documentation may differ slightly from your particular situation. All items described in this guide are for illustration
purposes only and may not apply to your particular situation. No legal right or entitlements may be obtained from the
description made in this manual.
4