1
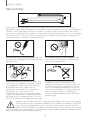
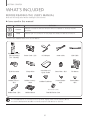
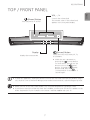
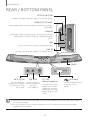
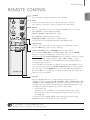
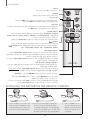
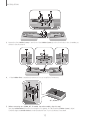
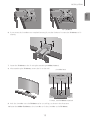
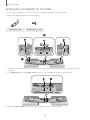
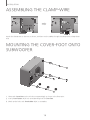
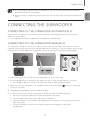
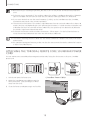
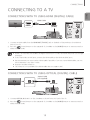
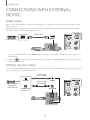
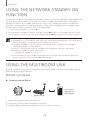
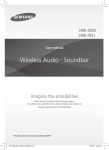
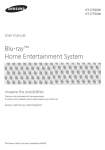
HW-J7500 HW-J7501 User manual Curved Soundbar Imagine the possibilities Thank you for purchasing this Samsung product. To receive more complete service, please register your product at www.samsung.com/register 'This Nanum Gothic Eco font is provided by NAVER' GETTING STARTED GETTING STARTED FEATURES Streaming Music Services USB Host Support The Curved Soundbar makes diving into all your favourite music easier than ever before, thanks to its Wi-Fi capabilities. Simply access the Samsung Multiroom App to experience the best of the internet’s subscription streaming music services. You can connect and play music files from external USB storage devices such as MP3 players, USB flash memory, etc. using the Soundbar's USB HOST function. Bluetooth Function Surround Sound Expansion The Surround Sound Expansion feature adds depth and spaciousness to your listening experience. TV SoundConnect Connect your TV and Soundbar easily through Bluetooth with TV Sound Connect. The absence of trailing wires between the Soundbar and TV allows you to showcase the slim and sleek design of both systems, while maintaining a clean look in your living environment. Easily control the Soundbar and TV from a single TV remote. Music Source Sharing (= Multiroom Play) Controlling and sharing one music source across multiple audio devices in various locations is made easy with Multiroom Link. The mobile app remotely controls volume and music on your system across different devices, including your TV, Soundbar, Home Entertainment System and Blu-ray Disc Player. Enjoy the audio you want, where you want. HDMI HDMI transmits video and audio signals simultaneously, and provides a clearer picture. The unit is also equipped with the ARC function which lets you listen to sound from your TV through the Soundbar via an HDMI cable. This function is only available if you connect the unit to an ARC compliant TV. You can connect a Bluetooth device to the Soundbar and enjoy music with high quality stereo sound, all without wires! LICENCES Manufactured under Licence from Dolby Laboratories. Dolby and the double-D symbol are trademarks of Dolby Laboratories. For DTS patents, see http://patents.dts.com. Manufactured under licence from DTS Licensing Limited. DTS, the Symbol, & DTS and the Symbol together are registered trademarks, and DTS 2.0 Channel is a trademark of DTS, Inc. © DTS, Inc. All Rights Reserved. The terms HDMI and HDMI High-Definition Multimedia Interface, and the HDMI Logo are trademarks or registered trademarks of HDMI Licensing LLC in the United States and other countries. 2 GETTING STARTED SAFETY INFORMATION TO REDUCE THE RISK OF ELECTRIC SHOCK, DO NOT REMOVE THE COVER (OR BACK). NO USER-SERVICEABLE PARTS ARE INSIDE. REFER SERVICING TO QUALIFIED SERVICE PERSONNEL. This symbol indicates “dangerous voltage” inside the product that presents a risk of electric shock or personal injury. CAUTION RISK OF ELECTRIC SHOCK DO NOT OPEN This symbol indicates important instructions accompanying the product. WARNING : To reduce the risk of fire or electric shock, do not expose this appliance to rain or moisture. CAUTION : TO PREVENT ELECTRIC SHOCK, MATCH WIDE BLADE OF PLUG TO WIDE SLOT, FULLY INSERT. •This apparatus shall always be connected to a AC outlet with a protective grounding connection. •To disconnect the apparatus from the mains, the plug must be pulled out from the mains socket, therefore the mains plug shall be readily operable. CAUTION •Do not expose this apparatus to dripping or splashing. Do not put objects filled with liquids, such as vases on the apparatus. •To turn this apparatus off completely, you must pull the power plug out of the wall socket. Consequently, the power plug must be easily and readily accessible at all times. Wiring the Main Power Supply Plug (UK Only) IMPORTANT NOTICE The mains lead on this equipment is supplied with a moulded plug incorporating a fuse. The value of the fuse is indicated on the pin face of the plug and if it requires replacing, a fuse approved to BS1362 of the same rating must be used. Never use the plug with the fuse cover removed. If the cover is detachable and a replacement is required, it must be of the same colour as the fuse fitted in the plug. Replacement covers are available from your dealer. If the fitted plug is not suitable for the power points in your house or the cable is not long enough to reach a power point, you should obtain a suitable safety approved extension lead or consult your dealer for assistance. However, if there is no alternative to cutting off the plug, remove the fuse and then safely dispose of the plug. Do not connect the plug to a mains socket as there is a risk of shock hazard from the bared flexible cord. Never attempt to insert bare wires directly into a mains socket. A plug and fuse must be used at all times. IMPORTANT The wires in the mains lead are coloured in accordance with the following code:– BLUE = NEUTRAL BROWN = LIVE As these colours may not correspond to the coloured markings identifying the terminals in your plug, proceed as follows:– The wire coloured BLUE must be connected to the terminal marked with the letter N or coloured BLUE or BLACK. The wire coloured BROWN must be connected to the terminal marked with the letter L or coloured BROWN or RED. WARNING : DO NOT CONNECT EITHER WIRE TO THE EARTH TERMINAL WHICH IS MARKED WITH THE LETTER E OR BY THE EARTH SYMBOL , OR COLOURED GREEN OR GREEN AND YELLOW. 3 ENG SAFETY WARNINGS GETTING STARTED PRECAUTIONS 68.6 mm 99.1mm 99.1mm 99.1mm Ensure that the AC power supply in your house complies with the power requirements listed on the identification sticker located on the back of your product. Install your product horizontally, on a suitable base (furniture), with enough space around it for ventilation (7~10 cm). Make sure the ventilation slots are not covered. Do not place the unit on amplifiers or other equipment which may become hot. This unit is designed for continuous use. To fully turn off the unit, disconnect the AC plug from the wall outlet. Unplug the unit if you intend to leave it unused for a long period of time. During thunderstorms, disconnect the AC plug from the wall outlet. Voltage peaks due to lightning could damage the unit. Do not expose the unit to direct sunlight or other heat sources. This could lead to overheating and cause the unit to malfunction. Protect the product from moisture (i.e. vases), and excess heat (e.g. a fireplace) or equipment creating strong magnetic or electric fields. Disconnect the power cable from the AC supply if the unit malfunctions. Your product is not intended for industrial use. It is for personal use only. Condensation may occur if your product has been stored in cold temperatures. If transporting the unit during the winter, wait approximately 2 hours until the unit has reached room temperature before using. The batteries used with this product contain chemicals that are harmful to the environment. Do not dispose of batteries in the general household trash. Do not dispose of batteries in a fire. Do not short circuit, disassemble, or overheat the batteries. There is a danger of explosion if the battery is incorrectly replaced. Replace only with the same or equivalent type. WARNING, DO NOT INGEST BATTERY, CHEMICAL BURN HAZARD, The remote control supplied with this product contains a coin/button cell battery. If the coin/button cell battery is swallowed, it can cause severe internal burns in just 2 hours and can lead to death. Keep new and used batteries away from children. If the battery compartment does not close securely, stop using the product and keep it away from children. If you think batteries might have been swallowed or placed inside any part of the body, seek immediate medical attention. 4 GETTING STARTED CONTENTS 25 FUNCTIONS 2 Features 25 Input Mode 3 Safety Information 26 Bluetooth 6 What’s Included 28 Using the Network Standby On Function 28 Using the Multiroom Link 7 DESCRIPTIONS 30 Software Update 7 Top / Front Panel 8 Rear / Bottom Panel 32 TROUBLESHOOTING 9 Remote Control 32 Troubleshooting 11 INSTALLATION 33 APPENDIX 11 Installing Soundbar 33 Specifications 11 Installing both Soundbar and TV to the Wall Mount Type 14 Installing Soundbar to TV Stand 15 Installing Soundbar to Free-Standing ●● Figures and illustrations in this User Manual are provided for reference only and may differ from actual product appearance. 16 Assembling the Clamp-Wire 16 Mounting the Cover-Foot onto Subwoofer ●● An administration fee may be charged if either (a)an engineer is called out at your request and there is no defect with the product (i.e. where the user manual has not been read). (b)you bring the unit to a repair centre and there is no defect with the product (i.e. where the user manual has not been read). 17 CONNECTIONS 17 Connecting the Subwoofer 19 Connecting to a TV 19 Connections with TV Using HDMI (Digital) Cable 19 Connections with TV Using Optical (Digital) Cable 20 TV SoundConnect ●● You will be informed of the administration fee amount before a technician visits. 22 Connections with External Device 22 HDMI Cable 22 Optical or AUX Cable 23 USB 5 ENG 2 GETTING STARTED GETTING STARTED WHAT’S INCLUDED BEFORE READING THE USER’S MANUAL Note the following terms before reading the user manual. ++Icons used in this manual Icon Term Definition Caution Indicates a situation where a function does not operate or settings may be cancelled. Note Indicates tips or instructions on the page that help you operate a function. Check for the supplied accessories shown below. Remote Control / Lithium Battery (3V : CR2032) Power Cord : 2EA DC Adapter HDMI Cable USB Cable USB Converter Clamp-Wire User Manual / Quick Guide Cover-Foot : 4EA TV-Mount Holder-Screw 1 : 4EA Holder-Screw 2 : 10EA Holder-Fix Mount Screw-Taptite : 4EA Foot Rubber : 4EA (For Power Cord) Holder-Foot : 3EA Holder-Mount Toroidal Ferrite Core ●● The appearance of the accessories may differ slightly from the illustrations above. ●● Use the dedicated USB cable to connect external USB devices to the unit. 6 DESCRIPTIONS DESCRIPTIONS TOP / FRONT PANEL Controls the volume level. The numeric value of the volume level appears in the front panel display. (Power) Button Turns the power on and off. (Source) Button Display Selects the D.IN, AUX, HDMI, BT, TV, or USB input. Displays the current mode. ●● While the unit is powered on, (Source) button pressing the for more than 3 seconds sets the (Mute) button to act as the (Mute) button. To cancel the button setup, press the (Source) button for more than 3 seconds again. ●● To clean this apparatus, unplug the power cord from the wall outlet and wipe the product using a soft, dry cloth. Due to aluminum being a positive electrostatic material, static discharge may occur. ●● When you turn on this unit, there will be a 4 to 5 second delay before it produces sound. ●● If you want to enjoy the sound only from the Soundbar, you must turn off the TV's speakers in the Audio Setup menu of your TV. Refer to the owner's manual supplied with your TV. 7 ENG VOL. - / + DESCRIPTIONS REAR / BOTTOM PANEL OPTICAL IN (D.IN) Connect to the digital (optical) output of an external device. HDMI OUT (TV-ARC) Outputs digital video and audio signals simultaneously using an HDMI cable. HDMI IN Inputs digital video and audio signals simultaneously using an HDMI cable. Use when connecting a supported external device. LAN Lets you connect to a network using a LAN cable. AUX IN AUX IN LAN HDMI IN HDMI OUT OPTICAL IN (TV-ARC) Connect to the Analogue output of an external device. Wi-Fi SETUP 5V 0.5A SPK ADD DC 24V LABEL Wi-Fi SETUP Wi-Fi SETUP SPK ADD 5V 0.5A DC 24V SPK ADD Press this button to Press the button to connect your Soundbar connect Soundbar to to your network using the HUB. Wi-Fi setup. (not supplied) DC 24V (Power Supply In) Connect the DC power adaptor to the power supply jack, and then connect the AC power adaptor plug to a wall outlet. (USB Port) Connect USB devices here to play files on the devices. ●● When disconnecting the power cable of the AC power adaptor from a wall outlet, pull the plug. Do not pull the cable. ●● Do not connect this unit or other components to an AC outlet until all connections between components are complete. 8 DESCRIPTIONS REMOTE CONTROL Mute You can turn the volume down to 0 with the push of a button. Press again to restore the sound to the previous volume level. Repeat Press to set the Repeat function during music playback from a USB device. OFF - REPEAT : Cancells Repeat Playback. TRACK - REPEAT : Repeatedly play a track. ALL - REPEAT : Repeatedly play all tracks. RANDOM - REPEAT : Plays tracks in random order. (A track that has already been played may be played again.) Skip Forward If there is more than one file on the device you are playing, and you press the ] button, the next file is selected. SOUND CONTROL (*Use the [,] buttons to adjust level.) Press to select TREBLE, BASS, or AUDIO SYNC. Then, use the [,] buttons to adjust the Treble, Bass volume from -3 to +3. Press and hold the SOUND CONTROL button for about 5 seconds to adjust the sound for each frequency band. 150Hz, 300Hz, 600Hz, 1.2KHz, 2.5KHz, 5KHz, and 10KHz are selectable and each can be adjusted to a setting between -6 and +6. If the Soundbar is connected to a digital TV and the video appears out of sync with the audio, press the SOUND CONTROL button to sync the audio with the video. Use the [,] buttons to set the audio delay between 0 ms and 300 ms. In USB mode, TV mode, and BT mode, the Audio Sync function may not available. Anynet+ Press the Anynet+ button to turn the Anynet+ function on or off. (Default : Auto Power Link OFF, ON - ANYNET+ / OFF - POWER LINK or OFF - ANYNET+ / ON - POWER LINK). The Anynet+ function lets you control the Soundbar with the remote from an Anynet+ compatible Samsung TV. The Soundbar must be connected to the TV via an HDMI cable. * Auto Power Link Synchronizes the Soundbar to a connected Optical source via the Optical jack so it turns on automatically when you turn on your TV. (See page 20) You can also activate Wi-Fi SETUP function by pressing and holding Anynet+ button on the remote for over 7 seconds. ●● Soundbar is a Samsung proprietary name. ●● Operate the TV using the TV's remote control. 9 ENG SOURCE Press to select a source connected to the Soundbar. DESCRIPTIONS Power Turns the Soundbar on and off. Volume Adjusts the volume level of the unit. Play / Pause Press the p button to pause the playing of a file temporarily. Press the p button again to play the selected file. Skip Back If there is more than one file on the device you are playing, and you press the [ button, the previous file is selected. SOUND EFFECT You can select from 6 different sound modes - STANDARD (Original Sound), MUSIC, VOICE, SPORTS, CINEMA, and NIGHT MODE - depending on the content you want to listen to. Select the STANDARD mode if you want to enjoy the original sound. SOUND Surr.Sound adds depth and spaciousness to the sound. Pressing the SOUND button repeatedly cycles through the Surr.Sound settings : ON - SURROUND SOUND, OFF - SURROUND SOUND STREAMING MUSIC Press STREAMING MUSIC button to listen to an Internet radio station. Each time you press this button, the Soundbar switches to the next default station, cycling through the 3 default stations. To use the STREAMING MUSIC function, the soundbar must be connected to the network. (See page 28) DRC (Dynamic Range Control) * Lets you apply dynamic range control to Dolby Digital, Dolby Digital Plus, and Dolby TrueHD audio. Press and hold the STREAMING MUSIC button, then the DRC (Dynamic Range Control) function toggles between ON and OFF. WOOFER (* Use the [,] buttons to adjust woofer volume.) Press the WOOFER button. Then, use the [,] buttons to adjust Subwoofer volume from -12, -6 to +6. You can also activate SPK ADD function of the soundbar by pressing and holding WOOFER button of the remote for over 5 seconds. INSTALLING THE BATTERY IN THE REMOTE CONTROL 1. Use a suitable coin to turn the remote control's battery cover counterclockwise to remove it as shown in the figure above. Insert a 3V lithium battery. Keep the positive (+) pole facing up when inserting the battery. Put the battery cover on and align the '●' marks side by side as shown in the figure above. 10 2. Use a suitable coin to turn the remote control battery cover clockwise as far as it will go to fix it in place. INSTALLATION INSTALLATION INSTALLING SOUNDBAR ●● This model corresponds to the 2015 Samsung curved TV S8500/S9000 - 55"/65", S9500 - 65". Please refer to the home page of Samsung Electronics to see the detail list of corresponding models. ●● When mounting the Soundbar to a JS9500 series TV, use the 1.6” Cover-Distance which is included in the Samsung Mini Wall Mount set. ●● To mount both of a soundbar and the TV using the wall mount, make sure to mount the soundbar onto the TV first, then mount the TV. ●● To mount the TV on the wall, refer to the user’s manual enclosed with the TV you purchased. ●● This Soundbar cannot be installed to a non-compatible TV, in either form of TV mount or TV stand. Check for the supplied accessories shown below. Used for S9500, 65” TV model Holder-Screw 1 : 4EA Holder-Screw 2 : 10EA TV-Mount Holder-Fix Mount Holder-Mount AUX IN LAN HDMI IN HDMI OUT OPTICAL IN (TV-ARC) 1. Place the Soundbar as shown in the illustration, ensuring that none of the buttons touch the surface it is lying on. Wi-Fi SETUP SPK ADD DC 24V AUX IN LAN HDMI IN HDMI OUT OPTICAL IN (TV-ARC) 5V 0.5A 5V 0.5A Wi-Fi SETUP SPK ADD DC 24V 2. Remove Holder-Support (2EA) from the Soundbar as shown in the illustration. 11 ENG INSTALLING BOTH SOUNDBAR AND TV TO THE WALL MOUNT TYPE AUX IN LAN HDMI IN HDMI OUT OPTICAL IN (TV-ARC) INSTALLATION Wi-Fi SETUP SPK ADD DC 24V AUX IN LAN HDMI IN HDMI OUT OPTICAL IN (TV-ARC) 5V 0.5A Wi-Fi SETUP 5V 0.5A SPK ADD DC 24V AUX IN LAN HDMI IN HDMI OUT OPTICAL IN (TV-ARC) 3. Fasten the four Holder-Screws 1 and four of the Holder-Screws 2 to the four holes in the Soundbar, as shown in the illustration. Wi-Fi SETUP SPK ADD DC 24V AUX IN LAN HDMI IN HDMI OUT OPTICAL IN (TV-ARC) 5V 0.5A 5V 0.5A Wi-Fi SETUP SPK ADD DC 24V 4. If the Holder-Foot is attached, remove it first to install the TV-Mount. TV 65” S9500 TV 5. (When mounting to a S9500, 65” TV model. For other models, skip this step.) Seat the Holder-Mount onto the TV using the TV’s guide, fix it by fastening Holder-Screw 2 (4EA). Carefully align the Holder-Mount’s hole centreed on the TV, not to place it one-sided. 12 INSTALLATION ENG 65” S9500 TV 6. If you mount the Soundbar on a matched Samsung TV, use the Guide on TV to put the TV-Mount on TV securely. 7. Fasten the TV-Mount to the TV using the remaining 4 Holder-Screws 2. 8. After attaching the TV-Mount, mount the TV on the wall. Soundbar base TV base, with TV-Mount attached 9. Push the Soundbar onto the TV-Mount as far as it will go, as shown in the illustration. 10.Fasten the Holder-Fix Mount to the Soundbar to fix the Soundbar to the TV-Mount. 13 INSTALLATION INSTALLING SOUNDBAR TO TV STAND You can install Soundbar to TV stand if you have Soundbar matching TV with this model. Check for the supplied accessories shown below. Holder-Foot : 3EA Holder-Screw 2 : 3EA AUX IN LAN HDMI IN HDMI OUT OPTICAL IN (TV-ARC) 2 Wi-Fi SETUP 5V 0.5A SPK ADD DC 24V AUX IN LAN HDMI IN HDMI OUT OPTICAL IN (TV-ARC) 1 Wi-Fi SETUP 5V 0.5A SPK ADD DC 24V AUX IN LAN HDMI IN HDMI OUT OPTICAL IN (TV-ARC) 1. Place the Soundbar as shown in the illustration, ensuring that none of the buttons touch the surface it is lying on. 2. Fix Holder-Foot (3EA) and Holder-Screw 2 (3EA) to the Soundbar as shown in the illustration. Wi-Fi SETUP SPK ADD DC 24V AUX IN LAN HDMI IN HDMI OUT OPTICAL IN (TV-ARC) 5V 0.5A Wi-Fi SETUP 5V 0.5A SPK ADD DC 24V 3. Remove Holder-Support (2EA) from the Soundbar as shown in the illustration. 14 INSTALLATION ENG 4. Align the Soundbar’s centre with the centre of the base of the TV, and then carefully push it onto the stand as far as it will go, as shown in the illustration. Be careful not to unbalance the TV. ●● Do not place a heavy thing or step on the main unit. INSTALLING SOUNDBAR TO FREE-STANDING 1. Centre the Soundbar on the flat area in front of the TV. 15 INSTALLATION OPTICAL IN AUX IN AUX IN AUX IN LAN LAN HDMI IN HDMI IN HDMI OUT (TV-ARC) HDMI OUT (TV-ARC) OPTICAL IN OPTICAL IN HDMI OUT (TV-ARC) HDMI IN LAN Clamp-Wire AUX IN LAN HDMI IN HDMI OUT (TV-ARC) OPTICAL IN ASSEMBLING THE CLAMP-WIRE Attach the clamp-wire to the unit as shown, and then run the cables through the clamp-wire to keep them neat. MOUNTING THE COVER-FOOT ONTO SUBWOOFER R WE PO 1 2 3 1. Place each Cover-Foot on the 4 holes correspondingly as shown in the illustration. 2. Insert Screw-Taptite (4EA) into corresponding hole of Cover-Foot. 3. Block up the holes with Foot Rubber (4EA) to complete. 16 CONNECTIONS CONNECTIONS CONNECTING THE SUBWOOFER CONNECTING TO THE SUBWOOFER AUTOMATICALLY The main unit and subwoofer should link (connect wirelessly) automatically when the main unit and subwoofer are turned on. • If it is completely connected, the blue LED in the subwoofer stops blinking. CONNECTING TO THE SUBWOOFER MANUALLY The Subwoofer's linking ID is preset at the factory and the main unit and subwoofer should link (connect wirelessly) automatically when the main unit and subwoofer are turned on. If the Link indicator does not light when the main unit and subwoofer are turned on, please set the ID by following the procedure below. POWER 1. Plug the power cords of the main unit and subwoofer into an AC wall outlet. POWER 2. Press the ID SET button on the back of the subwoofer with a small, pointed object for 5 seconds. • The STANDBY indicator is turned off and the LINK indicator (Blue LED) blinks quickly. 3. While the main unit is powered off (in STANDBY mode), press and hold the control for 5 seconds. (Mute) on the remote 4. The ID SET message appears on the Soundbar's display. 5. To finalise the link, turn the main unit’s power on while the subwoofer’s Blue LED blinks. • The main unit and the subwoofer should now be linked (connected). • The Link indicator (Blue LED) on the subwoofer should be on. • If the Link indicator is not solid blue, the linking process has failed. Turn off the main unit and start again from Step 2. • You can enjoy better sound from the wireless subwoofer by selecting a Sound Effect. (See page 10) 17 ENG ●● Do not connect the power cord of this product or your TV to a wall outlet until all connections between components are complete. ●● Before moving or installing this product, be sure to turn off the power and disconnect the power cord. CONNECTIONS ●● Before moving or installing the product, be sure to turn off the power and disconnect the power cord. ●● If the main unit is powered off, the wireless subwoofer will be in standby mode and the STANDBY LED on the upper side will come on after the Link indicator (Blue LED) blinks for 30 seconds. ●● If you use a device that uses the same frequency (2.4GHz) as the Soundbar near the Soundbar, interference may cause some sound interruption. ●● The transmission distance of the wireless signal between the main unit and subwoofer is about 10 meters, but may vary depending on your operating environment. If a steel-concrete or metallic wall is between the main unit and the wireless subwoofer, the system may not operate at all, because the wireless signal cannot penetrate metal. ●● If the main unit doesn't make a wireless connection, follow steps 1-5 in the left hand column to re-set the connection between the main unit and wireless subwoofer. ●● The wireless receiving antenna is built into the wireless subwoofer. Keep the unit away from water and moisture. ●● For optimal listening performance, make sure that the area around the wireless subwoofer location is clear of any obstructions. ATTACHING THE TOROIDAL FERRITE CORE SOUNDBAR POWER CORD You can reduce noise caused by electromagnetic radiation by fitting the ferrite core to the your Soundbar power cord. 1. Unlock and open the ferrite core. <Soundbar Power Cable> HDMI IN HDMI OUT OPTICAL IN (TV-ARC) 2. Wind the Soundbar power cable around the ferrite core twice. (Start winding 5 to 10 cm away from the core). AUX IN LAN 3. Close the ferrite core by pressing it until it clicks. 5V 0.5A Wi-Fi SETUP SPK ADD DC 24V 18 CONNECTIONS CONNECTING TO A TV HDMI Cable HDMI IN AUX IN LAN HDMI IN HDMI OUT OPTICAL IN (TV-ARC) HDMI OUT (TV-ARC) Wi-Fi SETUP 5V 0.5A SPK ADD DC 24V 1. Connect an HDMI cable from the HDMI OUT (TV-ARC) jack on the back of the product to the HDMI IN jack on your TV. 2. Press the (Source) button on the top panel of Soundbar or the SOURCE button on remote control to select the D.IN mode. ●● HDMI is an interface that enables the digital transmission of video and audio data with just a single connector. ●● If the TV provides an ARC port, connect the HDMI cable to the HDMI IN (ARC) port. ●● We recommend you use a coreless HDMI cable if possible. If you use a cored HDMI cable, use one whose diameter is less than 14 mm. ●● Anynet+ must be turned on. ●● This function is not available if the HDMI cable does not support ARC. CONNECTIONS WITH TV USING OPTICAL (DIGITAL) CABLE Optical Cable (not supplied) OPTICAL OUT AUX IN LAN HDMI IN HDMI OUT OPTICAL IN (TV-ARC) OPTICAL IN 5V 0.5A Wi-Fi SETUP SPK ADD DC 24V 1. Connect OPTICAL IN (Audio) on the Soundbar to the OPTICAL OUT jack of the TV. 2. Press the (Source) button on the top panel of Soundbar or the SOURCE button on remote control to select the D.IN mode. 19 ENG CONNECTIONS WITH TV USING HDMI (DIGITAL) CABLE CONNECTIONS ++Auto Power Link If you have connected the main unit to a TV with a digital optical cable, set the Auto Power function ON to have the Soundbar turn on automatically when you turn the TV on. AUTO POWER LINK Display ON OFF - ANYNET+ / ON - POWER LINK OFF ON - ANYNET+ / OFF - POWER LINK 1. Connect the Soundbar and a TV with an Optical cable (not supplied). 2. Press the (Source) button on the main unit’s top panel or the SOURCE button on the remote control to select the D.IN mode. 3. Press the Anynet+ button on the remote control to toggle the Auto Power Link function on and off. ●● Depending on the connected device, Auto Power Link may not function. TV SOUNDCONNECT You can enjoy TV sound through your Soundbar when it is connected to a Samsung TV that supports the TV SoundConnect function. Connect 1. Turn on the TV and Soundbar. • Turn on the menu of the TV. • Move to Speaker Settings on "Sound" tab. • Set the "Add New Device" menu to "On". 2. Press the (Source) button on the main unit’s top panel or the SOURCE button on the remote control to select the TV mode. 3. On the TV, a message asking whether to enable the TV SoundConnect function appears. 4. Select <Yes> to finish connecting the TV and Soundbar using the TV's remote control. ●● Switching the Soundbar’s mode from TV to another mode automatically terminates TV SoundConnect. ●● To connect the Soundbar to another TV, the existing connection must be terminated. ●● Terminate the connection to the existing TV, and then press the p button on the remote control for 5 seconds to connect to another TV. 20 CONNECTIONS 21 ENG ●● The TV SoundConnect (SoundShare) function is supported by some Samsung TVs released from 2012 on. Check whether your TV supports the TV SoundConnect (SoundShare) function before you begin. (For further information, refer to the TV’s user manual.). ●● If your Samsung TV was released before 2014, check the SoundShare setting menu. ●● If the distance between the TV and Soundbar exceeds 10 meters, the connection may not be stable or the audio may stutter. If this occurs, relocate the TV or Soundbar so that they are within operational range, and then re-establish the TV SoundConnect connection. ●● TV SoundConnect Operational Ranges: -- Recommended pairing range: within 2 meters. -- Recommended operational range: within 10 meters. ●● The Play/Pause, Next, and Prev buttons on the Soundbar or Soundbar's remote do not control the TV. CONNECTIONS CONNECTIONS WITH EXTERNAL DEVICE HDMI CABLE HDMI is the standard digital interface for connecting to TVs, projectors, DVD players, Blu-ray players, set top boxes, and more. HDMI prevents any degradation to the signal due to conversion to analogue and maintains the video and audio quality of the original digital source. HDMI Cable HDMI OUT HDMI IN AUX IN LAN HDMI IN HDMI OUT OPTICAL IN (TV-ARC) Digital Devices 5V 0.5A Wi-Fi SETUP SPK ADD DC 24V 1. Connect an HDMI cable from the HDMI IN jack on the back of the product to the HDMI OUT jack on your digital device. 2. Press the (Source) button on the top panel of Soundbar or the SOURCE button on remote control to select the HDMI mode. OPTICAL OR AUX CABLE This unit comes equipped with one optical in digital jack and one audio analogue in jack, giving you two ways to connect it to an External Devices. Audio Cable (not supplied) AUX OUT OPTICAL IN AUX IN LAN HDMI IN HDMI OUT OPTICAL IN (TV-ARC) OPTICAL OUT Wi-Fi SETUP SPK ADD 22 5V 0.5A DC 24V BD / DVD player / Set-top box / Game console AUX IN Optical Cable (not supplied) CONNECTIONS ++AUX Cable 1. Connect AUX IN (Audio) on the main unit to the AUDIO OUT jack of the Source Device. ++Optical Cable 1. Connect OPTICAL IN (Audio) on the main unit to the OPTICAL OUT jack of the Source Device. 2. Press the (Source) button on the top panel of Soundbar or the SOURCE button on remote control to select the D.IN mode. USB You can play music files located on USB storage devices through the Soundbar. Display AUX IN LAN HDMI IN HDMI OUT OPTICAL IN (TV-ARC) USB port 5V 0.5A Wi-Fi SETUP SPK ADD DC 24V 5V 0.5A 1. Connect the USB device to the USB port on the back of the product. 2. Press the (Source) button on the main unit’s top panel or the SOURCE button on the remote control to select the USB mode. 3. USB appears on the display screen. • The Soundbar connection to the USB device is complete. • The Soundbar automatically turns off (Auto Power Off) if no USB device has been connected for more than 15 minutes. ++Before you connect a USB device Be aware of the following: ●● If the file name of a file or folder on a USB device exceeds 10 characters, it is not displayed on the Soundbar's display. ●● This product may not be compatible with certain types of USB storage media. ●● The Soundbar supports the FAT16 and FAT32 file systems. -- The NTFS file system is not supported. ●● Connect USB devices directly to the USB port of the product. Otherwise, you may encounter a USB compatibility problem. ●● Do not connect multiple storage devices to the product via a multi-card reader. It may not operate properly. 23 ENG 2. Press the (Source) button on the top panel of Soundbar or the SOURCE button on remote control to select the AUX mode. CONNECTIONS ●● Digital camera PTP protocols are not supported. ●● Do not remove the USB device while it is transferring files. ●● DRM-protected music files (MP3, WMA) from commercial web sites cannot be played. ●● External HDDs are not supported. ●● Mobile phone devices are not supported. ●● File Format Type Compatibility list: Extension *.mp3 *.wma Codec Sampling Rate Bit rate MPEG 1 Layer1 32/44.1/48 32 ~ 448kbps MPEG 1 Layer2 32/44.1/48 32 ~ 384kbps MPEG 1 Layer3 32/44.1/48 32 ~ 320kbps MPEG 2 Layer3 16/22.05/24/32/44.1/48 8 ~ 160kbps MPEG 2.5 Layer3 8/11.025/12/16/22.05/24/32/44.1/48 8 ~ 160kbps Wave_Format_MSAudio1 - - Wave_Format_MSAudio2 - - WMA Professional Not Support - *.wav - 8 KHz ~ 192KHz ~ 8.8Mbps *.ogg - 8 KHz ~ 48KHz - *.flac - 8 KHz ~ 192KHz ~ 5.6Mbps *.m4a Alac (Apple lossless Audo codec) 8 KHz ~ 192KHz ~ 1Mbps *.ape MON-KEY Audio 8 KHz ~ 48KHz ~ 1Mbps *.aif Audio Interchange File Format 8 KHz ~ 192KHz ~ 4.4Mbps ●● If there are too many folders and files stored in the USB device, reading may take some time. 24 FUNCTIONS FUNCTIONS INPUT MODE Input mode Optical Digital input ARC (HDMI OUT) input Display D.IN AUX input AUX HDMI input HDMI BLUETOOTH mode BT TV SoundConnect TV USB mode USB The unit turns off automatically in the following situations. ●● D.IN / HDMI / BT / TV / USB / ARC Mode -- If there is no audio signal for 15 minutes. ●● AUX Mode To turn the Auto Power Down function ON or OFF, press and hold the p button for 5 seconds. ON - AUTO POWER DOWN / OFF - AUTO POWER DOWN appears on the display. -- If the AUX cable is disconnected for 15 minutes. -- If there is no KEY input for 8 hours when the AUX cable is connected. 25 ENG Press the (Source) button on the main unit’s top panel or the SOURCE button on the remote control to select the mode you want. FUNCTIONS BLUETOOTH You can connect a Bluetooth device to the Soundbar and enjoy music with high quality stereo sound, all without wires! TO CONNECT THE SOUNDBAR TO A BLUETOOTH DEVICE Check if the Bluetooth device supports the Bluetooth compliant stereo headset function. Connect Bluetooth device 1. Press the (Source) button on the main unit’s top panel or the SOURCE button on the remote control to select the BT mode. • You will see BT READY on the front display of the Soundbar. 2. Select the Bluetooth menu on the Bluetooth device you want to connect. (Refer to the Bluetooth device's user manual.) 3. Select "[Samsung] Soundbar" from the list. • When the Soundbar is connected to the Bluetooth device, it will display [Bluetooth device name] BT on the front display. • The device name can only be displayed in English. An underline " _ " will be displayed if the name is not in English. • If the Bluetooth device has failed to pair with the Soundbar, delete the previous "[Samsung] Soundbar" found by the Bluetooth device and have it search for the Soundbar again. 4. Play music on the connected device. • You can listen to the music playing on the connected Bluetooth device over the Soundbar. • In BT mode, the Play / Pause / Next / Prev functions are not available. However, these functions are available in Bluetooth devices supporting AVRCP. ●● ●● ●● ●● If asked for PIN code when connecting a Bluetooth device, enter <0000>. Only one Bluetooth device can be paired at a time. The Bluetooth connection will be terminated when you turn the Soundbar off. The Soundbar may not perform Bluetooth search or connection correctly under the following circumstances: -- If there is a strong electrical field around the Soundbar. -- If several Bluetooth devices are simultaneously paired with the Soundbar. -- If the Bluetooth device is turned off, not in place, or malfunctions. -- Note that such devices as microwave ovens, wireless LAN adaptors, fluorescent lights, and gas stoves use the same frequency range as the Bluetooth device, which can cause electric interference. 26 FUNCTIONS ●● Available only if the Soundbar is listed among the Bluetooth device’s paired devices. (The Bluetooth device and the Soundbar must have been previously paired at least once.) ●● Soundbar will appear in the Bluetooth device’s searched devices list only when the Soundbar is displaying BT READY. ●● In the TV SoundConnect mode, the Soundbar cannot be paired to another Bluetooth device. TO DISCONNECT THE BLUETOOTH DEVICE FROM THE SOUNDBAR You can disconnect the Bluetooth device from the Soundbar. For instructions, see the Bluetooth device's user manual. ●● The Soundbar will be disconnected. ●● When the Soundbar is disconnected from the Bluetooth device, the Soundbar will display BT DISCONNECTED on the front display. TO DISCONNECT THE SOUNDBAR FROM THE BLUETOOTH DEVICE Press the SOURCE button on the remote control or the (Source) button on the product's top panel to switch from BT to another mode or turn off the Soundbar. ●● The connected Bluetooth device will wait a certain amount of time for a response from the Soundbar before terminating the connection. (Disconnection time may differ, depending on the Bluetooth device) ●● In Bluetooth connection mode, the Bluetooth connection will be lost if the distance between the Soundbar and the Bluetooth device exceeds 10 meters. ●● The Soundbar automatically turns off after 15 minutes in the Ready state. ++More About Bluetooth Bluetooth is a technology that enables Bluetooth-compliant devices to interconnect easily with each other using a short wireless connection. ●● A Bluetooth device may cause noise or malfunction, depending on usage, when: -- A part of your body is in contact with the receiving/transmitting system of the Bluetooth device or the Soundbar. -- It is subject to electrical variation from obstructions caused by a wall, corner, or office partition. -- It is exposed to electrical interference from same frequency-band devices including medical equipment, microwave ovens, and wireless LANs. ●● Pair the Soundbar with the Bluetooth device while they are close together. ●● The further the distance between the Soundbar and Bluetooth device, the worse the quality is. If the distance exceeds the Bluetooth operational range, the connection is lost. ●● In poor reception areas, the Bluetooth connection may not work properly. ●● The Bluetooth connection only works when it is close to the unit. The connection will be automatically cut off if the Bluetooth device is out of range. Even within range, the sound quality may be degraded by obstacles such as walls or doors. 27 ENG ●● The Soundbar supports SBC data (44.1kHz, 48kHz). ●● Connect only to a Bluetooth device that supports the A2DP (AV) function. ●● You cannot connect the Soundbar to a Bluetooth device that supports only the HF (Hands Free) function. ●● Once you have paired the Soundbar to a Bluetooth device, selecting "[Samsung] Soundbar" from the device's scanned devices list will automatically change the Soundbar to BT mode. FUNCTIONS USING THE NETWORK STANDBY ON FUNCTION The Network Standby On function becomes available if wireless connection was properly established between the smart device and Soundbar. This function turns on the Soundbar automatically when a smart device attempts to connect to the Soundbar via Bluetooth or Wi-Fi. If the Soundbar was turned on via Bluetooth connection, its input mode is set to BT automatically. Turning on the Soundbar via Wi-Fi is available only by using the App. For further information, refer to the Web manual. 1. Connect the Smart device to your Soundbar. 2. Turn the Network Standby On function on by pressing the ] button on the Soundbar remote for more than 5 seconds. You can turn the function off by pressing the ] button again for more than 5 seconds. ●● Available only if the Soundbar is listed among the Smart device’s paired devices. (The Smart device and the Soundbar must have been previously paired at least once.) ●● Soundbar will appear in the Smart device’s searched devices list only when the Soundbar is displaying [BT READY] or [WiFi READY]. ●● In the TV SoundConnect mode, the Soundbar cannot be paired to another Smart device. ●● If Network Standby On function did not work -- The Network Standby On is set to Off. ●● Wi-Fi connection to the Soundbar will be terminated if its power cord was disconnected or the power was cut off. Turn on the Soundbar and reconnect. USING THE MULTIROOM LINK Once the Soundbar is connected to a smart device with Multiroom App, you can connect multiple Samsung Multiroom devices together wirelessly. BEFORE YOU BEGIN ++Communication Basics Smart Device: Android or iOS (App Control) Internet Wireless Router 1. Requirements: Wireless Router, Smart Device 2. The wireless router should be connected to the Internet. 3. The smart device should be connected to the router via a Wi-Fi connection. 28 FUNCTIONS INSTALLING THE SAMSUNG MULTIROOM APP ++Android or iOS Download the Samsung Multiroom app from Google Play or the App Store of your smart device. * Market search : Samsung Multiroom ANDROID APP ON or ++Accessing the Samsung Multiroom App To access the Samsung Multiroom app, press the Multiroom app icon on your smart device. CONNECTING THE SOUNDBAR TO YOUR NETWORK On your Smart device, select the Samsung Multiroom app. Follow the directions on your smart device’s screen. ●● For further information, refer to the Web Manual. -- Web manual : www.Samsung.com Support Product name search HW-J7500 or HW-J7501 PDF file download. ●● When connected to a wired network, try to use the CAT 7 cable to connect. 29 ENG To use the Soundbar, you must download and then install the Samsung Multiroom App by accessing the app through Google play or the App Store. With the Samsung Multiroom App installed, you can play music stored in your smart device, from connected devices and other content providers, and from Internet radio stations. FUNCTIONS AUX IN LAN HDMI IN HDMI OUT OPTICAL IN (TV-ARC) SOFTWARE UPDATE 5V 0.5A Wi-Fi SETUP SPK ADD DC 24V 5V 0.5A UPDATING WITH USB Samsung may offer updates for the Soundbar's system firmware in the future. If an update is offered, you can update the firmware by connecting a USB device with the firmware update stored on it to the USB port on your Soundbar. Note that if there are multiple update files, you must load them onto the USB device singly and use them to update the firmware one file at a time. Please visit samsung.com or contact the Samsung call centre to receive more information about downloading updates files. 1. While the Soundbar is turned off, connect the USB storage device that contains the updating firmware to the Soundbar’s USB port. 2. Turn on the Soundbar UPDATE appears on the display and updating begins within 3 minutes. • Upon completion of updating, the Soundbar turns off and on automatically. ++If UPDATE was not displayed 1. Turn off the Soundbar, connect the USB storage device that contains update files to the Soundbar’s USB port. 2. Disconnect the power cord, reconnect it and turn it on. ●● Insert a USB device containing the firmware update into the USB port on the main unit. ●● Updating firmware may not work properly if audio files supported by the Soundbar are stored in the USB storage device. ●● Do not disconnect the power or remove the USB device while updates are being applied. The main unit will turn off automatically after completing the firmware update. 30 FUNCTIONS ●● Do not format the USB device in the NTFS format. The Soundbar does not support the NTFS file system. ●● Depending on the manufacturer, some USB devices may not be supported. AUTO UPDATE Even when the Soundbar is turned off, the Soundbar will automatically check latest software version and continue to update if it was connected to the Internet. ●● The Soundbar is configured to run auto update by default. ●● To use auto update function, the Soundbar must be connected to the Internet. ●● Wi-Fi connection to the Soundbar will be terminated if its power cord was disconnected or the power was cut off. Turn on the Soundbar and reconnect. 31 ENG ●● After the update, all settings are reset to their factory default settings. We recommend you write down your settings so that you can easily reset them after the update. Note that updating firmware resets the subwoofer connection too. If connection to the subwoofer is not re-established automatically after the update, refer to page 17. If the firmware fails to update, we recommend formatting the USB device in FAT16 and trying again. TROUBLESHOOTING TROUBLESHOOTING TROUBLESHOOTING Before requesting service, please check the following. The unit will not turn on. •Is the power cord plugged into the outlet? ¼¼Connect the power plug to the outlet. A function does not work when the button is pressed. •Is there static electricity in the air? ¼¼Disconnect the power plug and connect it again. Sound is not produced. •Is the Mute function on? •Is the volume set to minimum? ¼¼Press the function. (Mute) button to cancel the ¼¼Adjust the Volume. The remote control does not work. •Are the batteries drained? ¼¼Replace with new batteries. •Is the distance between the remote control and main unit too far? ¼¼Move closer to the unit. The TV SoundConnect (TV pairing) failed. •Does your TV support TV SoundConnect? ¼¼TV SoundConnect is supported by some Samsung TVs released from 2012 on. Check your TV to see if it supports TV SoundConnect. •Is your TV firmware the latest version? ¼¼Update your TV with the latest firmware. •Does an error occur when connecting? ¼¼Contact the Samsung call centre. •Reset the TV mode and connect again. ¼¼Press and hold the p button for 5 seconds to reset the TV SoundConnect connection. The red LED on the subwoofer blinks and the subwoofer is not producing sound. •Your subwoofer may not be connected to the main body of the product. ¼¼Try to connect your subwoofer again. (See Page 17) The subwoofer drones and vibrates noticeably. •Try to adjust the vibration of your subwoofer. ¼¼Press the WOOFER button on your remote control to adjust its value (between -12, -6 to +6). 32 APPENDIX APPENDIX SPECIFICATIONS ENG Model name HW-J7500 / HW-J7501 5V / 0.5A USB Weight GENERAL Dimensions (W x H x D) Main Unit 4 kg Subwoofer (PS-WJ7500 / PS-WJ7501) 7.8 kg Main Unit 1230 x 47.5 x 170 mm Subwoofer (PS-WJ7500 / PS-WJ7501) 500 x 332 x 161 mm Operating Temperature Range +5°C to +35°C Operating Humidity Range 10 % to 75 % Main Unit AMPLIFIER Rated Output Subwoofer Power (PS-WJ7500 / PS-WJ7501) 20W/CH x 8, 8ohm, THD=10%, 1KHz 160W, 3ohm, THD=10%, 100Hz S/N Ratio (Analogue Input) 65 dB Separation (1kHz) 65 dB * S/N ratio, distortion, separation, and usable sensitivity are based on measurements using AES (Audio Engineering Society) guidelines. * Nominal specification -- Samsung Electronics Co., Ltd reserves the right to change the specifications without notice. -- Weight and dimensions are approximate. -- For the power supply and Power Consumption, refer to the label attached to the product. ※※ Precaution : The product will restart automatically if you turn on/off Wi-Fi/Ethernet. Overall Standby Power Consumption (W) (All the network ports are “ON” condition) Wi-Fi/Ethernet Port deactivation method Bluetooth Port deactivation method 7.4W Press Wi-Fi SETUP button on the product for 30 seconds to turn Wi-Fi/Ethernet On / Off. Press SPK ADD button on the product for 30 seconds to turn Bluetooth On / Off. ※※ Open Source Licence Notice -- To send inquiries and requests regarding open sources, contact Samsung via Email ([email protected]). Hereby, Samsung Electronics, declares that this equipment is in compliance with the essential requirements and other relevant provisions of Directive 1999/5/EC. The original Declaration of Conformity may be found at http://www.samsung.com, go to Support > Search Product Support and enter the model name. This equipment may be operated in all EU countries. This equipment may only be used indoors. 33 UNITED UNITED UNITED KINGDOM KINGDOM KINGDOM EIRE EIRE EIRE beyond beyondthe thecontrol control beyond ofofSamsung. the Samsung. control of sSamsung SamsungThis product product Samsung isiswarranted warranted product for for isthe the warranted period periodofof fortwelve twelve the period (12) (12)months of months twelve from from (12)the the months origiorigi- from the origidate dateofofpurchase, purchase, nal date against against of purchase, defective defective against materials materials defective and andworkmanship. materials workmanship. and In workmanship. Inthe theevent eventthat that In the event that 6.6.This Thiswarranty warranty 6. is This isvalid valid warranty for forany anyisperson person valid for ww This Samsung product is warranted for the period 4. This product is not considered to be defective anty rantyservice service warranty isisrequired, required, service you you isshould should required, return return youthe the should product product return totothe the theretailer product retailerfrom from to the whom whom retailer itit from whom it possession possession ofofpossession the theproduct productof during during the produc the theww of twelve (12) months from the original date in materials nor workmanship by reason that spurchased. purchased. was However, However, purchased. Samsung Samsung However, Authorised Authorised Samsung Dealers Dealers Authorised and andAuthorised Authorised Dealers and Service Service Authorised Centres Centres Service Centres 7.7.The 7. The Theconsumers consumers statutory statutory consumers rights rightsstatutory ininany anyap a of purchase, against defective materials and itpurchasers requires order to conform other her EC ECCountries Countries in other will will ECcomply comply Countries with with will the the comply warranty warranty with on on the the the warranty terms termsissued issued on thetoto terms purchasers issuedadaptation into in purchasers in arising the theinretailer retailer arising the retailer from fromthe the arising purchase purchase fromco cth country countryconcerned. concerned. the country InIncase concerned. case difficulty, difficulty, In case details details ofwarranty difficulty, ofofour ourAuthorised Authorised details of our Service Service Authorised Centres Service are are Centres are Unless warranty. warranty. Unless warranty. there thereisisUnless national national there legisla legisl is workmanship. Inofof the event that service toCentres national or local technical or safety lable ilablefrom: from:is available from: warranty warranty are arethe the warranty are the consumers consumers sole sole consume rights rightsa required, you should return the product to the standards in force in any Country other than tors tors shall shallnot not be be tors liable liable shall for for not indirect indirect be liable ororcons con for retailer from whom it was purchased. However, the one for which the product was originally Samsung Samsung Electronics Electronics Samsung U.K. U.K. Electronics Ltd. Ltd.Customer Customer U.K. Ltd. Care Care Customer CentrePO CentrePO Care Box Box CentrePO 479 479 and Box 479compact compactdiscs, discs, videos videosoror discs, audio audio videos taper taperor or ora Samsung Authorised Dealers and Authorised designed manufactured. This compact warranty GATESHEAD GATESHEAD NE9 NE9 9BJUnited United NE9 Kingdom 9BJ United Kingdom ServiceGATESHEAD Centres in other EC 9BJ Countries willKingdom will not cover, and no re-imbursement will be SAMSUNG SAMSUNG SAMSUN ELECT ELECT comply with the Kingdom warranty on the terms issued made for such adaptation nor any damage United United Kingdom United Kingdom to purchasers in the country concerned. In case which may result. Tel Tel: :0330 0330SAMSUNG SAMSUNG Tel : 0330 (7267864) (7267864) SAMSUNG (7267864) of difficulty, details of our Authorised Service Fax: Fax: 03307260001 03307260001 Fax: 03307260001 5. This warranty covers none of the following: Centres are available from: www.samsung.com www.samsung.com www.samsung.com a)Periodic check ups, maintenance and repair or replacement of parts due to normal wear and tear. b)Cost relating to transport, removal or installation of the product. c)Misuse, including the faiure to use this ARRANTY ARRANTY■WARRANTY CONDITIONS CONDITIONSCONDITIONS product for its normal purposes or United Kingdom 1.isisThe The he warranty warranty only onlywarranty valid validif,if,when is when onlywarranty warranty valid if, service when service warranty isisrequired, required, service the theis warranty warranty required, card card theisis warranty fully fully card is fully incorrect installation. Teland : 0330 SAMSUNG and nd properly properlycompleted completed and properly and is completed ispresented presented and with with is(7267864) the presented theoriginal originalwith invoice invoice the original ororsales salesinvoice slip slipororconfiror confirsales slip or confird)Damage caused by Lightning, Water, Fire, mation, ation, and andthe themation, serial serialwww.samsung.com/uk/support number number and theon on serial the theproduct number producthas on hasthe not notproduct been beendefaced. defaced. has not been defaced. Acts of God, War, Public Samsung’s amsung’s obligations 2. obligations Samsung’s are areobligations limited limitedtotothe the arerepair repair limited or, or, toatat the its itsrepair discretion, discretion, or, atreplacement its replacement discretion, ofofreplacement of Disturbances, incorrect mains voltage, improper he e product productororthe thedefective product defective part. the defective part. EIRE orpart. Warranty Warrantyrepairs repairs 3. Warranty must must repairs carried carried must out outbe by byAuthorised carried Authorised out by Samsung Samsung Authorised Dealers Dealers Samsung oror Dealers ventilation or or any other cause beyond the Tel be :be 0818 717100 Authorised uthorised Service Service Authorised Centres. Centres. Service No Nore-imbursement re-imbursement Centres. No re-imbursement will willbe bemade madefor for willrepairs repairs be made carried carried for of repairs carried control Samsung. www.samsung.com/ie/support out ut by bynon nonSamsung Samsung out by non Dealers Dealers Samsung and, and,any Dealers anysuch suchand, repair repair any work work such and and repair damage damage worktoto and the thedamage prodprod- to the prod6. This warranty is valid for any person who ucts cts caused causedby by ucts such such caused repair repairby work work such will will repair not notbe be work covered covered will not by bybe this this covered warranty. warranty. by this warranty. acquired possession of the product This his product product4.isisThis not notconsidered product considered is not totobe considered bedefective defectiveto ininbe materials materials defective nor nor inworkmanship workmanship materialslegally norby by workmanship by during the warranty period. eason easonthat thatit■ itrequires requires reason that adaptation adaptation itCONDITIONS requires ininorder order adaptation totoconform conform in order totonational national to conform ororlocal local to national technical technical or local technical WARRANTY or r safety safetystandards standards safety inin force force standards ininany Country inCountry force other other any than Country than the theone other onefor for than which which one theproduct product for which the productrights in any 1. orThe warranty isany only valid in if, when warranty 7.thethe The consumers statutory was as originally originallydesigned was designed originally and manufactured. designed manufactured. manufactured. This Thiswarranty warranty will This willnot not warranty cover, cover,and will andno not norecover, re-national and no reservice isand required, theand warranty card is fully applicable legislation whether mbursement mbursementwill will imbursement be bemade madefor for will such such be made adaptation adaptation for such nor adaptation any anydamage damage norwhich which any damage may mayresult. result. which may result. and properly completed and isnor presented against the retailer arising from the purchase This his warranty warranty 5. covers This covers warranty none none of of covers the the following: following: none of the following: with the original invoice or sales slip or contract or parts otherwise are not affected by this a) ) Periodic Periodiccheck check a) Periodic ups, ups,maintenance maintenance check ups,and maintenance andrepair repairororreplacement and replacement repair orofof replacement parts parts due duetotoof due to confirmation, warranty. Unless there is national legislation normal normalwear wearand and normal tear. tear.wear and and the tear.serial number on the hasremoval not the contrary, the rights under this warranty b) ) Cost b)toproduct Costrelating relating toCost transport, transport, relating removal to been transport, orordefaced. installation installation removalofof orthe the installation product. product.of the to product. are the consumers sole rights and Samsung, c) ) Misuse, Misuse,including including c) Misuse, the the faiure faiure including to to use use the this this faiure product to use for for its itsnormal product normal for its normal 2. Samsung’s obligations areproduct limited tothis the purposes purposesororincorrect incorrect purposes installation. installation. installation. its subsidiaries and distributors shall not be repair or, atoritsincorrect discretion, replacement of the d) ) Damage Damagecaused caused d) Damage by byLightning, Lightning, causedWater, Water, by Lightning, Fire, Fire,Acts Acts Water, ofofGod, God, Fire,War, War, ActsPublic Public of God, War, liable forPublic indirect or consequential loss or any product or the defective part. Disturbances, Disturbances,incorrect Disturbances, incorrectmains mains incorrect voltage, voltage,mains improper improper voltage, ventilation ventilation improper ororany any ventilation other othercause cause orto any other cause damage records, compact discs, videos or 3. Warranty repairs must be carried out by audio taper or any other related equipment -2-2-2Authorised Samsung Dealers or Authorised or material. Service Centres. No re-imbursement will be made for repairs carried out by non Samsung SAMSUNG ELECTRONICS (U.K.) LTD. Dealers and, any such repair work and damage to the products caused by such repair work will not be covered by this warranty. Eire Eire Eire U.K. Ltd Samsung Electronics Tel Tel: :0818 0818 717100 717100 Tel : 0818 717100 Samsung Customer Support Centre Fax: Fax:+44 +44117 117 Fax: 915 6736 6736 +44 117 Selectapost 38,915 Sheffield, S97915 3FJ 6736 www.samsung.com www.samsung.com www.samsung.com United Kingdom ©2015 Samsung Electronics Co.,Ltd. All rights reserved Contact SAMSUNG WORLD WIDE If you have any questions or comments relating to Samsung products, please contact the SAMSUNG customer care Centre. Area ` Europe Contact Centre U.K EIRE 0330 SAMSUNG (7267864) 0818 717100 0180 6 SAMSUNG bzw. 0180 6 7267864* GERMANY (*0,20 €/Anruf aus dem dt. Festnetz, aus dem Mobilfunk max. 0,60 €/Anruf) FRANCE 01 48 63 00 00 ITALIA 800-SAMSUNG (800.7267864) SPAIN 0034902172678 PORTUGAL 808 20 7267 LUXEMBURG 261 03 710 NETHER0900-SAMSUNG (0900-7267864) (€ 0,10/ LANDS Min) BELGIUM 02-201-24-18 NORWAY DENMARK FINLAND SWEDEN 815 56480 70 70 19 70 030-6227 515 0771 726 7864 (0771-SAMSUNG) 801-172-678* lub +48 22 607-93-33 * * (koszt połączenia według taryfy operatora) 0680SAMSUNG (0680-726-786) 0680PREMIUM (0680-773-648) 0800 - SAMSUNG (0800-726 786) 0800-SAMSUNG (0800-7267864) [Only for Premium HA] 0800-366661 [Only for Dealers] 0810-112233 POLAND HUNGARY SLOVAKIA AUSTRIA Web Site Area www.samsung.com/uk/support www.samsung.com/ie/support SWITZERLAND www.samsung.com/de/support CZECH www.samsung.com/fr/support www.samsung.com/it/support www.samsung.com/es/support www.samsung.com/pt/support www.samsung.com/support CROATIA BOSNIA MONTENEGRO www.samsung.com/be/support (Dutch) www.samsung.com/be_fr/ support (French) www.samsung.com/no/support www.samsung.com/dk/support www.samsung.com/fi/support www.samsung.com/se/support SERBIA BULGARIA www.samsung.com/nl/support www.samsung.com/pl/support www.samsung.com/hu/support www.samsung.com/sk/support SLOVENIA ROMANIA CYPRUS GREECE LITHUANIA LATVIA ESTONIA Contact Centre Web Site www.samsung.com/ch/support (German) 0800 726 78 64 (0800-SAMSUNG) www.samsung.com/ch_fr/ support (French) 800 - SAMSUNG (800-726786) www.samsung.com/cz/support Samsung Electronics Czech and Slovak, s.r.o. V Parku 2343/24, 148 00 Praha 4 072 726 786 www.samsung.com/hr/support 055 233 999 www.samsung.com/support 020 405 888 080 697 267 (brezplačna številka) 090 726 786 (0,39 EUR/min) klicni center vam je na voljo od ponedeljka do petka od 9. do 18. ure. 011 321 6899 800 111 31 , Безплатна телефонна линия 08008 726 78 64 (08008 SAMSUNG ) Apel GRATUIT 8009 4000 only from landline, toll free 80111-SAMSUNG (80111 726 7864) only from land line (+30) 210 6897691 from mobile and land line 8-800-77777 8000-7267 800-7267 www.samsung.com/support www.samsung.com/si www.samsung.com/rs/support www.samsung.com/bg/support www.samsung.com/ro/support www.samsung.com/gr/support www.samsung.com/lt/support www.samsung.com/lv/support www.samsung.com/ee/support www.samsung.com/at/support [Correct disposal of batteries in this product] Correct Disposal of This Product (Waste Electrical & Electronic Equipment) (Applicable in countries with separate collection systems) (Applicable in countries with separate collection systems) This marking on the battery, manual or packaging indicates that the batteries in this product should not be disposed of with other household waste at the end of their working life. Where marked, the chemical symbols Hg, Cd or Pb indicate that the battery contains mercury, cadmium or lead above the reference levels in EC Directive 2006/66. If batteries are not properly disposed of, these substances can cause harm to human health or the environment. This marking on the product, accessories or literature indicates that the product and its electronic accessories (e.g. charger, headset, USB cable) should not be disposed of with other household waste at the end of their working life. To prevent possible harm to the environment or human health from uncontrolled waste disposal, please separate these items from other types of waste and recycle them responsibly to promote the sustainable reuse of material resources. To protect natural resources and to promote material reuse, please separate batteries from other types of waste and recycle them through your local, free battery return system. Household users should contact either the retailer where they purchased this product, or their local government office, for details of where and how they can take these items for environmentally safe recycling. Business users should contact their supplier and check the terms and conditions of the purchase contract. This product and its electronic accessories should not be mixed with other commercial wastes for disposal. AH68-02820E-00 AH68-02820E-00