1
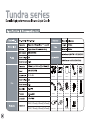
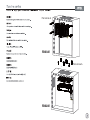
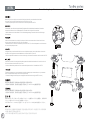
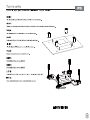
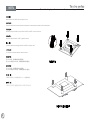
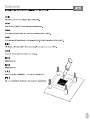
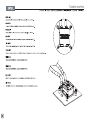
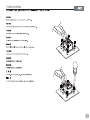
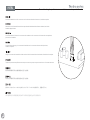
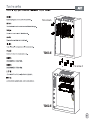
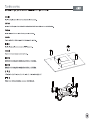
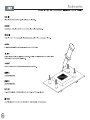
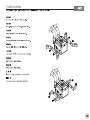
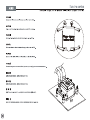
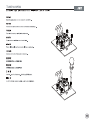
36.6
18~35 dBA
Back plate
Square spacer
Stand-off
M3. screws
Spring screws
INTEL clip
AMD clip
M3*6 screws
LGA2011 screws
Fan screw A
Insulatiom sheet
Thermal grease
Y split cable
Fan screw B
TD02-E, 273mm(L)x120mm(W)x27mm(H)
TD03-E, 153mm(L)x120mm(W)x27mm(H)
Fan screw A
TD03-E
Fan screw A
TD02-E
INTEL
Durable high performance all-in-one Liquid Cooler
Make sure you are using the correct side of the back plate for your motherboard and insert
the screw into the correct holes based on the CPU socket you use.
*Insert the square spacer into the center hole on the back plate for LGA775.
Sicherstellen, dass Sie die richtige Seite der Rückplatte für Ihr Motherboard verwenden; Schrauben
entsprechend dem von Ihnen verwendeten CPU-Sockel in die richtigen Löcher stecken.
*Setzen Sie bitte nur bei dem Sockel 775 die Schraubbegrenzungen zentrisch auf die Lochfuhrungen
der Backplate.
Assurez-vous d'utiliser le bon côté de la plaque arrière de votre carte mère et insérez les vis dans
les bons trous situés sur la fiche CPU que vous utilisez.
*Seulement dans le cas d'une installation pour Socket LGA 775, veiller à disposer le carré de mousse
au centre de la plaque arrière.
Asegúrese de que está usando el lado correcto de la placa trasera para su placa base e inserte los
tornillos en los agujeros correctos basándose en el zócalo de CPU que use.
*Utilice el espaciador cuadrado en el centro del anclaje, únicamente cuando se trate de socket LGA775.
Assicurarsi di usare il lato corretto della piastra posteriore della scheda madre e di inserire la vite nei
fori corretti in base al socket CPU che si usa.
*Inserire il distanziale quadrato nel foro centrale della piastra solo con l'installazione LGA775.
Проверьте правильность использования опорной прокладки для системной платы и установите
винты в надлежащие отверстия на сокете процессора.
*Установите квадратный вкладыш по середине монтажной пластины (для INTEL только).
確定背板正確的使用面,將螺柱依CPU平臺類型插入背板對應的孔位。
*安裝LGA775主機板時,須先將方形墊板壓入背板中心孔。LGA115X/1366主機板則不需要。
确定背板正确的使用面,将螺柱依CPU平台类型插入背板对应的孔位。
*安装LGA775主机板时,须先将方形垫板压入背板中心孔。LGA115X/1366主机板则不需要。
お持ちのマザーボードに対して正しい側のバックプレートを使用していることを確認し、ご使用のCPU
ソケットに基づいて正しい穴にネジを装着してください。
*LGA775のインストールにのみ、角型スペーサーをバックプレートの中心の穴に装着してください。
메인보드에서 백 플레이트의 올바른 면을 사용했는지 확인하고 사용 중인 CPU 소켓에 맞춰
나사를 올바른 구멍에 삽입합니다.
*사각 스페이서를 LGA775만 설치된 백보드의 중심 구멍에 끼우십시오.
4
INTEL
Durable high performance all-in-one Liquid Cooler
Mount LGA2011 and INTEL clips and tighten the nuts
Setzen Sie die LGA2011 und Intel Clips auf die Schrauben und verschrauben Sie diese mit den Schraubmuttern.
Monter les plaque de fixation pour processeur LGA2011 et INTEL, et serrer les écrous.
Monte los clips de LGA2011, INTEL y ajuste las tuercas.
Installare i dispositivi di fissaggio LGA2011 ed INTEL e stringere i dadi.
Установите интеловские зажимы и закрепите винты.
裝入INTEL扣具,將4顆螺絲順時針擰緊固定。
裝入LGA2011螺絲及INTEL扣具,將4顆螺絲順時針擰緊固定。
装入INTEL扣具,将4颗螺丝顺时针拧紧固定。
装入LGA2011螺丝及INTEL扣具,将4颗螺丝顺时针拧紧固定。
LGA2011とINTELクリップを取り付けて、ナットを締めます。
LGA2011과 INTEL 클립을 장착하고 너트를 조이십시오.
6
INTEL
Durable high performance all-in-one Liquid Cooler
Connect the waterblock and fan connectors onto the relevant motherboard connectors, installation complete.
Wasserblock- und Lüfteranschlüssen mit den entsprechenden Motherboard-Anschlüssen verbinden; damit ist die
Installation abgeschlossen.
Connectez le réservoir d'eau et les connecteurs du ventilateur sur les connecteurs de la carte mère correspondants,
pour terminer l'installation.
Conecte el bloque de agua y los conectores del ventilador en los conectores relevantes de la placa base,
instalación completa.
Collegare i connettori del waterblock e della ventola ai relativi connettori della scheda madre, l'installazione è completa.
Подключите разъемы ватерблока и вентилятора в соответствующие гнезда системной платы. Установка закончена.
將水冷頭與風扇端子插入主機板相應接口位置,完成安裝。
将水冷头与风扇端子插入主机板相应接口位置,完成安装。
液冷ブロックおよびファンコネクタを対応したマザーボードコネクタに接続すると、設置は完了です。
워터 블록과 팬 커넥터를 해당 메인보드 커넥터에 연결하면 설치가 완료됩니다.
10
Fan screw A
TD03-E
Fan screw A
TD02-E
AMD
Durable high performance all-in-one Liquid Cooler
Place the insulation pads on the appropriate position. Check the holes of motherboard before installation and insert
the screws into the corresponding holes of back plate.
Isolierungsauflagen an der entsprechenden Stelle anbringen. Löcher des Motherboards vor Installation prüfen, Schrauben
in die entsprechenden Löcher an der Rückplatte einstecken.
Placez les coussinets d'isolation dans la position appropriée. Vérifiez les trous de la carte mère avant installation et
insérez les vis dans les trous correspondants de la plaque arrière.
Sitúe las almohadillas de aislamiento en la posición apropiada. Compruebe los agujeros de la placa base antes de la
instalación e inserte los tornillos en los agujeros correspondientes de la placa trasera.
Collocare le piastre di isolamento sulla posizione appropriata. Controllare i fori della scheda madre prima dell'installazione
ed inserire le viti nei fori corrispondenti della piastra.
Поместите в соответствующие места изоляционные прокладки. Перед установкой проверьте отверстия на системной
плате и вставьте винты в соответствующие отверстия опорной платы.
確定背板正確的使用面,壓入方型墊片。將4片絕緣貼片貼於相應位置,再將螺桿插入其對應的孔位。
确定背板正确的使用面,压入方型垫片。将4片绝缘贴片贴于相应位置,再将螺杆插入其对应的孔位。
絶縁パッドを適切な場所に置きます。設置前にマザーボードの穴を確認してから、バックプレートの対応する穴にネジ
を装着します。
절연 패드를 적절한 위치에 배치합니다. 설치하기 전에 메인보드의 구멍을 확인하고 백 플레이트의 해당
구멍에 나사를 삽입합니다.
12
AMD
Durable high performance all-in-one Liquid Cooler
Connect the waterblock and fan connectors onto the relevant motherboard connectors, installation complete.
Wasserblock- und Lüfteranschlüssen mit den entsprechenden Motherboard-Anschlüssen verbinden; damit ist die
Installation abgeschlossen.
Connectez le réservoir d'eau et les connecteurs du ventilateur sur les connecteurs de la carte mère correspondants,
pour terminer l'installation.
Conecte el bloque de agua y los conectores del ventilador en los conectores relevantes de la placa base,
instalación completa.
Collegare i connettori del waterblock e della ventola ai relativi connettori della scheda madre,
l'installazione è completa.
Подключите разъемы ватерблока и вентилятора в соответствующие гнезда системной платы.
Установка закончена.
將水冷頭與風扇端子插入主機板相應接口位置,完成安裝。
将水冷头与风扇端子插入主机板相应接口位置,完成安装。
液冷ブロックおよびファンコネクタを対応したマザーボードコネクタに接続すると、設置は完了です。
워터 블록과 팬 커넥터를 해당 메인보드 커넥터에 연결하면 설치가 완료됩니다.
18
Warranty Information
This product has a limited 5 year warranty in North America, Europe, and Australia.
For information on warranty periods in other regions, please contact your reseller or SilverStone authorized distributor.
Warranty terms & conditions
1. Product component defects or damages resulted from defective production is covered under warranty.
Defects or damages with the following conditions will be fixed or replaced under SilverStone Technology’s jurisdiction.
a) Usage in accordance with instructions provided in this manual, with no misuse, overuse, or other inappropriate actions.
b) Damage not caused by natural disaster (thunder, fire, earthquake, flood, salt, wind, insect, animals, etc…)
c) Product is not disassembled, modified, or fixed. Components not disassembled or replaced.
d) Warranty mark/stickers are not removed or broken.
Loss or damages resulted from conditions other than ones listed above are not covered under warranty.
2. Under warranty, SilverStone Technology’s maximum liability is limited to the current market value for the product (depreciated value, excluding
shipping, handling, and other fees). SilverStone Technology is not responsible for other damages or loss associated with the use of product.
3. Under warranty, SilverStone Technology is obligated to repair or replace its defective products. Under no circumstances will SilverStone
Technology be liable for damages in connection with the sale, purchase, or use including but not limited to loss of data, loss of business, loss of
profits, loss of use of the product or incidental or consequential damage whether or not foreseeable and whether or not based on breach of warranty,
contract or negligence, even if SilverStone Technology has been advised of the possibility of such damages.
4. Warranty covers only the original purchaser through authorized SilverStone distributors and resellers and is not transferable to a second hand
purchaser.
5. You must provide sales receipt or invoice with clear indication of purchase date to determine warranty eligibility.
6. If a problem develops during the warranty period, please contact your retailer/reseller/SilverStone authorized distributors or SilverStone
http://www.silverstonetek.com.
Please note that: (i) You must provide proof of original purchase of the product by a dated itemized receipt; (ii) You shall bear the cost of shipping
(or otherwise transporting) the product to SilverStone authorized distributors. SilverStone authorized distributors will bear the cost of shipping
(or otherwise transporting) the product back to you after completing the warranty service; (iii) Before you send the product, you must be issued a
Return Merchandise Authorization (“RMA”) number from SilverStone. Updated warranty information will be posted on SilverStone’s official website.
Please visit http://www.silverstonetek.com for the latest updates.
Additional info & contacts
For North America ([email protected])
SilverStone Technology in North America may repair or replace defective product with refurbished product that is not new but has been functionally tested.
Replacement product will be warranted for remainder of the warranty period or thirty days, whichever is longer. All power supplies should be sent
back to the place of purchase if it is within 30 days of purchase, after 30 days, customers need to initiate RMA procedure with SilverStone Technology
in USA by first downloading the “USA RMA form for end-users” form from the below link and follow its instructions.
http://silverstonetek.com/contactus.php
For Australia only ([email protected])
Our goods come with guarantees that cannot be excluded under the Australian Consumer Law.
You are entitled to a replacement or refund for a major failure and for compensation for any other reasonably foreseeable loss or damage.
You are also entitled to have the goods repaired or replaced if the goods fail to be of acceptable quality and the failure does not amount to a major failure.
Please refer to above “Warranty terms & conditions” for further warranty details.
SilverStone Technology Co., Ltd. 12F No. 168 Jiankang Rd., Zhonghe Dist., New Taipei City 235 Taiwan R.O.C. + 886-2-8228-1238
(standard international call charges apply)
For Europe ([email protected])
For all other regions ([email protected])
NO.:G11222470